Routing Protocols
As introduced in Chapter 6, "IP Routing", the security Cisco ASA supports RIP and OSPF. The following sections cover routing protocol configuration using ASDM.
RIP
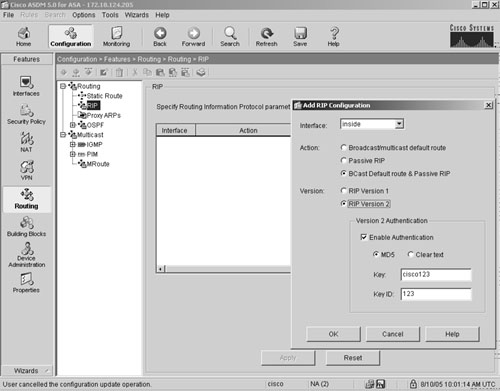
To set up the RIP routing protocol, navigate to Configuration > Features > Routing > Routing > RIP. In Figure 19-11, SecureMe wants to configure the inside interface of Cisco ASA for RIP Version 2 with MD5 authentication. The authentication key is cisco123 and the key ID is 123. Cisco ASA will only inject a default route to the RIP-enabled devices toward the inside interface.
Figure 19-11. Setting Up RIP as the Routing Protocol
Example 19-4 shows the RIP configuration generated by ASDM.
Example 19-4. RIP Configuration Generated by ASDM
rip inside default version 2 authentication MD5 cisco123 123

rip inside passive version 2 authentication MD5 cisco123 123
OSPF
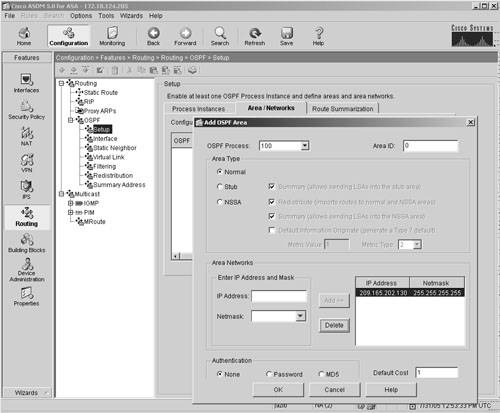
SecureMe is now planning to deploy OSPF in its inside network for dynamic routing. To set up OSPF, navigate to Configuration > Features > Routing > Routing > OSPF > Setup and click the Process Instances tab. You can enable OSPF globally and specify the OSPF process ID. Before you can set up OSPF, you need to disable RIP on the security Cisco ASA, because you cannot enable both routing protocols simultaneously. After you set up the process ID, click the Area/Networks tab to specify the OSPF area ID, as shown in Figure 19-12, in which the OSPF Process is set to 100 and the OSPF Area ID is 0. Because SecureMe wants to run OSPF on the inside interface, which has an IP address of 209.165.202.130, SecureMe's administrator has specified the IP address with a host mask of 255.255.255.255 in Figure 19-12.
Figure 19-12. Setting Up OSPF as the Routing Protocol
Example 19-5 shows the basic OSPF configuration that is generated by ASDM.
Example 19-5. OSPF Configuration Generated by ASDM
router ospf 100

log-adj-changes

area 0

network 209.165.202.130 255.255.255.255 area 0
Note
You can configure either RIP or OSPF as the routing protocol on Cisco ASA.
Multicast
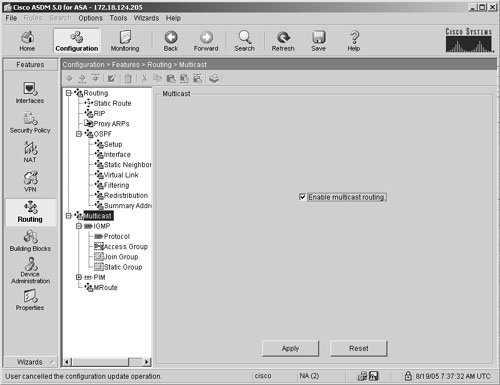
As discussed in Chapter 6, Cisco ASA supports multicast routing and uses PIM Sparse mode for dynamic routing. You can enable multicast routing by navigating to Configuration > Features > Routing > Multicast and clicking Enable Multicast Routing, as shown in Figure 19-13.
Figure 19-13. Enabling Multicast Routing
As the administrator, you can set up PIM Sparse mode by specifying a Rendezvous Point under Configuration > Features > Routing > Multicast > PIM > Rendezvous Points, as shown in Figure 19-14.
Figure 19-14. Specifying a Rendezvous Point

In Figure 19-14, SecureMe is using a Cisco IOS router at 192.168.10.2 as the Rendezvous Point and ASDM is being set up to use this address for all the multicast addresses. Example 19-6 shows the multicast configuration generated by ASDM.
Example 19-6. Multicast Configuration Generated by ASDM
multicast routing

pim old-register-checksum

pim rp-address 192.168.10.2 bidir
Part I: Product Overview
Introduction to Network Security
- Introduction to Network Security
- Firewall Technologies
- Intrusion Detection and Prevention Technologies
- Network-Based Attacks
- Virtual Private Networks
- Summary
Product History
- Product History
- Cisco Firewall Products
- Cisco IDS Products
- Cisco VPN Products
- Cisco ASA All-in-One Solution
- Summary
Hardware Overview
Part II: Firewall Solution
Initial Setup and System Maintenance
- Initial Setup and System Maintenance
- Accessing the Cisco ASA Appliances
- Managing Licenses
- Initial Setup
- IP Version 6
- Setting Up the System Clock
- Configuration Management
- Remote System Management
- System Maintenance
- System Monitoring
- Summary
Network Access Control
- Network Access Control
- Packet Filtering
- Advanced ACL Features
- Content and URL Filtering
- Deployment Scenarios Using ACLs
- Monitoring Network Access Control
- Understanding Address Translation
- DNS Doctoring
- Monitoring Address Translations
- Summary
IP Routing
Authentication, Authorization, and Accounting (AAA)
- Authentication, Authorization, and Accounting (AAA)
- AAA Protocols and Services Supported by Cisco ASA
- Defining an Authentication Server
- Configuring Authentication of Administrative Sessions
- Authenticating Firewall Sessions (Cut-Through Proxy Feature)
- Configuring Authorization
- Configuring Accounting
- Deployment Scenarios
- Troubleshooting AAA
- Summary
Application Inspection
- Application Inspection
- Enabling Application Inspection Using the Modular Policy Framework
- Selective Inspection
- Computer Telephony Interface Quick Buffer Encoding Inspection
- Domain Name System
- Extended Simple Mail Transfer Protocol
- File Transfer Protocol
- General Packet Radio Service Tunneling Protocol
- H.323
- HTTP
- ICMP
- ILS
- MGCP
- NetBIOS
- PPTP
- Sun RPC
- RSH
- RTSP
- SIP
- Skinny
- SNMP
- SQL*Net
- TFTP
- XDMCP
- Deployment Scenarios
- Summary
Security Contexts
- Security Contexts
- Architectural Overview
- Configuration of Security Contexts
- Deployment Scenarios
- Monitoring and Troubleshooting the Security Contexts
- Summary
Transparent Firewalls
- Transparent Firewalls
- Architectural Overview
- Transparent Firewalls and VPNs
- Configuration of Transparent Firewall
- Deployment Scenarios
- Monitoring and Troubleshooting the Transparent Firewall
- Summary
Failover and Redundancy
- Failover and Redundancy
- Architectural Overview
- Failover Configuration
- Deployment Scenarios
- Monitoring and Troubleshooting Failovers
- Summary
Quality of Service
- Quality of Service
- Architectural Overview
- Configuring Quality of Service
- QoS Deployment Scenarios
- Monitoring QoS
- Summary
Part III: Intrusion Prevention System (IPS) Solution
Intrusion Prevention System Integration
- Intrusion Prevention System Integration
- Adaptive Inspection Prevention Security Services Module Overview (AIP-SSM)
- Directing Traffic to the AIP-SSM
- AIP-SSM Module Software Recovery
- Additional IPS Features
- Summary
Configuring and Troubleshooting Cisco IPS Software via CLI
- Configuring and Troubleshooting Cisco IPS Software via CLI
- Cisco IPS Software Architecture
- Introduction to the CIPS 5.x Command-Line Interface
- User Administration
- AIP-SSM Maintenance
- Advanced Features and Configuration
- Summary
Part IV: Virtual Private Network (VPN) Solution
Site-to-Site IPSec VPNs
- Site-to-Site IPSec VPNs
- Preconfiguration Checklist
- Configuration Steps
- Advanced Features
- Optional Commands
- Deployment Scenarios
- Monitoring and Troubleshooting Site-to-Site IPSec VPNs
- Summary
Remote Access VPN
- Remote Access VPN
- Cisco IPSec Remote Access VPN Solution
- Advanced Cisco IPSec VPN Features
- Deployment Scenarios of Cisco IPSec VPN
- Monitoring and Troubleshooting Cisco Remote Access VPN
- Cisco WebVPN Solution
- Advanced WebVPN Features
- Deployment Scenarios of WebVPN
- Monitoring and Troubleshooting WebVPN
- Summary
Public Key Infrastructure (PKI)
- Public Key Infrastructure (PKI)
- Introduction to PKI
- Enrolling the Cisco ASA to a CA Using SCEP
- Manual (Cut-and-Paste) Enrollment
- Configuring CRL Options
- Configuring IPSec Site-to-Site Tunnels Using Certificates
- Configuring the Cisco ASA to Accept Remote-Access VPN Clients Using Certificates
- Troubleshooting PKI
- Summary
Part V: Adaptive Security Device Manager
Introduction to ASDM
- Introduction to ASDM
- Setting Up ASDM
- Initial Setup
- Functional Screens
- Interface Management
- System Clock
- Configuration Management
- Remote System Management
- System Maintenance
- System Monitoring
- Summary
Firewall Management Using ASDM
- Firewall Management Using ASDM
- Access Control Lists
- Address Translation
- Routing Protocols
- AAA
- Application Inspection
- Security Contexts
- Transparent Firewalls
- Failover
- QoS
- Summary
IPS Management Using ASDM
- IPS Management Using ASDM
- Accessing the IPS Device Management Console from ASDM
- Configuring Basic AIP-SSM Settings
- Advanced IPS Configuration and Monitoring Using ASDM
- Summary
VPN Management Using ASDM
- VPN Management Using ASDM
- Site-to-Site VPN Setup Using Preshared Keys
- Site-to-Site VPN Setup Using PKI
- Cisco Remote-Access IPSec VPN Setup
- WebVPN
- VPN Monitoring
- Summary
Case Studies
EAN: 2147483647
Pages: 231
