Packet Filtering
Cisco ASA can protect the inside network, the demilitarized zones (DMZs) and the outside network by inspecting all traffic that passes through it. You can specify policies and rules that identify what traffic should be permitted in or out of an interface. The security appliance uses access control lists (ACLs) to drop unwanted or unknown traffic when it attempts to enter the trusted networks. An ACL is a list of security rules or policies grouped together that allows or denies packets after looking at the packet headers and other attributes. Each permit or deny statement in the ACL is called an access control entry (ACE). These ACEs can classify packets by inspecting up to Layer 4 headers for a number of parameters, including the following:
- Layer 2 protocol information such as EtherTypes
- Layer 3 protocol information such as ICMP, TCP, or UDP
- Source and destination IP addresses
- Source and destination TCP or UDP ports
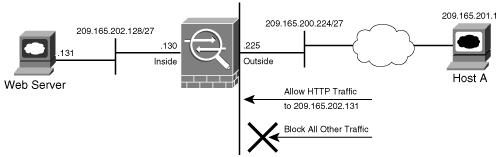
Once an ACL has been properly configured, you can apply it to an interface to filter traffic. The security appliance can filter packets in both the inbound and outbound direction on an interface. When an inbound ACL is applied to an interface, the security appliance inspects packets against the ACEs after receiving or before transmitting them. If a packet is allowed in, the security appliance continues to process it by sending it through the other configured engines. If a packet is denied by the ACL, the security appliance discards the packet and generates a syslog message indicating that such an event has occurred. In Figure 5-1, the security appliance administrator has applied to the outside interface an inbound ACL that permits only HTTP traffic destined for 209.165.202.131. All other traffic will be dropped at the interface by the security appliance.
Figure 5-1. Inbound Packet Filtering
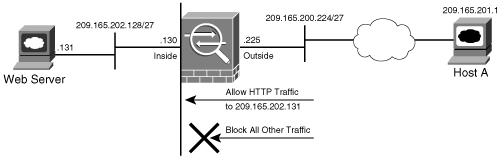
If an outbound ACL is applied on an interface, the security appliance processes the packets by sending them through the different processes (NAT, QoS, and VPN) and then applies the configured ACEs before transmitting the packets out on the wire. The security appliance transmits the packets only if they are allowed to go out. If the packets are denied by even one of the ACEs, the security appliance discards the packets and generates a syslog message indicating that such an event has occurred. In Figure 5-2, the security appliance administrator has applied to the inside interface an outbound ACL that permits only HTTP traffic destined for 209.165.202.131. All other traffic gets dropped at the interface by the security appliance.
Figure 5-2. Outbound Packet Filtering
Types of ACLs
The security appliance supports five different types of ACLs to provide a flexible and scaleable solution to filter unauthorized packets into the network:
- Standard ACLs
- Extended ACLs
- IPv6 ACLs
- EtherType ACLs
- WebVPN ACLs
The following sections describe each type in turn.
Standard ACLs
Standard ACLs are used to identify packets based on the destination IP addresses. These ACLs can be used in scenarios such as split tunneling for the remote-access VPN tunnels (discussed in Chapter 16, "Remote Access VPNs") and route redistribution using the route maps. These ACLs, however, cannot be applied on an interface to filter packets. A standard ACL can be used only if the security appliance is running in routed mode. In routed mode, the Cisco ASA routes packets from one subnet to another subnet by acting as an extra layer 3 hop in the network.
Extended ACLs
Extended ACLs, the most commonly deployed ACLs, can classify packets based on the following attributes:
- Source and destination IP addresses
- Layer 3 protocols
- Source and/or destination TCP and UDP ports
- Destination ICMP type for ICMP packets
An extended ACL can be used for interface packet filtering, QoS packet classification, packet identification for NAT and VPN encryption, and a number of other features listed shortly in the "Comparing ACL Features" section. These ACLs can be set up on the security appliance in the routed and the transparent mode.
IPv6 ACLs
An IPv6 ACL functions similarly to an extended ACL. However, it only identifies IPv6 traffic passing through a security appliance in routed mode.
EtherType ACLs
EtherType ACLs can be used to filter IP- and non-IP-based traffic by checking the Ethernet type code field in the Layer 2 header. IP-based traffic uses an Ethernet type code value of 0x800, whereas Novell IPX uses 0x8137 or 0x8138 depending on the Netware version.
An EtherType ACL can be configured only if the security appliance is running in transparent mode, covered in Chapter 10, "Transparent Firewalls."
Note
The security appliance does not allow IPv6 traffic to pass through it, even if it is allowed to pass through an IPv6 EtherType ACL.
WebVPN ACLs
A WebVPN ACL allows security appliance administrators to restrict traffic coming through the WebVPN tunnels (discussed in Chapter 16). In the case where there is a WebVPN ACL defined but there is no match for a packet, the default behavior is to drop the packet. On the other hand, if there is no ACL defined, the security appliance allows traffic to pass through it.
Comparing ACL Features
Table 5-1 compares the ACLs. It also specifies whether they can be used in conjunction with supported features on the security appliance.
|
Feature |
Standard |
Extended |
IPv6 |
EtherType |
WebVPN |
|---|---|---|---|---|---|
|
Layer 2 packet filtering |
No |
Yes |
No |
Yes |
No |
|
Layer 3 packet filtering |
No |
Yes |
Yes |
No |
Yes |
|
Capture |
No |
Yes |
Yes |
Yes |
No |
|
AAA |
No |
Yes |
Yes |
No |
No |
|
Time range |
No |
Yes |
Yes |
No |
Yes |
|
Object grouping |
No |
Yes |
Yes |
No |
No |
|
NAT 0 |
No |
Yes |
No |
No |
No |
|
PIM |
Yes |
No |
No |
No |
No |
|
Packet inspection |
No |
Yes |
No |
No |
No |
|
IPS inspection |
No |
Yes |
No |
No |
No |
|
VPN encryption |
No |
Yes |
No |
No |
Yes[1] |
|
Remarks |
Yes |
Yes |
Yes |
Yes |
Yes |
|
Line numbers |
No |
Yes |
Yes |
No |
No |
|
Logging |
No |
Yes |
Yes |
No |
Yes |
|
QoS |
No |
Yes |
No |
No |
No |
|
Policy NAT |
No |
Yes |
No |
No |
No |
|
OSPF route-map |
Yes |
Yes |
No |
No |
No |
[1] Only WebVPN encrypted traffic.
Configuring Packet Filtering
The packet filtering on the security appliance requires three configuration steps:
|
Step 1. |
Set up an ACL. |
|
Step 2. |
Apply an ACL to an interface. |
|
Step 3. |
Set up an IPv6 ACL (optional). |
Step 1: Set Up an ACL
The ACL identifies traffic that needs to be allowed or dropped when it tries to go through the security appliance. An ACE can be as simple as permitting all IP traffic from one network to another, to as complicated as permitting traffic originating from a unique source IP address on a particular port destined for a specific port on the destination address. An ACE is defined by using the access-list command. For interface filtering, you can define an extended ACL, an IPv6 ACL, or an EtherType ACL, as mentioned in the previous section. The command syntax to define an extended ACE is as follows:
 access-list id [extended][line line-num] {deny | permit}{protocol | object-group

 protocol_obj_grp_id {source_addr source_mask} | object-group network_obj_grp_id|

 host src_host_addr [operator port [port] | object-group service_obj_grp_id]

 {destination_addr destination_mask} | object-group network_obj_grp_id| host

 dst_host_addr [operator port [port] | object-group service_obj_grp_id]} [log

 [[disable | default] | level] [interval secs] [time_range name]] [inactive]


 access-list id [line line-num] remark text

 access-list alert-interval secs

 access-list deny-flow-max flow_num
Note
The interface ACL does not block packets destined for the security appliance's IP addresses.
Table 5-2 lists and defines the arguments used in an ACE.
|
Syntax |
Description |
|---|---|
|
access-list |
Keyword used to create an ACL. |
|
id |
Name or number of an ACL. |
|
extended |
Optional argument, used to specify an extended IP ACL. |
|
line line-num |
Optional argument, used to specify the line number at which to insert an ACE. |
|
deny |
Discards the packet if it matches the configured conditions. |
|
permit |
Allows the packet if it matches the configured conditions. |
|
protocol |
Name or number of an IP protocol. |
|
object-group[1] |
Grouping of different objects in a list. |
|
protocol_obj_grp_id[1] |
An object name containing the list of protocols to be filtered. |
|
source_addr |
Network or host address from which the packet is being sent. |
|
source_mask |
Network mask applied to source_addr. If an src_host_addr is used, this argument is optional. |
|
network_obj_grp_id[1] |
An object name containing the list of networks to be filtered. |
|
host |
A keyword used to specify a single IP address for traffic filtering. |
|
src_host_addr |
Specifies the source IP address to be filtered. |
|
operator |
An optional keyword used to compare the source or destination ports. Possible operands include lt for less than, gt for greater than, eq for equal, neq for not equal, and range for an inclusive range. |
|
port |
Name or number of TCP or UDP port to be filtered. |
|
service_obj_grp_id[1] |
An object name containing the list of services to be filtered. |
|
destination_addr |
Network or host address to which the packet is sent. |
|
destination_mask |
Network mask applied to destination_addr. If a dst_host_addr is used, this argument is optional. |
|
dst_host_addr |
Specifies the destination IP address to be filtered. |
|
log |
Generates a syslog message 106100 if a packet matches the ACE. |
|
level |
Specifies the logging level, 0 through 7, where: 0 = emergencies 1 = alerts 2 = critical 3 = errors 4 = warnings 5 = notifications 6 = informational (default) 7 = debugging |
|
disable |
Does not send syslog message if packets hit the configured ACE. |
|
default |
Uses the default behavior which generates a syslog 106023 message whenever packet matches a deny in the ACE. |
|
interval |
A keyword to specify the time interval to generate the subsequent new syslog messages. |
|
secs |
The actual time interval in seconds. The default time interval is 300 seconds. |
|
time range[1] |
A keyword to specify the time-range name. |
|
name |
A predefined time-range name. |
|
inactive |
Keyword to disable an ACE. |
|
remark |
Keyword to specify remarks on an ACL. |
|
text |
Actual text, up to 100 characters, to be added as remarks. |
|
alert-interval |
Keyword to specify the number of seconds to generate a 106101 syslog message when the maximum number of deny flows is reached. |
|
deny-flow-max |
Keyword to limit the maximum number of concurrent deny flows allowed. |
|
flow_num |
Actual number of deny flows that can be created. This can be between 1 and 4096 (the default). |
[1] These options are discussed in the "Object Grouping" section.
Note
The security appliance restricts the logging option to be implemented for interface filtering only. The logging option will be ignored if an ACL is used with another feature.
In Figure 5-3, SecureMe, the fictional company used in examples throughout this book, hosts a web server and an e-mail server at its location in Chicago. Both servers allow traffic to be destined for 209.165.202.131 on port 80 (HTTP) and 209.165.202.132 on port 25 (SMTP). However, the security appliance allows only two client hosts209.165.201.1 and 209.165.201.2to initiate the traffic. All other traffic passing through the security appliance will be dropped.
Figure 5-3. Inbound Traffic Filtering
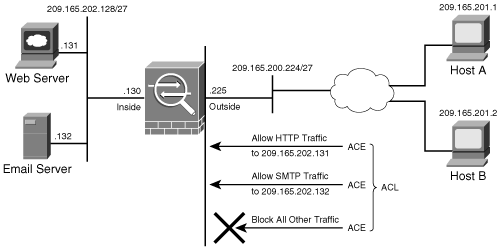
Example 5-1 shows the related configuration. An extended ACL called inbound_traffic_on_outside is set up with four ACEs. The first two ACEs allow HTTP traffic destined for 209.165.202.131 from the two client machines, while the last two ACEs allow SMTP access to 209.165.202.132 from both machines. Adding remarks to an ACL is recommended, because it helps other to recognize its function. The system administrator has added This is the interface ACL to block inbound traffic as the remark on this ACL.
Example 5-1. Configuration of an Extended ACL
Chicago# configure terminal

Chicago(config)# access-list inbound_traffic_on_outside remark This is the

 interface ACL to block inbound traffic

Chicago(config)# access-list inbound_traffic_on_outside extended permit tcp host

 209.165.201.1 host 209.165.202.131 eq www

Chicago(config)# access-list inbound_traffic_on_outside extended permit tcp host

 209.165.201.2 host 209.165.202.131 eq www

Chicago(config)# access-list inbound_traffic_on_outside extended permit tcp host

 209.165.201.1 host 209.165.202.132 eq smtp

Chicago(config)# access-list inbound_traffic_on_outside extended permit tcp host

 209.165.201.2 host 209.165.202.132 eq smtp
Note
The security appliance drops a packet if it does not find an ACE to explicitly permit the packet. There is an implicit deny at the end of all ACLs.
The security appliance software allows you to stop processing an ACE temporarily without removing the entry from the configuration. This is helpful if you are troubleshooting a connection issue through the security appliance and want to disable the entry. You do so by adding the inactive keyword at the end of the ACE.
Step 2: Apply an ACL to an Interface
After configuring an ACL to identify traffic allowed or denied by the security appliance, the next step is to apply the ACL to an interface in either the inbound or the outbound direction. You can apply the ACL by using the access-group command followed by the name of the ACL, as shown in the following syntax:
access-group access-list {in | out} interface interface_name [per-user-override]
Table 5-3 lists and defines the arguments used in the access-group command.
|
Syntax |
Description |
|---|---|
|
access-group |
Keyword used to apply an ACL to an interface. |
|
access-list |
The name of the actual ACL to be applied to an interface. |
|
in |
The ACL will be applied in the inbound direction. |
|
out |
The ACL will be applied in the outbound direction. |
|
interface |
Keyword to specify the interface to which to apply the ACL. |
|
interface_name |
The name of the interface to which to apply an ACL. |
|
per-user-override |
Option that allows the downloadable ACLs to override the entries on the interface ACL. Downloadable ACLs are discussed later in this chapter. |
Chapter 4 "Initial Setup and System Maintenance" discussed the concept of assigning security levels to an interface. In traffic filtering, the security appliance does not block the return TCP or UDP traffic on the lower security interface if the traffic is originated from a host on the higher security interface. For other protocols, such as GRE or ESP, you need to permit the return traffic in the ACL applied on that interface. For the ICMP, you can either allow the return traffic in the ACL or enable ICMP inspection (discussed in Chapter 8, "ASA Application Inspection").
In Example 5-2, an ACL called inbound_traffic_on_outside is applied to the outside interface in the inbound direction.
Example 5-2. Applying an ACL on the Outside Interface
Chicago# configure terminal

Chicago(config)# access-group inbound_traffic_on_outside in interface outside
Note
You can only apply one extended ACL in one direction. However, an inbound and an outbound extended ACL can be applied simultaneously on an interface.
You can, however, apply an extended and an IPv6 ACL in the same direction if the security appliance is set up to be in routed mode. In transparent mode, you can apply an extended and an EtherType ACL in the same direction.
Step 3: Set Up an IPv6 ACL (Optional)
As discussed previously in the "Types of ACLs" section, the security appliance supports filtering IPv6 traffic that is passing through interfaces. An IPv6 ACL is defined by using the ipv6 access-list command followed by the name of the ACL. Like an extended ACL, the IPv6 ACL uses similar command options, as shown in the following syntax:
 ipv6 access-list id [line line-num] {deny | permit} {protocol | object-group

 protocol_obj_grp_id} {source-ipv6-prefix/prefix-length | any | host source-ipv6-

 address | object-group network_obj_grp_id} [operator {port [port] | object-group

 service_obj_grp_id}] {destination-ipv6-prefix/prefix-length | any | host

 destination-ipv6-address | object-group network_obj_grp_id} [{operator port [port] |

 object-group service_obj_grp_id}] [log [[level] [interval secs] | disable |

 default]]

 ipv6 access-list id [line line-num] {deny | permit} icmp6 {source-ipv6-prefix/prefix-

 length | any | host source-ipv6-address | object-group network_obj_grp_id}

 {destination-ipv6-prefix/prefix-length | any | host destination-ipv6-address |

 object-group network_obj_grp_id} [icmp_type | object-group icmp_type_obj_grp_id]

 [log [[level] [interval secs] | disable | default]]

 ipv6 access-list id [line line-num] remark text
Table 5-4 defines the unique arguments of an IPv6 ACE that are different from the ones listed in Table 5-2.
|
Syntax |
Description |
|---|---|
|
ipv6 |
Keyword used to create an IPv6 ACL. |
|
source-ipv6-prefix |
Network or host IPv6 address from which the packet is being sent. |
|
prefix-length |
Network mask applied to an IPv6 address. It specifies how many higher-order bits compromise an IPv6 network address. |
|
source-ipv6-address |
Specifies the source IPv6 address to be filtered. |
|
destination-ipv6-prefix |
Network or host IPv6 address to which the packet is sent. |
|
destination-ipv6-address |
Specifies the destination IPv6 address to be filtered. |
|
icmp6 |
Specifies that the protocol used is ICMPv6. |
In Example 5-3, an ACL called inbound-ipv6-traffic-on-outside consists of two ACEs. The first ACE denies traffic from an IPv6 source fedc:ba98:1:3210:fedc:ba98:1:3210 if it is destined for a mail server (TCP port 25) located at 1080::8:800:200c:417a. The second ACE permits all mail traffic from the fedc:ba98:1:3210::/64 network if it is destined for 1080::8:800:200c:417a. The ACL is applied to the outside interface in the inbound direction.
Example 5-3. Configuring and Applying an IPv6 ACL on the Outside Interface
Chicago# configure terminal

Chicago(config)# ipv6 access-list inbound-ipv6-traffic-on-outside permit tcp host

 fedc:ba98:1:3210:fedc:ba98:1:3210 host 1080::8:800:200c:417a eq smtp

Chicago(config)# ipv6 access-list inbound-ipv6-traffic-on-outside permit tcp

 fedc:ba98:1:3210::/64 host 1080::8:800:200c:417a eq smtp

Chicago(config)# access-group inbound-ipv6-traffic-on-outside in interface

 outside
Part I: Product Overview
Introduction to Network Security
- Introduction to Network Security
- Firewall Technologies
- Intrusion Detection and Prevention Technologies
- Network-Based Attacks
- Virtual Private Networks
- Summary
Product History
- Product History
- Cisco Firewall Products
- Cisco IDS Products
- Cisco VPN Products
- Cisco ASA All-in-One Solution
- Summary
Hardware Overview
Part II: Firewall Solution
Initial Setup and System Maintenance
- Initial Setup and System Maintenance
- Accessing the Cisco ASA Appliances
- Managing Licenses
- Initial Setup
- IP Version 6
- Setting Up the System Clock
- Configuration Management
- Remote System Management
- System Maintenance
- System Monitoring
- Summary
Network Access Control
- Network Access Control
- Packet Filtering
- Advanced ACL Features
- Content and URL Filtering
- Deployment Scenarios Using ACLs
- Monitoring Network Access Control
- Understanding Address Translation
- DNS Doctoring
- Monitoring Address Translations
- Summary
IP Routing
Authentication, Authorization, and Accounting (AAA)
- Authentication, Authorization, and Accounting (AAA)
- AAA Protocols and Services Supported by Cisco ASA
- Defining an Authentication Server
- Configuring Authentication of Administrative Sessions
- Authenticating Firewall Sessions (Cut-Through Proxy Feature)
- Configuring Authorization
- Configuring Accounting
- Deployment Scenarios
- Troubleshooting AAA
- Summary
Application Inspection
- Application Inspection
- Enabling Application Inspection Using the Modular Policy Framework
- Selective Inspection
- Computer Telephony Interface Quick Buffer Encoding Inspection
- Domain Name System
- Extended Simple Mail Transfer Protocol
- File Transfer Protocol
- General Packet Radio Service Tunneling Protocol
- H.323
- HTTP
- ICMP
- ILS
- MGCP
- NetBIOS
- PPTP
- Sun RPC
- RSH
- RTSP
- SIP
- Skinny
- SNMP
- SQL*Net
- TFTP
- XDMCP
- Deployment Scenarios
- Summary
Security Contexts
- Security Contexts
- Architectural Overview
- Configuration of Security Contexts
- Deployment Scenarios
- Monitoring and Troubleshooting the Security Contexts
- Summary
Transparent Firewalls
- Transparent Firewalls
- Architectural Overview
- Transparent Firewalls and VPNs
- Configuration of Transparent Firewall
- Deployment Scenarios
- Monitoring and Troubleshooting the Transparent Firewall
- Summary
Failover and Redundancy
- Failover and Redundancy
- Architectural Overview
- Failover Configuration
- Deployment Scenarios
- Monitoring and Troubleshooting Failovers
- Summary
Quality of Service
- Quality of Service
- Architectural Overview
- Configuring Quality of Service
- QoS Deployment Scenarios
- Monitoring QoS
- Summary
Part III: Intrusion Prevention System (IPS) Solution
Intrusion Prevention System Integration
- Intrusion Prevention System Integration
- Adaptive Inspection Prevention Security Services Module Overview (AIP-SSM)
- Directing Traffic to the AIP-SSM
- AIP-SSM Module Software Recovery
- Additional IPS Features
- Summary
Configuring and Troubleshooting Cisco IPS Software via CLI
- Configuring and Troubleshooting Cisco IPS Software via CLI
- Cisco IPS Software Architecture
- Introduction to the CIPS 5.x Command-Line Interface
- User Administration
- AIP-SSM Maintenance
- Advanced Features and Configuration
- Summary
Part IV: Virtual Private Network (VPN) Solution
Site-to-Site IPSec VPNs
- Site-to-Site IPSec VPNs
- Preconfiguration Checklist
- Configuration Steps
- Advanced Features
- Optional Commands
- Deployment Scenarios
- Monitoring and Troubleshooting Site-to-Site IPSec VPNs
- Summary
Remote Access VPN
- Remote Access VPN
- Cisco IPSec Remote Access VPN Solution
- Advanced Cisco IPSec VPN Features
- Deployment Scenarios of Cisco IPSec VPN
- Monitoring and Troubleshooting Cisco Remote Access VPN
- Cisco WebVPN Solution
- Advanced WebVPN Features
- Deployment Scenarios of WebVPN
- Monitoring and Troubleshooting WebVPN
- Summary
Public Key Infrastructure (PKI)
- Public Key Infrastructure (PKI)
- Introduction to PKI
- Enrolling the Cisco ASA to a CA Using SCEP
- Manual (Cut-and-Paste) Enrollment
- Configuring CRL Options
- Configuring IPSec Site-to-Site Tunnels Using Certificates
- Configuring the Cisco ASA to Accept Remote-Access VPN Clients Using Certificates
- Troubleshooting PKI
- Summary
Part V: Adaptive Security Device Manager
Introduction to ASDM
- Introduction to ASDM
- Setting Up ASDM
- Initial Setup
- Functional Screens
- Interface Management
- System Clock
- Configuration Management
- Remote System Management
- System Maintenance
- System Monitoring
- Summary
Firewall Management Using ASDM
- Firewall Management Using ASDM
- Access Control Lists
- Address Translation
- Routing Protocols
- AAA
- Application Inspection
- Security Contexts
- Transparent Firewalls
- Failover
- QoS
- Summary
IPS Management Using ASDM
- IPS Management Using ASDM
- Accessing the IPS Device Management Console from ASDM
- Configuring Basic AIP-SSM Settings
- Advanced IPS Configuration and Monitoring Using ASDM
- Summary
VPN Management Using ASDM
- VPN Management Using ASDM
- Site-to-Site VPN Setup Using Preshared Keys
- Site-to-Site VPN Setup Using PKI
- Cisco Remote-Access IPSec VPN Setup
- WebVPN
- VPN Monitoring
- Summary
Case Studies
EAN: 2147483647
Pages: 231
