Advanced WebVPN Features
Cisco ASA provides many advanced WebVPN features to suit the VPN implementations:
- Port forwarding
- URL mangling
- E-mail proxy
- Windows file sharing
- WebVPN access lists
The sections that follow cover these features in more detail.
Port Forwarding
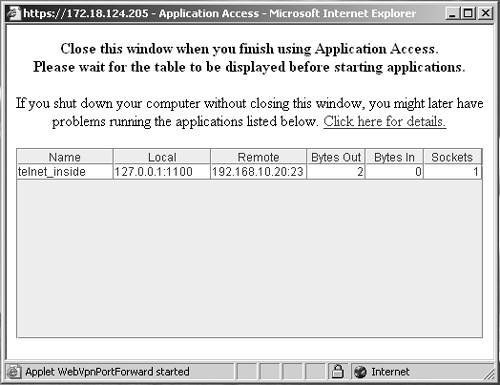
Once a session is established, users can use the features offered by WebVPN. One of the important features is port forwarding, which provides client access to the servers over the known and fixed TCP ports. VPN users connect to the TCP applications offered by the server using Cisco ASA. To use this feature, the authenticated WebVPN users click the "Start Application Access" link on the main page, which launches a Java applet on the client machine showing the IP address and the port number that can be used for the session. Figure 16-18 illustrates the Java applet launched in the client machine.
Figure 16-18. Port-Forwarding Applet
The port-forwarding feature requires you to install Sun Microsystems' Java Runtime Environment (JRE) and configure applications on the end user's PC. If users are establishing the WebVPN tunnel from public machines, such as Internet kiosks or web cafés, they might not be able to use this feature. The installation on Sun's JRE requires administrative rights on the client machine.
You can enable or disable port forwarding by configuring the functions command under the webvpn menu of a default, user group, or user policy. To enable port forwarding, use the functions command with the port-forward parameter, as shown in Example 16-69.
Example 16-69. Enabling Port Forwarding
Chicago(config)# group-policy SecureMeWebGrp attributes

Chicago(config-group-policy)# vpn-tunnel-protocol webvpn

Chicago(config-group-policy)# webvpn

Chicago(config-group-webvpn)# functions port-forward
Port forwarding is configured by using the port-forward command followed by the name of the list in the global configuration mode. The Cisco ASA configuration in Example 16-70 specifies a list called telnet_inside to forward information about a Telnet server located at 192.168.10.20.
Example 16-70. Port-Forwarding List Configuration
Chicago(config)# port-forward telnet_inside 1100 192.168.10.20 23
Note
When port forwarding is in use, the HOSTS file on the WebVPN client is modified to resolve the host name using one of the loopback addresses. Cisco ASA uses an available address in the range from 127.0.0.2 to 127.0.0.254.
If the HOSTS file cannot be modified, the host listens on 127.0.0.1 and the configured local port.
Once the applet is loaded on the client, the user can establish a Telnet connection to the server by using the loopback IP address of 127.0.0.1 on the local port 1100. This will redirect the connection over the WebVPN tunnel to the server at 192.168.10.20 on port 23.
Note
It is recommended to use a local port between 1024 and 65535 to avoid conflicts with the existing network services.
The port list can then be mapped to a default, user group, or user policy. In Example 16-71, the port list telnet_inside is mapped to a user group-policy named SecureMeWebGrp under the WebVPN submenu. Mapping of the list to a policy is done by using the port-forward value command followed by the name of the list.
Example 16-71. Port-Forwarding List Mapping
Chicago(config)# group-policy SecureMeWebGrp attributes

Chicago(config-group-policy)# vpn-tunnel-protocol webvpn

Chicago(config-group-webvpn)# webvpn

Chicago(config-group-webvpn)# functions port-forward

Chicago(config-group-webvpn)# port-forward value telnet_inside
The login page shows a default link of "Start Application Access" to launch the port-forwarding applet. This link can be renamed to accommodate the security policy of an organization. In Example 16-72, the link for the port-forwarding applet on the main login page is changed to "SecureMe Port-Forwarding".
Example 16-72. Configuration of Port-Forwarding Applet name
Chicago(config)# group-policy SecureMeWebGrp attributes

Chicago(config-group-policy)# vpn-tunnel-protocol webvpn

Chicago(config-group-policy)# webvpn

Chicago(config-group-webvpn)# functions port-forward

Chicago(config-group-webvpn)# port-forward value telnet_inside

Chicago(config-group-webvpn)# port-forward-name value SecureMe Port-Forwarding
Configuring URL Mangling
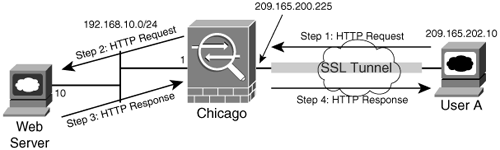
Using WebVPN, remote users can browse their internal websites. Cisco ASA terminates the HTTPS connections on the public interface, and then forwards the HTTP or HTTPS requests to the specified server. The response from the web server is then encapsulated into HTTPS and forwarded to the client. This feature, known as URL mangling, is illustrated in Figure 16-19. The following sequence of events takes place when UserA tries to connect to a web server located at 192.168.10.10:
|
Step 1. |
User A initiates an HTTP request to the web server, located on the other side of the WebVPN tunnel. The user request is encapsulated into the SSL tunnel and is then forwarded to the security appliance. |
|
Step 2. |
The security appliance de-encapsulates the traffic and initiates a connection to the server on behalf of the web client. |
|
Step 3. |
The response from the server is sent to the security appliance. |
|
Step 4. |
The security appliance, in turn, encapsulates and sends it to UserA. |
Figure 16-19. HTTP Requests Using URL Mangling
With URL mangling, the original protocol, host address, port number, and path get manipulated to establish connectivity to the Cisco ASA. The original protocol field is replaced with https, while the original address and port are replaced with the IP address and port of the security appliance. The mangled path in the URL is augmented with the protocol, port, and host elements of the original URL. Figure 16-20 shows the original and the modified URLs.
Figure 16-20. URL Mangling in WebVPN
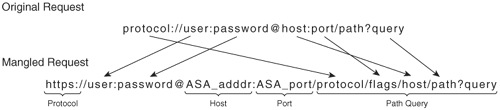
Table 16-6 lists four examples of the original and the mangled URLs. The Cisco ASA IP address is 209.165.200.225.
|
Original URL |
Mangled URL |
|---|---|
|
http://www.securemeinc.com |
https://209.165.200.225/http/0/www.securemeinc.com |
|
https://internalweb.securemeinc.com/index.html |
https://209.165.200.225/https/0/internalweb.securemeinc.com/index.html |
|
http://freedom.securemeinc.com/~free/protect-cgi-bin/simple_query.cgi |
https://209.165.200.225/http/0/freedom.securemeinc.com/~free/protect-cgi-bin/simple_query.cgi |
|
http://metrics.securemeinc.com:675 |
https://209.165.200.225/http/675/metrics.securemeinc.com:675 |
The flags parameter, shown in Figure 16-20, integrates the original port number and a set of other flag values. It is the ASCII representation in decimal, with the lower 16 bits reserved for the port and the upper 16 bits reserved for flags. Port 0 is used if the original URL either contains 80 (for HTTP) or 443 (for HTTPS). The upper 16 bits are currently not used.
Note
The current implementation of WebVPN cannot modify Java and ActiveX coding in a web page. Additionally, Cisco ASA does not mangle non-HTTP-based URLs such as ftp:// or telnet://.
The configuration of URL mangling involves setting up a URL list to specify the IP address of the web server(s). The command syntax to define a URL list is as follows:
url-list listname displayname url
where:
- listname is the name that is then used to map the url-list to a user or group-policy.
- displayname is the name that is shown to the WebVPN user after a successful user authentication.
- url is the actual URL to a web-server that resides toward the inside interface.
In Example 16-73, a URL list named HTTP_Link is set up with a displayname of Internal and the host URL of http://192.168.10.10.
Example 16-73. URL Mangling List
Chicago(config)# url-list HTTP_Link "Internal" http://192.168.10.10
The URL list is then linked to a user or group-policy by using the url-list command followed by the name of the URL list. In Example 16-74, the URL list HTTP_Link is applied to the SecureMeWebGrp group under the webvpn submenu.
Example 16-74. URL List Mapping to a Group-Policy
Chicago(config)# group-policy SecureMeWebGrp attributes

Chicago(config-group-policy)# webvpn

Chicago(config-group-webvpn)# url-list value HTTP_Link
Cisco ASA can optionally forward HTTP WebVPN sessions to either an HTTP or HTTPS server. These proxy servers act as the intermediary servers between the WebVPN users and the Internet. This greatly enhances network security by filtering unnecessary web traffic in the network. Example 16-75 shows the configuration for Cisco ASA to be set up as an HTTP server located at 192.168.10.100 and as an HTTPS server with an IP address of 192.168.10.200.
Example 16-75. HTTP/HTTPS Proxy Configuration
Chicago(config)# webvpn

Chicago(config-webvpn)# http-proxy 192.168.10.100 80

Chicago(config-webvpn)# https-proxy 192.168.10.200 443
As a security device, Cisco ASA has the capability to filter out Java or ActiveX applets, script tags, display images, and delete cookies from the HTML pages when they are sent over a WebVPN connection. This is done by using the html-content-filter command followed by the selected parameter to filter. The Cisco ASA configuration in Example 16-76 sets up the capability to filter out Java/ActiveX and display images when the HTML pages are sent to the client.
Example 16-76. HTML Content Filtering
Chicago(config)# group-policy SecureMeWebGrp attributes

Chicago(config-group-policy)# vpn-tunnel-protocol webvpn

Chicago(config-group-webvpn)# webvpn

Chicago(config-group- webvpn)# html-content-filter java images
E-Mail Proxy
WebVPN provides a way for the remote users to check e-mail using the secure HTTP connection. This feature, known as e-mail proxy, provides a seamless connection from an e-mail client to the server. Users have the option to either authenticate themselves to the GUI WebVPN authentication screen or set up the e-mail client for automatic user authentication.
Cisco ASA supports three types of e-mail proxies: SMTP, IMAP4, and POP3. All of these proxies use their own unique SSL/TLS ports. Cisco ASA uses the default TCP ports of 988, 993, and 995 for SMTP, IMAP4, and POP3, respectively. All of these proxies are disabled until explicitly enabled on the physical interface by configuring the enable command, followed by the name of the interface terminating the connections, under the e-mail proxies' subconfiguration menu. The Cisco ASA configuration in Example 16-77 enables the security appliance to accept IMAP4, POP3, and SMTP proxies on the outside interface.
Example 16-77. Enabling E-Mail Proxy on the Outside Interface
Chicago(config)# imap4s

Chicago(config-imap4s)# enable outside

Chicago(config-imap4s)# pop3s

Chicago(config-pop3s)# enable outside

Chicago(config-pop3s)# smtps

Chicago(config-smtps)# enable outside
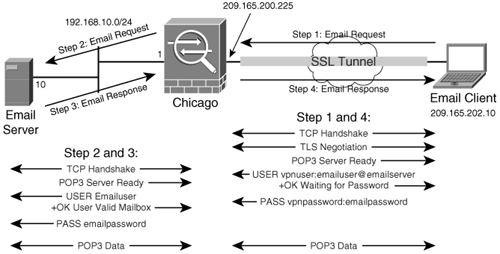
Cisco ASA provides protection against denial of service (DoS) attacks against the e-mail servers when deployed as an e-mail proxy. The user has to be authenticated first by the security appliance before the session is opened for e-mail transfer, as illustrated in Figure 16-21. After a successful user authentication, Cisco ASA opens a session to the e-mail server and forwards the user credentials for validation.
Figure 16-21. User Authentication Using E-Mail Proxy
Once the WebVPN session is authenticated, the Cisco ASA's default behavior is to apply the attributes configured under the DfltGrpPolicy group-policy. However, a user group-policy can be applied to the e-mail proxies by configuring the default-group-policy command followed by the name of the user group-policy. In Example 16-78, the IMAP4 proxy is associating the SecureMeWebGrp user group-policy with the authenticated IMAP4 sessions.
Example 16-78. Mapping of User Group-Policy on the IMAP4 Proxy
Chicago(config)# imap4s

Chicago(config-imap4s)# enable outside

Chicago(config-imap4s)# default-group-policy SecureMeWebGrp
Authentication Methods for E-Mail Proxy
Cisco ASA supports three methods for e-mail proxy authentication:
- Piggyback authentication
- AAA authentication
- Certificate authentication
Piggyback Authentication
With piggyback HTTPS, a user is required to have a WebVPN session already established before connecting to the e-mail server. The user provides their e-mail username and passwords for authentication. If the VPN and e-mail usernames are different, the user is required to provide both of them, separated by a VPN delimiter (discussed later in this chapter). The VPN user credentials are used to verify only that the WebVPN session is already established. If the session is not established, the user is not allowed to connect to the e-mail server.
Caution
Due to an inherit flaw in SMTP, if piggyback authentication is used with SMTP, an attacker can potentially send spam e-mail messages using any name and using a legitimate user account. This typically happens when the attacker spoofs the IP address and the VPN name of the legitimate user. To remedy this problem, consider using IMAP4 or POP3 for piggyback authentication. Alternatively, you can use certificate authentication for SMTP.
Example 16-79 shows that piggyback authentication is enabled for users who use IMAP4 for e-mail messages.
Example 16-79. Piggyback Authentication for IMAP4
Chicago(config)# imap4s

Chicago(config-imap4s)# enable outside

Chicago(config-imap4s)# authentication piggyback
AAA Authentication
AAA authentication is a way to authenticate the VPN users using either the internal or external database. For AAA authentication, users do not need to have a pre-established WebVPN session. When a user checks e-mail, the e-mail client opens the secured connection to Cisco ASA and presents the VPN user credentials. Cisco ASA checks the configured user database and authenticates the user if credentials are valid. After a successful authentication, Cisco ASA forwards the e-mail user credentials to the e-mail server. If the VPN and e-mail usernames are different, a VPN delimiter is used to differentiate them.
Cisco ASA uses an authentication server to validate user accounts. Example 16-80 shows the AAA authentication configuration for RADIUS users who use POP3 for e-mail. The RADIUS server is defined under tag Rad and is located at 192.168.10.30. This tag is then mapped to the POP3 proxy by using the authentication-server-group Rad command.
Example 16-80. AAA Authentication for POP3
Chicago(config)# aaa-server Rad protocol radius

Chicago(config-aaa-server-group)# exit

Chicago(config)# aaa-server Rad host 192.168.10.30

Chicago(config-aaa-server-host)# exit

Chicago(config)# pop3s

Chicago(config-pop3s)# enable outside

Chicago(config-pop3s)# authentication aaa

Chicago(config-pop3s)# authentication-server-group Rad
Certificate Authentication
Certificate authentication requires the e-mail user to present the certificate to the security appliance for validation. If the certificate authentication is unsuccessful, the secured connection is terminated, and the e-mail client fails to connect to the server. This method requires two certificates to be installed on the devices:
- A certificate authority (CA) certificate on Cisco ASA and on the e-mail client
- An identity certificate on the client machine that is signed by a CA and authenticated by Cisco ASA
Example 16-81 shows that certificate authentication is enabled for users who check their e-mail using SMTPS.
Example 16-81. Certificate Authentication for SMTPS
Chicago(config)# smtps

Chicago(config-smtps)# enable outside

Chicago(config-smtps)# authentication certificate
Note
SMTP e-mail proxy allows mailhost authentication for additional security. Mailhost authentication requires the use of username, password, and server information. Cisco ASA does not allow the configuration of mailhost authentication for POP3 and IMAP4, because they always perform mailhost authentication. SMTP e-mail proxy is enabled by configuring authentication mailhost under the SMTP proxy.
Identifying E-Mail Servers for E-Mail Proxies
After you configure the authentication methods, the next step is to identify the e-mail servers to be used for each proxy. To specify an e-mail server, you can use the server command followed by the IP address or the host name of the server. In the configuration in Example 16-82, one email server, called secureme-email, is set up to serve both IMAP and POP3 users. The server is defined under both the IMAP and POP3 configuration menus.
Example 16-82. Configuration of E-Mail Proxy Servers
Chicago(config)# imap4s

Chicago(config-imap4s)# enable outside

Chicago(config-imap4s)# server secureme-email

Chicago(config-imap4s)# authentication piggyback

Chicago(config-imap4s)# pop3s

Chicago(config-pop3s)# enable outside

Chicago(config-pop3s)# server secureme-email

Chicago(config-pop3s)# authentication aaa
Delimiters
Cisco ASA can differentiate the WebVPN username from the e-mail username by using specific delimiters for each of the e-mail proxies. There are two types of supported delimiters:
- Username delimiter
- Server delimiter
Username Delimiter
A username delimiter is used to separate out the VPN username from the e-mail username in the username string when configuring the e-mail client. However, this delimiter is necessary only when both usernames are different from each other. The same username delimiter is used to differentiate the user password from the e-mail server password. The username delimiter can be specified by using the name-separator command followed by the actual delimiter. Cisco ASA supports the following valid username delimiters:
- hash (#)
- comma (,)
- colon (:)
- semicolon (;)
- at (@)
- pipe (|)
The Cisco ASA configuration in Example 16-83 specifies the use of # for the username delimiter for the IMAP4 and POP3 proxies. The default username delimiter on Cisco ASA is the colon (:).
Example 16-83. Configuration of E-Mail Proxy Username Delimiter
Chicago(config)# imap4s

Chicago(config-imap4s)# enable outside

Chicago(config-imap4s)# server secureme-email

Chicago(config-imap4s)# name-separator #

Chicago(config-imap4s)# authentication piggyback

Chicago(config-imap4s)# pop3s

Chicago(config-pop3s)# enable outside

Chicago(config-pop3s)# server secureme-email

Chicago(config-pop3s)# name-separator #

Chicago(config-pop3s)# authentication aaa
Note
You cannot have a username delimiter as a valid character in the user password.
Server Delimiter
A server delimiter is used to differentiate the username from the e-mail server name when the username string is entered in the e-mail client. A server name can be either the host name or the IP address of the e-mail server. The server delimiter can be specified by using the server-separator command followed by the actual delimiter. Cisco ASA supports the following valid server delimiters:
- hash (#)
- comma (,)
- colon (:)
- semicolon (;)
- at (@)
- pipe (|)
However, the server delimiter must be different from the username delimiter. Example 16-84 demonstrates the Cisco ASA configuration to use | as the server delimiter for the IMAP4 and POP3 proxies. The default server delimiter on Cisco ASA is at (@).
Example 16-84. Configuration of E-Mail Proxy Server Delimiter
Chicago(config)# imap4s

Chicago(config-imap4s)# enable outside

Chicago(config-imap4s)# server secureme-email

Chicago(config-imap4s)# name-separator #

Chicago(config-imap4s)# server-separator |

Chicago(config-imap4s)# authentication piggyback

Chicago(config-imap4s)# pop3s

Chicago(config-pop3s)# enable outside

Chicago(config-pop3s)# server secureme-email

Chicago(config-pop3s)# name-separator #

Chicago(config-pop3s)# server-separator |

Chicago(config-pop3s)# authentication aaa
Tip
The e-mail client must be properly configured for the e-mail proxy feature to work. Consult the following link for an e-mail client sample configuration:
http://www.cisco.com/en/US/partner/products/hw/vpndevc/ps2284/products_configuration_guide_chapter09186a00801f1fb6.html
Windows File Sharing
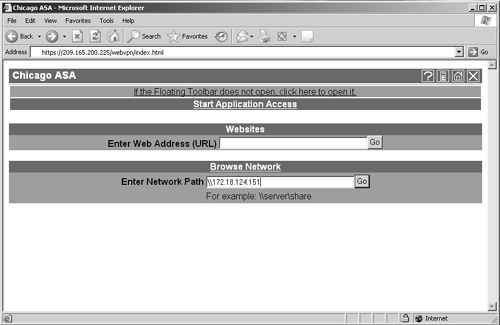
Cisco ASA supports network file sharing using Common Internet File System (CIFS), a file system that uses the original IBM and Microsoft networking protocols. Using CIFS, users can access their file shares located on the file servers, as illustrated in Figure 16-22. Users can download, upload, delete, or rename the files under the shared directories, but only if the file system permissions allow them to perform those actions.
Figure 16-22. CIFS Browsing on the Security Appliance
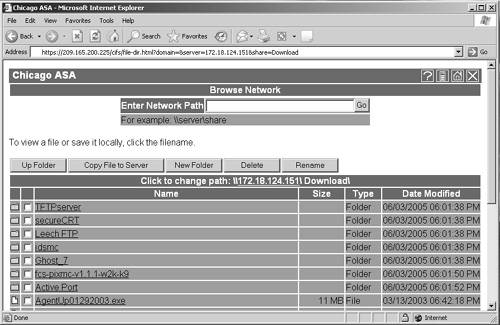
To access the shared resources, users can click the Browse Network link and select the proper domain or workgroup. They can browse to the desired shared resource and take the appropriate actions (read, write, delete, rename filename). They can even create subdirectories, assuming that they are allowed to do so. Alternatively, they can enter the NetBIOS name of the server in the Enter Network Path field to display all the shared resources available for that server, as depicted in Figure 16-23.
Figure 16-23. CIFS Support on Cisco ASA
The configuration of CIFS requires the use of a NetBIOS Name Server (NBNS), also known as Windows Internet Naming Server (WINS). When a WebVPN user queries to browse the network, the Cisco ASA contacts the WINS server and acquires the list of available domains, workgroups, and workstations. The command syntax to configure an NBNS server is as follows:
nbns-server ipaddr [master] [timeout timeout] [retry retries]
The nbns-server command can be found under webvpn subconfiguration mode. The ipaddr is the IP address of the NBNS server for CIFS name resolution. The master keyword specifies that the configured NBNS server acts as the master browser in addition to being a WINS server. The timeout value instructs an appliance to wait for the configured number of seconds (default is 2 seconds) before sending another query to the next server. The retry option is used to specify the number of times Cisco ASA has to go through the list of the configured NBNS servers. The default retries is 2, and it ranges from 0 to 10.
Note
You can specify up to three WINS servers in the current version.
The configuration in Example 16-85 sets up Cisco ASA to use three NBNS servers. The first server, 192.168.10.50, acts as a master browser rather than a WINS server. The other two servers, 192.168.10.51 and 192.168.10.52, are the WINS servers. The timeout and retry values are set to their defaults.
Example 16-85. CIFSNBNS Server Configuration
Chicago(config)# webvpn

Chicago(config-webvpn)# nbns-server 192.168.10.50 master timeout 2 retry 2

Chicago(config-webvpn)# nbns-server 192.168.10.51 timeout 2 retry 2

Chicago(config-webvpn)# nbns-server 192.168.10.52 timeout 2 retry 2
Cisco ASA does not enable CIFS functionality until the functions parameter is set up to allow file browsing, file access, and file entry. The configuration in Example 16-86 sets up Cisco ASA with a user group-policy named SecureMeWebGrp, which allows users to browse, access, and enter file information using the functions attribute.
Example 16-86. Configuration of User Group Attributes
Chicago(config)# group-policy SecureMeWebGrp attributes

Chicago(config-group-policy)# webvpn

Chicago(config-group-webvpn)# functions file-access file-entry file-browsing
WebVPN Access Lists
Cisco ASA enables network administrators to further their WebVPN security by configuring WebVPN access control lists (ACLs) to manage access to web, file, and e-mail servers. These ACLs affect only the WebVPN traffic and are processed in sequential order until there is a match. If there is an ACL defined but no match, the default behavior on Cisco ASA is to drop the packets. On the other hand, if there is no ACL defined, Cisco ASA allows all traffic to pass through it.
Moreover, this robust WebVPN feature allows these ACLs to be downloaded from a Cisco Secure Access Control Server (CS-ACS) by using the vendor specific attributes (VSAs). This allows central control and management of user access into the corporate network by offloading ACL definitions locally on the security appliance.
Tip
Using CS-ACS Server, a WebVPN ACL can be configured by specifying the webvpn:inacl# prefix in the downloadable ACLs, where # indicates the sequence number of an access control entry (ACE).
The command syntax to create a WebVPN ACL is as follows:
access-list id webtype {deny | permit} url [url_string | any] [log [[disable | default]

 | level][interval secs] [time_range name]]
and
access-list id webtype {deny | permit} tcp [host ip_address | ip_address subnet_mask

 | any] [oper port [port]] [log [[disable | default] | level] [interval secs]

 [time_range name]]
A URL-based WebVPN ACL is used to filter out WebVPN packets if they contain a URL such as http://. A TCP-based WebVPN ACL is used to filter out WebVPN packets if they use TCP encapsulation based on the IP address and the Layer 4 port number.
Table 16-7 describes all the options available in the WebVPN ACL.
|
Feature |
Description |
|---|---|
|
any |
Specifies all IP addresses or all URLs. |
|
deny |
Denies access if packets match the condition. |
|
permit |
Permits access if packets match the condition. |
|
tcp |
A keyword to specify a TCP-based ACE. |
|
host |
A keyword to specify a host IP address. |
|
oper |
The operator that is used to compare destination ports in WebVPN packets. The security appliance supports lt (less than), gt (greater than), eq (equal), neq (not equal), and range (inclusive range) as operators. |
|
port |
Specifies the TCP or UDP port in the range of 0 to 65535 used for WebVPN packets. |
|
ip_address |
The actual IP address of the host or the network address. |
|
subnet_mask |
The actual subnet mask when a network address is specified as the IP address. |
|
url |
A keyword to specify a URL-based ACE. |
|
url-string |
The actual URL used for filtering. |
|
log |
Sends a syslog message whenever there is a hit on the ACL. |
|
disable |
Does not send a syslog message if packets hit the configured ACE. |
|
default |
Uses the default behavior, which generates a syslog 106023 message whenever a packet matches a deny in the ACE. |
|
level |
Changes the syslog level when a message is generated. The default level is 6 (informational). |
|
interval |
A keyword to specify the time interval to generate the subsequent new syslog messages. |
|
secs |
The actual time interval, in seconds. The default time interval is 300 seconds, and it ranges from 1 to 600 seconds. |
|
time_range |
A keyword to specify the time-range name. |
|
name |
The predefined time-range name. |
Note
If you want to include all URLs that are not explicitly matched in the ACL, you can include an asterisk (*) as a wildcard. The following example shows how to block POP3 e-mail access and allow all other protocols:
 access-list blockpop3 webtype deny url pop3://*

 access-list blockpop3 webtype permit url any
In Example 16-87, there is a WebVPN ACL configured called HTTP. The first entry in the list denies WebVPN HTTP traffic destined to an internal server located at wwwin.securemeinc.com. The logging is set to debugging (level 7) with the subsequent syslog messages generated every 60 seconds. The second entry in the list permits all other WebVPN traffic.
Example 16-87. WebVPN ACL Configuration
Chicago(config)# access-list HTTP webtype deny url http://wwwin.securemeinc.com log

 debugging interval 60

Chicago(config)# access-list HTTP webtype permit url any
Once the WebVPN ACL is configured, the next step is to link it to a default, user group, or user policy under the WebVPN configuration menu. Example 16-88 shows that the configured HTTP ACL is mapped to a user group called SecureMeWebGrp by using the filter value command.
Example 16-88. WebVPN ACL Mapping
Chicago(config)# group-policy SecureMeWebGrp attributes

Chicago(config-group-policy)# webvpn

Chicago(config-group-webvpn)# filter value HTTP
Cisco ASA does not apply the WebVPN ACL feature to the user until the functions parameter is set up to filter traffic. In Example 16-89, SecureMeWebGrp is configured for filter function, which turns on WebVPN traffic filtering on the security appliance.
Example 16-89. WebVPN ACL Filtering
Chicago(config)# group-policy SecureMeWebGrp attributes

Chicago(config-group-policy)# webvpn

Chicago(config-group-webvpn)# functions filter

Chicago(config-group-webvpn)# filter value HTTP
Caution
WebVPN ACLs do not block a user from accessing the resources outside the company. These ACLs ensure that WebVPN traffic denied by the ACLs will not pass through the security appliance.
Part I: Product Overview
Introduction to Network Security
- Introduction to Network Security
- Firewall Technologies
- Intrusion Detection and Prevention Technologies
- Network-Based Attacks
- Virtual Private Networks
- Summary
Product History
- Product History
- Cisco Firewall Products
- Cisco IDS Products
- Cisco VPN Products
- Cisco ASA All-in-One Solution
- Summary
Hardware Overview
Part II: Firewall Solution
Initial Setup and System Maintenance
- Initial Setup and System Maintenance
- Accessing the Cisco ASA Appliances
- Managing Licenses
- Initial Setup
- IP Version 6
- Setting Up the System Clock
- Configuration Management
- Remote System Management
- System Maintenance
- System Monitoring
- Summary
Network Access Control
- Network Access Control
- Packet Filtering
- Advanced ACL Features
- Content and URL Filtering
- Deployment Scenarios Using ACLs
- Monitoring Network Access Control
- Understanding Address Translation
- DNS Doctoring
- Monitoring Address Translations
- Summary
IP Routing
Authentication, Authorization, and Accounting (AAA)
- Authentication, Authorization, and Accounting (AAA)
- AAA Protocols and Services Supported by Cisco ASA
- Defining an Authentication Server
- Configuring Authentication of Administrative Sessions
- Authenticating Firewall Sessions (Cut-Through Proxy Feature)
- Configuring Authorization
- Configuring Accounting
- Deployment Scenarios
- Troubleshooting AAA
- Summary
Application Inspection
- Application Inspection
- Enabling Application Inspection Using the Modular Policy Framework
- Selective Inspection
- Computer Telephony Interface Quick Buffer Encoding Inspection
- Domain Name System
- Extended Simple Mail Transfer Protocol
- File Transfer Protocol
- General Packet Radio Service Tunneling Protocol
- H.323
- HTTP
- ICMP
- ILS
- MGCP
- NetBIOS
- PPTP
- Sun RPC
- RSH
- RTSP
- SIP
- Skinny
- SNMP
- SQL*Net
- TFTP
- XDMCP
- Deployment Scenarios
- Summary
Security Contexts
- Security Contexts
- Architectural Overview
- Configuration of Security Contexts
- Deployment Scenarios
- Monitoring and Troubleshooting the Security Contexts
- Summary
Transparent Firewalls
- Transparent Firewalls
- Architectural Overview
- Transparent Firewalls and VPNs
- Configuration of Transparent Firewall
- Deployment Scenarios
- Monitoring and Troubleshooting the Transparent Firewall
- Summary
Failover and Redundancy
- Failover and Redundancy
- Architectural Overview
- Failover Configuration
- Deployment Scenarios
- Monitoring and Troubleshooting Failovers
- Summary
Quality of Service
- Quality of Service
- Architectural Overview
- Configuring Quality of Service
- QoS Deployment Scenarios
- Monitoring QoS
- Summary
Part III: Intrusion Prevention System (IPS) Solution
Intrusion Prevention System Integration
- Intrusion Prevention System Integration
- Adaptive Inspection Prevention Security Services Module Overview (AIP-SSM)
- Directing Traffic to the AIP-SSM
- AIP-SSM Module Software Recovery
- Additional IPS Features
- Summary
Configuring and Troubleshooting Cisco IPS Software via CLI
- Configuring and Troubleshooting Cisco IPS Software via CLI
- Cisco IPS Software Architecture
- Introduction to the CIPS 5.x Command-Line Interface
- User Administration
- AIP-SSM Maintenance
- Advanced Features and Configuration
- Summary
Part IV: Virtual Private Network (VPN) Solution
Site-to-Site IPSec VPNs
- Site-to-Site IPSec VPNs
- Preconfiguration Checklist
- Configuration Steps
- Advanced Features
- Optional Commands
- Deployment Scenarios
- Monitoring and Troubleshooting Site-to-Site IPSec VPNs
- Summary
Remote Access VPN
- Remote Access VPN
- Cisco IPSec Remote Access VPN Solution
- Advanced Cisco IPSec VPN Features
- Deployment Scenarios of Cisco IPSec VPN
- Monitoring and Troubleshooting Cisco Remote Access VPN
- Cisco WebVPN Solution
- Advanced WebVPN Features
- Deployment Scenarios of WebVPN
- Monitoring and Troubleshooting WebVPN
- Summary
Public Key Infrastructure (PKI)
- Public Key Infrastructure (PKI)
- Introduction to PKI
- Enrolling the Cisco ASA to a CA Using SCEP
- Manual (Cut-and-Paste) Enrollment
- Configuring CRL Options
- Configuring IPSec Site-to-Site Tunnels Using Certificates
- Configuring the Cisco ASA to Accept Remote-Access VPN Clients Using Certificates
- Troubleshooting PKI
- Summary
Part V: Adaptive Security Device Manager
Introduction to ASDM
- Introduction to ASDM
- Setting Up ASDM
- Initial Setup
- Functional Screens
- Interface Management
- System Clock
- Configuration Management
- Remote System Management
- System Maintenance
- System Monitoring
- Summary
Firewall Management Using ASDM
- Firewall Management Using ASDM
- Access Control Lists
- Address Translation
- Routing Protocols
- AAA
- Application Inspection
- Security Contexts
- Transparent Firewalls
- Failover
- QoS
- Summary
IPS Management Using ASDM
- IPS Management Using ASDM
- Accessing the IPS Device Management Console from ASDM
- Configuring Basic AIP-SSM Settings
- Advanced IPS Configuration and Monitoring Using ASDM
- Summary
VPN Management Using ASDM
- VPN Management Using ASDM
- Site-to-Site VPN Setup Using Preshared Keys
- Site-to-Site VPN Setup Using PKI
- Cisco Remote-Access IPSec VPN Setup
- WebVPN
- VPN Monitoring
- Summary
Case Studies
EAN: 2147483647
Pages: 231
