Advanced Features
Cisco ASA provides many advanced features to suit your site-to-site VPN implementations. These features include the following:
- OSPF updates over IPSec
- Reverse route injection
- NAT Traversal (NAT-T)
- Tunnel default gateway
OSPF Updates over IPSec
As discussed in Chapter 6, "IP Routing," Open Shortest Path First (OSPF) uses multicast methodology to communicate with its neighbors. IPSec, on the other hand, does not allow encapsulation of the multicast traffic. Cisco ASA solves this problem by statically defining neighbors using the neighbor command, which sends unicast OSPF packets to the remote VPN peer. Refer to Chapter 6 for in-depth coverage of this feature.
Example 15-15 shows how to set up the outside interface as a nonbroadcast media and specify the remote VPN peer as the OSPF neighbor on the outside interface.
Example 15-15. OSPF Updates over IPSec
Chicago(config)# interface GigabitEthernet0/0

Chicago(config-if)# nameif outside

Chicago(config-if)# security-level 0

Chicago(config-if)# ip address 209.165.200.225 255.255.255.224

Chicago(config-if)# ospf network point-to-point non-broadcast

Chicago(config)# router ospf 1

Chicago(config-router)# network 209.165.200.225 255.255.255.255 area 0

Chicago(config-router)# neighbor 209.165.201.1 interface outside
Note
The security Cisco ASA uses the outside interface as the source of the OSPF packets and the neighbor's IP address as the destination address. Verify that the crypto ACL includes an entry to encrypt packets from 209.165.200.225 to 209.165.201.1.
Reverse Route Injection
Reverse route injection (RRI) is a way to distribute remote network information into the local network with the help of a routing protocol. With RRI, the Cisco ASA automatically adds static routes to the routing table and then announces these routes to its neighbors on the private network using OSPF. To configure RRI, you simply set the crypto map instance for reverse route:
crypto map map-name seq-numset reverse-route
Figure 15-3 shows an IPSec topology that is using OSPF to propagate the remote private network information into the local LAN of the Chicago ASA.
Figure 15-3. Example of RRI in the ASA
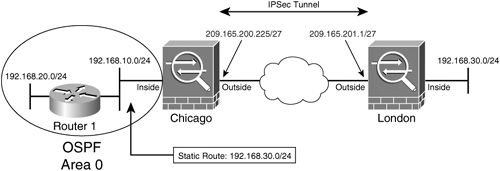
Example 15-16 illustrates how RRI can be enabled on the ASA in Chicago as depicted in Figure 15-3.
Example 15-16. Configuration of Reverse Route Injection
Chicago(config)# crypto map IPSec_map 10 match address encrypt-acl

Chicago(config)# crypto map IPSec_map 10 set peer 209.165.201.1

Chicago(config)# crypto map IPSec_map 10 set transform-set myset

Chicago(config)# crypto map IPSec_map 10 set reverse-route
To check if the ASA is adding the remote network information in the routing table, type show route, as illustrated in Example 15-17.
Example 15-17. Routing Table on the ASA
Chicago# show route

S 0.0.0.0 0.0.0.0 [1/0] via 209.165.200.226, outside

C 192.168.10.0 255.255.255.0 is directly connected, inside

C 209.165.200.224.0 255.255.255.224 is directly connected, outside

S 192.168.30.0 255.255.255.0 [1/0] via 209.165.200.226, outside
If you see the static route for the remote private network in the routing table, the next step is to advertise it to local OSPF peers, as shown in Example 15-18.
Example 15-18. OSPF Configuration on the ASA
Chicago(config)# router ospf 10

Chicago(config-router)# network 192.168.10.0 255.255.255.0 area 0

Chicago(config-router)# redistribute static subnets
The internal router (Router1) will receive this route and install it in its routing table, as demonstrated in Example 15-19.
Example 15-19. Routing Table on a Router
Router1# show ip route

C 192.168.10.0/24 is directly connected, Ethernet0

C 192.168.20.0/24 is directly connected, FastEthernet0

O E2 192.168.30.0/24 [110/20] via 192.168.10.1, 00:00:03, Ethernet0
NAT Traversal
Traditionally, the IPSec tunnels fail to pass traffic if there is a PAT device between the peers. Cisco ASA uses ESP which does not have any Layer 4 information. Thus a PAT device usually drops IPSec packets. To remedy this problem, Cisco drafted an IETF standard called NAT Traversal (NAT-T) to encapsulate the ESP packets into UDP port 4500 so that the PAT device knows how to translate the encrypted packets. NAT-T is dynamically negotiated if the following two conditions are met:
- Both VPN peers are NAT-T capable.
- There is a NAT or PAT device between the peers.
To enable NAT-T globally on the ASA, the command syntax is
isakmp nat-traversal [keepalives]
Keepalives range between 10 and 3600 seconds. If you don't specify the keepalive, the ASA uses 20 seconds as the default. In many cases, the NAT/PAT devices time out the UDP port 4500 entries if there is no active traffic passing through them. NAT-T keepalives are used so that the security Cisco ASA can send periodic keepalive messages to prevent the entries from timing out.
If NAT-T is globally enabled, and you do not want one of the peers to negotiate it, you can use the crypto map nat-t-disable command for that specific sequence number. The command syntax is
crypto map map-name seq-num set nat-t-disable
Example 15-20 illustrates how to disable NAT-T for a peer defined in sequence map 10.
Example 15-20. Disabling NAT-T for a Peer
Chicago(config)# crypto map IPSec_map 10 set nat-t-disable
Tunnel Default Gateway
A Layer 3 device typically has a default gateway that is used to route packets when the destination address is not found in the routing table. Tunnel default gateway, a concept first introduced in the VPN3000 concentrators, is used to route the packets if they reach the security Cisco ASA over an IPSec tunnel and if their destination IP address is not found in the routing table. The tunneled traffic can be either remote access or site-to-site VPN traffic. The tunnel default gateway next-hop address is generally the IP address of the inside router, Router1 (illustrated in Figure 15-3), or any Layer 3 device.
The tunnel default gateway feature is important if you do not want to define routes about your internal networks to the Cisco ASA and you rather want the tunneled traffic to be sent to the internal router for routing. To set up a tunnel default gateway, add the keyword tunneled to the statically configured default route. Example 15-21 shows the configuration of the Cisco ASA with the tunnel default gateway specified as 192.168.10.2, located on the inside interface.
Example 15-21. Tunnel Default Gateway Configuration
Chicago(config)# route inside 0.0.0.0 0.0.0.0 192.168.10.2 tunneled
Part I: Product Overview
Introduction to Network Security
- Introduction to Network Security
- Firewall Technologies
- Intrusion Detection and Prevention Technologies
- Network-Based Attacks
- Virtual Private Networks
- Summary
Product History
- Product History
- Cisco Firewall Products
- Cisco IDS Products
- Cisco VPN Products
- Cisco ASA All-in-One Solution
- Summary
Hardware Overview
Part II: Firewall Solution
Initial Setup and System Maintenance
- Initial Setup and System Maintenance
- Accessing the Cisco ASA Appliances
- Managing Licenses
- Initial Setup
- IP Version 6
- Setting Up the System Clock
- Configuration Management
- Remote System Management
- System Maintenance
- System Monitoring
- Summary
Network Access Control
- Network Access Control
- Packet Filtering
- Advanced ACL Features
- Content and URL Filtering
- Deployment Scenarios Using ACLs
- Monitoring Network Access Control
- Understanding Address Translation
- DNS Doctoring
- Monitoring Address Translations
- Summary
IP Routing
Authentication, Authorization, and Accounting (AAA)
- Authentication, Authorization, and Accounting (AAA)
- AAA Protocols and Services Supported by Cisco ASA
- Defining an Authentication Server
- Configuring Authentication of Administrative Sessions
- Authenticating Firewall Sessions (Cut-Through Proxy Feature)
- Configuring Authorization
- Configuring Accounting
- Deployment Scenarios
- Troubleshooting AAA
- Summary
Application Inspection
- Application Inspection
- Enabling Application Inspection Using the Modular Policy Framework
- Selective Inspection
- Computer Telephony Interface Quick Buffer Encoding Inspection
- Domain Name System
- Extended Simple Mail Transfer Protocol
- File Transfer Protocol
- General Packet Radio Service Tunneling Protocol
- H.323
- HTTP
- ICMP
- ILS
- MGCP
- NetBIOS
- PPTP
- Sun RPC
- RSH
- RTSP
- SIP
- Skinny
- SNMP
- SQL*Net
- TFTP
- XDMCP
- Deployment Scenarios
- Summary
Security Contexts
- Security Contexts
- Architectural Overview
- Configuration of Security Contexts
- Deployment Scenarios
- Monitoring and Troubleshooting the Security Contexts
- Summary
Transparent Firewalls
- Transparent Firewalls
- Architectural Overview
- Transparent Firewalls and VPNs
- Configuration of Transparent Firewall
- Deployment Scenarios
- Monitoring and Troubleshooting the Transparent Firewall
- Summary
Failover and Redundancy
- Failover and Redundancy
- Architectural Overview
- Failover Configuration
- Deployment Scenarios
- Monitoring and Troubleshooting Failovers
- Summary
Quality of Service
- Quality of Service
- Architectural Overview
- Configuring Quality of Service
- QoS Deployment Scenarios
- Monitoring QoS
- Summary
Part III: Intrusion Prevention System (IPS) Solution
Intrusion Prevention System Integration
- Intrusion Prevention System Integration
- Adaptive Inspection Prevention Security Services Module Overview (AIP-SSM)
- Directing Traffic to the AIP-SSM
- AIP-SSM Module Software Recovery
- Additional IPS Features
- Summary
Configuring and Troubleshooting Cisco IPS Software via CLI
- Configuring and Troubleshooting Cisco IPS Software via CLI
- Cisco IPS Software Architecture
- Introduction to the CIPS 5.x Command-Line Interface
- User Administration
- AIP-SSM Maintenance
- Advanced Features and Configuration
- Summary
Part IV: Virtual Private Network (VPN) Solution
Site-to-Site IPSec VPNs
- Site-to-Site IPSec VPNs
- Preconfiguration Checklist
- Configuration Steps
- Advanced Features
- Optional Commands
- Deployment Scenarios
- Monitoring and Troubleshooting Site-to-Site IPSec VPNs
- Summary
Remote Access VPN
- Remote Access VPN
- Cisco IPSec Remote Access VPN Solution
- Advanced Cisco IPSec VPN Features
- Deployment Scenarios of Cisco IPSec VPN
- Monitoring and Troubleshooting Cisco Remote Access VPN
- Cisco WebVPN Solution
- Advanced WebVPN Features
- Deployment Scenarios of WebVPN
- Monitoring and Troubleshooting WebVPN
- Summary
Public Key Infrastructure (PKI)
- Public Key Infrastructure (PKI)
- Introduction to PKI
- Enrolling the Cisco ASA to a CA Using SCEP
- Manual (Cut-and-Paste) Enrollment
- Configuring CRL Options
- Configuring IPSec Site-to-Site Tunnels Using Certificates
- Configuring the Cisco ASA to Accept Remote-Access VPN Clients Using Certificates
- Troubleshooting PKI
- Summary
Part V: Adaptive Security Device Manager
Introduction to ASDM
- Introduction to ASDM
- Setting Up ASDM
- Initial Setup
- Functional Screens
- Interface Management
- System Clock
- Configuration Management
- Remote System Management
- System Maintenance
- System Monitoring
- Summary
Firewall Management Using ASDM
- Firewall Management Using ASDM
- Access Control Lists
- Address Translation
- Routing Protocols
- AAA
- Application Inspection
- Security Contexts
- Transparent Firewalls
- Failover
- QoS
- Summary
IPS Management Using ASDM
- IPS Management Using ASDM
- Accessing the IPS Device Management Console from ASDM
- Configuring Basic AIP-SSM Settings
- Advanced IPS Configuration and Monitoring Using ASDM
- Summary
VPN Management Using ASDM
- VPN Management Using ASDM
- Site-to-Site VPN Setup Using Preshared Keys
- Site-to-Site VPN Setup Using PKI
- Cisco Remote-Access IPSec VPN Setup
- WebVPN
- VPN Monitoring
- Summary
Case Studies
EAN: 2147483647
Pages: 231
