Understanding Address Translation
Cisco ASA, being a security device, can mask the network address on the trusted side from the untrusted networks. This technique, commonly referred to as address translation, allows an organization to hide the internal addressing scheme from the outside by displaying a different IP address space. Address translation is useful in the following network deployments:
- You use a private addressing scheme internally, and want to assign global routable addresses to those hosts.
- You change to a service provider that requires you to change the addressing scheme. Rather than redesign the entire IP infrastructure, you implement translation on the border appliance.
- You do not want to advertise the internal addressing scheme to the outside hosts, for security reasons.
- You have multiple internal networks that require Internet connectivity through the security appliance, but only one (or few) global address is available for translation.
- You have overlapping networks in your organization and you want to provide connectivity between the two without modifying the existing addressing scheme.
Cisco ASA supports the following two types of address translation:
- Network Address Translation
- Port Address Translation
The following sections discuss the two address translation types, packet flow sequence, address translation configuration steps, ways to bypass address translation, and address translation order of operation.
Network Address Translation
Network Address Translation (NAT) defines a one-to-one address mapping when a packet passes through the security appliance and matches criteria for translation. The security appliance either assigns a static IP address (static NAT) or allocates an address from a pool of addresses (dynamic NAT).
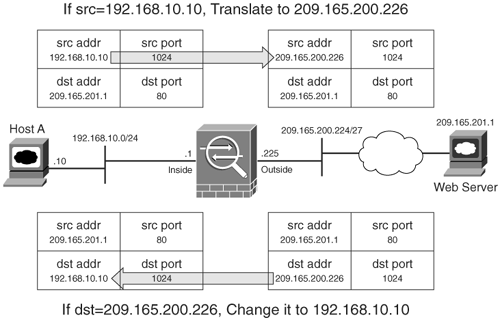
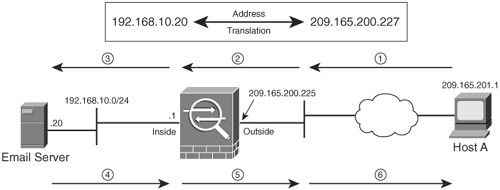
Cisco ASA can translate an internal address to a global address when packets are destined for the public network. With this method, also known as inside NAT, the security appliance converts the global address of the return traffic to the original internal address. Inside NAT is used when traffic originates from a higher security interface, such as the inside interface, and is destined for a lower-security interface, such as the outside interface. In Figure 5-10, a host on the internal network, 192.168.10.10, sends traffic to a host on the outside network, 209.165.201.1. The Cisco ASA converts the source IP address to 209.165.200.226 while keeping the destination IP address intact. When the web server responds to the global IP address, 209.165.200.226, the security appliance reverts the global IP address to an internal real IP address of 192.168.10.10.
Figure 5-10. Inside Network Address Translation
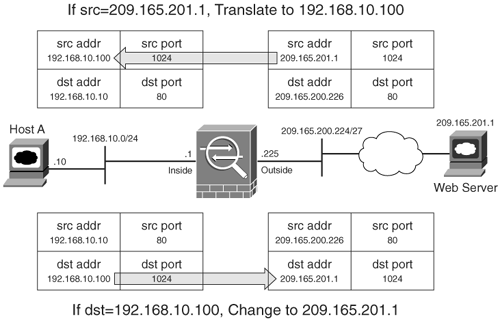
Optionally, the hosts on the lower security interface can be translated when traffic is destined for a host on the higher security interface. This method, known as outside NAT, is useful when you want the hosts on the outside network to appear as one of the internal IP addresses. In Figure 5-11, a host on the outside network, 209.165.201.1, sends traffic to a host on the inside network, 192.168.10.10, by using its global IP address as the destination address. Cisco ASA converts the source IP address to 192.168.10.100 while changing the destination IP address to 192.168.10.10.
Figure 5-11. Outside Network Address Translation
Note
If the packets are denied by the interface ACLs, the security appliance does not build the corresponding address translation table entry.
Port Address Translation
Port Address Translation (PAT) defines a many-to-one address mapping when a packet passes through the security appliance and matches criteria for translation. The security appliance creates the translation table by looking at the Layer 4 information in the header to distinguish between the inside hosts using the same global IP address.
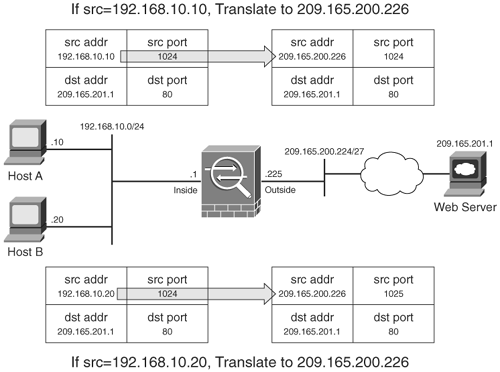
Figure 5-12 illustrates an appliance set up for PAT for the inside network of 192.168.10.0/24. However, there is only one global address available for translation. If two inside hosts, 192.168.10.10 and 192.168.10.20, require connectivity to an outside host, 209.165.201.1, the security appliance will build the translation table by evaluating the Layer 4 header information. In this case, because both inside hosts have the same source port number, the security appliance assigns a different source port number to keep both entries unique from each other. This way, when the response from the web server returns to the security appliance, the security appliance knows which inside host to forward the packets to.
Figure 5-12. Port Address Translation
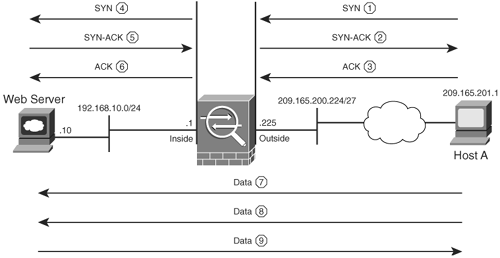
Packet Flow Sequence
When a packet passes through an appliance configured for address translation, the following sequence of events occurs:
- The packet arrives at the ingress interface from the end host.
- The security appliance checks the packet against the inbound ACL.
- If the packet is allowed in, the security appliance consults the routing table to determine the outbound physical interface.
- If address translation is enabled and the packet matches the translation criteria, the security appliance creates a translation for the host.
- The security appliance creates a stateful connection entry for the TCP and UDP packets. The security appliance can, optionally, create a stateful connection entry for the ICMP traffic if ICMP inspection is turned on.
- The packet is routed to the egress interface and is checked against the outbound ACL.
- If allowed, the packet is transmitted.
Configuring Address Translation
Cisco ASA supports the following five types of address translation, each of which is configured uniquely:
- Static NAT
- Dynamic NAT
- Static PAT
- Dynamic PAT
- Policy NAT/PAT
Static NAT
Static NAT defines a fixed translation of an inside host or subnet address to a global routable address or subnet. The security appliance uses the one-to-one methodology by assigning one global IP address to an inside IP address. Thus, if 100 hosts residing on the inside network require address translation, the security appliance should be configured for 100 global IP addresses. Additionally, the inside hosts are assigned the same IP address whenever the security appliance translates the packets going through it. This is a recommended solution in scenarios in which an organization provides services, such as e-mail, web, DNS, and FTP, for outside users. Using static NAT, the servers use the same global IP address for all the inbound and outbound connections.
A static address translation can be defined by using the static command. The complete command syntax of static follows:
 static (real_ifc,mapped_ifc) {mapped_ip} {real_ip [netmask mask]} [dns]

 [norandomseq] [[tcp] [max_conns [emb_lim]] [udp udp_max_conns]
Table 5-12 lists and defines the arguments used in the static command.
|
Syntax |
Description |
|---|---|
|
static |
Keyword used to define a static address translation. |
|
real_ifc |
Interface name to which the actual (or real) hosts are connected. It is the higher security interface if inside NAT is used or the lower security interface if outside NAT is implemented. |
|
mapped_ifc |
Interface name that owns the mapped_ip of a host. It is the lower security interface if inside NAT is used or the higher security interface if outside NAT is implemented. |
|
mapped_ip |
Translated IP address(es). |
|
real_ip |
Original or nontranslated IP address(es). |
|
netmask_mask |
Subnet mask of the real IP subnet address. For host-based NAT, it is 255.255.255.255. |
|
dns |
Enables DNS doctoring, which is covered later in the "DNS Doctoring" section. |
|
norandomseq |
Disables randomization of TCP sequence number. |
|
tcp |
Keyword to enable TCP embryonic and connection limit. |
|
max_conns |
Maximum number of simultaneous TCP connections originated from the real host address. |
|
emb_lim |
Maximum number of simultaneous TCP embryonic connections that have not completed the three-way TCP negotiations. Exceeding this limit triggers the TCP interception feature, discussed later in this section. |
|
udp |
Keyword to enable UDP connection limit. |
|
udp_max_conns |
Maximum number of simultaneous UDP connections originated from or destined for the real host address. |
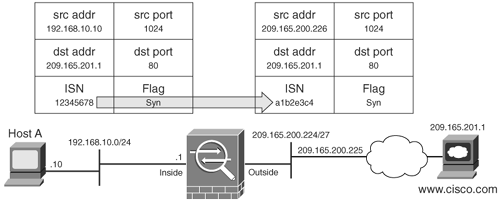
The static command not only masquerades the original IP address, it also provides protection against TCP connection hijacking for hosts with weak SYN implementation. When a packet enters the higher security interface and is destined for a lower security interface during the TCP three-way handshake, the security appliance randomizes the original sequence numbers used by the hosts. This process is illustrated in Figure 5-13. When the host 192.168.10.10 sends a TCP SYN HTTP packet to host 209.165.201.1 with an Initial Sequence Number (ISN) of 0x12345678, the Cisco ASA changes the source IP address to 209.165.200.226 and also modifies the ISN to a randomly generated value of 0xa1b2e3c4.
Figure 5-13. Randomization of ISN
In some deployment scenarios, such as BGP peering with MD5 authentication, it is recommended to turn off the randomization of TCP packets. When two routers establish BGP peering with each other, the TCP header and data payload are 128-bit hashed using the BGP password. When the sequence number is changed, the peering router fails to authenticate the packets because of mismatched hash. For more information about BGP MD5 authentication, consult RFC 2385.
Cisco ASA also provides protection against certain types of denial of service (DoS) attacks. By using the embryonic and maximum connection limit, the security appliance can restrict the establishment of new connections to the inside servers. An embryonic connection is a half-opened connection from the client to the server during the TCP three-way handshake. When the number of embryonic connections hits the maximum allowed limit, Cisco ASA starts intercepting the SYN packets from the client to the servers. When the client sends a TCP SYN packet destined for the server, the security appliance responds with an ACK on behalf of the server. If the client acknowledges the receipt of the previous packet, the security appliance marks the connection as valid and starts a connection to the server on behalf of the client. It combines both connections transparently without any user interception. This process of intercepting the TCP packets is known as TCP interception and is illustrated in Figure 5-14.
Figure 5-14. TCP Interception
Note
The TCP intercept feature is available only for inbound NAT.
The security appliance can also protect network resources from an unexpected increase in the number of connections by setting maximum limits. This is applicable for both TCP- and UDP-based connections. In Example 5-34, a static entry is created to translate an inside host, 192.168.10.10, to 209.165.200.226. The security appliance is also translating the 192.168.10.0/29 subnet to 209.165.200.232/29. Any host that falls in this range of IP addresses will be assigned an IP address from the 209.165.200.232/29 subnet. The maximum TCP and UDP simultaneous connection limits are set to 1000, while the embryonic connections are restricted to 100 before initiating the TCP intercept mode.
Example 5-34. Inside NAT
Chicago(config)# static (inside,outside) 209.165.200.226 192.168.10.10 netmask

 255.255.255.255 tcp 1000 100 udp 1000

Chicago(config)# static (inside,outside) 209.165.200.232 192.168.10.0 netmask

 255.255.255.248 tcp 1000 100 udp 1000
Example 5-35 illustrates how to set up an outside NAT static entry. An outside host, 209.165.201.1, is translated to an inside address, 192.168.10.100, before the packets enter the inside network.
Example 5-35. Outside NAT
Chicago(config)# static (outside,inside) 192.168.10.100 209.165.201.1 netmask

 255.255.255.255
Note
The security appliance does not support outside NAT if the Cisco CallManager server reside on the inside network and the IP phones connect from the outside network.
Dynamic Network Address Translation
Dynamic NAT assigns a random IP address from a preconfigured pool of global IP addresses. The security appliance uses a one-to-one methodology by allocating one global IP address to an inside IP address. Hence, if 100 hosts reside on the inside network, then the pool of addresses should be big enough to accommodate those hosts. This is a recommended solution in scenarios in which an organization uses protocols that don't contain Layer 4 information, such as Generic Routing Encapsulation (GRE), Reliable Datagram Protocol (RDP), and Data Delivery Protocol (DDP). Once the security appliance has built a dynamic NAT for an inside host, any machine can connect to the assigned IP address, assuming that the security appliance allows the inbound connection, as discussed in the "Monitoring Network Access Control" section earlier in this chapter.
A dynamic NAT is defined by using the nat and global commands. The following shows the complete command syntax of nat:
 nat (real_ifc) nat_id local_ip [mask [dns] [outside] [[tcp] tcp_max_conns

 [emb_limit] [norandomseq]]] [udp udp_max_conns]
The NAT statement identifies the host or subnet that needs to be translated to a global IP address. Most of the arguments defined in the nat statement are the same as those outlined in Table 5-12. The nat_id is a positive number between 1 and 65,535 that groups hosts and subnets together so that an address can be allocated from the respective global pool.
Note
Nat_id with a value of 0 (zero) has a special meaning, because it is used to bypass address translation. This option is discussed later in the chapter, in the "Bypassing Address Translation" section.
The outside keyword is used if you want to define an outside dynamic NAT policy to allocate addresses when packets traverse from a lower security interface to a higher security interface.
After defining a NAT entry, the next step is to bind it to a global statement by using the same nat_id. A global statement specifies a range of translated addresses that can be assigned to the hosts. The command syntax of the global command is
global (mapped_ifc) nat_id {global_ip [-global_ip] [netmask global_mask]}
In Example 5-36, an administrator wishes to dynamically assign global addresses from a pool of IP addresses ranging from 209.165.200.230 to 209.165.200.237 for an inside subnet of 192.168.10.96 with a subnet mask of 255.255.255.248. Because these entries are dynamically created, the security appliance assigns these addresses in round-robin fashion by assigning 209.165.200.230 from the pool first. A NAT statement identifies the inside subnet 192.168.10.96/29 as nat_id 1. This nat_id is then mapped to a global statement that translates the inside hosts on the outside interface as 209.165.200.230-237.
Example 5-36. Configuration of Dynamic NAT
Chicago(config)# nat (inside) 1 192.168.10.96 255.255.255.248

Chicago(config)# global (outside) 1 209.165.200.230-209.165.200.237
Note
When address translation is turned on, the security appliance does proxy ARP for the configured translated addresses. Proxy ARP is a process in which the security appliance answers ARP requests on behalf of other addresses.
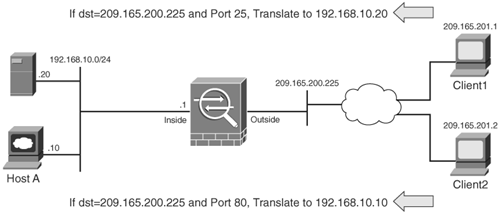
Static Port Address Translation
Static PAT, also known as port redirection, is useful when the security appliance needs to statically map multiple inside servers to one global IP address. Port redirection is applied on traffic when it passes through the security appliance from a lower security interface to a higher security interface. The outside hosts connect to the global IP address on a specific TCP or UDP port, which the security appliance redirects to the internal server, as shown in Figure 5-15. The security appliance redirects traffic destined for 209.165.200.225 on TCP port 80 to 192.168.10.10. Similarly, any traffic destined for 209.165.200.225 on TCP port 25 is redirected to 192.168.10.20.
Figure 5-15. Port Redirection
Port redirection is set up by using the static command (similar to static NAT) followed by the name of the Layer 4 protocol, as shown in the following command syntax:
static (real_ifc,mapped_ifc) {tcp | udp} {mapped_ip| interface} mapped_port {real_ip

 real_port [netmask mask]} [dns] [norandomseq] [[tcp] [max_conns [emb_lim]] [udp

 udp_max_conns]
The static command for port redirection uses most of the same arguments listed in Table 5-12. The tcp and udp keywords, after the real and mapped interface names, specify which protocol to consider for address translation. The security appliance allows the use of either a dedicated IP address or the global interface's IP address for port redirection.
When port redirection is set up to use the public interface's IP address, the security appliance uses the same address for:
- Address translation for the traffic traversing through the security appliance.
- Traffic destined for the security appliance.
Example 5-37 shows how to configure static PAT for an internal web server located at 192.168.10.10 and an e-mail server hosted at 192.168.10.20. The web and e-mail clients on the public network will connect to the server using the public IP address of the security appliance using the default web (TCP port 80) and SMTP (TCP port 25) ports.
Example 5-37. Configuration of Static PAT
Chicago(config)# static (inside,outside) tcp interface www 192.168.10.10 www netmask

 255.255.255.255

Chicago(config)# static (inside,outside) tcp interface smtp 192.168.10.20 smtp

 netmask 255.255.255.255
Note
If an inside host is configured for static PAT, then any packet sent from the host will also use the translated address. The security appliance creates a NAT and global entries for that host.
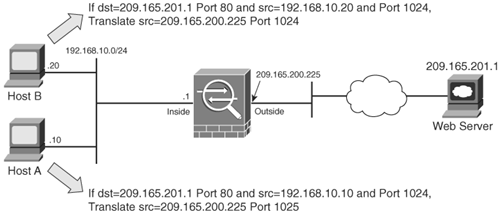
Dynamic Port Address Translation
Using dynamic PAT, the security appliance builds the address translation table by looking at the Layer 3 and Layer 4 header information. It is the most commonly deployed scenario because multiple inside machines can get outside connectivity using one global IP address. In dynamic PAT, the security appliance uses the source and destination IP addresses, the source and destination ports, and the IP protocol information (TCP or UDP) to translate an inside host.
Similar to setting up a static NAT entry, dynamic PAT also uses nat and global commands to configure address translation. You can choose to use either a dedicated global IP address or the public interface's IP address in this type. The complete command syntax for both commands follows:
 nat (real_ifc) nat_id local_ip [mask [dns] [outside] [[tcp] tcp_max_conns

 [emb_limit] [norandomseq]]] [udp udp_max_conns]


 global (mapped_ifc) nat_id global_ip| interface
Figure 5-16 illustrates a security appliance set up to translate the inside network, 192.168.10.0/24, by using the IP address on the outside interface, 209.165.200.225. The relevant configuration is shown in Example 5-38.
Figure 5-16. Dynamic PAT
Example 5-38. Configuration of Dynamic PAT
Chicago(config)# nat (inside) 1 192.168.10.0 255.255.255.0

Chicago(config)# global (outside) 1 interface

INFO: outside interface address added to PAT pool
Note
If both dynamic NAT and dynamic PAT are set up using the same nat_id, then the security appliance tries to allocate addresses from the pool of addresses first. When all the addresses have been allocated, the security appliance starts using dynamic PAT.
The security appliance supports up to 65,535 PAT translations using a single address. The PAT addresses time out every 30 seconds of inactivity to accommodate as many hosts as possible.
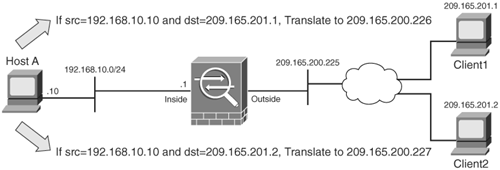
Policy NAT/PAT
Policy NAT/PAT translates the IP address of the packets passing through the security appliance only if those packets match the configured criterion or policy. The policy is defined by using ACLs. The ACL matches traffic against the source and the destination IP addresses. As illustrated in Figure 5-17, an administrator has defined a policy to translate the source IP address to 209.165.200.226 if the packets originate 192.168.10.10 and are destined for 209.165.201.1. Similarly, if the packets are sourced from 192.168.10.10 and destined for 209.165.201.2, the security appliance will change the source IP address to 209.165.200.227.
Figure 5-17. Policy-Based Network Address Translation
Policy NAT/PAT can be set up for static and dynamic address translations. An ACL identifies what traffic triggers the NAT or PAT engine for address translation. For static policy NAT/PAT, the security appliance uses the static command, as shown in the following syntax:
 static (real_ifc,mapped_ifc) {tcp | udp} {mapped_ip| interface} mapped_port

 {real_ip real_port [netmask mask]} | {access-list access_list_name} [dns]

 [norandomseq] [[tcp] [max_conns [emb_lim]] [udp udp_max_conns]
For dynamic policy NAT/PAT, the security appliance uses both nat and global statements. The complete command syntax for these commands follows:
 nat (real_ifc) nat_id access-list access_list_name [dns] [outside] [[tcp]

 tcp_max_conns [emb_limit] [norandomseq]]] [udp udp_max_conns]


 global (mapped_ifc) nat_id {global_ip[-global_ip] [netmask global_mask]} |

 interface
Example 5-39 shows the configuration of the network scenario depicted in Figure 5-17. The administrator creates two ACLs to identify the traffic coming from 192.168.10.10 and destined for 209.165.201.1 and 209.165.201.2. The ACLs are linked to the two nat statements that are bound to the two global commands.
Example 5-39. Configuration of Policy PAT
Chicago(config)# access-list policy_PAT1 permit ip host 192.168.10.10 host

 209.165.201.1

Chicago(config)# access-list policy_PAT2 permit ip host 192.168.10.10 host

 209.165.201.2

Chicago(config)# nat (inside) 1 access-list policy_PAT1

Chicago(config)# nat (inside) 2 access-list policy_PAT2

Chicago(config)# global (outside) 1 209.165.200.226

Chicago(config)# global (outside) 2 209.165.200.227
The security appliance can be very granular in translating source IP addresses even when static NAT needs to be defined. As shown in Example 5-40, an administrator allows the real source IP address (192.168.10.190) to be changed to 209.165.200.227 only if traffic is destined for 209.165.201.10. The same static entry will also change the destination address from 209.165.200.227 to 192.168.10.190 if traffic is sourced from host 209.165.201.10.
Example 5-40. Configuration of Static Policy NAT
Chicago(config)# access-list static_NAT extended permit ip host 192.168.10.190 host

 209.165.201.10

Chicago(config)# static (inside,outside) 209.165.200.227 access-list static_NAT
Note
If host-based static policy NAT entries are defined, the access list should contain only host-based source addresses to maintain the one-to-one mapping.
Bypassing Address Translation
Cisco ASA does not require an address translation policy to be created when the inside machines need to access the hosts on the outside network. This is a necessity of many firewalls, including the Cisco PIX Firewall running a pre-7.0 OS image. The security appliance translates the addresses if the packets match a NAT/PAT policy. If the packets do not match a policy, they are sent out without being translated. However, if an organizational security policy mandates that a translation policy should be defined before hosts can send traffic through Cisco ASA, you can enable the nat-control command. If implemented, any traffic trying to pass through the security appliance without address translation will be dropped.
Cisco ASA allows the traffic to pass through it without being translated even if the nat-control command is enabled. This way, if the security appliance is translating all traffic flowing through it and you do not want some hosts or networks to be translated, you can use the following methods to bypass address translation:
- Identity NAT
- NAT exemption
Identity NAT
Identity NAT bypasses address translation if traffic is initiated by a host or subnet address classified as the source. Consequently, an outside host cannot initiate traffic unless there is an entry in the translation table. Identity NAT is enabled by using the nat 0 command followed by the host or subnet address to be bypassed for address translation, as shown in Example 5-41. The security appliance will not translate the outbound connections from the inside host, 192.168.10.200.
Example 5-41. NAT Bypass Using Identity NAT
Chicago(config)# nat (inside) 0 192.168.10.200 255.255.255.255

 nat 0 192.168.10.200 will be identity translated for outbound
NAT Exemption
NAT exemption disables address translation for the traffic identified by the hosts in an ACL. NAT exemption allows both inside and outside hosts to initiate traffic without being translated into a different address. In Figure 5-18, a security appliance is translating the inside network to its outside interface using dynamic PAT. However, the administrator does not want to change the addresses when the two e-mail servers send packets to each other. To accomplish this, NAT exemption is deployed, which uses an ACL called Email_Servers to identify the two servers. The ACL is then linked to the nat 0 statement bound to the inside interface, as shown in Example 5-42.
Figure 5-18. NAT Exemption
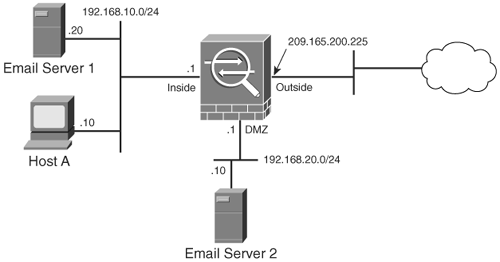
Example 5-42. NAT Bypass Using NAT Exemption
Chicago(config)# access-list Email_Servers permit ip host 192.168.10.20 host

 192.168.20.10

Chicago(config)# nat (inside) 0 access-list Email_Servers

Chicago(config)# nat (inside) 1 192.168.10.0 255.255.255.0

Chicago(config)# global (outside) 1 interface
The main difference between identity NAT and NAT exemption is that with identity NAT, the traffic must be sourced from the address specified with the nat 0 statement, whereas with NAT exemption, traffic can be initiated by the hosts on either side of the security appliance. NAT exemption is a preferred method to bypass traffic when it is flowing over a VPN tunnel. This will be discussed in Chapter 15, "Site-to-Site IPSec VPNs," and Chapter 16, "Remote Access VPNs."
Note
In NAT exemption, the ACL cannot contain TCP/UDP port numbers.
NAT Order of Operation
In many network scenarios, it is necessary to configure different types of address translation on a single security appliance. To adapt to those scenarios, the security appliance needs to prioritize certain NAT rules over others to make sure that it knows what to do if there is a conflict. You also need to understand this order, shown next, to ensure that rules are properly set up:
- NAT exemption When multiple NAT types/rules are set up, the security appliance tries to match traffic against the ACL in the NAT exemption rules. If there are overlapping entries in the ACL, the security appliance analyzes the ACEs until a match is found.
- Static NAT If there is no match found in the NAT exemption rules, the security appliance analyzes the static NAT entries in sequential order to determine a match.
- Static PAT If the security appliance does not find a match in NAT exemption or static NAT entries, it goes through the static PAT entries until it locates a match.
- Policy NAT/PAT The security appliance evaluates the policy NAT entries if it is still not able to find a match on the packet flow.
- Identity NAT The security appliance tries to find a match using the identity NAT statement, if one is set up to do so.
- Dynamic NAT If the security appliance fails to find a match using the first five rules, it checks to see if the packets need to be translated using dynamic NAT.
- Dynamic PAT The packets are checked against the dynamic PAT rules as the last resort, if all the previously mentioned rules fail.
If the security appliance does not find an exact match using all the rules and policies and if nat-control is enabled, it drops the packet and generates a syslog message indicating such an event has occurred.
Integrating ACLs and NAT
Cisco ASA integrates two core features, ACLs and NAT, to provide enhanced network security. In Figure 5-19, both features are implemented on a security appliance.
Figure 5-19. ACL and NAT
A host on the public network (209.165.201.1) sends a packet to an inside e-mail server. The security appliance handles the packet in the following sequence:
- The packet arrives at the outside interface of the security appliance with a source address of 209.165.201.1 and a destination address of 209.165.200.227. Cisco ASA checks the inbound ACL to make sure that it is allowed in.
- If the packet is permitted to pass through, the security appliance sends the packet to the NAT engine to determine if the addresses need to be translated. The destination address is changed to 192.168.10.20.
- The security appliance forwards the packet to the outbound ACL to determine if it is allowed to leave the security appliance.
- The e-mail server replies to Host A using a source IP address of 192.168.10.20.
- The packet is forwarded to the NAT engine, which changes the source IP address to 209.165.200.227.
- The security appliance sends the packet to Host A.
As depicted in Example 5-43, the e-mail server is being translated from 192.168.10.20 to 209.165.200.227 using static NAT. An ACL, named inbound_traffic_on_outside, allows any outside host to establish an SMTP connection to the e-mail server using the public IP address. The ACL is then applied to the outside interface to filter the inbound packets.
Example 5-43. Configuration of NAT and Interface ACLs
Chicago(config)# static (inside,outside) 209.165.200.227 192.168.10.20 netmask

 255.255.255.255

Chicago(config)# access-list inbound_traffic_on_outside extended permit tcp any

 host 209.165.200.227 eq smtp

Chicago(config)# access-group inbound_traffic_on_outside in interface outside
Note
Address translation is not supported in transparent mode. The nat and static commands are solely used to set embryonic and connection limits.
Part I: Product Overview
Introduction to Network Security
- Introduction to Network Security
- Firewall Technologies
- Intrusion Detection and Prevention Technologies
- Network-Based Attacks
- Virtual Private Networks
- Summary
Product History
- Product History
- Cisco Firewall Products
- Cisco IDS Products
- Cisco VPN Products
- Cisco ASA All-in-One Solution
- Summary
Hardware Overview
Part II: Firewall Solution
Initial Setup and System Maintenance
- Initial Setup and System Maintenance
- Accessing the Cisco ASA Appliances
- Managing Licenses
- Initial Setup
- IP Version 6
- Setting Up the System Clock
- Configuration Management
- Remote System Management
- System Maintenance
- System Monitoring
- Summary
Network Access Control
- Network Access Control
- Packet Filtering
- Advanced ACL Features
- Content and URL Filtering
- Deployment Scenarios Using ACLs
- Monitoring Network Access Control
- Understanding Address Translation
- DNS Doctoring
- Monitoring Address Translations
- Summary
IP Routing
Authentication, Authorization, and Accounting (AAA)
- Authentication, Authorization, and Accounting (AAA)
- AAA Protocols and Services Supported by Cisco ASA
- Defining an Authentication Server
- Configuring Authentication of Administrative Sessions
- Authenticating Firewall Sessions (Cut-Through Proxy Feature)
- Configuring Authorization
- Configuring Accounting
- Deployment Scenarios
- Troubleshooting AAA
- Summary
Application Inspection
- Application Inspection
- Enabling Application Inspection Using the Modular Policy Framework
- Selective Inspection
- Computer Telephony Interface Quick Buffer Encoding Inspection
- Domain Name System
- Extended Simple Mail Transfer Protocol
- File Transfer Protocol
- General Packet Radio Service Tunneling Protocol
- H.323
- HTTP
- ICMP
- ILS
- MGCP
- NetBIOS
- PPTP
- Sun RPC
- RSH
- RTSP
- SIP
- Skinny
- SNMP
- SQL*Net
- TFTP
- XDMCP
- Deployment Scenarios
- Summary
Security Contexts
- Security Contexts
- Architectural Overview
- Configuration of Security Contexts
- Deployment Scenarios
- Monitoring and Troubleshooting the Security Contexts
- Summary
Transparent Firewalls
- Transparent Firewalls
- Architectural Overview
- Transparent Firewalls and VPNs
- Configuration of Transparent Firewall
- Deployment Scenarios
- Monitoring and Troubleshooting the Transparent Firewall
- Summary
Failover and Redundancy
- Failover and Redundancy
- Architectural Overview
- Failover Configuration
- Deployment Scenarios
- Monitoring and Troubleshooting Failovers
- Summary
Quality of Service
- Quality of Service
- Architectural Overview
- Configuring Quality of Service
- QoS Deployment Scenarios
- Monitoring QoS
- Summary
Part III: Intrusion Prevention System (IPS) Solution
Intrusion Prevention System Integration
- Intrusion Prevention System Integration
- Adaptive Inspection Prevention Security Services Module Overview (AIP-SSM)
- Directing Traffic to the AIP-SSM
- AIP-SSM Module Software Recovery
- Additional IPS Features
- Summary
Configuring and Troubleshooting Cisco IPS Software via CLI
- Configuring and Troubleshooting Cisco IPS Software via CLI
- Cisco IPS Software Architecture
- Introduction to the CIPS 5.x Command-Line Interface
- User Administration
- AIP-SSM Maintenance
- Advanced Features and Configuration
- Summary
Part IV: Virtual Private Network (VPN) Solution
Site-to-Site IPSec VPNs
- Site-to-Site IPSec VPNs
- Preconfiguration Checklist
- Configuration Steps
- Advanced Features
- Optional Commands
- Deployment Scenarios
- Monitoring and Troubleshooting Site-to-Site IPSec VPNs
- Summary
Remote Access VPN
- Remote Access VPN
- Cisco IPSec Remote Access VPN Solution
- Advanced Cisco IPSec VPN Features
- Deployment Scenarios of Cisco IPSec VPN
- Monitoring and Troubleshooting Cisco Remote Access VPN
- Cisco WebVPN Solution
- Advanced WebVPN Features
- Deployment Scenarios of WebVPN
- Monitoring and Troubleshooting WebVPN
- Summary
Public Key Infrastructure (PKI)
- Public Key Infrastructure (PKI)
- Introduction to PKI
- Enrolling the Cisco ASA to a CA Using SCEP
- Manual (Cut-and-Paste) Enrollment
- Configuring CRL Options
- Configuring IPSec Site-to-Site Tunnels Using Certificates
- Configuring the Cisco ASA to Accept Remote-Access VPN Clients Using Certificates
- Troubleshooting PKI
- Summary
Part V: Adaptive Security Device Manager
Introduction to ASDM
- Introduction to ASDM
- Setting Up ASDM
- Initial Setup
- Functional Screens
- Interface Management
- System Clock
- Configuration Management
- Remote System Management
- System Maintenance
- System Monitoring
- Summary
Firewall Management Using ASDM
- Firewall Management Using ASDM
- Access Control Lists
- Address Translation
- Routing Protocols
- AAA
- Application Inspection
- Security Contexts
- Transparent Firewalls
- Failover
- QoS
- Summary
IPS Management Using ASDM
- IPS Management Using ASDM
- Accessing the IPS Device Management Console from ASDM
- Configuring Basic AIP-SSM Settings
- Advanced IPS Configuration and Monitoring Using ASDM
- Summary
VPN Management Using ASDM
- VPN Management Using ASDM
- Site-to-Site VPN Setup Using Preshared Keys
- Site-to-Site VPN Setup Using PKI
- Cisco Remote-Access IPSec VPN Setup
- WebVPN
- VPN Monitoring
- Summary
Case Studies
EAN: 2147483647
Pages: 231
