Configuring Basic AIP-SSM Settings
This section demonstrates how SecureMe's IPS administrator uses ASDM to configure basic settings on the AIP-SSM.
Licensing
When SecureMe's IPS administrator first launches ASDM, he discovers that the system does not have a valid license. To correct this problem, the administrator chooses Cisco Connection Online to obtain the license directly from Cisco.com, as shown in Figure 20-4.
Figure 20-4. Licensing
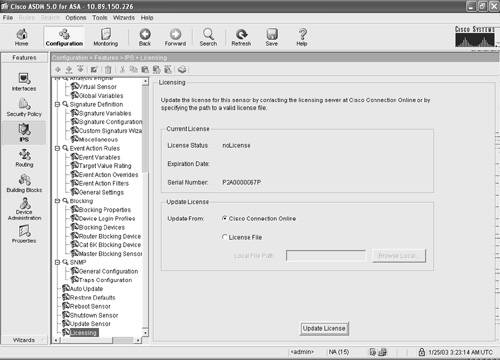
ASDM sends the serial number to Cisco over an HTTP connection to obtain the license key. The license key is displayed after it is retrieved.
Optionally, the IPS administrator can also upload the license information from a file stored on his local workstation.
Verifying Network Settings
The IPS administrator is informed that a new router is installed in the management subnet. The AIP-SSM gateway information needs to be updated with the router's IP address (10.89.149.254). Figure 20-5 shows how to add the new IP address under the ASDM network settings.
Figure 20-5. AIP-SSM Network Settings
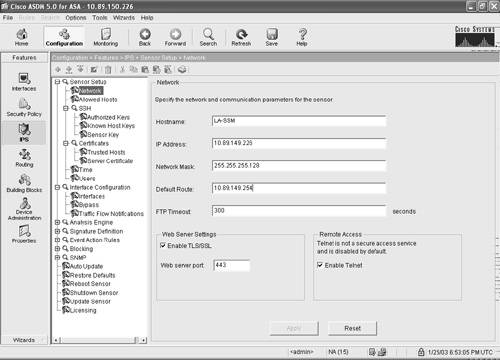
The administrator notices that Telnet access is enabled on the AIP-SSM. He proceeds and disables it, because SSH and ASDM access is only required by SecureMe's security policy. Under the network settings, you can modify any of the following options:
- Host name of the AIP-SSM.
- IP address of the management interface on the AIP-SSM (the default IP address is 10.1.9.201).
- Network mask.
- Default gateway address (the default is 10.1.9.1).
- The FTP timeout when an FTP client communicates with the AIP-SSM (default is 300 seconds).
- The AIP-SSM web server security level and port. It is strongly recommended that you enable TLS/SSL.
- Whether Telnet access is enabled or disabled. It is not enabled by default, because it is not a secure method.
Adding Allowed Hosts
The IPS administrator wants to connect to the IPS from his home workstation when connecting using the Cisco VPN client. He connects to a cluster of Cisco ASA appliances in Chicago to gain access to the private networks. These appliances are configured to always assign his VPN client a static IP address (192.168.75.34). Consequently, he adds this IP address in the Allowed Hosts section on ASDM, as shown in Figure 20-6.
Figure 20-6. Allowed Hosts Section

After navigating to the Allowed Hosts option under the Sensor Setup section, the IPS administrator clicks Add and adds the 192.168.75.34 IP address with a 32-bit subnet mask (255.255.255.255).
Configuring NTP
It is recommended that you use an NTP server as the AIP-SSM time source. The IPS administrator in Los Angeles installed a new NTP server (10.89.149.207) on the management network. He configures the NTP server parameters by choosing Configuration > Features > IPS > Sensor Setup > Time, as shown in Figure 20-7.
Figure 20-7. NTP Configuration
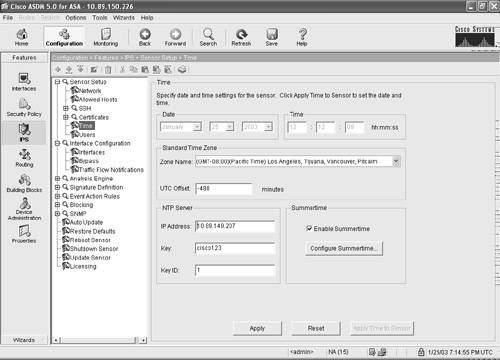
The IPS administrator adds the IP address of the NTP server (10.89.149.207). He also enters the NTP MD5 key (cisco123) and key ID (1) for NTP authentication. The NTP server uses the associated key when transferring data to the AIP-SSM.
Adding Users
Four different types of users can be configured in the AIP-SSM:
- Viewers
- Operators
- Administrators
- Service
Note
The definition of each account type is discussed in Chapter 14.
In the following scenario, the IPS administrator needs to create the service account to be able to enter into the AIP-SSM service mode.
Note
The service user cannot log in to ASDM. This user is only used to log in to the AIP-SSM service mode (bash shell) for administrative purposes. The service account should only be used for troubleshooting purposes with the assistance of the Cisco Technical Assistance Center (TAC).
The service account is added as illustrated in Figure 20-8.
Figure 20-8. Adding Users
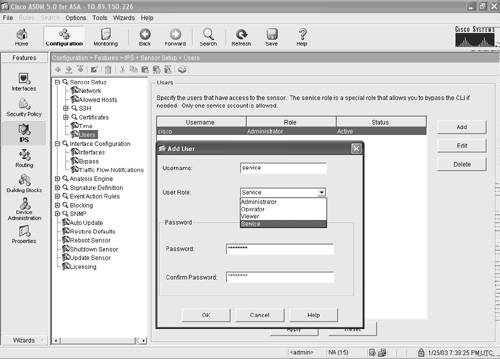
The security administrator navigates to Configuration > Features > IPS > Sensor Setup > Users and clicks the Add button. He enters service as the username and selects Service from the User Role drop-down menu. The corresponding password is also entered and confirmed, as shown in Figure 20-8.
Part I: Product Overview
Introduction to Network Security
- Introduction to Network Security
- Firewall Technologies
- Intrusion Detection and Prevention Technologies
- Network-Based Attacks
- Virtual Private Networks
- Summary
Product History
- Product History
- Cisco Firewall Products
- Cisco IDS Products
- Cisco VPN Products
- Cisco ASA All-in-One Solution
- Summary
Hardware Overview
Part II: Firewall Solution
Initial Setup and System Maintenance
- Initial Setup and System Maintenance
- Accessing the Cisco ASA Appliances
- Managing Licenses
- Initial Setup
- IP Version 6
- Setting Up the System Clock
- Configuration Management
- Remote System Management
- System Maintenance
- System Monitoring
- Summary
Network Access Control
- Network Access Control
- Packet Filtering
- Advanced ACL Features
- Content and URL Filtering
- Deployment Scenarios Using ACLs
- Monitoring Network Access Control
- Understanding Address Translation
- DNS Doctoring
- Monitoring Address Translations
- Summary
IP Routing
Authentication, Authorization, and Accounting (AAA)
- Authentication, Authorization, and Accounting (AAA)
- AAA Protocols and Services Supported by Cisco ASA
- Defining an Authentication Server
- Configuring Authentication of Administrative Sessions
- Authenticating Firewall Sessions (Cut-Through Proxy Feature)
- Configuring Authorization
- Configuring Accounting
- Deployment Scenarios
- Troubleshooting AAA
- Summary
Application Inspection
- Application Inspection
- Enabling Application Inspection Using the Modular Policy Framework
- Selective Inspection
- Computer Telephony Interface Quick Buffer Encoding Inspection
- Domain Name System
- Extended Simple Mail Transfer Protocol
- File Transfer Protocol
- General Packet Radio Service Tunneling Protocol
- H.323
- HTTP
- ICMP
- ILS
- MGCP
- NetBIOS
- PPTP
- Sun RPC
- RSH
- RTSP
- SIP
- Skinny
- SNMP
- SQL*Net
- TFTP
- XDMCP
- Deployment Scenarios
- Summary
Security Contexts
- Security Contexts
- Architectural Overview
- Configuration of Security Contexts
- Deployment Scenarios
- Monitoring and Troubleshooting the Security Contexts
- Summary
Transparent Firewalls
- Transparent Firewalls
- Architectural Overview
- Transparent Firewalls and VPNs
- Configuration of Transparent Firewall
- Deployment Scenarios
- Monitoring and Troubleshooting the Transparent Firewall
- Summary
Failover and Redundancy
- Failover and Redundancy
- Architectural Overview
- Failover Configuration
- Deployment Scenarios
- Monitoring and Troubleshooting Failovers
- Summary
Quality of Service
- Quality of Service
- Architectural Overview
- Configuring Quality of Service
- QoS Deployment Scenarios
- Monitoring QoS
- Summary
Part III: Intrusion Prevention System (IPS) Solution
Intrusion Prevention System Integration
- Intrusion Prevention System Integration
- Adaptive Inspection Prevention Security Services Module Overview (AIP-SSM)
- Directing Traffic to the AIP-SSM
- AIP-SSM Module Software Recovery
- Additional IPS Features
- Summary
Configuring and Troubleshooting Cisco IPS Software via CLI
- Configuring and Troubleshooting Cisco IPS Software via CLI
- Cisco IPS Software Architecture
- Introduction to the CIPS 5.x Command-Line Interface
- User Administration
- AIP-SSM Maintenance
- Advanced Features and Configuration
- Summary
Part IV: Virtual Private Network (VPN) Solution
Site-to-Site IPSec VPNs
- Site-to-Site IPSec VPNs
- Preconfiguration Checklist
- Configuration Steps
- Advanced Features
- Optional Commands
- Deployment Scenarios
- Monitoring and Troubleshooting Site-to-Site IPSec VPNs
- Summary
Remote Access VPN
- Remote Access VPN
- Cisco IPSec Remote Access VPN Solution
- Advanced Cisco IPSec VPN Features
- Deployment Scenarios of Cisco IPSec VPN
- Monitoring and Troubleshooting Cisco Remote Access VPN
- Cisco WebVPN Solution
- Advanced WebVPN Features
- Deployment Scenarios of WebVPN
- Monitoring and Troubleshooting WebVPN
- Summary
Public Key Infrastructure (PKI)
- Public Key Infrastructure (PKI)
- Introduction to PKI
- Enrolling the Cisco ASA to a CA Using SCEP
- Manual (Cut-and-Paste) Enrollment
- Configuring CRL Options
- Configuring IPSec Site-to-Site Tunnels Using Certificates
- Configuring the Cisco ASA to Accept Remote-Access VPN Clients Using Certificates
- Troubleshooting PKI
- Summary
Part V: Adaptive Security Device Manager
Introduction to ASDM
- Introduction to ASDM
- Setting Up ASDM
- Initial Setup
- Functional Screens
- Interface Management
- System Clock
- Configuration Management
- Remote System Management
- System Maintenance
- System Monitoring
- Summary
Firewall Management Using ASDM
- Firewall Management Using ASDM
- Access Control Lists
- Address Translation
- Routing Protocols
- AAA
- Application Inspection
- Security Contexts
- Transparent Firewalls
- Failover
- QoS
- Summary
IPS Management Using ASDM
- IPS Management Using ASDM
- Accessing the IPS Device Management Console from ASDM
- Configuring Basic AIP-SSM Settings
- Advanced IPS Configuration and Monitoring Using ASDM
- Summary
VPN Management Using ASDM
- VPN Management Using ASDM
- Site-to-Site VPN Setup Using Preshared Keys
- Site-to-Site VPN Setup Using PKI
- Cisco Remote-Access IPSec VPN Setup
- WebVPN
- VPN Monitoring
- Summary
Case Studies
EAN: 2147483647
Pages: 231
