Working with the .NET Framework
The .NET Framework contains an enormous set of prebuilt classes in its Base Class Library. These classes expose a wide range of functionality from user-interface components to server memory management. This chapter explores many Framework features you can use to make your applications more powerful and flexible, such as HTTP communication, regular expressions, reflection, and Microsoft Message Queue.
Application #66 Build a Custom Collection Class
This topic shows how to create custom collection classes by inheriting from System.Collections.CollectionBase. While the .NET Framework has many general-purpose collection classes, they are not type-safe because they are designed to contain objects of any type. If you want a collection that contains only objects of a specific type, you need to create a custom collection.
Building Upon…
Application #7: Object-Oriented Features
Application #8: Scoping, Overloading, Overriding
New Concepts
The first step in designing a custom collection is to identify which framework collection class is most suitable to serve as your custom collection’s base class. Each collection type maintains at least one internal list in which it stores the items added to it. The collections differ in the methods they expose for retrieving, adding, and deleting items from the list. For example, the Microsoft.VisualBasic.Collection class is intended to duplicate the behavior of the Collection object found in Visual Basic 6. As such, it’s limited to simple methods for adding an item with or without an associated key and for retrieving items by index or by key. It doesn’t contain any methods for searching for a particular item in the list. On the other hand, the System.Collections.Hashtable class requires that items be added with a key, does not support retrieval by index, and has methods for searching.
Once you’ve identified the framework collection class to serve as your base, you can begin creating your custom collection class. First, define a new class that inherits from your chosen framework collection class. Next, override all members of the base class that have a parameter or return value of the object type. Make sure the parameters and return values of your overrides use your custom type. For example, if you want to create a collection for storing Widget objects and your base class exposes an Insert(item as Object) method, you should override it with an Insert(item as Widget) method. This ensures that only Widgets can be inserted into the collection. Very often, the override can simply call the corresponding method in the base class.
System.Collections.CollectionBase
If you want to create your own collection class completely from scratch, you can start with the CollectionBase class. This is an abstract class that contains a protected ArrayList for storing members named InnerList, a Count property, and a RemoveAt method. It has no other methods, so you are free to implement whatever functionality you need. At a minimum, you’ll want to implement methods for adding, retrieving, and removing items from the collection.
Code Walkthrough
The sample application demonstrates how to create a type-safe collection named Customers that stores instances of a Customer class. The Customer class is a simple class with four properties: three that expose private fields and a fourth, DisplayData, that returns a string containing all the customer data.
PublicReadOnlyPropertyDisplayData()AsString
Get
ReturnMe.custAccount&":"&Me.FirstName&""&Me.LastN ame
EndGet
EndProperty
Creating a Type-Safe Collection
The Customers class is our type-safe collection and inherits from the CollectionBase class.
PublicClassCustomers
InheritsSystem.Collections.CollectionBase
An internal ArrayList is available through the InnerList property. You have to implement some methods to allow Customer objects to be added to it. The first is an Add method that accepts an instance of the Customer class. This method simply wraps a call to the Add method of the InnerList.
PublicOverloadsFunctionAdd(ByValValueAsCustomer)AsCustomer
Me.InnerList.Add(Value)
ReturnValue
EndFunction
It’s entirely up to you to decide how flexible your collection class should be. To make this class even easier to use, a second Add method accepts strings for the customer’s first name, last name, and account number. This method creates an instance of the Customer class and populates it with the passed-in values. Finally, the new Customer object is returned from the method.
PublicOverloadsFunctionAdd(ByValFirstNameAsString,_
ByValLastNameAsString,_
ByValAccountNumAsString)AsCustomer


DimcustAsNewCustomer()
cust.FirstName=FirstName
cust.LastName=LastName
cust.AccountNumber=AccountNum
Me.InnerList.Add(cust)
Returncust
EndFunction
Now that Customer objects can be added to the list, we need to expose methods for retrieving them. Two Item methods are defined. One accepts an Integer to allow lookup by index position. This method wraps a call to the Item method of the InnerList and casts the return value to a Customer object.
PublicOverloadsFunctionItem(ByValIndexAsInteger)AsCustomer
ReturnCType(Me.InnerList.Item(Index),Customer)
EndFunction
The second Item method takes a Customer object as a parameter and performs a lookup using the IndexOf method of the InnerList. This method checks the list to see whether the passed-in Customer exists and, if it does, retrieves and returns it. An exception will be thrown if the passed-in Customer is not in the list.
PublicOverloadsFunctionItem(ByValcustAsCustomer)AsCustomer
DimmyIndexAsInteger
myIndex=Me.InnerList.IndexOf(cust)
ReturnCType(Me.InnerList.Item(myIndex),Customer)
EndFunction
Finally, you need methods to remove Customer objects. The Customers collection inherits the RemoveAt method from CollectionBase. No override for this method is necessary, as it is already type-safe, accepting just an Integer as a parameter. However, an additional Remove method that accepts a Customer object and removes it from the InnerList has been added for additional functionality.
PublicOverloadsSubRemove(ByValcustAsCustomer)
Me.InnerList.Remove(cust)
EndSub
You now have a type-safe collection class that exposes methods that deal only with Customer objects. Figure 8-1 shows the final list of members for the class.
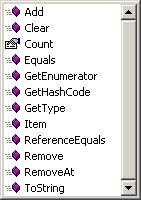
Figure 8-1: Customer Members.
Manipulating a Collection
The frmMain form uses an instance of the Customers class named myCustomers. The Form_Load event adds Customer objects to the myCustomer collection. After adding each item, it also adds the returned Customer object to the lstItems list box.
lstItems.DisplayMember="DisplayData"
cust=myCustomers.Add("Tom","Slick","1234567890")
listNumber=lstItems.Items.Add(cust)
Notice also that the return value is not cast from the call to the Add method. This is because the casting is done inside the collection. This results in simplifying the code needed to modify and access the items in the collection.
Conclusion
You can see that creating a basic type-safe collection is mostly a matter of wrapping the methods of the InnerList member of CollectionBase with your own custom members. However, more powerful custom collections can be created by inheriting from other classes in System.Collections and overriding their members. You can focus your base-class selection by examining what the primary feature set your custom class requires. Common behaviors to consider include the ability to associate a key with each value, choose whether the items are stored in a sorted order or in an add order, and specify what size list the class is optimized for.
Application #67 Understand the Garbage Collector
This topic explores an aspect of the .NET Framework’s memory management system known as the Garbage Collector (GC). You’ll see how the GC reclaims memory from your application and how you can make your applications more memory efficient by creating GC-aware classes and by interacting directly with the GC.
New Concepts
Unlike some other runtime environments, memory management for managed code is nondeterministic. This means that although your code can indicate when it is finished using an object by setting a reference to Nothing, it can not explicitly remove that object from memory. The common language runtime (CLR) is responsible for determining when to actually remove the object from memory. The part of the CLR that handles this is known as the Garbage Collector.
The Garbage Collector
The CLR asks the Garbage Collector to reclaim memory by collecting any unused objects when it needs memory. An unused object is one that cannot be reached by following references from the application. You should set your references to Nothing as soon as you are done with them to ensure your objects are eligible for collection as soon as possible.
Finalization
A memory-savvy application should also make sure each object is capable of cleaning up any resources it might acquire during its lifetime. In general, resources should be released as soon as possible, often in the same method call that acquired them. Sometimes though, an object might need to acquire a resource when it’s created and might not want to release the resource until it’s being destroyed. The simplest way to do this is to implement a finalizer by overriding the Finalize method. The Finalize method is a special-case procedure that, if implemented, is automatically called by the GC just before the object is destroyed. This provides a very convenient place to put clean-up code to perform tasks such as destroying database connections and file handles.
The benefit of a finalizer is that it’s guaranteed to run; however, a major drawback is that you don’t know when it will run. You could destroy a reference to an object, but the GC might not collect the object for many minutes, depending on the memory requirements of the system. In this scenario, your object is still holding on to its resources even though your application is not using them. Another problem with finalizers is that they slow down the garbage-collection process, which can have a significant impact on applicationwide performance. To resolve these problems, you should also implement an explicit way for an application to tell your object to clean up its resources.
Disposing of an Object
The act of cleaning up resources an object is using is referred to as disposing of the object. It’s such a common task that the .NET Framework has an interface named IDisposable for objects to implement. The IDisposable interface defines a single method named Dispose. You might have seen this method implemented on some common Framework types, such as the Form and DataSet. The Dispose method is generally implemented so that if it’s called on an object, it will clean up that object’s resources and might even call Dispose on any child objects that are disposable.
If you implement IDisposable, you need to take one other issue into account. Imagine that you call Dispose on an object and then destroy your reference to it. A little while later, the GC calls Finalize on that object and tries to clean up its resources again. This is likely to cause errors and is completely unnecessary, as the object already cleaned itself up when it was disposed of. To avoid this situation, you need to tell the GC not to call Finalize when it collects the object. You can do this by calling the SuppressFinalize method of the GC class in your Dispose method. By implementing the Finalize and Dispose methods correctly, you’ll have a class that can be explicitly instructed to release its resources by a client or automatically by the GC.
Manipulation of the Garbage Collector
As indicated in the last section, even though the GC operates in the background and can pretty much be left to run on its own, you’ll want to manipulate it directly in some cases. For example, suppose you’re finished with a very large object and want to immediately reclaim the memory that object was using rather than waiting for the GC collection. You can force the GC to collect the object by calling the Collect method. This method will cause the GC to collect any unreferenced objects and call their finalizers. Keep in mind that the memory used by these objects will not be released until after the finalizers have finished.
Taking the last example a bit further, suppose you plan to immediately load another large object after calling GC.Collect. You might want to wait until all the finalizers have finished just to be sure that enough memory will be available for the new object. This can be done by calling the GC WaitForPendingFinalizers method, which will block client processing until all finalizers have finished.
Code Walkthrough
The sample application works with a class named GcTest to demonstrate the relationship between disposing, finalizing, and the GC. In addition, various methods of the GC are used to show how to force a collection. First we’ll look at the clean-up functionality of the GcTest class.
| Note |
The GcTest class is a recursive class, meaning it contains a child that is also an instance of GcTest. Many methods in the class used to populate the object hierarchy and raise events back up to the form are beyond the scope of this discussion. |
Finalizing a Class
The GcTest class has overridden the Finalize method and implements a call to the CleanUp method. The CleanUp method is where the real work of releasing resources occurs. This work is contained in its own procedure, so it can be called by both the finalizer and the Dispose method. In this application, the CleanUp method just sends a message indicating that it was called. Most methods in GcTest also raise the ObjectGcInfo event, which is used by the application to send messages up to the form.
ProtectedOverridesSubFinalize()
CleanUp()
RaiseEventObjectGcInfo(m_Name+"Finalized")
EndSub
To test the finalizer, run the application and click the Create Objects button. This generates a hierarchy of GcTest objects and displays their names in the list box. A reference to the topmost GcTest object is stored in the m_TestObject variable.
m_TestObject=NewGcTest("TestObject",OBJECT_DEPTH)
Now select the first item in the list box, and click the Kill Selected Object button. This will set the form’s m_TestObject variable to Nothing, making it available for garbage collection.
m_TestObject=Nothing
Finally, click the Run GC button. The btnRunGC Click event forces the Garbage Collector to collect any unreachable objects.
GC.Collect()
GC.WaitForPendingFinalizers()
Remember that even though the objects in the hierarchy contain references to each other, none of them are reachable because we destroyed the reference to the topmost object. The activity log should show that the finalizer on each object was called, an action which in turn resulted in each object’s CleanUp method being called. Figure 8-2 shows the application’s Activity Log display after running the Garbage Collector.
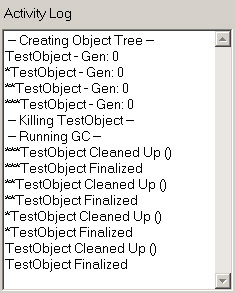
Figure 8-2: Activity Log.
Disposing of a Class
The GcTest class has also been designed to allow for explicit cleanup by implementing the IDisposable.Dispose method. The Dispose method first prevents the GC from calling the finalizer by calling GC.SuppressFinalize and passing in a reference to itself. Then Dispose is called on its child if it has one. Finally, the CleanUp method is called.
ImplementsIDisposable
SubDispose()ImplementsIDisposable.Dispose
GC.SuppressFinalize(Me)
IfNotm_ChildIsNothingThen
m_Child.Dispose()
m_Child=Nothing
EndIf
CleanUp()
RaiseEventObjectGcInfo(m_Name+"Disposed()")
EndSub
Test the dispose functionality by running the application and creating the objects. Then select the first item in the list box, and click the Dispose Selected Object button. The btnDisposeObject Click event is almost identical to the btnKillObject Click event except that it calls Dispose on the selected object before destroying the reference to it.
m_TestObject.Dispose()
m_TestObject=Nothing
Notice in the activity log that each object was cleaned up. Now click the Run GC button, and you’ll see that no finalizers are called as a part of garbage collection. Figure 8-3 shows the Activity Log output.
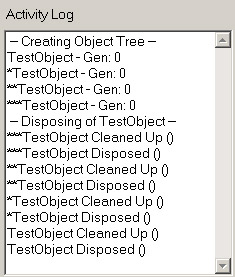
Figure 8-3: Activity Log output.
You can continue to experiment with the application by killing and disposing of objects further down in the hierarchy.
Conclusion
You’ve now seen how to create a class that can interact with the Garbage Collector and can reliably release its resources. When designing and using your classes, keep in mind that while finalizers are a convenient construct, explicitly calling Dispose will almost always result in a higher level of performance for your system.
Application #68 Partition an Application
This topic discusses the benefits of and steps involved in partitioning an application into multiple components. Learning how to separate application logic into components is very useful for stand-alone application developers, and it’s the first step to creating distributed enterprise applications. The sample application compares various ways of partitioning your logic and examines the development trade-offs of each.
Building Upon…
Application #33: Format a DataGrid
Application #73: Read From and Write To a Text File
New Concepts
Partitioning an application basically means dividing your code into separate projects based on the type of work the code performs. Each project generates an application component when compiled. Up to now, you’ve been creating single-component applications, which consist of just an .exe file. This might be adequate for simple applications written by a single developer, but for larger applications or projects involving multiple developers, partitioning is often a necessity.
A partitioned application is one that contains two or more components. For a WinForms application, there is a primary component: the application .exe, which uses any number of supporting code libraries, or DLLs. The first step in partitioning an application is determining how many components are appropriate for your application and what code should go in each. One of the most common ways to take advantage of partitioning, even in a simple application, is to separate all code related to data access into a separate code library, often referred to as a data-access layer.
Partitioning is extremely valuable because it offers various benefits throughout an application’s lifetime. These benefits can make development, deployment, and maintenance of an application easier and more flexible. Let’s take a minute to look at some of these benefits in detail.
Code Reuse
This is perhaps the most common reason for initially partitioning your applications. Just as functions allow you to reuse code within a single application, partitioning allows you to share code between multiple applications. When you put code into a code library separate from your application’s .exe, it gets compiled into a separate DLL. Because it’s a separate file, you can reference it and use it in any number of other applications.
For example, imagine you have to build a WinForms application and an ASP.NET application that manipulate the same database. If you don’t use partitioning, you’ll have to duplicate all the code that reads from and writes to the database in both applications. However, if you were to put all the data-access code into its own code library, you could write the library once and use it in both applications. This results in reduced development time for the second application and less code to maintain. Also, the code in both applications is simpler because all the complex data- access code is encapsulated in the component.
Code Maintenance
In addition to there being less code to maintain, the resulting code is also generally easier to maintain. This is because the complex task an application performs is divided into discrete substeps that can be quickly located and changed. For example, if you need to update some code in response to database schema changes, you can more quickly locate the appropriate code because you know you only have to look in the data component. Or if you need to change the way a piece of data is formatted on- screen or a control used for user input, you can limit your search to just the UI component. Without partitioning, all your code exists in one project, making it harder to locate any single piece of code.
Partitioning Steps
Ideally, partitioning should become an implicit part of designing an application. Remember that a partitioned design can greatly increase your ability to meet future requirements even when the current specifications might not necessitate multiple components. The steps involved in partitioning an application include:
- Identify your application components. For example:
- Primary UI component
- Supporting user-interface component
- Business rules component
- Data-access component
- Implement each component in a separate project.
- Windows Application for the primary UI component
- Windows Control for the supporting UI component
- Class library for the business rules and data-access component
- Add references between each project and its dependent projects.
- Implement code in the primary project to use the partitioned classes and controls.
Code Walkthrough
The sample application contains a tab control with three tabs labeled Form, Component, and User Control. Each tab contains a button labeled Get Customers, which performs the same set of tasks. The tasks are:
- Load and parse data from a comma-separated values text file, Customers.csv
- Add the data to a DataTable
- Display the results in a DataGrid by binding to the DataTable
The three tabs vary in the way their code is separated into components. The Form tab uses no components. The Component tab uses a component named DataAccessComponent. And the User Control tab uses a component named CSVControls, which in turn uses the DataAccessComponent. Let’s first look at the nonpartitioned version.
No Partitioning
The code used by the Form tab is contained completely inside the Click event of the btnLoadDataGridForm button. This procedure begins by defining the variables needed for reading the text file. The StreamReader provides read access to the .csv file, and the strLine and strColumns variables are used during the parsing of the file.
DimobjStreamReaderAsStreamReader=_
NewStreamReader(strCustomersFile)
DimstrLineAsString
DimstrColumns()AsString
Next, the DataTable is defined and columns for the pieces of data in the .csv file are added to it:
DimdtCustomersAsNewDataTable()
DimdrCustomerAsDataRow
dtCustomers.Columns.Add("CustomerID")
dtCustomers.Columns.Add("CompanyName")
dtCustomers.Columns.Add("ContactName")
dtCustomers.Columns.Add("Phone")
Once the DataTable is defined, the contents of the .csv file are read line by line. Each line is parsed into a string array named strColumns and added to the DataTable. This process continues until there are no more lines in the text file.
strLine=objStreamReader.ReadLine
DoWhile(NotstrLineIsNothing)
drCustomer=dtCustomers.NewRow
strColumns=Split(strLine,",")
drCustomer.ItemArray=strColumns
dtCustomers.Rows.Add(drCustomer)
strLine=objStreamReader.ReadLine
Loop
Finally, the data is displayed by binding the DataTable to the DataGrid named grdCustomersForm.
grdCustomersForm.SetDataBinding(dtCustomers,"")
This code, while functionally sufficient, is not at all reusable. In particular, you can imagine that you might need to load customer data from a .csv file into a DataTable in many applications. Unfortunately, with this code, the best you could do would be to copy and paste it into the new application.
| Important |
Copying and pasting large amounts of code between applications is one of the biggest indicators that you should consider partitioning that logic into a separate component. |
Data-Access Partition
To make the .csv parsing code reusable, it needs to be placed in a separate component. You can see that there is another project in the solution named DataAccessComponent. This project was created by adding a new Class Library project. In the project is a CustomersDB class. This class contains a method named GetCustomers, which loads the .csv file data into a DataTable and returns the DataTable. The rest of the code is virtually identical to the code presented in the previous section.
PublicFunctionGetCustomers()AsDataTable
ReturndtCustomers
EndFunction
Also, to make this component more flexible, a string property named FileName has been added so that you can pass in the location of the .csv file just before calling GetCustomers.
Protectedm_FileNameAsString
PublicPropertyFileName()AsString
Get
Returnm_FileName
EndGet
Set(ByValValueAsString)
m_FileName=Value
EndSet
EndProperty
To use this component, a reference has to be made between the Partition An Application project and the DataAccessComponent project. Figure 8-4 shows the reference to the DataAccessComponent.
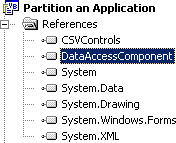
Figure 8-4: Reference to the DataAccessComponent assembly.
Now that the component has been implemented and a reference has been set, we can use the functionality provided by the component. The Click event for the bnLoadDataGridComponent button contains the code that uses the component to retrieve the data. First a DataTable to store the returned data and an instance of the CustomersDB class are instantiated.
DimdtCustomersAsDataTable
DimoBusinessAsDataAccessComponent.CustomersDB=_
NewDataAccessComponent.CustomersDB()
To retrieve data, the component user simply has to set the FileName property, call GetCustomers, and bind the DataTable to the DataGrid.
oBusiness.FileName=strCustomersFile
dtCustomers=oBusiness.GetCustomers()
grdCustomersComponent.SetDataBinding(dtCustomers,"")
You can see that partitioning your application does not mean you have to write a lot more code. In fact, in the long run you end up writing much less code. After compiling, you could now use this CustomersDB class from any application.
The User Interface and the Data-Access Partition
Partitioning the data-access code for your application is a great start, but you might also have reason to create reusable interface components. The third tab, User Control, uses a custom user control named grdCustomersUserControl. This control is an instance of the CustomerGrid defined in the CSVControls project. This user control exposes a BindCustomers method, which uses the DataAccessComponent to get a DataTable and binds the DataTable to the dgData constituent DataGrid.
SubBindCustomers()
DimdtCustomersAsDataTable
DimoBusinessAsDataAccessComponent.CustomersDB=_
NewDataAccessComponent.CustomersDB()
oBusiness.FileName=m_FileName
dtCustomers=oBusiness.GetCustomers
dgData.SetDataBinding(dtCustomers,"")
EndSub
With this code, the CustomerGrid control is a fully self-contained UI component that can load and display customer data. Any WinForms application can now use it by simply setting a reference to the DLL and implementing two lines of code. The Partition An Application project has a reference to the CSVControls project, and the Click event of the bnLoadUserControl button implements the code to use the custom control.
grdCustomersUserControl.FileName=strCustomersFile
grdCustomersUserControl.BindCustomers()
Conclusion
Partitioning is an easy way to make your code more reusable, manageable, and distributable. The majority of the work involved consists of identifying what portions of your application should be partitioned and being diligent in implementing the correct code in the correct partition. Once you are comfortable encapsulating your data- access code in a separate component, you might consider taking the next step by separating your business rules into yet another component.
Application #69 Send and Receive Data
This topic explores how to send and receive text and binary data over HTTP. Although the .NET Framework and Microsoft Visual Studio .NET provide first-class support for Web services, there might be cases where you want to use Internet resources that are not Web services. For example, if you’re creating a .NET application that needs to make calls to classic ASP pages, you can’t use the Web services functionality. You’ll need to know how to manually issue an HTTP request and process the response.
Building Upon…
Application #73: Read From and Write To a Text File
New Concepts
For any interaction with an HTTP server, you must be able to populate a request with data to send to the server and read the data returned by the server. You can use the WebRequest and WebResponse classes in conjuction with the StreamReader and StreamWriter classes to perform these tasks.
Working with WebRequest and WebResponse Classes
The WebRequest and WebResponse classes are located in the System.Net namespace and provide client-side Internet functionality. You can use the WebRequest object to make requests to Internet resources. The benefit of these classes is that they hide all the complex details of the underlying protocols. So you can make a request to a Web page without having to know the inner workings of HTTP. In fact, you can make a call to a Web page in as little as three steps:
- Create the WebRequest instance, and set its URL.
- Set the request method to GET or POST.
- Issue the request.
The WebRequest object handles the work of making the HTTP connection to the server and sending the request message. The response sent back by the server is provided to you as an instance of the WebResponse class. In many cases, you’ll need to pass data to the server and read the response sent back. The WebRequest and WebResponse classes each expose a Stream object to allow you to populate the request and consume the response.
Working with Streams
The .NET Framework uses the System.IO.Stream class as a base for many data transfer needs. If you need to work with the file system, an external device, or Internet resources, you’ll use some implementation of the Stream class to transfer your data. The fundamentals of working with streams involve creating the stream and using the Read and Write methods. The Read and Write methods provide byte-level access to the underlying data. Both methods provide parameters you can use to determine how much data to work with at a time. This flexibility allows you to work with large amounts of data in more manageable chunks. Each implementation of the Stream class reads and writes its data from different locations. For example, the FileStream exposes data in a file, the MemoryStream allows you to read and write from a memory buffer, and the streams exposed by WebRequest and WebResponse read from and write to the Internet. The sample application demonstrates many ways of using the various types of streams.
Code Walkthrough
The sample application contains four buttons that examine various ways of exchanging data with a Web site. The top three buttons send files to and retrieve files from the Web site, while the bottom button sends the text entered into the TextBox to the server. The Web site consists of four ASPX pages that provide the server-side functionality for the application. You must expose these files through a virtual directory before you can run the sample application.
| Note |
While this application uses ASP.NET pages hosted in Internet Information Services (IIS), the mechanisms described in this walkthrough will work with any HTTP server technology. |
Creating Virtual Directories
Creating a virtual directory allows you to expose a file system directory as a Web resource. For this application, we need to create a virtual directory on the local machine named VDir1 that points to the VDir1 file system directory. Implement the following steps to create the virtual directory:
- Open Internet Information Services.
- Expand the machine name node.
- Right-click Default Web Site, and select New, Virtual Directory.
- Click Next.
- Enter VDir1 for the Alias field.
- Click Next.
- Browse to the Application Directory / VDir1.
- Click Next.
- Click Finish.
- Close Internet Information Services.
Copying Streams
Before we look at sending data to the Web site, we need to first understand a utility procedure named CopyData, which transfers data from one stream to another. This procedure is important because most code in the application is centered around moving data into and out of the streams provided by the WebRequest and WebResponse classes. The CopyData procedure has two Stream object parameters, one named FromStream that acts as the data source and another named ToStream that is the data destination.
PrivateSubCopyData(ByValFromStreamAsStream,ByValToStreamAsS tream)
The retrieval of data from FromStream is done by calling its Read method. This method fills the byte array passed in to the first parameter with data. The number of bytes to retrieve is defined by the third parameter. In this case, we’re retrieving data in blocks of 4096 bytes. In addition to filling the byte array with data, the Read method also returns an integer indicating how many bytes were actually read into the array. This value will be 0 once we reach the end of the stream. The second parameter allows you to specify an offset from which to begin reading, but it’s not used in this application.
DimintBytesReadAsInteger
ConstintSizeAsInteger=4096
Dimbytes(intSize)AsByte
intBytesRead=FromStream.Read(bytes,0,intSize)
After reading a chunk, we check to see whether any data was returned, and if so, we write it to the destination stream by using the Write method and passing in the chunk of data and the integer indicating how much data is in the chunk. This read/ write process continues until no data is left in the source stream.
WhileintBytesRead>0
ToStream.Write(bytes,0,intBytesRead)
intBytesRead=FromStream.Read(bytes,0,intSize)
EndWhile
EndSub
Once the procedure is finished, the entire contents of FromStream will have been copied into ToStream. This procedure is extremely useful because the parameters are typed as Stream. That means we can use it to transfer data between any two objects that inherit from Stream, including file streams, network streams, and memory streams. Now let’s see how we can use streams to get data to and from a Web server.
Send Text
The cmdPassText_Click event handler takes text entered into the txtDataPassed TextBox and sends it to the PassText.aspx page in the Web site. The Web page processes the text and returns a message, which is displayed in the txtDataReturned TextBox. Instances of the WebRequest and WebResponse classes are declared to handle this round-trip exchange.
DimreqAsWebRequest
DimrspAsWebResponse
The WebRequest instance is created by calling the WebRequest shared Create method and passing in the URL to be invoked. Keep in mind that this does not invoke the URL at this time; it simply verifies that your address is a valid Uniform Resource Identifier (URI).
| More Info |
You can find out more about what qualifies as a valid URI by looking up the System.Uri class in online help. |
We also need to specify how the contents of our request should be sent to the server by assigning a value of GET or POST to the Method property. Using POST assures that the data will be sent in the body of the HTTP message.
req=WebRequest.Create("http://localhost/VDir1/PassText.aspx")
req.Method="POST"
Now that our WebRequest instance is configured, we can identify what data to send to the server by populating the request stream. The GetRequestStream method returns a reference to a Stream object that could be used directly, but because we want to write some text to the stream, we create a StreamWriter instance and pass the Stream into the StreamWriter constructor.
DimswAsNewStreamWriter(req.GetRequestStream())
We can now use the text-friendly methods of the StreamWriter to pass in the data from the txtDataPassed TextBox. Once we are done filling the request, we can close the StreamWriter.
sw.WriteLine(txtDataPassed.Text())
sw.Close()
Our WebRequest is now configured and populated with data, so we can finally issue the request to the server by calling the GetResponse method. This sends an HTTP request message containing our data to the URL specified earlier and returns a WebResponse instance we can use to retrieve the server’s response.
rsp=req.GetResponse()
Retrieving and working with the response from the server is similar to working with the request. We get the response stream by calling GetResponseStream on our WebResponse instance and passing the stream into the constructor for a StreamReader instance. This allows us to work with the stream as text instead of having to work byte by byte.
DimsrAsNewStreamReader(rsp.GetResponseStream())
txtDataReturned.Text=sr.ReadLine()
As a final bit of error handling, you should make sure your request and response streams are closed once you are done with them.
IfNotreqIsNothingThenreq.GetRequestStream().Close()
IfNotrspIsNothingThenrsp.GetResponseStream().Close()
Send a File
The cmdSendFileData_Click event handler sends a file, datafile.txt, to the server. The type of file sent in this manner is not limited to text files and can actually be of any type. The process starts by creating a new FileStream object referencing the file that you want to send.
fs=NewFileStream("datafile.txt",FileMode.Open)
Next, the WebRequest object is created just like in the previous example; however, this time we point to the SendData.aspx page.
req=WebRequest.Create("http://localhost/VDir1/SendData.aspx")
req.Method="POST"
Finally, we populate the request by copying the contents of the FileStream to the WebRequest request stream and send the file by calling GetResponse.
CopyData(fs,req.GetRequestStream())

⋮

DimrspAsWebResponse=req.GetResponse()
Receive Files
Receiving files from a server is basically the same as sending a file but in reverse. The cmdReceiveDataFile_Click event handler invokes the ReceiveData.aspx page to retrieve an .xml file from the server. Creating and configuring the WebRequest object is the same except that, in this case, we’re using the HTTP GET method instead of POST because we’re not sending any data to the server.
req=WebRequest.Create("http://localhost/VDir1/ReceiveData.aspx")
req.Method="GET"
GetResponse is called to invoke the page and store the returned WebResponse.
DimrspAsWebResponse=req.GetResponse()
The WebResponse instance contains the XML data returned by the server. Because we want to store this data in a file, we create an instance of the FileStream class and copy the contents of the response stream into the file.
fs=NewFileStream("ReceivedXMLFile.xml",FileMode.Create)
CopyData(rsp.GetResponseStream(),fs)
The final step is to ensure that both the response and file streams are closed.
IfNotrspIsNothingThenrsp.GetResponseStream.Close()
IfNotfsIsNothingThenfs.Close()
After running this part of the sample, you should have a file named ReceivedXMLFile.xml in the bin directory.
Receive Images
The process for retrieving image data from a server is identical to that for retrieving any kind of file. However, sometimes you might want to display that image directly in a PictureBox control instead of saving it to a file. The cmdReceiveImageFile_Click event handler does just that. Retrieving the data from the server is no different than before, except you copy the returned data into a MemoryStream instance instead of a FileStream.
ms=NewMemoryStream()
CopyData(rsp.GetResponseStream(),ms)
The MemoryStream instance can then be passed into the shared FromStream method of the Image class. This reads the contents of the stream and returns an Image object that can be assigned to the Image property of the PictureBox.
picDownloadImage.Image=Image.FromStream(ms)
When you run this part of the sample, an image of clouds should appear in the picture box.
Conclusion
You can see that sending and receiving data over HTTP has much more to do with understanding streams and the kind of data your are exchanging than understanding the inner workings of HTTP. By issuing your own Web requests, you can create clients that can easily interact with any Web resource, even if it’s not a true Web service.
Application #70 Reflection
Reflection is the process of interrogating an assembly at run time to discover information about the types that the assembly contains. You can find out all kinds of information, such as what members a type has; the type accessibility of those members; and the number, type, and order of any parameters a member might require. Development tools and configuration utilities often make use of reflection to display this type metadata to users. Visual Studio .NET, for example, uses reflection to display the member signature ToolTips and member drop-down lists while you code. The .NET Framework provides many classes for retrieving assembly and type metadata. This topic examines some of these classes.
New Concepts
The primary class used to retrieve information about classes is the Type class. You create a Type object and tell it what class you want to examine. So if you want to reflect the Foo class, you need to have an instance of the Type class that is Foo specific. From that Type instance, you could then find out what methods Foo has, whether Foo is public, or what interfaces Foo implements. There are two simple ways to get a Type instance. One is to call the GetType method on an instance of the object you want to reflect. All .NET objects have a GetType method. For our Foo example, the code could look like the following:
DimfAsNewFoo()
DimtAsType=f.GetType()
You can also get a type reference by calling the shared GetType method of the Type class and passing in the name of the class to reflect as a string. For example:
DimtasType=Type.GetType("Foo")
The major limitation of this method is that you can get type information only for classes in the current assembly. We will look at reflecting other assemblies later in this topic.
Once you have a Type instance, you can call a variety of GetXXX methods— such as GetMethods, GetProperties, and GetInterfaces—to retrieve information about those aspects of the target class. There is also a set of IsXXX properties, such as IsPublic and IsSerializable. The return value from methods such as GetProperties or GetMethods is an array of XXXInfo classes such as PropertyInfo or MethodInfo. You can then use the properties of these XXXInfo objects to find out information such as what the return type of the target property is or what parameters the target method takes.
| Note |
Remember that while the Type class exists in the System namespace, the other reflection classes, such as MethodInfo and PropertyInfo, are in the System.Reflection namespace. |
| More Info |
Reflection is also often used to dynamically invoke members on a class. The Type class contains methods for this, but they are beyond the scope of this topic. For more information, look up Type.InvokeMember in online help. |
Examining Loaded Assemblies
As mentioned earlier, the GetType method of the Type class allows you to reflect only classes in the currently executing assembly. Sometimes you’ll need to reflect classes in other loaded assemblies. The System namespace provides a class named AppDomain that you can use to find out what assemblies are currently loaded in your application. The shared property CurrentDomain of the AppDomain class returns a reference to your application domain. You can then call the GetAssemblies method of your AppDomain object to return an array of Assembly objects.
Once you identify which assembly contains the type you want to reflect, you can call the GetType method of the appropriate Assembly object and pass in the name of the class you want to reflect. If we assume that our Foo class exists in a loaded assembly named BarAssembly, we could reflect Foo with the following:
DimasmAs[Assembly]
ForEachasmInAppDomain.CurrentDomain.GetAssemblies()
Ifasm.GetName.Name="BarAssembly"ThenExitFor
Next
DimtAsType=asm.GetType("Foo")
| More Info |
If you need to reflect a type that is in an assembly that isn’t loaded, you can use a variety of methods of the Assembly class to load it. See Assembly.LoadFrom in online help for more information. |
Code Walkthrough
The sample application allows you to view information about all the currently loaded assemblies and the types in those assemblies. You can start by clicking the List Loaded Assemblies button, which will display the names of the currently loaded assemblies in the list box. Then select an assembly, and click the Show Detail button to display the types contained in that assembly. You can then click on a type to display the members contained by that type. The following sections examine the code in detail.
Listing Loaded Assemblies
The application has a class-level variable named CurrentAsm that is used to store a reference to the currently selected assembly.
PrivateCurrentAsmAs[Assembly]
The cmdListLoadedAssemblies_Click event handler starts by declaring an array of Assembly objects, and it populates the array by calling the GetAssemblies method of the current AppDomain.
Dimasms()As[Assembly]
asms=AppDomain.CurrentDomain.GetAssemblies()
We then loop through each Assembly in the array and display their names. The GetName method returns an instance of the AssemblyName class, which contains version and culture information in addition to the simple name.
lstLoadedAssemblies.Items.Clear()
DimasmAs[Assembly]
ForEachasmInasms
lstLoadedAssemblies.Items.Add(asm.GetName.Name)
Next
The rest of the procedure resets the interface and sets the CurrentAsm variable to Nothing.
Displaying Assembly Contents
The ShowAssemblyDetail method displays assembly information in response to clicks on the btnAssemblyDetail button and double-clicks on the lstLoadedAssemblies list box.
PrivateSubShowAssemblyDetail(ByValsenderAsSystem.Object,_
ByValeAsSystem.EventArgs)HandleslstLoadedAssemblies.DoubleC lick,_
btnAssemblyDetail.Click
After checking to make sure an item is selected in the assembly list, we loop through the loaded assemblies to get a reference to the one with the selected name.
DimasmAs[Assembly]
ForEachasmInAppDomain.CurrentDomain.GetAssemblies()
Ifasm.GetName.Name=lstLoadedAssemblies.TextThenExitFor
Next
CurrentAsm=asm
After displaying the FullName and Location properties on screen, we display the full name of each of the Types defined in the current assembly by looping through the array of Types returned by the GetTypes method of our CurrentAsm object.
txtDisplayName.Text=CurrentAsm.FullName
txtLocation.Text=CurrentAsm.Location


DimtAsType
ForEachtInCurrentAsm.GetTypes
lstTypes.Items.Add(t.FullName)
Next
Displaying a Type’s Members
The lstTypes_SelectedIndexChanged event handler is responsible for displaying all members of the selected Type. First, a Type instance is created by calling the GetType method of our currently selected assembly.
DimtAsType=CurrentAsm.GetType(lstTypes.Text)
Finally, we display the Name and MemberType properties of each MemberInfo object in the array returned by the GetMembers method of the Type object.
DimmiAsMemberInfo
ForEachmiInt.GetMembers()
lstMembers.Items.Add(mi.Name&"-"&mi.MemberType.ToString)
Next
Conclusion
This topic has shown you how to reflect information about the types contained in the currently loaded assemblies. With this information, you can create more powerful tools and utilities.
Application #71 Use MSMQ
Microsoft Message Queue (MSMQ) provides applications with a powerful yet simple mechanism for transferring data between two applications in an asynchronous fashion. The .NET Framework has the System.Messaging namespace to provide you with a set of classes that make sending and receiving messages from MSMQ queues remarkably easy. This topic examines some of those classes.
Building Upon…
Application #72: Configuration Settings
Application #78: Create a Windows Service
Application #79: Use Thread Pooling
Application #82: Serialize Objects
Application #84: Asynchronous Calls
New Concepts
Working with a queue is focused around the MessageQueue class. This class provides methods for connecting to a queue, interrogating its contents, sending a message to it, and retrieving messages from it. You can add a MessageQueue instance to your code manually or drag one onto a design surface from the Toolbox.
Configuring the MessageQueue Component
When you create a MessageQueue instance, you have to provide at least two pieces of information before you can send or receive messages. You must specify the path to the actual queue in the enterprise by providing a string to the Path property. A path that would connect to a private queue named Foo on the local machine would look like the following:
FormatName:DIRECT=OS:.private$foo
| More Info |
The help documentation for the MessageQueue.Path property has some examples of other valid queue paths. |
You also need to tell the MessageQueue component how to serialize objects when you send them to the queue. You do this by providing a value for the Formatter property. The two main choices here are the XmlMessageFormatter and the BinaryMessageFormatter. The BinaryMessageFormatter creates compact messages that can be used only by a receiving application that is also using the BinaryMessageFormatter. This limits your consuming applications to being .NET applications. The XmlMessageFormatter serializes your object to an XML string. Because XML is not .NET specific, your consuming application can be anything that can talk to the queue and process XML. The basic message transfer process is displayed in Figure 8-5.
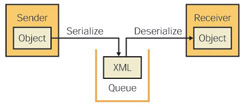
Figure 8-5: The message transfer process for an object using the XmlMessageFormatter and MSMQ.
Sending and Receiving Messages
Once you have your MessageQueue component configured, you can use its methods to send and receive messages from the queue. The Send method provides a simple mechanism to submit objects to the queue. At a minimum, you need to provide the object you want to send, and you can optionally provide a label for the message and define transaction behavior if you’re sending to a transactional queue. The component will then pass your object to the selected formatter and then pass the serialized data on to the queue. Your application will continue after the message is placed in the queue.
You can retrieve all the messages in a queue by calling the GetAllMessages method. This returns an array of Message objects that you can then process. If you want to retrieve messages one at a time, you can use the Receive method to perform a synchronous retrieval or use BeginReceive and EndReceive to perform asynchronous reads. The Message object contains Body and Label properties you can use to retrieve the content of the message.
Code Walkthrough
The sample application demonstrates how to send information from one application to another by using MSMQ as the transport mechanism. The application consists of three projects. The Server project contains the definition for the MSMQOrders class. This class defines a simple business object that contains product order information. The Client project provides a user interface for populating an instance of the MSMQOrders class and sending it to a private message queue named Orders. The WindowService project defines a Microsoft Windows service application that consumes messages in the Orders queue. You can find the setup instructions for the application in the ReadMe.htm file in the root application directory.
The MSMQOrders class contains three public fields to store order information. There is also a Process method that uses a tracing method so that we can verify it is consumed. This has been added solely for the requirements of this sample application and is not a requirement for using MSMQ in general.
PublicClassMSMQOrders
PublicNumberAsInteger
PublicCustomerAsString
PublicRequiredByAsDate
PublicSubProcess(ByValStateAsObject)
Trace.WriteLine(Number&"-"&Customer&"- "&RequiredBy)
Threading.Thread.Sleep(2000)
EndSub
EndClass
When you run the Client application and send a message, it will go to the queue and be consumed by the installed service. You can verify that the message was sent by examining the journal for the Orders queue.
Defining the Queue
MSMQ integration is provided to the Client application through the MessageQueue component on the frmMain design surface. This component was added from the Components tab of the toolbox. Two properties that have been set are worth pointing out. The Formatter property is set to use the XmlMessageFormatter. This ensures any objects sent to the queue will be serialized into XML before going to the queue. Also, the Path property is configured to retrieve its value from the qOrders.Path item in the application’s configuration file. You can see this by expanding DynamicProperties in the Property window.
Writing to the Queue
Once the queue is configured, we can send objects to it. The cmdSend_Click event handler starts by creating an instance of the MSMQOrders class and populating it with values from the interface.
DimoAsNewServer.MSMQOrders()
o.Number=CInt(Me.txtOrderNumber.Text)
o.Customer=Me.txtCustomer.Text
o.RequiredBy=CDate(Me.txtReqDate.Text)
Sending the object consists of calling the Send method of the queue object and passing in our order object as the first parameter and some text as the label.
Me.qOrders.Send(o,"NewOrder:"&o.Number)
Remember that at this point the Framework serializes our object to XML and sends it to the Orders queue with the label we specified.
Reading from the Queue
The WindowsService application contains a service defined in the WatchMSMQ.vb file. It has a MessageQueue component configured the same as the component in the Client project. The process of consuming messages from the Orders queue begins when the service is started and the OnStart method fires. This method calls the HookQueue procedure, where we determine whether our queue component has been instantiated yet. This component needs to be instantiated to support the pause/continue behavior of Windows services.
IfMe.qOrdersIsNothingThen
Me.qOrders=NewSystem.Messaging.MessageQueue(Me.m_Path)
EndIf
After ensuring that we have a MessageQueue object, we start retrieving messages asynchronously by calling the BeginReceive method.
Me.qOrders.BeginReceive()
Each time a message is retrieved, the queue’s ReceiveCompleted event is raised. Our event handler, qOrders_ReceiveCompleted, handles that event and processes the retrieved message. We get the message by calling the EndReceive method of the queue and passing in the AsyncResult property of the ReceiveCompletedEventArgs parameter. This returns a Message object, the body of which is our serialized MSMQOrders object.
DimmAsMessage
m=qOrders.EndReceive(e.AsyncResult)
The body of the message needs to be converted to an MSMQOrders object, which we do with a simple use of the CType function.
DimoAsServer.MSMQOrders
o=CType(m.Body,Server.MSMQOrders)
At this point, your application can do whatever it wants with the retrieved object. This application calls the order object Process method on a separate thread. Because the call is made on another thread, our service can continue listening for additional messages in the queue without having to wait for the current order to finish processing.
ThreadPool.QueueUserWorkItem(AddressOfo.Process)
Me.qOrders.BeginReceive()
Listing Messages in the Queue
In addition to retrieving messages from the queue, you can also find out what messages are in the queue without consuming them. The Client application has a List Messages In Queue button that displays in a list box the labels of all the messages in the queue. This is done in the cmdScanQ_Click event handler by iterating over the MessageQueue component.
DimmAsMessage
ForEachmInMe.qOrders
Me.lstMessages.Items.Add(m.Label)
Next
Conclusion
The .NET Framework makes it easy to use MSMQ as a transport mechanism between applications. With a few lines of code, you can add a powerful messaging system with transaction, acknowledgement, security, and auditing features to your programs.
Application #72 Configuration Settings
This topic examines the purpose of the appSettings section of .NET application configuration files and how to read from and write to it in your applications. By the end of the topic, you’ll understand how to use configuration settings and how to create reusable custom classes for standardizing your appSettings-related code.
Building Upon…
Application #28: Work with XML DOM
Application #35: Create an Explorer-Style Application
Application #67: Understand the Garbage Collector
Application #73: Read From and Write To a Text File
New Concepts
Virtually every application needs to store configuration information outside of compiled code that can be used at run time. Whether it’s user settings or a database connection string, this information needs to be easily accessible from code and updatable. In the past, this information was mostly stored in either the system Registry or in .ini files, but this is no longer the case in .NET. For .NET applications, you store these settings in an Application Configuration File. This configuration file is simply an XML document that complies with the configuration file schema. An example of a simple configuration file is shown in Figure 8-6.

Figure 8-6: Example Application Configuration File.
| More Info |
Configuration files can actually contain more than just custom application settings. For more information on all the things configuration files can be used for, see ms-help://MS.VSCC/MS.MSDNVS /cpguide/html/cpconapplicationconfigurationfiles.htm. |
The Framework supplies some easy-to-use utility classes for reading your application’s configuration file. However, to use them, your configuration file must reside in the application’s root directory and be named ExecutableAssemblyName.exe.config. So, if your application is named Foo.exe, your configuration file must be named Foo.exe.config and exist in the same directory as Foo.exe.
| Tip |
In Visual Studio, add an Application Configuration File named app.config to your project. When you run the project, Visual Studio will automatically rename it and copy it to the Debug directory for you. |
The System.Configuration namespace contains a class named ConfigurationSettings. This class has a single shared property named AppSettings that automatically loads your application configuration file and reads in the items in the appSettings section. This information is made available to you in a read-only NameValueCollection. This is very convenient because you don’t have to load, parse, or validate the configuration file. However, because the access provided by the AppSettings property is read-only, you are not able to make any changes to the configuration file.
The AppSettings Class
Most applications need the ability to change configuration settings from time to time, either as the result of a change in user preferences or sometimes because of environmental changes. In addition, you might want to have multiple configuration files for your application. You’ll have to write your own code to perform these tasks because the built-in mechanisms described earlier cannot handle these requirements. The sample application illustrates one possible way to implement an application-settings manager with the following features:
- Load settings from anywhere on the file system
- Add new settings
- Update existing settings
- Optionally, automatically save when changes are made
Code Walkthrough
The sample application allows you to view application settings in the default application configuration file. The Custom tab uses the custom AppSettings class discussed earlier to manipulate the settings in any available configuration file. The following walkthrough describes how to work with the built-in application settings and how to create the utility classes.
| Note |
When running the sample application from Visual Studio, changes will not be saved between sessions. This is because Visual Studio overwrites the configuration file each time you run the application. To see your changes persisted, run the compiled application directly from the file system. |
Accessing the AppSettings Property
The AppSettings tab allows you to load and display the settings in the application configuration file. The loading takes place in the cmdLoadAS_Click event handler by getting a reference to the AppSettings property of the ConfigurationSettings class. Remember that the ConfigurationSettings class is available in the System.Configuration namespace.
mAppSet=ConfigurationSettings.AppSettings
We can display the individual settings either by index or key value. The cmdListByKey_Click event handler retrieves an array of key values and loops through this array using each key as the input to the Item method of the AppSettings reference. The return is added to the list box.
IfNotmAppSetIsNothingThen
Me.lstSettings.Items.Clear()
Dimkeys()AsString
keys=mAppSet.AllKeys
DimkeyAsString
ForEachkeyInkeys
Me.lstSettings.Items.Add(key&":"&mAppSet.Item(key))
Next
EndIf
The cmdListByIndex_Click event handler also displays the settings, but it does so by looping through the Items by index.
IfNotmAppSetIsNothingThen
Me.lstSettings.Items.Clear()
DimiAsInteger
Fori=0TomAppSet.Count-1
Me.lstSettings.Items.Add(mAppSet.GetKey(i)&":"&_
mAppSet.Item(i))
Next
EndIf
The Custom AppSettings Wrapper
The Custom tab provides controls for loading a configuration file and manipulating its contents through an instance of the custom AppSettings class. Each setting in the configuration file is exposed through an instance of the custom AppSetting class.
The AppSetting Class
The AppSetting class maintains three pieces of information: a key, a value, and a reference to the AppSettings instance it belongs to.
PrivatemParentAsAppSettings
PrivatemstrKeyAsString
PrivatemstrValueAsString
mstrKey and mstrValue are exposed through public properties named Key and Value, respectively. When setting the Value property, we call the UpdateParent method after storing the new value.
mstrValue=Value
Me.UpdateParent()
The UpdateParent method calls the parent’s Update method and passes in a reference to itself. This signals the parent that a setting has changed. We will examine the parent’s update behavior later in this walkthrough.
PrivateSubUpdateParent()
IfNotMe.mParentIsNothingThen
Me.mParent.Update(Me)
EndIf
EndSub
AppSettings Class
The AppSettings class wraps access to a configuration file’s appSettings section. The class’s constructor requires that you provide a path to the configuration file you want to manage and a Boolean indicating whether the class should automatically save after every change.
PublicSubNew(ByValConfigFileAsString,_
ByValAutoSaveAsBoolean)
After some validation, the specified file is loaded into a module-level XmlDocument instance named cfg.
cfg.Load(ConfigFile)
If no exceptions are thrown, we know that the file was well-formed XML, but we still need to make sure it contains an appSettings section in the appropriate place. We use the XPath query defined in the APPSETTINGS_ELEMENT constant to retrieve a node reference. If this reference is Nothing, the file does not contain the necessary structure.
xAS=cfg.SelectSingleNode(APPSETTINGS_ELEMENT)
Retrieving Items
The Item method accepts a string containing the key for the setting you want to retrieve and returns an instance of the AppSetting class. The key you pass in is injected into the XPath query contained in the XPATH_KEY_ADD_KEY constant by using String.Format.
PublicFunctionItem(ByValKeyAsString)AsAppSetting
DimxNodeAsXmlNode
DimstrSearchAsString=XPATH_KEY_ADD_KEY
xNode=xAS.SelectSingleNode(String.Format(strSearch,Key))
If a node is found, we retrieve the second attribute and construct a new instance of AppSetting.
ReturnNewAppSetting(Key,_
xNode.Attributes.Item(1).Value,Me)
Iterating All Items
The GetAllItems function returns all of the setting data through an array of AppSetting instances. An XmlNodeList is populated with XmlNode references retrieved by using the XPath query defined in the XPATH_KEY_ADD constant.
DimxNodeAsXmlNode
DimxNodeListAsXmlNodeList
DimattsAsXmlAttributeCollection
xNodeList=xAS.SelectNodes(XPATH_KEY_ADD)
We then loop through the list, creating a new AppSetting instance for each node. The first attribute of each node contains the setting key and the second attribute contains the value.
DimxaAsXmlAttribute
Dimasa(xNodeList.Count-1)AsAppSetting
DimiAsInteger=-1
ForEachxNodeInxNodeList
i+=1
atts=xNode.Attributes
Withatts
asa(i)=NewAppSetting(.Item(0).Value,.Item(1).Value,Me)
EndWith
Next
Returnasa
Updating a Setting
So far we have basically re-created the functionality provided by the Framework’s ConfigurationSettings class. However, this class also contains methods for adding new settings and changing existing settings. Earlier we examined the Update method of the AppSetting class. That method simply called the Update method on the parent AppSettings class and passed in a reference to itself. The Update method of the AppSettings class takes the passed-in AppSetting and copies its data into the underlying XML configuration file. The first step is to make sure there is a setting with the specified key already in the configuration file. We take the Key property of the passed-in AppSetting and inject it into the XPath query defined by the XPATH_KEY_ADD_KEY constant.
DimxNodeAsXmlNode
DimstrSearchAsString=XPATH_KEY_ADD_KEY
xNode=xAS.SelectSingleNode(String.Format(strSearch,_
NewSetting.Key))
If the setting is found, we populate its value attribute with the Value property of the AppSetting instance.
IfxNodeIsNothingThen
⋮

Else
xNode.Attributes.Item(1).Value=NewSetting.Value
EndIf
Finally, we indicate that the settings have changed by setting the mblnDirty variable to True and call the Save method if AutoSave is equal to True. Remember, the value of AutoSave was set when the AppSettings instance was first created.
Me.mblnDirty=True
IfMe.AutoSaveThen
Me.Save()
EndIf
We will examine the use of the Save method later in the walkthrough.
Adding a Setting
To add a new setting to the configuration file, we have to create the appropriate XML structure, populate it with data, and add it to the appSettings section of the file. The Add method performs these tasks by accepting two strings—one for the key and one for the value of the new setting—and returning an AppSetting instance for the newly created setting.
DimnewElemAsXmlElement
DimnewAttrAsXmlAttribute
newElem=cfg.CreateElement(NEWELEMENT)
newAttr=cfg.CreateAttribute("key")
newAttr.Value=Key
newElem.Attributes.Append(newAttr)
newAttr=cfg.CreateAttribute("value")
newAttr.Value=Value
newElem.Attributes.Append(newAttr)
xAS.AppendChild(newElem)
After the setting is added, we perform the same saving-related tasks as in the Update method.
Me.mblnDirty=True
IfMe.AutoSaveThen
Me.Save()
EndIf
Saving
In the last two sections, we’ve seen calls to the Save method. This method simply calls the Save method of the XmlDocument instance cfg and sets the dirty flag to False after the save completes.
PublicSubSave()
cfg.Save(Me.mstrFileName)
Me.mblnDirty=False
EndSub
Conclusion
Application configuration files provide an easy and standardized way of exposing configuration information to your programs. The built-in Framework classes in the System.Configuration namespace allow you to easily read these values, while creating your own settings wrapper classes allows you to add any other configuration- related functionality you need.
Application #73 Read From and Write To a Text File
This topic describes some of the functionality provided by classes in the System.IO namespace for working with text files. The sample application examines various ways of reading text data and saving changes back to the file.
| Note |
See “Application #55: Use the File System” in Chapter 7 for information on how to retrieve file-system information about files and directories. |
Building Upon…
Application #30: Use Common Dialog Boxes
New Concepts
The System.IO namespace contains many types for working with text files such as the File, StreamReader, and StreamWriter classes.
Using the File Class
The System.IO.File class provides a number of shared methods for working with both binary and text files. In general, these methods require the path to the file of interest to be passed in as a parameter. There is a general-purpose method named Open that allows you to specify what kind of access you want to the file and what kind of access other applications should have while your code is using the file. There are also some helper methods such as CreateText, AppendText, and OpenText that open files with the appropriate access settings already set. OpenText returns a StreamReader instance, and CreateText and AppendText return StreamWriter instances. In many cases, you’ll want to check whether a file exists before you read it or attempt to edit its contents. You can do this by calling the Exists method of the File object.
Using the StreamReader Class
The StreamReader class allows you to retrieve data from a text file either all at once or piece by piece. If you want to retrieve all the data in the file at once, you can easily do so by calling the ReadToEnd method. Sometimes you might want to read a file line by line—for example, if you were reading a data file that uses carriage returns as the row delimiter. The ReadLine method returns all the characters up to the next new line or to the end of the file if there are no more new line characters. Once all the data has been read, calls to ReadLine will return Nothing. The last action you must be sure to do after reading your data is release the file by calling the Close method. This will ensure that your application releases any locks on the file.
Using the StreamWriter Class
The StreamWriter instance returned by the CreateText and AppendText methods can be used to send string data to the file. The Write method simply adds the specified text to the file, while the WriteLine method adds the text and a new line character. The StreamWriter contains an internal buffer to reduce the number of times the underlying stream is actually accessed. To make sure all your data is sent from the buffer to the file, you should call the Flush method before calling the Close method.
Code Walkthrough
The sample application allows you to create, read, and append to text files. The first step in executing any of these tasks is to identify the path of the file you want to work with. You can do this by manually entering the path in the File Name text box or using the dialog boxes presented by the New File and Open File buttons. You can read from a file by clicking the appropriate button or write to a file by first entering text in the File Text text box and clicking either Create New File or Append To File.
Reading Files
The btnStreamReaderReadFromFile_Click event handler implements the code for reading the entire contents of the text file in one shot. By passing a file path into the OpenText method of the File object, we get an instance of the StreamReader class.
DimmyStreamReaderAsStreamReader
myStreamReader=File.OpenText(txtFileName.Text)
The ReadToEnd method of the StreamReader instance is used to populate a text box with the entire contents of the file.
Me.txtFileText.Text=myStreamReader.ReadToEnd()
Finally, the StreamReader is closed before the procedure ends.
IfNotmyStreamReaderIsNothingThen
myStreamReader.Close()
EndIf
The btnStringReaderReadFileInLines_Click event handler reads a file line by line and prepends line numbers before displaying the text. Variables for temporarily storing a line of text and a row counter are declared in addition to StreamReader.
DimmyStreamReaderAsStreamReader
DimmyInputStringAsString
DimrowCountAsInteger=0
The code for opening the file is identical to the last procedure, but this time we call ReadLine instead of ReadToEnd. The returned string contains just the text up to the next new line character in the document.
myStreamReader=File.OpenText(txtFileName.Text)
txtFileText.Clear()
myInputString=myStreamReader.ReadLine()
Because the ReadLine method will return Nothing when there is no more data, you should check for Nothing before attempting to process the text.
WhileNotmyInputStringIsNothing
As long as there is text, we prepend the current value of the row counter and add the line to the text box. The row counter is then incremented, and the next line is read.
txtFileText.Text+=rowCount.ToString()+":"+_
myInputString+vbCrLf
rowCount+=1
myInputString=myStreamReader.ReadLine()
The last way we read text is character by character, as demonstrated in the btnStreamReaderReadInChars_Click event handler. Just as before, we declare a StreamReader and a variable to store each character as it is read in. Notice that this variable, myNextInt, is an Integer not a String. This is because the read method returns an integer character code that will be converted to a String.
DimmyStreamReaderAsStreamReader
DimmyNextIntAsInteger
Next, the file is opened and the first character is read into myNextInt by calling the Read method of our StreamReader instance.
myStreamReader=File.OpenText(txtFileName.Text)
txtFileText.Clear()
myNextInt=myStreamReader.Read()
Just as in the last example, we have to make sure data was returned, but this time we do it by checking whether myNextInt is not equal to -1. If it isn’t, then it contains a character code that must be converted using the ChrW function. Then the next character is read and the process is repeated.
WhilemyNextInt<>-1
txtFileText.Text+=ChrW(myNextInt)
myNextInt=myStreamReader.Read()
txtFileText.Refresh()
System.Threading.Thread.CurrentThread.Sleep(100)
EndWhile
| Note |
The System.Threading.Thread.CurrentThread.Sleep(100) statement causes execution to pause for 100 milliseconds. This statement is used solely to give the output a typewriter-like appearance and is not required for reading text by character. |
Writing To Files
The btnStreamWriterCreateFile_Click event handler uses a StreamWriter instance to write the contents of the txtFileText TextBox to the specified file. However, before writing the data, we determine whether the file already exists by calling the Exists method of the File class. If it does exist, we prompt the user to specify whether she wants to overwrite it.
IfFile.Exists(txtFileName.Text)Then
IfMsgBox("Thatfileexists.Wouldyouliketooverwriteit?",_
MsgBoxStyle.YesNo)=MsgBoxResult.NoThen
Return
EndIf
EndIf
The CreateText method of the File class is used to create a new text file or overwrite an existing one. It returns a StreamWriter instance that is used to transfer data to the file.
myStreamWriter=File.CreateText(txtFileName.Text)
The Write method of the StreamWriter instance copies the contents of the text box into the writer’s buffer. The Flush method sends the buffered data to the file.
myStreamWriter.Write(txtFileText.Text)
myStreamWriter.Flush()
Appending to an existing file is demonstrated in the btnStreamWriterAppendToFile_Click event handler. The code for appending is essentially the same as the last example except that the AppendText method of the File class is used instead of the CreateText method. This ensures that all data written to the file is added to the end of the file.
myStreamWriter=File.AppendText(txtFileName.Text)
Conclusion
You can see that working with text files requires learning only a couple classes and methods. Remember that the methods of the File class discussed here are all shared methods. If you want to maintain a reference to a file, consider using the System.IO.FileInfo class.
Application #74 Use Temporary Resources
It’s quite common for an application to need to store some information for use later on. Ideally, we would like to store everything in memory, but often this is not possible because system resources are limited or the amount of data we want to store is very large. In these situations, you can use a file to temporarily store the information.
Building Upon…
Application #73: Read From and Write To a Text File
New Concepts
An application that uses temporary files needs to select a reasonable location for creating the files that does not clutter the user’s system. The Framework provides mechanisms to ensure that your application uses temporary files responsibly.
Locating Temporary Locations
Technically, you could create your temporary file wherever you want, but we suggest you create your temporary files in the system-defined Temp directory. The exact location of this directory varies across platforms, so you need to retrieve the path at run time. The System.IO.Path class has a couple methods specialized for working with temporary files. One of them is the GetTempPath method, which returns the path to the system’s Temp directory as a string.
Creating Temporary Files
Once you know where the Temp directory is located, you can create files in it as you would create files in any other location. However, the Path class has another utility function, GetTempFileName, that automatically creates a temporary file and returns the path to the file. Immediately after creating the file, you should set the file’s Temporary attribute. Setting this attribute allows the runtime to optimize its use of the file. You can then work with the file as necessary.
Code Walkthrough
The sample application allows you to locate the system’s Temp directory and create, use, and destroy temporary files. In addition, you’ll see how to mark your temporary files so that the runtime can optimize its use of them.
Working with Temporary Files
Before we can create a temporary file, we need to retrieve the path to the Temp directory. The btnFindTempDirectory_Click event handler retrieves the Temp path by calling the GetTempPath method of the Path class. This call is made within a Try/Catch block, so we can catch any exceptions. Notice that in addition to normal I/O-related exceptions, you should also handle any security-related exceptions.
Try
tempPathString=Path.GetTempPath()
CatchsexAsSecurity.SecurityException
Me.sbrStatus.Text="Youdonothavetherequiredpermissions."
CatchexcAsException
Me.sbrStatus.Text="UnabletoretrieveTEMPdirectorypath."
EndTry
The btnCreateTempFile_Click event handler creates a temporary file by calling the GetTempFileName method of the Path class. Remember that although this method returns a string, it actually creates a file at the path returned.
m_FileName=Path.GetTempFileName()
After creating the file, we set the file’s Temporary attribute by creating a FileInfo instance that points to the file and modifying the Attributes property.
DimmyFileInfoAsNewFileInfo(m_FileName)
myFileInfo.Attributes=FileAttributes.Temporary
Now that the temporary file exists, we can use it just like any other file. The btnUseTempFilebtnUseTempFile_Click event handler creates a StreamWriter to the new file and writes out some text.
DimmyWriterAsStreamWriter=File.AppendText(m_FileName)
myWriter.WriteLine("Datawrittentotemporaryfile.")
You should always make sure you flush and close your file-access classes even when using temporary files.
myWriter.Flush()
myWriter.Close()
The final task is to make sure our application deletes any temporary files that it created. You can do this simply by calling the shared Delete method of the System.IO.File class and passing in the path to the file. The btnDeleteTempFile_Click event handler does exactly this.
File.Delete(m_FileName)
Conclusion
Working with temporary files is identical to working with any other file except that you ask the system for the location to create it in. Remember to treat temporary files just as you would any other resource by destroying them once you are done with them.
Application #75 Send Mail
Whether you are using it to send an administrative alert or an action confirmation to a user, e-mail has become an important facet of most applications. The Framework makes sending e-mail to a Simple Mail Transport Protocol (SMTP) server very easy by wrapping up all e-mail functionality in a couple simple classes.
Building Upon…
Application #3: String Manipulation
Application #30: Use Common Dialog Boxes
Application #64: Interact with Services
Application #72: Configuration Settings
New Concepts
The System.Web.Mail namespace contains three classes that can be used to create and send e-mail messages to an SMTP server. The SmtpMail class exposes a shared property named SmtpServer that you use to specify the host name or IP address of the target SMTP server. The Send method accepts either a MailMessage instance or a series of strings, and sends the message to the specified server. The MailMessage class exposes properties for defining the common aspects of an e-mail message, such as Subject, Body, BodyFormat, From, and To. If you want to add attachments to your message, you can create instances of the MailAttachment class and add them to the Attachments property of the MailMessage. You simply provide a file path to the Filename property, and the class will handle the reading, encoding, and transmission of the file for you.
Code Walkthrough
The sample application demonstrates how to create an e-mail message, add attachments, and send the message to an SMTP server.
Setting Up an SMTP Mail Server on Windows XP
To run the sample, you must have a running SMTP server available. If there is already one you can use, just change the application setting in app.config to point to it. Otherwise, you can install the SMTP service locally.
If you are running Windows XP Professional on your computer, you can install for free the Microsoft Web server, Internet Information Services 5.1 (IIS), from the Windows XP Pro installation CD and configure it to run on your system. To do this, open the Add Or Remove Programs control panel and click Add/Remove Windows Components.
If you don’t have IIS installed, select the Internet Information Services (IIS) check box, leaving all the default installation settings intact. If you do have IIS installed and just need to add SMTP support, select Internet Information Services and click the Details button. Select the SMTP Services check box.
With IIS installed, you will find the Internet Information Services console in the Performance And Maintenance section of the Administrative Tools control panels. Double-click the Internet Information Services icon.
Once the Internet Information Services console is open, you’ll see any IIS Web services you have running on your machine, including the SMTP server. You’ll also have a mailroot/Drop directory structure under the InetPub directory. This is the directory where your messages will appear when you send them from your application.
Defining Attachments
Before we create and send an e-mail message, we need to identify some files to send as attachments to the message. The btnBrowse_Click event handler allows you to select a file from an Open dialog box. A new MailAttachment object is created with the path to the selected file and added to the arlAttachments ArrayList.
WithodlgAttachment
⋮

arlAttachments.Add(NewMailAttachment(.FileName))
DimstrFileName()AsString=_
.FileName.Split(NewChar(){CChar("")})
strFileName.Reverse(strFileName)
lstAttachments.Items.Add(strFileName(0))
We examine the use of this ArrayList when sending a message in the next section.
Sending Mail
The btnSend_Click event handler is invoked after the user fills out the e-mail information on the form. The e-mail addresses are validated by passing in their values to the ValidateEmailAddress function. The ValidateEmailAddress method performs a simple check to make sure that an “@” and a “.” both exist in the entered value.
Try
ValidateEmailAddress(txtFrom)
CatchexAsException
txtFrom.Select(0,txtFrom.Text.Length)
erpEmailAddresses.SetError(txtFrom,ex.Message)
ExitSub
EndTry
| Tip |
You could implement more powerful validation by using the regular expression techniques described later in the “Application #77: Use Regular Expressions” section. |
Once the e-mail addresses are validated, we can build the body for the e-mail message. In this case, we are using a StringBuilder to concatenate the body contents.
DimsbAsNewStringBuilder()
sb.Append("Thefollowingemailwassenttoyoufrom"&_
"theSendMailHow-Tosampleapplication:")
sb.Append(vbCrLf)
sb.Append(vbCrLf)
sb.Append("MESSAGE:")
sb.Append(Trim(txtBody.Text))
sb.Append(vbCrLf)
Creating the message entails creating an instance of the MailMessage class and populating its properties with the entered values.
DimmailMsgAsNewMailMessage()
WithmailMsg
.From=txtFrom.Text.Trim
.To=txtTo.Text.Trim
.Cc=txtCC.Text.Trim
.Bcc=txtBCC.Text.Trim
.Subject=txtSubject.Text.Trim
.Body=sb.ToString
.Priority=CType(cboPriority.SelectedIndex,MailPriority)
The last bit of information to define for our message is its attachments. Each item in the arlAttachments ArrayList is added to the Attachments collection of our MailMessage object.
IfNotIsNothing(arlAttachments)Then
DimmailAttachmentAsObject
ForEachmailAttachmentInarlAttachments
.Attachments.Add(mailAttachment)
Next
EndIf
EndWith
We can now send our message by calling the shared Send method of the SmtpMail class. Before doing this though, we read a value named SmtpMail.SmtpServer from the application configuration file and assign it to the SmtpServer property of the SmtpMail class.
SmtpMail.SmtpServer=_
Configuration.ConfigurationSettings.AppSettings.Item("SmtpMail.SmtpServer")
Try
SmtpMail.Send(mailMsg)
Conclusion
The Framework makes it easy to send e-mail from your applications. As long as you have an SMTP server available, you can use the classes in the System.Net.Mail namespace to create and send messages with attachments.
Application #76 Create and Use Trace Listeners
Monitoring run-time health and behavior is an important part of application development and maintenance. The Framework contains an easy-to-use class in the System.Diagnostics namespace named Trace that you can use to output messages to a group of trace listeners. The listeners then send the messages to some observable location such as the Event Viewer, a file, or a database. This topic examines some of the members of the Trace class and how to implement some of the provided listeners. Finally, we will look at how to extend your diagnostic ability by creating your own custom listeners.
Building Upon…
Application #7: Object-Oriented Features
Application #8: Scoping, Overloading, Overriding
New Concepts
Getting started with tracing is remarkably easy because Visual Studio automatically hooks up a trace listener that sends trace messages to the Output window in the integrated development environment (IDE). All you have to do is call the shared WriteLine method of the Trace class and provide the message you want output. There are a couple other write-related methods you can use—such as Write, which doesn’t include a line feed. WriteLineIf and WriteIf allow you to specify an expression and message. They output the message only if the condition is True. You can also indicate that you want a portion of your output to be indented by calling the Indent method. All messages written after calling Indent will be indented until you call Unindent. Once your application is done tracing, you should be sure to call the Close method to force all listeners to flush any contents they might have buffered and close themselves.
Using the Event Log Trace Listener
While the default trace listener might be sufficient during development, you’ll likely want to send your messages to some external store once your application is in production. The event log is one option that is convenient because it can easily be monitored remotely. To implement event log tracing, you should create an instance of the EventLogTraceListener class and provide a reference to the log you want to write to the constructor. The listener will start receiving trace messages after you add the instance to the shared Listeners collection of the Trace class.
Creating a Custom Trace Listener
In some cases, you might want to write trace messages to some custom location or in a custom format. For example, you might want to have your trace messages stored in a database or sent via e-mail to an administrator. To do this, you need to create your own listener by implementing a class that inherits from the TraceListener class. At a minimum, you must implement the Write and WriteLine methods to determine where and how your listener sends its messages.
Code Walkthrough
The sample application illustrates how to use various types of trace listeners, including the DefaultTraceListener, EventLogTraceListener, and TextWriterTraceListener. In addition, a custom listener that writes to an HTML file is demonstrated.
Default Trace Listener
The cmdTraceToOutput_Click event handler uses the WriteLine, Indent, WriteLineIf, and Unindent methods of the Trace class to send messages to the Output window of the IDE. Remember, the listener that writes to the Output window is automatically added to the Listeners collection, so we don’t have to add it in code.
⋮

Trace.WriteLine("******TraceOutputStart******")
Trace.WriteLine("Outputwindowtraceinformation")
Trace.Indent()
Trace.WriteLine("Thislineisindented")
Trace.WriteLine("ProductType="&ProductType)
Trace.WriteLine("Price=$"&Price)
Trace.WriteLineIf(Price>1800,"Price>$1800")
Trace.Unindent()
Trace.WriteLine("******TraceOutputEnd******")
Figure 8-7 shows output displayed in the Output window.

Figure 8-7: Trace output in the Output window.
Event Log Trace Listener
The cmdTraceToEventLog_Click event handler sends a message to the event log. It starts by creating an instance of the EventLog class and setting its Source property.
DimmyLogAsNewEventLog()
myLog.Source=Me.Text
This EventLog instance is then passed in to the constructor of the EventLogTraceListener class.
DimtlEventLogAsNewEventLogTraceListener(myLog)
Before we add the event log listener to the Listeners collection, we need to remove the default trace listener by calling the Clear method of the Listeners collection.
Trace.Listeners.Clear()
Now we can add the event log listener.
Trace.Listeners.Add(tlEventLog)
Finally, we call WriteLine. Once this procedure completes, you can view the message in the event log.
Trace.WriteLine("Thisisatestofeventlogtracing")
TextWriterTraceListener
The cmdTraceToFile_Click event handler uses an instance of the TextWriterTraceListener to send trace messages to a text file. The path to the file is provided to the listener’s constructor.
| Note |
The TextWriterTraceListener can be used to write to any stream, not just files. You could, for example, use it to send messages to a network stream.
DimtlTextFileAsNewTextWriterTraceListener("TraceOutput.txt")
|
We then remove the default listener and add the new one just as in the previous section.
Trace.Listeners.Clear()
Trace.Listeners.Add(tlTextFile)
The rest of the procedure sends messages as normal, but now the messages are being written to the TraceOutput.txt file in the application directory. The final line in the procedure opens the new trace file in Notepad.
System.Diagnostics.Process.Start("Notepad.exe","TraceOutput.txt")
Creating an HTML Trace Listener
The sample application defines a custom trace listener named HTMLTraceListener that writes messages to an HTML file. Because the TextWriterTraceListener already contains all the functionality for writing to a file, we chose to inherit from it instead of from TraceListener.
PublicClassHTMLTraceListener
InheritsSystem.Diagnostics.TextWriterTraceListener
There is a constructor that accepts a file name and passes that information on to the base-class constructor.
PublicSubNew(ByValfileNameAsString)
MyBase.New(fileName)
EndSub
There is also a method named WriteHeader that is intended to be called before the listener starts receiving trace messages. This method writes some HTML to give the document a title.
PublicSubWriteHeader(ByValTitleAsString)
Writer.WriteLine("
")
Writer.WriteLine(""&Title&"")
Writer.WriteLine("
")
Writer.WriteLine("
"&Title&"
")
Writer.WriteLine("
")
EndSub
The protected WriteIndent method is overridden because creating indentations in HTML is different from doing so in a plain text file. IndentLevel and IndentSize are public properties you can read to determine how much of an indentation to write out.
DimiAsInteger
DimjAsInteger
IfIndentLevel>0Then
Fori=1ToIndentLevel
Forj=1ToIndentSize
Writer.Write(" ")
Nextj
Nexti
EndIf
The WriteLine method is overridden so that each message is preceded by a timestamp and followed by an HTML line break.
Writer.Write(""&Now()&"-")
IfNeedIndentThen
WriteIndent()
EndIf
Writer.WriteLine(message&"
")
Using the HTML Trace Listener
The process for using our new HTMLTraceListener is almost identical to how we used the TextWriterTraceListener as illustrated in the cmdTraceToHTML_Click event handler. The only difference is that after creating the listener, we call the WriteHeader method to create a title in the output file.
DimtlHTMLFileAsNewHTMLTraceListener("TraceOutputHTML.htm")
tlHTMLFile.WriteHeader("HTMLTraceOutputfor"&Me.Text)
The rest of the procedure sends tracing messages and closes the listeners as we’ve seen before. The procedure completes by launching the HTML trace file in your default browser.
Conclusion
Tracing is a simple and easy way of monitoring the status of your applications. In many cases, the provided trace listeners should be sufficient, but you can always enhance your tracing capability by creating your own trace listeners.
Application #77 Use Regular Expressions
This topic explores the basics of using regular expressions to validate data entered by an end user. We examine the Regex class and some regular-expression syntax.
New Concepts
At some point or another, you have probably written code to make sure the data entered by a user matched some sort of pattern. In the past, this type of validation was often accomplished by parsing the piece of data character by character and checking a set of rules to determine whether each character was appropriate. Regular expressions provide us with an alternative way of performing these kinds of validation tasks. The .NET Framework has regular-expression support built in through the Regex class that allows us to perform very complex validations with very little code.
A regular expression is a string that describes a character pattern that another string must match. You provide your expression string and your data string to the Regex class, and it tells you whether the data string matches the pattern defined in the expression string. The majority of your development effort in working with regular expressions will involve learning the regular-expression syntax. The sample application walkthrough provides you with an introduction to this syntax.
Code Walkthrough
The sample application demonstrates how to use regular expressions to validate some common types of data patterns, such as zip codes, dates, and e-mail addresses.
Validating Data
If you look through the code for the btnValidate_Click event handler, you should notice that there isn’t much code to review. This is exactly the point of regular expressions. The majority of the validation work is done by the Regex class that we pass our data and validation expression to. The IsMatch method returns a Boolean indicating whether or not our data is valid according to the expression. Each expression used in the procedure is explained in the following sections.
Zip Codes
The first expression used defines a zip code containing either five digits or five digits followed by a dash and another four digits.
^(d{5}|(d{5}-d{4}))$
The construction of this expression can be broken down as follows. The ^ specifies that nothing can precede the matching text. The d means we expect a digit, and the {5} indicates that we expect five of them. The | says that we can have either the pattern before it or the pattern after it. The ( starts a pattern group. The – represents a literal dash, and the d{4} matches the last four digits. Finally, the $ indicates that nothing can follow the matching data. With this pattern, values of 13254 and 13253-8657 would both be valid.
Dates
The next expression is one that matches month, day, and year numerical dates separated by either a / or a -.
^d{1,2}(/|-)d{1,2}1(d{4}|d{2})$
The expression is broken down as follows: The d{X,Y} matches a sequence of digits where the number of digits is between X and Y. So d{1,2} would match one or two digits. The /|- indicates that either a / or a – must appear next. Notice that this choice is wrapped in parentheses. This is important because the parentheses declare this choice as a group. After the d{1,2} pattern for the days, the next value is a 1. This is a reference to the first group in the pattern, which is the /|- choice we just saw. This group reference means that the next value must be the same as whatever satisfied the referenced group pattern. So, if a / is what satisfied the first group pattern, the next value after the days must be a / also. The last group, (d{4}|d{2}), means we can specify years with either four or two digits. You can’t use d{4,2} here because three digits would satisfy that expression.
E-mail Addresses
The last expression used in this procedure is one that validates e-mail addresses. It’s a flexible pattern that accounts for the period-separated format of both user and domain names.
^([w-]+.)*?[w-]+@[w-]+.([w-]+.)*?[w]+$
Let’s start with the expression to the left of the @ that defines valid user names. The first group, ([w-]+.), is broken down into the following. The w represents any word character, which is any alphanumeric character or an underscore. The + means we can have one or more of the word characters, and the . means that this set of word characters must be followed by a period. The *? that follows the group means that the preceding group is optional and can repeat. The + after the next [w-] means we can have any number of word characters but must have at least one. This ensures that you couldn’t have an e-mail address with a period just before the @. The following are examples of valid e-mail user names according to this pattern: john.doe, jdoe, and j.d.1.
The rest of the pattern uses similar constructs to define valid e-mail domains.
Conclusion
Regular expression allow us to perform complex validation with very little code. You have now seen examples of some common expressions and how they are used with the Regex class to validate data entered by a user.
About the Applications
- Working with Microsoft Visual Studio .NET 2003 and Microsoft .NET Framework 1.1
- Working with the Microsoft Visual Basic .NET Language
- Data Access
- Building Windows Forms User Interfaces
- Building Web Applications
- Working with Console Applications
- Interacting with the Operating System
- Working with the .NET Framework
- Advanced .NET Framework
- GDI+
- Building Enterprise Services Applications
- COM Interop/PInvoke
- Visual Studio .NET
- Securing Applications
- Coding Conventions
- Windows Server 2003 for .NET Developers
EAN: 2147483647
Pages: 157
