Understanding Field Objects
As described in Chapter 1, the Field Explorer displays a tree view of data fields in your report. It shows database fields, formula fields, SQL expression fields, parameter fields, running total fields, group name fields, and special system fields that you have defined for use in your report. This chapter introduces you to all the standard field types available in Crystal Reports.
To activate the Field Explorer, either select it from the View menu or click on the Field Explorer button in the Crystal Reports Standard toolbar. Figure 2.1 shows the sample Crystal Report created in the last chapter with the Field Explorer activated and docked on the right side of the screen. As previously mentioned, this can be docked on either side of the designer or at the bottom the screen. Alternatively, the Field Explorer can freely float over any part of the design window by simply dragging and dropping it.
Figure 2.1. Crystal Reports Designer with the Field Explorer docked on the right side.

The next seven sections introduce the different types of fields accessible from the Field Explorer and provide ideas on where they might be used in a report. Subsequent chapters in the book cover some advanced uses of these types of fields. Before moving on to explore these different types of fields, here are some common traits shared by all field types:
- Fields that are being used in the report or fields that have been used by other fields (for example, formulas) being used in the report are highlighted with a green check mark in front of them.
- The buttons along the top of the Field Explorer (Insert, Browse, New, Edit, Rename, and Delete) are enabled or disabled based on the availability of the selected Field type.
- Detailed report field formatting, positioning, and resizing are covered in Chapter 6, "Fundamentals of Report Formatting."
Accessing Database Fields
The Database Fields branch of the Field Explorer tree is used to add database fields to your report. The fields that can be added to your report are those from standard database tables, views, stored procedures, synonyms, and system tables. To add additional tables or other data sources to your report, you would use the Database Expert under the Database menu.
To insert the database fields that are available from the Field Explorer into your report, either click and drag them into the desired location on the report or select them, click the Insert to Report button (or Insert to Report action from the right-click menu), and then select the desired location on the report for the highlighted fields.
TIP
If you are uncertain of exactly which fields to add to your report because of ambiguous (for example, WERKS, MENGE, LEAFS) or similar (for example, District, Region, Locale, Division) field names, you might be able to determine the appropriate field by selecting the respective field and using the Browse button (or the Browse action from the right-click menu) to view the data type and sample values of data from the table.
Multiple fields can be highlighted simultaneously in the Field Explorer and placed in the report designer window at once. Crystal Reports drops the first of the multiple chosen fields in the selected location on the report and places the subsequent fields in order to the right of the initial field. If the report's layout runs out of real estate on the right side of the report, the subsequent fields are placed one line down and the placement algorithm continues.
Accessing Formula Fields
Formula fields provide a means to add derived fields (that is, those not directly available in your database) such as a calculation into your Crystal Reports. Crystal Reports treats derived formula fields in exactly the same manner as it does original database fields. Some examples of where formulas might be used on the sample report from Chapter 1 would include the following:
- Days Until Shipped: A date formula determining the difference between the two database fieldsOrder Date and Ship Date
- Next Years Sales Projection: A numeric formula that multiplies the database field Last Years Sales by 110%
- Custom Name Field: To include the first letter of a customer contact's First Name (a database field) concatenated with a space and the contact's last name (another database field)
The formula fields branch of the Field Explorer tree is used to add existing or new formula fields to a report. A listing of previously created formulas appears in this part of the Field Explorer tree. Once created, existing formulas are added to the report by either clicking and dragging and dropping or by selecting the formula and using the Insert functionalityavailable through the right-click menu or Field Explorer action buttonand then selecting the location.
TIP
Both simple and complex formulas can be created on any type of field including numeric, date, string, Boolean, or memo fields. This is explored in Chapters 11, "Using Record Selections and Alerts for Interactive Reporting," and 13, "Using Formulas and Custom Functions."
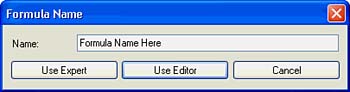
If a new formula is required, it can be created directly from the Field Explorer by using the New toolbar button. You are prompted to name the new formula and then select the method of creation. This dialog is displayed in Figure 2.2.
Figure 2.2. The Formula Name dialog requires specification of a formula name.
Using the Xtreme Sample Database and the sample report created in Chapter 1 (chap1Wizard.rpt), one simple formula you might want to add is a Full Name field that comprises both the first and last name of the customer's contact person (Contact First Name and Contact Last Name in the Customer sample table).
To perform this task, implement the following steps:
- After opening the Chap1Wizard report, highlight the Formula Fields branch of the Field Explorer tree.
- Select New either by using the New button or right-clicking and selecting New from the fly-out menu.
- Enter the Formula Name Full Name in the Formula Creation dialog and select the Formula Editor using the Use Editor button.
- Scroll down in the Report Fields window (the top-left window in the main frame) to locate and open the Customer table. Select the Contact First Name field by double-clicking on it. The field displays in the main Formula Editing window.
- Add a space after the Contact First Name field and then type in + " " +. This concatenates the two fields together and also adds a space between the first name and the last name.
- Scroll down in the Report Fields window (the top-left window in the main frame) to locate and open the Customer table. Select the Contact Last Name field by double-clicking on it. The field is displayed in the main Formula Editing window.
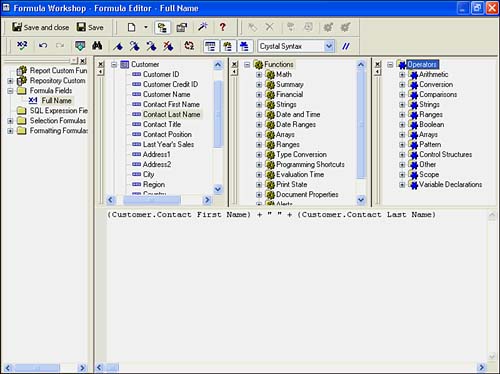
- When you have confirmed that the main formula window looks exactly like that shown in Figure 2.3, save the Full Name formula by clicking the Save button and then closing the main Formula Editor window.
Figure 2.3. This is the Formula Editor after you created a String concatenation formula.
By selecting Save in the Formula Editor, you return to the Field Explorer and the new formula, Full Name, is now available to be placed on the report. Finish this section by placing the Full Name Formula Field onto the report beside the Customer Name.
Accessing SQL Expression Fields
The SQL Expression Fields branch of the Field Explorer tree is used to add existing or new SQL Expression fields to a report. A listing of previously created SQL Expressions appears in this part of the Field Explorer tree. Once created, existing SQL Expressions are added to the report by either clicking and dragging and dropping or by selecting the SQL Expressionusing the Insert into Report button or action on the right-click menuand selecting the location.
SQL Expressions are created in the same Formula Editor as formulas but use Structured Query Language (SQL) statements (rather than the formula syntax). SQL Expressions are used in cases where report-processing efficiency is critical. Using SQL expressions can give report designers greater report processing performance by pushing data processing to the database server instead of the Crystal Reports engine as this is generally most efficient.
 For more information on SQL, p. 820
NOTE
The SQL syntax created in SQL Expressions must be appropriate to the source database. Different databases support various syntactical versions of SQL and even diverse degrees of functionality. This is explored in Appendix A, "Using SQL Queries in Crystal Reports."
Accessing Parameter Fields
Parameter fields provide a means to create dynamic reports and provide your business users with an interactive method of driving the report content or layout they view. When a Crystal Report contains parameters, it requests certain pieces of information from the business user before processing. The involved Crystal Report can then use those inputted parameters to filter the data that is presented or even suppress entire report sections. Some examples of where parameters might be used include
- A region parameter on a sales report
- A profit center on a financial report
- Beginning and ending dates on a transactional report
- A department on an HR salary listing report
- A salesperson name on a customer order listing report
The Parameter Fields branch of the Field Explorer tree is used to add existing or new parameter fields to your report. A listing of previously created parameters appears in this part of the Field Explorer tree. Once created, Parameter fields are added to the report by either clicking and dragging and dropping or by selecting the Parameter Fieldusing the Insert into Report button or action on the right-click menuand selecting the location.
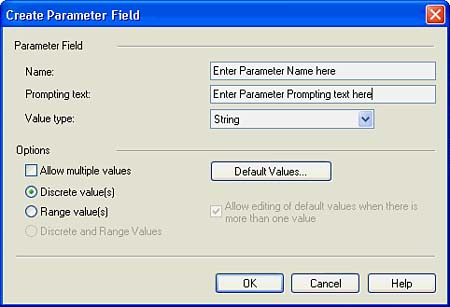
If a new parameter is required, it can also be created directly from the Field Explorer by using the New toolbar button. You are prompted to name the new parameter and enter some supporting information. This dialog is displayed in Figure 2.4.
Figure 2.4. The Create Parameter Field dialog enables you to specify a parameter name and supporting parameter type information.
For detailed information on parameter creation and use as a means to filter report information, p. 129
At this point, it is only important to note the location of this field type.
Implementing Running Total Fields
Running total fields provide a means to incrementally calculate a total on a report as the records are processed. In contrast to the summary fields you will learn about later in the book, running total fields enable you to control how a total is calculated, when it is reset, and when it is displayed. Some examples in which running total fields might be used include
- Running Total of Web site hits over multiple Days/Weeks/Months and so on
- Running Total of sales expenses over Weeks in a Quarter or Fiscal Year
- Running Total of average order amount over time
- Running Total of employee count over time
The Running Total Fields branch of the Field Explorer tree is used to add existing or new running total fields to your report. A listing of previously created running totals appears in this part of the Field Explorer tree. Once created, existing running total fields are added to the report by either clicking and dragging and dropping or by selecting the Running Total Fieldusing the Insert into Report button or action on the right-click menuand selecting the location.
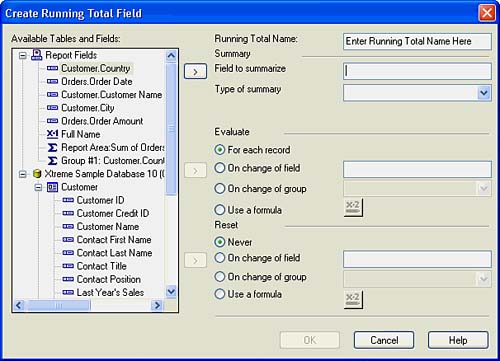
If a new running total is required, it can be created directly from the Field Explorer by using the New toolbar button. You are prompted to name the new running total. Select the field to calculate the running total on, the type of running total (for example, sum, average, variance, and so on), and some other supporting information about when the running total is to be evaluated and reset as shown in Figure 2.5.
Figure 2.5. The Create Running Total Field dialog enables you to specify a Running Total Name and its supporting information.
In the sample Customer Order Listing report from Chapter 1, an interesting running total to add would be one on the average order amount over time within each country. This running total tells senior sales management whether the average order size for each country is increasing or decreasing over time. To create this running total, follow these steps:
- Open the sample report from Chapter 1 (Chap1Manual.rpt). Sort the data by ascending date by accessing the Record Sorting Expert from either the Report menu or the Record Sort icon on the Expert Tools toolbar. Then select Order Date as a secondary sort order after Country.
- Highlight the Running Total Fields branch of the Field Explorer tree.
- Select New using either the New toolbar button or by right-clicking and selecting New from the pop-up menu. This opens the dialog shown in Figure 2.5.
- Enter the name Avg Order Size for the Running Total Name.
- Select the Order Amount field from the Order Table as the Field to summarize by highlighting it in the field selection window and clicking on the Select button (>).
- Because you want an average summary instead of the default Sum summary, select this from the Type of Summary drop-down box.
- You want to calculate the average order amount for each order, so select the For Each Record option in the Evaluate section.
- Because you want to calculate this for each Country, select the Reset On Change of Group option and select the Country group in the Reset section and click OK to finish.
The completed Running Total dialog is shown in Figure 2.6
Figure 2.6. The Edit Running Total Field dialog with Average Order Size Running Total Information entered.
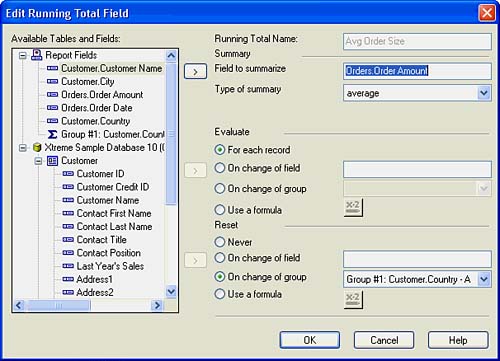
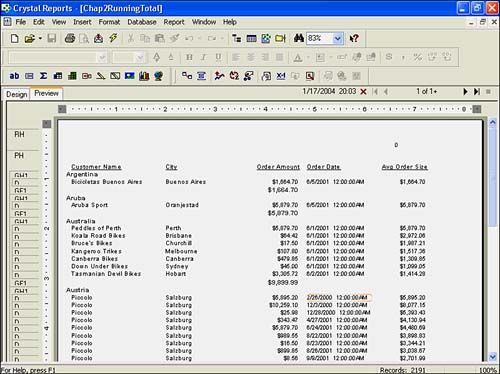
After the running total has been created, it only needs to be dragged onto the report in the appropriate section. In this example, the appropriate section is the Detail section to show a changing average order size for every order. The Updated Sample Customer Order report is shown in Figure 2.7. Notice the changing average order size being calculated for each record. This type of report can now provide increasing value to senior sales management.
Figure 2.7. A sample Orders report with Running Average Total on Order Size for each sales rep.
TIP
It's not necessary to place running total fields exclusively in the Details Section of your reports. By placing running total fields in different sections of your report, you can receive very interesting results. For example, if you place a running total in a Group Footer section, the running total displays the selected running total up to and including the current group. This can be very useful when analyzing average order size over time and grouping by month or quarter (for example, where you are only interested in some form of aggregated running total).
As highlighted in the Running Total dialog, it is possible to both evaluate and reset the running total fields based on four different options. The first three are self-explanatoryfor each record, on the change of a specified field, or on the change of a specified group. The last option, using a formula, is a powerful and flexible option that should be more fully explored after reviewing Chapter 13, on formula creation. In its simplest description, this option enables the creation of a conditional running total or the reset of that running total based on the results of a formula you have created.
For detailed information on using formulas, p. 282
TIP
A good use of this conditional summing is the creation of a running total that calculates the sum of all orders, but only evaluates (or sums in this case) the running total when the total order amount on a given record is greater than a certain amount (for example, 1,000). This running total, in effect, would provide a running total of only large orders so that business analysts can determine the percentage of revenue derived from large orders. Another common usage of this functionality is for financial statements (such as income statements) where a number of General Ledger transactions compose the rows retrieved from the database and different Running Totals are used to conditionally add the associated transaction value to their total if and only if certain conditions are met (for example, a certain account code is associated with the transaction value). The resulting running totals are then placed in a report to present financial statementoriented information such as Total Revenue, Operating Costs, Investment Income, Taxes, and so on.
Using Group Name Fields
Group Name fields only exist in a report after you have specified one or more groups to add to your report. You will read about that functionality later in this chapter. Group Name fields are created at the same time you add a Grouping to a report. Once created, existing Group Name fields are added to the report by either clicking and dragging and dropping or by selecting the Group Nameusing the Insert into Report button or action on the right-click menuand selecting the location.
Special Fields
The special fields in the Field Explorer are a number of system fields that Crystal Reports provides. These system fields and a brief description are presented in Table 2.1. The new fields are suffixed with a *10.
|
Field |
Description |
Valid Locations on Report |
|---|---|---|
|
Current CE User ID*10 |
The ID number of the current Crystal Enterprise user (if one exists). |
Anywhere |
|
Current CE User Name*10 |
The username of the current Crystal Enterprise user (if one exists). |
Anywhere |
|
Data Date |
The date the data in your report was las t retrieved. |
Anywhere |
|
Data Time |
The time the data in your report was last retrieved. |
Anywhere |
|
File Author |
The author of the report. This is set in Document Properties (File, Summary Info in the menu). |
Anywhere |
|
File Creation Date |
The date the report was created. |
Anywhere |
|
File Path and Name |
The file path and name for the report. |
Anywhere |
|
Group Number |
An automatically created group numbering field. |
Group Header or Group Footer sections only |
|
Group Selection Formula |
The current report's group selection formula. This is created by using the Select Expert covered in Chapter6. |
Anywhere |
|
Horizontal Page Number*10 |
The current horizontal page number of a report using either a Cross-Tab or an OLAP Grid. |
Anywhere |
|
Modification Date |
Date that the report was last modified (in any way). |
Anywhere |
|
Modification Time |
Time that the report was last modified (in any way). |
Anywhere |
|
Page N of M |
Indicates current page on report relative to total number of pages. |
Anywhere |
|
Page Number |
The current page number. |
Anywhere |
|
Print Date |
Either the current date or a date specified in the Set Print Date and Time dialog under the Reports, Set Print and Date Time option. |
Anywhere |
|
Print Time |
Either the current time or a time specified in the Set Print Date and Time dialog under the Reports, Set Print and Date Time option. |
Anywhere |
|
Record Number |
An automatically created number that counts the records in the detail section of your report. |
Details Section |
|
Record Selection Formula |
The current report's record selection formula. This is created by using the Select Expert covered in Chapter 7. |
Anywhere |
|
Report Comments |
Comments summarizing the report. This is set in Document Properties (choose File, Summary Info in the menu). |
Anywherebut only the first 256 characters are printed. |
|
Report Title |
The title of the report set in the Document Properties dialog (File, Summary Info in the menu). |
Anywhere |
|
Total Page Count |
The total number of pages for this report. |
Anywhere |
These special fields are added to the report by either clicking and dragging and dropping or by selecting the Special Fieldusing the Insert into Report button or action on the right-click menuand selecting the location.
Part I. Crystal Reports Design
Creating and Designing Basic Reports
- Creating and Designing Basic Reports
- Introducing the Crystal Reports Designer
- Understanding Data and Data Sources
- Introduction to the Data Explorer
- Adding Database Objects to Your Report
- Joining Database Objects Together
- Understanding the Different Join Types
- Using the Report Creation Wizards
- Understanding the Crystal Reports Gallery
- Using the Standard Report Creation Wizard
- Creating a Report Without Wizards
- Troubleshooting
Selecting and Grouping Data
- Selecting and Grouping Data
- Introduction
- Understanding Field Objects
- Working with Groups
- Understanding Drill-down Reports
- Troubleshooting
Filtering, Sorting, and Summarizing Data
- Filtering, Sorting, and Summarizing Data
- Introduction
- Filtering the Data in Your Report
- Learning to Sort Records
- Working with the Sort Expert
- Creating Effective Summaries
- Troubleshooting
Understanding and Implementing Formulas
- Understanding and Implementing Formulas
- Introduction
- Using the Formula Workshop
- Using the Workshop Formula Editor
- Creating Formulas with the Formula Expert
- Using the Formula Extractor to Create Custom Functions
- The Multi-Pass Reporting Process of the Crystal Reports Engine
- Troubleshooting
Implementing Parameters for Dynamic Reporting
- Implementing Parameters for Dynamic Reporting
- Introduction
- Understanding the Value of Parameters
- Creating and Implementing Parameters Fields
- Using Parameters with Record Selections
Part II. Formatting Crystal Reports
Fundamentals of Report Formatting
- Fundamentals of Report Formatting
- Introduction
- Positioning and Sizing Report Objects
- Modifying Object Properties for Formatting Purposes
- Exploring the Format Editor Dialog Common Options
- Combining and Layering Report Objects
- Configuring Report Page and Margin Properties
Working with Report Sections
- Working with Report Sections
- Introduction
- Formatting Report Sections
- Modifying Report Section Properties
- Using Multiple Report Sections
- Troubleshooting
Visualizing Your Data with Charts and Maps
- Visualizing Your Data with Charts and Maps
- Introduction to Charts and Maps
- Using the Chart Expert
- Using the Map Expert
- Modifying Chart and Map Properties
- Troubleshooting
Custom Formatting Techniques
- Introduction
- Making Presentation-Quality Reports
- Common Formatting Features
- Conditional Formatting Using Data to Drive the Look of a Report
Part III. Advanced Crystal Reports Design
Using Cross-Tabs for Summarized Reporting
- Using Cross-Tabs for Summarized Reporting
- Introduction to Cross-Tabs
- Benefits of Cross-Tabs
- Using the Cross-Tab Wizard
- Using Top N with Cross-Tabs Reports
- Using Advanced Cross-Tab Features
Using Record Selections and Alerts for Interactive Reporting
- Using Record Selections and Alerts for Interactive Reporting
- Creating Advanced Record Selection Formulas
- Adding Alerting to Your Reports
- Performance Monitoring and Tuning
Using Subreports and Multi-Pass Reporting
- Using Subreports and Multi-Pass Reporting
- Understanding Subreports
- Understanding Linked Versus Unlinked Subreports
- Considering Subreport Execution Time and Performance
- Using Variables to Pass Data Between Reports
- Emulating Nested Subreports
- Troubleshooting
Using Formulas and Custom Functions
- Using Formulas and Custom Functions
- Becoming More Productive with Formulas
- Choosing a Formula Language: Crystal Versus Basic Syntax
- Using Brackets in Formulas
- Using Characters in Formulas
- Recent Improvements to Formulas
Designing Effective Report Templates
- Designing Effective Report Templates
- Understanding the Importance of Reuse in Reporting
- Understanding Report Templates
- Using Report Templates
- Using Existing Crystal Reports as Templates
- Understanding How Templates Work
- Creating Useful Report Templates
- Using Template Field Objects
- Using Report Templates to Reduce Report Creation Effort
- Applying Multiple Templates
Additional Data Sources for Crystal Reports
- Additional Data Sources for Crystal Reports
- Understanding the Additional Crystal Reports Data Sources
- Connecting to COM-based Data Sources
- Connecting to Java-based Data Sources
- Understanding Solution Kits for Crystal Enterprise
- Troubleshooting
Multidimensional Reporting Against OLAP Data with Crystal Reports
- Multidimensional Reporting Against OLAP Data with Crystal Reports
- Introduction to OLAP
- OLAP Concepts and OLAP Reporting
- Recently Added or Changed OLAP Features in Crystal Reports
- Using the OLAP Report Creation Wizard and OLAP Expert
- Advanced OLAP Reporting
- Introduction to Crystal Analysis
Part IV. Enterprise Report Design Analytic, Web-based, and Excel Report Design
Introduction to Crystal Repository
- Introduction to Crystal Repository
- What Is the Crystal Repository?
- Why Implement the Crystal Repository?
- Installing the Crystal Repository
- Adding Objects to and from the Repository
- Migration of the Crystal Enterprise Repository
- Troubleshooting
Crystal Reports Semantic Layer Business Views
- Crystal Reports Semantic Layer Business Views
- Introduction to Business Views
- Why Implement Business Views?
- Performance and Implementation Considerations
- Business Views Architecture and Implementation
- Troubleshooting
Creating Crystal Analysis Reports
- Creating Crystal Analysis Reports
- Introduction
- Introducing Crystal Analysis
- Accessing OLAP Data with Crystal Analysis
- Designing Crystal Analysis Reports and Applications
- Adding Crystal Analysis Objects to a Report
- Troubleshooting
Advanced Crystal Analysis Report Design
- Advanced Crystal Analysis Report Design
- Introduction
- Advanced Crystal Analysis Designer Tools
- Custom Calculations and Advanced Data Analysis
- Setting Report Options
- Troubleshooting
- Crystal Analysis in the Real World MDX
Ad-Hoc Application and Excel Plug-in for Ad-Hoc and Analytic Reporting
- Ad-Hoc Application and Excel Plug-in for Ad-Hoc and Analytic Reporting
- Introducing Ad-Hoc Reporting Conceptually
- Introducing the Crystal Enterprise Ad-Hoc Reporting Application
- Crystal Reports Excel Plug-in
- Crystal Analysis Excel Plug-in
Part V. Web Report Distribution Using Crystal Enterprise
Introduction to Crystal Enterprise
- Introduction to Crystal Enterprise
- What Is Crystal Enterprise?
- Why Implement a Crystal Enterprise Solution?
- Versions of Crystal Enterprise
- Understanding the Core Functions of Crystal Enterprise
Using Crystal Enterprise with Web Desktop
- Using Crystal Enterprise with Web Desktop
- Introduction
- Crystal Enterprise User Launchpad
- Crystal Enterprise Web Desktop
- Customizing the Web Desktop and Report Viewers
- Publishing to the Web Desktop
- Customizing the Web Desktop
- Troubleshooting
Crystal Enterprise Architecture
- Crystal Enterprise Architecture
- Introduction
- Crystal Enterprise Architecture Overview
- The Client Tier
- The Application Tier
- The Server Tier: Introduction to the Crystal Enterprise Framework
- The Server Tier: Overview of the Crystal Enterprise Services
- The Data Tier
- The Crystal Enterprise Architecture in Action
- Taking Advantage of the Crystal Enterprise Distributed Architecture
- Extending Crystal Enterprise
Planning Considerations When Deploying Crystal Enterprise
- Planning Considerations When Deploying Crystal Enterprise
- Ensuring a Successful Crystal Enterprise Implementation
- Approaching the Project
- Identifying Business Pain
- Establishing Project Requirements
- Understanding Organizational Reporting Requirements
- Troubleshooting
Deploying Crystal Enterprise in a Complex Network Environment
- Deploying Crystal Enterprise in a Complex Network Environment
- Introduction
- Understanding Network Protocols
- Understanding Firewall Types
- Configuring the Crystal Enterprise Architecture for Your Network Environment
- Interaction Between the WCS and the WC
- Deploying Crystal Enterprise with an IP Packet Filtering Firewall
- Using Crystal Enterprise with NAT
- Exploring the NAT and Crystal Enterprise Relationship
- Crystal Enterprise and Proxy Servers
Administering and Configuring Crystal Enterprise
- Introduction
- Using the Crystal Management Console
- Managing Accounts
- Managing Content
- Introducing Servers
- Managing Crystal Enterprise System Settings
- Using the Crystal Configuration Manager
Part VI. Customized Report Distribution Using Crystal Reports Components
Java Reporting Components
- Java Reporting Components
- Overview of the Crystal Reports Java Reporting Component
- Understanding the Java Reporting Components Architecture
- Differences with the Java Reporting Engine
- Configuring the Application Server
- Delivering Reports in Web Applications
- Using the Crystal Tag Libraries
- Exporting Reports to Other File Formats
- Printing Reports from the Browser
- Common Programming Tasks
- Troubleshooting
Crystal Reports .NET Components
- Crystal Reports .NET Components
- Understanding Microsofts .NET Platform
- Understanding the Different Crystal .NET Components
- An Overview of the Crystal Reports 10 .NET Components
- The Report Designer
- The Report Engine Object Model
- Delivering Reports with the Windows Forms Viewer
- Delivering Reports with the Web Forms Viewer
- Database Credentials
- Setting Parameters
- Troubleshooting
COM Reporting Components
- COM Reporting Components
- Understanding the Report Designer Component
- Building Reports with the Visual Basic Report Designer
- Programming with the Report Engine Object Model
- Delivering Reports Using the Report Viewer
- Troubleshooting
Part VII. Customized Report Distribution Using Crystal Enterprise Embedded Edition
Introduction to Crystal Enterprise Embedded Edition
- Introduction to Crystal Enterprise Embedded Edition
- Introduction to Crystal Enterprise Embedded Edition
- Understanding Crystal Enterprise Embedded Edition
- Crystal Enterprise Embedded Edition Samples
- DHTML Report Design Wizard
- Troubleshooting
Crystal Enterprise Viewing Reports
- Crystal Enterprise Viewing Reports
- Viewing Reports over the Web
- Introduction to the Crystal Report Viewers
- Understanding the Report Source
- Implementing the Page Viewer
- Implementing the Part Viewer
- Implementing the Interactive Viewer
- Implementing the Grid Viewer
- Troubleshooting
Crystal Enterprise Embedded Report Modification and Creation
- Introduction
- Deploying RAS Environments
- Loading Report Files
- Locating RAS Components in a Network Architecture
- Installing the RAS SDK
- Best Practices in RAS Exception Handling
- The RAS SDK in Action
Part VIII. Customized Report Distribution Using Crystal Enterprise Professional
Introduction to the Crystal Enterprise Professional Object Model
- Introduction to the Crystal Enterprise Professional Object Model
- Understanding the Crystal Enterprise Object Model
- Establishing a Crystal Enterprise Session
- Querying the Crystal Enterprise Repository
- Viewing Reports
- The Crystal Enterprise Java SDK
- Accessing the Java SDK
- Troubleshooting
Creating Enterprise Reports Applications with Crystal Enterprise Part I
- Creating Enterprise Reports Applications with Crystal Enterprise Part I
- Advanced Scenarios with the Crystal Enterprise Object Model
- Scheduling Reports
- Scheduling to a Destination
- Using Crystal Enterprise Notifications
- Scheduling to a Server Group
- Scheduling to a Specific Format
- Setting Database Credentials
- Troubleshooting
Creating Enterprise Reporting Applications with Crystal Enterprise Part II
- Creating Enterprise Reporting Applications with Crystal Enterprise Part II
- Querying the Crystal Enterprise InfoStore
- Creating and Responding to Crystal Enterprise Alerts
- Creating Schedulable Program Objects
- Troubleshooting
Appendix A. Using Sql Queries In Crystal Reports
Creating Enterprise Reporting Applications with Crystal Enterprise Part II
EAN: 2147483647
Pages: 341
- Chapter III Two Models of Online Patronage: Why Do Consumers Shop on the Internet?
- Chapter VIII Personalization Systems and Their Deployment as Web Site Interface Design Decisions
- Chapter XIII Shopping Agent Web Sites: A Comparative Shopping Environment
- Chapter XVI Turning Web Surfers into Loyal Customers: Cognitive Lock-In Through Interface Design and Web Site Usability
- Chapter XVII Internet Markets and E-Loyalty
