Accessing the Cisco ASA Appliances
Cisco ASA provides two types of user interface:
- Command-line interface (CLI)
- Graphical user interface (GUI)
The CLI provides nongraphical access to the Cisco ASA. The CLI can be accessed from a console, Telnet, or Secure Shell (SSH) session. Telnet and SSH are discussed later in the chapter, in the "Remote System Management" Section. The security appliance can also use Adaptive Security Device Manager (ASDM), a GUI-based application to configure the different security and networking features. ASDM is discussed in later chapters within Part V, "Adaptive Security Device Manager."
Establishing a Console Connection
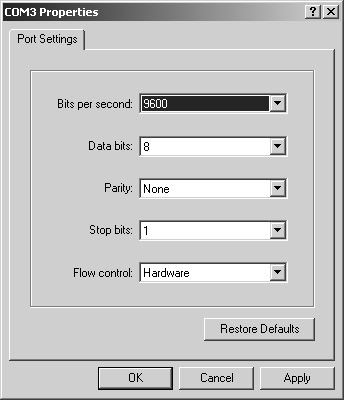
A new security appliance, by default, has no IP addresses assigned to its interfaces. To access the CLI, you need to have a successful connection to the console port of the security appliance. The console port is a serial asynchronous port with the settings listed in Table 4-1.
|
Parameters |
Value |
|---|---|
|
Baud rate |
9600 |
|
Data bits |
8 |
|
Parity |
None |
|
Stop bits |
1 |
|
Flow control |
Hardware |
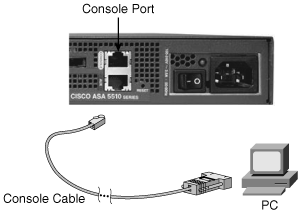
The console port on the security appliance can be connected to a serial port on a PC using a flat rolled console cable, with a DB9 serial adapter on one end and a RJ-45 port on the other. The DB9 side of the cable goes to the serial port of a PC, while the RJ-45 end of the cable goes to the console port of the security appliance, as illustrated in Figure 4-1.
Figure 4-1. Console Port Connectivity from a Computer
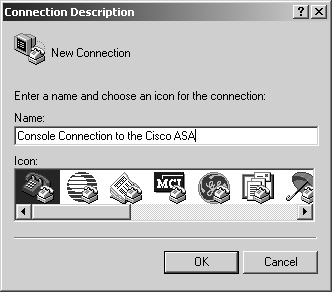
After connecting the console cable to the security appliance and the computer, launch terminal-emulation software, such as HyperTerminal or TeraTerm, to send and receive output. You can launch HyperTerminal by navigating to Start > Programs > Accessories > Communications > HyperTerminal on a Windows-based PC. The initial configuration window of HyperTerminal is shown in Figure 4-2. In the Connection Description dialog box, you can enter a connection name to identify this session as a unique connection. A connection name of Console Connection to the Cisco ASA is specified in Figure 4-2. You can choose an icon to associate with the connection entry. After filling out the connection name and selecting an icon, click OK to proceed to the Connect To window.
Figure 4-2. Initial Configuration of HyperTerminal
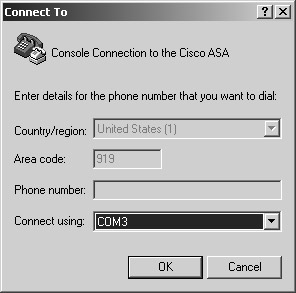
Specify the connection type in the Connect To window. Because the console port uses an asynchronous serial connection, the HyperTerminal setting must use a COM port. As illustrated in Figure 4-3, COM3 is being set up for the serial connection to the security appliance. After you are done, click OK to proceed to the last configuration window.
Figure 4-3. Setting HyperTerminal Connection Type
The next window is used to configure port properties, such as the baud rate and flow control. Figure 4-4 shows HyperTerminal set up with the values listed in Table 4-1. After configuring the port settings, click OK to complete the configuration setup.
Figure 4-4. Setting HyperTerminal Port Specification
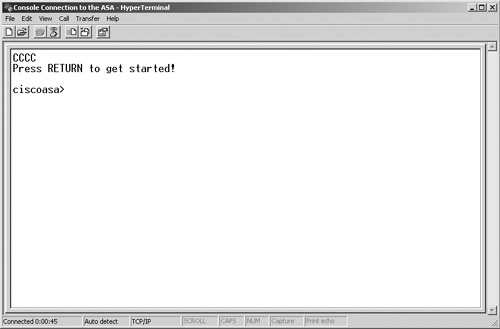
The HyperTerminal application is ready to transmit and receive data from the security appliance. If you press Enter a few times, you should see a ciscoasa> prompt in the HyperTerminal window, as shown in Figure 4-5.
Figure 4-5. Initial Command Prompt in HyperTerminal
The next section describes how to use the CLI after establishing a successful console connection.
Command-Line Interface
After a successful console connection, the security appliance is ready to accept your commands. The Cisco ASA contains a similar command set structure as a Cisco IOS router and offers the following access modes:
- User mode, also known as user access mode
- Privileged mode
- Configuration mode
- Sub-configuration mode
- ROMMON mode
User mode, shown as the hostname with a > sign, is the first mode of access available when you log into the security appliance. This mode offers a limited set of commands that is useful in obtaining basic information about the security appliance. One of the important commands in this mode is enable, which prompts a user to specify a password to log into privileged mode.
Privileged mode, shown as the host name with a # sign, gives full access to a user after a successful logon. This mode also allows execution of all the commands that are available in user mode. The security appliance offers a rich set of monitoring and troubleshooting commands to check the health of different processes and features in the security appliance. One of the important commands in this mode is configure terminal, which places a user in configuration mode.
Note
The security appliance enables you to restrict what a user can do by implementing command authorization. This is covered in Chapter 7, "Authentication, Authorization, and Accounting (AAA)."
Configuration mode, displayed as the host name with a (config)# prompt, allows a user to enable or disable a feature, set up security and networking components, and tweak the default parameters. This mode not only allows the user to configure the security appliance, but also allows the use of all the commands that are available in the user and privileged modes. A user may enter into the sub-configuration mode of different features from this mode.
Sub-configuration mode, displayed as the hostname with a (config-xxxx)# prompt, lets a user configure specific networking or security features on the security appliance. The xxxx is replaced by the process/feature keyword that is being configured on the security appliance. For example, if a user is setting up specific parameters on an interface, the prompt changes to (config-if). Sub-configuration mode allows the user to execute all the configuration mode commands as well as the user and privileged mode commands.
In Example 4-1, a user logs into privileged mode from user access mode by typing the enable command. The security appliance prompts a user to specify a password to gain privileged mode access. If the security appliance has the default configuration, it uses a null (no) password to grant access. After logging into privileged mode, the user types configure terminal to access configuration mode. The user enters into interface subconfiguration mode by typing the interface GigabitEthernet0/0 command. To go back to the previous mode, the user can enter exit or quit, as shown in Example 4-1.
Example 4-1. Accessing the Privileged and Configuration Modes
ciscoasa> enable

Password:

ciscoasa# configure terminal

ciscoasa(config)# interface GigabitEthernet0/0

ciscoasa(config-if)# exit

ciscoasa(config)# exit

ciscoasa#
In the preceding example, the administrator of the security appliance typed exit twice to return to the privileged mode prompt. Optionally, you can type end to return to privileged mode from any configuration mode.
Tip
Like a Cisco IOS router, the security appliance also allows you to press the Tab key to complete a partial command. For example, to enter a show command, type sho and press the Tab key. The security appliance displays the complete show command on the screen.
The security appliance allows you to abbreviate commands and keywords to the number of characters that identify a distinct abbreviation. For example, you can abbreviate the enable command as en.
All the supported options and arguments of a command are displayed when you type ? after the command. For example, you can type show ? to see all the options that are supported under the show command.
The security appliance also provides a brief description and command syntax when you type help followed by the command. For example, when you type help reload, the security appliance shows the command syntax for reload, a description, and the supported arguments.
The security appliance uses ROMMON mode (Read-Only-Memory Monitor mode) when it does not find a bootable image or when an administrator forces it to enter into that mode. In ROMMON mode, you can use a TFTP server to load a system image into the security appliance. ROMMON mode is also used to recover the system password, discussed later in this chapter under "Image Recovery Using ROMMON."
Part I: Product Overview
Introduction to Network Security
- Introduction to Network Security
- Firewall Technologies
- Intrusion Detection and Prevention Technologies
- Network-Based Attacks
- Virtual Private Networks
- Summary
Product History
- Product History
- Cisco Firewall Products
- Cisco IDS Products
- Cisco VPN Products
- Cisco ASA All-in-One Solution
- Summary
Hardware Overview
Part II: Firewall Solution
Initial Setup and System Maintenance
- Initial Setup and System Maintenance
- Accessing the Cisco ASA Appliances
- Managing Licenses
- Initial Setup
- IP Version 6
- Setting Up the System Clock
- Configuration Management
- Remote System Management
- System Maintenance
- System Monitoring
- Summary
Network Access Control
- Network Access Control
- Packet Filtering
- Advanced ACL Features
- Content and URL Filtering
- Deployment Scenarios Using ACLs
- Monitoring Network Access Control
- Understanding Address Translation
- DNS Doctoring
- Monitoring Address Translations
- Summary
IP Routing
Authentication, Authorization, and Accounting (AAA)
- Authentication, Authorization, and Accounting (AAA)
- AAA Protocols and Services Supported by Cisco ASA
- Defining an Authentication Server
- Configuring Authentication of Administrative Sessions
- Authenticating Firewall Sessions (Cut-Through Proxy Feature)
- Configuring Authorization
- Configuring Accounting
- Deployment Scenarios
- Troubleshooting AAA
- Summary
Application Inspection
- Application Inspection
- Enabling Application Inspection Using the Modular Policy Framework
- Selective Inspection
- Computer Telephony Interface Quick Buffer Encoding Inspection
- Domain Name System
- Extended Simple Mail Transfer Protocol
- File Transfer Protocol
- General Packet Radio Service Tunneling Protocol
- H.323
- HTTP
- ICMP
- ILS
- MGCP
- NetBIOS
- PPTP
- Sun RPC
- RSH
- RTSP
- SIP
- Skinny
- SNMP
- SQL*Net
- TFTP
- XDMCP
- Deployment Scenarios
- Summary
Security Contexts
- Security Contexts
- Architectural Overview
- Configuration of Security Contexts
- Deployment Scenarios
- Monitoring and Troubleshooting the Security Contexts
- Summary
Transparent Firewalls
- Transparent Firewalls
- Architectural Overview
- Transparent Firewalls and VPNs
- Configuration of Transparent Firewall
- Deployment Scenarios
- Monitoring and Troubleshooting the Transparent Firewall
- Summary
Failover and Redundancy
- Failover and Redundancy
- Architectural Overview
- Failover Configuration
- Deployment Scenarios
- Monitoring and Troubleshooting Failovers
- Summary
Quality of Service
- Quality of Service
- Architectural Overview
- Configuring Quality of Service
- QoS Deployment Scenarios
- Monitoring QoS
- Summary
Part III: Intrusion Prevention System (IPS) Solution
Intrusion Prevention System Integration
- Intrusion Prevention System Integration
- Adaptive Inspection Prevention Security Services Module Overview (AIP-SSM)
- Directing Traffic to the AIP-SSM
- AIP-SSM Module Software Recovery
- Additional IPS Features
- Summary
Configuring and Troubleshooting Cisco IPS Software via CLI
- Configuring and Troubleshooting Cisco IPS Software via CLI
- Cisco IPS Software Architecture
- Introduction to the CIPS 5.x Command-Line Interface
- User Administration
- AIP-SSM Maintenance
- Advanced Features and Configuration
- Summary
Part IV: Virtual Private Network (VPN) Solution
Site-to-Site IPSec VPNs
- Site-to-Site IPSec VPNs
- Preconfiguration Checklist
- Configuration Steps
- Advanced Features
- Optional Commands
- Deployment Scenarios
- Monitoring and Troubleshooting Site-to-Site IPSec VPNs
- Summary
Remote Access VPN
- Remote Access VPN
- Cisco IPSec Remote Access VPN Solution
- Advanced Cisco IPSec VPN Features
- Deployment Scenarios of Cisco IPSec VPN
- Monitoring and Troubleshooting Cisco Remote Access VPN
- Cisco WebVPN Solution
- Advanced WebVPN Features
- Deployment Scenarios of WebVPN
- Monitoring and Troubleshooting WebVPN
- Summary
Public Key Infrastructure (PKI)
- Public Key Infrastructure (PKI)
- Introduction to PKI
- Enrolling the Cisco ASA to a CA Using SCEP
- Manual (Cut-and-Paste) Enrollment
- Configuring CRL Options
- Configuring IPSec Site-to-Site Tunnels Using Certificates
- Configuring the Cisco ASA to Accept Remote-Access VPN Clients Using Certificates
- Troubleshooting PKI
- Summary
Part V: Adaptive Security Device Manager
Introduction to ASDM
- Introduction to ASDM
- Setting Up ASDM
- Initial Setup
- Functional Screens
- Interface Management
- System Clock
- Configuration Management
- Remote System Management
- System Maintenance
- System Monitoring
- Summary
Firewall Management Using ASDM
- Firewall Management Using ASDM
- Access Control Lists
- Address Translation
- Routing Protocols
- AAA
- Application Inspection
- Security Contexts
- Transparent Firewalls
- Failover
- QoS
- Summary
IPS Management Using ASDM
- IPS Management Using ASDM
- Accessing the IPS Device Management Console from ASDM
- Configuring Basic AIP-SSM Settings
- Advanced IPS Configuration and Monitoring Using ASDM
- Summary
VPN Management Using ASDM
- VPN Management Using ASDM
- Site-to-Site VPN Setup Using Preshared Keys
- Site-to-Site VPN Setup Using PKI
- Cisco Remote-Access IPSec VPN Setup
- WebVPN
- VPN Monitoring
- Summary
Case Studies
EAN: 2147483647
Pages: 231
