Managing Accounts
The most common use of the CMC is to manage user accounts. Although this chapter provides a review of managing user accounts, this should always be combined with an effective user-management strategy appropriate for your organization. For example, managing users is best accomplished through an effective group inheritance model, where object restrictions are never assigned to individual users, but rather to groups. When users are placed as members within those groups, they inherit the restrictions of the group. Often a single system of record, such as an LDAP or Active directory system, establishes one set of uses and groups that the entire organization and all software can use, greatly speeding user administration.
NOTE
Rights are not assigned to users or groups, but to the objects within Crystal Enterprise themselves (Reports and Folders). This is explained later in the chapter.
This section reviews all the various components that factor into account management, which includes users and groups.
Managing Users
To access Crystal Enterprise resources, a physical end user must possess a username. Upon initial installation, by default, Crystal Enterprise creates the Administrator user and the Guest user only.
The Guest account is a generic account meant for use in a scenario where certain global reports contain public information that could be accessed by anyone using Crystal Enterprise. Without an assigned username, a user can log on only as an administrator (if they know the password) or a guest (provided the Guest account remains enabled).
NOTE
The Administrator and Guest accounts are required for proper system functionality. The Guest account can be disabled by the system administrator; however, it should not be deleted.
All Crystal Enterprise permissions ultimately originate from, or apply to, individual user accounts/usernames. In light of this, one of the most important aspects of system administration is the creation of new user accounts or mapping accounts from the system of record. Whether adding one user or several hundred, the Crystal Management Console makes this process fast and intuitive. To begin adding new users, click the New User icon displayed on the main CMC screen (see Figure 27.3).
Figure 27.3. The initial CMC page for adding a new user.
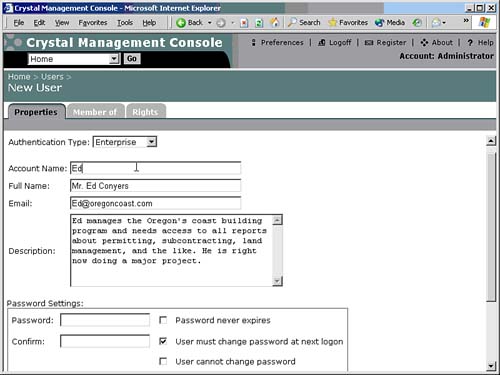
In the Account Name field, enter a unique name that the user enters to log on to Crystal Enterprise. Generally, usernames are entered as a single word in lowercase (for example, Ed for Ed Conyers). If the Crystal Enterprise administrator prefers, the username can contain mixed-case letters as well as spaces. Crystal Enterprise is not case sensitive to usernames.
Next, enter the users proper name in the Full Name field. The full name can contain mixed-case letters and spaces. A freeform text description can be included.
The Crystal Enterprise administrator can also specify a password in the Password Settings dialog; however, its not necessary because users can be forced to change their passwords the first time they log on. Checking Password Never Expires exempts the username from the Crystal Enterprise global password expiration rules (discussed later in this chapter). Selecting User Cannot Change Password prevents end users from changing their passwords in the future.
The Connection Type radio buttons enable the Crystal Enterprise administrator to indicate whether the username will capture a concurrent user license or a named user license when logged in to Crystal Enterprise. A concurrent user license is not absorbed unless the user is logged in to Crystal Enterprise.
After the users session ends, a default of 20 minutes, the concurrent license is released. This means that another user within Crystal Enterprise can log in to Crystal Enterprise and use the concurrent license. A named license is relinquished only when the username is deleted or changed to use a concurrent license. An in-depth discussion of license keys is covered later in this chapter in the Authorization section of the CMC.
After the required information for creating a new user is provided, click the OK button at the bottom of the screen. The new user is created. Refresh the User Properties screen. Note that the User Properties screen reload is the only confirmation that the new user was successfully added to the system.
After the User Properties screen has been reloaded, two new options appear at the bottom of the page. The Authentication setting enables you to specify whether the users password validation will be processed by Crystal Enterprise, LDAP, Windows NT, Active Directory, or even perhaps a system such as SAP via the Crystal Enterprise Solution Kit for SAP. By default, Crystal Enterprise handles authentication internally. The Account Is Disabled option disables an account without deleting it. Although the account can always be enabled again in the future, this is useful for employees who might take a leave of absence from the company.
Before leaving this screen, a new feature to version 10 should be covered. The Rights tab at the top of the User screen can confuse a new administrator into thinking that he can grant the user whose profile he is looking at certain system rights. Actually the opposite is true! The Rights tab, which appears on almost every object in Crystal Enterprise, supports a new feature called Delegated Administration, which enables different users to administer different portions of one Crystal Enterprise system. Use the tab to specify which users or groups have access to this object; in this case to the particular user you are looking at. So if you only enable access to this users profile for the Administrators group, another user logging onto the CMC will not see the user at all. In this way you can have administrators in different departments or functional areas do their own system maintenance without seeing the information of other groups or departments.
A list of all the users in the system, including the Crystal Enterprise administrator, can be accessed by selecting Users from the CMC drop-down menu (see Figure 27.4).
Figure 27.4. All user-management functions are accessible from the Users screen.
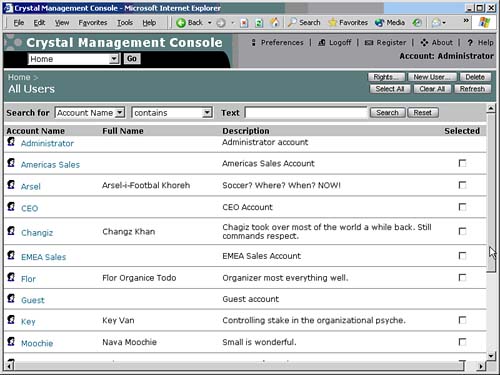
From the Users screen, you can search for specific usernames, edit an existing username, add a new user, or delete an existing user. To delete a username, place a check mark in the corresponding box on the right side of the screen. You can select more than one username. After a minimum of one username has been selected in this manner, click the Delete button at the top of the screen. The Crystal Management Console then prompts to confirm deletion of the user account. Again we see a Rights icon as wellagain this is to specify which user/group has the rights to see this portion of the administrative console.
Managing Groups
A user group is a collection of Crystal Enterprise users with one or more logical characteristics in common. For example, the users in the Marketing department should be grouped together based on the fact that they all belong to the same business division. Because these users work together, they are more likely to share the same reports. Creating groups such as marketing enables the system administrator to globally assign permissions to a broader audience.
Groups are useful for classifying users according to their job function and report needs. In most cases, its advisable to create a series of logical user groups to reduce the complexity of managing permissions in Crystal Enterprise.
TIP
Globally managing permissions for user groups is significantly less complex than trying to manage permissions for each individual user. However, there might be situations in which its desirable to make an exception to a groups security policy for a minimum number of users within that group. Crystal Enterprise has the flexibility to make object restriction exceptions on a user-by-user basis.
Crystal Enterprise contains three default user groups:
- Administrators
- Everyone
- New Sign-Up Accounts
The Administrators Group
The Administrators group is for system administrators only. Users who belong to this group have full, unrestricted access to Crystal Enterprise, including the capability to manage servers using the CMC. Administrators can run any report and access any report folder. Use discretion when adding users to this group.
The Everyone Group
The Everyone group contains all users by default. When new users are created, they are automatically enrolled in the Everyone group. The Everyone group is useful for globally setting permissions for all Crystal Enterprise users.
New Sign-Up Accounts
New Sign-Up Accounts is a special group that contains users who have created their own new accounts through the Register option in the Web Desktop. Note that this capability can be disabled.
Creating New User Groups
To create a new user group, click the New Group icon on the home CMC page (see Figure 27.5).
Figure 27.5. Creating new user groups is a fundamental system administration task. Its often helpful to seek input from business users when formulating user group names and hierarchies.
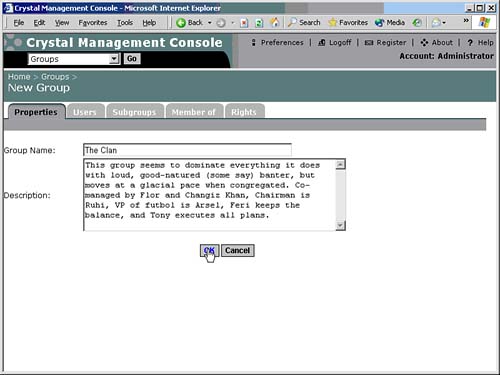
In the Group Name field, enter the group name exactly as it should appear in Crystal Enterprise. The group name field accepts upper- and lowercase, spaces, and punctuation. A freeform text description is optional. After the required information has been provided, click OK to create the group.
After clicking OK, the group creation screen should momentarily reload. This indicates that the group was created successfully. The Crystal Enterprise administrator now has access to three new tabs at the top of the screen: Users, Subgroups, and Member Of, shown in Figure 27.6.
Figure 27.6. New group management options are made available after the group has been created.

Adding Users to a Group
Creating a group name is the first step in configuring a new group. By default, the new group does not contain any users. You must click the Users tab to add users to the group (see Figure 27.7).
Figure 27.7. Initially, the Users tab is empty. New users can be added to the group by clicking on the Add/Remove Users button.
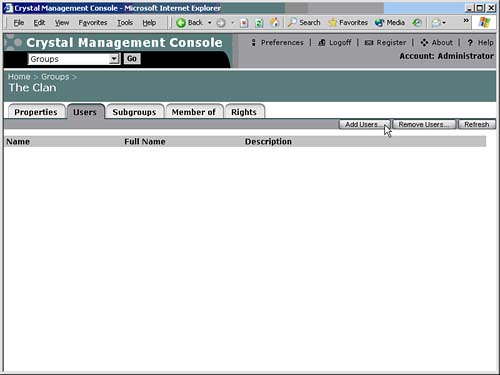
The Users tab does not contain any users initially. To add users to the new group, click the Add Users button at the top of the screen. A list of all Crystal Enterprise users appears on the left side of the screen, as shown in Figure 27.8. Highlight the users to add to the group. You can select several, noncontiguous names by holding down the Ctrl key when clicking. After the desired usernames are highlighted, click the Add button to verify the selection. Highlighted users are moved from the Available list to the Users list. When satisfied with the selections, click OK to commit, as shown in Figure 27.9.
Figure 27.8. All Crystal Enterprise users appear in the list box on the left.
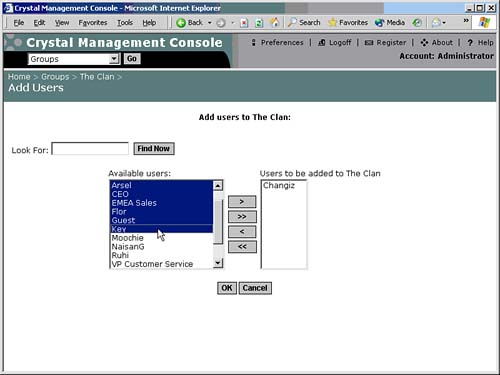
Figure 27.9. Any changes to the group membership are not committed until the Crystal Enterprise administrator clicks OK.
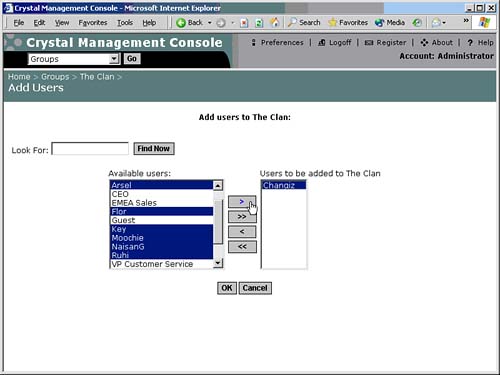
To select a range of users, click the topmost username in the desired range. Then, while holding down the Shift key, click the bottom username in the range. All users between the top and bottom names are selected.
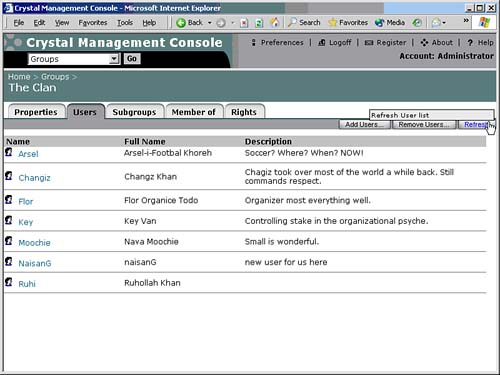
The CMC returns to the Users tab after the changes have been committed. The Users tab immediately reflects the membership of the group, as shown in Figure 27.10. Keep in mind that Crystal Enterprise enables a single user to be a member of multiple groups, so its possible for users to belong to other groups, such as the Everyone group.
Figure 27.10. The new group now contains several users.
Creating Subgroups
Now that the group has users, you can create subgroups. As the name implies, a subgroup is a child of the parent group. Subgroups can be used to further define user roles and permissions at a more detailed level. A top-level group can contain several subgroups, and those subgroups can also contain subgroups, as Figure 27.11 shows. The benefit is that permissions need not be applied at a user level, even though they can be. Even if an individual users needs might seem unique, there is always the distinct possibility that someone else could come along with similar requirements. Creating subgroups minimizes individual user permission/restriction management.
Figure 27.11. The Subgroups tab identifies any child groups that belong to the current parent group.
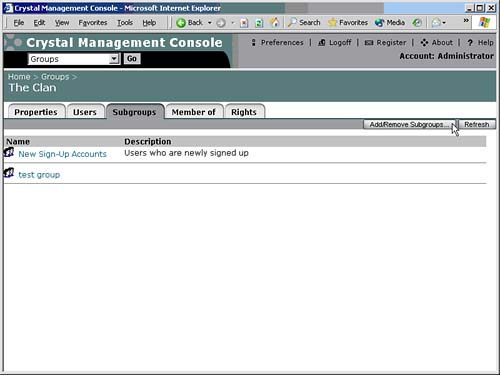
Click the Subgroups tab to add new subgroups.
Click the Add/Remove Subgroups button to designate a new subgroup. The Add/Remove Subgroups page works just like the Add or Remove Users screen. All available groups are listed in the list box on the left.
To be clear, a subgroup is not a special kind of group, but rather an ordinary group that has a hierarchical relationship established with another group. Like parent or top-level groups, subgroups are created by using the New Group option on the main CMC screen.
If a subgroup needs to be created (that is, it doesn exist yet), you need to create the new subgroup in the same manner as other groups would be created, from the New Groups screen. Figure 27.12 shows a list of groups where the intended subgroup has already been defined.
Figure 27.12. SubgroupOne has already been created and you can move this into a parent group. (Note that the name can be anything "SubgroupOne" is used to clarify the relationship in this text.)

NOTE
Any group can also be a subgroup. This can get a bit messy with respect to restrictions because overlapping inherited security can be confusing. Try to keep things streamlined by using naming conventions and inherited permissions. This lowers administrative cost and Total Cost of Ownership.
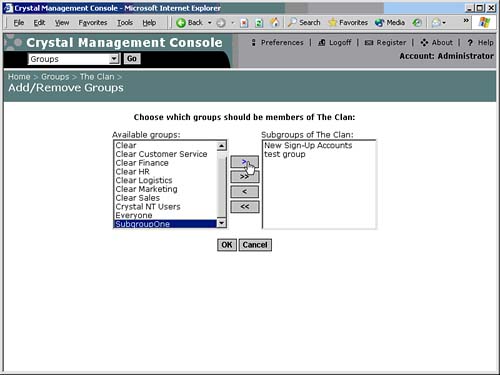
Add the subgroups to the parent group and click OK to commit the change to the system database (see Figure 27.13). The CMC returns to the subgroup listing screen, which now reflects the new subgroups.
Figure 27.13. The subgroup SubgroupOne is added to two existing subgroups.
This particular subgroup tree is only one level deep. Its possible to create subgroups of subgroups for more granular management of users. For example, a few regional subgroups (East, Central, and West) could be added to the North America Sales subgroup. To do this, you only need to click the name of the subgroup, and then repeat the preceding steps to add another subgroup.
Part I. Crystal Reports Design
Creating and Designing Basic Reports
- Creating and Designing Basic Reports
- Introducing the Crystal Reports Designer
- Understanding Data and Data Sources
- Introduction to the Data Explorer
- Adding Database Objects to Your Report
- Joining Database Objects Together
- Understanding the Different Join Types
- Using the Report Creation Wizards
- Understanding the Crystal Reports Gallery
- Using the Standard Report Creation Wizard
- Creating a Report Without Wizards
- Troubleshooting
Selecting and Grouping Data
- Selecting and Grouping Data
- Introduction
- Understanding Field Objects
- Working with Groups
- Understanding Drill-down Reports
- Troubleshooting
Filtering, Sorting, and Summarizing Data
- Filtering, Sorting, and Summarizing Data
- Introduction
- Filtering the Data in Your Report
- Learning to Sort Records
- Working with the Sort Expert
- Creating Effective Summaries
- Troubleshooting
Understanding and Implementing Formulas
- Understanding and Implementing Formulas
- Introduction
- Using the Formula Workshop
- Using the Workshop Formula Editor
- Creating Formulas with the Formula Expert
- Using the Formula Extractor to Create Custom Functions
- The Multi-Pass Reporting Process of the Crystal Reports Engine
- Troubleshooting
Implementing Parameters for Dynamic Reporting
- Implementing Parameters for Dynamic Reporting
- Introduction
- Understanding the Value of Parameters
- Creating and Implementing Parameters Fields
- Using Parameters with Record Selections
Part II. Formatting Crystal Reports
Fundamentals of Report Formatting
- Fundamentals of Report Formatting
- Introduction
- Positioning and Sizing Report Objects
- Modifying Object Properties for Formatting Purposes
- Exploring the Format Editor Dialog Common Options
- Combining and Layering Report Objects
- Configuring Report Page and Margin Properties
Working with Report Sections
- Working with Report Sections
- Introduction
- Formatting Report Sections
- Modifying Report Section Properties
- Using Multiple Report Sections
- Troubleshooting
Visualizing Your Data with Charts and Maps
- Visualizing Your Data with Charts and Maps
- Introduction to Charts and Maps
- Using the Chart Expert
- Using the Map Expert
- Modifying Chart and Map Properties
- Troubleshooting
Custom Formatting Techniques
- Introduction
- Making Presentation-Quality Reports
- Common Formatting Features
- Conditional Formatting Using Data to Drive the Look of a Report
Part III. Advanced Crystal Reports Design
Using Cross-Tabs for Summarized Reporting
- Using Cross-Tabs for Summarized Reporting
- Introduction to Cross-Tabs
- Benefits of Cross-Tabs
- Using the Cross-Tab Wizard
- Using Top N with Cross-Tabs Reports
- Using Advanced Cross-Tab Features
Using Record Selections and Alerts for Interactive Reporting
- Using Record Selections and Alerts for Interactive Reporting
- Creating Advanced Record Selection Formulas
- Adding Alerting to Your Reports
- Performance Monitoring and Tuning
Using Subreports and Multi-Pass Reporting
- Using Subreports and Multi-Pass Reporting
- Understanding Subreports
- Understanding Linked Versus Unlinked Subreports
- Considering Subreport Execution Time and Performance
- Using Variables to Pass Data Between Reports
- Emulating Nested Subreports
- Troubleshooting
Using Formulas and Custom Functions
- Using Formulas and Custom Functions
- Becoming More Productive with Formulas
- Choosing a Formula Language: Crystal Versus Basic Syntax
- Using Brackets in Formulas
- Using Characters in Formulas
- Recent Improvements to Formulas
Designing Effective Report Templates
- Designing Effective Report Templates
- Understanding the Importance of Reuse in Reporting
- Understanding Report Templates
- Using Report Templates
- Using Existing Crystal Reports as Templates
- Understanding How Templates Work
- Creating Useful Report Templates
- Using Template Field Objects
- Using Report Templates to Reduce Report Creation Effort
- Applying Multiple Templates
Additional Data Sources for Crystal Reports
- Additional Data Sources for Crystal Reports
- Understanding the Additional Crystal Reports Data Sources
- Connecting to COM-based Data Sources
- Connecting to Java-based Data Sources
- Understanding Solution Kits for Crystal Enterprise
- Troubleshooting
Multidimensional Reporting Against OLAP Data with Crystal Reports
- Multidimensional Reporting Against OLAP Data with Crystal Reports
- Introduction to OLAP
- OLAP Concepts and OLAP Reporting
- Recently Added or Changed OLAP Features in Crystal Reports
- Using the OLAP Report Creation Wizard and OLAP Expert
- Advanced OLAP Reporting
- Introduction to Crystal Analysis
Part IV. Enterprise Report Design Analytic, Web-based, and Excel Report Design
Introduction to Crystal Repository
- Introduction to Crystal Repository
- What Is the Crystal Repository?
- Why Implement the Crystal Repository?
- Installing the Crystal Repository
- Adding Objects to and from the Repository
- Migration of the Crystal Enterprise Repository
- Troubleshooting
Crystal Reports Semantic Layer Business Views
- Crystal Reports Semantic Layer Business Views
- Introduction to Business Views
- Why Implement Business Views?
- Performance and Implementation Considerations
- Business Views Architecture and Implementation
- Troubleshooting
Creating Crystal Analysis Reports
- Creating Crystal Analysis Reports
- Introduction
- Introducing Crystal Analysis
- Accessing OLAP Data with Crystal Analysis
- Designing Crystal Analysis Reports and Applications
- Adding Crystal Analysis Objects to a Report
- Troubleshooting
Advanced Crystal Analysis Report Design
- Advanced Crystal Analysis Report Design
- Introduction
- Advanced Crystal Analysis Designer Tools
- Custom Calculations and Advanced Data Analysis
- Setting Report Options
- Troubleshooting
- Crystal Analysis in the Real World MDX
Ad-Hoc Application and Excel Plug-in for Ad-Hoc and Analytic Reporting
- Ad-Hoc Application and Excel Plug-in for Ad-Hoc and Analytic Reporting
- Introducing Ad-Hoc Reporting Conceptually
- Introducing the Crystal Enterprise Ad-Hoc Reporting Application
- Crystal Reports Excel Plug-in
- Crystal Analysis Excel Plug-in
Part V. Web Report Distribution Using Crystal Enterprise
Introduction to Crystal Enterprise
- Introduction to Crystal Enterprise
- What Is Crystal Enterprise?
- Why Implement a Crystal Enterprise Solution?
- Versions of Crystal Enterprise
- Understanding the Core Functions of Crystal Enterprise
Using Crystal Enterprise with Web Desktop
- Using Crystal Enterprise with Web Desktop
- Introduction
- Crystal Enterprise User Launchpad
- Crystal Enterprise Web Desktop
- Customizing the Web Desktop and Report Viewers
- Publishing to the Web Desktop
- Customizing the Web Desktop
- Troubleshooting
Crystal Enterprise Architecture
- Crystal Enterprise Architecture
- Introduction
- Crystal Enterprise Architecture Overview
- The Client Tier
- The Application Tier
- The Server Tier: Introduction to the Crystal Enterprise Framework
- The Server Tier: Overview of the Crystal Enterprise Services
- The Data Tier
- The Crystal Enterprise Architecture in Action
- Taking Advantage of the Crystal Enterprise Distributed Architecture
- Extending Crystal Enterprise
Planning Considerations When Deploying Crystal Enterprise
- Planning Considerations When Deploying Crystal Enterprise
- Ensuring a Successful Crystal Enterprise Implementation
- Approaching the Project
- Identifying Business Pain
- Establishing Project Requirements
- Understanding Organizational Reporting Requirements
- Troubleshooting
Deploying Crystal Enterprise in a Complex Network Environment
- Deploying Crystal Enterprise in a Complex Network Environment
- Introduction
- Understanding Network Protocols
- Understanding Firewall Types
- Configuring the Crystal Enterprise Architecture for Your Network Environment
- Interaction Between the WCS and the WC
- Deploying Crystal Enterprise with an IP Packet Filtering Firewall
- Using Crystal Enterprise with NAT
- Exploring the NAT and Crystal Enterprise Relationship
- Crystal Enterprise and Proxy Servers
Administering and Configuring Crystal Enterprise
- Introduction
- Using the Crystal Management Console
- Managing Accounts
- Managing Content
- Introducing Servers
- Managing Crystal Enterprise System Settings
- Using the Crystal Configuration Manager
Part VI. Customized Report Distribution Using Crystal Reports Components
Java Reporting Components
- Java Reporting Components
- Overview of the Crystal Reports Java Reporting Component
- Understanding the Java Reporting Components Architecture
- Differences with the Java Reporting Engine
- Configuring the Application Server
- Delivering Reports in Web Applications
- Using the Crystal Tag Libraries
- Exporting Reports to Other File Formats
- Printing Reports from the Browser
- Common Programming Tasks
- Troubleshooting
Crystal Reports .NET Components
- Crystal Reports .NET Components
- Understanding Microsofts .NET Platform
- Understanding the Different Crystal .NET Components
- An Overview of the Crystal Reports 10 .NET Components
- The Report Designer
- The Report Engine Object Model
- Delivering Reports with the Windows Forms Viewer
- Delivering Reports with the Web Forms Viewer
- Database Credentials
- Setting Parameters
- Troubleshooting
COM Reporting Components
- COM Reporting Components
- Understanding the Report Designer Component
- Building Reports with the Visual Basic Report Designer
- Programming with the Report Engine Object Model
- Delivering Reports Using the Report Viewer
- Troubleshooting
Part VII. Customized Report Distribution Using Crystal Enterprise Embedded Edition
Introduction to Crystal Enterprise Embedded Edition
- Introduction to Crystal Enterprise Embedded Edition
- Introduction to Crystal Enterprise Embedded Edition
- Understanding Crystal Enterprise Embedded Edition
- Crystal Enterprise Embedded Edition Samples
- DHTML Report Design Wizard
- Troubleshooting
Crystal Enterprise Viewing Reports
- Crystal Enterprise Viewing Reports
- Viewing Reports over the Web
- Introduction to the Crystal Report Viewers
- Understanding the Report Source
- Implementing the Page Viewer
- Implementing the Part Viewer
- Implementing the Interactive Viewer
- Implementing the Grid Viewer
- Troubleshooting
Crystal Enterprise Embedded Report Modification and Creation
- Introduction
- Deploying RAS Environments
- Loading Report Files
- Locating RAS Components in a Network Architecture
- Installing the RAS SDK
- Best Practices in RAS Exception Handling
- The RAS SDK in Action
Part VIII. Customized Report Distribution Using Crystal Enterprise Professional
Introduction to the Crystal Enterprise Professional Object Model
- Introduction to the Crystal Enterprise Professional Object Model
- Understanding the Crystal Enterprise Object Model
- Establishing a Crystal Enterprise Session
- Querying the Crystal Enterprise Repository
- Viewing Reports
- The Crystal Enterprise Java SDK
- Accessing the Java SDK
- Troubleshooting
Creating Enterprise Reports Applications with Crystal Enterprise Part I
- Creating Enterprise Reports Applications with Crystal Enterprise Part I
- Advanced Scenarios with the Crystal Enterprise Object Model
- Scheduling Reports
- Scheduling to a Destination
- Using Crystal Enterprise Notifications
- Scheduling to a Server Group
- Scheduling to a Specific Format
- Setting Database Credentials
- Troubleshooting
Creating Enterprise Reporting Applications with Crystal Enterprise Part II
- Creating Enterprise Reporting Applications with Crystal Enterprise Part II
- Querying the Crystal Enterprise InfoStore
- Creating and Responding to Crystal Enterprise Alerts
- Creating Schedulable Program Objects
- Troubleshooting
Appendix A. Using Sql Queries In Crystal Reports
Creating Enterprise Reporting Applications with Crystal Enterprise Part II
EAN: 2147483647
Pages: 341
