Core Library Classes
Overview
We saw in the preceding chapter that Delphi includes a large number of functions and procedures, but the real power of Delphi's visual programming lies in the huge class library that comes with it. Delphi's standard class library contains hundreds of classes, with thousands of methods, and it is so large that I certainly cannot provide a detailed reference in this book. What I'll do, instead, is explore various areas of this library starting with this chapter and continuing through those that follow.
This chapter is devoted to the library's core classes as well as to some standard programming techniques, such as the definition of events. We'll explore some commonly used classes, such as lists, string lists, collections, and streams. We'll devote most of our time to exploring the content of the Classes unit, but we'll also examine other core units of the library.
Delphi classes can be used either entirely in code or within the visual form designer. Some of them are component classes, which show up in the Component Palette, and others are more general-purpose. The terms class and component can be used almost as synonyms in Delphi. Components are the central elements of Delphi applications. When you write a program, you basically choose a number of components and define their interactions— that's all there is to Delphi visual programming.
Before reading this chapter, you need to have a good understanding of the language, including inheritance, properties, virtual methods, class references, and so on, as discussed in Chapter 2, "The Delphi Programming Language."
The RTL Package, VCL, and CLX
Until version 5, Delphi's class library was known as VCL, which stands for Visual Components Library. This is a component library mapped on top of the Windows API. Kylix, the Delphi version for Linux, introduced a new component library, called CLX (Component Library for X-Platform or Cross Platform; the acronym is pronounced "clicks"). Delphi 6 was the first edition to include both the VCL and CLX libraries. For visual components, the two class libraries are alternative one to the other. However, the core classes and the database and Internet portions of the two libraries are basically shared.
VCL was considered as a single large library, although programmers used to refer to different parts of it (components, controls, nonvisual components, data sets, data-aware controls, Internet components, and so on). CLX introduces a distinction in four parts: BaseCLX, VisualCLX, DataCLX, and NetCLX. Only in VisualCLX does the library use a totally different approach between the Windows and Linux platforms; the rest of the code is inherently portable to Linux. In the following section, I discuss these two libraries; the rest of the chapter focuses on the common core classes.
In recent versions of Delphi, this distinction is underlined by the fact that the core non-visual components and classes of the library are part of the new RTL package, which is used by both VCL and CLX. Moreover, using this package in non-visual applications (for example, web server programs) allows you to reduce considerably the size of the files to deploy and load in memory.
Traditional Sections of VCL
Delphi programmers used to refer to the sections of the VCL with names Borland originally suggested in its documentation—names that became common afterward for different groups of components. Technically, components are subclasses of the TComponent class, which is one of the root classes of the hierarchy, as you can see in Figure 4.1. The TComponent class inherits from the TPersistent class; the role of these two classes will be explained in the next section.
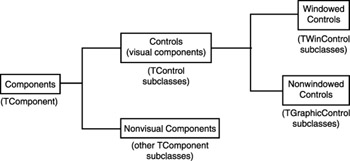
Figure 4.1: A graphical representation of the main groups of VCL components
In addition to components, the library includes classes that inherit directly from TObject and from TPersistent. These classes are collectively known as Objects in portions of the documentation, a rather confusing name. These noncomponent classes are often used for values of properties or as utility classes used in code; not inheriting from TComponent, these classes cannot be used directly in visual programming.
| Note |
To be more precise, noncomponent classes cannot be made available in the Component Palette and cannot be dropped directly into a form, but they can be visually managed with the Object Inspector as subproperties of other properties or items of collections of various types. So, even noncomponent classes are often easily used when interacting with the Form Designer. |
The component classes can be further divided into two main groups: controls and nonvisual components.
Controls All the classes that descend from TControl. Controls have a position and a size on the screen and show up in the form at design time in the same position they'll have at run time. Controls have two different subspecifications—window-based or graphical— that I'll discuss in more detail in Chapter 5, "Visual Controls."
Nonvisual Components All the components that are not controls—all the classes that descend from TComponent but not from TControl. At design time, a nonvisual component appears on the form or data module as an icon, with a caption below it (the caption is optional on forms). At run time, some of these components may be visible (for example, the standard dialog boxes), and others are always invisible (for example, the database table component).
| Tip |
You can simply move the mouse cursor over a control or component in the Form Designer to see a Tooltip with its name and class type (and some extended information). You can also use an environment option, Show Component Captions, to see the name of a nonvisual component under its icon. |
The traditional subdivision of VCL is very common for Delphi programmers. Even with the introduction of CLX and some new naming schemes, the traditional names will probably survive and merge into Delphi programmers' jargon.
The Structure of CLX
Borland now refers to different portions of the CLX library using one terminology under Linux and a slightly different (and less clear) naming structure in Delphi. This new subdivision of the cross-platform library represents more logical areas than the structure of the class hierarchy:
BaseCLX The core of the class library: the topmost classes (such as TComponent) and several general utility classes (including lists, containers, collections, and streams). Compared to the corresponding classes of VCL, BaseCLX is largely unchanged and is highly portable between the Windows and Linux platforms. This chapter is largely devoted to exploring BaseCLX and the common VCL core classes.
VisualCLX The collection of visual components, generally called controls. This is the portion of the library that is more tightly related to the operating system: VisualCLX is implemented on top of the Qt library, available both on Windows and on Linux. Using VisualCLX allows for full portability of the visual portion of your application between Delphi on Windows and Kylix on Linux. However, most of the VisualCLX components have corresponding VCL controls, so you can also easily move your code from one library to the other. I'll discuss VisualCLX and the controls of VCL in Chapter 5.
DataCLX All the database-related components of the library. DataCLX is the front end of the new dbExpress database engine included in both Delphi and Kylix. Delphi also includes the traditional BDE front end, dbGo, and InterBase Express (IBX). If we consider all these components as part of DataCLX, only the dbExpress front end and IBX are portable between Windows and Linux. In addition, DataCLX includes the ClientDataSet component, now called MyBase, and other related classes. Delphi's data access components are discussed in Part III of the book.
NetCLX The Internet-related components, from the WebBroker framework to the HTML producer components, from Indy (Internet Direct) to Internet Express, from WebSnap to XML support. This part of the library is, again, highly portable between Windows and Linux. Internet support is discussed in Part IV of the book. (The name is short for Internet CLX, and has nothing to do with the Microsoft .NET technology it predates.)
VCL Specific Sections of the Library
The preceding areas of the library are available, with the differences I've mentioned, on both Delphi and Kylix. In Delphi, however, other sections of the VCL are for one reason or another specific to Windows only:
- The Delphi ActiveX (DAX) framework provides support for COM, OLE Automation, ActiveX, and other COM-related technologies. See Chapter 12, "From COM to COM+," for more information on this area of Delphi.
- The Decision Cube components provide Online Analytical Processing (OLAP) support but have ties with the BDE and haven't been updated recently. Decision Cube is not discussed in the book.
Finally, the default Delphi installation includes some third-party components, such as TeeChart for business graphics, RAVE for reporting and printing, and IntraWeb for Internet development. Some of these components will be discussed in the book, but they are not strictly part of the VCL. RAVE and IntraWeb are also available for Kylix.
The TPersistent Class
The first core class of the Delphi library we'll look at is TPersistent, which is quite a strange class: It has very little code and almost no direct use, but it provides a foundation for the entire idea of visual programming. You can see the definition of the class in Listing 4.1.
Listing 4.1: The Definition of the TPersistent Class, from the ClassesUnit
{$M+}
TPersistent = class(TObject)
private
 procedure AssignError(Source: TPersistent);
protected
 procedure AssignTo(Dest: TPersistent); virtual;
 procedure DefineProperties(Filer: TFiler); virtual;
 function GetOwner: TPersistent; dynamic;
public
 destructor Destroy; override;
 procedure Assign(Source: TPersistent); virtual;
 function GetNamePath: string; dynamic;
end;
As the name implies, this class handles persistency—that is, saving the value of an object to a file to be used later to re-create the object in the same state and with the same data. Persistency is a key element of visual programming. In fact (as you saw in Chapter 1, "Delphi 7 and Its IDE"), at design time in Delphi you manipulate actual objects, which are saved to DFM files and re-created at run time when the specific component container— form or data module—is created.
| Note |
Everything I say about DFM files also applies to XFM files, the file format used by CLX applications. The format is identical. The extension difference is relevant because Delphi uses it to determine whether the form is based on CLX/Qt or on VCL/Windows. In Kylix, every form is a CLX/Qt form, regardless of which extension is used; so, the XFM/ DFM file extension in Kylix really doesn't matter. |
Streaming support is not embedded in the TPersistent class but is provided by other classes, which target TPersistent and its descendants. In other words, you can "persist" with Delphi default streaming-only objects of classes inheriting from TPersistent. One of the reasons for this behavior lies in the fact that the class is compiled with a special option turned on, {$M+}. This flag activates the generation of extended RTTI information for the published portion of the class.
Delphi's streaming system doesn't try to save the in-memory data of an object, which would be complex because of the many pointers to other memory locations and totally meaningless when the object was reloaded. Instead, Delphi saves objects by listing the values of all properties in the published section of the class. When a property refers to another object, Delphi saves the name of the object or the entire object (with the same mechanism) depending on its type and relationship with the main object. For a comparison with other approaches, see the sidebar "Object Streaming versus Code Generation."
The only method of the TPersistent class that you'll generally use is the Assign procedure, which can be used to copy the actual value of an object. In the library, this method is implemented by many noncomponent classes but by very few components. Most subclasses reimplement the virtual protected AssignTo method, called by the default implementation of Assign.
Other methods include DefineProperties, used for customizing the streaming system and adding extra information (pseudo-properties); and the GetOwner and GetNamePath methods, used by collections and other special classes to identify themselves to the Object Inspector.
Object Streaming versus Code Generation
The approach used by Delphi (and Kylix) is different from the approach used by other visual development tools and languages. For example, in Java, the effect of the definition of a form inside an IDE is the generation of the Java source code used to create the components and set their properties. Setting properties in an inspector affects the source code. Something similar happens in C#, although properties in this language are closer to the notion of properties in Delphi. You've already seen that in Delphi; you can write code to generate the components instead of relying on streaming, but because there is no specific support in the IDE you'll have to write that code manually.
Each of the two approaches has advantages and disadvantages. When generating source code, you have more control over what goes on and the exact sequence of creation and initialization. Delphi reloads objects and their properties but delays some assignments until a later fix-up phase, to avoid the problems of references to not-yet-initialized objects. This process is more complex, but it is so hidden that it becomes simpler for the programmer.
The Java language allows a tool like JBuilder to recompile a form class and load it in a running program for every change. In a compiled system like Delphi, this approach would be more complex (Delphi uses a fake version, technically called a proxy, of your form at design time, not the actual form).
One advantage of the approach used by Delphi is that the DFM files can be translated into different languages without affecting the source code; this is one reason Java is offering XML persistence of forms. Another difference is that Delphi embeds the component's graphic in the DFM file, instead of referring to external files. Doing so simplifies deployment (because everything ends up in the executable file) but can also make the executable much bigger.
The published Keyword
Delphi has four directives specifying data access: public, protected, private, and published. I've covered the first three in Chapter 2, "The Delphi Programming Language," so now it's time to look at what published means. For any published field, property, or method, the compiler generates extended RTTI information, so that Delphi's run-time environment or a program can query a class for its published interface. For example, every Delphi component has a published interface that is used by the IDE, in particular the Object Inspector. A proper use of published items is important when you write components. Usually, the published part of a component contains no fields or methods, just properties and events.
When Delphi generates a form or data module, it places the definitions of its components and methods (the event handlers) in the first portion of its definition, before the public and private keywords. These fields and methods in the initial portion of the class are published. The default is published when no special keyword is added before an element of a component class.
To be more precise, published is the default keyword only if the class was compiled with the $M+ compiler directive or is descended from a class compiled with $M+. This directive is used in the TPersistent class, so most classes of the VCL and all the component classes default to published. However, noncomponent classes in Delphi (such as TStream and TList) are compiled with $M- and default to public visibility.
The methods used to handle events in the IDE (and in DFM files) should be published, and the fields corresponding to your components in the form should be published to be automatically connected with the objects described in the DFM file and created along with the form. (Later in this chapter I'll discuss the details of this situation and the problems it generates.)
Accessing Published Fields and Methods
As I've mentioned, three different declarations make sense in the published section of a class: fields, methods, and properties. In your code, you'll generally refer to published items like you refer to public ones, that is, by referring to the corresponding identifiers in the code. In some special cases, though, it is possible to access published items at runtime by name. I'll discuss dynamic access to properties in the section "Accessing Properties by Name;" here I'll introduce possible ways of interacting at runtime with fields and methods. The TObject class has three interesting methods for this area: MethodAddress, MethodName, and FieldAddress.
The first function, MethodAddress, returns the memory address of the compiled code (a sort of function pointer) of the method passed as parameter in a string. By assigning this method address to the Code field of a TMethod structure and assigning an object to the Data field, you can obtain a complete method pointer. At this point, to call the method you must cast it to the proper method pointer type. Here is a code fragment highlighting the key points of this technique:
var
 Method: TMethod;
 Evt: TNotifyEvent;
 begin
 Method.Code := MethodAddress ('Button1Click');
 Method.Data := Self;
 Evt := TNotifyEvent(Method);
 Evt (Sender); // call the method
 end;
Delphi uses similar code to assign an event handler when it loads a DFM file, because these files store the name of the methods used to handle the events, whereas the components store the method pointer. The second method, MethodName, does the opposite transformation, returning the name of the method at a given memory address. This method can be used to obtain the name of an event handler, given its value, something Delphi does when streaming a component into a DFM file.
Finally, the FieldAddress method of TObject returns the memory location of a published field, given its name. Delphi uses this method to connect components created from the DFM files with the fields of their owner (for example, a form) having the same name.
Note that these three methods are seldom used in "normal" programs but play a key role in making Delphi work. They are strictly related to the streaming system. You'll need to use these methods only when writing extremely dynamic programs, special-purpose wizards, or other Delphi extensions.
Accessing Properties by Name
The Object Inspector displays a list of an object's published properties, even for components you've written. To do this, it relies on the RTTI information generated for published properties. Using some advanced techniques, an application can retrieve a list of an object's published properties and use them.
Although this capability is not very well known, in Delphi it is possible to access properties by name simply by using the string with the name of the property and then retrieving its value. Access to the RTTI information of properties is provided through a group of undocumented subroutines, part of the TypInfo unit.
| Warning |
These subroutines have always been undocumented in past versions of Delphi, so that Borland remained free to change them. However, from Delphi 1 to Delphi 7, changes were very limited and related only to supporting new features, with a high level of backward compatibility. In Delphi 5, Borland added many more goodies and a few "helper" routines that are officially promoted (even if still not fully documented in the Help file but explained only with comments provided in the unit). |
Rather than explore the entire TypInfo unit here, we will look at only the minimal code required to access properties by name. Prior to Delphi 5, it was necessary to use the GetPropInfo function to retrieve a pointer to some internal property information and then apply one of the access functions, such as GetStrProp, to this pointer. You also had to check for the existence and the type of the property.
Now you can use a new set of TypInfo routines, including the handy GetPropValue, which returns a variant with the value of the property and raises an exception if the property doesn't exist. To avoid the exception, you can call the IsPublishedProp function first. You simply pass to these functions the object and a string with the property name. A further optional parameter of GetPropValue allows you to choose the format for returning values of properties of any set type (either a string or the numeric value for the set). For example, you can call
ShowMessage (GetPropValue (Button1, 'Caption'));
This call has the same effect as calling ShowMessage, passing as parameter Button1.Caption. The only real difference is that this version of the code is much slower, because the compiler generally resolves normal access to properties in a more efficient way. The advantage of the run-time access is that you can make it very flexible, as in the following RunProp example.
This program displays in a list box the value of a property of any type for each component of a form. The name of the property you are looking for is provided in an edit box. Being able to type the property name in the edit box makes the program very flexible. In addition to the edit box and the list box, the form has a button to generate the output and some other components added only to test their properties. When you click the button, the following code is executed:
uses
 TypInfo;

procedure TForm1.Button1Click(Sender: TObject);
var
 I: Integer;
 Value: Variant;
begin
 ListBox1.Clear;
 for I := 0 to ComponentCount -1 do
 begin
 if IsPublishedProp (Components[I], Edit1.Text) then
 begin
 Value := GetPropValue (Components[I], Edit1.Text);
 ListBox1.Items.Add (Components[I].Name + '.' +
 Edit1.Text + ' = ' + string (Value));
 end
 else
 ListBox1.Items.Add ('No ' + Components[I].Name + '.' +
 Edit1.Text);
 end;
end;
Figure 4.2 shows the effect of clicking the Fill List button while using the default Caption value in the edit box. You can try it with any other property name. Numbers will be converted to strings by the variant conversion. Objects (such as the value of the Font property) will be displayed as memory addresses.
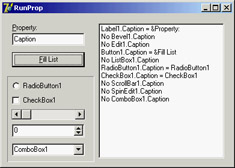
Figure 4.2: The output of the RunProp example, which accesses properties by name at run time
| Warning |
Do not use regularly the TypInfo unit instead of polymorphism and other property-access techniques. Use base-class property access first, or use the safe as typecast when required, and reserve RTTI access to properties as a last resort. Using TypInfo techniques makes your code slower, more complex, and more prone to human error; in fact, it skips the compile-time type-checking. |
The TComponent Class
If the TPersistent class is more important than it seems at first sight, the key class at the heart of Delphi's component-based class library is TComponent, which inherits from TPersistent (and from TObject). The TComponent class defines many core elements of components; however, it is not as complex as you might think, because the base classes and the language already provide most of what's needed.
I won't explore all the details of the TComponent class, some of which are more important for component designers than they are for component users. I'll just discuss ownership (which accounts for some public properties of the class) and the two published properties of the class, Name and Tag.
Ownership
One of the core features of the TComponent class is the definition of ownership. When a component is created, it can be assigned an owner component, which will be responsible for destroying it. So, every component can have an owner and can also be the owner of other components.
Several public methods and properties of the class are devoted to handling the two sides of ownership. Here is a list, extracted from the class declaration (in the Classes unit of the VCL):
type
 TComponent = class(TPersistent, IInterface, IInterfaceComponentReference)
  public
 constructor Create(AOwner: TComponent); virtual;
 procedure DestroyComponents;
 function FindComponent(const AName: string): TComponent;
 procedure InsertComponent(AComponent: TComponent);
 procedure RemoveComponent(AComponent: TComponent);

 property Components[Index: Integer]: TComponent read GetComponent;
 property ComponentCount: Integer read GetComponentCount;
 property ComponentIndex: Integer
 read GetComponentIndex write SetComponentIndex;
 property Owner: TComponent read FOwner;
If you create a component and give it an owner, it will be added to the list of components (InsertComponent), which is accessible using the Components array property. The specific component has an Owner and knows its position in the owner components list, with the ComponentIndex property. Finally, the owner's destructor will take care of the destruction of the object it owns by calling DestroyComponents. A few more protected methods are involved, but this should give you the overall picture.
It's important to emphasize that component ownership can solve many of your applications' memory management problems, if used properly. When you use the Form Designer or Data Module Designer of the IDE, that form or data module will own any component dropped on it. At the same time, you should generally create components with a form or data module owner, even in your code. In these circumstances you only need to remember to destroy the component containers (form or data module) when they are not needed anymore, and you can forget about the components they contain. For example, you delete a form to destroy all the components it contains at once, which is a major simplification compared to having to remember to free each and every object individually. At a larger scale, forms and data modules are generally owned by the Application object, which is destroyed by the VCL shutdown code freeing all of the component containers, which free the components they contain.
The Components Array
The Components property can also be used to access one component owned by another—let's say, a form. This property can be very handy (compared to using a specific component directly) for writing generic code, acting on all or many components at a time. For example, you can use the following code to add to a list box the names of all a form's components (this code is part of the ChangeOwner example presented in the next section):
procedure TForm1.Button1Click(Sender: TObject);
var
 I: Integer;
begin
 ListBox1.Items.Clear;
 for I := 0 to ComponentCount - 1 do
 ListBox1.Items.Add (Components [I].Name);
end;
This code uses the ComponentCount property, which holds the total number of components owned by the current form, and the Components property, which is the list of owned components. When you access a value from this list, you get a value of the TComponent type. For this reason, you can directly use only the properties common to all components, such as the Name property. To use properties specific to particular components, you have to use the proper type-downcast (as).
| Note |
In Delphi, some components are also component containers: the GroupBox, Panel, PageControl, and, of course, Form components. When you use these controls, you can add other components inside them. In this case, the container is the parent of the components (as indicated by the Parent property), and the form is their owner (as indicated by the Owner property). You can use the Controls property of a form or group box to navigate the child controls, and you can use the Components property of the form to navigate all the owned components, regardless of their parent. |
Using the Components property, you can always access each component of a form. If you need access to a specific component, however, instead of comparing each name with the name of the component you are looking for, you can let Delphi do this work by using the form's FindComponent method. This method simply scans the Components array looking for a name match. More information about the role of the Name property for a component is in the section "The Name Property."
Changing the Owner
You have seen that almost every component has an owner. When a component is created at design time (or from the resulting DFM file), its owner will invariably be its form. When you create a component at run time, the owner is passed as a parameter to the Create constructor.
Owner is a read-only property, so you cannot change it. The owner is set at creation time and should generally not change during the lifetime of a component. To understand why you should not change a component's owner at design time nor freely change its name, read the following discussion. Be warned that the topic covered is not simple; if you're just beginning with Delphi, you might want to come back to this section at a later time.
To change the owner of a component, you can call the InsertComponent and RemoveComponent methods of the owner itself, passing the current component as parameter. However, you cannot apply these methods directly in a form's event handler, as I attempt to do here:
procedure TForm1.Button1Click(Sender: TObject);
begin
 RemoveComponent (Button1);
 Form2.InsertComponent (Button1);
end;
This code produces a memory access violation, because when you call RemoveComponent, Delphi disconnects the component from the form field (Button1), setting it to nil. (I talk more about form fields in the section "Removing Form Fields.") The solution is to write a procedure like this:
procedure ChangeOwner (Component, NewOwner: TComponent);
begin
 Component.Owner.RemoveComponent (Component);
 NewOwner.InsertComponent (Component);
end;
This method (extracted from the ChangeOwner example) changes the owner of the component. It is called along with the simpler code used to change the parent component; the two commands combined move the button completely to another form, changing its owner:
procedure TForm1.ButtonChangeClick(Sender: TObject);
begin
 if Assigned (Button1) then
 begin
    // change parent
 Button1.Parent := Form2;
    // change owner
 ChangeOwner (Button1, Form2);
 end;
end;
The method checks whether the Button1 field still refers to the control, because while moving the component, Delphi will set Button1 to nil. You can see the effect of this code in Figure 4.3.
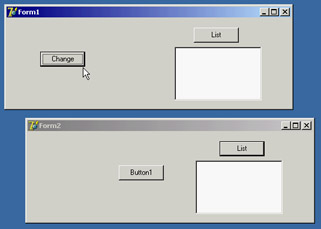
Figure 4.3: In the ChangeOwner example, clicking the Change button moves the Button1 component to the second form.
To demonstrate that the owner of the Button1 component actually changes, I've added another feature to both forms. The List button fills the list box with the names of the components each form owns, using the procedure shown in the previous section. Click the two List buttons before and after moving the component, and you'll see what happens behind the scenes. As a final feature, the Button1 component has a simple handler for its OnClick event, to display the caption of the owner form:
procedure TForm1.Button1Click(Sender: TObject);
begin
 ShowMessage ('My owner is ' + ((Sender as TButton).Owner as TForm).Caption);
end;
The Name Property
Every component in Delphi should have a name. The name must be unique within the owner component, which is generally the form into which you place the component. This means an application can have two different forms, each with a component that has the same name, although you might want to avoid this practice to prevent confusion. It is generally better to keep component names unique throughout an application.
Setting a proper value for the Name property is very important: If it's too long, you'll need to type a lot of code to use the object; if it's too short, you may confuse different objects. Usually the name of a component has a prefix with the component type; this makes the code more readable and allows Delphi to group components in the combo box of the Object Inspector, where they are sorted by name.
Three important elements are related to a component's Name property:
- At design time, the value of the Name property is used to define the name of the form field in the declaration of the form class. This is the name you'll generally use in the code to refer to the object. For this reason, the value of the Name property must be a legal Delphi language identifier (it must have no spaces and begin with a letter, not a number).
- If you set a control's Name property before changing its Caption or Text property, the new name is often copied to the caption. That is, if the name and the caption are identical, then changing the name will also change the caption.
- Delphi uses the name of the component to create the default name of the methods related to its events. If you have a Button1 component, its default OnClick event handler will be called Button1Click unless you specify a different name. If you later change the name of the component, Delphi will modify the names of the related methods accordingly. For example, if you change the name of the button to MyButton, the Button1Click method automatically becomes MyButtonClick.
As mentioned earlier, if you have a string with the name of a component, you can get its instance by calling the FindComponent method of its owner, which returns nil if the component is not found. For example, you can write
var
 Comp: TComponent;
begin
 Comp := FindComponent ('Button1');
 if Assigned (Comp) then
 with Comp as TButton do
 // some code...
| Note |
Delphi also includes a FindGlobalComponent function, which finds a top-level component (a form or data module) that has a given name. FindGlobalComponent calls one or more installed functions, so in theory you can modify the way the function works. However, because FindGlobalComponent is used by the streaming system, I strongly recommend against installing your own replacement functions. If you want a customized way to search for components on other containers, simply write a new function with a custom name. |
Removing Form Fields
Every time you add a component to a form, Delphi adds an entry for it, along with some of its properties, to the DFM file. To the Pascal file, Delphi adds the corresponding field in the form class declaration. This field of the form is a reference to the corresponding object, as is any class-type variable in Delphi. When the form is created, Delphi loads the DFM file and uses it to re-create all the components and set their properties back to the design-time values, saved in the DFM file itself. Then it connects the new object with the form field corresponding to its Name property. This is why in your code, you can use the form field to operate on the corresponding component.
For this reason, it is possible to have a component without a name. If your application will not manipulate the component or modify it at run time, you can remove the component name from the Object Inspector. Examples include a static label with fixed text, or a menu item, or even more obviously, menu item separators. By blanking out the name, you remove the corresponding element from the form class declaration. Doing so reduces the size of the form object (by only four bytes, the size of the object reference) and reduces the DFM file by not including a useless string (the component name). Reducing the DFM file size also implies reducing the final executable file size, even if only slightly.
| Warning |
If you remove component names, just make sure to leave at least one named component of each class used on the form, so the smart linker and the streaming system will link in the required code for the class and recognize it from the DFM file. For example, if you remove from a form all the fields referring to TLabel components, when the system loads the form at run time, it will be unable to create an object of an unknown class and will issue an error indicating that the class is not available. As we'll see in the next section you can call the RegisterClass or RegisterClasses routines to avoid such an error. |
You can also keep the component name and manually remove the corresponding field of the form class. Even if the component has no corresponding form field, it is created anyway, although using it (through the FindComponent method, for example) will be a little more difficult.
Hiding Form Fields
Many OOP purists complain that Delphi doesn't really follow the encapsulation rules, because all the components of a form are mapped to public fields and can be accessed from other forms and units. Fields for components are listed in the first unnamed section of a class declaration, which has a default visibility of published. However, Delphi does that only as a default to help beginners learn to use the Delphi visual development environment quickly. A programmer can follow a different approach and use properties and methods to operate on forms. The risk, however, is that another programmer on the same team might inadvertently bypass this approach, directly accessing the components if they are left in the published section. The solution, which many programmers don't know about, is to move the components to the private portion of the class declaration.
As an example, I've made a simple form with an edit box, a button, and a list box. When the edit box contains text and the user clicks the button, the text is added to the list box. When the edit box is empty, the button is disabled. This is the code of the HideComp example:
procedure TForm1.Button1Click(Sender: TObject);
begin
 ListBox1.Items.Add (Edit1.Text);
end;

procedure TForm1.Edit1Change(Sender: TObject);
begin
 Button1.Enabled := Length (Edit1.Text) <> 0;
end;
I've listed these methods only to show you that in a form's code, you usually refer to the available components, defining their interactions. For this reason, it seems impossible to get rid of the fields corresponding to the component. However, you can hide them, moving them from the default published section to the private section of the form class declaration:
TForm1 = class(TForm)
 procedure Button1Click(Sender: TObject);
 procedure Edit1Change(Sender: TObject);
 procedure FormCreate(Sender: TObject);
private
 Button1: TButton;
 Edit1: TEdit;
 ListBox1: TListBox;
end;
Now, if you run the program you'll get in trouble: The form will load, but because the private fields are not initialized, the events will use nil object references. Delphi usually initializes the published fields of the form using the components created from the DFM file. What if you do it yourself, with the following code?
procedure TForm1.FormCreate(Sender: TObject);
begin
 Button1 := FindComponent ('Button1') as TButton;
 Edit1 := FindComponent ('Edit1') as TEdit;
 ListBox1 := FindComponent ('ListBox1') as TListBox;
end;
It will almost work, but it generates a system error, similar to the one discussed in the previous section. This time, the private declarations will cause the linker to link in the implementations of those classes; the problem is, the streaming system needs to know the names of the classes in order to locate the class reference needed to construct the components while loading the DFM file.
The final touch you need is registration code to tell Delphi at run time about the existence of the component classes you want to use. You should do this before the form is created, so I generally place this code in the initialization section of the unit:
initialization
 RegisterClasses ([TButton, TEdit, TListBox]);
The question is, is this really worth the effort? You obtain a higher degree of encapsulation, protecting the components of a form from other forms (and other programmers writing them). Replicating these steps for every form can be tedious, so I wrote a wizard to generate the code for me on the fly. The wizard is far from perfect, because it doesn't handle changes automatically, but it is usable. See Appendix A, "Extra Delphi Tools by the Author," for more information about how to get it. For a large project built according to the principles of object-oriented programming, I recommend you consider this or a similar technique.
The Customizable Tag Property
The Tag property is strange, because it has no effect at all. It is merely an extra memory location, present in each component class, where you can store custom values. The kind of information stored and the way it is used are completely up to you.
It is often useful to have an extra memory location to attach information to a component without needing to define it in your component class. Technically, the Tag property stores a long integer so that, for example, you can store the entry number of an array or list that corresponds to an object. Using typecasting, you can store in the Tag property a pointer, an object reference, or anything else that is four bytes wide. A programmer can associate virtually anything with a component using its tag. You'll see how to use this property in several examples in future chapters.
Events
Now that I've discussed the TComponent class, I need to introduce one more element of Delphi. Delphi components are programmed using PME: properties, methods, and events. Methods and properties should be clear by now, but you haven't yet learned about events. The reason is that events don't imply a new language feature but are simply a standard coding technique. An event is technically a property—the only difference is that it refers to a method (a method pointer type, to be precise) instead of other types of data.
Events in Delphi
When a user does something with a component, such as click it, the component generates an event. Other events are generated by the system, in response to a method call or a change to one of that component's properties (or even a different component's). For example, if you set the focus on a component, the component currently having the focus loses it, triggering the corresponding event.
Technically, most Delphi events are triggered when a corresponding operating system message is received, although the events do not match the messages on a one-to-one basis. Delphi events tend to be higher-level than operating system messages, and Delphi provides a number of extra inter-component messages.
From a theoretical point of view, an event is the result of a request sent to a component or control, which can respond to the message. Following this approach, to handle the click event of a button, you would need to subclass the TButton class and add the new event handler code inside the new class.
In practice, creating a new class for every component you want to use is too complex to be a reasonable solution. In Delphi, a component's event handler usually is a method of the form that holds the component, not of the component itself. In other words, the component relies on its owner, the form, to handle its events. This technique is called delegation, and it is fundamental to the Delphi component-based model. This way, you don't have to modify the TButton class, unless you want to define a new type of component, but can simply customize its owner to modify the behavior of the button.
| Note |
As you'll see in the next section, events in Delphi are based on pointers to methods. This is quite different from Java, which uses listener classes with methods for a family of events. These listener methods call the event handlers. C# and .NET use the similar idea of delegate classes, covered in Chapter 24, "The Microsoft .NET Architecture from the Delphi Perspective." Notice that the term delegate is the same traditionally used in the Delphi literature to explain the idea of event handlers. |
Method Pointers
Events rely on a specific feature of the Delphi language: method pointers. A method pointer type is like a procedural type, but one that refers to a method. Technically, a method pointer type is a procedural type that has an implicit Self parameter. In other words, a variable of a procedural type stores the address of a function to call, provided it has a given set of parameters. A method pointer variable stores two addresses: the address of the method code and the address of an object instance (data). The address of the object instance will show up as Self inside the method body when the method code is called using this method pointer.
| Note |
This explains the definition of Delphi's generic TMethod type, a record with a Code field and a Data field. |
The declaration of a method pointer type is similar to that of a procedural type, except that it has the keywords of object at the end of the declaration:
type
 IntProceduralType = procedure (Num: Integer);
 IntMethodPointerType = procedure (Num: Integer) of object;
When you have declared such a method pointer type, you can declare a variable of this type and assign to it a compatible method—a method that has the same signature (parameters, return type, calling convention)—of another object.
When you add an OnClick event handler for a button, Delphi does exactly that. The button has a method pointer type property, named OnClick, and you can directly or indirectly assign to it a method of another object, such as a form. When a user clicks the button, this method is executed, even if you have defined it inside another class.
What follows is a sketch of the code Delphi uses to define the event handler of a button component and the related method of a form:
type
 TNotifyEvent = procedure (Sender: TObject) of object;

 MyButton = class
 OnClick: TNotifyEvent;
 end;

 TForm1 = class (TForm)
 procedure Button1Click (Sender: TObject);
 Button1: MyButton;
 end;

var
 Form1: TForm1;
Now, inside a procedure, you can write
MyButton.OnClick := Form1.Button1Click;
The only real difference between this code fragment and the VCL code is that OnClick is a property name, and the data it refers to is called FOnClick. An event that shows up in the Events page of the Object Inspector is nothing more than a property of a method pointer type. This means, for example, that you can dynamically modify the event handler attached to a component at design time or even build a new component at run time and assign an event handler to it.
Events Are Properties
I've already mentioned that events are properties. To handle an event of a component, you assign a method to the corresponding event property. When you double-click an event value in the Object Inspector, a new method is added to the owner form and assigned to the proper event property of the component.
It is possible for several events to share the same event handler or change an event handler at run time. To use this feature, you don't need much knowledge of the language. In fact, when you select an event in the Object Inspector, you can click the arrow button to the right of the event name to see a drop-down list of compatible methods—methods having the same signature of the method pointer type. Using the Object Inspector, it is easy to select the same method for the same event of different components or for different, compatible events of the same component.
Just as you added some properties to the TDate class in Chapter 2, you can add one event. The event will be very simple. It will be called OnChange, and it can be used to warn the user of the component that the date value has changed. To define an event, you simply define a property corresponding to it and add some data to store the method pointer the event refers to. These are the new definitions added to the class, available in the DateEvt example:
type
 TDate = class
 private
 FOnChange: TNotifyEvent;
 ...
 protected
 procedure DoChange; dynamic;
 ...
 public
 property OnChange: TNotifyEvent
 read FOnChange write FOnChange;
 ...
 end;
The property definition is simple. A user of this class can assign a new value to the property and, hence, to the FOnChange private field. The class doesn't assign a value to this FOnChange field; the user of the component does the assignment. The TDate class simply calls the method stored in the FOnChange field when the value of the date changes. Of course, the call takes place only if the event property has been assigned. The DoChange method (declared as a dynamic method as is traditional with event-firing methods) makes the test and the method call:
procedure TDate.DoChange;
begin
 if Assigned (FOnChange) then
 FOnChange (Self);
end;
The DoChange method in turn is called every time one of the values changes, as in the following method:
procedure TDate.SetValue (y, m, d: Integer);
begin
 fDate := EncodeDate (y, m, d);
  // fire the event
 DoChange;
If you look at the program that uses this class, you can simplify its code considerably. First, add a new custom method to the form class:
type
 TDateForm = class(TForm)
 ...
 procedure DateChange(Sender: TObject);
The method's code simply updates the label with the current value of the TDate object's Text property:
procedure TDateForm.DateChange;
begin
 LabelDate.Caption := TheDay.Text;
end;
This event handler is then installed in the FormCreate method:
procedure TDateForm.FormCreate(Sender: TObject);
begin
 TheDay := TDate.Init (2003, 7, 4);
 LabelDate.Caption := TheDay.Text;
  // assign the event handler for future changes
 TheDay.OnChange := DateChange;
end;
This seems like a lot of work. Was I lying when I told you the event handler would save you some coding? No. Now, after you've added some code, you can forget about updating the label when you change some of the object data. For example, here is the handler of the OnClick event of one of the buttons:
procedure TDateForm.BtnIncreaseClick(Sender: TObject);
begin
 TheDay.Increase;
end;
The same simplified code is present in many other event handlers. Once you have installed the event handler, you don't have to remember to update the label continually. That eliminates a significant potential source of errors in the program. Also note that you had to write some code at the beginning because this is not a component installed in Delphi but simply a class. With a component, you select the event handler in the Object Inspector and write a single line of code to update the label—that's all.
| Note |
This is just a short introduction to defining events. A basic understanding of these features is important for every Delphi programmer. If your aim is to write new components with complex events, you'll find a lot more information on all these topics in Chapter 9 ("Writing Delphi Components"). |
Lists and Container Classes
It is often important to handle groups of components or objects. In addition to using standard arrays and dynamic arrays, a few VCL classes represent lists of other objects. These classes can be divided into three groups: simple lists, collections, and containers.
Lists and String Lists
Lists are represented by the generic list of objects, TList, and by the two lists of strings, TStrings and TStringList:
- TList defines a list of pointers, which can be used to store objects of any class. A TList is more flexible than a dynamic array, because it can be expanded automatically simply by adding new items to it. The advantage of a dynamic array over a TList is that the dynamic array allows you to indicate a specific type for contained objects and perform the proper compile-time type checking.
- TStrings is an abstract class to represent all forms of string lists, regardless of their storage implementations. This class defines an abstract list of strings. For this reason, TStrings objects are used only as properties of components capable of storing the strings themselves, such as a list box.
- TStringList, a subclass of TStrings, defines a list of strings with their own storage. You can use this class to define a list of strings in a program.
TStringList and TStrings objects have both a list of strings and a list of objects associated with the strings. These classes have a number of different uses. For example, you can use them for dictionaries of associated objects or to store bitmaps or other elements to be used in a list box.
The two classes of string lists also have ready-to-use methods to store or load their contents to or from a text file: SaveToFile and LoadFromFile. To loop through a list, you can use a simple for statement based on its index, as if the list were an array.
All these lists have a number of methods and properties. You can operate on lists using the array notation ([ and ]) both to read and to change elements. There is a Count property, as well as typical access methods, such as Add, Insert, Delete, Remove; search methods (for example, IndexOf); and sorting support. The TList class has an Assign method that, besides copying the source data, can perform set operations on the two lists, including and, or, and xor.
To fill a string list with items and later check whether one is present, you can write code like this:
var
 sl: TStringList;
 idx: Integer;
begin
 sl := TStringList.Create;
 try
 sl.Add ('one');
 sl.Add ('two');
 sl.Add ('three');
 // later
 idx := sl.IndexOf ('two');
 if idx >= 0 then
 ShowMessage ('String found');
 finally
 sl.Free;
 end;
end;
Name-Value Pairs (and Delphi 7 Extensions)
The TStringList class has always had another nice feature: support for name-value pairs. If you add to a list a string like 'lastname=john', you can then search for the existence of the pair using the IndexOfName function or the Values array property. For example, you can retrieve the value 'john' by calling Values ['lastname'].
You can use this feature to build much more complex data structures, such as dictionaries, and still benefit from the possibility of attaching an object to the string. This data structure maps directly to initialization files and other common formats.
Delphi 7 further extends the possibilities of name-value pair support by allowing you to customize the separator, beyond the equal sign, using the new NameValueSeparator property. In addition, the new ValueFromIndex property gives you direct access to the value portion of a string at a given position; you no longer have to extract the name value manually from the complete string using a cumbersome (and extremely slow) expression:
str := MyStringList.Values [MyStringList.Names [I]]; // old
str := MyStringList.ValueFromIndex [I]; // new
Using Lists of Objects
I've written an example focusing on the use of the generic TList class. When you need a list of any kind of data, you can generally declare a TList object, fill it with the data, and then access the data while casting it to the proper type. The ListDemo example demonstrates this approach and also shows its pitfalls. The form has a private variable, holding a list of dates:
private
 ListDate: TList;
This list object is created when the form itself is created:
procedure TForm1.FormCreate(Sender: TObject);
begin
 Randomize;
 ListDate := TList.Create;
end;
A button on the form adds a random date to the list (of course, I've included in the project the unit containing the date component built in the previous chapter):
procedure TForm1.ButtonAddClick(Sender: TObject);
begin
 ListDate.Add (TDate.Create (1900 + Random (200), 1 + Random (12),
 1 + Random (30)));
end;
When you extract the items from the list, you have to cast them back to the proper type, as in the following method, which is connected to the List button (you can see its effect in Figure 4.4):
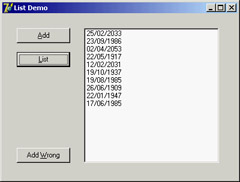
Figure 4.4: The list of dates shown by the ListDemo example
procedure TForm1.ButtonListDateClick(Sender: TObject);
var
 I: Integer;
begin
 ListBox1.Clear;
 for I := 0 to ListDate.Count - 1 do
 Listbox1.Items.Add ((TObject(ListDate [I]) as TDate).Text);
end;
At the end of the code, before you can do an as downcast, you first need to hard-cast the pointer returned by the TList into a TObject reference. This kind of expression can result in an invalid typecast exception, or it can generate a memory error when the pointer is not a reference to an object.
| Tip |
If there were no possibility of having anything but date objects in the list, extracting it with a static cast rather than an as cast would be more efficient. However, when there's even a remote chance of having a wrong object, I'd suggest using the as cast. |
To demonstrate that things can indeed go wrong, I've added one more button, which adds a TButton object to the list by calling ListDate.Add(Sender). If you click this button and then update one of the lists, you'll get an error. Finally, remember that when you destroy a list of objects, you should destroy all of the list's objects first. The ListDemo program does this in the form's FormDestroy method:
procedure TForm1.FormDestroy(Sender: TObject);
var
 I: Integer;
begin
 for I := 0 to ListDate.Count - 1 do
 TObject(ListDate [I]).Free;
 ListDate.Free;
end;
Collections
The second group, collections, contains only two VCL classes: TCollection and TCollectionItem. TCollection defines a homogeneous list of objects, which are owned by the collection class. The objects in the collection must be descendants of the TCollectionItem class. If you need a collection storing specific objects, you have to create both a subclass of TCollection and a matching subclass of TCollectionItem.
Collections are used to specify values of component properties; it is very unusual to work with collections to store your own objects. I discuss collections in Chapter 9.
Container Classes
Recent versions of Delphi include a series of container classes, defined in the Contnrs unit. The container classes extend the TList classes by adding the idea of ownership and by defining specific extraction rules (mimicking stacks and queues) or sorting capabilities.
The basic difference between TList and the new TObjectList class, for example, is that the latter is defined as a list of TObject objects, not a list of pointers. Even more important, however, is the fact that if the object list has the OwnsObjects property set to True, it automatically deletes an object when it is replaced by another one and deletes each object when the list itself is destroyed. Here's a list of the container classes:
- The TObjectList class (already described) represents a list of objects, eventually owned by the list itself.
- The inherited class TComponentList represents a list of components, with full support for destruction notification (an important safety feature when two components are connected using their properties; that is, when a component is the value of a property of another component).
- The TClassList class is a list of class references. It inherits from TList and requires no specific destruction, as you don't have to destroy class references in Delphi.
- The classes TStack and TObjectStack represent lists of pointers and objects, from which you can only extract elements starting from the last one you've inserted. A stack follows LIFO order (last in, first out). The typical methods of a stack are Push for insertion, Pop for extraction, and Peek to preview the first item without removing it. You can still use all the methods of the base class, TList.
- The classes TQueue and TObjectQueue represent lists of pointers and objects, from which you always remove the first item you've inserted (FIFO: first in, first out). The methods of these classes are the same as those of the stack classes, but they behave differently.
| Warning |
Unlike TObjectList, the TObjectStack and TObjectQueue classes do not own the inserted objects and will not destroy those objects left in the data structure when it is destroyed. You can simply Pop all the items, destroy them once you're finished using them, and then destroy the container. |
To demonstrate the use of these classes, I've modified the earlier ListDate example into the Contain example. First, I changed the type of the ListDate variable to TObjectList. In the FormCreate method, I've modified the list creation to the following code, which activates the list ownership:
ListDate := TObjectList.Create (True);
At this point, you can simplify the destruction code, because applying Free to the list will automatically free the dates it holds.
I've also added to the program a stack and a queue object, filling each of them with numbers. One of the form's two buttons displays a list of the numbers in each container, and the other removes the last item (displayed in a message box):
procedure TForm1.btnQueueClick(Sender: TObject);
var
 I: Integer;
begin
 ListBox1.Clear;
 for I := 0 to Stack.Count - 1 do begin
 ListBox1.Items.Add (IntToStr (Integer (Queue.Peek)));
 Queue.Push(Queue.Pop);
 end;
 ShowMessage ('Removed: ' + IntToStr (Integer (Stack.Pop)));
end;
By clicking the two buttons, you can see that calling Pop for each container returns the last item. The difference is that the TQueue class inserts elements at the beginning, and the TStack class inserts them at the end.
Hashed Associative Lists
Since Delphi 6, the set of predefined container classes includes TBucketList and TObjectBucketList. These two lists are associative, which means they have a key and an actual entry. The key is used to identify the items and search for them. To add an item, you call the Add method with two parameters: the key and the data. When you use the Find method, you pass the key and retrieve the data. The same effect is achieved by using the Data array property, passing the key as parameter.
These lists are based on a hash system. The lists create an internal array of items, called buckets, each having a sublist of list elements. As you add an item, its key value is used to compute the hash value, which determines the bucket to which the item should be added. When searching the item, the hash is computed again, and the list immediately grabs the sublist containing the item and searches for it there. This process makes for very fast insertion and searches, but only if the hash algorithm distributes the items evenly among the various buckets and if there are enough different entries in the array. When many elements can be in the same bucket, searching is slower.
For this reason, as you create the TObjectBucketList, you can specify the number of entries for the list by using the parameter of the constructor and choosing a value between 2 and 256. The value of the bucket is determined by taking the first byte of the pointer (or number) passed as the key and doing an and operation with a number corresponding to the entries.
| Note |
I don't find this algorithm very convincing for a hash system, but replacing it with your own implies only overriding the BucketFor virtual function and eventually changing the number of entries in the array, by setting a different value for the BucketCount property. |
Another interesting feature, not available for lists, is the ForEach method, which allows you to execute a given function on each item contained in the list. You pass the ForEach method a pointer to your data and a procedure that receives four parameters: your custom pointer, each key and object of the list, and a Boolean parameter you can set to False to stop the execution. In other words, these are the two signatures:
type
 TBucketProc = procedure(AInfo, AItem, AData: Pointer;
 out AContinue: Boolean);

function TCustomBucketList.ForEach(AProc: TBucketProc;
 AInfo: Pointer): Boolean;
| Note |
In addition to these containers, Delphi includes a THashedStringList class, which inherits from TStringList. This class has no direct relationship with the hashed lists and is defined in a different unit, IniFiles. The hashed string list has two associated hash tables (of type TStringHash), which are completely refreshed every time the content of the string list changes. So, this class is useful only for reading a large set of fixed strings, not for handling a list of strings changing often over time. On the other hand, the TStringHash support class seems to be quite useful in general cases, and has a good algorithm for computing the hash value of a string. |
Type Safe Containers and Lists
Containers and lists have a problem: They are not type-safe, as I've shown in both examples by adding a button object to a list of dates. To ensure that the data in a list is homogenous, you can check the type of the data you extract before you insert it, but as an extra safety measure you might also want to check the type of the data while extracting it. However, adding run-time type checking slows a program and is risky—a programmer might fail to check the type in some cases.
To solve both problems, you can create specific list classes for given data types and fashion the code from the existing TList or TObjectList class (or another container class). There are two approaches to accomplish this:
- Derive a new class from the list class and customize the Add method and the access methods, which relate to the Items property. This is also the approach used by Borland for the container classes, which all derive from TList.
Note Delphi container classes use static overrides to perform simple type conveniences (parameters and function results of the desired type). Static overrides are not the same as polymorphism; someone using a container class via a TList variable will not be calling the container's specialized functions. Static override is a simple and effective technique, but it has one very important restriction: The methods in the descendent should not do anything beyond simple typecasting, because you have no guarantee the descendent methods will be called. The list might be accessed and manipulated using the ancestor methods as much as by the descendent methods, so their operations must be identical. The only difference is the type used in the descendent methods, which allows you to avoid extra typecasting.
- Create a brand-new class that contains a TList object, and map the methods of the new class to the internal list using proper type checking. This approach defines a wrapper class, a class that "wraps" around an existing one to provide a different or limited access to its methods (in our case, to perform a type conversion).
I've implemented both solutions in the DateList example, which defines lists of TDate objects. In the code that follows, you'll find the declaration of the two classes, the inheritance-based TDateListI class and the wrapper class TDateListW:
type
  // inheritance-based
 TDateListI = class (TObjectList)
  protected
 procedure SetObject (Index: Integer; Item: TDate);
 function GetObject (Index: Integer): TDate;
  public
 function Add (Obj: TDate): Integer;
 procedure Insert (Index: Integer; Obj: TDate);
 property Objects [Index: Integer]: TDate
 read GetObject write SetObject; default;
  end;

  // wrapper based
 TDateListW = class(TObject)
  private
 FList: TObjectList;
 function GetObject (Index: Integer): TDate;
    procedure SetObject (Index: Integer; Obj: TDate);
 function GetCount: Integer;
  public
 constructor Create;
 destructor Destroy; override;
 function Add (Obj: TDate): Integer;
 function Remove (Obj: TDate): Integer;
 function IndexOf (Obj: TDate): Integer;
    property Count: Integer read GetCount;
    property Objects [Index: Integer]: TDate
 read GetObject write SetObject; default;
  end;
Obviously, the first class is simpler to write—it has fewer methods, and they just call the inherited ones. The good thing is that a TDateListI object can be passed to parameters expecting a TList. The problem is that the code that manipulates an instance of this list via a generic TList variable will not be calling the specialized methods, because they are not virtual and might end up adding to the list objects of other data types.
Instead, if you decide not to use inheritance, you end up writing a lot of code; you need to reproduce every one of the original TList methods, simply calling the methods of the internal FList object. The drawback is that the TDateListW class is not type compatible with TList, which limits its usefulness. It can't be passed as parameter to methods expecting a TList.
Both of these approaches provide good type checking. After you've created an instance of one of these list classes, you can add only objects of the appropriate type, and the objects you extract will naturally be of the correct type. This technique is demonstrated by the DateList example. This program has a few buttons, a combo box to let a user choose which of the lists to show, and a list box to show the list values. The program stretches the lists by trying to add a button to the list of TDate objects. To add an object of a different type to the TDateListI list, you can convert the list to its base class, TList. This might happen accidentally if you pass the list as a parameter to a method that expects an ancestor class of the list class. In contrast, for the TDateListW list to fail, you must explicitly cast the object to TDate before inserting it, something a programmer should never do:
procedure TForm1.ButtonAddButtonClick(Sender: TObject);
begin
 ListW.Add (TDate(TButton.Create (nil)));
 TList(ListI).Add (TButton.Create (nil));
 UpdateList;
end;
The UpdateList call triggers an exception, displayed directly in the list box, because I've used an as typecast in the custom list classes. A wise programmer should never write the previous code. To summarize, writing a custom list for a specific type makes a program much more robust. Writing a wrapper list instead of one that's based on inheritance tends to be a little safer, although it requires more coding.
| Note |
Instead of rewriting wrapper-style list classes for different types, you can use my List Template Wizard. See Appendix A for details. |
Streaming
Another core area of the Delphi class library is its support for streaming, which includes file management, memory, sockets, and other sources of information arranged in a sequence. The idea of streaming is that you move through the data while reading it, much like the Read and Write functions traditionally used by the Pascal language (and discussed in Chapter 12 of Essential Pascal (see Appendix C for availability of this e-book).
The TStream Class
The VCL defines the abstract TStream class and several subclasses. The parent class, TStream, has just a few properties, and you'll never create an instance of it, but it has an interesting list of methods you'll generally use when working with derived stream classes.
The TStream class defines two properties, Size and Position. All stream objects have a specific size (which generally grows if you write something after the end of the stream), and you must specify a position within the stream where you want to either read or write information.
Reading and writing bytes depends on the actual stream class you are using, but in both cases you don't need to know much more than the size of the stream and your relative position in the stream to read or write data. In fact, that's one of the advantages of using streams. The basic interface remains the same whether you're manipulating a disk file, a binary large object (BLOB) field, or a long sequence of bytes in memory.
In addition to the Size and Position properties, the TStream class also defines several important methods, most of which are virtual and abstract. (In other words, the TStream class doesn't define what these methods do; therefore, derived classes are responsible for implementing them.) Some of these methods are important only in the context of reading or writing components within a stream (for instance, ReadComponent and WriteComponent), but some are useful in other contexts, too. In Listing 4.2, you can find the declaration of the TStream class, extracted from the Classes unit.
Listing 4.2: The Public Portion of the Definition of the TStream Class
TStream = class(TObject)
public
 // read and write a buffer
 function Read(var Buffer; Count: Longint): Longint; virtual; abstract;
 function Write(const Buffer; Count: Longint): Longint; virtual; abstract;
 procedure ReadBuffer(var Buffer; Count: Longint);
 procedure WriteBuffer(const Buffer; Count: Longint);

 // move to a specific position
 function Seek(Offset: Longint; Origin: Word): Longint; overload; virtual;
 function Seek(const Offset: Int64; Origin: TSeekOrigin): Int64;
 overload; virtual;

 // copy the stream
 function CopyFrom(Source: TStream; Count: Int64): Int64;

 // read or write a component
 function ReadComponent(Instance: TComponent): TComponent;
 function ReadComponentRes(Instance: TComponent): TComponent;
 procedure WriteComponent(Instance: TComponent);
 procedure WriteComponentRes(const ResName: string; Instance: TComponent);
 procedure WriteDescendent(Instance, Ancestor: TComponent);
 procedure WriteDescendentRes(
 const ResName: string; Instance, Ancestor: TComponent);
 procedure WriteResourceHeader(const ResName: string; out FixupInfo: Integer);
 procedure FixupResourceHeader(FixupInfo: Integer);
 procedure ReadResHeader;

 // properties
 property Position: Int64 read GetPosition write SetPosition;
 property Size: Int64 read GetSize write SetSize64;
end;
The basic use of a stream involves calling the ReadBuffer and WriteBuffer methods, which are very powerful but not terribly easy to use. The first parameter is an untyped buffer in which you can pass the variable to save from or load to. For example, you can save into a file a number (in binary format) and a string, with this code:
var
 stream: TStream;
 n: integer;
 str: string;
begin
 n := 10;
 str := 'test string';
 stream := TFileStream.Create ('c:	mp	est', fmCreate);
 stream.WriteBuffer (n, sizeOf(integer));
 stream.WriteBuffer (str[1], Length (str));
 stream.Free;
An alternative approach is to let specific components save or load data to and from streams. Many VCL classes define a LoadFromStream or a SaveToStream method, including TStrings, TStringList, TBlobField, TMemoField, TIcon, and TBitmap.
Specific Stream Classes
Creating a TStream instance makes no sense, because this class is abstract and provides no direct support for saving data. Instead, you can use one of the derived classes to load data from or store it to an actual file, a BLOB field, a socket, or a memory block. Use TFileStream when you want to work with a file, passing the filename and some file access options to the Create method. Use TMemoryStream to manipulate a stream in memory and not an actual file.
Several units define TStream-derived classes. The Classes unit includes the following classes:
- THandleStream defines a stream that manipulates a disk file represented by a file handle.
- TFileStream defines a stream that manipulates a disk file (a file that exists on a local or network disk) represented by a filename. It inherits from THandleStream.
- TCustomMemoryStream is the base class for streams stored in memory but is not used directly.
- TMemoryStream defines a stream that manipulates a sequence of bytes in memory. It inherits from TCustomMemoryStream.
- TStringStream provides a simple way to associate a stream to a string in memory, so that you can access the string with the TStream interface and also copy the string to and from another stream.
- TResourceStream defines a stream that manipulates a sequence of bytes in memory, and provides read-only access to resource data linked into the executable file of an application (the DFM files are an example of this resource data). It inherits from TCustomMemoryStream.
Stream classes defined in other units include the following:
- TBlobStream defines a stream that provides simple access to database BLOB fields. There are similar BLOB streams for database access technologies other than the BDE, including TSQLBlobStream and TClientBlobStream. (Notice that each type of dataset uses a specific stream class for BLOB fields.) All these classes inherit from TMemoryStream.
- TOleStream defines a stream for reading and writing information over the interface for streaming provided by an OLE object.
- TWinSocketStream provides streaming support for a socket connection.
Using File Streams
Creating and using a file stream can be as simple as creating a variable of a type that descends from TStream and calling components' methods to load content from the file:
var
 S: TFileStream;
begin
 if OpenDialog1.Execute then
 begin
 S := TFileStream.Create (OpenDialog1.FileName, fmOpenRead);
 try
 Memo1.Lines.LoadFromStream (S);
 finally
 S.Free;
 end;
 end;
end;
As you can see in this code, the Create method for file streams has two parameters: the name of the file and a flag indicating the requested access mode. In this case, you want to read the file, so you use the fmOpenRead flag (other available flags are documented in the Delphi help).
| Note |
Of the different modes, the most important are fmShareDenyWrite, which you'll use when you're simply reading data from a shared file, and fmShareExclusive, which you'll use when you're writing data to a shared file. There is a third parameter in TFileStream.Create, called Rights. This parameter is used to pass file access permissions to the Linux filesystem when the access mode is fmCreate (that is, only when you are creating a new file). This parameter is ignored on Windows. |
A big advantage of streams over other file access techniques is that they're very interchangeable, so you can work with memory streams and then save them to a file, or you can perform the opposite operations. This might be a way to improve the speed of a file-intensive program. Here is a snippet of a file-copying function to give you another idea of how you can use streams:
procedure CopyFile (SourceName, TargetName: String);
var
 Stream1, Stream2: TFileStream;
begin
 Stream1 := TFileStream.Create (SourceName, fmOpenRead);
  try
 Stream2 := TFileStream.Create (TargetName, fmOpenWrite or fmCreate);
    try
 Stream2.CopyFrom (Stream1, Stream1.Size);
    finally
 Stream2.Free;
 end
  finally
 Stream1.Free;
  end
end;
Another important use of streams is to handle database BLOB fields or other large fields directly. You can export such data to a stream or read it from one by calling the SaveToStream and LoadFromStream methods of the TBlobField class.
| Note |
Delphi 7 streaming support adds a new exception base class, EFileStreamError. Its constructor takes as parameter a filename for error reporting. This class standardizes and largely simplifies the notification of file-related errors in streams. |
The TReader and TWriter Classes
By themselves, the VCL stream classes don't provide much support for reading or writing data. In fact, stream classes don't implement much beyond simply reading and writing blocks of data. If you want to load or save specific data types in a stream (and don't want to perform a great deal of typecasting), you can use the TReader and TWriter classes, which derive from the generic TFiler class.
Basically, the TReader and TWriter classes exist to simplify loading and saving stream data according to its type, and not just as a sequence of bytes. To do this, TWriter embeds special signatures into the stream that specify the type for each object's data. Conversely, the TReader class reads these signatures from the stream, creates the appropriate objects, and then initializes those objects using the subsequent data from the stream.
For example, I could have written out a number and a string to a stream by writing:
var
 stream: TStream;
 n: integer;
 str: string;
 w: TWriter;
begin
 n := 10;
 str := 'test string';
 stream := TFileStream.Create ('c:	mp	est.txt', fmCreate);
 w := TWriter.Create (stream, 1024);
 w.WriteInteger (n);
 w.WriteString (str);
 w.Free;
 stream.Free;
This time the file will include the extra signature characters, so I can read back this file only by using a TReader object. For this reason, using TReader and TWriter is generally confined to component streaming and is seldom applied in general file management.
Streams and Persistency
In Delphi, streams play a considerable role in persistency. For this reason, many methods of TStream relate to saving and loading a component and its subcomponents. For example, you can store a form in a stream by writing
stream.WriteComponent(Form1);
If you examine the structure of a Delphi DFM file, you'll discover that it's really just a resource file that contains a custom format resource. Inside this resource, you'll find the component information for the form or data module and for each of the components it contains. As you would expect, the stream classes provide two methods to read and write this custom resource data for components: WriteComponentRes to store the data, and ReadComponentRes to load it.
For your experiment in memory (not involving DFM files), though, using WriteComponent is generally better suited. After you create a memory stream and save the current form to it, the problem is how to display it. You can do this by transforming the form's binary representation to a textual representation. Even though the Delphi IDE, since version 5, can save DFM files in text format, the representation used internally for the compiled code is invariably a binary format.
The IDE can accomplish the form conversion, generally with the View as Text command of the Form Designer, and in other ways. The Delphi Bin directory also contains a command-line utility, CONVERT.EXE. Within your own code, the standard way to obtain a conversion is to call the specific VCL methods. There are four functions for converting to and from the internal object format obtained by the WriteComponent method:
procedure ObjectBinaryToText(Input, Output: TStream); overload;
procedure ObjectBinaryToText(Input, Output: TStream;
 var OriginalFormat: TStreamOriginalFormat); overload;
procedure ObjectTextToBinary(Input, Output: TStream); overload;
procedure ObjectTextToBinary(Input, Output: TStream;
 var OriginalFormat: TStreamOriginalFormat); overload;
Four different functions, with the same parameters and names containing the name Resource instead of Binary (as in ObjectResourceToText), convert the resource format obtained by WriteComponentRes. A final method, TestStreamFormat, indicates whether a DFM is storing a binary or textual representation.
In the FormToText program, I've used the ObjectBinaryToText method to copy the binary definition of a form into another stream, and then I've displayed the resulting stream in a memo, as you can see in Figure 4.5. Here is the code of the two methods involved:
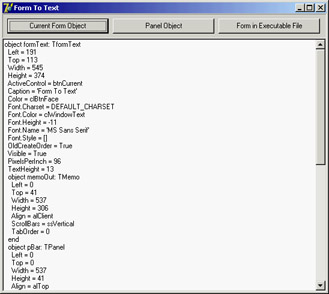
Figure 4.5: The textual description of a form component, displayed inside itself by the FormToText example
procedure TformText.btnCurrentClick(Sender: TObject);
var
  MemStr: TStream;
begin
 MemStr := TMemoryStream.Create;
 try
 MemStr.WriteComponent (Self);
 ConvertAndShow (MemStr);
 finally
 MemStr.Free
 end;
end;

procedure TformText.ConvertAndShow (aStream: TStream);
var
 ConvStream: TStream;
begin
 aStream.Position := 0;
 ConvStream := TMemoryStream.Create;
 try
 ObjectBinaryToText (aStream, ConvStream);
 ConvStream.Position := 0;
 MemoOut.Lines.LoadFromStream (ConvStream);
 finally
 ConvStream.Free
 end;
end;
Notice that by repeatedly clicking the Current Form Object button you'll get more and more text, and the text of the memo is included in the stream. After a few times, the entire operation will become extremely slow, until the program seems to be hung up. In this code, you see some of the flexibility of using streams—you can write a generic procedure that you can use to convert any stream.
| Note |
It's important to stress that after you've written data to a stream, you must explicitly seek back to the beginning (or set the Position property to 0) before you can use the stream further—unless you want to append data to the stream, of course. |
Another button, labeled Panel Object, shows the textual representation of a specific component, the panel, passing the component to the WriteComponent method. The third button, Form in Executable File, performs a different operation. Instead of streaming an existing object in memory, it loads in a TResourceStream object the design-time representation of the form—that is, its DFM file—from the corresponding resource embedded in the executable file:
procedure TFormText.btnResourceClick(Sender: TObject);
var
 ResStr: TResourceStream;
begin
 ResStr := TResourceStream.Create(hInstance, 'TFORMTEXT', RT_RCDATA);
 try
 ConvertAndShow (ResStr);
 finally
 ResStr.Free
 end;
end;
By clicking the buttons in sequence (or modifying the form of the program) you can compare the form saved in the DFM file to the current run-time object.
Writing a Custom Stream Class
Besides using the existing stream classes, Delphi programmers can write their own stream classes and use them in place of the existing ones. To accomplish this, you need only specify how a generic block of raw data is saved and loaded, and the VCL will be able to use your new class wherever you call for it. You may not need to create a brand-new stream class to work with a new type of media, but only need to customize an existing stream. In that case, all you have to do is write the proper read and write methods.
As an example, I created a class to encode and decode a generic file stream. Although this example is limited by its use of a totally dumb encoding mechanism, it fully integrates with the VCL and works properly. The new stream class simply declares the two core reading and writing methods and has a property that stores a key:
type
 TEncodedStream = class (TFileStream)
 private
 FKey: Char;
 public
 constructor Create(const FileName: string; Mode: Word);
 function Read(var Buffer; Count: Longint): Longint; override;
 function Write(const Buffer; Count: Longint): Longint; override;
 property Key: Char read FKey write FKey;
 end;
The value of the key is added to each of the bytes saved to a file and subtracted when the data is read. Here is the complete code of the Write and Read methods, which uses pointers quite heavily:
constructor TEncodedStream.Create( const FileName: string; Mode: Word);
begin
 inherited Create (FileName, Mode);
 FKey := 'A'; // default
end;

function TEncodedStream.Write(const Buffer; Count: Longint): Longint;
var
 pBuf, pEnc: PChar;
 I, EncVal: Integer;
begin
  // allocate memory for the encoded buffer
 GetMem (pEnc, Count);
 try
 // use the buffer as an array of characters
 pBuf := PChar (@Buffer);
    // for every character of the buffer
 for I := 0 to Count - 1 do
 begin
   // encode the value and store it
 EncVal := ( Ord (pBuf[I]) + Ord(Key) ) mod 256;
 pEnc [I] := Chr (EncVal);
 end;
    // write the encoded buffer to the file
 Result := inherited Write (pEnc^, Count);
 finally
 FreeMem (pEnc, Count);
 end;
end;

function TEncodedStream.Read(var Buffer; Count: Longint): Longint;
var
 pBuf, pEnc: PChar;
 I, CountRead, EncVal: Integer;
begin
 // allocate memory for the encoded buffer
  GetMem (pEnc, Count);
 try
   // read the encoded buffer from the file
 CountRead := inherited Read (pEnc^, Count);
    // use the output buffer as a string
 pBuf := PChar (@Buffer);
    // for every character actually read
 for I := 0 to CountRead - 1 do
 begin
      // decode the value and store it
 EncVal := ( Ord (pEnc[I]) - Ord(Key) ) mod 256;
 pBuf [I] := Chr (EncVal);
 end;
 finally
 FreeMem (pEnc, Count);
 end;
  // return the number of characters read
 Result := CountRead;
end;
The comments in this rather complex code should help you understand the details.
Now I used this encoded stream in a demo program, called EncDemo. The form of this program has two memo components and three buttons, as you can see in the following graphic:
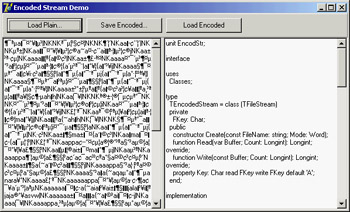
The first button loads a plain text file in the first memo; the second button saves the text of this first memo in an encoded file; and the third button reloads the encoded file into the second memo, decoding it. In this example, after encoding the file, I've reloaded it in the first memo as a plain text file on the left, which of course is unreadable.
Because the encoded stream class is available, the code of this program is very similar to that of any other program using streams. For example, here is the method used to save the encoded file (you can compare its code to that of earlier examples based on streams):
procedure TFormEncode.BtnSaveEncodedClick(Sender: TObject);
var
 EncStr: TEncodedStream;
begin
 if SaveDialog1.Execute then
 begin
 EncStr := TEncodedStream.Create(SaveDialog1.Filename, fmCreate);
 try
 Memo1.Lines.SaveToStream (EncStr);
 finally
 EncStr.Free;
 end;
 end;
end;
Compressing Streams with ZLib
A new feature of Delphi 7 is official support for the ZLib compression library (available and described at www.gzip.org/zlib). A unit interfacing ZLib has been available for a long time on Delphi's CD, but now it is included in the core distribution and is part of the VCL source (the ZLib and ZLibConst units). In addition to providing an interface to the library (which is a C library you can directly embed in the Delphi program, with no need to distribute a DLL), Delphi 7 defines a couple of helper stream classes: TCompressStream and TDecompressStream.
As an example of using these classes, I've written a small program called ZCompress that compresses and decompresses files. The program has two edit boxes in which you enter the name of the file to compress and the name of the resulting file, which is created if it doesn't already exist. When you click the Compress button, the source file is used to create the destination file; clicking the Decompress button moves the compressed file back to a memory stream. In both cases, the result of the compression or decompression is displayed in a memo. Figure 4.6 shows the result for the compressed file (which happens to be the source code of the form of the current program).
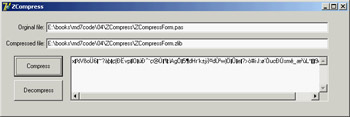
Figure 4.6: The ZCompress example can compress a file using the ZLib library.
To make the code of this program more reusable, I've written two functions for compressing or decompressing a stream into another stream. Here is the code:
procedure CompressStream (aSource, aTarget: TStream);
var
 comprStream: TCompressionStream;
begin
 comprStream := TCompressionStream.Create(
 clFastest, aTarget);
 try
 comprStream.CopyFrom(aSource, aSource.Size);
 comprStream.CompressionRate;
 finally
 comprStream.Free;
 end;
end;

procedure DecompressStream (aSource, aTarget: TStream) ;
var
 decompStream: TDecompressionStream;
 nRead: Integer;
 Buffer: array [0..1023] of Char;
begin
 decompStream := TDecompressionStream.Create(aSource);
 try
    // aStreamDest.CopyFrom (decompStream, size) doesn't work
    // properly as you don't know the size in advance,
    // so I've used a similar "manual" code
 repeat
 nRead := decompStream.Read(Buffer, 1024);
 aTarget.Write (Buffer, nRead);
 until nRead = 0;
 finally
 decompStream.Free;
 end;
end;
As you can see in the code comment, the decompression operation is slightly more complex because you cannot use the CopyFrom method: You don't know the size of the resulting stream in advance. If you pass 0 to the method, it will try to get the size of the source stream, which is a TDecompressionStream. However, this operation causes an exception, because the compression and decompression streams can be read only from the beginning to the end and don't allow for seeking the end of the file.
Summarizing the Core VCL and BaseCLX Units
I've spent most of this chapter discussing the classes of a single unit of the library: Classes. This unit, in fact, contains most of the core classes of the library. In this section, I'll provide an overview of what's available in the Classes unit and a few other core library units.
The Classes Unit
The Classes unit is at the heart of both VCL and CLX libraries, and although it has many internal changes from the last version of Delphi, little is new for average users. (Most changes are related to modified IDE integration and are meant for expert component writers.)
Here is a list of what you can find in the Classes unit, a unit that every Delphi programmer should spend some time with:
- Many enumerated types, the standard method pointer types (including TNotifyEvent), and many exception classes.
- Core library classes, including TPersistent and TComponent as well as many others seldom used directly.
- List classes, including TList, TThreadList (a thread-safe version of the list), TInterfaceList (a list of interfaces, used internally), TCollection, TCollectionItem, TOwnedCollection (which is simply a collection with an owner), TStrings, and TStringList.
- All the stream classes I discussed in the previous section but won't list here again. There are also the TFiler, TReader, and TWriter classes and a TParser class used internally for DFM parsing.
- Utility classes, such as TBits for binary manipulation and a few utility routines (for example, point and rectangle constructors, and string list manipulation routines such as LineStart and ExtractStrings). There are also many registration classes, to notify the system of the existence of components, classes, special utility functions you can replace, and much more.
- The TDataModule class, a simple object container alternative to a form. Data modules can contain only nonvisual components and are generally used in database and web applications.
Note In early versions of Delphi, the TDataModule class was defined in the Forms unit; since Delphi 6 it has been moved to the Classes unit. This was done to eliminate the code overhead of the GUI classes from non-visual applications (for example, web server modules) and to better separate non-portable Windows code from OS-independent classes, such as TDataModule. Other changes relate to the data modules—for example, to allow the creation of web applications with multiple data modules.
- New interface-related classes, such as TInterfacedPersistent, aimed at providing further support for interfaces. This particular class allows Delphi code to hold on to a reference to a TPersistent object or any descendent implementing interfaces, and is a core element of the new support for interfaced objects in the Object Inspector (see Chapter 9, "Writing Delphi Components," for an example).
- The new TRecall class, used to maintain a temporary copy of an object. This class is particularly useful for graphical-based resources.
- The new TClassFinder class, which is used to find a registered class instead of the FindClass method.
- The TThread class, which provides the core operating system–independent support for multithreaded applications.
New in the Classes Unit
In Delphi 7, the Classes unit has only a few minor additions. Beside the changes I've already mentioned in this chapter, such as the extended support for name-value pairs in the TStringList class, there are a couple of new global functions, AncestorIsValid and IsDefaultPropertyValue.
Both functions were introduced to support the highlighting of non-default properties in the Object Inspector. They serve little other purpose, and I doubt you'll benefit from their use in an application—unless you are interested in saving the status of a component and form, and writing your own custom streaming mechanism.
Other Core Units
Typical Delphi programmers don't directly use the other units that are part of the RTL package as often as they use Classes. Here is a list of these other units:
- The TypInfo unit includes support for accessing RTTI information for published properties, as discussed in the section "Accessing Properties by Name."
- The SyncObjs unit contains a few generic classes for thread synchronization.
- The ZLib unit includes compression and decompression streams, as discussed earlier in the section "Compressing Streams with ZLib."
- The ObjAuto unit contains code to call the published methods of an object by name, passing the parameters in a variant array. This unit is part of the extended support for dynamic method invocation pushed by SOAP and other new Delphi technologies.
Of course, the RTL package also includes the units with functions and procedures discussed in the preceding chapter, such as Math, SysUtils, Variants, VarUtils, StrUtils, DateUtils, and so on.
What s Next?
As you have seen in this chapter, the Delphi class library has a few root classes that play a considerable role and that you should learn to leverage to the maximum possible extent. Some programmers tend to become expert on the components they use every day, and this is important; but without understanding the core classes (and ideas such as ownership and streaming), you'll have a tough time grasping the full power of Delphi.
Of course, in this book, I also need to discuss visual and database classes. Now that I've introduced all the base elements of Delphi (language, RTL, core classes), I'm ready to discuss the development of real applications with this tool. Chapter 5 covers the structure of the visual portion of the component library.
Following chapters are devoted to examples of using the various components to build applications with a modern user interface and use forms effectively. I'll cover the advanced use of traditional controls and menus, discuss the actions architecture, cover the TForm class, and then examine toolbars, status bars, dialog boxes, and MDI applications.
Part I - Foundations
- Delphi 7 and Its IDE
- The Delphi Programming Language
- The Run-Time Library
- Core Library Classes
- Visual Controls
- Building the User Interface
- Working with Forms
Part II - Delphi Object-Oriented Architectures
- The Architecture of Delphi Applications
- Writing Delphi Components
- Libraries and Packages
- Modeling and OOP Programming (with ModelMaker)
- From COM to COM+
Part III - Delphi Database-Oriented Architectures
- Delphis Database Architecture
- Client/Server with dbExpress
- Working with ADO
- Multitier DataSnap Applications
- Writing Database Components
- Reporting with Rave
Part IV - Delphi, the Internet, and a .NET Preview
- Internet Programming: Sockets and Indy
- Web Programming with WebBroker and WebSnap
- Web Programming with IntraWeb
- Using XML Technologies
- Web Services and SOAP
- The Microsoft .NET Architecture from the Delphi Perspective
- Delphi for .NET Preview: The Language and the RTL
- Appendix A Extra Delphi Tools by the Author
- Appendix B Extra Delphi Tools from Other Sources
- Appendix C Free Companion Books on Delphi
EAN: 2147483647
Pages: 279
