Modeling and OOP Programming (with ModelMaker)
Overview
When Borland decided to provide a UML design solution for the Enterprise and Architect editions of Delphi 7, it chose to bundle ModelMaker, by ModelMaker Tools of Holland (www.modelmakertools.com). ModelMaker is a high-quality UML design tool with integration into the Delphi IDE. But as you become acquainted with ModelMaker and over the course of this chapter, you'll see that ModelMaker is far more than a UML diagramming tool. I will, of course, cover the UML diagramming capabilities of ModelMaker, but I will also spend some time on the other features of the tool as well a conceptual overview of the product that should allow you to begin getting the most out of it.
ModelMaker has been around since the early days of Delphi, and over time it has accumulated options to support almost the entire Delphi language as well as a vast number of conveniences for programmers. The result is a huge feature set that can be daunting at first glance. The ModelMaker user interface comprises more than 100 forms, and without the proper grounding the uninitiated may become frustrated. Stick with me, and you will soon be navigating ModelMaker fearlessly.
Although ModelMaker is often referred to as a UML diagramming tool, I prefer to describe it as a Delphi-specific, customizable, extensible full-cycle UML diagramming and CASE tool. It's Delphi-specific because it is designed to handle Delphi code. When working with a property, for instance, the dialog boxes in ModelMaker present options that are specific to Delphi language keywords and concepts. ModelMaker is customizable because, as you'll see, hundreds of options control how Delphi code is generated from your object model. ModelMaker is extensible because it includes a robust OpenTools API that allows the creation of plug-in experts to extend the functionality of the product. It's is a full-cycle tool because it offers features that apply to all phases of the standard development cycle. Finally, ModelMaker can be described as a CASE tool because it will automatically generate some of the redundant, obvious code required for Delphi classes, leaving it to you to provide the operational code for your classes.
| Note |
This chapter has been co-written with Robert Leahey and benefits from his in-depth knowledge of and extensive experience with ModelMaker. In the world of software, Robert is an architect, programmer, author, and speaker. As a musician, he has played professionally for over 20 years and is currently a graduate student at the University of North Texas in the area of music theory. Via his company, Thoughtsmithy (www.thoughtsmithy.com), Robert offers consulting and training services, commercial software, audio production, and large-scale LEGO brick sculptures. He lives in north Texas with his wife and daughters. |
Understanding ModelMaker s Internal Model
Before proceeding with a discussion of ModelMaker's UML support and other features, it is vital that you understand conceptually how ModelMaker manages your code model. Unlike Delphi and other editors, ModelMaker does not continually parse a source code file to visually represent the contents. Consider Delphi: Any IDE convenience you use to alter your code will directly change the contents of the source code file (which you can then save in order to persist the changes). In contrast, ModelMaker maintains an internal model representing your classes, code, documentation, and so on, from which your source code files are generated. When you edit your model through the various editors in ModelMaker, the changes are applied to the internal model—not the external source code files; at least, not until you tell ModelMaker to regenerate the external files. Understanding this distinction should save you some frustration.
Another concept to understand is that ModelMaker is capable of representing a single internal code model with multiple views in its user interface. The model can be viewed and edited, for example, as a class hierarchy, or as a list of units with contained classes. Class members can be sorted, filtered, grouped, and edited in a variety of ways. Any number of views can be seen in the various plug-ins available for ModelMaker. But most important for this discussion, the UML diagram editor itself is another view into the model. When you visualize elements of the model (such as classes and units) in your diagrams, you are creating visual representations of the code model elements; if you delete a symbol from a diagram, you are not necessarily deleting the element from the model—you are simply removing the representation from your diagram.
One last consideration about diagramming in ModelMaker: Although ModelMaker offers several wizards and automation features in the area of visualization, the product will not read your code and magically produce attractive UML diagrams with no effort on your part. Upon importing your source code and adding your classes to diagrams, you will need to arrange the symbols in order to create usable UML diagrams.
Modeling and UML
UML (Unified Modeling Language) is a graphical notation used to express the analysis and design of a software project and communicate it to others. UML is language independent, but it's intended to describe object-oriented projects. As the creators of UML stress, it is not itself a methodology; it can be used as a descriptive tool no matter what your preferred design process.
My goal is to look at UML diagrams from the perspective of a Delphi programmer using ModelMaker. An in-depth discussion of UML is well beyond the scope of this chapter.
| Note |
The best introduction to UML I've seen is Martin Fowler's compact UML Distilled (Addison-Wesley, 1999). |
Class Diagrams
One of the most common UML diagrams supported by ModelMaker is the class diagram. Class diagrams can display a wide variety of class relationships, but at its simplest this type of diagram depicts a set of classes or objects and the static relationships between them. For example, Figure 11.1 is a class diagram containing the classes from the NewDate program presented in Chapter 2, "The Delphi Programming Language." If the results are different when you import these classes into ModelMaker and create your own class diagram, keep in mind the numerous options I discussed earlier. Many settings control how your visualized classes will appear. You can open the ModelMaker file (MPB file) used for Figure 11.1 from the corresponding source code folder of the current chapter.

Figure 11.1: A class diagram in ModelMaker
Earlier, I mentioned that the ModelMaker diagram editor is just another view into the internal model. Some of the symbols in the ModelMaker diagrams map directly to code model elements, and others do not. With low-level diagrams like class diagrams, most symbols represent actual code model elements. Manipulating these symbols can change the code generated by ModelMaker. At the opposite end of the spectrum, in use case diagrams most (if not all) symbols have no representation within the code model. In your class diagram, you can add new classes, interfaces, fields, properties, and even documentation to the model. Likewise, you can change the inheritance of a class in the model from within the diagram. At the same time, you can add several symbols to a class diagram that have no logical representation within the code model.
Class diagrams in ModelMaker also allow you to code to interfaces, thus working at a higher abstraction level. Figure 11.2 shows the relationships of the classes and interfaces in a complex example of interface use, IntfDemo. This example is covered in an online book discussed in Appendix C, "Free Companion Books on Delphi," and is available among the chapter's source code examples.
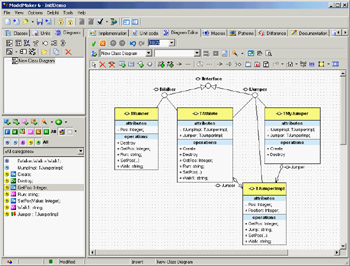
Figure 11.2: A class diagram with interfaces, classes, and interface delegation
When you're using interfaces in class diagrams, you can specify interface implementation relationships between classes and interfaces, and those implementations will be added to the code model. Adding an interface implementation within a diagram results in the appearance of one of ModelMaker's niftier features: the Interface Wizard (see Figure 11.3).
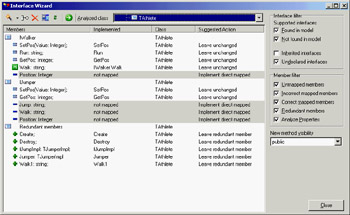
Figure 11.3: ModelMaker's Interface Wizard
Activating the Interface Wizard for a class greatly simplifies the task of implementing an interface. The wizard enumerates the methods and properties a class needs in order to implement a given interface (or interfaces); if told to, the wizard will add those needed members to the implementing class. Note that it is up to you to provide meaningful code for any methods added to the class. In Figure 11.3, the wizard is evaluating TAthlete for its implementation of IWalker and IJumper and suggesting the changes that are necessary for correct implementation of these interfaces.
Sequence Diagrams
Sequence diagrams model object interaction by rendering objects and the messages that pass between them over time. In a typical sequence diagram, the objects interacting within a system are arrayed along the x-axis, and time is represented as passing from top to bottom along the y-axis. Messages are represented as arrows between objects. You can see an example of a rather trivial sequence diagram in Figure 11.4. Sequence diagrams can be created at various levels of abstraction, allowing you to represent high-level system interaction involving just a few messages or low-level interaction with many messages.
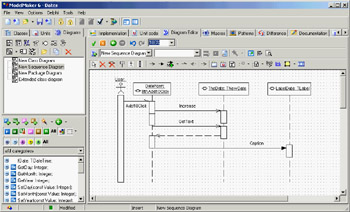
Figure 11.4: A sequence diagram for an event handler of the NewDate example
Along with class diagrams, sequence diagrams are among the UML diagrams supported by ModelMaker that are most closely related to your code model. You can create several diagrams in ModelMaker in which the diagram symbols have no direct relation to your code model, but in sequence diagramming, you can directly affect the code as you model classes and their methods. For example, as you create a symbol for a message between objects, you can choose from a list of methods belonging to the recipient object; or, you can choose to add a new method to the object, and that new method will be added to the code model.
Note that, as mentioned earlier, ModelMaker will not automatically create sequence diagrams from your imported code; you will need to create them yourself.
Use Cases and Other Diagrams
I've discussed two of the lowest-level UML diagrams first, but ModelMaker supports several other higher-level UML diagrams designed to provide a path from the highest-level user interaction modeling of use case diagrams to low-level class and sequence diagrams. Use case diagrams are among the most-used diagrams, in spite of the fact that their symbols bear no relation to code model elements. These diagrams are intended to model what the software is supposed to do, and they are self-explanatory enough to use in analysis sessions with non-developers.
A simple use case diagram consists of actors (users or application subsystems) and use cases (things the actors do). One of the most frequent questions regarding use cases is how to handle use case texts in ModelMaker. Texts for use cases are a typical next step when doing preliminary analysis. For example, a use case is a short description of an action an actor might take ("Preview Sales Report" or "Resize Window"); a use case text is a longer, more detailed description of the text. ModelMaker does not specifically support the longer use case texts; you can either use an annotation symbol within the diagram attached to the use case symbol, or you can link the use case symbol to an external file containing the use case text. You'll learn more about these techniques in the "Common Diagram Elements" section of this chapter.
The other UML diagrams supported by ModelMaker are as follows:
Collaboration Diagrams Interaction diagrams, much like sequence diagrams. They differ, however, in that the order of messages is specified by numbering rather than by time-scale. This results in a different diagram layout where the relationships between objects can sometimes be seen more clearly.
State Diagrams Diagrams that describe the behavior of a system by identifying all the states an object can assume as a result of messages it receives. A state diagram should list all the state transitions an object is subject to, indicating the starting and resulting state of each transition.
Activity Diagrams Diagrams that depict the workflow of a system and are particularly well suited for visualizing parallel processing.
Component and Deployment Diagrams Also known as implementation diagrams. Diagrams that allow you to model the relationships between components (modules, actually—executables, COM objects, DLLs, and so on) or, in the case of deployment diagrams, physical resources (referred to as nodes).
Non UML Diagrams
ModelMaker supports three diagrams that are not UML-standard, but are quite useful:
Mind-Map Diagrams Originated by Tony Buzan in the 1960s. An excellent method for brainstorming, exploring branching topics, or quickly recording related thoughts. I've often used mind-map diagrams for generic data display during presentations.
Unit Dependency Diagrams Often used to display the results of ModelMaker's powerful Unit Dependency Analyzer. These diagrams can show the branching relations of units within a Delphi project.
Robustness Diagrams Questionably left out of the UML specification. These diagrams help to bridge the gap between interface-only use case modeling and implementation-specific sequence diagrams. Robustness diagrams can help an analysis team verify their use case and begin looking toward implementation details.
Common Diagram Elements
Each type of diagram supported by ModelMaker contains symbols specific to that diagram type, but there are elements within the Diagram Editor that are common to all diagram types. You can add images and shapes to your diagrams, as well as package symbols (containers to which you can add other symbols).
The Hyperlink symbol lets you add to a diagram a label linked to some other entity. In fact, the vast majority of diagram symbols support this hyperlinking feature. You can link to another diagram (clicking the link will open the linked diagram in the editor), you can link to an element within the code model (be it class, unit, method, interface, and so on—clicking this link will open the appropriate editor for the linked element), or you can link to an external document (this link will open the linked document with the appropriate application).
Three different types of annotation tools are available to each diagram type. Several documents more fully explain these tools, so suffice it to say here that you can add a stand-alone annotation symbol; you can add an annotation symbol that automatically displays the linked object's internal documentation; or you can add an annotation symbol, type in your text, and link this symbol to an object. When you do this, the object's internal documentation is updated to match the annotation symbol's text.
Relationship or association symbols default to straight lines. However, you can turn them into orthogonal lines by selecting the symbol and pressing Ctrl+O. You can also add nodes to these symbols by pressing Ctrl and clicking the line. ModelMaker attempts to keep these symbols orthogonal when at all possible.
ModelMaker also offers a robust set of visual symbol styles. You can define font and color styles in a hierarchical manner and apply them by name to your diagram symbols. See the entry "style manager" in the online help for more information.
One final common feature to note is the ability to hierarchically order the Diagrams list (see Figure 11.5). You can add folders for organizational purposes and to "re-parent" diagrams; to do so, Ctrl+drag a diagram to its new parent.
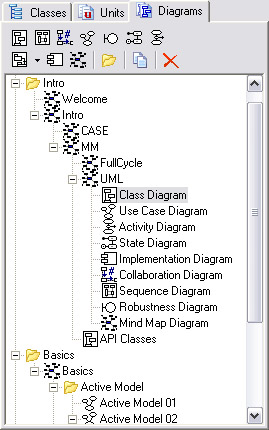
Figure 11.5: The organizational possibilities of the Diagrams view
ModelMaker's diagramming capabilities encompass a vast set of possibilities; once you've put some time into learning the feature set, you may find that it transforms your development process. For the Delphi developer, the two-way active nature of the Diagram Editor provides a far more dynamic diagramming experience than most UML editors that simply generate static "pretty pictures."
Coding Features of ModelMaker
As you've seen, ModelMaker is a powerful UML diagramming tool, and you can do a great deal of analysis and design work exercising only those capabilities; but, as I'll explain in the following sections, ModelMaker offers a great deal more than just diagramming. Many developers use ModelMaker as their primary development environment, supplanting Delphi in that regard. This is due in part to the visual way in which ModelMaker represents Delphi programming tasks, automating many of the repetitive parts of coding Delphi classes. But it is also because Delphi, for all its strengths, tends to facilitate the development of code where the line between the presentation domain and problem domain is blurred. In other words, it is easy to write application implementation code—the code that actually does stuff—and put it right in the event handlers of your forms. This is typically not considered good object-oriented design. On the other hand, ModelMaker facilitates the creation and refactoring of problem domain objects, and the de-coupling of those objects from the user interface.
Before we get to these topics, though, I'll first discuss how Delphi and ModelMaker work together.
Delphi ModelMaker Integration
When properly installed, ModelMaker adds a menu to the Delphi IDE, appropriately labeled ModelMaker:
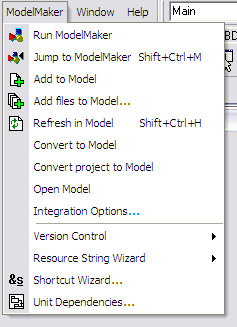
If you don't see this menu, you need to install ModelMaker's DLL-based wizard in the Delphi registry, as covered in the sidebar "Installing New DLL Wizards" at the end of Chapter 1. From this menu, you can control ModelMaker somewhat and quickly import your code into ModelMaker projects.
Most of the menu options are available only if ModelMaker is running. Once you start ModelMaker (either from the Run ModelMaker menu item or in the normal fashion), the other items will become available. The integration menu contains a number of ways to add your code to a model. The Add to Model, Add Files to Model, Convert to Model, and Convert Project to Model items cause ModelMaker to import the specified units: The Add items import units into the currently loaded model in ModelMaker, and the Convert items create a new model and import the units into it.
Convert Project to Model is a great place to begin—make sure you back up your code, and then select this menu item while one of your projects is open in Delphi. The entire project will be imported into a new model in ModelMaker.
Where's the VCL? Inheritance and Importing Code in ModelMaker
Upon examining your newly imported code in ModelMaker, you may notice that only the units that are part of the project were imported. ModelMaker won't automatically import units that are "used" by your project—doing so would create inordinately large models with many unnecessarily imported classes. However, many of ModelMaker's nicer inheritance-related features require that ancestor classes exist in the code model. (For instance, when properly set up, changes to ancestor classes will automatically propagate down to overriding descendants.)
Fortunately, you have many options when importing code. Although you can import via the ModelMaker integration menu in Delphi (or by dragging a unit from Windows Explorer into ModelMaker), the more flexible way is to use one of the Import buttons on ModelMaker's main toolbar. Importing units this way opens the Import Source File dialog, where you can set options for how to import the code. Taking advantage of these options lets you import part of the VCL as placeholder classes so that you can leverage ModelMaker's inheritance tools without bloating your model.
Also in the integration menu is Refresh in Model, which forces ModelMaker to re-import the current unit. This is a good time to discuss one of the consequences of ModelMaker's internal code model that I mentioned earlier. Because ModelMaker operates on its internal model and not on your external source code files (until you regenerate the files), it is common to find that both your model and your source code files have been edited—the result being that your model is now out of synch with the source files. When the source files have changed but not the model, you can re-synch the model by re-importing the source units. But if both the model and source files have been changed, the situation is more complicated. Fortunately, ModelMaker offers a robust set of tools to handle synchronization problems. See the section "The Difference View" for more information.
Another item of note in the integration menu is Jump to ModelMaker. When you select this item, ModelMaker attempts to find the current code position within its loaded model, bringing ModelMaker to the front in the process.
Although ModelMaker can be controlled from Delphi, the integration is two-way. Similar to the ModelMaker menu in the Delphi IDE, a Delphi menu appears in ModelMaker. In that menu are commands that let you jump from the currently selected model element to its corresponding position in the source code file in Delphi, as well as commands that cause Delphi to perform a syntax check, a compile, or a build. Thus you can edit your code, generate it, and compile it, all from within ModelMaker.
Managing the Code Model
It's time to discuss the nuts and bolts of coding within ModelMaker. Due to the objectified nature of ModelMaker's internal code model, editing code model elements is typically a more visual process than it is in Delphi. Editing a class property, for instance, is done via the Property Editor dialog, as you can see in Figure 11.6. Here is one of the best examples of ModelMaker's automation. When you add a new property, you don't have to worry about all the overhead of also adding a private state field, any read or write methods, or even the property's declaration. All you do is choose the appropriate settings in the editor, and ModelMaker creates the necessary supporting class members. This is more extended than the similar benefits offered in the Delphi IDE by Class Completion.
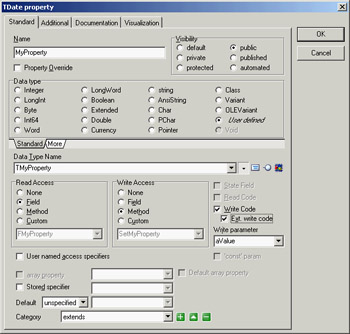
Figure 11.6: The Property Editor dialog
Notice that the attributes of a property that you might normally type in by hand are represented by various controls in the dialog. Visibility, Type, Read and Write specifications, and so on are all managed in the editor. The benefits are in the area of refactoring (not to mention the elimination of certain repetitive typing tasks). For instance, because ModelMaker manages a property as an object in its code model, changing something about the property—its type, for instance—will cause ModelMaker to apply that change to any references of which it is aware. If later you want to change the read access from a field to a method, you can make that change in the editor, and ModelMaker will take care of adding the get method and changing the property's declaration. Best of all, if you decide to rename the property or move it to another class, the property owns its supporting class members: They will be automatically renamed or moved as appropriate.
The same approach is used for each of the class member types; similar editors exist for methods, events, fields, and even method resolution clauses.
There's a developer-level sense of abstraction to developing in ModelMaker. It decouples you from the need to think about implementation details when editing class members; you need merely think in terms of interface, while ModelMaker handles most of the repetitive parts of implementing the member. (Don't confuse my metaphor with writing the code of a method implementation—you'll still need to do that.)
The Unit Code Editor
ModelMaker includes two code editors: the editor for implementing class methods, which I'll discuss next, and the Unit Code Editor, which requires some explanation. ModelMaker really is a class/object oriented tool—its conveniences are mostly built around managing class-level code. When it comes to code that is not part of a class (non-class type declarations, metaclass declarations, unit methods and variables, and so on), ModelMaker takes a more no-frills approach. When ModelMaker imports a unit, anything that can be stored within the code model is handled accordingly, and what's left over appears in the Unit Code Editor. (Often, for new users, this includes any documentation not residing within method implementations—but ModelMaker can reverse-engineer your documentation as well; more on that later.)
The following is an example of what you might see in the Unit Code Editor:
unit ;

interface

uses
 SysUtils, Windows, Messages, Classes, Graphics, Controls,
 Forms, Dialogs, Dates, StdCtrls;

type
MMWIN:CLASSINTERFACE TDateForm; ID=37;
var
 DateForm: TDateForm;

implementation

{$R *.DFM}

MMWIN:CLASSIMPLEMENTATION TDateForm; ID=37;
end.
Although this code looks vaguely familiar to a Delphi programmer, it obviously will not compile. You're looking at the shell that ModelMaker's code generation engine will use when expanding or generating a unit of code. When ModelMaker generates a unit, it starts at the top of this code and begins emitting lines of text while looking for one of three things: plain text, macros, or code-generation tags.
Plain text, in this example, can be found in the very first line: unit. ModelMaker will emit this text exactly as is. The next token on that line is a macro, . I'll discuss macros in depth later; for now, understand that ModelMaker will expand the macro in-place. In this case, the macro represents the name of the unit, and that text will be emitted.
Finally, an example of a code-generation tag appears directly under the type keyword:
MMWIN:CLASSINTERFACE TDateForm; ID=37;
In this case, the tag tells ModelMaker to expand the class interface for TDateForm at this point in the unit code.
Thus, when editing code in the Unit Code Editor, you are looking at a hybrid of code managed by you and code managed by ModelMaker. Take care when editing this code not to disturb the ModelMaker-managed code unless you know what you're doing. It's analogous to editing code in a Delphi-managed DPR file—you can get in trouble fast if you're not careful. Nevertheless, this is where you would add a non-class-type declaration (an enumerated type, for instance). You would handle it just as you would in Delphi, adding the type declaration into the type section of the unit:
unit ;

interface

uses
 SysUtils, Windows, Messages, Classes, Graphics, Controls,
 Forms, Dialogs, Dates, StdCtrls;

type
 TmyWeekday = (wdSunday, wdMonday, wdTuesday, wdWednesday,
 wdThursday, wdFriday, wdSaturday);

MMWIN:CLASSINTERFACE TDateForm; ID=37;
var
 DateForm: TDateForm;

implementation

{$R *.DFM}

MMWIN:CLASSIMPLEMENTATION TDateForm; ID=37;
end.
In this example, ModelMaker will emit the type declaration just as you've entered it—as plain text—and then begin expanding the TDateForm class declaration.
ModelMaker offers tools within the Unit Code Editor for managing unit-level methods, and they are a significant convenience when you have large routine library-type units. However, now that you're using ModelMaker, you can leverage its strong refactoring features to objectify some of those routines.
The Method Implementation Code Editor
ModelMaker's Method Implementation Code Editor (see Figure 11.7) is quite different from the Unit Code Editor. The editor takes up the right two thirds of the screen. In this example, I've added a fictional property named MyNewProperty and allowed ModelMaker to generate the state field and the read and write access methods. The write access method is active in the editor.
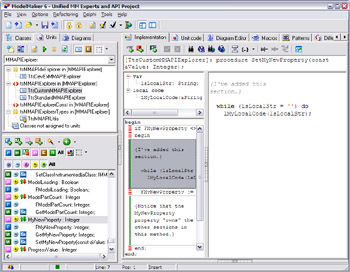
Figure 11.7: ModelMaker with the Implementation tab active
Next to the code editor on the right you can see two interesting windows. The tree view on top is the local code explorer: Here you can manage local variables and local procedures. Below that is the Section List; ModelMaker allows you to break up code within a method implementation into sections. In part, this is an organizational convenience; but more importantly, it allows ModelMaker to control specific sections of code. Just as ModelMaker can own parts of the model (like a property access method automatically generated for a property), it can also own sections of code within a method. Most often this occurs when you have chosen to have ModelMaker generate the read or write code within a property access method. Notice that in this example, the first, third, and fifth sections have a red and white dashed left margin, indicating that they are owned by ModelMaker. The sections with the green margin are user-owned. When ModelMaker generates this method, the code will be emitted in the order shown, one section after another.
| Warning |
A big drawback of writing code within ModelMaker Implementation windows is that is lacks any of the forms of Code Completion offered by the Delphi IDE. |
The Difference View
As I mentioned earlier, it's easy to get into a situation where your model is out of synch with your source files. If both your model and your source files have been edited, you can't simply regenerate the files from the model, lest you overwrite the source file changes. Likewise, you can't re-import the units, for fear of eliminating the changes to the model. Fortunately, ModelMaker offers one of the most robust differencing tools I've seen. When you find your model out of synch, it's time to visit the Difference tab (see Figure 11.8).
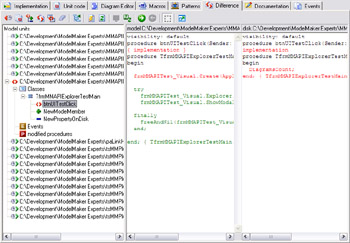
Figure 11.8: ModelMaker's Difference view
ModelMaker offers a variety of ways to view differences. You can view a standard text file comparison, time stamp differences, or even a comparison of two selected classes within the model. My favorite is on display in Figure 11.8—a structured difference. ModelMaker temporarily imports the source file on disk (thereby objectifying it just like the internal code model) and compares the imported file with the same unit and classes in the model on an object and attribute level rather than as text. The result is a much faster, much more accurate comparison.
Notice in the tree view in Figure 11.8 the icons that denote differences. The red <> indicates that both the model and the source file contain the indicated class member (btnUITestClick in the example) but the two instances differ. The differing code is displayed in the memo controls to the right. The green + in the tree view indicates that the indicated class member exists only in the model, not on the disk. The blue – indicates that the class member exists only on disk, not in the model. With this information, you can choose how to proceed in re-synchronizing your model. One nifty feature is the ability to re-import a selected method (rather than the whole unit) from within the Difference view.
This approach implies that it is very important to know when your model is out of synch, so you don't override your changes on disk when regenerating the source files. Fortunately, ModelMaker offers several safeguards that can prevent this situation. One of these is a Design Critic (see the "Little-Known Tidbits" section later in the chapter). If your Design Critics are enabled, ModelMaker's Message View will warn you when a file on disk has changed:

The Event Types View
ModelMaker enables the management of event types on the Events tab; there you can edit event type declarations. But keep in mind that although a new event type may exist in ModelMaker's internal code model, it does not exist in a source file until you add the event type's declaration to a unit. The easiest way to manage that process is to drag the event type declaration from the Events view list to the Unit list and drop the item into a unit.
Documentation and Macros
ModelMaker can come in very handy in supporting software documentation efforts. You need to master an important concept prior to proceeding (fortunately, it is not complex): Within ModelMaker, documentation does not equate to comments. Fear not; you can do complicated things with source code commenting, but you must take some steps to cause ModelMaker to emit (or import) those comments. Virtually every model element (classes, units, members, diagram symbols, and so on) can have documentation, but entering documentation for an element will not automatically cause that documentation to appear in your source code. That text is attached to the element within the model, but you must cause ModelMaker to generate a source code comment that contains your documentation.
Documentation versus Comments
Every element in a ModelMaker code model can own two types of documentation: a standard, large text block of documentation, and a short one liner (see Figure 11.9). These texts can serve multiple purposes within the context of ModelMaker and, as noted earlier, do not directly equate to source code comments, although such comments can be generated from them.
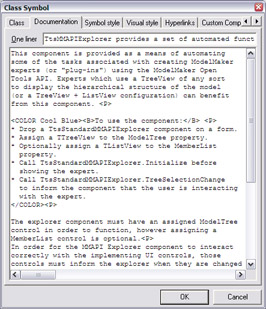
Figure 11.9: The Documentation tab of a Class Symbol
In this example, a class has both types of documentation. This documentation might appear in a diagram as an attached annotation (either the one liner or the standard documentation can be used), or you can specify that either or both be used as part of the source code file's comments. To do this, you'll need to use ModelMaker's powerful macros (discussed in the next section) and change some of your project options. For now, let's not worry about the macros (accepting the defaults) and look only at the project options.
Access the Project Options dialog by selecting Project Options from the Options menu and select the Source Doc Generation tab. Here you will find many options regarding the generation of source code comments from ModelMaker documentation. (For more information, see the online ModelMaker help.) To see source code commenting in action, select Before Declaration from the Method Implementation section of the In Source Documentation Generation group. Now any methods that contain documentation will use the default macro to generate source code comments.
ModelMaker can also import comments from a source unit and associate those comments with the appropriate code model elements. To do this, you must signify your comments with a Documentation Import Signature (see the Source Doc Import tab of the Project Options dialog) and tell ModelMaker what lines to import into the model. Thus if your method implementation has comments like the following, you can tell ModelMaker to ignore the first five lines and import only the actual comment text:
{***************************************************
TmyClass.DoSomething
Returns: String
Visibility: Public
Comment:
   This is the actual comment that we want ModelMaker to import. The
   first 5 lines of this comment block should not be imported into
   the model.}
When you're configuring ModelMaker for source commenting, it's important to watch out for comment creep. This can occur when your comment import and export settings do not quite match. For instance, if the macro controlling your source comment output adds six lines to the comment before adding the documentation text, but your import settings eliminate only five lines, then each import/generation cycle will add a redundant line of text to your comment.
Working with Macros
Macros represent one of the key features of ModelMaker: They are easy to learn, but difficult to master. A macro is an identifier that represents a block of text. When ModelMaker encounters a macro, it attempts to replace the macro name with the text the macro represents.
You've seen this process in action in the Unit Code Editor: is replaced at code generation time with the name of the unit being generated. This is an example of an entity-specific macro that is always different depending on what unit is being generated. The macro, UnitName, is predefined, but the result will differ by context.
ModelMaker includes many predefined macros (the complete list is on page 75 of the User Manual, the usermanual620.pdf file you can find on Delphi's Companion CD). You can create your own macros of varying complexity (even nested macros) in the Macros tab. You can also override certain predefined documentation expander macros. For instance, if you enable method implementation documentation but supply no macro, ModelMaker will use its built-in macro to generate the comments. However, if you declare and define a macro named MemberImpDoc, ModelMaker will use this macro when generating method comments. (See ModelMaker's online help for a list of override-able macros used for source comment generation, looking for the topic "Documentation Macros.")
Macros are not used only at code-generation time. You can also expand macros while typing within a code editor. In this case, you can parameterize a macro so that when ModelMaker attempts to expand it, you will be prompted for values. These values can be inserted into the text being expanded.
Refactoring Your Code
Refactoring is one of those trendy terms in computer programming that is constantly bandied about, but that means different things to different people. Refactoring is basically the process of improving your existing code in place without altering its external behavior. There is no single refactoring process to which you must adhere—it's simply the task of trying to improve your code in place without breaking too much around it.
Many texts are dedicated to the concept of refactoring, so I will simply look at some of the specific ways ModelMaker can assist you in refactoring your code. Again, ModelMaker's internal code model plays a big role—remember that developing in ModelMaker is not just development of object-oriented code; it's also a development process that is assisted by object orientation. Because all these code model elements are stored internally as objects—objects that have references to each other—and because source code units are completely regenerated from this model every time you choose to generate your code, any changes to the code elements are propagated throughout your classes instantly.
The perfect example is again a class property. If you have a property named MyNewProperty with attending read/write methods (maintained by ModelMaker and named GetMyNewProperty and SetMyNewProperty), and you would like to rename the property MyProperty, doing so requires only one step: rename the property. ModelMaker takes care of the rest—the access methods are automatically renamed GetMyProperty and SetMyProperty. If the property appears in a diagram, the diagram is automatically updated to represent the change. (One caveat: ModelMaker will not automatically search your code for instances of MyNewProperty—you'll have to do this with a global search and replace within ModelMaker.) This is a simple example, but it illustrates how ModelMaker simplifies the task of refactoring; as you move and rename code elements, ModelMaker will handle the majority of the details for you. Now let's look at some specifics:
Simple Renaming This task is quite simple and we've already touched on it, but its usefulness cannot be overstressed. Code model element name changes are propagated by ModelMaker through the code model to all instances of that element of which it is aware.
Reparenting Classes This absurdly simple process can be done a number of different ways. Most commonly, you can simply drag a class in the Classes view from one parent node to another (you can also do this in a class diagram by dragging the generalization arrow from the old parent to the new parent)—now your class has a new parent. If inheritance is restricted, ModelMaker will automatically update the child class's inherited methods to match the new parent's declarations. The next time you generate your code, these changes will automatically appear.
Moving Classes between Units It is also simple to move a class to a new unit. In the Units view, drag the class from its current place to the new unit. All relevant code (declarations, implementations, and comments) will be regenerated in the new unit.
Moving Members between Classes In refactoring, this process is known as "moving features (or responsibilities) between objects." The idea is simple: as development progresses, you may discover that certain responsibilities (implemented as class members) are more appropriately moved to another class. You can do sousing drag and drop. Select the desired class members from the member list and drag them to the new class in the Classes (hold down the Shift key to move rather than copy).
Converting Members This is one of ModelMaker's niftier refactoring features. Right-clicking on a member in the Member List will display the context menu that contains the Convert To menu item and subitems. Selecting one of these subitems lets you convert an existing class member from one member type to another. For instance, if you have a private field named FMyInteger, and you opt to convert it to a property, ModelMaker automatically creates a public property named MyInteger, which reads from and writes to FMyInteger. Likewise, you can convert this field into a method—it will be a private function named MyInteger that returns an integer.
Restricted Inheritance In the method editor dialog is an Inheritance Restricted check box. When this box is checked, ModelMaker does not allow you to change most of the method's attributes, because those attributes are being set based on the ancestor class's implementation of the overridden method. If you change the declaration of a method in an ancestor class, those changes will automatically be applied in any descendant classes where the overriding method is set to restricted inheritance.
If you have experience in refactoring (or you are familiar with the latest versions of JBuilder), this may not seem like a particularly impressive set of refactoring tools. However, when compared to what is possible in Delphi alone, this is a wonderful collection of possibilities. In addition, ModelMaker's OpenTools API gives you access to most of the code model. If you're discontented with what ModelMaker offers out of the box, you can extend its refactoring capabilities on your own.
| Note |
Additionally, I can clandestinely say that I've seen beta versions (at the time of this writing) of a future release of ModelMaker that contain sets of new refactoring tools. Most of them are pulled straight from Martin Fowler's book on refactoring, and they are impressive. |
Applying Design Patterns
ModelMaker puts it all together impressively in its support of design patterns. (A full discussion of design patterns is beyond the scope of this chapter; however, if you're unfamiliar with patterns, see the sidebar "Design Patterns 101" for a short introduction.) ModelMaker provides the convenience of applying a pattern implementation with a single mouse click. Depending on the pattern you select, a variety of actions take place—some patterns display a wizard before adding code, and others simply add their members to the selected class. As I've discussed earlier, these new members are owned by ModelMaker and are easily updated as a result. In addition, should you choose to un-apply the pattern, ModelMaker removes any class members it added for that pattern.
As an example, let's look at the Singleton pattern. Suppose you have a class and you want only one instance of it at most. Here is the sample class:
type
 TOneTimeData = class (TObject)
 private
 FGlobalCount: Integer;
 procedure SetGlobalCount(const Value: Integer);
 public
 property GlobalCount: Integer read FGlobalCount write SetGlobalCount;
 end;
The Singleton pattern mandates the use of a single entry point (the class function Instance in the ModelMaker implementation of this pattern, as seen next) to gain access to your single instance of the class. If the instance does not yet exist, it will be created and returned; otherwise the existing instance will be returned. Because Instance is the entry point, you'll disallow the use of Create for this class. Once you apply the Singleton pattern to your class in ModelMaker, it appears thus:
type
 TOneTimeData = class (TObject)
 private
 FGlobalCount: Integer;
 procedure SetGlobalCount(const Value: Integer);
 protected
 constructor CreateInstance;
 class function AccessInstance(Request: Integer): TOneTimeData;
 public
 constructor Create;
 destructor Destroy; override;
 class function Instance: TOneTimeData;
 class procedure ReleaseInstance;
 property GlobalCount: Integer read FGlobalCount write SetGlobalCount;
 end;
I won't list the method implementations here; you can look them up either by applying the pattern yourself, or by looking up the source code of the PatternDemo example.
| Warning |
The code used by ModelMaker to implement the Singleton patterns is based on the interesting use of a constant within a method to mimic per-class data. However, this code fails to compile unless you enable the Assignable Typed Constants Delphi compiler option, which is disabled by default. |
Design Patterns 101
Whereas programmers concentrate on implementing specific classes, designers are more focused on making different classes/objects work together. Although it is difficult to give a precise definition of software design, essentially it is the organization of the overall structure of a program.
Looking at different people's design solutions to different problems, you can notice similarities and common elements. A pattern is the acknowledgement of such a common design, expressed in a standard way, and abstracted enough to be applicable in a number of different situations. Design patterns relate to design reuse more than code reuse. Although the coded solution of a pattern can be an inspiration to the programmer, the actual focus is in the design: Even if you might have to rewrite the code, starting with a clear and proven design will save you considerable time. Design patterns do not cover primitive building blocks (like a hash table or a linked list) or domain-specific problems (like analysis patterns do).
The recognized originator of the pattern movement was not a software designer but an architect, who noticed the use of patterns in buildings. "Each pattern describes a problem which occurs over and over again in our environment, and then describes the core of the solution to that problem, in such a way that you can use the solution a million times over, without ever doing it the same way twice." Erich Gamma, Richard Helm, Ralph Johnson, and John Vlissides wrote the book that started the pattern movement in the software world: Design Patterns: Elements of Reusable Object-Oriented Software (Addison-Wesley, 1995). The authors are often indicated as "Gamma et al.," but are more frequently called the Gang of Four or simply GoF. The book is often colloquially referenced as the "GoF book."
The book describes the notion of software patterns, indicates a precise way of describing them, and provides a catalog of 23 patterns divided into three groups: creational, structural, and behavioral. Most of the GoF patterns are implemented in C++, and some in Smalltalk, although they generally abstract the language and are equally applicable in Java or Delphi.
The core structure of a pattern is the following:
- The pattern name is important, so you can refer to the pattern when talking to other programmers and designers.
- The problem describes when to apply a pattern, eventually including context and conditions.
- The solution describes the elements part of the design and their relationships. It isn't an implementation, only an abstract description of class responsibilities and collaborations.
- The consequences are the results and trade-off of applying a pattern, including space and time constraints.
Currently, no book is devoted to patterns from the Delphi perspective. However, many articles have appeared in the Delphi magazines (including Delphi Informant and The Delphi Magazine). The classic GoF patterns have been a source of inspiration for many articles, along with the detailed discussion of patterns available with the ModelMaker documentation (see the website to download it).
I don't always agree with the Delphi implementation of some standard patterns. In fact, I tend to focus on the underlying design and how it can be preserved while moving the GoF implementation (often in C++ or Java) to Delphi and leveraging its specific language features. Other authors tend to port the code, which is only a way to implement the design. Learning about patterns is important, because you'll develop a common jargon with other programmers and learn better ways to apply OOP techniques (particularly encapsulation and low coupling).
As a final hint, consider that most patterns are better implemented in Delphi using interfaces rather than classes (as ModelMaker tends to do, following the classic approach).
ModelMaker offers implementations of several other patterns, including Visitor, Observer, Wrapper, Mediator, and Decorator. They are hard-coded within ModelMaker to be applied a specific way, and some of the implementations are better than others. This has been a point of contention among some developers, and for that reason (among others) ModelMaker supports another means of applying patterns: code templates (discussed in the next section). This approach allows creation and customization on the part of the developer. However, don't overlook ModelMaker's extant support for patterns; they're quite good and offer a fixed, solid, working, Delphi-specific implementation of these common problems.
Code Templates
Yet another powerful feature in ModelMaker (which is seemingly lost, tucked in among the myriad other conveniences) is code templates, a technique you can use to create your own implementations of design patterns. Code templates are like a snapshot of part of a class that can be applied to another class. In other words, it's a collection of class members, saved in a template that can be added to another class, en masse. Better still, these templates can be parameterized (much like macros) so that when you apply one to a class, a dialog will pop up to ask you to fill in certain values, which are then applied as part of the template.
One example is an array property. Declaring an array property is simple in ModelMaker, but completely implementing one requires several steps: You must have not only the array property itself, but also a TList or descendant to contain the array elements, and a means of supplying a count of the stored elements. Even for this simple example, it takes a bit of work to get your array property up and running. Enter the array property template. Open a model in ModelMaker (or create a new model and add a TObject descendant) and select a class to which you'd like to add your new array property. Right-click in the Member List and select Code Templates. There should now be a floating toolbar named Code Templates (note that this same toolbar is available in the Patterns tab). Click the Apply Array Property Template button to open the Code Template Parameters dialog. It contains a list of items you can specify for the template that is about to be applied, as you can see in Figure 11.10. You can highlight any item in the left column and press F2 to edit the value for that parameter. Accept the defaults and click OK.
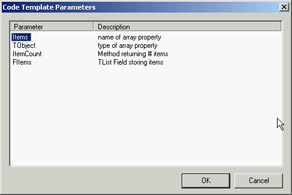
Figure 11.10: ModelMaker's Code Template Parameters dialog box
Your class should now contain the following members:
private
 FItems: TList;
protected
 function GetItemCount: Integer;
 function GetItems(Index: Integer): TObject;
public
 property ItemCount: Integer read GetItemCount;
 property Items[Index: Integer]: TObject read GetItems;
You can see how flexible this technique can be. Other common tasks (like strongly typed lists) and your own implementations of design patterns are easily implemented; let's see how.
To create your own code template, begin with an existing class that already has the members you wish to turn into a template. Select that class, and then, in the Member List, select the members you wish to use (these can be any type of member). Right-click in the Member List and select Create Code Template; the Save Code Template dialog will appear. It is much like a standard Save As dialog (and you do specify where to save the template), but you can also detail how you'd like the template to appear. Specify a name for the template and on which page of the template palette you wish it to appear. Take note of the resulting confirmation message; you can change the palette bitmap if you wish.
Your new template is now available in the template palette; you can add this template to any class. To parameterize your template, you must alter the PAS file that was created when you saved the template. For example, here is part of the ArrayProp_List.pas file used for the Array Property template:
unit ArrayProp_List;

//DEFINEMACRO:Items=name of array property
//DEFINEMACRO:TObject=type of array property
//DEFINEMACRO:ItemCount=Method returning # items
//DEFINEMACRO:FItems=TList Field storing items

 TCodeTemplate = class (TObject)
 private
 : TList;
 protected
 function Get: Integer;
 function Get(Index: Integer): ;
 public
 property : Integer read Get;
 property [Index: Integer]:  read Get;
 end;
Notice the lines that begin with //DEFINEMACRO. This is where you declare your parameters; they will appear in the Code Template Parameters dialog you saw earlier. Each line is a Name/ Value pair: the element on the left of the = is the editable value, and the element on the right is a description you can provide to explain the parameter.
After you supply a list of parameters, they can be used as macros in your template code. Note in the example lines like this:
property [Index: Integer]: read Get;
When this property is added to a class as part of the template, the macros (things like ) will be replaced with the value of the appropriate parameter. In this way, you can use parameters to deeply customize your code templates.
Little Known Tidbits
As a parting thought, here's a list of interesting features you might want to examine more closely:
Rethink Orthogonal You can change the default straight, diagonal lines in the Diagram Editor to orthogonal lines by pressing Ctrl+O. You can also force ModelMaker to try to find the shortest possible orthogonal path for a line by pressing Shift+Ctrl+O.
Visual Styles Manager This manager (available in the shortcut menu of the diagram view, under Visual style ® Style manager) deserves an entire section. Take some time to check it out. You can define a wide variety of hierarchically related visual styles for your diagram symbols and apply them on the fly. Also, don't forget to click the Use Printing Style button in the Diagram Editor to strip out the non-printing elements and see what the diagram will look like on paper.
Design Critics Design critics are an impressive QA feature in ModelMaker. They are little proofreaders running the background, checking out your code. To get at them, make sure Show Messages is enabled (Shift+Ctrl+M), right-click the Message view, and select Show Critics Manager. I advise against turning off the time-stamp-checking design critic, because it will warn you if the source file on the disk has changed outside of ModelMaker. You can also create your own design critics via the ModelMaker OpenTools API.
Creational Wizard This is yet another nifty bit of automation for the busy Delphi programmer. The Creational Wizard (available from the Wizards button in the Member List) checks the model for class members that need to be instantiated or freed and adds them to the appropriate constructor or destructor. It will do a few other things too, and there are some caveats; press F1 while you're in the wizard to access the online help.
Open Tools API Much like in Delphi's Tools API, this ModelMaker feature allows the creation of plug-in experts for ModelMaker. The API is robust and includes access to diagrams as well as the entire code model. The possibilities for extending ModelMaker in this way are extreme.
What s Next?
This chapter has provided a limited overview of the capabilities of ModelMaker, covering apparently unrelated topics like UML diagrams, patterns, refactoring, and developer's documentation. There was a reason to touch on all these aspects, of course: ModelMaker can help you with all of them, whereas the Delphi IDE by itself provides little or no support for these features.
Refer to the websites and other documentation mentioned to gain a better understanding of the various techniques. As mentioned, ModelMaker provides a lot of documentation, including material about diagrams and patterns. Visit the product website www.modelmakertools.com to download more than you'll find in the default installation.
If you want more information about the techniques I've discussed, or just how to get started, refer to the ModelMaker online help and the User's Manual (available on Delphi 7's Companion CD). I also recommend the Thoughtsmithy website, where Robert Leahey has authored a set of "Getting Started with ModelMaker" tutorials. You can find them at:
www.thoughtsmithy.com/mmjump/MMGettingStarted_Intro.html
Next up is another chapter devoted to Delphi applications architecture. Chapter 12 features an in-depth analysis of COM-related technologies available in the Windows operating system and fully supported by Delphi. After that, we'll delve into the database-programming portion of the book.
Part I - Foundations
- Delphi 7 and Its IDE
- The Delphi Programming Language
- The Run-Time Library
- Core Library Classes
- Visual Controls
- Building the User Interface
- Working with Forms
Part II - Delphi Object-Oriented Architectures
- The Architecture of Delphi Applications
- Writing Delphi Components
- Libraries and Packages
- Modeling and OOP Programming (with ModelMaker)
- From COM to COM+
Part III - Delphi Database-Oriented Architectures
- Delphis Database Architecture
- Client/Server with dbExpress
- Working with ADO
- Multitier DataSnap Applications
- Writing Database Components
- Reporting with Rave
Part IV - Delphi, the Internet, and a .NET Preview
- Internet Programming: Sockets and Indy
- Web Programming with WebBroker and WebSnap
- Web Programming with IntraWeb
- Using XML Technologies
- Web Services and SOAP
- The Microsoft .NET Architecture from the Delphi Perspective
- Delphi for .NET Preview: The Language and the RTL
- Appendix A Extra Delphi Tools by the Author
- Appendix B Extra Delphi Tools from Other Sources
- Appendix C Free Companion Books on Delphi
EAN: 2147483647
Pages: 279
