The Architecture of Delphi Applications
Overview
Although together we've built Delphi applications since the beginning of the book, we haven't focused on the structure and the architecture of an application built with Delphi's class libraries. For example, I haven't included much coverage about the global Application object, techniques for keeping tracks of forms you've created, the flow of messages in the system, and other such elements.
In Chapter 7, "Working with Forms," you saw how to create applications with multiple forms and dialog boxes. However, I haven't discussed how these forms can be related one to the other, how you can share similar features of forms, and how you can operate on multiple similar forms in a consistent way.
My ambitious goal in this chapter is to discuss all these topics. The chapter covers both basic and advanced techniques, including visual form inheritance, the use of frames, and MDI development, as well as the use of interfaces for building complex hierarchies of form classes.
The Application Object
I've mentioned the Application global object on multiple occasions, but because this chapter focuses on the structure of Delphi applications, it is time to delve into the details of this global object and its corresponding class. Application is a global object of the TApplication class, defined in the Forms unit and created in the Controls unit. The TApplication class is a component, but you cannot use it at design time. Some of its properties can be directly set in the Application page of the Project Options dialog box; others must be assigned in code.
To handle its events, Delphi includes a handy ApplicationEvents component. Besides allowing you to assign handlers at design time, the advantage of this component is that it allows for multiple handlers. If you simply place an instance of the ApplicationEvents component in two different forms, each of them can handle the same event, and both event handlers will be executed. In other words, multiple ApplicationEvents components can chain the handlers.
Some of these application-wide events, including OnActivate, OnDeactivate, OnMinimize, and OnRestore, allow you to keep track of the status of the application. Other events are forwarded to the application by the controls receiving them, as in OnActionExecute, OnActionUpdate, OnHelp, OnHint, OnShortCut, and OnShowHint. Finally, there is the OnException global exception handler we used in Chapter 2 ("The Delphi Programming Language"), the OnIdle event used for background computing, and the OnMessage event, which fires when a message is posted to any of the windows or windowed controls of the application.
Although its class inherits directly from TComponent, the Application object has a window associated with it. The application window is hidden from sight but appears on the Taskbar. This is why Delphi names the window Form1 and the corresponding Taskbar icon Project1.
The window related to the Application object—the application window—serves to keep together all the windows of an application. The fact that all the top-level forms of a program have this invisible owner window, for example, is fundamental when the application is activated. When your program's windows are behind other programs' windows, clicking one window in your application will bring all of that application's windows to the front. In other words, the unseen application window is used to connect the application's various forms. (The application window is not hidden, because that would affect its behavior; it simply has zero height and width, and therefore it is not visible.)
| Tip |
In Windows, the Minimize and Maximize operations are associated by default with system sounds and a visual animated effect. Applications built with Delphi produce the sound and display the visual effect by default. |
When you create a new, blank application, Delphi generates code for the project file that includes the following:
begin
 Application.Initialize;
 Application.CreateForm(TForm1, Form1);
 Application.Run;
end.
As you can see in this standard code, the Application object can create forms, setting the first one as the MainForm (one of the Application properties) and closing the entire application when this main form is destroyed. The program execution is enclosed in the Run method, which embeds the system loop to process system messages. This loop continues until the application's main window (the first window you created) is closed.
| Tip |
As we saw in the splash screen example in Chapter 7, the main form is not necessarily the first form you create, but the first one you create by calling Application.CreateForm. |
The Windows message loop embedded in the Run method delivers the system messages to the proper application windows. A message loop is required by any Windows application, but you don't need to write one in Delphi because the Application object provides a default loop.
In addition to performing this main role, the Application object manages a few other interesting areas:
- Hints (discussed at the end of Chapter 5, "Visual Controls")
- The help system, which includes the ability to define the type of help viewer (a topic not covered in detail in this book)
- Application activation, minimization, and restoration
- A global exceptions handler, as discussed in the ErrorLog example of Chapter 2.
- General application information, including the MainForm, executable filename and path (ExeName), Icon, and Title displayed in the Windows Taskbar and when you scan the running applications with the Alt+Tab keys
| Tip |
To avoid a discrepancy between the two titles, you can change the application's title at design time. In case the caption of the main form changes at runtime, you can copy it to the title of the application with this code: Application.Title := Form1.Caption. |
In most applications, you don't care about the application window, apart from setting its Title and icon and handling some of its events. However, you can perform some other simple operations. Setting the ShowMainForm property to False in the project source code indicates that the main form should not be displayed at startup. Inside a program, you can use the Application object's MainForm property to access the main form.
Displaying the Application Window
There is no better proof that a window exists for the Application object than to display it, an in the ShowApp example. You don't need to show it—you just need to resize it and set a couple of window attributes, such as the presence of a caption and a border. You can perform these operations using Windows API functions on the window indicated by the Application object's Handle property:
procedure TForm1.Button1Click(Sender: TObject);
var
 OldStyle: Integer;
begin
  // add border and caption to the app window
 OldStyle := GetWindowLong (Application.Handle, gwl_Style);
 SetWindowLong (Application.Handle, gwl_Style,
 OldStyle or ws_ThickFrame or ws_Caption);
  // set the size of the app window
 SetWindowPos (Application.Handle, 0, 0, 0, 200, 100,
 swp_NoMove or swp_NoZOrder);
end;
The GetWindowLong and SetWindowLong API functions access the system information related to the window. In this case, you use the gwl_Style parameter to read or write the styles of the window, which include its border, title, system menu, border icons, and so on. This code gets the current styles and adds (using an or statement) a standard border and a caption to the form.
Of course, you generally won't need to implement something like this in your programs. But knowing the application object has a window connected to it is an important aspect of understanding the default structure of Delphi applications and being able to modify it when needed.
Activating Applications and Forms
To show how the activation of forms and applications works, I've written a self-explanatory example called ActivApp. This example has two forms. Each form has a Label component (LabelForm) used to display the form's status. The program uses text and color to indicate this status information, as the handlers of the first form's OnActivate and OnDeactivate events demonstrate:
procedure TForm1.FormActivate(Sender: TObject);
begin
 LabelForm.Caption := 'Form2 Active';
 LabelForm.Color := clRed;
end;

procedure TForm1.FormDeactivate(Sender: TObject);
begin
 LabelForm.Caption := 'Form2 Not Active';
 LabelForm.Color := clBtnFace;
end;
The second form has a similar label and similar code.
The main form also displays the status of the entire application. It uses an ApplicationEvents component to handle the Application object's OnActivate and OnDeactivate events. These two event handlers are similar to the two listed previously; the only difference is that they modify the text and color of a second label on the form and that one of them makes a beep.
If you run this program, you'll see whether this application is active and, if so, which of its forms is active. By looking at the output (see Figure 8.1) and listening for the beep, you can understand how Delphi triggers each of the activation events. Run the program and play with it for a while to understand how it works. Later, we'll get back to other events related to the activation of forms.
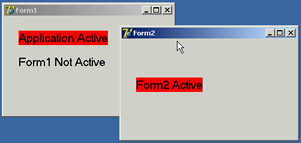
Figure 8.1: The ActivApp example shows whether the application is active and which of the application's forms is active.
Tracking Forms with the Screen Object
We have already explored some of the properties and events of the Application object. Other interesting global information about an application is available through the Screen object, whose base class is TScreen. This object holds information about the system display (the screen size and the screen fonts) and also about the current set of forms in a running application. For example, you can display the screen size and the list of fonts by writing:
Label1.Caption := IntToStr (Screen.Width) + 'x' + IntToStr (Screen.Height);
ListBox1.Items := Screen.Fonts;
TScreen also reports the number and resolution of monitors in a multimonitor system. Right now, however, I will focus on the list of forms held by the Screen object's Forms property, the top-most form indicated by the ActiveForm property, and the related OnActiveFormChange event. Note that the forms the Screen object references are the forms of the application and not those of the system.
These features are demonstrated by the Screen example, which maintains a list of the current forms in a list box. This list must be updated each time a new form is created, an existing form is destroyed, or the program's active form changes. To see how this process works, you can create secondary forms by clicking the button labeled New:
procedure TMainForm.NewButtonClick(Sender: TObject);
var
 NewForm: TSecondForm;
begin
  // create a new form, set its caption, and run it
 NewForm := TSecondForm.Create (Self);
 Inc (nForms);
 NewForm.Caption := 'Second ' + IntToStr (nForms);
 NewForm.Show;
end;
Note that you need to disable the automatic creation of the secondary form by using the Forms page of the Project Options dialog box. One of the key portions of the program is the form's OnCreate event handler, which fills the list the first time and then connects a handler to the OnActive- FormChange event:
procedure TMainForm.FormCreate(Sender: TObject);
begin
 FillFormsList (Self);
 // set the secondary form's counter to 0
 nForms := 0;
 // set an event handler on the screen object
 Screen.OnActiveFormChange := FillFormsList;
end;
The code used to fill the Forms list box is inside a second procedure, FillFormsList, which is also installed as an event handler for the Screen object's OnActiveFormChange event:
procedure TMainForm.FillFormsList (Sender: TObject);
var
 I: Integer;
begin
 // skip code in destruction phase
 if Assigned (FormsListBox) then
  begin
 FormsLabel.Caption := 'Forms: ' + IntToStr (Screen.FormCount);
 FormsListBox.Clear;
 // write class name and form title to the list box
 for I := 0 to Screen.FormCount - 1 do
 FormsListBox.Items.Add (Screen.Forms[I].ClassName + ' - ' +
 Screen.Forms[I].Caption);
 ActiveLabel.Caption := 'Active Form : ' + Screen.ActiveForm.Caption;
 end;
end;
| Warning |
It is very important not to execute this code while the main form is being destroyed. As an alternative to testing whether the list box is set to nil, you could test the form's ComponentState for the csDestroying flag. Another approach would be to remove the OnActiveFormChange event handler before exiting the application; that is, handle the main form's OnClose event and assign nil to Screen.OnActiveFormChange. |
The FillFormsList method fills the list box and sets a value for the two labels above it to show the number of forms and the name of the active form. When you click the New button, the program creates an instance of the secondary form, gives it a new title, and displays it. The Forms list box is updated automatically because of the handler installed for the OnActiveFormChange event. Figure 8.2 shows the output of this program when some secondary windows have been created.
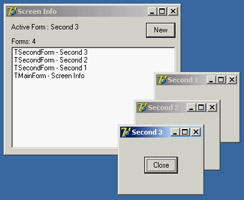
Figure 8.2: The output of the Screen example with some secondary forms
Each secondary form has a Close button you can click to remove it. The program handles the OnClose event, setting the Action parameter to caFree, so that the form is destroyed when it is closed. This code closes the form, but it doesn't update the list of the windows properly. The system moves the focus to another window first, firing the event that updates the list, and destroys the old form only after this operation.
The first idea I had to update the windows list properly was to introduce a delay, posting a user-defined Windows message. Because the posted message is queued and not handled immediately, if you send it at the last possible moment of the secondary form's life, the main form will receive it when the other form is destroyed. The trick is to post the message in the secondary form's OnDestroy event handler. To accomplish this, you need to refer to the MainForm object by adding a uses statement in the implementation portion of this unit. I've posted a wm_User message, which is handled by a specific message method of the main form, as shown here:
public
 procedure ChildClosed (var Message: TMessage); message wm_User;

procedure TMainForm.ChildClosed (var Message: TMessage);
begin
 FillFormsList (Self);
end;
The problem is that if you close the main window before closing the secondary forms, the main form exists, but its code can no longer be executed. To avoid another system error (an Access Violation Fault), you need to post the message only if the main form is not closing. But how do you determine whether the form is closing? One way is to add a flag to the TMainForm class and change its value when the main form is closing, so that you can test the flag from the code of the secondary window.
This is a good solution—so good that the VCL already provides similar functionality with the ComponentState property and its csDestroying flag, as mentioned earlier. Therefore, you can write the following code:
procedure TSecondForm.FormDestroy(Sender: TObject);
begin
 if not (csDestroying in MainForm.ComponentState) then
 PostMessage (MainForm.Handle, wm_User, 0, 0);
end;
With this code, the list box always lists all the forms in the application.
After giving this approach some thought, however, I found an alternative and much more Delphi-oriented solution. The trick is to consider that every time a component is destroyed, it tells its owner about the event by calling the Notification method defined in the TComponent class. Because the secondary forms are owned by the main form, as specified in the NewButtonClick method's code, you can override this method and simplify the code (see the Screen2 folder for this version's code):
procedure TMainForm.Notification(AComponent: TComponent;
 Operation: TOperation);
begin
 inherited Notification(AComponent, Operation);
 if (Operation = opRemove) and Showing and (AComponent is TForm) then
 FillFormsList;
end;
| Note |
If the secondary forms were not owned by the main form, you could have used the FreeNotification method to get the secondary forms to notify the main form when they are destroyed. FreeNotification receives as parameter the component to notify when the current component is destroyed. The effect is a call to the Notification method that comes from a component other than the owned components. FreeNotification is generally used by component writers to safely connect components on different forms or data modules. |
The last feature I've added to both versions of the program is simple: When you click an item in the list box, the corresponding form is activated using the BringToFront method. Nice—well, almost nice. If you click the list box when the main form is not active, the main form is activated first, and the list box is rearranged; so, you might end up selecting a different form than you were expecting. If you experiment with the program, you'll soon realize what I mean. This minor glitch in the program is an example of the risks you face when you dynamically update information and let the user work on it at the same time.
From Events to Threads
To understand how Windows applications work internally, let's spend a minute discussing how multitasking is supported in this environment. You also need to understand the role of timers (and the Timer component) and of background (or idle) computing, as well as the ProcessMessages method of the Application global object.
In short, we need to delve deeper into the event-driven structure of Windows and its multitasking support. Because this is a book about Delphi programming, I won't discuss this topic in detail, but I will provide an overview for readers who have limited experience with Windows API programming.
Event Driven Programming
The basic idea behind event-driven programming is that specific events determine the control flow
of the application. A program spends most of its time waiting for these events and provides code to respond to them. For example, when a user clicks one of the mouse buttons, an event occurs. A message describing this event is sent to the window currently under the mouse cursor. The program code that responds to events for that window receives the event, processes it, and responds accordingly. When the program has finished responding to the event, it returns to a waiting or "idle" state.
As this explanation shows, events are serialized; each event is handled only after the previous one is completed. When an application is executing event-handling code (that is, when it is not waiting for an event), other events for that application have to wait in a message queue reserved for that application (unless the application uses multiple threads). When an application has responded to a message and returned to a waiting state, it becomes the last in the list of programs waiting to handle additional messages. In every version of Win32 (9x, NT, Me, and 2000), after a fixed amount of time has elapsed, the system interrupts the current application and immediately gives control to the next program in the list. The first program is resumed only after each application has had a turn. This process is called preemptive multitasking.
So, an application performing a time-consuming operation in an event handler doesn't prevent the system from working properly (because other processes have their time-slice of the CPU), but the application generally is unable even to repaint its own windows properly—with a very nasty effect. If you've never experienced this problem, try it for yourself: Write a time-consuming loop that executes when a button is clicked, and try to move the form or move another window on top of it. The effect is really annoying. Now try adding the call Application.ProcessMessages within the loop; you'll see that the operation becomes much slower, but the form will be refreshed immediately.
As an example of the use of Application.ProcessMessages within a time-consuming loop (and the lack of this call), you can refer to the BackTask example. Here is the code using this approach (ignore the naïve technique for computing the sum of a given set of prime numbers):
procedure TForm1.Button2Click(Sender: TObject);
var
 I, Tot: Integer;
begin
 Tot := 0;
 for I := 1 to Max do
 begin
 if IsPrime (I) then
 Tot := Tot + I;
 ProgressBar1.Position := I * 100 div Max;
 Application.ProcessMessages;
 end;
 ShowMessage (IntToStr (Tot));
end;
| Tip |
There is a second alternative to calling ProcessMessages: the HandleMessage function. There are two differences: HandleMessage processes at most one message each time it is called, whereas ProcessMessages keeps processing messages in the queue; and HandleMessage also activates idle time processing, such as action update calls. |
If an application has responded to its events and is waiting for its turn to process messages, it has no chance to regain control until it receives another message (unless it uses multithreading). This is a reason to use a timer: a system component that will send a message to your application whenever a specified time interval elapses. Using a timer is the only way to make an application perform operations automatically from time to time, even when the user is absent or not using the program (so that it is not processing any events).
One final note—when you think about events, remember that input events (generated using the mouse or the keyboard) account for only a small percentage of the total message flow in a Windows application. Most of the messages are the system's internal messages or messages exchanged between different controls and windows. Even a familiar input operation such as clicking a mouse button can result in a huge number of messages, most of which are internal Windows messages. You can test this yourself by using the WinSight utility included in Delphi. In WinSight, choose to view the Message Trace, and select the messages for all the windows. Click Start, and then perform some normal operations with the mouse. You'll see hundreds of messages in a few seconds.
Windows Message Delivery
Before looking at some real examples, let's consider another key element of message handling. Windows has two different ways to send a message to a window:
PostMessage API Function Places a message in the application's message queue. The message will be handled only when the application has a chance to access its message queue (that is, when it receives control from the system), and only after earlier messages have been processed. This is an asynchronous call, because you do not know when the message will be received.
SendMessage API function Executes message-handler code immediately. SendMessage bypasses the application's message queue and sends the message directly to a target window or control. This is a synchronous call. This function even has a return value, which is passed back by the message-handling code. Calling SendMessage is no different than directly calling another method or function of the program.
The difference between these two ways of sending messages is similar to that between mailing a letter, which will reach its destination sooner or later, and sending a fax, which goes immediately to the recipient. Although you will rarely need to use these low-level functions in Delphi, this description should help you determine which one to use if you do need to write this type of code.
Background Processing and Multitasking
Suppose you need to implement a time-consuming algorithm. If you write the algorithm as a response to an event, your application will be stopped completely during the time it takes to process that algorithm. To let the user know that something is being processed, you can display the hourglass cursor or show a progress bar, but this is not a user-friendly solution. Win32 allows other programs to continue their execution, but the program in question will appear to be frozen; it won't even update its own user interface if a repaint is requested. While the algorithm is executing, the application won't be able to receive and process any other messages, including paint messages.
The simplest solution to this problem is to call the ProcessMessages and HandleMessage methods, discussed earlier. The problem with this approach, however, is that the user might click the button again or re-press the keystrokes that started the algorithm. To fix this possibility, you can disable the buttons and commands you don't want the user to select, and you can display the hourglass cursor (which technically doesn't prevent a mouse-click event, but does suggest that the user should wait before doing any other operation).
For some low-priority background processing, you can also split the algorithm into smaller pieces and execute each of them in turn, letting the application fully respond to pending messages in between processing the pieces. You can use a timer to let the system notify you once a time interval has elapsed. Although you can use timers to implement some form of background computing, this is far from a good solution. A better technique would be to execute each step of the program when the Application object receives the OnIdle event.
The difference between calling ProcessMessages and using the OnIdle event is that calling ProcessMessages gives your code more processing time. Calling ProcessMessages lets the program perform other operations while a long operation is being executed; using the OnIdle event lets your application perform background tasks when it doesn't have pending requests from the user.
Delphi Multithreading
When you need to perform background operations or any processing not strictly related to the user interface, you can follow the technically most correct approach: spawn a separate thread of execution within the process. Multithreading programming might seem like an obscure topic, but it really isn't that complex, even if you must consider it with care. It is worth knowing at least the basics of multithreading, because in the world of sockets and Internet programming, there is little you can do without threads.
Delphi's RTL library provides a TThread class that will let you create and control threads. You will never use the TThread class directly, because it is an abstract class—a class with a virtual abstract method. To use threads, you always subclass TThread and use the features of this base class.
The TThread class has a constructor with a single parameter (CreateSuspended) that lets you choose whether to start the thread immediately or suspend it until later. If the thread object starts automatically, or when it is resumed, it will run its Execute method until it is done. The class provides a protected interface, which includes the two key methods for your thread subclasses:
procedure Execute; virtual; abstract;
procedure Synchronize(Method: TThreadMethod);
The Execute method, declared as a virtual abstract procedure, must be redefined by each thread class. It contains the thread's main code—the code you would typically place in a thread function when using the system functions.
The Synchronize method is used to avoid concurrent access to VCL components. The VCL code runs inside the program's main thread, and you need to synchronize access to VCL to avoid re-entry problems (errors from re-entering a function before a previous call is completed) and concurrent access to shared resources. The only parameter of Synchronize is a method that accepts no parameters, typically a method of the same thread class. Because you cannot pass parameters to this method, it is common to save some values within the data of the thread object in the Execute method and use those values in the synchronized methods.
| Note |
Delphi 7 includes two new versions of Synchronize that allow you to synchronize a method with the main thread without calling it from the thread object. Both the new overloaded Synchronize and StaticSynchronize are class methods of TThread and require a thread as parameter. |
Another way to avoid conflicts is to use the synchronization techniques offered by the operating system. The SyncObjs unit defines a few VCL classes for some of these low-level synchronization objects, such as events (with the TEvent class and the TSingleEvent class) and critical sections (with the TCriticalSection class). (Synchronization events should not be confused with Delphi events, as the two concepts are unrelated.)
An Example of Threading
For an example of a thread, you can refer again to the BackTask example. This example spawns a secondary thread for computing the sum of the prime numbers. The thread class has the typical Execute method, an initial value passed in a public property (Max), and two internal values (FTotal and FPosition) used to synchronize the output in the ShowTotal and UpdateProgress methods. The following is the complete class declaration for the custom thread object:
type
 TPrimeAdder = class(TThread)
 private
 FMax, FTotal, FPosition: Integer;
 protected
 procedure Execute; override;
 procedure ShowTotal;
 procedure UpdateProgress;
 public
 property Max: Integer read FMax write FMax;
 end;
The Execute method is very similar to the code used for the buttons in the BackTask example listed earlier. The only difference is in the final call to Synchronize, as you can see in the following two fragments:
procedure TPrimeAdder.Execute;
var
 I, Tot: Integer;
begin
 Tot := 0;
 for I := 1 to FMax do
 begin
 if IsPrime (I) then
 Tot := Tot + I;
 if I mod (fMax div 100) = 0 then
 begin
 FPosition := I * 100 div fMax;
 Synchronize(UpdateProgress);
 end;
 FTotal := Tot;
 Synchronize(ShowTotal);
end;

procedure TPrimeAdder.ShowTotal;
begin
 ShowMessage ('Thread: ' + IntToStr (FTotal));
end;

procedure TPrimeAdder.UpdateProgress;
begin
 Form1.ProgressBar1.Position := fPosition;
end;
The thread object is created when a button is clicked and is automatically destroyed as soon as its Execute method is completed:
procedure TForm1.Button3Click(Sender: TObject);
var
 AdderThread: TPrimeAdder;
begin
 AdderThread := TPrimeAdder.Create (True);
 AdderThread.Max := Max;
 AdderThread.FreeOnTerminate := True;
 AdderThread.Resume;
end;
Instead of setting the maximum number using a property, it would have been better to pass this value as an extra parameter of a custom constructor; I've avoided doing so only to remain focused on the example of using a thread. You'll see more examples of threads in other chapters—particularly Chapter 19, "Internet Programming: Sockets and Indy," which discusses the use of sockets.
Checking for a Previous Instance of an Application
One form of multitasking is the execution of two or more instances of the same application. Any application can generally be executed by a user in more than one instance, and it needs to be able to check for a previous instance already running, in order to disable this default behavior and allow for one instance at most. This section demonstrates several ways of implementing such a check, allowing me to discuss some interesting Windows programming techniques.
Looking for a Copy of the Main Window
To find a copy of the main window of a previous instance, use the FindWindow API function and pass it the name of the window class (the name used to register the form's window type, or WNDCLASS, in the system) and the caption of the window for which you are looking. In a Delphi application, the name of the WNDCLASS window class is the same as the Object Pascal name for the form's class (for example, TForm1). The result of the FindWindow function is either a handle to the window or zero (if no matching window was found).
The main code of your Delphi application should be written so that it will execute only if the FindWindow result is zero:
var
 Hwnd: THandle;
begin
 Hwnd := FindWindow ('TForm1', nil);
 if Hwnd = 0 then
 begin
 Application.Initialize;
 Application.CreateForm(TForm1, Form1);
 Application.Run;
 end
 else
 SetForegroundWindow (Hwnd)
end.
To activate the window of the application's previous instance, you can use the SetForegroundWindow function, which works for windows owned by other processes. This call produces its effect only if the window passed as parameter hasn't been minimized. When the main form of a Delphi application is minimized, it is hidden, and for this reason the activation code has no effect.
Unfortunately, if you run a program that uses the FindWindow call just shown from within the Delphi IDE, a window with that caption and class may already exist: the design-time form. Thus, the program won't start even once. However, it will run if you close the form and its corresponding source code file (closing only the form simply hides the window), or if you close the project and run the program from the Windows Explorer. Consider also that having a form called Form1 is quite likely to not work as expected, as many Delphi applications might have a form with the same name. This will be fixed in the following versions of the code.
Using a Mutex
A completely different approach is to use a mutex, or mutual exclusion object. This is a typical Win32 approach, commonly used for synchronizing threads. Here you will use a mutex to synchronize two different applications or, to be more precise, two instances of the same application.
Once an application has created a mutex with a given name, it can test whether this object is already owned by another application by calling the WaitForSingleObject Windows API function. If the mutex has no owner, the application calling this function becomes the owner. If the mutex is already owned, the application waits until the time-out (the function's second parameter) elapses. It then returns an error code.
To implement this technique, you can use the following project source code:
var
 hMutex: THandle;
begin
 HMutex := CreateMutex (nil, False, 'OneCopyMutex');
 if WaitForSingleObject (hMutex, 0) <> wait_TimeOut then
 begin
 Application.Initialize;
 Application.CreateForm(TForm1, Form1);
 Application.Run;
 end;
end.
If you run this example twice, you'll see that it creates a new, temporary copy of the application (the icon appears in the Taskbar) and then destroys it when the time-out elapses. This approach is certainly more robust than the previous one, but it lacks a feature: How do you enable the existing instance of the application? You still need to find its form, but you can use a better technique.
Searching the Window List
When you want to search for a specific main window in the system, you can use the EnumWindows API functions. Enumeration functions are peculiar in Windows, because they usually require another function as a parameter. These enumeration functions require a pointer to a function (often described as a callback function) as parameter. This function is applied to each element of the list (in this case, the list of main windows), until the list ends or the function returns False. Here is the enumeration function from the OneCopy example:
function EnumWndProc (hwnd: THandle; Param: Cardinal): Bool; stdcall;
var
 ClassName, WinModuleName: string;
 WinInstance: THandle;
begin
 Result := True;
 SetLength (ClassName, 100);
 GetClassName (hwnd, PChar (ClassName), Length (ClassName));
 ClassName := PChar (ClassName);
 if ClassName = TForm1.ClassName then
 begin
 // get the module name of the target window
 SetLength (WinModuleName, 200);
 WinInstance := GetWindowLong (hwnd, GWL_HINSTANCE);
 GetModuleFileName (WinInstance,
 PChar (WinModuleName), Length (WinModuleName));
 WinModuleName := PChar(WinModuleName); // adjust length
 // compare module names
 if WinModuleName = ModuleName then
 begin
 FoundWnd := Hwnd;
 Result := False; // stop enumeration
 end;
 end;
end;
This function, which is called for each nonchild window of the system, checks the name of each window's class, looking for the name of the TForm1 class. When it finds a window with this string in its class name, it uses GetModuleFilename to extract the name of the executable file of the application that owns the matching form. If the module name matches that of the current program (which was extracted previously with similar code), you can be sure that you have found a previous instance of the same program. Here is how you can call the enumerated function:
var
 FoundWnd: THandle;
 ModuleName: string;
begin
 if WaitForSingleObject (hMutex, 0) <> wait_TimeOut then
 ...
 else
 begin
 // get the current module name
 SetLength (ModuleName, 200);
 GetModuleFileName (HInstance, PChar (ModuleName), Length (ModuleName));
 ModuleName := PChar (ModuleName); // adjust length
 // find window of previous instance
 EnumWindows (@EnumWndProc, 0);
Handling User Defined Window Messages
I've mentioned that the SetForegroundWindow call doesn't work if the main form of the program has been minimized. Now you can solve this problem. You can ask the form of another application—the previous instance of the same program, in this case—to restore its main form by sending it a user-defined window message. You can then test whether the form is minimized and post a new user-defined message to the old window. Here is the code; in the OneCopy program, it follows the last fragment shown in the preceding section:
if FoundWnd <> 0 then
begin
 // show the window, eventually
 if not IsWindowVisible (FoundWnd) then
 PostMessage (FoundWnd, wm_App, 0, 0);
 SetForegroundWindow (FoundWnd);
end;
The PostMessage API function sends a message to the message queue of the application that owns the destination window. In the form's code, you can add a special function to handle this message:
public
 procedure WMApp (var msg: TMessage); message wm_App;

procedure TForm1.WMApp (var msg: TMessage);
begin
 Application.Restore;
end;
| Note |
The program uses the wm_App message rather than the wm_User message; some system windows use wm_User, so there is no guarantee that other applications or the system won't send this message. That's why Microsoft introduced wm_App for messages that are restricted to the application's interpretation. |
Creating MDI Applications
MDI (Multiple Document Interface) is a common approach for an application's structure. An MDI application is made up of several forms that appear inside a single main form. If you use Windows Notepad, you can open only one text document, because Notepad isn't an MDI application. But with your favorite word processor, you can probably open several different documents, each in its own child window, because the word processor is an MDI application. All these document windows are usually held by a frame, or application, window.
| Note |
Increasingly, Microsoft is departing from the MDI model stressed in Windows 3 days. Even recent versions of Office tend to use a specific main window for every document: the classic SDI (Single Document Interface) approach. However, MDI isn't dead and can sometimes be a useful structure, as demonstrated by browsers like Opera and Mozilla. |
MDI in Windows A Technical Overview
The MDI structure gives programmers several benefits automatically. For example, Windows handles a list of the child windows in one of an MDI application's pull-down menus, and specific Delphi methods activate the corresponding MDI functionality to tile or cascade the child windows. The following is the technical structure of an MDI application in Windows:
- The main window of the application acts as a frame or a container.
- A special window, known as the MDI client, covers the whole client area of the frame window. This MDI client is one of the Windows predefined controls, just like an edit box or a list box. The MDI client window lacks any specific user-interface element, but it is visible. You can change the standard system color of the MDI work area (called the Application Background) in the Appearance page of the Display Properties dialog box in Windows.
- There are multiple child windows, of the same kind or of different kinds. These child windows are not placed in the frame window directly, but each is defined as a child of the MDI client window, which in turn is a child of the frame window.
Frame and Child Windows in Delphi
Delphi makes it easy to develop MDI applications, even without using the MDI Application template available in Delphi (see the Applications page of the File ® New ® Other dialog box). You only need to build at least two forms, one with the FormStyle property set to fsMDIForm and the other with the same property set to fsMDIChild. Set these two properties in a simple program and run it, and you'll see the two forms nested in the typical MDI style.
Generally, however, the child form is not created at startup, and you need to provide a way to create one or more child windows. You can do so by adding a menu with a New menu item and writing the following code:
var
 ChildForm: TChildForm;
begin
 ChildForm := TChildForm.Create (Application);
 ChildForm.Show;
Another important feature to add is a Window pull-down menu, which you use as the value of the form's WindowMenu property. This pull-down menu will automatically list all the available child windows. (Of course, you can choose any other name for the pull-down menu, but Window is the standard.)
To make this program work properly, you can add a number to the title of any child window when it is created:
procedure TMainForm.New1Click(Sender: TObject);
var
 ChildForm: TChildForm;
begin
 WindowMenu := Window1;
 Inc (Counter);
 ChildForm := TChildForm.Create (Self);
 ChildForm.Caption := ChildForm.Caption + ' ' + IntToStr (Counter);
 ChildForm.Show;
end;
You can also open child windows, minimize or maximize each of them, close them, and use the Window pull-down menu to navigate among them. Now suppose you want to close some of these child windows, to unclutter the client area of your program. Click the Close boxes in some of the child windows, and they are minimized! What is happening? Remember that when you close a window, you generally hide it from view. The closed forms in Delphi still exist, although they are not visible. In the case of child windows, hiding them won't work, because the MDI Window menu and the list of windows will still list existing child windows, even if they are hidden. For this reason, Delphi minimizes the MDI child windows when you try to close them. To solve this problem, you need to delete the child windows when they are closed by setting the Action reference parameter of the OnClose event to caFree.
Building a Complete Window Menu
Your first task is to define a better menu structure for the example. Typically the Window pull-down menu has at least three items: Cascade, Tile, and Arrange Icons. To handle the menu commands, you can use some of the predefined methods of TForm that can be used only for MDI frames:
Cascade Method Cascades the open MDI child windows. The windows overlap each other. Iconized child windows are also arranged (see ArrangeIcons).
Tile Method Tiles the open MDI child windows; the child forms are arranged so that they do not overlap. The default behavior is horizontal tiling, although if you have several child windows, they will be arranged in several columns. This default can be changed by using the TileMode property (set the value to either tbHorizontal or tbVertical).
ArrangeIcons Procedure Arranges all the iconized child windows. Open forms are not moved.
As a better alternative to calling these methods, you can place an ActionList in the form and add to it a series of predefined MDI actions. The related classes are TWindowArrange, TWindowCascade, TWindowClose, TWindowTileHorizontal, TWindowTileVertical, and TWindowMinimizeAll. The connected menu items will perform the corresponding actions and will be disabled if no child window is available. The MdiDemo example, which we'll look at next, demonstrates the use of the MDI actions, among other things.
There are some other interesting methods and properties related strictly to MDI in Delphi:
ActiveMDIChild Property A run-time, read-only property of the MDI frame form that holds the active child window. The user can change this value by selecting a new child window, or the program can change it using the Next and Previous procedures, which activate the child window following or preceding the currently active one.
ClientHandle Property Holds the Windows handle of the MDI client window, which covers the client area of the main form.
MDIChildren Property An array of child windows you can use together with the MDIChildCount property to cycle among all the child windows. This property can be useful for finding a particular child window or to operate on each of them.
Note that the internal order of the child windows is the reverse order of activation. This means the last child window selected is the active window (the first in the internal list), the second-to-last child window selected is the second, and the first child window selected is the last. This order determines how the windows are arranged on the screen. The first window in the list is above all the others, whereas the last window is below all the others, and probably hidden. You can imagine an axis (the z-axis) coming out of the screen toward you. The active window has a higher value for the z coordinate and, thus, covers other windows. For this reason, the Windows ordering schema is known as the z-order.
| Note |
The Window menu can be used along with the ActionManager and the ActionMainMenuBar control hosting the menu, starting with Delphi 7. This control has a specific property, WindowMenu, that you have to set to specify the menu that is going to list the MDI child windows. |
The MdiDemo Example
I've built an example to demonstrate most of the features of a simple MDI application. MdiDemo is a full-blown MDI text editor, because each child window hosts a Memo component and can open and save text files. The child form has a Modified property that indicates whether the text of the memo has changed (it is set to True in the handler of the memo's OnChange event). Modified is set to False in the Save and Load custom methods and is checked when the form is closed (prompting the user to save the file).
As I've mentioned, the example's main form is based on an ActionList component. The actions are available through some menu items and a toolbar, as shown in Figure 8.3. You can see the details of the ActionList in the example's source code; I'll focus on the code of the custom actions.
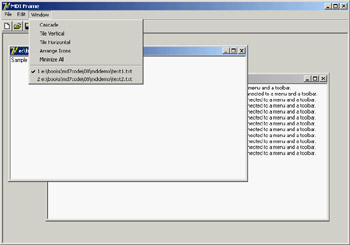
Figure 8.3: The MdiDemo program uses a series of predefined Delphi actions connected to a menu and a toolbar.
One of the simplest actions is the ActionFont object, which has both an OnExecute handler (which uses a FontDialog component) and an OnUpdate handler (which disables the action—and hence the associated menu item and toolbar button—when there are no child forms):
procedure TMainForm.ActionFontExecute(Sender: TObject);
begin
 if FontDialog1.Execute then
 (ActiveMDIChild as TChildForm).Memo1.Font := FontDialog1.Font;
end;

procedure TMainForm.ActionFontUpdate(Sender: TObject);
begin
 ActionFont.Enabled := MDIChildCount > 0;
end;
The action named New creates the child form and sets a default filename. The Open action calls the ActionNewExcecute method prior to loading the file:
procedure TMainForm.ActionNewExecute(Sender: TObject);
var
 ChildForm: TChildForm;
begin
 Inc (Counter);
 ChildForm := TChildForm.Create (Self);
 ChildForm.Caption :=
 LowerCase (ExtractFilePath (Application.Exename)) + 'text' +
 IntToStr (Counter) + '.txt';
 ChildForm.Show;
end;

procedure TMainForm.ActionOpenExecute(Sender: TObject);
begin
 if OpenDialog1.Execute then
 begin
 ActionNewExecute (Self);
 (ActiveMDIChild as TChildForm).Load (OpenDialog1.FileName);
 end;
end;
The file loading is performed by the form's Load method. Likewise, the child form's Save method is used by the Save and Save As actions. Notice the Save action's OnUpdate handler, which enables the action only if the user has changed the memo's text:
procedure TMainForm.ActionSaveAsExecute(Sender: TObject);
begin
  // suggest the current file name
 SaveDialog1.FileName := ActiveMDIChild.Caption;
 if SaveDialog1.Execute then
 begin
    // modify the file name and save
 ActiveMDIChild.Caption := SaveDialog1.FileName;
 (ActiveMDIChild as TChildForm).Save;
 end;
end;

procedure TMainForm.ActionSaveUpdate(Sender: TObject);
begin
 ActionSave.Enabled := (MDIChildCount > 0) and
 (ActiveMDIChild as TChildForm).Modified;
end;

procedure TMainForm.ActionSaveExecute(Sender: TObject);
begin
 (ActiveMDIChild as TChildForm).Save;
end;
MDI Applications with Different Child Windows
In complex MDI applications, it's common to include child windows of different kinds (that is, based on different child forms). I built an example called MdiMulti to highlight some problems you may encounter with this approach. This example has two different types of child forms: the first type hosts a circle drawn in the position of the last mouse click, and the second contains a bouncing square. The main form also has a custom background, obtained by painting a tiled image in it.
Child Forms and Merging Menus
The first type of child form displays a circle in the position where the user clicked one of the mouse buttons. Figure 8.4 shows an example of the output of the MdiMulti program. The program includes a Circle menu, which allows the user to change the color of the surface of the circle as well as the color and size of its border. It's interesting that to program the child form, you do not need to consider the existence of other forms or of the frame window. You simply write the code for the form, and that's all. The only special care required is for the menus of the two forms.
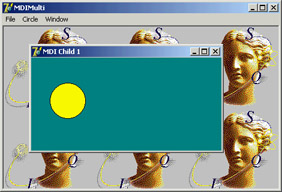
Figure 8.4: The output of the MdiMulti example, with a child window that displays circles
If you prepare a main menu for the child form, it will replace the main menu of the frame window when the child form is activated: An MDI child window cannot have a menu of its own. But the fact that a child window can't have any menus should not bother you, because this is the standard behavior of MDI applications. You can use the frame window's menu bar to display the child window's menus. Even better, you can merge the frame window's menu bar with that of the child form. For example, in this program, the child form's menu can be placed between the frame window's File and Window pull-down menus. You can accomplish this using the following GroupIndex values:
- File pull-down menu, main form: 1
- Circle pull-down menu, child form: 2
- Window pull-down menu, main form: 3
Using these settings for the menu group indexes, the menu bar of the frame window will have either two or three pull-down menus. At startup, the menu bar has two menus. As soon as you create a child window, there are three menus; and when the last child window is closed (destroyed), the Circle pull-down menu disappears. You should spend some time testing this behavior by running the program.
The second type of child form shows a moving image. The square (a Shape component) moves around the client area of the form at fixed time intervals, using a Timer component, and bounces against the edges of the form, changing its direction. This turning process is determined by a fairly complex algorithm, which I don't have space to examine; the main point of the example is to show you how menu merging behaves when you have an MDI frame with child forms of different types. (You can study the source code to see how it works.)
The Main Form
Now let's integrate the two child forms into an MDI application. The File pull-down menu has two separate New menu items, which are used to create a child window of either kind. The code uses a single child window counter. As an alternative, you could use two different counters for the two kinds of child windows. The Window menu uses the predefined MDI actions.
As soon as a form of this kind is displayed on the screen, its menu bar is automatically merged with the main menu bar. When you select a child form of one of the two kinds, the menu bar changes accordingly. Once all the child windows are closed, the main form's original menu bar is reset. By using the proper menu group indexes, you let Delphi accomplish everything automatically, as you can see in Figure 8.5.
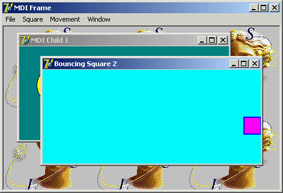
Figure 8.5: The menu bar of the MdiMulti application changes automatically to reflect the currently selected child window, as you can see by comparing the menu bar with that of Figure 8.4.
I've added a few other menu items in the main form to close every child window and show some statistics about them. The method related to the Count command scans the MDIChildren array property to count the number of child windows of each kind (using the RTTI operator is):
for I := 0 to MDIChildCount - 1 do
 if MDIChildren is TBounceChildForm then
 Inc (NBounce)
 else
 Inc (NCircle);
Subclassing the MDI Client Window
The example program also includes support for a background-tiled image. The bitmap is taken from an Image component and should be painted on the form in the wm_EraseBkgnd Windows message's handler. The problem is that you cannot simply connect the code to the main form, because a separate window (the MDI Client) covers its surface.
You have no corresponding Delphi form for this window, so how can you handle its messages? You have to resort to a low-level Windows programming technique known as subclassing. (In spite of the name, it has little to do with OOP inheritance.) The basic idea is that you can replace the window procedure that receives all the window messages with a new procedure you provide. You can do so by calling the SetWindowLong API function and providing the memory address of the procedure (the function pointer).
| Note |
A window procedure is a function that receives all the messages for a window. Every window must have a window procedure and can have only one. Even Delphi forms have a window procedure; although it is hidden in the system, it calls the WndProc virtual function, which you can use. However, the VCL has a predefined handler for the messages, which are then forwarded to the form's message-handling methods after some preprocessing. With all this support, you need to handle window procedures explicitly only when working with non-Delphi windows, as in this case. |
Unless you have a reason to change the default behavior of this system window, you can simply store the original procedure and call it to obtain default processing. The two function pointers referring to the two procedures (old and new) are stored in two local fields on the form:
private
 OldWinProc, NewWinProc: Pointer;
 procedure NewWinProcedure (var Msg: TMessage);
The form also has a method you'll use as a new window procedure; the code will be used to paint on the background of the window. Because this is a method and not a plain window procedure, the program has to call the MakeObjectInstance method to add a prefix to the method and let the system use it as if it were a function. All this description is summarized by just two complex statements:
procedure TMainForm.FormCreate(Sender: TObject);
begin
 NewWinProc := MakeObjectInstance (NewWinProcedure);
 OldWinProc := Pointer (SetWindowLong (ClientHandle, gwl_WndProc, Cardinal
 (NewWinProc)));
 OutCanvas := TCanvas.Create;
end;
The window procedure you install calls the default procedure. Then, if the message is wm_EraseBkgnd and the image is not empty, you draw it on the screen many times using the Draw method of a temporary canvas. This canvas object is created when the program starts (see the previous code) and connected to the handle passed as wParam parameter by the message. With this approach, you don't have to create a new TCanvas object for every background painting operation requested, thus saving a little time in the frequent operation. Here is the code, which produces the output already seen in Figure 8.5:
procedure TMainForm.NewWinProcedure (var Msg: TMessage);
var
 BmpWidth, BmpHeight: Integer;
 I, J: Integer;
begin
  // default processing first
 Msg.Result := CallWindowProc (OldWinProc, ClientHandle, Msg.Msg, Msg.wParam,
 Msg.lParam);

  // handle background repaint
 if Msg.Msg = wm_EraseBkgnd then
 begin
 BmpWidth := MainForm.Image1.Width;
 BmpHeight := MainForm.Image1.Height;
 if (BmpWidth <> 0) and (BmpHeight <> 0) then
 begin
 OutCanvas.Handle := Msg.wParam;
 for I := 0 to MainForm.ClientWidth div BmpWidth do
 for J := 0 to MainForm.ClientHeight div BmpHeight do
 OutCanvas.Draw (I * BmpWidth, J * BmpHeight,
 MainForm.Image1.Picture.Graphic);
 end;
 end;
end;
Visual Form Inheritance
When you need to build two or more similar forms, possibly with different event handlers, you can use dynamic techniques, hide or create new components at run time, change event handlers, and use if or case statements. Or, you can apply the object-oriented techniques, thanks to visual form inheritance. In short, instead of creating a form based on TForm, you can inherit a form from an existing form, adding new components or altering the properties of the existing components. But what is the advantage of visual form inheritance?
It mostly depends on the kind of application you are building. If the program has multiple forms, some of which are very similar or simply include common elements, then you can place the common components and the common event handlers in the base form and add the specific behavior and components to the subclasses. For example, if you prepare a standard parent form with a toolbar, a logo, default sizing and closing code, and the handlers of some Windows messages, you can then use it as the parent class for each of the application's forms.
You can also use visual form inheritance to customize an application for different clients without duplicating any source code or form definition code—you inherit the specific versions for a client from the standard forms. Remember, the main advantage of visual inheritance is that you can later change the original form and automatically update all the derived forms. This is a well-known advantage of inheritance in object-oriented programming languages. But there is a beneficial side effect: polymorphism. You can add a virtual method in a base form and override it in a subclassed form. Then you can refer to both forms and call this method for each of them.
| Note |
Delphi includes another feature that resembles visual form inheritance: frames. In both cases, you can work at design time on two versions of a form/frame. However, in visual form inheritance, you define two different classes (parent and derived), whereas with frames, you work on a class and an instance. Frames are discussed in detail later in this chapter. |
Inheriting from a Base Form
The rules governing visual form inheritance are simple, once you have a clear idea of what inheritance is. Basically, a subclass form has the same components as the parent form as well as some new components. You cannot remove a component of the base class, although (if it is a visual control) you can make it invisible. What's important is that you can easily change properties of the components you inherit.
Notice that if you change a property of a component in the inherited form, any modification of the same property in the parent form will have no effect. Changing other properties of the component will affect the inherited versions, as well. You can resynchronize the two property values by using the Revert to Inherited local menu command in the Object Inspector. You can do the same thing by setting the two properties to the same value and recompiling the code. After modifying multiple properties, you can resynchronize them all to the base version by applying the Revert to Inherited command from the component's local menu.
Besides inheriting components, the new form inherits all the methods of the base form, including the event handlers. You can add new handlers in the inherited form and also override existing handlers.
To describe how visual form inheritance works, I've built a simple example called VFI. To build it, first start a new project and add four buttons to its main form. Then select File ® New ® Other and choose the page with the name of the project in the New Items dialog box (see Figure 8.6).
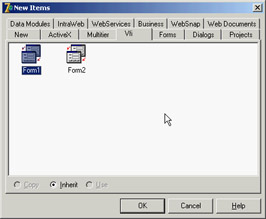
Figure 8.6: The New Items dialog box allows you to create an inherited form.
In the New Items dialog, you can choose the form from which you want to inherit. The new form has the same four buttons. Here is the initial textual description of the new form:
inherited Form2: TForm2
 Caption = 'Form2'
end
And here is its initial class declaration, where you can see that the base class is not the usual TForm but the base class form:
type
 TForm2 = class(TForm1)
 private
    { Private declarations }
 public
    { Public declarations }
 end;
Notice the presence of the inherited keyword in the textual description; also notice that the form has some components, although they are defined in the base class form. If you move the form and add the caption of one of the buttons, the textual description changes accordingly:
inherited Form2: TForm2
 Left = 313
 Top = 202
 Caption = 'Form2'
 inherited Button2: TButton
 Caption = 'Beep...'
  end
end
Only the properties with a different value are listed (and by removing these properties from the textual description of the inherited form, you can reset them to the value of the base form, as I mentioned earlier). I've changed the captions of most of the buttons, as you can see in Figure 8.7.
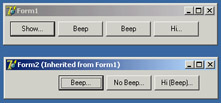
Figure 8.7: The two forms of the VFI example at run time
Each of the first form's buttons has an OnClick handler with simple code. The first button shows the inherited form by calling its Show method; the second and third buttons call the Beep procedure; and the last button displays a message.
In the inherited form you should first remove the Show button, because the secondary form is already visible. However, you cannot delete a component from an inherited form. An alternative solution is to set the component's Visible property to False—the button will still be there, but it won't be visible (as you can guess from Figure 8.7). The other three buttons will be visible but with different handlers. If you select the OnClick event of a button in the inherited form (by double-clicking it), you'll get an empty method that's slightly different from the default one, because it includes the inherited keyword. This keyword stands for a call to the corresponding event handler of the base form. Notice, though, that this keyword is always added by Delphi, even if the handler is not defined in the parent class (and this is reasonable, because it might be defined later) or if the component is not present in the parent class (which doesn't seem like a great idea to me). It is simple to execute the base form's code and perform some other operations:
procedure TForm2.Button2Click(Sender: TObject);
begin
  inherited;
 ShowMessage ('Hi');
end;
This is not the only choice. Alternatively, you can write a new event handler and not execute the base class's code, as I've done for the VFI example's third button: To accomplish this, simply remove the inherited keyword.
Still another choice includes calling a base-class method after some custom code has been executed, calling it when a condition is met, or calling the handler of a different event of the base class, as I've done for the fourth button:
procedure TForm2.Button4Click(Sender: TObject);
begin
 inherited Button3Click (Sender);
 inherited;
end;
You probably won't inherit from a different handler often, but you must be aware that you can. Of course, you can consider each method of the base form as a method of your form, and call it freely. This example allows you to explore some features of visual form inheritance, but to see its true power you'll need to look at real-world examples more complex than this book has room to explore. Next I want to show you visual form polymorphism.
| Note |
Visual form inheritance doesn't work nicely with collections: You cannot extend a collection property of a component in an inherited form. This limitation prevents the practical use of a series of components like Toolbars or ListViews with details. Of course, you can use those components in the parent or inherited form, but you cannot extend the elements they contain, because they are stored in a collection. A solution to this problem is to avoid assigning these collections at design time, and instead use a run-time technique. You'll still use form inheritance, but lose the visual portion of it. If you try to use the Action Manager component, you'll find you cannot even inherit from a form hosting it. Borland disabled this feature, because it would cause you too much trouble. |
Polymorphic Forms
If you add an event handler to a form and then change it in an inherited form, there is no way to refer to the two methods using a common variable of the base class, because the event handlers use static binding by default.
Confusing? Here is an example, which is intended for experienced Delphi programmers. Suppose you want to build a bitmap viewer form and a text viewer form in the same program. The two forms have similar elements, a similar toolbar, a similar menu, an OpenDialog component, and different components for viewing the data. So, you decide to build a base-class form containing the common elements and inherit the two forms from it. You can see the three forms at design time in Figure 8.8.
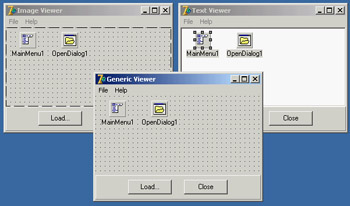
Figure 8.8: The base-class form and the two inherited forms of the PoliForm example at design time
The main form contains a toolbar panel with a few buttons (real toolbars have a few problems with visual form inheritance), a menu, and an open dialog component. The two inherited forms have only minor differences, but they feature a new component: either an image viewer (TImage) or a text viewer (TMemo). They also modify the settings of the OpenDialog component, to refer to different types of files.
The main form includes some common code. The Close button and the File ® Close command call the Close method of the form. The Help ® About command shows a simple message box. The base form's Load button has only a ShowMessage call displaying an error message. The File ® Load command calls another method:
procedure TViewerForm.Load1Click(Sender: TObject);
begin
 LoadFile;
end;
This method is defined in the TViewerForm class as a virtual abstract method (so that the class of the base form is an abstract class). Because this is an abstract method, you must redefine it (and override it) in the inherited forms. The code for this LoadFile method uses the OpenDialog1 component to ask the user to select an input file and loads it into the image component:
procedure TImageViewerForm.LoadFile;
begin
 if OpenDialog1.Execute then
 Image1.Picture.LoadFromFile (OpenDialog1.Filename);
end;
The other inherited class has similar code, which loads the text into the memo component. The project has one more form, a main form with two buttons, that reloads the files in each of the viewer forms. The main form is the only form created by the project when it starts. The generic viewer form is never created: It is only a generic base class, containing common code and components of the
two subclasses. The forms of the two subclasses are created in the main form's OnCreate event
handler:
procedure TMainForm.FormCreate(Sender: TObject);
var
 I: Integer;
begin
 FormList [1] := TTextViewerForm.Create (Application);
 FormList [2] := TImageViewerForm.Create (Application);
 for I := 1 to 2 do
 FormList[I].Show;
end;
FormList is a polymorphic array of generic TViewerForm objects, declared in the TMainForm class. Note that to make this declaration in the class, you need to add the Viewer unit (but not the specific forms) in the uses clause of the interface portion of the main form. The array of forms is used to load a new file in each viewer form when one of the two buttons is clicked. The handlers of the two buttons' OnClick events use different approaches:
// ReloadButton1Click
for I := 1 to 2 do
 FormList [I].ButtonLoadClick (Self);

// ReloadButton2Click
for I := 1 to 2 do
 FormList [I].LoadFile;
The second button calls a virtual method, and it works without any problem. The first button calls an event handler and always reaches the generic TFormView class (displaying the error message of its ButtonLoadClick method). This happens because the method is static, not virtual.
To make this approach work, you can declare the ButtonLoadClick method of the TFormView class as virtual and declare it as overridden in each of the inherited form classes, as you do for any other virtual method:
type
 TViewerForm = class(TForm)
 procedure ButtonLoadClick(Sender: TObject); virtual;
 public
 procedure LoadFile; virtual; abstract;
 end;

type
 TImageViewerForm = class(TViewerForm)
 procedure ButtonLoadClick(Sender: TObject); override;
 public
 procedure LoadFile; override;
 end;
This trick really works, although it is never mentioned in the Delphi documentation. This ability to use virtual event handlers is what I mean by visual form polymorphism. In other (more technical) words, you can assign a virtual method to an event property, which will take the address of the method according to the instance available at run time.
Understanding Frames
Chapter 1, "Delphi 7 And Its IDE," briefly discussed frames. You've seen that you can create a new frame, place components in it, write event handlers for the components, and then add the frame to a form. In other words, a frame is similar to a form, but it defines only a portion of a window, not a complete window. The interesting element of frames is that you can create multiple instances of a frame at design time, and you can modify the class and the instance at the same time. Thus frames are an effective tool for creating customizable composite controls at design time—something close to a visual component-building tool.
In visual form inheritance, you can work on both a base form and a derived form at design time, and any changes you make to the base form are propagated to the derived one (unless doing so overrides a property or event). With frames, you work on a class (as usual in Delphi), but you can also customize one or more instances of the class at design time. When you work on a form, you cannot change a property of the TForm1 class for a specific instance of this form, and not the others, at design time. With frames, you can.
Once you realize you are working with a class and one or more of its instances at design time, there is nothing more to understand about frames. In practice, frames are useful when you want to use the same group of components in multiple forms within an application. In this case, you can customize each instance at design time. You could already do this with component templates, but component templates were based on the concept of copying and pasting components and their code. You could not change the original definition of the template and see the effect every place it was used. With frames (and, in a different way, with visual form inheritance), changes to the original version (the class) are reflected in the copies (the instances).
Let's discuss a few more elements of frames with an example called Frames2. This program has a frame with a list box, an edit box, and three buttons with code operating on the components. The frame also has a bevel aligned to its client area, because frames have no border. Of course, the frame has also a corresponding class, which looks like a form class:
type
 TFrameList = class(TFrame)
 ListBox: TListBox;
 Edit: TEdit;
 btnAdd: TButton;
 btnRemove: TButton;
 btnClear: TButton;
 Bevel: TBevel;
 procedure btnAddClick(Sender: TObject);
 procedure btnRemoveClick(Sender: TObject);
 procedure btnClearClick(Sender: TObject);
 private
    { Private declarations }
 public
    { Public declarations }
 end;
What is different from a form is that you can add the frame to a form. I've used two instances of the frame in the example (as you can see in Figure 8.9) and modified the behavior slightly. The first instance of the frame has the list box items sorted. When you change a property of a component of a frame, the DFM file of the hosting form will list the differences, as it does with visual form inheritance:
object FormFrames: TFormFrames
 Caption = 'Frames2'
 inline FrameList1: TFrameList
 Left = 8
 Top = 8
 inherited ListBox: TListBox
 Sorted = True
    end
  end
  inline FrameList2: TFrameList
 Left = 232
 Top = 8
 inherited btnClear: TButton
 OnClick = FrameList2btnClearClick
    end
  end
end
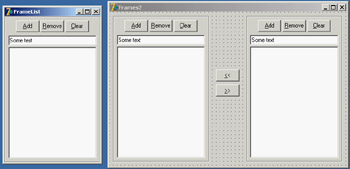
Figure 8.9: A frame and two instances of it at design time, in the Frames2 example
As you can see from the listing, the DFM file for a form that has frames uses a specific DFM keyword, inline. The references to the modified components of the frame, however, use the inherited keyword, although this term is used with an extended meaning: In this case, inherited doesn't refer to a base class you are inheriting from, but to the class from which you are instancing (or inheriting) an object. It was a good idea, though, to use an existing feature of visual form inheritance and apply it to the new context. This approach lets you use the Revert to Inherited command of the Object Inspector or of the form to cancel the changes and get back to the default value of properties.
Notice also that unmodified components of the frame class are not listed in the DFM file of the form using the frame; and, the form has two frames with different names, but the com-ponents on the two frames have the same name. These components are not owned by the form, but are owned by the frame. This implies that the form has to reference those components through the frame, as you can see in the code for the buttons that copy items from one list box to the other:
procedure TFormFrames.btnLeftClick(Sender: TObject);
begin
 FrameList1.ListBox.Items.AddStrings (FrameList2.ListBox.Items);
end;
Finally, in addition to modifying properties of any instance of a frame, you can change the code of any of its event handlers. If you double-click one of the frame's buttons while working on the form (not on the stand-alone frame), Delphi will generate this code for you:
procedure TFormFrames.FrameList2btnClearClick(Sender: TObject);
begin
 FrameList2.btnClearClick(Sender);
end;
The line of code automatically added by Delphi corresponds to a call to the inherited event handler of the base class in visual form inheritance. This time, however, to get the default behavior of the frame, you need to call an event handler and apply it to a specific instance—the frame object itself. The current form doesn't include this event handler and knows nothing about it. Whether you leave this call in place or remove it depends on the effect you are looking for.
| Tip |
Note that because the event handler has some code, leaving it as Delphi generated it and saving the form won't remove it as usual: It isn't empty! Instead, if you want to omit the default code for an event, you need to add at least a comment to it to avoid the system removing it automatically. |
Frames and Pages
When a dialog box has many pages full of controls, the code underlying the form becomes very complex because all the controls and methods are declared in a single form. In addition, creating all these components (and initializing them) might delay the display of the dialog box. Frames don't reduce the construction and initialization time of equivalently loaded forms; quite the contrary, because loading frames is more complicated for the streaming system than loading simple components. However, using frames, you can load only the visible pages of a multipage dialog box, reducing the initial load time, which is what the user perceives.
Frames can solve both of these issues. You can easily divide the code of a single complex form into one frame per page. The form will host all the frames in a PageControl. This approach yields simpler, more focused units and makes it easier to reuse a specific page in a different dialog box or application. Reusing a single page of a PageControl without using a frame or an embedded form is far from simple. (For an alternative approach, see the sidebar "Forms in Pages.")
As an example of this approach, I've built the FramePag example. It has some frames placed inside the three pages of a PageControl, as you can see in Figure 8.10 by looking at the Object TreeView on the side of the design-time form. All the frames are aligned to the client area, using the entire surface of the tab sheet (the page) hosting them. Two of the pages have the same frame, but the two instances of the frame have some differences at design time. The Frame3 frame in the example has a list box populated with a text file at startup, and it has buttons to modify the items in the list and save them to a file. The filename is placed in a label so you can easily select a file for the frame at design time by changing the Caption of the label.
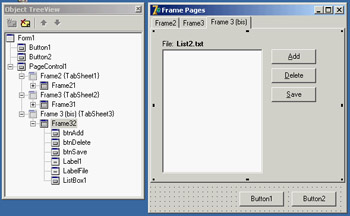
Figure 8.10: Each page of the FramePag example contains a frame, thus separating the code of this complex form into more manageable chunks.
Being able to use multiple instances of a frame is one of the reasons this technique was introduced, and customizing the frame at design time is even more important. Because adding properties to a frame and making them available at design time requires some customized and complex code, it is nice to use a component to host these custom values. You have the option of hiding these components (such as the label in this example) if they don't pertain to the user interface.
In the example, you need to load the file when the frame instance is created. Because frames have no OnCreate event, your best choice is probably to override the CreateWnd method. Writing a custom constructor doesn't work, because it is executed too early—before the specific label text is available. In the CreateWnd method, you load the list box content from a file.
| Note |
When questioned about the issue of the missing OnCreate event handler for frames, Borland R&D members have stated that they could not fire it in correspondence with the wm_Create message, because it happens with forms. The creation of the frame window (as is true for most controls) is delayed for performance reasons. More trouble happens in the case of inheritance among forms holding frames, so to avoid problems, this features has been disabled—programmers can write the code they deem reasonable. |
Forms in Pages
Although you can use frames to define the pages of a PageControl at design time, I generally use other forms at run time. This approach leaves me with the flexibility of having the pages defined in separate units (and DFM files) but at the same time allows me to also use those forms as stand-alone windows. In addition, I avoid having to live with the subtly different behaviors of frames.
Once you have a main form with a page control and one or more secondary forms to display in it, all you have to do is write the following code to create the secondary forms and place them in the pages:
var
 Form: TForm;
 Sheet: TTabSheet;
begin
 // create a tabsheet within the page control
 Sheet := TTabSheet.Create(PageControl1);
 Sheet.PageControl := PageControl1;
 // create the form and place it in the tabsheet
 Form := TForm2.Create (Application);
 Form.BorderStyle := bsNone;
 Form.Align := alClient;
 Form.Parent := Sheet;
 Form. Visible := True;
  // activate and set title
  PageControl1.ActivePage := Sheet;
 Sheet.Caption := Form.Caption;
end;
You can find this code in the FormPage example, but this is all the program does. For an application, see the RWBlocks demo in Chapter 14, "Client/Server with dbExpress."
Multiple Frames with No Pages
Another approach avoids creating all the pages along with the form hosting them, by leaving the PageControl empty and creating the frames only when a page is displayed. When you have frames on multiple pages of a PageControl, the windows for the frames are created only when they are first displayed, as you can find out by placing a breakpoint in the creation code of the previous example.
As an even more radical approach, you can get rid of the page controls and use a TabControl. Used this way, the tab has no connected tab sheets (or pages) and can display only one set of information at a time. For this reason, you must create the current frame and either destroy the previous one or hide it by setting its Visible property to False or calling the new frame's BringToFront. Although this sounds like a lot of work, in a large application this technique can be worth it because of the reduced resource and memory usage you can obtain.
To demonstrate this approach, I've built the FrameTab example, which is similar to the previous one but it is based on a TabControl and dynamically created frames. The main form, visible at run time in Figure 8.11, has a TabControl with one page for each frame:
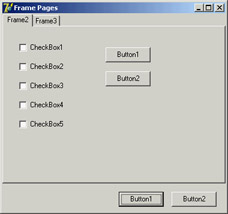
Figure 8.11: The first page of the FrameTab example at run time. The frame inside the tab is created at run time.
object Form1: TForm1
 Caption = 'Frame Pages'
 OnCreate = FormCreate
 object Button1: TButton...
 object Button2: TButton...
 object Tab: TTabControl
 Anchors = [akLeft, akTop, akRight, akBottom]
 Tabs.Strings = ( 'Frame2' 'Frame3' )
 OnChange = TabChange
  end
end
I've given each tab a caption corresponding to the name of the frame, because I'll use this information to create the new pages. When the form is created, and whenever the user changes the active tab, the program gets the tab's current caption and passes it to the custom ShowFrame method. The method's code checks whether the requested frame already exists (frame names in this example follow the Delphi standard of having a number appended to the class name) and then brings it to the front. If the frame doesn't exist, the method uses the frame name to find the related frame class, creates an object of that class, and assigns a few properties to it. The code makes extensive use of class references and dynamic creation techniques:
type
 TFrameClass = class of TFrame;

procedure TForm1.ShowFrame(FrameName: string);
var
 Frame: TFrame;
 FrameClass: TFrameClass;
begin
 Frame := FindComponent (FrameName + '1') as TFrame;
 if not Assigned (Frame) then
 begin
 FrameClass := TFrameClass (FindClass ('T' + FrameName));
 Frame := FrameClass.Create (Self);
 Frame.Parent := Tab;
 Frame.Visible := True;
 Frame.Name := FrameName + '1';
 end;
 Frame.BringToFront;
end;
To make this code work, remember to add a call to RegisterClass in the initialization section of each unit defining a frame.
Base Forms and Interfaces
You have seen that when you need two similar forms in an application, you can use visual form inheritance to inherit one from the other or both of them from a common ancestor. The advantage of visual form inheritance is that you can use it to inherit the visual definition: the DFM. However, this is not always required.
At times, you might want several forms to exhibit a common behavior or respond to the same commands without having any shared component or user interface elements. Using visual form inheritance with a base form that has no extra components makes little sense to me. I rather prefer to define my own custom form class, inherited from TForm, and then manually edit the form class declarations to inherit from this custom base form class instead of the standard one. If you only need to define shared methods or override TForm virtual methods in a consistent way, defining custom form classes can be a good idea.
Using a Base Form Class
A simple demonstration of this technique is available in the FormIntf demo; it also showcases the use of interfaces for forms. In a new unit called SaveStatusForm, I've defined the following form class (with no related DFM file—instead of using the New Form command, create a new unit and type the code in it):
type
 TSaveStatusForm = class (TForm)
 protected
 procedure DoCreate; override;
 procedure DoDestroy; override;
 end;
The two overridden methods are called at the same time as the event handler so you can attach extra code (allowing the event handler to be defined as usual). Inside the two methods, you load or save the form position in an INI file of the application, in a section marked with the form caption. Here is the code for the two methods:
procedure TSaveStatusForm.DoCreate;
var
 Ini: TIniFile;
begin
 inherited;
 Ini := TIniFile.Create (ExtractFileName (Application.ExeName));
 Left := Ini.ReadInteger(Caption, 'Left', Left);
 Top := Ini.ReadInteger(Caption, 'Top', Top);
 Width := Ini.ReadInteger(Caption, 'Width', Width);
 Height := Ini.ReadInteger(Caption, 'Height', Height);
 Ini.Free;
end;

procedure TSaveStatusForm.DoDestroy;
var
 Ini: TIniFile;
begin
 Ini := TIniFile.Create (ExtractFileName (Application.ExeName));
 Ini.WriteInteger(Caption, 'Left', Left);
 Ini.WriteInteger(Caption, 'Top', Top);
 Ini.WriteInteger(Caption, 'Width', Width);
 Ini.WriteInteger(Caption, 'Height', Height);
 Ini.Free;
 inherited;
end;
Again, this is a simple common behavior for your forms, but you can define a complex class here. To use this as a base class for the forms you create, let Delphi create the forms as usual (with no inheritance) and then update the form declaration to something like the following:
type
 TFormBitmap = class(TSaveStatusForm)
 Image1: TImage;
 OpenPictureDialog1: TOpenPictureDialog;
 ...
Simple as it seems, this technique is very powerful, because all you need to do is change the definition of your application's forms to refer to this base class. If even this step is too tedious, because you might want to change this base class in your program at some point, you can use an extra trick: "interposer" classes.
INI Files and the Registry in Delphi
To save information about the status of an application in order to restore it the next time the program is executed, you can use the explicit support Windows provides for storing this kind of information. INI files, the old Windows standard, are once again the preferred way to save application data. The alternative is the Registry, which is still quite popular. Delphi provides ready-to-use classes to manipulate both.
The TIniFile Class
For INI files, Delphi has a TIniFile class. Once you have created an object of this class and connected it to a file, you can read and write information to it. To create the object, you need to call the constructor, passing a filename to it, as in the following code:
var
 IniFile: TIniFile;
 begin
 IniFile := TIniFile.Create ('myprogram.ini');
There are two choices for the location of the INI file. The code just listed will store the file in the Windows directory or a user folder for settings in Windows 2000. To store data locally to the application (as opposed to local to the current user), you should provide a full path to the constructor.
INI files are divided into sections, each indicated by a name enclosed in square brackets. Each section can contain multiple items of three possible kinds: strings, integers, or Booleans. The TIniFile class has three Read methods, one for each kind of data: ReadBool, ReadInteger, and ReadString. There are also three corresponding methods to write the data: WriteBool, WriteInteger, and WriteString. Other methods allow you to read or erase a whole section. In the Read methods, you can also specify a default value to be used if the corresponding entry doesn't exist in the INI file.
Notice that Delphi uses INI files quite often, but they are disguised with different names. For example, the desktop (.dsk) and options (.dof) files are structured as INI files.
The TRegistry and TRegIniFile classes
The Registry is a hierarchical database of information about the computer, software configuration, and user preferences. Windows has a set of API functions to interact with the Registry; you basically open a key (or folder) and then work with subkeys (or subfolders) and values (or items), but you must be aware of the structure and the details of the Registry.
Delphi provides two approaches to using the Registry. The TRegistry class provides a generic encapsulation of the Registry API, whereas the TRegIniFile class provides the interface of the TIniFile class but saves the data in the Registry. This class is the natural choice for portability between INI-based and Registry-based versions of the same program. When you create a TRegIniFile object, your data ends up in the current user information, so you'll generally use a constructor like this:
IniFile := TRegIniFile.Create ('SoftwareMyCompanyMyProgram');
By using the TIniFile and the TRegIniFile classes offered by the VCL, you can move from one model of local and per-user storage to the other. Not that I think you should use the Registry much, because having a centralized repository for the settings of each application was an architectural error—even Microsoft acknowledges this fact (without really admitting the error) by suggesting, in the Windows 2000 Compatibility Requirements, that you no longer use the Registry for applications settings, but instead go back to using INI files within the Documents and Settings folder of the current user (something not many programmers know of ).
An Extra Trick: Interposer Classes
In contrast with Delphi VCL components, which must have unique names, Delphi classes in general must be unique only within their unit. Thus you can have two different units defining a class with the same name. This technique looks weird at first sight, but can be useful. For example, Borland uses this approach to provide compatibility between VCL and VisualCLX classes. Both have a TForm class, one defined in the Forms unit and the other in the QForms unit.
| Note |
This technique is much older than CLX/VCL. For example, the service and control panel applet units define their own TApplication object, which is not related to the TApplication used by VCL visual GUI applications and defined in the Forms unit. |
I've seen a technique called "interposer classes" mentioned in an old issue of The Delphi Magazine. It suggested replacing standard Delphi class names with your own versions that have the same class name. This way, you can use Delphi's form designer and refer to Delphi standard components at design time, but use your own classes at run time.
The idea is simple. In the SaveStatusForm unit, you can define the new form class as follows:
type
 TForm = class (Forms.TForm)
 protected
 procedure DoCreate; override;
 procedure DoDestroy; override;
 end;
This class is called TForm, and it inherits from TForm of the Forms unit (this last reference is compulsory to avoid a kind of recursive definition). In the rest of the program, you don't need to change the class definition for your form, but simply add the unit defining the interposer class (the SaveStatusForm unit in this case) in the uses statement after the unit defining the Delphi class. The order of the unit in the uses statement is important, and is the reason some people criticize this technique, because it is difficult to know what is going on. I have to agree: I find interposer classes handy at times (more for components than for forms), but their use makes programs less readable and at times harder to debug.
Using Interfaces
Another technique, which is slightly more complex but even more powerful than the definition of a common base form class, is to create forms that implement specific interfaces. You can have forms that implement one or more of these interfaces, query each form for the interfaces it implements, and call the supported methods.
As an example (available in the same FormIntf program I began discussing in the last section), I've defined a simple interface for loading and storing:
type
 IFormOperations = interface
 ['{DACFDB76-0703-4A40-A951-10D140B4A2A0}']
 procedure Load;
 procedure Save;
 end;
Each form can optionally implement this interface, as in the following TFormBitmap class:
type
 TFormBitmap = class(TForm, IFormOperations)
 Image1: TImage;
 OpenPictureDialog1: TOpenPictureDialog;
 SavePictureDialog1: TSavePictureDialog;
 public
 procedure Load;
 procedure Save;
 end;
The example code includes the Load and Save methods, which use the standard dialog boxes to load or save the image. (In the example's code, the form also inherits from the TSaveStatusForm class.)
When an application has one or more forms implementing interfaces, you can apply a given interface method to all the forms supporting it, with code like this (extracted from the main form of the FormIntf example):
procedure TFormMain.btnLoadClick(Sender: TObject);
var
 i: Integer;
 iFormOp: IFormOperations;
begin
 for i := 0 to Screen.FormCount - 1 do
 if Supports (Screen.Forms [i], IFormOperations, iFormOp) then
 iFormOp.Load;
end;
Consider a business application in which you can synchronize all the forms to the data of a specific company or a specific business event. Also consider that, unlike inheritance, you can have several forms that implement multiple interfaces, with unlimited combinations. This is why using such an architecture can improve a complex Delphi application a great deal, making it much more flexible and easier to adapt to implementation changes.
Delphi s Memory Manager
I'll end this chapter devoted to the structure of Delphi applications with a section devoted to memory management. This topic is very complex, and probably worth an entire chapter of its own; here I can only scratch it and provide a few indications for further experiments. For more detailed memory analysis you can refer to the many Delphi add-on tools addressing memory verification and control, including MemCheck, MemProof, MemorySleuth, Code Watch, and AQTime.
Delphi has a memory manager, accessible using the GetMemoryManager and SetMemoryManager functions of the System unit. These functions allow you to retrieve the current memory manager record or modify it with your custom memory manager. A memory manager record is a set of three functions used to allocate, deallocate, and reallocate memory:
type
 TMemoryManager = record
 GetMem: function(Size: Integer): Pointer;
 FreeMem: function(P: Pointer): Integer;
 ReallocMem: function(P: Pointer; Size: Integer): Pointer;
  end;
It's important to know how these functions are called when you create an object, because you can hook in two different steps. As you call a constructor, Delphi invokes the NewInstance virtual class function, defined in TObject. Because this is a virtual function, you can modify the memory manager for a specific class by overriding it. To perform the memory allocation, however, NewInstance typically ends up calling the GetMem function of the active memory manager, which provides you with your second chance to customize the standard behavior.
Unless you have very special needs, you won't generally need to hook into the memory manager to modify how memory allocation works. However, I find it quite useful to hook into a memory manager to determine whether memory allocation is working properly— that is, to be sure the program has no memory leaks. For example, you can override a class's NewInstance and FreeInstance methods to keep a count of the number of objects of the class being created and destroyed and check if the total is zero.
An even simpler technique is to perform the same test over the number of objects allocated by the entire memory manager. In the early versions of Delphi doing so required extra code, but the memory manager exposes two global variables (AllocMemCount and AllocMemSize) that can help you determine what is going on in the system.
| Note |
For more detailed information about how the memory manager is working internally, you can use the GetHeapStatus function. It is available only on Windows, because it provides information about the status of the memory allocator. On Linux, the RTL uses the system allocator, not a custom memory allocator. |
The simplest way to determine whether your program is handling memory properly is to test whether AllocMemCount goes back to zero. The problem is deciding when to perform such a test. A program begins by executing the initialization section of its units, which usually allocate memory freed by the respective finalization sections. To guarantee that your code is executed at the very end, you must write it in the finalization section of a unit and place it at the very beginning of the units list in the project source code file. You can see such a unit in Listing 8.1. This is the SimpleMemTest unit of the ObjsLeft example, which has a sample form with a button to show the current allocations count and a button to create a memory leak (which is then caught when the program terminates).
Listing 8.1: A Simple Unit for Testing Memory Leaks, from the ObjsLeft Example
unit SimpleMemTest;

interface

implementation

uses
 Windows;

var
 msg: string;

initialization

finalization
 if AllocMemCount > 0 then
  begin
 Str (AllocMemCount, msg);
 msg := msg + ' heap blocks left';
 MessageBox (0, PChar(msg), 'Memory Leak', MB_OK);
  end;
end.
| Tip |
When writing code that involves checking, implementing, or extending memory manager code, you have to avoid using any high-level functions, as they might affect the memory manager. For example, in the SimpleMemTest unit, I couldn't include the SysUtils unit because it allocates memory. I had to resort to the traditional Turbo Pascal Str function instead of Delphi's standard IntToStr conversion. |
This program is handy, but doesn't really help you understand what went wrong. For this purpose, powerful third-party tools are available (some of which have free trial versions), or you can refer to my custom memory manager, which tracks memory allocations (described in Appendix A of this book).
What s Next?
After the detailed description of forms and secondary forms in the previous chapters, I have focused on the architecture of applications, discussing both how Delphi's Application object works and how you can structure applications with multiple forms.
In particular, I've discussed MDI, visual form inheritance, and frames. Toward the end of the chapter I also discussed custom architectures, with form inheritance and interfaces. Now we can move forward to another key element of non-trivial Delphi applications: building custom components to use in your programs. I could write a book about this topic, so the description won't be exhaustive; but I'll offer a comprehensive overview.
Another element associated with the architecture of Delphi applications is the use of packages, which I'll introduce as a technology related to components but which really goes further. You can structure the code of a large application in multiple packages containing forms and other units. The development of programs based on multiple executable files, libraries, and packages, is discussed in Chapter 10.
After this step, I will begin delving into Delphi database programming, another key element of the Borland development environment and for many developers, the prime focus.
Part I - Foundations
- Delphi 7 and Its IDE
- The Delphi Programming Language
- The Run-Time Library
- Core Library Classes
- Visual Controls
- Building the User Interface
- Working with Forms
Part II - Delphi Object-Oriented Architectures
- The Architecture of Delphi Applications
- Writing Delphi Components
- Libraries and Packages
- Modeling and OOP Programming (with ModelMaker)
- From COM to COM+
Part III - Delphi Database-Oriented Architectures
- Delphis Database Architecture
- Client/Server with dbExpress
- Working with ADO
- Multitier DataSnap Applications
- Writing Database Components
- Reporting with Rave
Part IV - Delphi, the Internet, and a .NET Preview
- Internet Programming: Sockets and Indy
- Web Programming with WebBroker and WebSnap
- Web Programming with IntraWeb
- Using XML Technologies
- Web Services and SOAP
- The Microsoft .NET Architecture from the Delphi Perspective
- Delphi for .NET Preview: The Language and the RTL
- Appendix A Extra Delphi Tools by the Author
- Appendix B Extra Delphi Tools from Other Sources
- Appendix C Free Companion Books on Delphi
EAN: 2147483647
Pages: 279
