Web Programming with WebBroker and WebSnap
Overview
The Internet has a growing role in the world, and much of it depends on the success of the World Wide Web, which is based on the HTTP protocol. In Chapter 19, "Internet Programming: Sockets and Indy," we discussed HTTP and the development of client- and server-side applications based on it. With the availability of several high-performance, scalable, flexible web servers, you'll rarely want to create your own. Dynamic web server applications are generally built by integrating scripting or compiled programs within web servers, rather than by replacing them with custom software.
This chapter is entirely focused on the development of server-side applications, which extend existing web servers. I introduced the dynamic generation of HTML pages toward the end of the last chapter. Now you will learn how to integrate this dynamic generation within a server. This chapter is a logical continuation of the last one, but it won't complete this book's coverage of Internet programming; Chapter 21 is devoted to the IntraWeb technology available in Delphi 7, and Chapter 22 gets back to Internet programming from the XML perspective.
| Warning |
To test some of the examples in this chapter, you'll need access to a web server. The simplest solution is to use the version of Microsoft's IIS or Personal Web Server already installed on your computer. My personal preference, however, is to use the free open-source Apache Web Server available at www.apache.org. I won't spend much time giving you details of the configuration of your web server to enable the use of applications; you can refer to its documentation for this information. |
Dynamic Web Pages
When you browse a website, you generally download static pages—HTML-format text files—from the web server to your client computer. As a web developer, you can create these pages manually, but for most businesses, it makes more sense to build the static pages from information in a database (a SQL server, a series of files, and so on). Using this approach, you're basically generating a snapshot of the data in HTML format, which is reasonable if the data isn't subject to frequent changes. This approach was discussed in Chapter 19.
As an alternative to static HTML pages, you can build dynamic pages. To do this, you extract information directly from a database in response to the browser's request, so that the HTML sent by your application displays current data, not an old snapshot of the data. This approach makes sense if the data changes frequently.
As mentioned earlier, there are a couple of ways you can program custom behavior at the web server, and these are ideal techniques you can use to generate HTML pages dynamically. In addition to script-based techniques, which are very popular, two common protocols for programming web servers are CGI (the Common Gateway Interface) and the web server APIs.
| Note |
Keep in mind that Delphi's WebBroker technology (available in both the Enterprise Studio and Professional editions) flattens the differences between CGI and server APIs by providing a common class framework. This way, you can easily turn a CGI application into an ISAPI library or integrate it into Apache. |
An Overview of CGI
CGI is a standard protocol for communication between the client browser and the web server. It's not a particularly efficient protocol, but it is widely used and is not platform specific. This protocol allows the browser both to ask for and to send data, and it is based on the standard command-line input and output of an application (usually a console application). When the server detects a page request for the CGI application, it launches the application, passes command-line data from the page request to the application, and then sends the application's standard output back to the client computer.
You can use many tools and languages to write CGI applications, and Delphi is only one of them. Despite the obvious limitation that your web server must be an Intel-based Windows or Linux system, you can build some fairly sophisticated CGI programs in Delphi and Kylix. CGI is a low-level technique, because it uses the standard command-line input and output along with environment variables to receive information from the web server and pass it back.
To build a CGI program without using support classes, you can create a Delphi console application, remove the typical project source code, and replace it with the following statements:
program CgiDate;
{$APPTYPE CONSOLE}

uses SysUtils;

begin
 writeln ('content-type: text/html');
 writeln;
 writeln ('
'
); writeln ('
Time at this site
'); writeln ('
); writeln ('
Time at this site
'); writeln ('
'); writeln ('
'); writeln (FormatDateTime('"Today is " dddd, mmmm d, yyyy,' + '"
and the time is" hh:mm:ss AM/PM', Now)); writeln ('
'); writeln ('
'); writeln ('Page generated by CgiDate.exe'); writeln (''); end.
CGI programs produce a header followed by the HTML text using the standard output. If you execute this program directly, you'll see the text in a terminal window. If you run it instead from a web server and send the output to a browser, the formatted HTML text will appear, as shown in Figure 20.1.
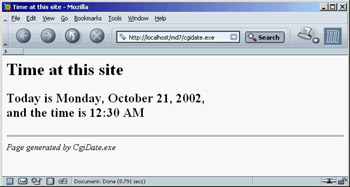
Figure 20.1: The output of the CgiDate application, as seen in a browser
Building advanced applications with plain CGI requires a lot of work. For example, to extract status information about the HTTP request, you need to access the relevant environment variables, as in the following:
// get the pathname
GetEnvironmentVariable ('PATH_INFO', PathName, sizeof (PathName));
Using Dynamic Libraries
A completely different approach is the use of the web server APIs: the popular ISAPI (Internet Server API, introduced by Microsoft), the less common NSAPI (Netscape Server API), or the Apache API. These APIs allow you to write a library that the server loads into its own address space and keeps in memory. Once it loads the library, the server can execute individual requests via threads within the main process, instead of launching a new EXE for every request (as it must in CGI applications).
When the server receives a page request, it loads the DLL (if it hasn't done so already) and executes the appropriate code, which may launch a new thread or use an existing one to process the request. The library then sends the appropriate HTTP data back to the client that requested the page. Because this communication generally occurs in memory, this type of application tends to be faster than CGI.
Delphi s WebBroker Technology
The CGI code snippet I've shown you demonstrates the plain, direct approach to this protocol. I could have provided similar low-level examples for ISAPI or Apache modules, but in Delphi it's more interesting to use the WebBroker technology. This comprises a class hierarchy within VCL and CLX (built to simplify server-side development on the Web) and a specific type of data modules called WebModules. Both the Enterprise Studio and Professional editions of Delphi include this framework (as opposed to the more advanced and newer WebSnap framework, which is available only in the Enterprise Studio version).
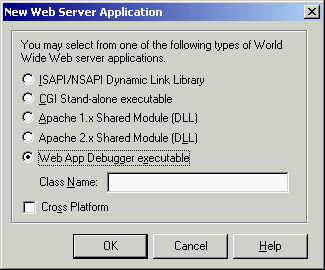
Using the WebBroker technology, you can begin developing an ISAPI or CGI application or an Apache module easily. On the first page (New) of the New Items dialog box, select the Web Server Application icon. The subsequent dialog box will offer you a choice among ISAPI, CGI, Apache 1 or 2 module, and the Web App Debugger:
In each case, Delphi will generate a project with a WebModule, which is a non-visual container similar to a data module. This unit will be identical, regardless of the project type; only the main project file changes. For a CGI application, it will look like this:
program Project2;

{$APPTYPE CONSOLE}

uses
 WebBroker,
 CGIApp,
 Unit1 in 'Unit1.pas' {WebModule1: TWebModule};

{$R *.res}

begin
 Application.Initialize;
 Application.CreateForm(TWebModule1, WebModule1);
 Application.Run;
end.
Although this is a console CGI program, the code looks similar to that of a standard Delphi application. However, it uses a trick—the Application object used by this program is not the typical global object of class TApplication but an object of a new class. This Application object is of class TCGIApplication or another class derived from TWebApplication, depending on your web project type.
The most important operations take place in the WebModule. This component derives from TCustomWebDispatcher, which provides support for all the input and output of your programs. The TCustomWebDispatcher class defines Request and Response properties, which store the client request and the response you're going to send back to the client. Each of these properties is defined using a base abstract class (TWebRequest and TWebResponse), but an application initializes them using a specific object (such as the TISAPIRequest and TISAPIResponse subclasses). These classes make available all the information passed to the server, so you have a single approach to accessing all the information. The same is true of a response, which is easy to manipulate. The key advantage of this approach is that the code written with WebBroker is independent of the type of application (CGI, ISAPI, Apache module); you'll be able to move from one to the other, modifying the project file or switching to another one, but you won't need to modify the code written in a WebModule.
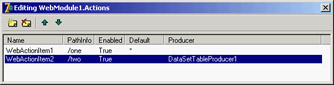
This is the structure of Delphi's framework. To write the application code, you can use the Actions editor in the WebModule to define a series of actions (stored in the Actions array property) depending on the pathname of the request:
This pathname is a portion of the CGI or ISAPI application's URL, which comes after the program name and before the parameters, such as path1 in the following URL:
http://www.example.com/scripts/cgitest.exe/path1?param1=date
By providing different actions, your application can easily respond to requests with different pathnames, and you can assign a different producer component or call a different OnAction event handler for every possible pathname. Of course, you can omit the pathname to handle a generic request. Also consider that instead of basing your application on a WebModule, you can use a plain data module and add a WebDispatcher component to it. This is a good approach if you want to turn an existing Delphi application into a web server extension.
| Warning |
The WebModule inherits from the base WebDispatcher class and doesn't require it as a separate component. Unlike WebSnap applications, WebBroker programs cannot have multiple dispatchers or multiple web modules. Also note that the actions of the WebDispatcher have nothing to do with the actions stored in an ActionList or ActionManager component. |
When you define the accompanying HTML pages that launch the application, the links will make page requests to the URLs for each of those paths. Having a single library that can perform different operations depending on a parameter (in this case, the pathname) allows the server to keep a copy of this library in memory and respond much more quickly to user requests. The same is partially true for a CGI application: The server has to run several instances but can cache the file and make it available more quickly.
In the OnAction event, you write the code to specify the response to a given request, the two main parameters passed to the event handler. Here is an example:
procedure TWebModule1.WebModule1WebActionItem1Action(Sender: TObject;
 Request: TWebRequest; Response: TWebResponse; var Handled: Boolean);
begin
 Response.Content :=
 '
Hello Page' + '
Hello
' + '
Page generated by Marco
'; end;
In the Content property of the Response parameter, you enter the HTML code you want users to see. The only drawback of this code is that the output in a browser will be correctly displayed on multiple lines, but looking at the HTML source code, you'll see a single line corresponding to the entire string. To make the HTML source code more readable by splitting it onto multiple lines, you can insert the #13 newline character (or, even better, the cross-platform sLineBreak value).
To let other actions handle this request, you set the last parameter, Handled, to False. The default value is True; if this value is set, then once you've handled the request with your action, the WebModule assumes you're finished. Most of a web application's code will be in the OnAction event handlers for the actions defined in the WebModule container. These actions receive a request from the client and return a response using the Request and Response parameters.
When you're using the producer components, your OnAction event often returns as Response.Content the Content of the producer component, with an assignment operation. You can shortcut this code by assigning a producer component to the Producer property of the action, and you won't need to write these event handlers any more (but don't do both things, because doing so might get you into trouble).
| Tip |
As an alternative to the Producer property, you can use the ProducerContent property. This property allows you to connect custom producer classes that don't inherit from the TCustomContentProducer class but implement the IProduceContent interface. The ProducerContent property is almost an interface property: It behaves the same way, but this behavior is due to its property editor and is not based on Delphi's support for interfaced properties. |
Debugging with the Web App Debugger
Debugging web applications written in Delphi is often difficult. You cannot simply run the program and set breakpoints in it, but must convince the web server to run your CGI program or library within the Delphi debugger. You can do so by indicating a host application in Delphi's Run Parameters dialog box, but this approach implies letting Delphi run the web server (which is often a Windows service, not a stand-alone program).
To solve these issues, Borland has developed a specific Web App Debugger program. This program, which is activated by the corresponding item on the Tools menu, is a web server that waits for requests on a port you can set up (1024 by default). When a request arrives, the program can forward it to a stand-alone executable. In Delphi 6, this communication was based on COM techniques; in Delphi 7 it is based on Indy sockets. In both cases, you can run the web server application from within the Delphi IDE, set all the breakpoints you need, and then (when the program is activated through the Web App Debugger) debug the program as you would a plain executable file.
The Web App Debugger does a good job of logging all the received requests and the responses returned to the browser. The program also has a Statistics page that tracks the time required for each response, allowing you to test the efficiency of an application in different conditions. Another new feature of the Web App Debugger in Delphi 7 is that it is now a CLX application instead of a VCL application. This user interface change and the conversion from COM to sockets were both done to make the Web App Debugger available in Kylix.
| Warning |
Because the Web App Debugger uses Indy sockets, your application will receive frequent exceptions of type EidConnClosedGracefully. For this reason, this exception is automatically disabled in all Delphi 7 projects. |
By using the corresponding option in the New Web Server Application dialog, you can easily create a new application compatible with the debugger. This option defines a standard project, which creates both a main form and a web module. The (useless) form includes code for providing initialization code and adding the application to the Windows Registry:
initialization
 TWebAppSockObjectFactory.Create('program_name');
The Web App Debugger uses this information to get a list of the available programs. It does so when you use the default URL for the debugger, indicated in the form as a link, as you can see (for example) in Figure 20.2. The list includes all the registered servers, not only those that are running, and can be used to activate a program. This is not a good idea, though, because you have to run the program within the Delphi IDE to be able to debug it. (Notice that you can expand the list by clicking View Details; this view includes a list of the executable files and many other details.)
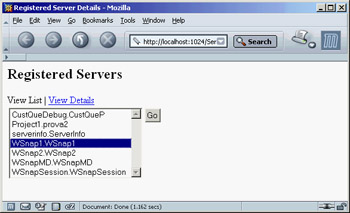
Figure 20.2: A list of applications registered with the Web App Debugger is displayed when you hook to its home page.
The data module for this type of project includes initialization code:
uses WebReq;

initialization
 if WebRequestHandler <> nil then
 WebRequestHandler.WebModuleClass := TWebModule2;
The Web App Debugger should be used only for debugging. To deploy the application, you should use one of the other options. You can create the project files for another type of web server program and add to the project the same web module as the debug application.
The reverse process is slightly more complex. To debug an existing application, you have to create a program of this type, remove the web module, add the existing one, and patch it by adding a line to set the WebModuleClass of the WebRequestHandler, as in the preceding code snippet.
| Warning |
Although in most cases you'll be able to move a program from one web technology to another, this is not always the case. For example, in the CustQueP example (discussed later), I had to avoid the request's ScriptName property (which is fine for a CGI program) and use the InternalScriptName property instead. |
There are two other interesting elements involved in using the Web App Debugger. First, you can test your program without having a web server installed and without having to tweak its settings. In other words, you don't have to deploy your programs to test them— you can try them right away. Second, instead of doing early development of an application as CGI, you can begin experimenting with a multithreaded architecture immediately, without having to deal with the loading and unloading of libraries (which often implies shutting down the web server and possibly even the computer).
Building a Multipurpose WebModule
To demonstrate how easily you can build a feature-rich server-side application using Delphi's support, I created the BrokDemo example. I built this example using the Web App Debugger technology, but it should be relatively simple to recompile as a CGI or a web server library.
A key element of the WebBroker example is the list of actions. The actions can be managed in the Actions editor or directly in the Object TreeView. Actions are also visible in the Designer page of the editor, so you can graphically see their relationship with database objects. If you examine the source code, you'll notice that every action has a specific name. I also gave meaningful names to the OnAction event handlers. For instance, TimeAction as a method name is much more understandable than the WebModule1WebActionItem1Action name automatically generated by Delphi.
Every action has a different pathname, and one is marked as a default and executed even if no pathname is specified. The first interesting idea in this program is the use of two PageProducer components, PageHead and PageTail, which are used for the initial and final portion of every page. Centralizing this code makes it easier to modify, particularly if it is based on external HTML files. The HTML produced by these components is added at the beginning and the end of the resulting HTML in the web module's OnAfterDispatch event handler:
procedure TWebModule1.WebModule1AfterDispatch(Sender: TObject;
 Request: TWebRequest; Response: TWebResponse; var Handled: Boolean);
begin
 Response.Content := PageHead.Content + Response.Content + PageTail.Content;
end;
You add the initial and final HTML at the end of the page generation because doing so allows the components to produce the HTML as if they were making all of it. Starting with HTML in the OnBeforeDispatch event means that you cannot directly assign the producer components to the actions, or the producer component will override the Content you've already provided in the response.
The PageTail component includes a custom tag for the script name, replaced by the following code, which uses the current request object available in the web module:
procedure TWebModule1.PageTailHTMLTag(Sender: TObject; Tag: TTag;
 const TagString: String; TagParams: TStrings; var ReplaceText: String);
begin
 if TagString = 'script' then
 ReplaceText := Request.ScriptName;
end;
This code is activated to expand the <#script> tag of the PageTail component's HTMLDoc property.
The code for the time and date actions is straightforward. The really interesting part begins with the Menu path, which is the default action. In its OnAction event handler, the application uses a for loop to build a list of the available actions (using their names without the first two letters, which are always Wa in this example), providing a link to each of them with an anchor (an tag):
procedure TWebModule1.MenuAction(Sender: TObject; Request: TWebRequest;
 Response: TWebResponse; var Handled: Boolean);
var
 I: Integer;
begin
 Response.Content := '
Menu
'#13; for I := 0 to Actions.Count - 1 do Response.Content := Response.Content + '
- <a href="</i> + Request.ScriptName + Action[I].PathInfo + <i>">'</a><a href="</i> + Request.ScriptName + Action[I].PathInfo + <i>"> + Copy (Action[I].Name, 3, 1000) + '</a>'#13; Response.Content := Response.Content + '
'; end;
The BrokDemo example also provides users with a list of the system settings related to the request, which is useful for debugging. It is also instructive to learn how much information (and exactly what information) the HTTP protocol transfers from a browser to a web server and vice versa. To produce this list, the program looks for the value of each property of the TWebRequest class, as this snippet demonstrates:
procedure TWebModule1.StatusAction(Sender: TObject; Request: TWebRequest;
 Response: TWebResponse; var Handled: Boolean);
var
 I: Integer;
begin
 Response.Content := '
Status
'#13 + 'Method: ' + Request.Method + '
'#13 + 'ProtocolVersion: ' + Request.ProtocolVersion + '
'#13 + 'URL: ' + Request.URL + '
'#13 + 'Query: ' + Request.Query + '
'#13 + ...
Dynamic Database Reporting
The BrokDemo example defines two more actions, indicated by the /table and /record pathnames. For these two last actions, the program produces a list of names and then displays the details of one record, using a DataSetTableProducer component to format the entire table and a DataSetPageProducer component to build the record view. Here are the properties of these two components:
object DataSetTableProducer1: TDataSetTableProducer
 DataSet = dataEmployee
 OnFormatCell = DataSetTableProducer1FormatCell
end
object DataSetPage: TDataSetPageProducer
 HTMLDoc.Strings = (
    '
Employee: <#LastName>
' '
- Employee ID: <#EmpNo>' '
- Name: <#FirstName> <#LastName>' '
- Phone: <#PhoneExt>' '
- Hired On: <#HireDate>' '
- Salary: <#Salary>
') OnHTMLTag = PageTailHTMLTag DataSet = dataEmployee end
To produce the entire table, you connect the DataSetTableProducer to the Producer property of the corresponding actions without providing a specific event handler. The table is made more powerful by adding internal links to the specific records. The following code is executed for each cell of the table but a link is created only for the first column and not for the first row (the one with the title):
procedure TWebModule1.DataSetTableProducer1FormatCell(Sender: TObject;
 CellRow, CellColumn: Integer; var BgColor: THTMLBgColor;
 var Align: THTMLAlign; var VAlign: THTMLVAlign;
 var CustomAttrs, CellData: String);
begin
 if (CellColumn = 0) and (CellRow <> 0) then
 CellData := '<a href="</i> + ScriptName + <i>/record?LastName=</i> +
 dataEmployee[Last_Name] + &FirstName= +
 dataEmployee[First_Name] + "> '
 + CellData + ' </a>';
end;
You can see the result of this action in Figure 20.3. When the user selects one of the links, the program is called again, and it can check the QueryFields string list and extract the parameters from the URL. It then uses the values corresponding to the table fields used for the record search (which is based on the FindNearest call):
procedure TWebModule1.RecordAction(Sender: TObject; Request: TWebRequest;
 Response: TWebResponse; var Handled: Boolean);
begin
 dataEmployee.Open;
  // go to the requested record
 dataEmployee.Locate ('LAST_NAME;FIRST_NAME',
 VarArrayOf([Request.QueryFields.Values['LastName'],
 Request.QueryFields.Values['FirstName']]), []);
  // get the output
 Response.Content := Response.Content + DataSetPage.Content;
end;
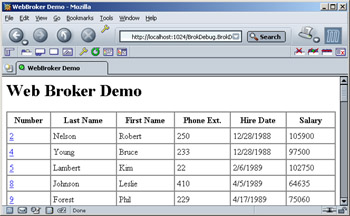
Figure 20.3: The output corresponding to the table path of the BrokDemo example, which produces an HTML table with internal hyperlinks
Queries and Forms
The previous example used some of the HTML producer components introduced earlier in this chapter. This group includes another component you haven't used yet: QueryTableProducer (for the BDE) and its sister SQL QueryTableProducer (for dbExpress). As you'll see in a moment, this component makes building even complex database programs a breeze.
Suppose you want to search for customers in a database. You might construct the following HTML form (embedded in an HTML table for better formatting):
Customer QueryProducer Search Form
action="<#script>/search" method="POST">
| State: | type="text" name="State"> |
| Country: | type="text" name="Country"> |
|
type="Submit"> |
| Note |
As in Delphi, an HTML form hosts a series of controls. There are visual tools to help you design these forms, or you can manually enter the HTML code. The available controls include buttons, input text (or edit boxes), selections (or combo boxes), and input buttons (or radio buttons). You can define buttons as specific types, such as Submit or Reset, which imply standard behaviors. An important element of forms is the request method, which can be either POST (data is passed behind the scenes, and you receive it in the ContentFields property) or GET (data is passed as part of the URL, and you extract it from the QueryFields property). |
You should notice a very important element in the form: the names of the input components (State and Country), which should match the parameters of a SQLQuery component:
SELECT Customer, State_Province, Country
FROM CUSTOMER
WHERE
 State_Province = :State OR Country = :Country
This code is used in the CustQueP (customer query producer) example. To build it, I placed a SQLQuery component inside the WebModule and generated the field objects for it. In the same WebModule, I added a SQLQueryTableProducer component connected to the Producer property of the /search action. The program generates the proper response. When you activate the SQLQuery-TableProducer component by calling its Content function, it initializes the SQLQuery component by obtaining the parameters from the HTTP request. The component can automatically examine the request method and then use either the QueryFields property (if the request is a GET) or the ContentFields property (if the request is a POST).
One problem with using a static HTML form as you did earlier is that it doesn't tell you which states and countries you can search for. To address this issue, you can use a selection control instead of an edit control in the HTML form. However, if the user adds a new record to the database table, you'll need to update the element list automatically. As a final solution, you can design the ISAPI DLL to produce a form on-the-fly, and you can fill the selection controls with the available elements.
You'll generate the HTML for this page in the /form action, which you connect to a PageProducer component. The PageProducer contains the following HTML text, which embeds two special tags:
Customer QueryProducer Search Form
action=" <#script>/search" method="POST">
| State: | name="State"><#State_Province> |
| Country: | name="Country"><#Country> |
|
type="Submit"> |
You'll notice that the tags have the same name as some of the table's fields. When the PageProducer encounters one of these tags, it adds an
HTML tag for every distinct value of the corresponding field. Here's the OnTag event handler's code, which is generic and reusable:
procedure TWebModule1.PageProducer1HTMLTag(Sender: TObject; Tag: TTag;
 const TagString: String; TagParams: TStrings; var ReplaceText: String);
begin
 ReplaceText := '';
 SQLQuery2.SQL.Clear;
 SQLQuery2.SQL.Add ('select distinct ' + TagString + ' from customer');
 try
 SQLQuery2.Open;
 try
 SQLQuery2.First;
 while not SQLQuery2.EOF do
 begin
 ReplaceText := ReplaceText +
 '
' + SQLQuery2.Fields[0].AsString + ''#13; SQLQuery2.Next; end; finally SQLQuery2.Close; end; except ReplaceText := '{wrong field: ' + TagString + '}'; end; end;
This method uses a second SQLQuery component, which I manually placed on the form and connected to a shared SQLConnection component. It produces the output shown in Figure 20.4.
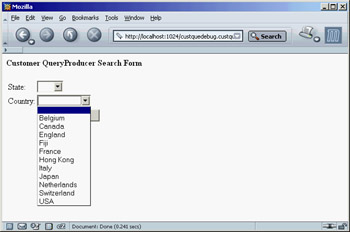
Figure 20.4: The form action of the CustQueP example produces an HTML form with a selection component dynamically updated to reflect the current status of the database.
This web server extension, like many others, allows the user to view the details of a specific record. As in the previous example, you can accomplish this by customizing the output of the first column (column zero), which is generated by the QueryTableProducer component:
procedure TWebModule1.QueryTableProducer1FormatCell(
 Sender: TObject; CellRow, CellColumn: Integer;
 var BgColor: THTMLBgColor; var Align: THTMLAlign;
 var VAlign: THTMLVAlign; var CustomAttrs, CellData: String);
begin
 if (CellColumn = 0) and (CellRow <> 0) then
 CellData := '<a href="</i> + Request.ScriptName + <i>/record?Company=</i> + CellData +
 <i>">'</a><a href="</i> + Request.ScriptName + <i>/record?Company=</i> + CellData +
 <i>"> + CellData + '</a>'#13;
 if CellData = '' then
 CellData := ' ';
end;
| Tip |
When you have an empty cell in an HTML table, most browsers render it without the border. For this reason, I added a non-breaking space symbol ( ) in each empty cell. You'll have to do this in each HTML table generated with Delphi's table producers. |
The action for this link is /record, and you pass a specific element after the ? parameter (without the parameter name, which is slightly nonstandard). The code you use to produce the HTML tables for the records doesn't use the producer components as you've been doing; instead, it shows the data of every field in a custom-built table:
procedure TWebModule1.RecordAction(Sender: TObject; Request: TWebRequest;
 Response: TWebResponse; var Handled: Boolean);
var
 I: Integer;
begin
 if Request.QueryFields.Count = 0 then
 Response.Content := 'Record not found'
 else
 begin
 Query2.SQL.Clear;
 Query2.SQL.Add ('select * from customer ' +
 'where Company="' + Request.QueryFields.Values['Company'] + '"');
 Query2.Open;
 Response.Content :=
 '
Customer Record'#13 + '
Customer Record: ' + Request.QueryFields[0] + '
'#13 + ''#13; for I := 1 to Query2.FieldCount - 1 do Response.Content := Response.Content + ''#13''#13; Response.Content := Response.Content + '
| ' + Query2.Fields [I].FieldName + ' | ' + Query2.Fields [I].AsString + ' |
'#13 + // pointer to the query form '<a href="</i> + Request.ScriptName + <i>/form">'</a><a href="</i> + Request.ScriptName + <i>/form"> + ' Next Query </a>'#13 + ''#13; end; end;
Working with Apache
If you plan to use Apache instead of IIS or another web server, you can take advantage of the CGI technology to deploy your applications on almost any web server. However, using CGI means reduced speed and some trouble handling state information (because you cannot keep any data in memory). This is a good reason to write an ISAPI application or a dynamic Apache module. Using Delphi's WebBroker technology, you can also easily compile the same code for both technologies, so that moving your program to a different web platform becomes much simpler. You can also recompile a CGI program or a dynamic Apache module with Kylix and deploy it on a Linux server.
As I've mentioned, Apache can run traditional CGI applications but also has a specific technology for keeping the server extension program loaded in memory at all times for faster response. To build such a program in Delphi, you can use the Apache Shared Module option in the New Web Server Application dialog box; choose Apache 1 or Apache 2, depending on the version of the web server you plan to use.
| Warning |
While D7 supports version 2.0.39 of Apache, it doesn't support the current popular version 2.0.40 due to a change in library interfaces. Use of version 2.0.39 is discouraged because it has a security problem. Information on how to fix the VCL code and make your modules compatible with Apache 2.0.40 and above have been posted by Borland R&D members on the newsgroups and are currently available also on Bob Swart's website at the URL www.drbob42.com/delphi7/apache2040.htm. |
If you choose to create an Apache module, you end up with a library having this type of source code for its project:
library Apache1;

uses
 WebBroker,
 ApacheApp,
 ApacheWm in 'ApacheWm.pas' {WebModule1: TWebModule};

{$R *.res}

exports
 apache_module name 'apache1_module';

begin
 Application.Initialize;
 Application.CreateForm(TWebModule1, WebModule1);
 Application.Run;
end.
Notice in particular the exports clause, which indicates the name used by Apache configuration files to reference the dynamic module. In the project source code, you can add two more definitions—the module name and the content type—in the following way:
ModuleName := 'Apache1_module';
ContentType:= 'Apache1-handler';
If you don't set these values, Delphi will assign them defaults, which are built adding the _module and -handler strings to the project name (resulting in the two names I used here).
An Apache module is generally not deployed within a script folder, but within the modules subfolder of the server (by default, c:Program FilesApachemodules). You have to edit the http.conf file, adding a line to load the module, as follows:
LoadModule apache1_module modules/apache1.dll
Finally, you must indicate when the module is invoked. The handler defined by the module can be associated with a given file extension (so that your module will process all the files having a given extension) or with a physical or virtual folder. In the latter case, the folder doesn't exist, but Apache pretends it is there. This is how you can set up a virtual folder for the Apache1 module:
SetHandler Apache1-handler
Because Apache is inherently case sensitive (because of its Linux heritage), you also might want to add a second, lowercase virtual folder:
SetHandler Apache1-handler
Now you can invoke the sample application with the URL http://localhost/Apache1. A great advantage of using virtual folders in Apache is that a user doesn't really distinguish between the physical and dynamic portions of your site, as you can see by experimenting with the Apache1 example (which includes the code discussed here).
Practical Examples
After this general introduction to developing server-side applications with WebBroker, I'll end this part of the chapter with two practical examples. The first is a classic web counter. The second is an extension of the WebFind program presented in Chapter 19, which produces a dynamic page instead of filling a list box.
A Graphical Web Hit Counter
The server-side applications you've built up to now were based only on text. Of course, you can easily add references to existing graphics files. What's more interesting, however, is to build server-side programs capable of generating graphics that change over time.
A typical example is a page hit counter. To write a web counter, you save the current number of hits to a file and then read and increase the value every time the counter program is called. To return this information, all you need is HTML text with the number of hits. The code is straightforward:
procedure TWebModule1.WebModule1WebActionItem1Action(Sender: TObject;
 Request: TWebRequest; Response: TWebResponse; var Handled: Boolean);
var
 nHit: Integer;
 LogFile: Text;
 LogFileName: string;
begin
 LogFileName := 'WebCont.log';
 System.Assign (LogFile, LogFileName);
 try
    // read if the file exists
 if FileExists (LogFileName) then
 begin
 Reset (LogFile);
 Readln (LogFile, nHit);
 Inc (nHit);
 end
 else
 nHit := 0;
    // saves the new data
 Rewrite (LogFile);
 Writeln (LogFile, nHit);
 finally
 Close (LogFile);
 end;
 Response.Content := IntToStr (nHit);
end;
| Warning |
This simple file handling does not scale. When multiple visitors hit the page at the same time, this code may return false results or fail with a file I/O error because a request in another thread has the file open for reading while this thread tries to open the file for writing. To support a similar scenario, you'll need to use a mutex (or a critical section in a multithreaded program) to let each subsequent thread wait until the thread currently using the file has completed its task. |
It's more interesting to create a graphical counter that can be easily embedded into any HTML page. There are two approaches to building a graphical counter: You can prepare a bitmap for each digit up front and then combine them in the program, or you can let the program draw over a memory bitmap to produce the graphic you want to return. In the WebCount program, I chose the second approach.
Basically, you can create an Image component that holds a memory bitmap, which you can paint on with the usual methods of the TCanvas class. Then you can attach this bitmap to a TJpegImage object. Accessing the bitmap through the JpegImage component converts the image to the JPEG format. Then, you can save the JPEG data to a stream and return it. As you can see, there are many steps, but the code is not complicated:
// create a bitmap in memory
Bitmap := TBitmap.Create;
try
 Bitmap.Width := 120;
 Bitmap.Height := 25;
  // draw the digits
 Bitmap.Canvas.Font.Name := 'Arial';
 Bitmap.Canvas.Font.Size := 14;
 Bitmap.Canvas.Font.Color := RGB (255, 127, 0);
 Bitmap.Canvas.Font.Style := [fsBold];
 Bitmap.Canvas.TextOut (1, 1, 'Hits: ' +
 FormatFloat ('###,###,###', Int (nHit)));
  // convert to JPEG and output
 Jpeg1 := TJpegImage.Create;
 try
 Jpeg1.CompressionQuality := 50;
 Jpeg1.Assign(Bitmap);
 Stream := TMemoryStream.Create;
 Jpeg1.SaveToStream (Stream);
 Stream.Position := 0;
 Response.ContentStream := Stream;
 Response.ContentType := 'image/jpeg';
 Response.SendResponse;
 // the response object will free the stream
 finally
 Jpeg1.Free;
 end;
finally
 Bitmap.Free;
end;
The three statements responsible for returning the JPEG image are the two that set the ContentStream and ContentType properties of the Response and the final call to SendResponse. The content type must match one of the possible MIME types accepted by the browser, and the order of these three statements is relevant. The Response object also has a SendStream method, but it should be called only after sending the type of the data with a separate call. Here you can see the effect of this program:
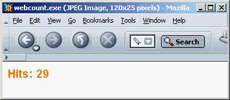
To embed the program in a page, add the following code to the HTML:
<img src="books/2/37/1/html/2/http://localhost/scripts/webcount.exe" border=0 alt="hit counter">
Searching with a Web Search Engine
In Chapter 19, I discussed the use of the Indy HTTP client component to retrieve the result of a search on the Google website. Let's extend the example, turning it into a server-side application. The WebSearcher program, available as a CGI application or a Web App Debugger executable, has two actions: The first returns the HTML retrieved by the search engine; and the second parses the HTML filling a client data set component, which is hooked to a table page producer for generating the final output. Here is the code for the second action:
const
 strSearch = 'http://www.google.com/search?as_q=borland+delphi&num=100';

procedure TWebModule1.WebModule1WebActionItem1Action(Sender: TObject;
 Request: TWebRequest; Response: TWebResponse; var Handled: Boolean);
var
 I: integer;
begin
 if not cds.Active then
 cds.CreateDataSet
 else
 cds.EmptyDataSet;
 for i := 0 to 5 do // how many pages?
 begin
    // get the data form the search site
 GrabHtml (strSearch + '&start=' + IntToStr (i*100));
    // scan it to fill the cds
 HtmlStringToCds;
 end;
 cds.First;
  // return producer content
 Response.Content := DataSetTableProducer1.Content;
end;
The GrabHtml method is identical to the WebFind example. The HtlStringToCds method is similar to the corresponding method of the WebFind example (which adds the items to a list box); it adds the addresses and their textual descriptions by calling
cds.InsertRecord ([0, strAddr, strText]);
The ClientDataSet component is set up with three fields: the two strings plus a line counter. This extra empty field is required in order to include the extra column in the table producer. The code fills the column in the cell-formatting event, which also adds the hyperlink:
procedure TWebModule1.DataSetTableProducer1FormatCell(Sender: TObject; CellRow,
 CellColumn: Integer; var BgColor: THTMLBgColor; var Align: THTMLAlign;
 var VAlign: THTMLVAlign; var CustomAttrs, CellData: String);
begin
 if CellRow <> 0 then
 case CellColumn of
 0: CellData := IntToStr (CellRow);
 1: CellData := '<a href=" </i>+ CellData + <i>">'</a><a href=" </i>+ CellData + <i>"> + SplitLong(CellData) + '</a>';
 2: CellData := SplitLong (CellData);
 end;
end;
The call to SplitLong is used to add extra spaces in the output text, to avoid having grid columns that are too large—the browser won't split the text on multiple lines unless it contains spaces or other special characters. The result of this program is a rather slow application (because of the multiple HTTP requests it must forward) that produces output like that shown in Figure 20.5.
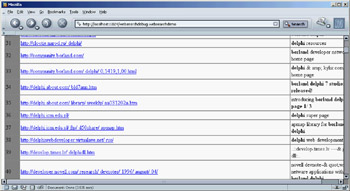
Figure 20.5: The WebSearch program shows the result of multiple searches done on Google.
WebSnap
Now that I've introduced the core elements of developing web server applications with Delphi, let's move to a more complex architecture available since Delphi 6: WebSnap. There are two good reasons I didn't jump into this topic at the beginning of this chapter. First, WebSnap builds on the foundation offered by WebBroker, so you cannot learn how to use the new features if you don't understand the underlying ones. For example, a WebSnap application is technically a CGI program, or an ISAPI or Apache module. Second, because WebSnap is included only in the Enterprise Studio version of Delphi, not all Delphi programmers have the chance to use it.
WebSnap has a few definite advantages over WebBroker, such as allowing for multiple web modules each corresponding to a page, integrating server-side scripting, XSL, and the Internet Express technology (these last two elements will be covered in Chapter 22, "Using XML Technologies"). Moreover, many ready-to-use components are available for handling common tasks, such as user logins, session management, and so on. Instead of listing all the features of WebSnap, though, I've decided to cover them in a sequence of simple and focused applications. I built these applications using the Web App Debugger, for testing purposes, but you can easily deploy them using one of the other available technologies.
When you're developing a WebSnap application, the starting point is a dialog box you can invoke either in the WebSnap page of the New Items dialog box (File ® New ® Other) or using the Internet toolbar in the IDE (which is not visible by default). The resulting dialog box, shown in Figure 20.6, allows you to choose the type of application (as in a WebBroker application) and to customize the initial application components (you'll be able to add more later). The bottom portion of the dialog determines the behavior of the first page (usually the default or home page of the program). A similar dialog box is displayed for subsequent pages.
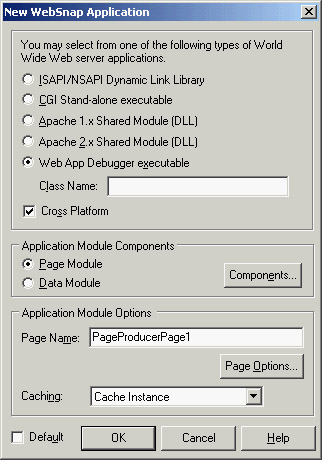
Figure 20.6: The options offered by the New Web-Snap Application dialog box include the type of server and a button that lets you select the core appli-cation components.
If you choose the defaults and type in a name for the home page, the dialog box will create a project and open a TWebAppPageModule. This module contains the components you've chosen, by default:
- A WebAppComponents component is a container for all the centralized services of the WebSnap application, such as the user list, core dispatcher, session services, and so on. Not all of its properties must be set up, because an application might not need all the available services.
- One of these core services is offered by the PageDispatcher component, which (automatically) holds a list of the application's available pages and defines the default page.
- Another core service is given by the AdapterDispatcher component, which handles HTML form submissions and image requests.
- The ApplicationAdapter is the first component you encounter from the adapters family. These components offer fields and actions to the server-side scripts evaluated by the program. Specifically, the ApplicationAdapter is a field adapter that exposes the value of its own ApplicationTitle property. If you enter a value for this property, it will be made available to the scripts.
- The module hosts a PageProducer that includes the HTML code of the page—in this case, the program's default page. Unlike in WebBroker applications, the HTML for this component is not stored inside its HTMLDoc string list property or referenced by its HTMLFile property. The HTML file is an external file, stored by default in the folder hosting the project's source code and referenced from the application using a statement similar to a resource include statement: {*.html}.
- Because the HTML file included by the PageProducer is kept as a separate file (the LocateFileService component will eventually help you for its deployment), you can edit it to change the output of a page of your program without having to recompile the application. These possible changes relate not only to the fixed portion of the HTML file but also to some of its dynamic content, thanks to the support for server-side scripting. The default HTML file, based on a standard template, already contains some scripting.
| Warning |
The similarity between resource inclusion and HTML reference is mostly syntactical. The HTML reference is used only for the design-time location of the file, whereas a resource include directive links the data it refers into the executable file. |
You can view the HTML file in the Delphi editor thanks to that directive (with reasonably good syntax highlighting) by selecting the corresponding lower tab. The editor also has pages for a WebSnap module, including by default an HTML Result page where you can see the HTML generated after evaluating the scripts, and a Preview page hosting what a user will see in a browser. The Delphi 7 editor for a WebSnap module includes a much more powerful HTML editor than Delphi 6 had; it includes better syntax highlighting and code completion. If you prefer to edit your web application's HTML with a more sophisticated editor, you can set up your choice in the Internet page of the Environment Options dialog box. Click the Edit button for the HTML extension, and you can choose an external editor from the editor's shortcut menu or a specific button on Delphi's Internet toolbar.
The standard HTML template used by WebSnap adds to any page of the program its title and the application title, using script lines such as these:
<%= Application.Title %>
<%= Page.Title %>
We'll get back to the scripting in a while; we'll begin developing the WSnap1 example in the next section by creating a program with multiple pages. But first, I'll finish this overview by showing you the source code for a sample web page module:
type
 Thome = class(TWebAppPageModule)
 ...
 end;

function home: Thome;

implementation

{$R *.dfm} {*.html}

uses WebReq, WebCntxt, WebFact, Variants;

function home: Thome;

begin
 Result := Thome(WebContext.FindModuleClass(Thome));
end;

initialization
 if WebRequestHandler <> nil then

 WebRequestHandler.AddWebModuleFactory(TWebAppPageModuleFactory.Create(
 Thome, TWebPageInfo.Create([wpPublished {, wpLoginRequired}], '.html'),
 caCache));
end.
The module uses a global function instead of a form's typical global object to support page caching. This application also has extra code in the initialization section (particularly registration code) to let the application know the role of the page and its behavior.
| Tip |
Unlike this chapter's WebBroker examples, the WebSnap examples compile each in its own folder. This is because the HTML files are needed at runtime and I preferred simplifying the deployment as much as possible. |
Managing Multiple Pages
The first notable difference between WebSnap and WebBroker is that instead of having a single data module with multiple actions eventually connected to producer components, WebSnap has multiple data modules, each corresponding to an action and having a producer component with an HTML file attached to it. You can add multiple actions to a page/module, but the idea is that you structure applications around pages rather than actions. As is the case with actions, the name of the page is indicated in the request path.
As an example, I added two more pages to the WebSnap application (which was built with default settings). For the first page, in the New WebSnap Page Module dialog (see Figure 20.7) choose a standard page producer and name it date. For the second, choose a DataSetPageProducer and name it country. After saving the files, you can begin testing the application. Thanks to some of the scripting I'll discuss later, each page lists all the available pages (unless you've unchecked the Published check box in the New WebSnap Page Module dialog).
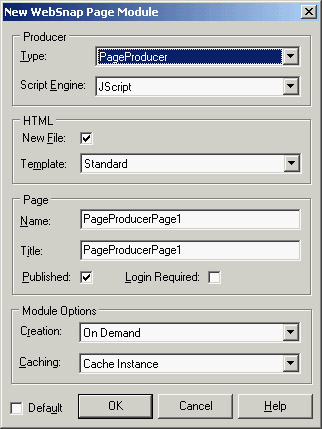
Figure 20.7: The New WebSnap Page Module dialog box
The pages will be rather empty, but at least you have the structure in place. To complete the home page, you'll edit its linked HTML file directly. For the date page, use the same approach as a WebBroker application. Add some custom tags to the HTML text, like the following:
The time at this site is <#time>.
I also added code to the producer component's OnTag event handler to replace this tag with the current time.
For the third page (the country page), modify the HTML to include tags for the various fields of the country table, as in:
Country: <#name>
Then attach the ClientDataSet to the page producer:
object DataSetPageProducer: TDataSetPageProducer
 DataSet = cdsCountry
end
object cdsCountry: TClientDataSet
 FileName = 'C:Program FilesCommon FilesBorland
    SharedDatacountry.cds'
end
To open this dataset when the page is first created and reset it to the first record in further invocations, you handle the OnBeforeDispatchPage event of the web page module, adding this code to it:
cdsCountry.Open;
cdsCountry.First;
The fact that a WebSnap page can be very similar to a portion of a WebBroker application (basically, an action tied to a producer) is important, if you want to port existing WebBroker code to this new architecture. You can even port your existing DataSetTableProducer components to the new architecture. Technically, you can generate a new page, remove its producer component, replace it with a DataSetTableProducer, and hook this component to the PageProducer property of the web page module. In practice, this approach would cut out the HTML file of the page and its scripts.
In the WSnap1 program, I used a better technique. I added a custom tag (<#htmltable>) to the HTML file and used the OnTag event of the page producer to add to the HTML the result of the data set table:
if TagString = 'htmltable' then
 ReplaceText := DataSetTableProducer1.Content;
Server Side Scripts
Having multiple pages in a server-side program—each associated with a different page module—changes the way you write a program. Having the server-side scripts at hand offers an even more powerful approach. For example, the standard scripts of the WSnap1 example account for the application and page titles, and for the index of the pages. This index is generated by an enumerator, the technique used to scan a list from within WebSnap script code. Let's look at it:
 cellspacing="0" cellpadding="0">
<% e = new Enumerator(Pages)
 s = ''
 c = 0
 for (; !e.atEnd(); e.moveNext())
 {
 if (e.item().Published)
 {
 if (c > 0) s += ' | '
 if (Page.Name != e.item().Name)
 s += '<a href=" + e.item().HREF + ">' + e.item().Title + '</a>'
 else
 s += e.item().Title
 c++
 }
 }
 if (c>1) Response.Write(s)
%>
| Note |
Typically, WebSnap scripts are written in JavaScript, an object-based language common for Internet programming because it is the only scripting language generally available in browsers (on the client side). JavaScript (technically indicated as ECMAScript) borrows the core syntax of the C language and has almost nothing to do with Java. WebSnap uses Microsoft's ActiveScripting engine, which supports both JScript (a variation of JavaScript) and VBScript. |
Inside the single cell of this table (which, oddly enough, has no rows), the script outputs a string with the Response.Write command. This string is built with a for loop over an enumerator of the application's pages, stored in the Pages global entity. The title of each page is added to the string only if the page is published. Each title uses a hyperlink with the exclusion of the current page. Having this code in a script, instead of hard-coded into a Delphi component, allows you to pass it to a good web designer, who can turn it into something a more visually appealing.
| Tip |
To publish or unpublish a page, don't look for a property in the web page module. This status is controlled by a flag of the AddWebModuleFactory method called in the web page module initialization code. You can comment or uncomment this flag to obtain the desired effect. |
As a sample of what you can do with scripting, I added to the WSnap2 example (an extension of the WSnap1 example) a demoscript page. The page's script can generate a full table of multiplied values with the following scripting code (see Figure 20.8 for its output):
 border=1 cellspacing=0>


  <% for (j=1;j<=5;j++) { %>
 Column <%=j %>
  <% } %>

<% for (i=1;i<=5;i++) { %>

 Line <%=i %>
  <% for (j=1;j<=5;j++) { %>
 Value= <%=i*j %>
  <% } %>

<% } %>
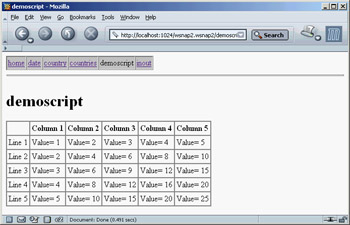
Figure 20.8: The WSnap2 example features a plain script and a custom menu stored in an include file.
In this script, the <%= symbol replaces the longer Response.Write command. Another important feature of server-side scripting is the inclusion of pages within other pages. For example, if you plan to modify the menu, you can include the related HTML and script in a single file, instead of changing it and maintaining it in multiple pages. File inclusion is generally done with a statement like this:
In Listing 20.1, you can find the complete source code of the include file for the menu, which is referenced by all of the project's other HTML files. Figure 20.9 shows an example of this menu, which is displayed across the top of the page using the table-generation script mentioned earlier.
Listing 20.1: The menu.html File Included in Each Page of the WSnap2 Example
<%= Page.Title %>
<%= Application.Title %>
cellspacing="0" cellpadding="2" border="1" bgcolor="#c0c0c0"> <% e = new Enumerator(Pages) for (; !e.atEnd(); e.moveNext()) { if (e.item().Published) { if (Page.Name != e.item().Name) Response.Write ('<a href=" + e.item().HREF + ">' +</a><a href=" + e.item().HREF + "> e.item().Title + '</a>') else Response.Write ('' + e.item().Title + '') } } %>
<%= Page.Title %>
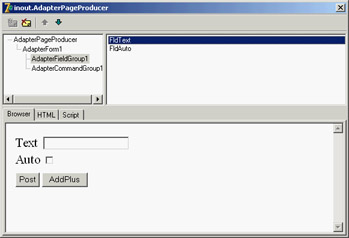
Figure 20.9: The Web Surface Designer for the inout page of the WSnap2 example, at design time
This script for the menu uses the Pages list and the Page and Application global scripting objects. WebSnap makes available a few other global objects, including EndUser and Session objects (in case you add the corresponding adapters to the application), the Modules object, and the Producer object, which allows access to the Producer component of the web page module. The script also has available the Response and Request objects of the web module.
Adapters
In addition to these global objects, within a script you can access all the adapters available in the corresponding web page module. (Adapters in other modules, including shared web data modules, must be referenced by prefixing their name with the Modules object and the corresponding module.) Adapters allow you to pass information from your compiled Delphi code to the interpreted script, providing a scriptable interface to your Delphi application. Adapters contain fields that represent data and host actions that represent commands. The server-side scripts can access these values and issue these commands, passing specific parameters to them.
Adapter Fields
For simple customizations, you can add new fields to specific adapters. For instance, in the WSnap2 example, I added a custom field to the application adapter. After selecting this component, you can either open its Fields editor (accessible via its shortcut menu) or work in the Object TreeView. After adding a new field (called AppHitCount in the example), you can assign a value to it in its OnGetValue event. Because you want to count the hits (or requests) on any page of the web application, you can also handle the OnBeforePageDispatch event of the global PageDispatcher component to increase the value of a local field, HitCount. Here is the code for the two methods:
procedure Thome.PageDispatcherBeforeDispatchPage(Sender: TObject;
 const PageName: String; var Handled: Boolean);
begin
 Inc (HitCount);
end;

procedure Thome.AppHitCountGetValue(Sender: TObject; var Value: Variant);
begin
 Value := HitCount;
end;
Of course, you could use the page name to also count hits on each page (and you could add support for persistency, because the count is reset every time you run a new instance of the application). Now that you've added a custom field to an existing adapter (corresponding to the Application script object), you can access it from within any script, like this:
Application hits since last activation: <%= Application.AppHitCount.Value %>
Adapter Components
In the same way, you can add custom adapters to specific pages. If you need to pass along a few fields, use the generic Adapter component. Other custom adapters (besides the global ApplicationAdapter you've already used) include these:
- The PagedAdapter component has built-in support for showing its content over multiple pages.
- The DataSetAdapter component is used to access a Delphi dataset from a script and is covered in the section "WebSnap and Databases."
- The StringValuesList holds a list of name/value pairs, such as a string list, and can be used directly or to provide a list of values to an adapter field. The inherited DataSetValuesList adapter has the same role but grabs the list of name/value pairs from a dataset, providing support for lookups and other selections.
- User-related adapters, such as the EndUser, EndUserSession, and LoginForm adapters, are used to access user and session information and to build a login form for the application that is automatically tied to the users list. I'll discuss these adapters in the section "Sessions, Users, and Permissions" later in this chapter.
Using the AdapterPageProducer
Most of these components are used in conjunction with an AdapterPageProducer component. The AdapterPageProducer can generate portions of script after you visually design the desired result. As an example, I've added to the WSnap2 application the inout page, which has an adapter with two fields, one standard and one Boolean:
object Adapter1: TAdapter
 OnBeforeExecuteAction = Adapter1BeforeExecuteAction
 object TAdapterActions
 object AddPlus: TAdapterAction
 OnExecute = AddPlusExecute
 end
 object Post: TAdapterAction
 OnExecute = PostExecute
 end
 end
 object TAdapterFields
 object Text: TAdapterField
 OnGetValue = TextGetValue
 end
 object Auto: TAdapterBooleanField
 OnGetValue = AutoGetValue
 end
 end
end
The adapter also has a couple of actions that post the current user input and add a plus sign (+) to the text. The same plus sign is added when the Auto field is enabled. Developing the user interface for this form and the related scripting would take some time using plain HTML. But the AdapterPageProducer component (used in this page) has an integrated HTML designer, which Borland calls Web Surface Designer. Using this tool, you can visually add a form to the HTML page and add an AdapterFieldGroup to it. Connect this field group to the adapter to automatically display editors for the two fields. Then you can add an AdapterCommandGroup and connect it to the AdapterFieldGroup, to provide buttons for all of the adapter's actions. You can see an example of this designer in Figure 20.9.
To be more precise, the fields and buttons are automatically displayed if the AddDefaultFields and AddDefaultCommands properties of the field group and command group are set. The effect of these visual operations to build this form are summarized in the following DFM snippet:
object AdapterPageProducer: TAdapterPageProducer
 object AdapterForm1: TAdapterForm
 object AdapterFieldGroup1: TAdapterFieldGroup
 Adapter = Adapter1
 object FldText: TAdapterDisplayField
 FieldName = 'Text'
 end
 object FldAuto: TAdapterDisplayField
 FieldName = 'Auto'
 end
 end
 object AdapterCommandGroup1: TAdapterCommandGroup
 DisplayComponent = AdapterFieldGroup1
 object CmdPost: TAdapterActionButton
 ActionName = 'Post'
 end
 object CmdAddPlus: TAdapterActionButton
 ActionName = 'AddPlus'
 end
 end
 end
end
Now that you have an HTML page with some scripts to move data back and forth and issue commands, let's look at the source code required to make this example work. First, you must add to the class two local fields to store the adapter fields and manipulate them, and you need to implement the OnGetValue event for both, returning the field values. When each button is clicked, you must retrieve the text passed by the user, which is not automatically copied into the corresponding adapter field. You can obtain this effect by looking at the ActionValue property of these fields, which is set only if something was entered (for this reason, when nothing is entered you set the Boolean field to False). To avoid repeating this code for both actions, place it in the OnBeforeExecuteAction event of the web page module:
procedure Tinout.Adapter1BeforeExecuteAction(Sender, Action: TObject;
 Params: TStrings; var Handled: Boolean);
begin
 if Assigned (Text.ActionValue) then
 fText := Text.ActionValue.Values [0];
 fAuto := Assigned (Auto.ActionValue);
end;
Notice that each action can have multiple values (in case components allow multiple selections); but this is not the case, so you can grab the first element. Finally, here is the code for the OnExecute events of the two actions:
procedure Tinout.AddPlusExecute(Sender: TObject; Params: TStrings);
begin
 fText := fText + '+';
end;

procedure Tinout.PostExecute(Sender: TObject; Params: TStrings);
begin
 if fAuto then
 AddPlusExecute (Self, nil);
end;
As an alternative, adapter fields have a public EchoActionFieldValue property you can set to get the value entered by the user and place it in the resulting form. This technique is typically used in case of errors, to let the user change the input starting with the values already entered.
| Note |
The AdapterPageProducer component has specific support for Cascading Style Sheets (CSS). You can define the CSS for a page using either the StylesFile property or the Styles string list. Any element of the editor of the producer's items can define a specific style or choose a style from the attached CSS. You accomplish this last operation (which is the suggested approach) using the StyleRule property. |
Scripts Rather Than Code?
Even this example of the combined use of an adapter and an adapter page producer, with its visual designer, shows the power of this architecture. However, this approach also has a drawback: By letting the components generate the script (in the HTML, you have only the <#SERVERSCRIPT> tag), you save a lot of development time; but you end up mixing the script with the code, so changes to the user interface will require updating the program. The division of responsibilities between the Delphi application developer and the HTML/script designer is lost. And, ironically, you end up having to run a script to accomplish something the Delphi program could have done right away, possibly much faster.
In my opinion, WebSnap is a powerful architecture and a huge step forward from WebBroker, but it must be used with care to avoid misusing some of these technologies just because they are simple and powerful. For example, it might be worth using the AdapterPageProducer designer to generate the first version of a page, and then grabbing the generated script and copying it to a plain Page-Producer's HTML, so that a web designer can modify the script with a specific tool.
For nontrivial applications, I prefer the possibilities offered by XML and XSL, which are available within this architecture even if they don't have a central role. You'll find more on this topic in Chapter 22.
Locating Files
When you have written an application like the one just described, you must deploy it as a CGI or dynamic library. Instead of placing the templates and include files in the same folder as the executable file, you can devote a subfolder or custom folder to host all the files. The LocateFileService component handles this task.
The component is not intuitive to use. Instead of having you specify a target folder as a property, the system fires one of this component's events any time it has to locate a file. (This approach is much more powerful.) There are three events: OnFindIncludeFile, OnFindStream, and OnFindTemplateFile. The first and last events return the name of the file to use in a var parameter. The OnFindStream event allows you to provide a stream directly, using one you already have in memory or that you've created on the fly, extracted from a database, obtained via an HTTP connection, or gotten any other way you can think of. In the simplest case of the OnFindIncludeFile event, you can write code like the following:
procedure TPageProducerPage2.LocateFileService1FindIncludeFile(
 ASender: TObject; AComponent: TComponent; const AFileName: String;
 var AFoundFile: String; var AHandled: Boolean);
begin
 AFoundFile := DefaultFolder + AFileName;
 AHandled := True;
end;
WebSnap and Databases
Delphi has always shone in the area of database programming. For this reason, it is not surprising to see a lot of support for handling datasets within the WebSnap framework. Specifically, you can use the DataSetAdapter component to connect to a dataset and display its values in a form or a table using the AdapterPageProducer component's visual editor.
A WebSnap Data Module
As an example, I built a new WebSnap application (called WSnapTable) with an AdapterPage-Producer as its main page to display a table in a grid and another AdapterPageProducer in a secondary page to show a form with a single record. I also added to the application a WebSnap Data Module, as a container for the dataset components. The data module has a ClientDataSet that's wired to a dbExpress dataset through a provider and based on an InterBase connection, as shown here:
object ClientDataSet1: TClientDataSet
 Active = True
 ProviderName = 'DataSetProvider1'
end
object SQLConnection1: TSQLConnection
 Connected = True
 ConnectionName = 'IBLocal'
 LoginPrompt = False
end
object SQLDataSet1: TSQLDataSet
 SQLConnection = SQLConnection1
 CommandText =
 'select CUST_NO, CUSTOMER, ADDRESS_LINE1, CITY, STATE_PROVINCE, ' +
 ' COUNTRY from CUSTOMER'
end
object DataSetProvider1: TDataSetProvider
 DataSet = SQLDataSet1
end
The DataSetAdapter
Now that you have a dataset available, you can add a DataSetAdapter to the first page and connect it to the web module's ClientDataSet. The adapter automatically makes available all of the dataset's fields and several predefined actions for operating on the dataset (such as Delete, Edit, and Apply). You can add them explicitly to the Actions and Fields collections to exclude some of them and customize their behavior, but this step is not always required.
Like the PagedAdapter, the DataSetAdapter has a PageSize property you can use to indicate the number of elements to display in each page. The component also has commands you can use to navigate among pages. This approach is particularly suitable when you want to display a large dataset in a grid. These are the adapter settings for the main page of the WSnapTable example:
object DataSetAdapter1: TDataSetAdapter
 DataSet = WebDataModule1.ClientDataSet1
 PageSize = 6
end
The corresponding page producer has a form containing two command groups and a grid. The first command group (displayed above the grid) has the predefined commands for handling pages: CmdPrevPage, CmdNextPage, and CmdGotoPage. The last command generates a list of numbers for the pages, so that a user can jump to each of them directly. The AdapterGrid component has the default columns plus an extra column hosting Edit and Delete commands. The bottom command group provides a button used to create a new record. You can see an example of the table's output in Figure 20.10 and the complete settings of the AdapterPageProducer in Listing 20.2.
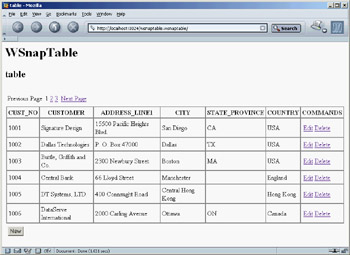
Figure 20.10: The page shown by the WSnapTable example at startup includes the initial portion of a paged table.
Listing 20.2: AdapterPageProducer Settings for the WSnapTable Main Page
object AdapterPageProducer: TAdapterPageProducer
 object AdapterForm1: TAdapterForm
 object AdapterCommandGroup1: TAdapterCommandGroup
 DisplayComponent = AdapterGrid1
 object CmdPrevPage: TAdapterActionButton
 ActionName = 'PrevPage'
 Caption = 'Previous Page'
 end
 object CmdGotoPage: TAdapterActionButton...
 object CmdNextPage: TAdapterActionButton
 ActionName = 'NextPage'
 Caption = 'Next Page'
 end
 end
 object AdapterGrid1: TAdapterGrid
 TableAttributes.CellSpacing = 0
 TableAttributes.CellPadding = 3
 Adapter = DataSetAdapter1
 AdapterMode = 'Browse'
 object ColCUST_NO: TAdapterDisplayColumn
 ...
 object AdapterCommandColumn1: TAdapterCommandColumn
 Caption = 'COMMANDS'
 object CmdEditRow: TAdapterActionButton
 ActionName = 'EditRow'
 Caption = 'Edit'
 PageName = 'formview'
 DisplayType = ctAnchor
 end
 object CmdDeleteRow: TAdapterActionButton
 ActionName = 'DeleteRow'
 Caption = 'Delete'
 DisplayType = ctAnchor
 end
 end
 end
 object AdapterCommandGroup2: TAdapterCommandGroup
 DisplayComponent = AdapterGrid1
 object CmdNewRow: TAdapterActionButton
 ActionName = 'NewRow'
 Caption = 'New'
 PageName = 'formview'
 end
 end
 end
end
There are a couple of things to notice in this listing. First, the grid's AdapterMode property is set to Browse (other possibilities are Edit, Insert, and Query). This dataset display mode for adapters determines the type of user interface (text or edit boxes and other input controls) and the visibility of other buttons (for example, Apply and Cancel buttons are only present in the edit view; the opposite is true for the Edit command).
| Note |
You can also modify the adapter mode by using server-side script and accessing Adapter.Mode. |
Second, I modified the display of the commands in the grid using the ctAnchor value for the DisplayType property instead of the default button style. Similar properties are available for most components of this architecture to tweak the HTML code they produce.
Editing the Data in a Form
Some of the commands are connected to a different page, which will be displayed after the commands are invoked. For example, the edit command's PageName property is set to formview. This second page of the application has an AdapterPageProducer with components hooked to the same DataSetAdapter as of the other table, so that all the requests will be automatically synchronized. If you click the Edit command, the program will open the secondary page that displays the data of the record corresponding to the command.
Listing 20.3 shows the details of the page producer for the program's second page. Again, building the HTML form visually using the Delphi-specific designer (see Figure 20.11) was a very fast operation.
Listing 20.3: AdapterPageProducer Settings for the formview Page
object AdapterPageProducer: TAdapterPageProducer
 object AdapterForm1: TAdapterForm
 object AdapterErrorList1: TAdapterErrorList
 Adapter = table.DataSetAdapter1
 end
 object AdapterCommandGroup1: TAdapterCommandGroup
 DisplayComponent = AdapterFieldGroup1
 object CmdApply: TAdapterActionButton
 ActionName = 'Apply'
 PageName = 'table'
 end
 object CmdCancel: TAdapterActionButton
 ActionName = 'Cancel'
 PageName = 'table'
 end
 object CmdDeleteRow: TAdapterActionButton
 ActionName = 'DeleteRow'
 Caption = 'Delete'
 PageName = 'table'
 end
 end
 object AdapterFieldGroup1: TAdapterFieldGroup
 Adapter = table.DataSetAdapter1
 AdapterMode = 'Edit'
 object FldCUST_NO: TAdapterDisplayField
 DisplayWidth = 10
 FieldName = 'CUST_NO'
 end
 object FldCUSTOMER: TAdapterDisplayField
 ...
 end
 end
end
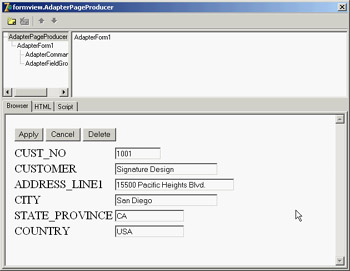
Figure 20.11: The formview page shown by the WSnapTable example at design time, in the Web Surface Designer (or AdapterPageProducer editor)
In the listing, you can see that all the operations send the user back to the main page and that the AdapterMode is set to Edit, unless there are update errors or conflicts. In this case, the same page is displayed again, with a description of the errors obtained by adding an AdapterErrorList component at the top of the form.
The second page is not published, because selecting it without referring to a specific record would make little sense. To unpublish the page, you comment the corresponding flag in the initialization code. Finally, to make the changes to the database persistent, you can call the ApplyUdpates method in the OnAfterPost and OnAfterDelete events of the ClientDataSet component hosted by the data module.
Another problem (which I haven't fixed) relates to the fact that the SQL server assigns the ID of each customer, so that when you enter a new record, the data in the ClientDataSet and in the database are no longer aligned. This situation can cause Record Not Found errors.
Master Detail in WebSnap
The DataSetAdapter component has specific support for master/detail relationships between datasets. After you've created the relationship among the datasets, as usual, define an adapter for each dataset and then connect the MasterAdapter property of the detail dataset's adapter. Setting up the master/detail relationship between the adapters makes them work in a more seamless way. For example, when you change the work mode of the master or enter new records, the detail automatically enters into Edit mode or is refreshed.
The WSnapMD example uses a data module to define such a relationship. It includes two ClientDataSet components, each connected to a SQLDataSet through a provider. The data access components each refer to a table, and the ClientDataSet components define a master/detail relationship. The same data module hosts two dataset adapters that refer to the two datasets and again define the master/detail relationship:
object dsaDepartment: TDataSetAdapter
 DataSet = cdsDepartment
end
object dsaEmployee: TDataSetAdapter
 DataSet = cdsEmployee
 MasterAdapter = dsaDepartment
end
| Warning |
I originally tried to use a SimpleDataSet component to avoid cluttering the data module, but this approach didn't work. The master/detail portion of the program was correct, but moving from a page to the next or a previous page with the related buttons kept failing. The reason is that if you use a SimpleDataSet, a bug closes the dataset at each interaction, losing the status information. |
This WebSnap application's only page has an AdapterPageProducer component hooked to both dataset adapters. The page's form has a field group hooked to the master and a grid connected with the detail. Unlike other examples, I tried to improve the user interface by adding custom attributes for the various elements. I used a gray background, displayed some of the grid borders (HTML grids are often used by Web Surface Designer), centered most of the elements, and added spacing. Notice that I added extra spaces to the button captions to prevent them from being too small. You can see the related code in the following detailed excerpt and the effect in Figure 20.12:
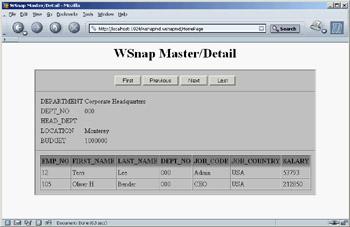
Figure 20.12: The WSnapMD example shows a master/detail structure and has some customized output.
object AdapterPageProducer: TAdapterPageProducer
 object AdapterForm1: TAdapterForm
 Custom = 'Border="1" CellSpacing="0" CellPadding="10" ' +
      'BgColor="Silver" align="center"'
 object AdapterCommandGroup1: TAdapterCommandGroup
 DisplayComponent = AdapterFieldGroup1
 Custom = 'Align="Center"'
 object CmdFirstRow: TAdapterActionButton...
 object CmdPrevRow: TAdapterActionButton...
 object CmdNextRow: TAdapterActionButton...
 object CmdLastRow: TAdapterActionButton...
 end
 object AdapterFieldGroup1: TAdapterFieldGroup
 Custom = 'BgColor="Silver"'
 Adapter = WDataMod.dsaDepartment
 AdapterMode = 'Browse'
 end
 object AdapterGrid1: TAdapterGrid
 TableAttributes.BgColor = 'Silver'
 TableAttributes.CellSpacing = 0
 TableAttributes.CellPadding = 3
 HeadingAttributes.BgColor = 'Gray'
 Adapter = WDataMod.dsaEmployee
 AdapterMode = 'Browse'
 object ColEMP_NO: TAdapterDisplayColumn...
 object ColFIRST_NAME: TAdapterDisplayColumn...
 object ColLAST_NAME: TAdapterDisplayColumn...
 object ColDEPT_NO: TAdapterDisplayColumn...
 object ColJOB_CODE: TAdapterDisplayColumn...
 object ColJOB_COUNTRY: TAdapterDisplayColumn...
 object ColSALARY: TAdapterDisplayColumn...
 end
 end
end
Sessions, Users, and Permissions
Another interesting feature of the WebSnap architecture is its support for sessions and users. Sessions are supported using a classic approach: temporary cookies. These cookies are sent to the browser so that following requests from the same user can be acknowledged by the system. By adding data to a session instead of an application adapter, you can have data that depends on the specific session or user (although a user can run multiple sessions by opening multiple browser windows on the same computer). For supporting sessions, the application keeps data in memory, so this feature is not available in CGI programs.
Using Sessions
To underline the importance of this type of support, I built a WebSnap application with a single page showing both the total number of hits and the total number of hits for each session. The program has a SessionService component with default values for its MaxSessions and DefaultTimeout properties. For every new request, the program increases both an nHits private field of the page module and the SessionHits value of the current session:
procedure TSessionDemo.WebAppPageModuleBeforeDispatchPage(Sender: TObject;
 const PageName: String; var Handled: Boolean);
begin
  // increase application and session hits
 Inc (nHits);
 WebContext.Session.Values ['SessionHits'] :=
 Integer (WebContext.Session.Values ['SessionHits']) + 1;
end;
| Note |
The WebContext object (of type TWebContext) is a thread variable created by WebSnap for each request. It provides thread-safe access to other global variables used by the program. |
The associated HTML displays status information by using both custom tags evaluated by the OnTag event of the page producer and script evaluated by the engine. Here is the core portion of the HTML file:
Plain Tags
Session id: <#SessionID>
Session hits: <#SessionHits>
Script
Session hits (via application): <%=Application.SessionHits.Value%>
Application hits: <%=Application.Hits.Value%>
The parameters of the output are provided by the OnTag event handler and the fields' OnGetValue events:
procedure TSessionDemo.PageProducerHTMLTag(Sender: TObject; Tag: TTag;
 const TagString: String; TagParams: TStrings; var ReplaceText: String);
begin
 if TagString = 'SessionID' then
 ReplaceText := WebContext.Session.SessionID
 else if TagString = 'SessionHits' then
 ReplaceText := WebContext.Session.Values ['SessionHits']
end;

procedure TSessionDemo.HitsGetValue(Sender: TObject; var Value: Variant);
begin
 Value := nHits;
end;

procedure TSessionDemo.SessionHitsGetValue(Sender: TObject; var Value: Variant);
begin
 Value := Integer (WebContext.Session.Values ['SessionHits']);
end;
The effect of this program is visible in Figure 20.13, where I've activated two sessions in two different browsers.
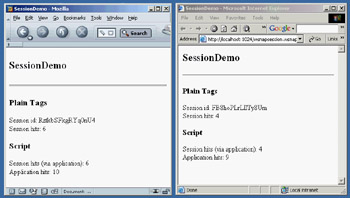
Figure 20.13: Two instances of the browser operate on two different sessions of the same WebSnap application.
| Tip |
In this example, I used both the traditional WebBroker tag replacement and the newer WebSnap adapter fields and scripting, so that you can compare the two approaches. Keep in mind that they are both available in a WebSnap application. |
Requesting Login
In addition to generic sessions, WebSnap also has specific support for users and login-based authorized sessions. You can add to an application a list of users (with the WebUserList component), each with a name and a password. This component is rudimentary in the data it can store. However, instead of filling it with your list of users, you can keep the list in a database table (or in another proprietary format) and use the WebUserList component's events to retrieve your custom user data and check the user passwords.
You'll generally also add to the application the SessionService and EndUserSessionAdapter components. At this point, you can ask the users to log in, indicating for each page whether it can be viewed by everyone or only by logged-in users. This is accomplished by setting the wpLoginRequired flag in the constructor of the TWebPageModuleFactory and TWebAppPageModuleFactory classes in the web page unit's initialization code.
| Note |
Rights and publication information is included in the factory rather than in the WebPageModule because the program can check the access rights and list the pages even without loading the module. |
When a user tries to see a page that requires user identification, the login page indicated in the EndUserSessionAdapter component is displayed. You can create such a page easily by creating a new web page module based on an AdapterPageProducer and adding to it the LoginFormAdapter. In the page's editor, add a field group within a form, connect the field group to the LoginFormAdapter, and add a command group with the default Login button. The resulting login form will have fields for the username and its password, and also for the requested page. This last value is automatically filled with the requested page, in case this page required authorization and the user wasn't already logged in. This way, a user can immediately reach the requested page without being bounced back to a generic menu.
The login form is typically not published, because the corresponding Login command is already available when the user isn't logged in to the system; when the user logs in, it is replaced by a Logout command. This command is obtained by the standard script of the web page module, particularly the following:
<% if (EndUser.Logout != null) { %>
<% if (EndUser.DisplayName != '') { %>
Welcome <%=EndUser.DisplayName %>
<% } %> <% if (EndUser.Logout.Enabled) { %> href="<%=EndUser.Logout.AsHREF%>">Logout <% } %> <% if (EndUser.LoginForm.Enabled) { %> href=<%=EndUser.LoginForm.AsHREF%>>Login <% } %> <% } %>
There isn't much else to say about the WSnapUsers application, because it has almost no custom code and settings. This script for the standard template demonstrates the access to the user data.
Single Page Access Rights
In addition to making pages require a login for access, you can give specific users the right to see more pages than others. Any user has a set of rights separated by semicolons or commas. The user must have all the rights defined for the requested page. These rights, which are generally listed in the ViewAccess and ModifyAccess properties of the adapters, indicate respectively whether the user can see the given elements while browsing or can edit them. These settings are granular and can be applied to entire adapters or specific adapter fields (notice I'm referring to the adapter fields, not the user interface components within the designer). For example, you can hide some of a table's columns from given users by hiding the corresponding fields (and also in other cases, as specified by the HideOptions property).
The global PageDispatcher component also has OnCanViewPage and OnPageAccessDenied events, which you can use to control access to various pages of a program within the program code, allowing for even greater control.
What s Next?
In this chapter, I've covered web server applications, using multiple server-side techniques and two different frameworks of the Delphi class library: WebBroker and WebSnap. This wasn't an in-depth presentation, because I could write an entire book on this topic alone. It was intended as a starting point, and (as usual) I've tried to make the core concepts clear rather than building complex examples.
If you want to learn more about the WebSnap framework and see examples in actions, refer to the extensive Delphi demos in the DemosWebSnap folder. Some other options, relating to XML, XSL, and client-side scripts, will be examined in the Chapter 22.
Chapter 21 is devoted to another alternative framework for developing web server applications in Delphi: IntraWeb. This third-party tool has been around for a few years, but it has now become more relevant because Borland included it in Delphi 7. As you'll see, IntraWeb can be integrated in a WebBroker or WebSnap program, or it can be used as a separate architecture.
Chapter 21 Web Programming with IntraWeb
Part I - Foundations
- Delphi 7 and Its IDE
- The Delphi Programming Language
- The Run-Time Library
- Core Library Classes
- Visual Controls
- Building the User Interface
- Working with Forms
Part II - Delphi Object-Oriented Architectures
- The Architecture of Delphi Applications
- Writing Delphi Components
- Libraries and Packages
- Modeling and OOP Programming (with ModelMaker)
- From COM to COM+
Part III - Delphi Database-Oriented Architectures
- Delphis Database Architecture
- Client/Server with dbExpress
- Working with ADO
- Multitier DataSnap Applications
- Writing Database Components
- Reporting with Rave
Part IV - Delphi, the Internet, and a .NET Preview
- Internet Programming: Sockets and Indy
- Web Programming with WebBroker and WebSnap
- Web Programming with IntraWeb
- Using XML Technologies
- Web Services and SOAP
- The Microsoft .NET Architecture from the Delphi Perspective
- Delphi for .NET Preview: The Language and the RTL
- Appendix A Extra Delphi Tools by the Author
- Appendix B Extra Delphi Tools from Other Sources
- Appendix C Free Companion Books on Delphi
EAN: 2147483647
Pages: 279
- Chapter I e-Search: A Conceptual Framework of Online Consumer Behavior
- Chapter VIII Personalization Systems and Their Deployment as Web Site Interface Design Decisions
- Chapter IX Extrinsic Plus Intrinsic Human Factors Influencing the Web Usage
- Chapter XII Web Design and E-Commerce
- Chapter XIV Product Catalog and Shopping Cart Effective Design
