Internet Programming: Sockets and Indy
Internet Programming Sockets and Indy
Overview
With the advent of the Internet era, writing programs based on Internet protocols has become commonplace, so I've devoted five chapters to this topic. This chapter focuses on low-level socket programming and Internet protocols, Chapter 20 is devoted to server-side web programming, Chapter 21 covers IntraWeb, and Chapters 22 and 23 discuss XML and web services.
In this chapter I'll begin by looking at the sockets technology in general; then I'll move to the use of the Internet Direct (Indy) components supporting both low-level socket programming and the most common Internet protocols. I will introduce some elements of the HTTP protocol, leading up to building HTML files from database data.
Although you probably just want to use a high-level protocol, the discussion of Internet programming starts from the core concepts and low-level applications. Understanding TCP/ IP and sockets will help you grasp most of the other concepts more easily.
Building Socket Applications
Delphi 7 ships with two sets of TCP components—Indy socket components (IdTCPClient and IdTCPServer) and native Borland components—which are also available in Kylix and are hosted in the Internet page of the Component palette. The Borland components, TcpClient and TcpServer, were probably developed to replace the ClientSocket and ServerSocket components available in past versions of Delphi. However, now that the ClientSocket and ServerSocket components have been declared obsolete (although they are still available), Borland suggests using the corresponding Indy components instead.
In this chapter I'll focus on using Indy during my discussion of low-level socket programming, not only when I cover support for high-level Internet protocols. To learn more about the Indy project, refer to the sidebar "Internet Direct (Indy) Open Source Components"; keep reading to see how you can use these components for low-level socket programming.
Before I present an example of a low-level socket-based communication, let's take a tour of the core concepts of TCP/IP so you understand the foundations of the most widespread networking technology.
Internet Direct (Indy) Open Source Components
Delphi ships with a collection of open-source Internet components called Internet Direct (Indy). The Indy components, previously called WinShoes (a pun on the term WinSock, the name of the Windows socket library), are built by a group of developers led by Chad Hower and are also available in Kylix. You can find more information and the most recent versions of the components at www.nevrona.com/indy.
Delphi 7 ships with Indy 9, but you should check the website for updated versions. The components are free and are complemented by many examples and a reasonable help file. Indy 9 includes many more components than the previous version (Indy 8, available in Delphi 6), and it has two new pages on the component palette (Indy Intercepts and Indy I/O Handlers).
With more than 100 components installed on Delphi's palette, Indy has an enormous number of features, ranging from the development of client and server TCP/IP applications for various protocols to encoding and security. You can recognize Indy components from the Id prefix. Rather than list the various components here, I'll touch on a few of them throughout this chapter.
Blocking and Non-Blocking Connections
When you're working with sockets in Windows, reading data from a socket or writing to it can happen asynchronously, so that it does not block the execution of other code in your network application. This is called a non-blocking connection. The Windows socket support sends a message when data is available. An alternative approach is the use of blocking connections, where your application waits for the reading or writing to be completed before executing the next line of code. When you're using a blocking connection, you must use a thread on the server, and you'll generally also use a thread on the client.
The Indy components use blocking connections exclusively. So, any client socket operation that might be lengthy should be performed within a thread or by using Indy's IdAntiFreeze component as a simpler but limited alternative. Using blocking connections to implement a protocol has the advantage of simplifying the program logic, because you don't have to use the state-machine approach of non-blocking connections.
All the Indy servers use a multithreaded architecture that you can control with the IdThreadMgrDefault and IdThreadMgrPool components. The first is used by default; the second supports thread pooling and should account for faster connections.
Foundations of Socket Programming
To understand the behavior of the socket components, you need to be confident with several terms related to the Internet in general and with sockets in particular. The heart of the Internet is the Transmission Control Protocol/Internet Protocol (TCP/IP), a combination of two separate protocols that work together to provide connections over the Internet (and that can also provide connection over a private intranet). In brief, IP is responsible for defining and routing the datagrams (Internet transmission units) and specifying the addressing scheme. TCP is responsible for higher-level transport services.
Configuring a Local Network: IP Addresses
If you have a local network available, you'll be able to test the following programs on it; otherwise, you can use the same computer as both client and server. In this case, as I've done in the examples, use the address 127.0.0.1 (or localhost), which is invariably the address of the current computer. If your network is complex, ask your network administrator to set up proper IP addresses for you. If you want to set up a simple network with a couple of spare computers, you can set up the IP address yourself; it's a 32-bit number usually represented with each of its four components (called octets) separated by dots. These numbers have a complex logic underlying them, and the first octet indicates the class of the address.
Specific IP addresses are reserved for unregistered internal networks. Internet routers ignore these address ranges, so you can freely do your tests without interfering with an actual network. For example, the "free" IP address range 192.168.0.0 through 192.168.0.255 can be used for experiments on a network of fewer than 255 machines.
Local Domain Names
How does the IP address map to a name? On the Internet, the client program looks up the values on a domain name server. But it is also possible to have a local hosts file, which is a text file you can easily edit to provide local mappings. Look at the HOSTS.SAM file (installed in a subdirectory of the Windows directory, depending on the version of Windows you have) to see a sample; you can eventually rename the file HOSTS, without the extension, to activate local host mapping.
You may wonder whether to use an IP or a hostname in your programs. Hostnames are easier to remember and won't require a change if the IP address changes (for whatever reason). On the other hand, IP addresses don't require any resolution, whereas hostnames must be resolved (a time-consuming operation if the lookup takes place on the web).
TCP Ports
Each TCP connection takes place though a port, which is represented by a 16-bit number. The IP address and the TCP port together specify an Internet connection, or a socket. Different processes running on the same machine cannot use the same socket (the same port).
Some TCP ports have a standard usage for specific high-level protocols and services. In other words, you should use those port numbers when implementing those services and stay away from them in any other case. Here is a short list:
|
Protocol |
Port |
|---|---|
|
HTTP (Hypertext Transfer Protocol) |
80 |
|
FTP (File Transfer Protocol) |
21 |
|
SMTP (Simple Mail Transfer Protocol) |
25 |
|
POP3 (Post Office Protocol, version 3) |
110 |
|
Telnet |
23 |
The Services file (another text file similar to the Hosts file) lists the standard ports used by services. You can add your own entry to the list, giving your service a name of your own choosing. Client sockets always specify the port number or the service name of the server socket to which they want to connect.
High-Level Protocols
I've used the term protocol many times now. A protocol is a set of rules the client and server agree on to determine the communication flow. The low-level Internet protocols, such as TCP/IP, are usually implemented by an operating system. But the term protocol is also used for high-level Internet standard protocols (such as HTTP, FTP, or SMTP). These protocols are defined in standard documents available on the Internet Engineering Task Force website (www.ietf.org).
If you want to implement a custom communication, you can define your own (possibly simple) protocol, a set of rules determining which request the client can send to the server and how the server can respond to the various possible requests. You'll see an example of a custom protocol later. Transfer protocols are at a higher level than transmission protocols, because they abstract from the transport mechanism provided by TCP/IP. This makes the protocols independent not only from the operating system and the hardware but also from the physical network.
Socket Connections
To begin communication through a socket, the server program starts running first; but it simply waits for a request from a client. The client program requests a connection indicating the server it wishes to connect to. When the client sends the request, the server can accept the connection, starting a specific server-side socket, which connects to the client-side socket.
To support this model, there are three types of socket connections:
- Client connections are initiated by the client and connect a local client socket with a remote server socket. Client sockets must describe the server they want to connect to, by providing its hostname (or its IP address) and its port.
- Listening connections are passive server sockets waiting for a client. Once a client makes a new request, the server spawns a new socket devoted to that specific connection and then gets back to listening. Listening server sockets must indicate the port that represents the service they provide. (The client will connect through that port.)
- Server connections are activated by servers; they accept a request from a client.
These different types of connections are important only for establishing the link from the client to the server. Once the link is established, both sides are free to make requests and to send data to the other side.
Using Indy s TCP Components
To let two programs communicate over a socket (either on a local area network or over the Internet), you can use the IdTCPClient and IdTCPServer components. Place one of them on a program form and the other on another form in a different program; then, make them use the same port, and let the client program refer to the host of the server program, and you'll be able to open a connection between the two applications. For example, in the IndySock1 project group, I've used the two components with these settings:
// server program
object IdTCPServer1: TIdTCPServer
 DefaultPort = 1050
end
// client program
object IdTCPClient1: TIdTCPClient
 Host = 'localhost'
 Port = 1050
end
| Note |
The Indy server sockets allow binding to multiple IP addresses and/or ports, using the Bindings collection. |
As this point, in the client program you can connect to the server by executing
IdTCPClient1.Connect;
The server program has a list box used to log information. When a client connects or disconnects, the program lists the IP of that client along with the operation, as in the following OnConnect event handler:
procedure TFormServer.IdTCPServer1Connect(AThread: TIdPeerThread);
begin
 lbLog.Items.Add ('Connected from: ' +
 AThread.Connection.Socket.Binding.PeerIP);
end;
Now that you have set up a connection, you need to make the two programs communicate. Both the client and server sockets have read and write methods you can use to send data, but writing a multithreaded server that can receive many different commands (usually based on strings) and operate differently on each of them is far from trivial.
However, Indy simplifies the development of a server by means of its command architecture. In a server, you can define a number of commands, which are stored in the CommandHandlers collection of the IdTCPServer. In the IndySock1 example the server has three handlers, all implemented differently to show you some of the possible alternatives.
The first server command, called test, is the simplest one, because it is fully defined in its properties. I've set the command string, a numeric code, and a string result in the ReplyNormal property of the command handler:
object IdTCPServer1: TIdTCPServer
 CommandHandlers = <
 item
 Command = 'test'
 Name = 'TIdCommandHandler0'
 ParseParams = False
 ReplyNormal.NumericCode = 100
 ReplyNormal.Text.Strings = (
 'Hello from your Indy Server')
 ReplyNormal.TextCode = '100'
 end
The client code used to execute the command and show its response is as follows:
procedure TFormClient.btnTestClick(Sender: TObject);
begin
 IdTCPClient1.SendCmd ('test');
 ShowMessage (IdTCPClient1.LastCmdResult.TextCode + ' : ' +
 IdTCPClient1.LastCmdResult.Text.Text);
end;
For more complex cases, you should execute code on the server and read and write directly over the socket connection. This approach is shown in the second command of the trivial protocol I've come up with for this example. The server's second command is called execute; and it has no special property set (only the command name), but has the following OnCommand event handler:
procedure TFormServer.IdTCPServer1TIdCommandHandler1Command(
 ASender: TIdCommand);
begin
 ASender.Thread.Connection.Writeln ('This is a dynamic response');
end;
The corresponding client code writes the command name to the socket connection and then reads a single-line response, using different methods than the first one:
procedure TFormClient.btnExecuteClick(Sender: TObject);
begin
 IdTCPClient1.WriteLn('execute');
 ShowMessage (IdTCPClient1.ReadLn);
end;
The effect is similar to the previous example, but because it uses a lower-level approach, it should be easier to customize it to your needs. One such extension is provided by the third and last command in the example, which allows the client program to request a bitmap file from the server (in a sort of file-sharing architecture). The server command has parameters (the filename) and is defined as follows:
object IdTCPServer1: TIdTCPServer
 CommandHandlers = <
 item
 CmdDelimiter = ' '
 Command = 'getfile'
 Name = 'TIdCommandHandler2'
 OnCommand = IdTCPServer1TIdCommandHandler2Command
 ParamDelimiter = ' '
 ReplyExceptionCode = 0
 ReplyNormal.NumericCode = 0
 Tag = 0
 end>
The code uses the first parameter as filename and returns it in a stream. In case of error, it raises an exception, which will be intercepted by the server component, which in turn will terminate the connection (not a very realistic solution, but a safe approach and a simple one to implement):
procedure TFormServer.IdTCPServer1TIdCommandHandler2Command(
 ASender: TIdCommand);
var
 filename: string;
 fstream: TFileStream;
begin
 if Assigned (ASender.Params) then
 filename := HttpDecode (ASender.Params [0]);
 if not FileExists (filename) then
 begin
 ASender.Response.Text := 'File not found';
 lbLog.Items.Add ('File not found: ' + filename);
 raise EIdTCPServerError.Create ('File not found: ' + filename);
 end
 else
 begin
 fstream := TFileStream.Create (filename, fmOpenRead);
 try
 ASender.Thread.Connection.WriteStream(fstream, True, True);
 lbLog.Items.Add ('File returned: ' + filename +
 ' (' + IntToStr (fStream.Size) + ')');
 finally
 fstream.Free;
    end;
  end;
end;
The call to the HttpDecode utility function on the parameter is required to encode a pathname that includes spaces as a single parameter, at the reverse the client program calls HttpEncode. As you can see, the server also logs the files returned and their sizes, or an error message. The client program reads the stream and copies it into an Image component, to show it directly (see Figure 19.1):
procedure TFormClient.btnGetFileClick(Sender: TObject);
var
 stream: TStream;
begin
 IdTCPClient1.WriteLn('getfile ' + HttpEncode (edFileName.Text));
 stream := TMemoryStream.Create;
 try
 IdTCPClient1.ReadStream(stream);
 stream.Position := 0;
 Image1.Picture.Bitmap.LoadFromStream (stream);
 finally
 stream.Free;
 end;
end;
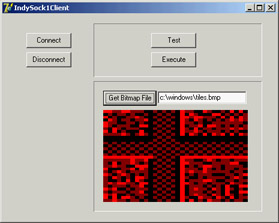
Figure 19.1: The client program of the IndySock1 example
Sending Database Data over a Socket Connection
Using the techniques you've seen so far, you can write an application that moves database records over a socket. The idea is to write a front end for data input and a back end for data storage. The client application will have a simple data-entry form and use a database table with string fields for Company, Address, State, Country, Email, and Contact, and a floating-point field for the company ID (called CompID).
| Note |
Moving database records over a socket is exactly what you can do with DataSnap and a socket connection component (as covered in Chapter 16, "Multitier DataSnap Applications") or with SOAP support (discussed in Chapter 23, "Web Services and SOAP"). |
The client program I've come up with works on a ClientDataSet with this structure saved in the current directory. (You can see the related code in the OnCreate event handler.) The core method on the client side is the handler of the Send All button's OnClick event, which sends all the new records to the server. A new record is determined by looking to see whether the record has a valid value for the CompID field. This field is not set up by the user but is determined by the server application when the data is sent.
For all the new records, the client program packages the field information in a string list, using the structure FieldName=FieldValue. The string corresponding to the entire list, which is a record, is then sent to the server. At this point, the program waits for the server to send back the company ID, which is then saved in the current record. All this code takes place within a thread, to avoid blocking the user interface during the lengthy operation. By clicking the Send button, a user starts a new thread:
procedure TForm1.btnSendClick(Sender: TObject);
var
 SendThread: TSendThread;
begin
 SendThread := TSendThread.Create(cds);
 SendThread.OnLog := OnLog;
 SendThread.ServerAddress := EditServer.Text;
 SendThread.Resume;
end;
The thread has a few parameters: the dataset passed in the constructor, the address of the server saved in the ServerAddress property, and a logging event to write to the main form (within a safe Synchronize call). The thread code creates and opens a connection and keeps sending records until it's finished:
procedure TSendThread.Execute;
var
 I: Integer;
 Data: TStringList;
 Buf: String;
begin
 try
 Data := TStringList.Create;
 fIdTcpClient := TIdTcpClient.Create (nil);
 try
 fIdTcpClient.Host := ServerAddress;
 fIdTcpClient.Port := 1051;
 fIdTcpClient.Connect;
 fDataSet.First;
 while not fDataSet.Eof do
      begin
        // if the record is still not logged
 if fDataSet.FieldByName('CompID').IsNull or
 (fDataSet.FieldByName('CompID').AsInteger = 0) then
        begin
 FLogMsg := 'Sending ' + fDataSet.FieldByName('Company').AsString;
 Synchronize(DoLog);
 Data.Clear;
          // create strings with structure "FieldName=Value"
 for I := 0 to fDataSet.FieldCount - 1 do
 Data.Values [fDataSet.Fields[I].FieldName] :=
 fDataSet.Fields [I].AsString;
          // send the record
 fIdTcpClient.Writeln ('senddata');
 fIdTcpClient.WriteStrings (Data, True);
          // wait for reponse
 Buf := fIdTcpClient.ReadLn;
 fDataSet.Edit;
 fDataSet.FieldByName('CompID').AsString := Buf;
 fDataSet.Post;
 FLogMsg := fDataSet.FieldByName('Company').AsString +
 ' logged as ' + fDataSet.FieldByName('CompID').AsString;
 Synchronize(DoLog);
 end;
 fDataSet.Next;
      end;
    finally
 fIdTcpClient.Disconnect;
 fIdTcpClient.Free;
 Data.Free;
    end;
  except
    // trap exceptions in case of dataset errors
    // (concurrent editing and so on)
  end;
end;
Now let's look at the server. This program has a database table, again stored in the local directory, with two more fields than the client application's table: LoggedBy, a string field; and LoggedOn, a data field. The values of the two extra fields are determined automatically by the server as it receives data, along with the value of the CompID field. All these operations are done in the handler of the senddata command:
procedure TForm1.IdTCPServer1TIdCommandHandler0Command(
 ASender: TIdCommand);
var
 Data: TStrings;
 I: Integer;
begin
 Data := TStringList.Create;
 try
 ASender.Thread.Connection.ReadStrings(Data);
 cds.Insert;
    // set the fields using the strings
 for I := 0 to cds.FieldCount - 1 do
 cds.Fields [I].AsString :=
 Data.Values [cds.Fields[I].FieldName];
    // complete with ID, sender, and date
 Inc(ID);
 cdsCompID.AsInteger := ID;
 cdsLoggedBy.AsString := ASender.Thread.Connection.Socket.Binding.PeerIP;
 cdsLoggedOn.AsDateTime := Date;
 cds.Post;
    // return the ID
 ASender.Thread.Connection.WriteLn(cdsCompID.AsString);
 finally
 Data.Free;
 end;
end;
Except for the fact that some data might be lost, there is no problem when fields have a different order and if they do not match, because the data is stored in the FieldName=FieldValue structure. After receiving all the data and posting it to the local table, the server sends back the company ID to the client. When receiving feedback, the client program saves the company ID, which marks the record as sent. If the user modifies the record, there is no way to send an update to the server. To accomplish this, you might add a modified field to the client database table and make the server check to see if it is receiving a new field or a modified field. With a modified field, the server should not add a new record but update the existing one.
As shown in Figure 19.2, the server program has two pages: one with a log and the other with a DBGrid showing the current data in the server database table. The client program is a form-based data entry, with extra buttons to send the data and delete records already sent (and for which an ID was received back).
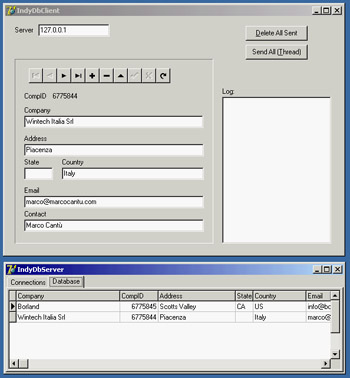
Figure 19.2: The client and server programs of the data-base socket example (IndyDbSock)
Sending and Receiving Mail
Probably the most common operation you do on the Internet is to send and receive e-mail. There is generally little need to write a complete application to handle e-mail, because some of the existing programs are rather complete. For this reason, I have no intention of writing a general-purpose mail program here. You can find some examples of those among Indy demos. Other than creating a general-purpose mail application, you can do many things with the mail components and protocols; I've grouped the possibilities into two areas:
Automatic Generation of Mail Messages An application you've written can have an About box for sending a registration message back to your marketing department or a specific menu item for sending a request to your tech support. You might even decide to enable a tech-support connection whenever an exception occurs. Another related task could automate the dispatching of a message to a list of people or generate an automatic message from your website (an example I'll show you toward the end of this chapter).
Use of Mail Protocols for Communication with Users Who Are Only Occasionally Online When you must move data between users who are not always online, you can write an application on a server to synchronize among them, and you can give each user a specialized client application for interacting with the server. An alternative is to use an existing server application, such as a mail server, and write the two specialized programs based on the mail protocols. The data sent over this connection will generally be formatted in special ways, so you'll want to use a specific e-mail address for these messages (not your primary e-mail address). As an example, you could rewrite the earlier IndyDbSock example to dispatch mail messages instead of using a custom socket connection. This approach has the advantage of being firewall-friendly and allowing the server to be temporarily offline, because the requests will be kept on the mail server.
Mail In and Out
Using the mail protocols with Indy means placing a message component (IdMessage) in your application, filling it with data, and then using the IdSMTP component to send the mail message. To retrieve a mail message from your mailbox, use the IdPop3 component, which will return an IdMessage object. To give you an idea how this process works, I've written a program for sending mail to multiple people at once, using a list stored in an ASCII file. I originally used this program to send mail to people who sign up on my website, but later I extended the program by adding database support and the ability to read subscriber logs automatically. The original version of the program is still a good introduction to the use of the Indy SMTP component.
The SendList program keeps a list of names and e-mail addresses in a local file, which is displayed in a list box. A few buttons allow you to add and remove items, or to modify an item by removing it, editing it, and then adding it again. When the program closes, the updated list is automatically saved. Now let's get to the interesting portion of the program. The top panel, shown in Figure 19.3 at design time, allows you to enter the subject, the sender address, and the information used to connect to the mail server (hostname, username, and eventually a password).
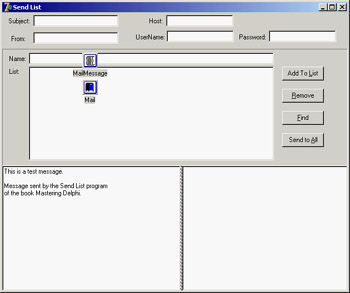
Figure 19.3: The SendList pro-gram at design time
You'll probably want to make the value of these edit boxes persistent, possibly in an INI file. I haven't done this, only because I don't want you to see my mail connection details! The value of these edit boxes, along with the list of addresses, allows you to send the series of mail messages (after customizing them) with the following code:
procedure TMainForm.BtnSendAllClick(Sender: TObject);
var
 nItem: Integer;
 Res: Word;
begin
 Res := MessageDlg ('Start sending from item ' +
 IntToStr (ListAddr.ItemIndex) + ' (' +
 ListAddr.Items [ListAddr.ItemIndex] + ')?'#13 +
 '(No starts from 0)', mtConfirmation, [mbYes, mbNo, mbCancel], 0);
 if Res = mrCancel then
 Exit;
 if Res = mrYes then
 nItem := ListAddr.ItemIndex
 else
 nItem := 0;
  // connect
 Mail.Host := eServer.Text;
 Mail.UserName := eUserName.Text;
 if ePassword.Text <> '' then
  begin
 Mail.Password := ePassword.Text;
 Mail.AuthenticationType := atLogin;
 end;
 Mail.Connect;
  // send the messages, one by one, prepending a custom message
  try
 // set the fixed part of the header
 MailMessage.From.Name := eFrom.Text;
 MailMessage.Subject := eSubject.Text;
 MailMessage.Body.SetText (reMessageText.Lines.GetText);
 MailMessage.Body.Insert (0, 'Hello');
 while nItem < ListAddr.Items.Count do
    begin
 // show the current selection
 Application.ProcessMessages;
 ListAddr.ItemIndex := nItem;
 MailMessage.Body [0] := 'Hello ' + ListAddr.Items [nItem];
 MailMessage.Recipients.EMailAddresses := ListAddr.Items [nItem];
 Mail.Send(MailMessage);
 Inc (nItem);
 end;
 finally // we're done
 Mail.Disconnect;
  end;
end;
Another interesting example of using mail is to notify developers of problems within applications (a technique you might want to use in an internal application rather than in one you'll distribute widely). You can obtain this effect by modifying the ErrorLog example from Chapter 2 and sending mail when an exception (or one of a given type only) occurs.
Working with HTTP
Handling mail messages is certainly interesting, and mail protocols are probably still the most widespread Internet protocols. The other popular protocol is HTTP, which is used by web servers and web browsers. I'll devote the rest of this chapter to this protocol (along with a discussion of HTML); the following two chapters also discuss it.
On the client side of the Web, the main activity is browsing—reading HTML files. Besides building a custom browser, you can embed the Internet Explorer ActiveX control within your program (as I've done in the WebDemo example in Chapter 12, "From COM to COM+"). You can also directly activate the browser installed on the user's computer—for example, opening an HTML page by calling the ShellExecute method (defined in the ShellApi unit):
ShellExecute (Handle, 'open', FileName, '', '', sw_ShowNormal);
Using ShellExecute, you can simply execute a document, such as a file. Windows will start the program associated with the HTM extension, using the action passed as the parameter (in this case, open, but passing nil would have invoked the standard action producing the same effect). You can use a similar call to view a website, by using a string like ' http://www.example.com' instead of a filename. In this case, the system recognizes the http section of the request as requiring a web browser and launches it.
On the server side, you generate and make available the HTML pages. At times, it may be enough to have a way to produce static pages, occasionally extracting new data from a database table to update the HTML files as needed. In other cases, you'll need to generate pages dynamically based on a request from a user.
As a starting point, I'll discuss HTTP by building a simple but complete client and server; then I'll move on to discuss HTML producer components. In Chapter 20, I'll move from this "core technology" level to the RAD development style for the web supported by Delphi, introducing the web server extension technologies (CGI, ISAPI, and Apache modules) and discussing the WebBroker and WebSnap architectures.
Grabbing HTTP Content
As an example of the use of the HTTP protocols, I've written a specific search application. The program hooks onto the Google website, searches for a keyword, and retrieves the first 100 sites found. Instead of showing the resulting HTML file, the program parses it to extract only the URLs of the related sites to a list box. The description of these sites is kept in a separate string list and is displayed as you click a list-box item. So, the program demonstrates two techniques at once: retrieving a web page and parsing its HTML code.
To demonstrate how you should work with blocking connections, such as those used by Indy, I've implemented the program using a background thread for the processing. This approach also gives you the advantage of being able to start multiple searches at once. The thread class used by the WebFind application receives as input a URL to look for, strUrl.
The class has two output procedures, AddToList and ShowStatus, to be called inside the Synchronize method. The code of these two methods sends some results or some feedback to the main form, respectively adding a line to the list box and changing the status bar's SimpleText property. The key method of the thread is Execute. Before we look at it, however, here is how the thread is activated by the main form:
const
 strSearch = 'http://www.google.com/search?as_q=';

procedure TForm1.BtnFindClick(Sender: TObject);
var
 FindThread: TFindWebThread;
begin
  // create suspended, set initial values, and start
 FindThread := TFindWebThread.Create (True);
 FindThread.FreeOnTerminate := True;
 // grab the first 100 entries
  FindThread.strUrl := strSearch + EditSearch.Text +'&num=100';
 FindThread.Resume;
end;
The URL string is made of the main address of the search engine, followed by some parameters. The first, as_q, indicates the words you are looking for. The second, num=100, indicates the number of sites to retrieve; you cannot use numbers at will but are limited to a few alternatives, with 100 being the largest possible value.
| Warning |
The WebFind program works with the server on the Google website at the time this book was written and tested. The custom software on the site can change, however, which might prevent WebFind from operating correctly. This program was also in Mastering Delphi 6; however, it was missing the user agent HTTP header, and after a while Google changed its server software and blocked the requests. Adding any value for the user agent fixed the problem. |
The thread's Execute method, activated by the Resume call, calls the two methods doing the work (shown in Listing 19.1). In the first, GrabHtml, the program connects to the HTTP server using a dynamically created IdHttp component and reads the HTML with the result of the search. The second method, HtmlToList, extracts the URLs referring to other websites from the result, the strRead string.
Listing 19.1: The TFindWebThread Class (of the WebFind Program)
unit FindTh;

interface

uses
 Classes, IdComponent, SysUtils, IdHTTP;

type
 TFindWebThread = class(TThread)
 protected
 Addr, Text, Status: string;
 procedure Execute; override;
 procedure AddToList;
 procedure ShowStatus;
 procedure GrabHtml;
 procedure HtmlToList;
 procedure HttpWork (Sender: TObject; AWorkMode: TWorkMode;
 const AWorkCount: Integer);
 public
 strUrl: string;
 strRead: string;
 end;

implementation

{ TFindWebThread }

uses
 WebFindF;

procedure TFindWebThread.AddToList;
begin
  if Form1.ListBox1.Items.IndexOf (Addr) < 0 then
  begin
 Form1.ListBox1.Items.Add (Addr);
 Form1.DetailsList.Add (Text);
  end;
end;

procedure TFindWebThread.Execute;
begin
 GrabHtml;
 HtmlToList;
 Status := 'Done with ' + StrUrl;
 Synchronize (ShowStatus);
end;

procedure TFindWebThread.GrabHtml;
var
 Http1: TIdHTTP;
begin
 Status := 'Sending query: ' + StrUrl;
 Synchronize (ShowStatus);
 Http1 := TIdHTTP.Create (nil);
 try
 Http1.Request.UserAgent := 'User-Agent: NULL';
 Http1.OnWork := HttpWork;
 strRead := Http1.Get (StrUrl);
 finally
 Http1.Free;
 end;
end;

procedure TFindWebThread.HtmlToList;
var
 strAddr, strText: string;
 nText: integer;
 nBegin, nEnd: Integer;
begin
 Status := 'Extracting data for: ' + StrUrl;
 Synchronize (ShowStatus);
 strRead := LowerCase (strRead);
 repeat
    // find the initial part HTTP reference
 nBegin := Pos ('href=http', strRead);
 if nBegin <> 0 then
 begin
      // get the remaining part of the string, starting with 'http'
 strRead := Copy (strRead, nBegin + 5, 1000000);
      // find the end of the HTTP reference
 nEnd := Pos ('>', strRead);
 strAddr := Copy (strRead, 1, nEnd - 1);
      // move on
 strRead := Copy (strRead, nEnd + 1, 1000000);
      // add the URL if 'google' is not in it
 if Pos ('google', strAddr) = 0 then
 begin
 nText := Pos ('', strRead);
 strText := copy (strRead, 1, nText - 1);
        // remove cached references and duplicates
 if (Pos ('cached', strText) = 0) then
 begin
 Addr := strAddr;
 Text := strText;
 AddToList;
 end;
 end;
 end;
 until nBegin = 0;
end;

procedure TFindWebThread.HttpWork(Sender: TObject; AWorkMode: TWorkMode;
 const AWorkCount: Integer);
begin
 Status := 'Received ' + IntToStr (AWorkCount) + ' for ' + strUrl;
 Synchronize (ShowStatus);
end;

procedure TFindWebThread.ShowStatus;
begin
 Form1.StatusBar1.SimpleText := Status;
end;

end.
The program looks for subsequent occurrences of the href=http substring, copying the text up to the closing > character. If the found string contains the word google, or its target text includes the word cached, it is omitted from the result. You can see the effect of this code in the output shown in Figure 19.4. You can start multiple searches at the same time, but be aware that the results will be added to the same memo component.
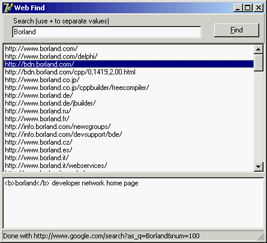
Figure 19.4: The WebFind application can be used to search for a list of sites on the Google search engine.
The WinInet API
When you need to use the FTP and HTTP protocols, as alternatives to using particular VCL components, you can use a specific API provided by Microsoft in the WinInet DLL. This library is part of the core operating system and implements the FTP and HTTP protocols on top of the Windows sockets API.
With just three calls—InternetOpen, InternetOpenURL, and InternetReadFile—you can retrieve a file corresponding to any URL and store a local copy or analyze it. Other simple methods can be used for FTP; I suggest you look for the source code of the WinInet.pas Delphi unit, which lists all the functions.
| Tip |
The help file of the WinInet library is not part of the SDK Help shipping with Delphi, but can be found online on MSDN at msdn.microsoft.com/library/en-us/wininet/wininet/wininet_reference.asp. |
The InternetOpen function establishes a generic connection and returns a handle you can use in the InternetOpenURL call. This second call returns a handle to the URL that you can pass to the InternetReadFile function in order to read blocks of data. In the following sample code, the data is stored in a local string. When all the data has been read, the program closes the connection to the URL and the Internet session by calling the InternetCloseHandle function twice:
var
 hHttpSession, hReqUrl: HInternet;
 Buffer: array [0..1023] of Char;
 nRead: Cardinal;
 strRead: string;
 nBegin, nEnd: Integer;
begin
 strRead := '';
 hHttpSession := InternetOpen ('FindWeb', INTERNET_OPEN_TYPE_PRECONFIG,
 nil, nil, 0);
 try
 hReqUrl := InternetOpenURL (hHttpSession, PChar(StrUrl), nil, 0,0,0);
 try // read all the data
 repeat
 InternetReadFile (hReqUrl, @Buffer, sizeof (Buffer), nRead);
 strRead := strRead + string (Buffer);
 until nRead = 0;
 finally
 InternetCloseHandle (hReqUrl);
 end;
 finally
 InternetCloseHandle (hHttpSession);
 end;
end;
Browsing on Your Own
Although I doubt you are interested in writing a new web browser, it might be interesting to see how you can grab an HTML file from the Internet and display it locally, using the HTML viewer available in CLX (the TextBrowser control). Connecting this control to an Indy HTTP client, you can quickly come up with a simplistic text-only browser with limited navigation. The core is
TextBrowser1.Text := IdHttp1.Get (NewUrl);
where NewUrl is complete location of the web resource you want to access. In the BrowseFast example, this URL is entered in a combo box, which keeps track of recent requests. The effect of a similar call is to return the textual portion of a web page (see Figure 19.5), because grabbing the graphic content requires much more complex coding. The TextBrowser control really is better defined as a local file viewer than as a browser.
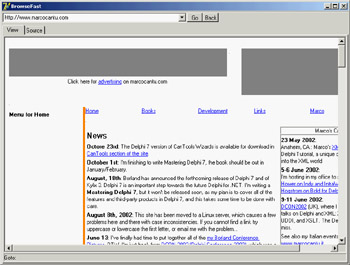
Figure 19.5: The output of the BrowseFast text-only browser
I've added to the program only very limited support for hyperlinks. When a user moves the mouse over a link, its link text is copied to a local variable (NewRequest), which is then used in case of a click on the control to compute the new HTTP request to forward. Merging the current address (LastUrl) with the request, though, is far from trivial, even with the help of the IdUrl class provided by Indy. Here is my code, which handles only the simplest cases:
procedure TForm1.TextBrowser1Click(Sender: TObject);
var
 Uri: TIdUri;
begin
 if NewRequest <> '' then
 begin
 Uri := TIdUri.Create (LastUrl);
 if Pos ('http:', NewRequest) > 0 then
 GoToUrl (NewRequest)
 else if NewRequest [1] = '/' then
 GoToUrl ('http://' + Uri.Host + NewRequest)
 else
 GoToUrl ('http://' + Uri.Host + Uri.Path + NewRequest);
 end;
end;
Again, this example is trivial and far from usable, but building a browser involves little more than the ability to connect via HTTP and display HTML files.
A Simple HTTP Server
The situation with the development of an HTTP server is quite different. Building a server to deliver static pages based on HTML files is far from simple, although one of the Indy demos provides a good starting point. However, a custom HTTP server might be interesting when building a totally dynamic site, something I'll focus on in more detail in Chapter 20.
To show you how to begin the development of a custom HTTP server, I've built the HttpServ example. This program has a form with a list box used for logging requests and an IdHTTPServer component with these settings:
object IdHTTPServer1: TIdHTTPServer
 Active = True
 DefaultPort = 8080
 OnCommandGet = IdHTTPServer1CommandGet
end
The server uses port 8080 instead of the standard port 80, so that you can run it alongside another web server. All the custom code is in the OnCommandGet event handler, which returns a fixed page plus some information about the request:
procedure TForm1.IdHTTPServer1CommandGet(AThread: TIdPeerThread;
 RequestInfo: TIdHTTPRequestInfo; ResponseInfo: TIdHTTPResponseInfo);
var
 HtmlResult: String;
begin
  // log
 Listbox1.Items.Add (RequestInfo.Document);
  // respond
 HtmlResult := '
HttpServ Demo
' + '
This is the only page you''ll get from this example.
' + '
Request: ' + RequestInfo.Document + '
' + '
Host: ' + RequestInfo.Host + '
' + '
Params: ' + RequestInfo.UnparsedParams + '
' + '
The headers of the request follow:
' + RequestInfo.RawHeaders.Text + '
'; ResponseInfo.ContentText := HtmlResult; end;
By passing a path and some parameters in the command line of the browser, you'll see them reinterpreted and displayed. For example, Figure 19.6 shows the effect of this command line:
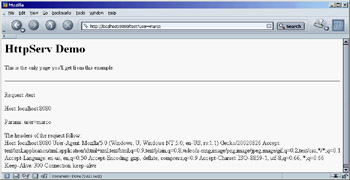
Figure 19.6: The page displayed by connecting a browser to the custom HttpServ program
http://localhost:8080/test?user=marco
If this example seems too trivial, you'll see a slightly more interesting version in the next section, where I discuss the generation of HTML with Delphi's producer components.
| Note |
If you plan to build an advanced web server or other Internet servers with Delphi, then as an alternative to the Indy components, you should look at the DXSock components from Brain Patchwork DX (www.dxsock.com). |
Generating HTML
The Hypertext Markup Language, better known by its acronym HTML, is the most widespread format for content on the Web. HTML is the format web browsers typically read; it is a standard defined by the W3C (World Wide Web Consortium, www.w3.org), which is one of the bodies controlling the Internet. The HTML standard document is available on www.w3.org/MarkUp along with and some interesting links.
Delphi s HTML Producer Components
Delphi's HTML producer components (on the Internet page of the Component Palette) can be used to generate the HTML files and particularly to turn a database table into an HTML table. Many developers believe that the use of these components makes sense only when writing a web server extension. Although they were introduced for this purpose and are part of the WebBroker technology, you can still use three out of the five producer components in any application in which you must generate a static HTML file.
Before looking at the HtmlProd example, which demonstrates the use of these HTML producer components, let me summarize their role:
- The simplest HTML producer component is the PageProducer, which manipulates an HTML file in which you've embedded special tags. The HTML can be stored in an external file or an internal string list. The advantage of this approach is that you can generate such a file using the HTML editor you prefer. At run time, the PageProducer converts the special tags to HTML code, giving you a straightforward method for modifying sections of an HTML document. The special tags have the basic format <#tagname>, but you can also supply named parameters within the tag. You'll process the tags in the OnTag event handler of the PageProducer.
- The DataSetPageProducer extends the PageProducer by automatically replacing tags corresponding to field names of a connected data source.
- The DataSetTableProducer component is generally useful for displaying the contents of a table, query, or other dataset. The idea is to produce an HTML table from a dataset, in a simple yet flexible way. The component has a nice preview, so you can see how the HTML output will look in a browser directly at design time.
- The QueryTableProducer and the SQLQueryTableProducer components are similar to the DataSetTableProducer, but they are specifically tailored for building parametric queries (for the BDE or dbExpress, respectively) based on input from an HTML search form. This component makes little sense in a stand-alone program, and for this reason, I'll delay covering these components until Chapter 20.
Producing HTML Pages
A very simple example of using tags (introduced by the # symbol) is creating an HTML file that displays fields with the current date or a date computed relative to the current date, such as an expiration date. If you examine the HtmlProd example, you'll find a PageProducer1 component with internal HTML code, specified by the HTMLDoc string list:
Producer Demo
Producer Demo
This is a demo of the page produced by the <#appname> application on <#date>.
The prices in this catalog are valid until <#expiration days=21>.
| Warning |
If you prepare this file with an HTML editor (something I suggest you do), it may automatically place quotes around tag parameters, as in days="21", because this format is required by HTML 4 and XHTML. The PageProducer component has a StripParamQuotes property you can activate to remove those extra quotes when the component parses the code (before calling the OnHTMLTag event handler). |
The Demo Page button copies the PageProducer component's output to the Text of a Memo. As you call the Content function of the PageProducer component, it reads the input HTML code, parses it, and triggers the OnTag event handler for every special tag. In the handler for this event, the program checks the value of the tag (passed in the TagString parameter) and returns a different HTML text (in the ReplaceText reference parameter), producing the output shown in Figure 19.7.
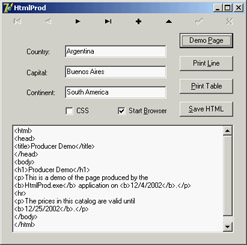
Figure 19.7: The output of the HtmlProd example, a simple demonstra-tion of the Page-Producer component, when the user clicks the Demo Page button
procedure TFormProd.PageProducer1HTMLTag(Sender: TObject;
 Tag: TTag; const TagString: String; TagParams: TStrings;
 var ReplaceText: String);
var
 nDays: Integer;
begin
 if TagString = 'date' then
 ReplaceText := DateToStr (Now)
 else if TagString = 'appname' then
 ReplaceText := ExtractFilename (Forms.Application.Exename)
 else if TagString = 'expiration' then
 begin
 nDays := StrToIntDef (TagParams.Values['days'], 0);
 if nDays <> 0 then
 ReplaceText := DateToStr (Now + nDays)
 else
 ReplaceText := '{expiration tag error}';
 end;
end;
Notice in particular the code I've written to convert the last tag, #expiration, which requires a parameter. The PageProducer places the entire text of the tag parameter (in this case, days=21) in a string that's part of the TagParams list. To extract the value portion of this string (the portion after the equal sign), you can use the Values property of the TagParams string list and search for the proper entry at the same time. If it can't locate the parameter or if the parameter's value isn't an integer, the program displays an error message.
| Tip |
The PageProducer component supports user-defined tags, which can be any string you like, but you should first review the special tags defined by the TTags enumeration. The possible values include tgLink (for the link tag), tgImage (for the img tag), tgTable (for the table tag), and a few others. If you create a custom tag, as in the PageProd example, the value of the Tag parameter to the HTMLTag handler will be tgCustom. |
Producing Pages of Data
The HtmlProd example also has a DataSetPageProducer component, which is connected with a database table and with the following HTML source code:
Data for <#name>
Data for <#name>
Capital: <#capital>
Continent: <#continent>
Area: <#area>
Population: <#population>
Last updated on <#date>
HTML file produced by the program <#program>.
By using tags with the names of the connected dataset's fields (the usual COUNTRY.DB database table), the program automatically gets the value of the current record's fields and replaces them automatically. This produces the output shown in Figure 19.8; the browser is connected to the HtmlProd example working as an HTTP server, as I'll discuss later. In the source code of the program related to this component, there is no reference to the database data:
procedure TFormProd.DataSetPageProducer1HTMLTag(Sender: TObject; Tag: TTag;
  const TagString: String; TagParams: TStrings; var ReplaceText: String);
begin
 if TagString = 'program' then
 ReplaceText := ExtractFilename (Forms.Application.Exename)
 else if TagString = 'date' then
 ReplaceText := DateToStr (Date);
end;
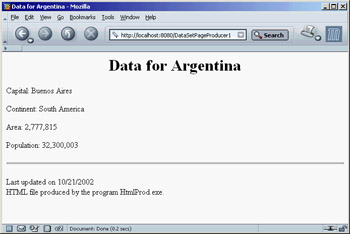
Figure 19.8: The output of the HtmlProd example for the Print Line button
Producing HTML Tables
The third button in the HtmlProd example is Print Table. This button is connected to a DataSetTableProducer component, again calling its Content function and copying its result to the Text of the Memo. By connecting the DataSet property of the DataSetTableProducer to ClientDataSet1, you can produce a standard HTML table.
The component by default generates only 20 rows, as indicated by the MaxRows property. If you want to get all of the table's records, you can set this property to -1—a simple but undocumented setting.
| Tip |
The DataSetTableProducer component starts from the current record rather than from the first one. So, the second time you click the Print Table button, you'll see no records in the output. Adding a call to the dataset's First method before calling the producer component's Content method fixes the problem. |
To make the output of this producer component more complete, you can perform two operations. The first is to provide some Header and Footer information (to generate the HTML heading and closing elements) and add a Caption to the HTML table. The second is to customize the table by using the setting specified by the RowAttributes, TableAttributes, and Columns properties. The property editor for the columns, which is also the default component editor, allows you to set most of these properties, providing at the same time a nice preview of the output, as you can see in Figure 19.9. Before using this editor, you can set up properties for the dataset's fields using the Fields editor. This is how, for example, you can format the output of the population and area fields to use thousands separators.
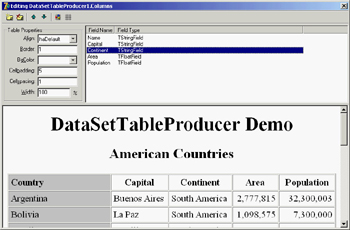
Figure 19.9: The editor of the DataSetTable-Producer compo-nent's Columns property provides you with a preview of the final HTML table (if the data-base table is active).
You can use three techniques to customize the HTML table, and it's worth reviewing each of them:
- You can use the table producer component's Column's property to set properties, such as the text and color of the title, or the color and the alignment for the cells in the rest of the column.
- You can use the TField properties, particularly those related to output. In the example, I've set the DisplayFormat property of the ClientDataSet1Area field object to ###,###,###. This is the approach to use if you want to determine the output of each field. You might go even further and embed HTML tags in the output of a field.
- You can handle the DataSetTableProducer component's OnFormatCell event to customize the output further. In this event, you can set the various column attributes uniquely for a given cell, but you can also customize the output string (stored in the CellData parameter) and embed HTML tags. You can't do this using the Columns property.
In the HtmlProd example, I've used a handler for this event to turn the text of the Population and Area columns to bold font and to a red background for large values (unless it is the header row). Here is the code:
procedure TFormProd.DataSetTableProducer1FormatCell(
 Sender: TObject; CellRow, CellColumn: Integer;
 var BgColor: THTMLBgColor; var Align: THTMLAlign;
 var VAlign: THTMLVAlign; var CustomAttrs, CellData: String);
begin
  if (CellRow > 0) and
 (((CellColumn = 3) and (Length (CellData) > 8)) or
 ((CellColumn = 4) and (Length (CellData) > 9))) then
 begin
 BgColor := 'red';
 CellData := '' + CellData + '';
 end;
end;
The rest of the code is summarized by the settings of the table producer component, including its header and footer, as you can see by opening the source code of the HtmlProd example.
Using Style Sheets
The latest incarnations of HTML include a powerful mechanism for separating content from presentation: Cascading Style Sheets (CSS). Using a style sheet, you can separate the formatting of the HTML (colors, fonts, font sizes, and so on) from the text displayed (the content of the page). This approach makes your code more flexible and your website easier to update. In addition, you can separate the task of making the site graphically appealing (the work of a web designer) from automatic content generation (the work of a programmer). Style sheets are a complex technique, in which you give formatting values to the main types of HTML sections and to special "classes" (which have nothing to do with OOP). Again, see an HTML reference for the details.
You can update table generation in the HtmlProd example to include style sheets by providing a link to the style sheet in the Header property of a second DataSetTableProducer component:
<link rel="stylesheet" type="text/css" href="test.css">
You can then update the code of the OnFormatCell event handler with the following action (instead of the two lines changing the color and adding the bold font tag):
CustomAttrs := '';
The style sheet I've provided (test.css, available in the source code of the example) defines a highlight style, which has the bold font and red background that were hard-coded in the first DataSetTableProducer component.
The advantage of this approach is that now a graphic artist can modify the CSS file and give your table a nicer look without touching its code. When you want to provide many formatting elements, using a style sheet can also reduce the total size of the HTML file. This is an important element that can reduce download time.
Dynamic Pages from a Custom Server
The HtmlProd component can be used to generate static HTML files; it doubles as a web server, using an approach similar to that demonstrated in the HttpServ example, but in a more realistic context. The program accesses the request of one of the possible page producers, passing the name of the component in a request. This is a portion of the IdHTTPServer component's OnCommandGet event handler, which uses the FindComponent method to locate the proper producer component:
var
 Req, Html: String;
 Comp: TComponent;
begin
 Req := RequestInfo.Document;
 if Req [1] = '/' then
 Req := Copy (Req, 2, 1000); // skip '/'
 Comp := FindComponent (Req);
 if (Req <> '') and Assigned (Comp) and
 (Comp is TCustomContentProducer) then
 begin
 ClientDataSet1.First;
 Html := TCustomContentProducer (Comp).Content;
 end;
 ResponseInfo.ContentText := Html;
end;
In case the parameter is not there (or is not valid), the server responds with an HTML-based menu of the available components:
Html := '
HtmlProd Menu
- '; for I := 0 to ComponentCount - 1 do if Components [i] is TCustomContentProducer then Html := Html + '
- <a href="/</i> + Components [i].Name + <i>">'</a><a href="/</i> + Components [i].Name + <i>"> + Components [i].Name + '</a>
- '; Html := Html + '
';
Finally, if the program returns a table that uses CSS, the browser will request the CSS file from the server; so, I've added some specific code to return it. With the proper generalizations, this code shows how a server can respond by returning files, and also how to indicate the MIME type of the response (ContentType):
if Pos ('test.css', Req) > 0 then
begin
 CssTest := TStringList.Create;
 try
 CssTest.LoadFromFile(ExtractFilePath(Application.ExeName) + 'test.css');
 ResponseInfo.ContentText := CssTest.Text;
 ResponseInfo.ContentType := 'text/css';
  finally
 CssTest.Free;
 end;
 Exit;
end;
What s Next?
In this chapter, I've focused on some core Internet technologies, including the use of sockets and core Internet protocols. I've discussed the main idea and shown a few examples of using the mail and HTTP protocols. You can find many more examples that use the Indy components in the demos written by their developers (which are not installed in Delphi 7).
After this introduction to the world of the Internet, you are now ready to delve into two key areas: the present and the future. The present is represented by the development of web applications, and I'll explore the development of dynamic websites in the next two chapters. I'll focus first on the old WebBroker technology and then move to the new WebSnap architecture. Then, in Chapter 21, I'll discuss IntraWeb. The future is represented by the development of web services and the use of XML and related technology, discussed in Chapters 22 and 23.
Part I - Foundations
- Delphi 7 and Its IDE
- The Delphi Programming Language
- The Run-Time Library
- Core Library Classes
- Visual Controls
- Building the User Interface
- Working with Forms
Part II - Delphi Object-Oriented Architectures
- The Architecture of Delphi Applications
- Writing Delphi Components
- Libraries and Packages
- Modeling and OOP Programming (with ModelMaker)
- From COM to COM+
Part III - Delphi Database-Oriented Architectures
- Delphis Database Architecture
- Client/Server with dbExpress
- Working with ADO
- Multitier DataSnap Applications
- Writing Database Components
- Reporting with Rave
Part IV - Delphi, the Internet, and a .NET Preview
- Internet Programming: Sockets and Indy
- Web Programming with WebBroker and WebSnap
- Web Programming with IntraWeb
- Using XML Technologies
- Web Services and SOAP
- The Microsoft .NET Architecture from the Delphi Perspective
- Delphi for .NET Preview: The Language and the RTL
- Appendix A Extra Delphi Tools by the Author
- Appendix B Extra Delphi Tools from Other Sources
- Appendix C Free Companion Books on Delphi
EAN: 2147483647
Pages: 279
