Designing Forms
Planning the appearance and functionality of a form should take place before designing the form begins. Because most database applications consist of more than one form, you should consider the relationships between forms and determine the purpose of the form. Does it simply collect data, or does it take actions? What information does the form need to track? Where does the data come from? Do the users enter it, does it come from external data sources, or is it calculated? Are there any security considerations?
While designing the forms in a database, you might find that some information is repeated across many forms. Examples of this type of information are author and edit history, which are common to all Notes documents. You might have several forms that need to look up information about employees , such as their name , department, and location. Subforms are an excellent place to store and display such information; they can also help keep the appearance of forms more consistent. Using a subform enables you to enforce consistency in the appearance of the form as well as the contents of the fields. Subforms are discussed in Chapter 7, "Using Shared Resources in Domino Applications."
NOTE
Shared fields can also be used to enforce design consistency. You can define the formula and data type for a shared field and reuse it throughout the forms in a database. Shared fields are discussed in Chapter 5, "Advanced Form Design."
When you design the physical appearance of a form, it is sometimes a good idea to sketch it either electronically or on paper. Also, be sure to look for similar forms that might be available in another database that can be used as a starting point for your design.
Understanding Form Types
The default form type is Document, but there are actually three types of Notes forms: Document, Response, and Response-to-response forms. By far, the most common form used is the Document type. The Type setting is in the Form properties box on the Form Info tab, as shown in Figure 4.1.
Figure 4.1. Choose the form type from the Form Info tab of the Form properties box.
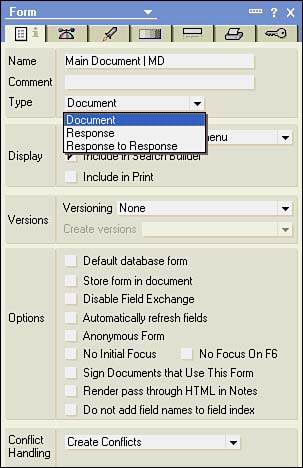
The three types of forms are based on a hierarchy of documents. The Document form type, also referred to as main or main document, is at the top of the hierarchy, followed by the response, and then by the response-to-response form types. The document form type is used to create main documents. These documents stand at the top of the hierarchy. Main documents can have multiple response documents associated with them. Similarly, response documents can have multiple response-to-response documents associated with them.
This document hierarchy is used in discussion-style databases, but it can also be used in data-collection applications. For example, you might create a contact-management system that collects information about your customers and each contact between your company and theirs. You start by creating a main document form to collect information about your customers, such as company name, address, phone number, fax number, and so on. To create a customer contact form, you could choose the Response document type and include information such as date and time of contact, type of contact, who initiated the contact, and the outcome of the contact, including any action items for your company. Because this is a response document, it will always be associated with the main document.
The relationship between documents, response documents, and response-to-response documents is similar to a parent/child relationship in a relational database. A number of @Functions work with this relationship @AllChildren , @AllDescendants , @DocChildren , and @DocumentUniqueID , just to name a few. The relationship among these document types is maintained internally by Notesthe response documents store a reference to the parent document in a field named $Ref. This reserved field contains the document ID of the parent.
In a hierarchical view, response documents appear under the main document from which they were composed. Response-to-response documents appear under the response document that was highlighted when they were composed . Hierarchical views automatically indent response and response-to-response documents underneath the parent document. Displaying documents, response documents, and response-to-response documents is useful in discussions but is less useful in forms that principally collect data. (Response hierarchies are discussed in the next section.)
Understanding Response Hierarchies
To see documents displayed in a hierarchy, open a discussion database. If you don't have a discussion database available, create one based on the Discussion - Notes & Web (6) template that ships with Domino Designer 6. After you open the discussion database, you can see the action buttons in the view to create a new main topic (the form type is Document), a response, and a response-to-response document. Create a few documents to get the feel of this functionality. See Figure 4.2.
Figure 4.2. The response hierarchy illustrated in this view is from a database created from the discussion database template.
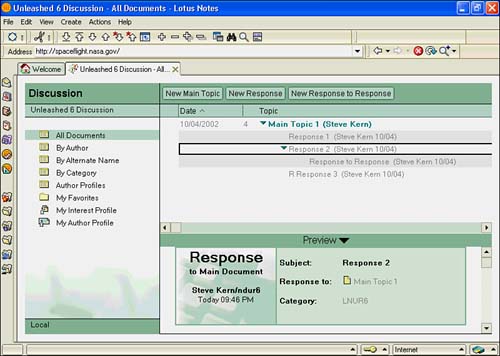
When response documents are listed in a view that enforces the response hierarchy, response documents are indented three spaces underneath the parent. Up to 32 levels are supported. A perfect example of document hierarchies can be found in nearly any discussion database (see Figure 4.2).
NOTE
The advanced database property Don't Support Specialized Response Hierarchy must not be checked. If it is, the hierarchy among documents is not maintained. Conversely, if you don't need hierarchical views, checking this property improves the performance of the database.
As stated earlier, Domino maintains the relationship between these documents through the use of the document ID. A document ID is found in the properties box for a document. Programmatically, it can be accessed with the following formula:
@Text(@DocumentUniqueID)
TIP
You can use $Ref in a computed field in a response document as a formula for the Value event. A field with this formula displays a doclink icon that can be clicked to open the parent document.
Choosing a Form Type
Choose a form type carefully . In most cases, the form type will be a document. If you come from a relational database development background, it can be tempting to use a response document similar to a child table in a relational database. Domino does not conform well to this model, however. Because Notes maintains the internal relationship between documents and response documents, response documents can be useful in many situations. Using response documents in a discussion format is obviously a good fit, for example. Another good use of a response document is in a database that tracks projects. The parent document can contain information pertinent to the project itself, whereas response documents can contain information about specific tasks .
CAUTION
There is a real drawback to using response documents to collect data. Response documents do not total in hierarchical views (views containing both main documents and response documents). Only main documents total in hierarchical views. If you want to total fields in response or response-to-response documents, you must create a view containing only response-type documents. Consider the reporting needs of the form before deciding to use one of the response types.
Creating a Form
Creating a form is fairly easy. After you have decided what the form should look like and what items it should contain, create the form in Domino Designer:
- Open Domino Designer 6.
- Open the database in the Design pane.
- In the Design list, click Forms.
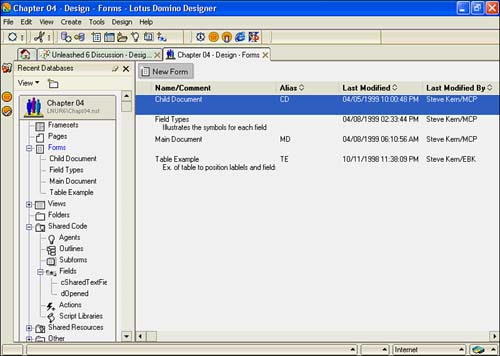
- In the Work pane, click the New Form button. See Figure 4.3.
Figure 4.3. Click the New Form button in the Forms Design view to create a form.
- Open the Form properties box, and enter a name and synonym for the form.
- In the Form properties box, choose a type for the form and make any other appropriate selections.
- Add text, fields, subforms, embedded editors, image resources, layers , and so forth to complete your form.
- Enter a window title and add any code to any necessary form events.
- To close and save the new form, click the Close button (the small x) on the form's Window tab.
NOTE
For more information about the Designer IDE, see Chapter 3, "The Integrated Development Environment."
Adding Text, Fields, and Objects to the Form
Adding static text, fields, and other objects to a form is very simple. A Notes form is just like one big word-processing document or Notes rich-text field. You can enter text, fields, and other objects where you need them simply by positioning the cursor at the desired location. You can add fields and tables from the Create menu (Create, Field), by clicking the Create Field SmartIcon, or by right-clicking the form in design and choosing Create Field.
Graphic objects can be added from the image resources stored in the database, copied to the Clipboard and pasted into the form, or imported. HTML files can be imported and display in native format. You can embed any one of a number of Web design elements, Standard and Controlled Access sections, Java applets, and so on by choosing the appropriate command from the Create menu. Table 4.1 lists some of the available objects that can be used in forms.
TIP
GIFs are image files that can have a transparent background. If you copy a GIF to the Clipboard and then paste it into a form, the background will not be transparent and will retain the background color of the GIF, regardless of the form's background color . This is okay if you are using a GIF with a white background on a form with a white background. If you instead add the GIF as an image resource, the background transparency will be maintained. You can also maintain transparency by importing the GIF. Background transparency displays properly for both Web and Notes clients .
Most objects have properties that can be set from properties boxes. To access the properties box of any object on the form, simply right-click the object and choose Properties from the floating context menu. For example, to change the properties of a text object, open the Text properties box and you will be able to easily change the font, size , color, and attributes of the text. (The Text properties box is discussed in the "Working with Text Properties" section, later in this chapter.)
Testing the Form During Design
Testing the form during design enables the designer to build the form incrementally and test it along the way. Unfortunately, you must save your changes before testing them, so backing out of a change is manual. Another drawback is that you can test only document forms, not response-type forms. If you attempt to test one of the response forms, Domino Designer displays an error because a response form must be composed while a main document is selected. Because the form is in design, no main document is selected and, thus, the error message is generated. Similarly, if you use inheritance to populate field values, nothing will be inherited because no document is selected.
TIP
A workaround to testing response-type forms is to make the response form a document-type form during design. When design is completed and the appearance and functionality of the form are to your satisfaction, simply change the type back to its original type.
You can test the following four versions of a form:
- Notes Preview Previews the form in the Notes client
- Domino Preview Previews the form using the Notes Web browser
- Internet Explorer Preview Previews the form using Internet Explorer
- Netscape Preview Previews the form using Netscape
Previews are available from the menu options Design, Preview or Design, Preview in the Web Browser, or from one of the Preview buttons in the Domino Designer IDE. When you preview a form for a Web browser, if you choose Domino as the preview browser, you can choose View, Show, Page Source from the menu to see color-coded HTML source code.
CAUTION
If you are testing a form with one of the Web browsers, the database must be in the Notes data directory or one of the subdirectories.
To see how previewing works, select any document-type form, either in design or from the Work pane, and click one of the Preview buttons. Domino Designer 6 displays the form in the appropriate client. This is a good way to test field formulas such as input validation formulas, action buttons, and other form objects. You can also check each field for field-level help quickly by scrolling through each field and checking the status bar at the bottom of the document. You can check the type of each field while editing a document by right-clicking a field and choosing Properties from the context menu. Each time you navigate to a new field, the Field properties box displays the field type, with the exception of rich-text and Rich Text Lite fields, which display the Text properties box.
NOTE
In R3, field help was an option set on the menu. In R4, the menu option was removed; in R5, it was added to the menu as an option again. The default for this option is On. If you do not see field help, check the menu option View, Show, Field Help. This menu prompt is a toggle, so you can click it on and off. This option is available for selection only if you are editing a document.
Part I. Introduction to Release 6
Whats New in Release 6?
- Whats New in Release 6?
- A Brief History of Lotus Notes
- Major Features of Lotus Notes
- Types of Applications
- Whats New in Domino Designer?
- New Design Element Features
- New Language Features
The Release 6 Object Store
- The Release 6 Object Store
- Defining a Domino Database
- Understanding the Database Structure
- Creating a Database
- Working with Database Properties
- Understanding Design Templates
- Creating Your Own Templates
- Inheriting Designs from Templates
- Using Templates to Replicate Design Changes
- Using Templates as Design Libraries
- Archiving Versions with Templates
The Integrated Development Environment
- The Integrated Development Environment
- Working in the Application Design Environment
- Working with the Properties Box
- Understanding the Work Pane
- Using the Programmers Pane
- Understanding the Info List
- Understanding the Action Pane
- Customizing the Tools Menu
- Printing Source Code
- Using the HTML Editor
- Locking Design Elements
Part II. Foundations of Application Design
Forms Design
- Forms Design
- Designing Forms
- Setting Form Properties
- Working with Text Properties
- Working with Fields
- Writing Formulas in Fields
Advanced Form Design
- Advanced Form Design
- Working with Tables
- Using Graphic Objects on Forms
- Working with Form-Level Events
- Using Form Actions
- Working with Hotspots
- Understanding Sections and Section Properties
- Using Layout Regions
- Working with Special Forms
- Creating Reusable Design Objects
- Using Embedded Elements
- Using the Form Design Document
Designing Views
- Designing Views
- Defining the Elements of a View
- Creating a View
- Setting View Properties
- Creating Advanced View Selections
- Adding and Editing View Columns
- Using View Column Properties
- Adding Actions to a View
- Creating Calendar Views
- Understanding Folders
Using Shared Resources in Domino Applications
- Shared Resources
- Sharing Images Within a Database
- Creating Shared Files
- Creating Shared Applets
- Shared Code
- Creating Subforms
- Creating Shared Fields
- Creating Shared Actions
- Script Libraries
- Database Resources
Using the Page Designer
- Using the Page Designer
- Understanding Pages
- Working with the Page Properties Box
- Using the Page Designer
- Adding Layers to Your Pages
Creating Outlines
- Creating Outlines
- Creating an Outline
- Working with Outline Entries
- Embedding Outlines
- Adding an Outline to a Frameset
Adding Framesets to Domino Applications
- Adding Framesets to Domino Applications
- Creating a Frameset
- Using the Frameset Designer
- Working with Frames
- Viewing the HTML Source of Your Frameset
- Launching the Frameset
Automating Your Application with Agents
- Automating Your Application with Agents
- Working with Agents
- Creating an Agent
- Working in the Agent Builder Design Window
- Using @Commands in Agents
- Putting Your Agent to Work
- Creating a Complex Agent
- Using LotusScript in Agents
- Creating Web Agents Using Formulas and LotusScript
- Using Java in Agents
- Testing and Debugging Agents, the Agent Log, and Agent Properties
- Agent Properties via the Agent InfoBox
Part III. Programming Domino Applications
Using the Formula Language
- Using the Formula Language
- Overview of the Formula Language
- Knowing Where to Use @Functions and @Commands
- Formula Syntax
- Limitations of the Formula Language
- Working with Statements
- Using Logical @Functions
- Working with Date and Time @Functions
- Working with Strings
- Getting Session and User Information
- Working with Documents
- Retrieving Data with @DbColumn and @DbLookup
- Working with Lists
- Getting User Input
- Controlling the Flow of a Formula
- Error Handling
Real-World Examples Using the Formula Language
- Real-World Examples Using the Formula Language
- Programming Practices
- Using Formulas in Forms and Subforms
- Writing Field Formulas
- Writing View Formulas
- Using Hide When Formulas
- Working with Forms, Views, and Shared Actions
Writing LotusScript for Domino Applications
- Writing LotusScript for Domino Applications
- Software Construction
- Fundamental Elements of LotusScript
- New Technologies and LotusScript
Real-World LotusScript Examples
- Real-World LotusScript Examples
- Real-World Example 1: Importing a Delimited Text File
- Real-World Example 2: Delete a Parent Document and All Its Children: DeleteParentAndChildren
- Real-World Example 3: Schedule an Agent Robot to Refresh All the Documents in a View: Robot-DailyRefreshAllDocs
- Real-World Example 4: Return a Web User to the Place Where He Started After a Document Is Submitted: WebQuerySave-DocSubmit
Writing JavaScript for Domino Applications
- Writing JavaScript for Domino Applications
- What Is JavaScript?
- JavaScript Is Not Java
- JavaScript and the Domino IDE
- The Document Object Model
- JavaScript Support in Domino 6
- When to Use JavaScript
- A Look at JavaScript in Domino
- JavaScript Libraries in Domino
- JavaScript Principles 101
- Syntax and Command Blocks
- Statements
- Output
- Functions
- Objects
- Input Validation
- Validating Check Boxes
- Validating Radio Buttons
- Validating Selection Lists
- Calculations
- JavaScript Application
Real-World JavaScript Examples
- Real-World JavaScript Examples
- Real-World Example 1: Dynamic Drop-Down Lists on the Web
- Real-World Example 2: Dialog Boxes and window. opener on the Web
- Real-World Example 3: Dynamic Tables
- Real-World Example 4: Useful JavaScript Utilities
Writing Java for Domino Applications
- Writing Java for Domino Applications
- Introduction to Java
- Choosing a Java Solution in Domino
- Understanding the Notes Object Interface
- Writing Java Agents
- Using Other Java IDEs
- Other Uses for Java
Real-World Java Examples
Enhancing Domino Applications for the Web
- Enhancing Domino Applications for the Web
- Whats New in Designer 6
- Understanding the Domino Web Application Server
- Understanding the Basics of HTML
- Using HTML in Domino Designer
- Adding Power with Domino URLs
- Views and Forms Working Together on the Web
- Incorporating Flash into Your Web Pages
- What Its All About: XML Exposed
- How Does Domino Use XML?
Part IV. Advanced Design Topics
Accessing Data with XML
Accessing Data with DECS and DCRs
- Accessing Data with DECS and DCRs
- What Is DECS?
- The External Data Source
- DECS Administrator
- Creating the Activity
- Accessing the Application
- DECS Summary
- Data Connection Resources
- DCR Example
- Tips on External Data Access
Security and Domino Applications
- Security and Domino Applications
- How Does Domino Security Work?
- Enabling Physical Security
- Setting Server Access
- Database Access Control Lists
- The Role of the Domino Directory in Application Security
- ACL Privileges
- Enabling Database Encryption
- Using Roles
- Implementing View-Level Security
- Implementing Form-Level Security
- Implementing Document-Level Security
- Applying Field-Level Security
- Hiding the Design of Your Application
Creating Workflow Applications
- Creating Workflow Applications
- The Evolution of Groupware
- Introducing Workflow
- Creating Mail-Enabled Applications
- Using Triggers to Send Email
- Sending Mail with LotusScript
Analyzing Domino Applications
Part V. Appendices
Appendix A. HTML Reference
Appendix B. Domino URL Reference
EAN: 2147483647
Pages: 288
- Challenging the Unpredictable: Changeable Order Management Systems
- ERP System Acquisition: A Process Model and Results From an Austrian Survey
- The Second Wave ERP Market: An Australian Viewpoint
- Enterprise Application Integration: New Solutions for a Solved Problem or a Challenging Research Field?
- A Hybrid Clustering Technique to Improve Patient Data Quality
