Creating Mail-Enabled Applications
As you can see from the previous case study, enabling applications to route mail is at the heart of workflow applications. There are many ways to build mail-enabled Domino applications, from the very simple mail-enabled forms to sophisticated agent-driven applications that route mail based on triggers. The next few sections expose you to a number of techniques you can use to mail-enable a database application.
Simple Mail-Enabling at the Form Level
The simplest method of mail-enabling an application is to create a form that is mail-enabled from the Form properties box. Follow these steps to mail-enable a form:
- Open a form in design mode or create a new one.
- Open the Form properties box and click the Defaults tab.
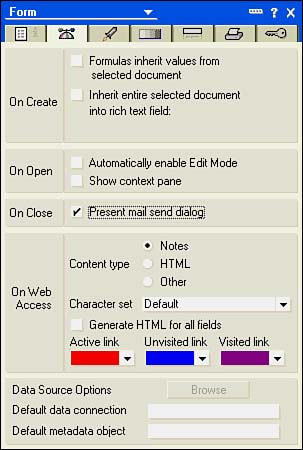
- In the On Close section, click Present Mail Send Dialog (see Figure 24.1).
Figure 24.1. A form can be mail-enabled on the Defaults tab of the Form properties box.
CAUTION
Mail-enabling a form does not work for Web clients . A Notes client can route mail because that function is built into the client. However, a browser interacts only with HTML pages and does not have a way to send mail.
For this to function properly, at minimum, a field called SendTo must be included on the form with a valid email addresseither a username or a group . SendTo is one of several reserved fields. A full list of reserved fields for mailing is listed later in this chapter in Table 24.3. At this point, the document is mailed optionally ; that is, the user is presented with the Send Mail window, which is illustrated in Figure 24.2. This window has more options on it than the window presented from a New Mail memo when the Escape key is pressed. That window is shown in Figure 24.3.
Figure 24.2. The Send Mail window for a mail-enabled form enables the user to choose how the document is mailed.
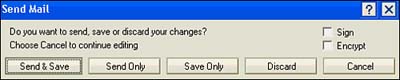
Figure 24.3. A simpler Send Mail window without the Sign and Encrypt fields.

Understanding the Disadvantages
Some disadvantages are involved in this approach. When the document is mailed, it does not display properly unless it has the same fields as the Memo form in the Mail database. This is because Domino attempts to locate the form used to compose the document; when that fails, Domino displays the document with the default form of the database. In the Mail database, that form is the Memo form. There are several ways to work around this limitation.
Working Around the Limitations
Firstand easiest is to click the Store Form in Document property on the Defaults tab of the Form properties box. Unfortunately, if the source form changes, none of the documents mailed with the earlier versions reflects the changes. This has an additional drawback of significantly increasing the disk storage space of the database. Even a small form with a few fields can be 5KB or 6KB. A larger form can be 50KB or 60KB. Embedded graphics, such as those in a layout region or a hotspot, can increase the size significantly. You can do some quick math and see how much additional storage space a stored form can add to the database. Simply open the Design Document properties box for the form and look at the Size field at the bottom of the Info tab. The size is listed in bytes, which you can multiply by the number of anticipated documents to estimate additional disk space taken by the stored form. Nonetheless, this technique has the advantage of displaying the document with the original form.
A second way around this is to add the form itself to the Mail database. This enables the form to be displayed in its native format. However, unless you make a corresponding change to the Mail template or disable the template for the Mail database, your change is overwritten when the Design task runs on the server at night. Any changes can also be lost when Domino is upgraded to a new version. To prevent this from happening, all customizations to the Domino mail template or databases can be archived to a temporary database and then restored after the mail databases are converted to the new version.
The third way around this is to use some of the fields that are in the Memo form. If you include Subject and Body fields, the form essentially duplicates the Mail Memo form. When Domino cannot find the form the document was created in, it displays successfully using the default Memo form. An easy way to do this is to open the Memo form in design mode, copy the fields you want to use to the Clipboard, and then paste them into the new form.
Although this is certainly simple and convenient , there is a price to pay. In most mail-enabled applications, you should retain greater control over what gets mail-routed and when. Users most often should not be able to override or initiate mail. Instead, mail is usually sent automatically from a server-based agent, based on the status of the document. Mail-enabling at the form level is a rather crude technique and is not suitable for most applications.
Working with Mail @Functions, @Commands, and Reserved Fields
As you can imagine, many useful @Functions, @Commands, and reserved fields have been specially designed for mail-enabling a database. These are listed in Tables 24.124.4.
Table 24.1. Useful @Functions
| Function | Usage |
|---|---|
| @MailSend without parameters | Sends the document to the recipient in the SendTo field. |
| @MailSend with parameters | Creates a new memo based on parameters. See Table 24.4 for a list of the parameters. |
| @IsDocBeingMailed | Returns 1 (Boolean true ) if the document is being mailed. |
| @OptimizeMailAddress | Removes unnecessary domains from the address. |
| @MailEncryptSavedPreference | Returns 1 (Boolean true ) if Encrypt Saved Mail is selected in User Preferences. |
| @MailEncryptSentPreference | Returns 1 (Boolean true ) if Encrypt Sent Mail is selected in User Preferences. |
| @MailSavePreference | Indicates the option the user has selected in User Preferences for saving mail. Returns for Don't Keep a Copy, returns 1 for Always Keep a Copy, and returns 2 for Always Prompt. |
| @MailSignPreference | Returns 1 (Boolean true ) if Sign Sent Mail is selected in User Preferences. |
| @MailDBName | Returns the server and mail filename of the current user. |
Table 24.2. Some Useful Mail @Commands
| Function | Usage |
|---|---|
| @Command([MailAddress]) | Presents the Address Book dialog box and stores the To in the SendTo field of the document, cc in the CopyTo, and so on. |
| @Command([MailComposeMemo) | Composes a mail memo. |
| @Command([MailForward]) | Forwards the current or selected document. |
| @Command([MailSend]) | Displays the Mail Send dialog box before sending the current document with two options: Sign and Encrypt. |
@Command([MailAddress]) is intelligent enough to populate the dialog box with To, cc, and bcc only if the SendTo, CopyTo, and BlindCopyTo fields are present on the form. In other words, if you place only the SendTo and CopyTo fields on the form, @Command([MailAddress]) displays only those fields in the dialog box. Chapt24.nsf has a form titled Mail Send Form that illustrates the use of this @Command. To see how it works, remove one of the Address fields, such as CopyTo or BlindCopyTo.
Table 24.3. Reserved Fields
| Field Name | Purpose |
|---|---|
| SendTo | Multivalue text list of primary mail recipients. |
| CopyTo | Multivalue text list of other mail recipients. |
| BlindCopyTo | Multivalue text list of mail recipients unknown to other recipients of the document or memo. |
| Subject | Subject of memo. |
| Body | Rich-text field containing the message. |
| Sign | A value of 1 signs the document; doesn't. |
| Encrypt | A value of 1 encrypts the document; doesn't. |
| DeliveryPriority | A value of L is low priority, N is normal priority, and H is high priority. |
| DeliveryReport | A value of B is basic and creates only a delivery failure report, C confirms delivery, T traces failures, and N never generates a report. |
| ReturnReceipt | A value of 1 sends a receipt when the document is opened by the recipient, and a value of sends no receipt. |
| SaveOptions | A value of 1 always saves; never saves. |
| MailOptions | A value of 1 overrides the Present Mail Send Dialog in the Form Properties Box On Close section of the Defaults tab. |
CAUTION
The Sign, Encrypt, ReturnReceipt, SaveOptions, and MailOptions are text or keyword fields and are not numeric, although the values of 1 and might lead you to think they are numeric.
Using @MailSend with Parameters
Of all the @Functions listed, @MailSend is the most often used and the most powerful. It is with this function (or its equivalent in LotusScript or Java) that a database becomes mail-enabled. @MailSend without parameters can be used to send the document itself, as long as a SendTo field is available. @MailSend is discussed in the section "Working with Mail @Functions, Commands, and Reserved Fields." The @MailSend function with parameters is the most useful and interesting of the @Functions listed. The syntax of the @MailSend function is shown here:
@MailSend(SendTo; CopyTo; BlindCopyTo; Subject; Remark; BodyFields; [Flags])
The SendTo, CopyTo, BlindCopyTo, and Subject fields are described in Table 24.3. These parameters are exactly the same as the descriptions for the reserved fields. The only required parameter is SendTo . The remaining parameters are listed next in Table 24.4.
Table 24.4. @MailSend Parameters
| Parameter | Comment |
|---|---|
| Remark | Optional text; included at the beginning of the Body field of the memo. |
| BodyFields | Adds fields to the memo in the order listed. One or more fields from the document can be included. To include fields, put the field name in quotes; to include multiple fields, use a colon to create a list, as in "Field1":"Field2":"Field3" . The fields can be any data type. |
| [flags] | One or more flags can be included and are described next. To include more than one flag, use the colon to separate the flags, as in [Sign]:{IncludeDocLink] . |
| [Sign] | Signs the memo. |
| [Encrypt] | Encrypts the memo using the recipient's public key. |
| [PriorityLow] | Sends the memo at low priority. |
| [PriorityNormal] | Sends the memo at normal priority. |
| [PriorityHigh] | Sends the memo at high priority. |
| [ReturnReceipt] | Sends a receipt when recipient opens memo. |
| [DeliveryReportConfirmed] | Sends confirmation of delivery failure or success. |
| [IncludeDocLink] | Sends a doclink to the document that generated the mail memo. |
@MailSend , with parameters, is discussed in the next section.
CAUTION
These Notes Mail functions do not work directly in Web clients. However, you can work around that limitation by using an agent and including @MailSend in the agent.
Sending Document Links
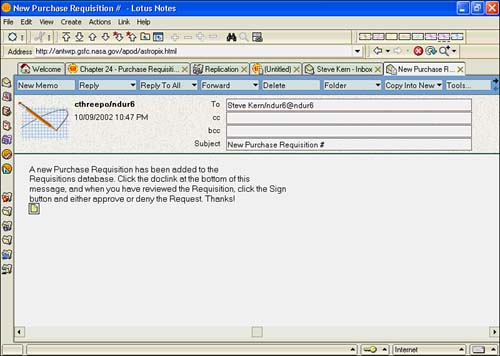
The previous examples used the @MailSend @Function with parameters to generate an email message. Including a doclink is done with the [IncludeDocLink] flag. A doclink is a small icon that contains a pointer to a document (see Figure 24.4). If the user has access to both the document and the database, the document is opened when double-clicked. This means that a user can work on documents in the database without switching from the mail file.
@MailSend(SendTo; ""; ""; Subject; Remark; ""; [IncludeDoclink])
Figure 24.4. This email message has a doclink embedded in the message body.
TIP
You might have noticed the use of variables rather than literals in the @Function. This makes the formula easier to read, easier to code, and easier to debug. You should avoid hard-coded values, if possible. An additional benefit is that the values to SendTo, Subject, Remark, and so on can be assigned through a formula.
Sending links to a document is by far the most flexible way to mail-enable an application and is used by the vast majority of the mail-enabled applications I've worked on or seen. Most, if not all, of the mail-enabled templates that come with Notes and Domino also use doclinks. Using @MailSend and including a doclink is a very effective technique.
Using @MailSend Without Parameters
Using @MailSend without parameters is in many ways very similar to enabling a form to send mail from the Form properties box. If the form is sent to a user's mail database using @MailSend , the same display problems exist. If the database doesn't contain the form for the document, Domino attempts to display it with the default form. @MailSend sends the document automatically. @MailSend can also be combined with reserved fields such as DeliveryPriority and DeliveryReport.
The form property On Close: Present Mail Send Dialog takes care of mailing the document when it is saved. When using @Command([MailSend]) or the @Function @MailSend , you must ensure that the document is mailed at the appropriate time and that the SendTo field has a legitimate value, at minimum. One way to ensure that the SendTo field has a valid username is to make the field a keyword field and select Use Address Dialog for Choices. In Input Validation for the field, include the following line of code:
@If(SendTo = "" ;@Failure("You must choose an addressee!"); @Success)
If the SendTo field is blank, a message box displays with the message "You must choose an addressee!" in it. The Input Validation formula executes only when the document is being saved or refreshed.
You must also take steps to ensure that @MailSend executes when the document is being saved. A variety of @Functions return the state of a document. @IsDocBeingSaved returns True when the document is being saved, so the following formula works:
@If(@IsDocBeingSaved; @MailSend; "")
As discussed previously, there are some inherent drawbacks to using this technique. Principally, they involve the display of the form. However, @MailSend can be useful when mailing documents to a mail-in database. @MailSend executes without presenting the Mail Send dialog box and, therefore, requires no user intervention.
Sending Mail with Simple Actions
A few simple actions can be used in both Action bar buttons and agents to send mail. They are listed in Table 24.5.
Table 24.5. Simple Actions for Mailing Documents
| Action | What Happens |
|---|---|
| Reply to Sender | Sends reply. Useful in mail-in databases. |
| Send Document | Sends the document, such as @MailSend . Needs a SendTo field, at minimum. This is a default system command in views and forms. |
| Send Newsletter Summary | Sends a mail message listing documents with doclinks that fit the criteria. |
| Send Mail Message | Sends a document or doclink. A dialog box allows choices from an address book for recipients. |
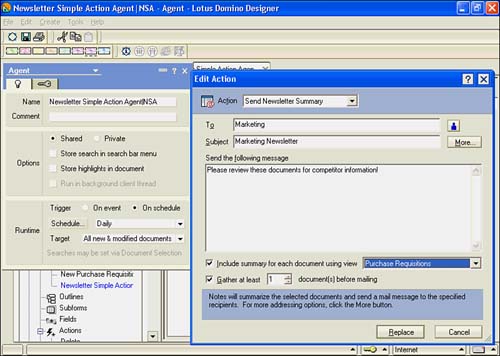
Simple actions are available for use in both agents and Action bar buttons. In this respect, they are not context sensitive. For instance, it doesn't make much sense to send a newsletter summary from a form action. Simple actions are not supported on the Web. Figure 24.5 shows a Newsletter agent under construction in a database. This Newsletter agent notifies all participants in a particular database of new and modified documents using the Send Newsletter Summary simple action.
Figure 24.5. The Send Newsletter Summary simple action in design.
This agent is useful because it helps to keep a database alive . As the name implies, it is very simple to set up:
- Choose Create, Agent from the menu. A new agent is created, open to the properties box.
- Change the name in the properties box to Newsletter or a name of your choosing. Click the Shared Agent box. Add an alias by using the pipe symbol ( ) after the name of your agent, followed by the alias.
- Set the trigger to On Schedule, and set the drop-down list to Daily.
- Click the Schedule button and, in the Schedule window, choose the server on which the agent is to run.
- Set the target to All New and Modified Documents.
- In the Design pane, click Simple Actions and then click the Add Action button at the bottom of the Design pane. The Add Action dialog window appears.
- Choose Send Newsletter Summary, pick the appropriate addressees, and enter a subject and a brief text message.
- Click Include Summary for Each Document Using View, and choose the view.
- Click Gather at Least # Document(s) Before Mailing; either leave the default of 1 or enter a new value.
- Click the Add button at the bottom of the Add Action dialog window. Save the agent. See Figure 24.5.
This is not the only way to create a mail agent. You can also use @Functions, LotusScript, or Java. You can run agents under many different conditions, as you will see in Chapter 11, "Automating Your Applications with Agents." Search conditions can also be included that can create truly powerful focused agents that act only on documents that match the criteria.
Using Mail-In Databases
Your Domino mailbox is simply a Domino database. As such, the router can deposit mail directly into the database.
NOTE
The Mail Router is a task that runs on the Domino server. This task is responsible for delivering mail to databases on the local Domino server and for forwarding mail to other servers. The Mail Router task also takes care of sending mail destined for the Internet and other foreign mail domains.
A mail-in database is an extension of this concept; documents can be emailed directly to a mail-in database. Furthermore, any forms that you want to email to this database can be included in the design of the database, eliminating the need to store the form with the document. To create a mail-in database, complete the following steps:
- Create your mail-in database and open the Domino directory.
- Go to the Servers, Mail-In Databases and Resources view.
- Click the Add Mail-In Database button in the Action bar.
- Fill out the Mail-In Database document.
- Close and save the document.
NOTE
You must be a member of the NetCreator role in the Domino directory to create a mail-in database document. If you do not have this access to the Domino directory, you must ask an administrator to create the document for you or give you the appropriate access.
To send mail (such as documents) to a mail-in database, include the mail-in name of the database as it appears in the Domino directory in the memo's address. A mail-in database appears in the Domino directory with all other users and is therefore available for mail addressing. You can access the mail-in database in an address field in the same manner that you would a user or group, using type-ahead or the Directory dialog box. The mail router treats the mail-in database entry just as it would a person document and deposits messages into the database file specified in the Filename field.
Part I. Introduction to Release 6
Whats New in Release 6?
- Whats New in Release 6?
- A Brief History of Lotus Notes
- Major Features of Lotus Notes
- Types of Applications
- Whats New in Domino Designer?
- New Design Element Features
- New Language Features
The Release 6 Object Store
- The Release 6 Object Store
- Defining a Domino Database
- Understanding the Database Structure
- Creating a Database
- Working with Database Properties
- Understanding Design Templates
- Creating Your Own Templates
- Inheriting Designs from Templates
- Using Templates to Replicate Design Changes
- Using Templates as Design Libraries
- Archiving Versions with Templates
The Integrated Development Environment
- The Integrated Development Environment
- Working in the Application Design Environment
- Working with the Properties Box
- Understanding the Work Pane
- Using the Programmers Pane
- Understanding the Info List
- Understanding the Action Pane
- Customizing the Tools Menu
- Printing Source Code
- Using the HTML Editor
- Locking Design Elements
Part II. Foundations of Application Design
Forms Design
- Forms Design
- Designing Forms
- Setting Form Properties
- Working with Text Properties
- Working with Fields
- Writing Formulas in Fields
Advanced Form Design
- Advanced Form Design
- Working with Tables
- Using Graphic Objects on Forms
- Working with Form-Level Events
- Using Form Actions
- Working with Hotspots
- Understanding Sections and Section Properties
- Using Layout Regions
- Working with Special Forms
- Creating Reusable Design Objects
- Using Embedded Elements
- Using the Form Design Document
Designing Views
- Designing Views
- Defining the Elements of a View
- Creating a View
- Setting View Properties
- Creating Advanced View Selections
- Adding and Editing View Columns
- Using View Column Properties
- Adding Actions to a View
- Creating Calendar Views
- Understanding Folders
Using Shared Resources in Domino Applications
- Shared Resources
- Sharing Images Within a Database
- Creating Shared Files
- Creating Shared Applets
- Shared Code
- Creating Subforms
- Creating Shared Fields
- Creating Shared Actions
- Script Libraries
- Database Resources
Using the Page Designer
- Using the Page Designer
- Understanding Pages
- Working with the Page Properties Box
- Using the Page Designer
- Adding Layers to Your Pages
Creating Outlines
- Creating Outlines
- Creating an Outline
- Working with Outline Entries
- Embedding Outlines
- Adding an Outline to a Frameset
Adding Framesets to Domino Applications
- Adding Framesets to Domino Applications
- Creating a Frameset
- Using the Frameset Designer
- Working with Frames
- Viewing the HTML Source of Your Frameset
- Launching the Frameset
Automating Your Application with Agents
- Automating Your Application with Agents
- Working with Agents
- Creating an Agent
- Working in the Agent Builder Design Window
- Using @Commands in Agents
- Putting Your Agent to Work
- Creating a Complex Agent
- Using LotusScript in Agents
- Creating Web Agents Using Formulas and LotusScript
- Using Java in Agents
- Testing and Debugging Agents, the Agent Log, and Agent Properties
- Agent Properties via the Agent InfoBox
Part III. Programming Domino Applications
Using the Formula Language
- Using the Formula Language
- Overview of the Formula Language
- Knowing Where to Use @Functions and @Commands
- Formula Syntax
- Limitations of the Formula Language
- Working with Statements
- Using Logical @Functions
- Working with Date and Time @Functions
- Working with Strings
- Getting Session and User Information
- Working with Documents
- Retrieving Data with @DbColumn and @DbLookup
- Working with Lists
- Getting User Input
- Controlling the Flow of a Formula
- Error Handling
Real-World Examples Using the Formula Language
- Real-World Examples Using the Formula Language
- Programming Practices
- Using Formulas in Forms and Subforms
- Writing Field Formulas
- Writing View Formulas
- Using Hide When Formulas
- Working with Forms, Views, and Shared Actions
Writing LotusScript for Domino Applications
- Writing LotusScript for Domino Applications
- Software Construction
- Fundamental Elements of LotusScript
- New Technologies and LotusScript
Real-World LotusScript Examples
- Real-World LotusScript Examples
- Real-World Example 1: Importing a Delimited Text File
- Real-World Example 2: Delete a Parent Document and All Its Children: DeleteParentAndChildren
- Real-World Example 3: Schedule an Agent Robot to Refresh All the Documents in a View: Robot-DailyRefreshAllDocs
- Real-World Example 4: Return a Web User to the Place Where He Started After a Document Is Submitted: WebQuerySave-DocSubmit
Writing JavaScript for Domino Applications
- Writing JavaScript for Domino Applications
- What Is JavaScript?
- JavaScript Is Not Java
- JavaScript and the Domino IDE
- The Document Object Model
- JavaScript Support in Domino 6
- When to Use JavaScript
- A Look at JavaScript in Domino
- JavaScript Libraries in Domino
- JavaScript Principles 101
- Syntax and Command Blocks
- Statements
- Output
- Functions
- Objects
- Input Validation
- Validating Check Boxes
- Validating Radio Buttons
- Validating Selection Lists
- Calculations
- JavaScript Application
Real-World JavaScript Examples
- Real-World JavaScript Examples
- Real-World Example 1: Dynamic Drop-Down Lists on the Web
- Real-World Example 2: Dialog Boxes and window. opener on the Web
- Real-World Example 3: Dynamic Tables
- Real-World Example 4: Useful JavaScript Utilities
Writing Java for Domino Applications
- Writing Java for Domino Applications
- Introduction to Java
- Choosing a Java Solution in Domino
- Understanding the Notes Object Interface
- Writing Java Agents
- Using Other Java IDEs
- Other Uses for Java
Real-World Java Examples
Enhancing Domino Applications for the Web
- Enhancing Domino Applications for the Web
- Whats New in Designer 6
- Understanding the Domino Web Application Server
- Understanding the Basics of HTML
- Using HTML in Domino Designer
- Adding Power with Domino URLs
- Views and Forms Working Together on the Web
- Incorporating Flash into Your Web Pages
- What Its All About: XML Exposed
- How Does Domino Use XML?
Part IV. Advanced Design Topics
Accessing Data with XML
Accessing Data with DECS and DCRs
- Accessing Data with DECS and DCRs
- What Is DECS?
- The External Data Source
- DECS Administrator
- Creating the Activity
- Accessing the Application
- DECS Summary
- Data Connection Resources
- DCR Example
- Tips on External Data Access
Security and Domino Applications
- Security and Domino Applications
- How Does Domino Security Work?
- Enabling Physical Security
- Setting Server Access
- Database Access Control Lists
- The Role of the Domino Directory in Application Security
- ACL Privileges
- Enabling Database Encryption
- Using Roles
- Implementing View-Level Security
- Implementing Form-Level Security
- Implementing Document-Level Security
- Applying Field-Level Security
- Hiding the Design of Your Application
Creating Workflow Applications
- Creating Workflow Applications
- The Evolution of Groupware
- Introducing Workflow
- Creating Mail-Enabled Applications
- Using Triggers to Send Email
- Sending Mail with LotusScript
Analyzing Domino Applications
Part V. Appendices
Appendix A. HTML Reference
Appendix B. Domino URL Reference
EAN: 2147483647
Pages: 288
