Real-World Example 1: Dynamic Drop-Down Lists on the Web
Real World Example 1 Dynamic Drop Down Lists on the Web
If you have ever built a serious Domino application for the Web, you know that a refresh can instantly kill the user's interest in the application in just less than 25 seconds. This is the average time it takes for the code bits to travel round-trip from the browser to the server and then back to the client browser with a new screen of data to present to the user . If you're lucky enough to have a high-bandwidth connection to the Internet, a super-wizzy Pentium IV or V PC, and 512MB RAM, this might not be a problem for you. However, statistics show that in real-world situations, most companies do not have full T1 line connectivity out to the Web, employee PCs average 64MB “128MB of memory, and typical PCs are Pentium IIs and IIIs, at best. Developers must create designs built around these facts, all while keeping the user in mind. As corporations roll out Web applications that challenge global languages, the design must also reflect global connectivity and technology issues faced in today's corporate world.
This particular example shows you how to use JavaScript to present dynamically selectable drop-down lists, preventing a refresh after each selection is made in a field by the user. With a twist, this example uses lists built from various fields on a form using one @DbColumn command and then building the other dynamic sublists using JavaScript from the main list. What's so powerful is that after a selection is made in the first field, the next field's list is built dynamically without a browser refresh. Let's get started by first reviewing each of the necessary fields on the form that are needed for this JavaScript example.
The JSExample1 Form Fields
Figure 17.1 shows the JSExample1 form in Domino Designer for the Yonder Produce Market Web site. To support the JavaScript function in this example, we will use one computed field named ProduceCatList and four other multivalue , editable text fields: ProduceCategories, ProduceCategoryItems, ProduceItemPrices, and ProduceItemDetails. These are shown on the form in Figure 17.1.
Figure 17.1. The JSExample1 form, as shown in Domino Designer 6.
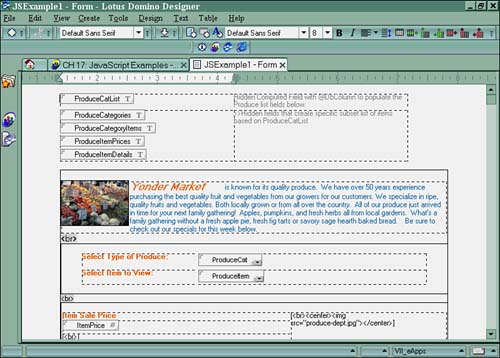
The ProduceCatList field uses a @DbColumn formula to retrieve the list of values from column 1 of the (ProduceCatLookup) view, as shown in Listing 17.1.
Listing 17.1 @DbColumn Formula Used in the ProduceCatList Field
List := @Trim(@Unique(@DbColumn( "":"NoCache";"":"";"ProduceCatLookup"; 1)));
@If(@IsError(List) List = ""; ""; List)
The ProduceCatList field properties are set as Multivalue, Computed, and the multivalue separator options are both set to Semicolon Only. This field produces results that look like Listing 17.2.
Listing 17.2 ProduceCatList Resulting List Value
Fruits~Apples~2.49It's time for Grandma's apple pie! This week's special price makethem irresistible.; Fruits~Avocados~1.29Fresh sun-ripened Avocados can warm up any meal,
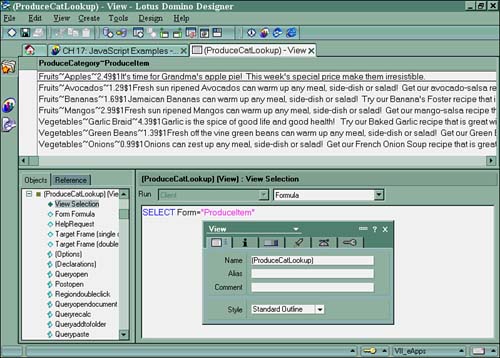
Each value that make up the list is extracted from the respective fields for all the ProduceItem documents in the database by way of the first column in the ProduceCatLookup view. The first column uses the formula shown in Listing 17.3 to build the list and is shown in Designer in Figure 17.2.
Listing 17.3 ProduceCatLookup View Column 1 Formula
CatName+"~"+ItemName+"~"+@Text(Price) +"" + ItemDetails
Figure 17.2. The ProduceCatLookup view, as shown in Domino Designer 6.
This concatenated list allows the four other remaining fields to parse the list and grab only a subset of its items. This makes it easier for the JavaScript routine to render the sublist results more quickly. The ProduceCategories field properties are set to Multivalue, Editable, and the multivalue separator options are both set to Semicolon Only. Its HTML Attributes event uses the "Type="Hidden"" method to hide the field from the user and enables JavaScript to write to it even though the user can't see it. This field uses the default value formula shown in Listing 17.4 to build a subset of the main list that includes only the produce categories found in the ProduceCatList field.
Listing 17.4 ProduceCategories Field Default Value Formula
List := @Unique(@Trim(@Left(ProduceCatList;"~")));
@If(@IsError(List) List = ""; ""; List)
The resulting list for this field looks like this:
Fruits; Vegetables
This list's purpose is to populate the ProduceCat dialog box field with selection items on the JSExample1 form, as shown in Figure 17.1. This is where the user makes the first selection to determine what values are displayed in the ProduceItem field.
The ProduceCategoryItems, ProduceItemPrices, and ProduceItemDetails fields' properties are each set to Multivalue, Editable, and the multivalue separator options are both set to Semicolon Only. The HTML Attributes event for each field uses the "Type="Hidden"" method to hide the field from the user and enables JavaScript to write to it even though the user can't see it. These fields use the default formulas also shown in Table 17.1 to build a different subset of the main list values found in the ProduceCatList field.
Table 17.1. The Various Hidden JavaScript Fields and Their Formulas
| Field Name | Default Value Formula |
|---|---|
| ProduceCategoryItems |
List := @Unique(@Trim(@LeftBack(ProduceCatList; Resulting list looks like: Fruits~Apples; Fruits~Avocados; Fruits~Bananas; |
| ProduceItemPrices |
List := @Unique(@Trim(@Left(@Right(ProduceCatList; Resulting list looks like: Apples~2.49; Avocados~1.29; Bananas~1.69; |
| ProduceItemDetails |
List := @Unique(@Trim(@Right(ProduceCatList; Resulting list looks like: Apples~2.49It's time for Grandma's apple pie! |
The ProduceCat field properties are set to Dialog List, Editable; its default value formula is shown in Listing 17.5.
Listing 17.5 ProduceCat Selection Field Default Value Formula
@If(
 selectedCat!=""&@IsDocBeingSavedselectedCat!="" & @IsDocBeingRecalculated;
 @Return(selectedCat);
 ProduceCat
)
The field's dialog list choices formula uses Use Formula for Choices with the formula shown in Listing 17.6.
Listing 17.6 ProduceCat Dialog List Choices Formula
List := ProduceCategories; @If(List=""@IsError(List); "- No Items Found to Select -"; "- Select Type of Produce -" :
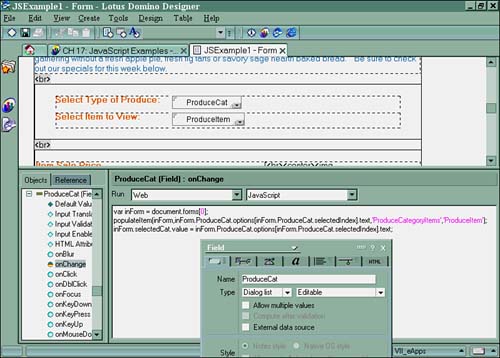
This field's dialog choices are derived from the values in the ProduceCategories list field and are used by the user to select a produce category ”in this case, the choice is either Fruits or Vegetables. If no choice is found in the main list or an error occurs, the No Items Found to Select choice is displayed. After a selection is made, the field's onChange event calls the populateItem() JavaScript function, shown in Figure 17.3, which populates the ProduceItems field with the respective Fruits or Vegetables selectable items. It also sets the hidden JavaScript selectedCat field at the bottom of the form.
Figure 17.3. The ProduceCat field's onChange event.
The ProduceItem field properties are set to Dialog List, Editable; its default value formula is shown in Listing 17.7.
Listing 17.7 ProduceItem Selection Field Default Value Formula
@If(
 selectedItem!=""&@IsDocBeingSavedselectedItem!="" & @IsDocBeingRecalculated;
 @Return(selectedItem);
 ProduceItem
)
This field's dialog box choices are built dynamically by the populateItem() JavaScript function, based on the user selection made in the ProduceCat field.
The field's dialog list choices formula is shown in Listing 17.8.
Listing 17.8 ProduceItem Selection Field Dialog List Choices Formula
List := selectedItem;
@If(List=""@IsError(List); "- Select an Item -" ; "- Select an Item -":List)
)
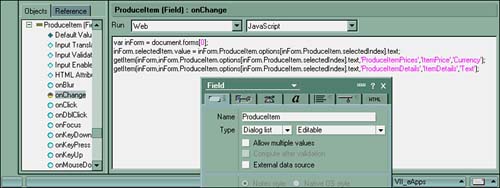
If no choices are found, meaning that a selection has not yet been made in the ProduceCat field or an error has occurred, only the Select an Item choice is displayed by default. After a ProduceItem selection is made, the field's onChange event calls the getItem() JavaScript function as shown in Figure 17.4 that, in turn , populates each of the selected item's detail fields on the form ”ItemDetails and ItemPrice, respectively. The selectedItem field is also set in the onChange event with the current selection value.
Figure 17.4. The ProduceItem field's onChange event.
The populateItem() JavaScript Function
The populateItem() function pulls this example all together. Listing 17.9 shows the function in its entirety. Figure 17.5 shows the populateItem() JavaScript function in Designer 6.
Listing 17.9 The populateItem() JavaScript Function
1. function populateItem(inForm,selected,ListFieldName,TargetFieldName) {
2. var tempString = inForm[ListFieldName].value;
3. var stringArray=explodeArray(tempString,";");
4. var x=0;
5. var y=1;
6. var selectedArray = new Array();
7. //Now for all the Items, go create an Item Array and match them up to the Produce

Categories
 a. for (k = 0; k < stringArray.length; k++) {
 i. var currItem = trim(stringArray[k]);
 ii. var currVal = trim(currItem.substring(currItem.length, (currItem.

lastIndexOf('~')+1)));
 iii. var currCatName = trim(currItem.substring(0, (currItem.lastIndexOf('~'))));

 iv. if (currCatName == selected ) {selectedArray[x] = currVal;x=x+1;v. }
 b. }
 c. while (selectedArray.length < inForm[TargetFieldName].options.length) {
 i. inForm[TargetFieldName].options[(inForm[TargetFieldName].options.length -

1)] = null;
 d. }
 e. //Now create the new items list that the field will use for its selection choices

in the drop-
//down
 field. For each list item that matches the category selected, the item will be

added to
//the
 selectedArray list and then that list displayed in the TargetFieldName field
 f. eval( "inForm[TargetFieldName].options[0]=" + "new Option('- Select an Item -')"

);
 g. for (var i=0; i < selectedArray.length; i++) {
 i. eval("inForm[TargetFieldName].options[y]=" + "new Option('" +

selectedArray[i] + "')");
 ii. y=y+1;
 h. }
8. }
Figure 17.5. The populateItem() JavaScript function in the Programmer's pane in the Designer 6.
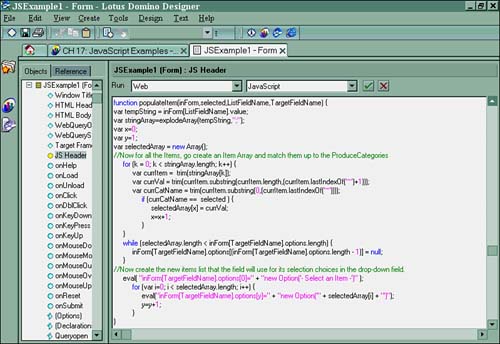
The populateItem() function is called from a field's onChange event, which provides the values for its parameters that are needed to run. These are inForm , selected , ListFieldName , and TargetFieldName , as shown in Line 1 of Listing 17.9. Listing 17.10 shows the code necessary to call the function from the onChange event in the ProduceCat field.
Listing 17.10 Calling the populateItem() JavaScript Function in a Field's onChange Event
var inForm = document.forms[0];
populateItem(inForm, inForm.ProduceCat.options [inForm.ProduceCat.selectedIndex].text,
'ProduceCategoryItems','ProduceItem');
The first parameter, inForm , passes the document.forms[0] string to the function. The second parameter, inForm.ProduceCat.options[inForm.ProduceCat.selectedIndex].text , passes the text value for the selected item name in the current field to the function. The third parameter, 'ProduceCategoryItems' , passes to the function the name of the field that contains the list of categories and items from where the items will be obtained. Finally, the last parameter, 'ProduceItem' , passes to the function the name of the field that will receive the new list of items based on the selection in the ProduceCat field.
Line 2 of Listing 17.9 sets the selected value to a tempString variable so that it can be used in line 3 to create a new stringArray using the explodeArray() JavaScript function. Lines 4 and 5 set variable integers to and 1 , respectively, which are used in the for loops later in the script. Line 6 creates the empty shell for a new array called selectedArray[] that will be used later in the script to create the list of items for the ProduceItem field. Line 7.a begins the for loop that loops through the stringArray[k] list, which we exploded earlier in the script, to grab all the items in the list that match the selected produce category ( selected ); it then places them in a new array called selectedArray[x] . The x=x+1 operation in line 7.a.iv.2 is used as a counter to renumerate the objects in the selectedArray[x] as they are found. Because the first instance in an array always begins at , x was initialized at in Line 4. The while loop in lines 7.c and 7.c.i redeclares each of the target field options in the list to null , to prepare for the new dynamic items. In simpler terms, this really just resizes the target field list so that it can fit the new items from the selectedArray[x] array that we are building in the script.
Line 7.f declares the first instance of [0] in the ProduceItem field as Select an Item. This means that the Select an Item choice always is the first item on the list. This is also why the y integer variable is initialized to 1 in line 5. Each item added to the field list after [0] begins at 1 and then goes to (y=y+1) thereafter, as shown in line 7.g.ii. This is an easy method to force an item to always be the first instance, [0] , in any given array, or merely the first item on any given list.
The FOR loop in line 7.g provides the means for the script to loop through each item in the newly created selectedArray[i] array and to add the item ( option[y] ) to the ProduceItem field in this case.
This script is really quite simple, but is very powerful. Let's see what this all looks like on the Web.
Figure 17.6 shows the JSExample1 form as displayed on the Web.
Figure 17.6. The JSExample1 form on the Web.
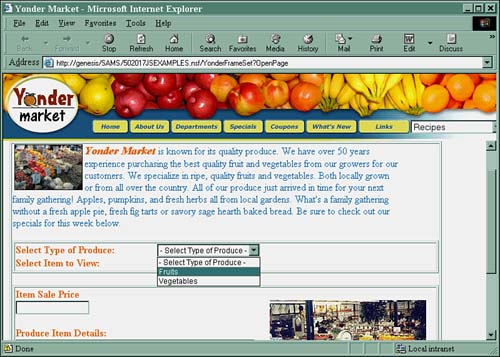
The first selection is made in the Select Type of Produce field. Figure 17.7 shows the Fruits selection made.
Figure 17.7. Making a selection in the first drop-down field.

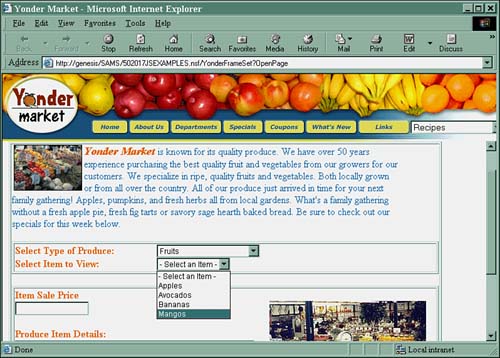
After the selection is made in the first ProduceCat field, the values dynamically change in the second selection field, depending whether the item Fruits or Vegetables is selected. Figure 17.8 shows the ProduceItem field values when Fruits is selected in the first field.
Figure 17.8. Making a selection in the second drop-down field.
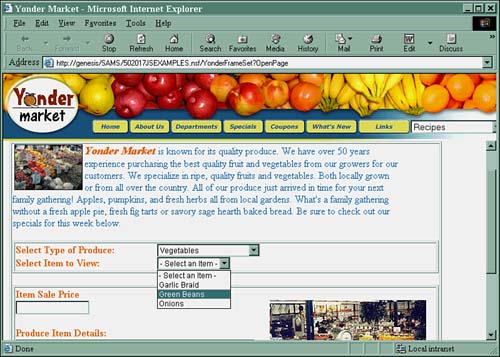
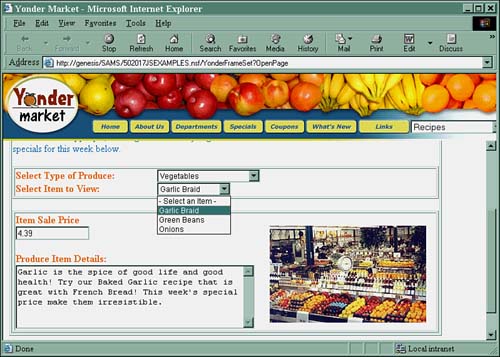
Let's change the selection in the first field to Vegetables and see the new choices in the second Produce Items field, as shown in Figure 17.9.
Figure 17.9. Changing the selection in the first drop-down field to generate new values in the second field.
What's more, after a selection is made in the second field, the item's associated details are also populated in the fields farther down in the document, as shown in Figure 17.10.
Figure 17.10. Changing the selection in the first drop-down field to generate new values in the second field.
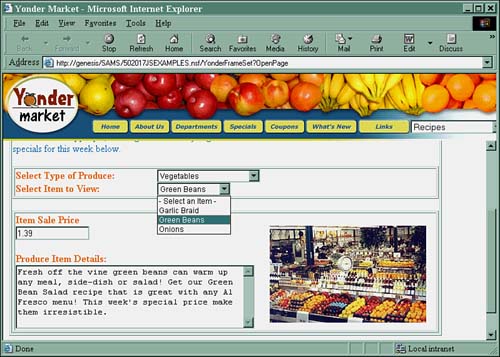
If the second selection is changed, the item's details are also changed for the item selected, as shown in Figure 17.11.
Figure 17.11. Making a selection in the second drop-down field based on the selection made in the first field.
This example can be used by any set of selection fields as long as you provide the dialog box list fields and the parameters to the JavaScript function. This saves you from calling a refresh in the Web browser and irritating your users. One @ DbLookup command upon form load is much easier to manage than a 25-second form refresh on the Web.
Part I. Introduction to Release 6
Whats New in Release 6?
- Whats New in Release 6?
- A Brief History of Lotus Notes
- Major Features of Lotus Notes
- Types of Applications
- Whats New in Domino Designer?
- New Design Element Features
- New Language Features
The Release 6 Object Store
- The Release 6 Object Store
- Defining a Domino Database
- Understanding the Database Structure
- Creating a Database
- Working with Database Properties
- Understanding Design Templates
- Creating Your Own Templates
- Inheriting Designs from Templates
- Using Templates to Replicate Design Changes
- Using Templates as Design Libraries
- Archiving Versions with Templates
The Integrated Development Environment
- The Integrated Development Environment
- Working in the Application Design Environment
- Working with the Properties Box
- Understanding the Work Pane
- Using the Programmers Pane
- Understanding the Info List
- Understanding the Action Pane
- Customizing the Tools Menu
- Printing Source Code
- Using the HTML Editor
- Locking Design Elements
Part II. Foundations of Application Design
Forms Design
- Forms Design
- Designing Forms
- Setting Form Properties
- Working with Text Properties
- Working with Fields
- Writing Formulas in Fields
Advanced Form Design
- Advanced Form Design
- Working with Tables
- Using Graphic Objects on Forms
- Working with Form-Level Events
- Using Form Actions
- Working with Hotspots
- Understanding Sections and Section Properties
- Using Layout Regions
- Working with Special Forms
- Creating Reusable Design Objects
- Using Embedded Elements
- Using the Form Design Document
Designing Views
- Designing Views
- Defining the Elements of a View
- Creating a View
- Setting View Properties
- Creating Advanced View Selections
- Adding and Editing View Columns
- Using View Column Properties
- Adding Actions to a View
- Creating Calendar Views
- Understanding Folders
Using Shared Resources in Domino Applications
- Shared Resources
- Sharing Images Within a Database
- Creating Shared Files
- Creating Shared Applets
- Shared Code
- Creating Subforms
- Creating Shared Fields
- Creating Shared Actions
- Script Libraries
- Database Resources
Using the Page Designer
- Using the Page Designer
- Understanding Pages
- Working with the Page Properties Box
- Using the Page Designer
- Adding Layers to Your Pages
Creating Outlines
- Creating Outlines
- Creating an Outline
- Working with Outline Entries
- Embedding Outlines
- Adding an Outline to a Frameset
Adding Framesets to Domino Applications
- Adding Framesets to Domino Applications
- Creating a Frameset
- Using the Frameset Designer
- Working with Frames
- Viewing the HTML Source of Your Frameset
- Launching the Frameset
Automating Your Application with Agents
- Automating Your Application with Agents
- Working with Agents
- Creating an Agent
- Working in the Agent Builder Design Window
- Using @Commands in Agents
- Putting Your Agent to Work
- Creating a Complex Agent
- Using LotusScript in Agents
- Creating Web Agents Using Formulas and LotusScript
- Using Java in Agents
- Testing and Debugging Agents, the Agent Log, and Agent Properties
- Agent Properties via the Agent InfoBox
Part III. Programming Domino Applications
Using the Formula Language
- Using the Formula Language
- Overview of the Formula Language
- Knowing Where to Use @Functions and @Commands
- Formula Syntax
- Limitations of the Formula Language
- Working with Statements
- Using Logical @Functions
- Working with Date and Time @Functions
- Working with Strings
- Getting Session and User Information
- Working with Documents
- Retrieving Data with @DbColumn and @DbLookup
- Working with Lists
- Getting User Input
- Controlling the Flow of a Formula
- Error Handling
Real-World Examples Using the Formula Language
- Real-World Examples Using the Formula Language
- Programming Practices
- Using Formulas in Forms and Subforms
- Writing Field Formulas
- Writing View Formulas
- Using Hide When Formulas
- Working with Forms, Views, and Shared Actions
Writing LotusScript for Domino Applications
- Writing LotusScript for Domino Applications
- Software Construction
- Fundamental Elements of LotusScript
- New Technologies and LotusScript
Real-World LotusScript Examples
- Real-World LotusScript Examples
- Real-World Example 1: Importing a Delimited Text File
- Real-World Example 2: Delete a Parent Document and All Its Children: DeleteParentAndChildren
- Real-World Example 3: Schedule an Agent Robot to Refresh All the Documents in a View: Robot-DailyRefreshAllDocs
- Real-World Example 4: Return a Web User to the Place Where He Started After a Document Is Submitted: WebQuerySave-DocSubmit
Writing JavaScript for Domino Applications
- Writing JavaScript for Domino Applications
- What Is JavaScript?
- JavaScript Is Not Java
- JavaScript and the Domino IDE
- The Document Object Model
- JavaScript Support in Domino 6
- When to Use JavaScript
- A Look at JavaScript in Domino
- JavaScript Libraries in Domino
- JavaScript Principles 101
- Syntax and Command Blocks
- Statements
- Output
- Functions
- Objects
- Input Validation
- Validating Check Boxes
- Validating Radio Buttons
- Validating Selection Lists
- Calculations
- JavaScript Application
Real-World JavaScript Examples
- Real-World JavaScript Examples
- Real-World Example 1: Dynamic Drop-Down Lists on the Web
- Real-World Example 2: Dialog Boxes and window. opener on the Web
- Real-World Example 3: Dynamic Tables
- Real-World Example 4: Useful JavaScript Utilities
Writing Java for Domino Applications
- Writing Java for Domino Applications
- Introduction to Java
- Choosing a Java Solution in Domino
- Understanding the Notes Object Interface
- Writing Java Agents
- Using Other Java IDEs
- Other Uses for Java
Real-World Java Examples
Enhancing Domino Applications for the Web
- Enhancing Domino Applications for the Web
- Whats New in Designer 6
- Understanding the Domino Web Application Server
- Understanding the Basics of HTML
- Using HTML in Domino Designer
- Adding Power with Domino URLs
- Views and Forms Working Together on the Web
- Incorporating Flash into Your Web Pages
- What Its All About: XML Exposed
- How Does Domino Use XML?
Part IV. Advanced Design Topics
Accessing Data with XML
Accessing Data with DECS and DCRs
- Accessing Data with DECS and DCRs
- What Is DECS?
- The External Data Source
- DECS Administrator
- Creating the Activity
- Accessing the Application
- DECS Summary
- Data Connection Resources
- DCR Example
- Tips on External Data Access
Security and Domino Applications
- Security and Domino Applications
- How Does Domino Security Work?
- Enabling Physical Security
- Setting Server Access
- Database Access Control Lists
- The Role of the Domino Directory in Application Security
- ACL Privileges
- Enabling Database Encryption
- Using Roles
- Implementing View-Level Security
- Implementing Form-Level Security
- Implementing Document-Level Security
- Applying Field-Level Security
- Hiding the Design of Your Application
Creating Workflow Applications
- Creating Workflow Applications
- The Evolution of Groupware
- Introducing Workflow
- Creating Mail-Enabled Applications
- Using Triggers to Send Email
- Sending Mail with LotusScript
Analyzing Domino Applications
Part V. Appendices
Appendix A. HTML Reference
Appendix B. Domino URL Reference
EAN: 2147483647
Pages: 288
