Setting View Properties
Before you add columns or other elements to the view, I want to take a moment to discuss the View properties box, which provides options for setting colors and styles as well as global indexing options. This is where you enter the name and the alias for a view. There are six tabs on the View properties box:
- View Info
- Options
- Styles
- Launch
- Advanced
- Security
Setting View Info Properties
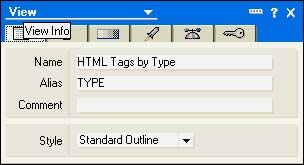
The View Info tab (see Figure 6.4) is where you name views, create aliases, and choose the type of view. Names are entered in the Name field and cannot exceed 64 characters . It is always a good idea to create a view alias, just as it is a good idea to create a form alias. Views can be referred to in formulas just as forms can. Using a view alias in formulas allows the view name to be changed without affecting the formulas. Keep the alias short to facilitate use in a formula. As the number of views grows, you will probably want to collect them into folders. This involves changing the name; if you have been careful to use a view alias and to use that alias in formulas referencing the view, no formulas have to be changed.
Figure 6.4. The View Info tab of the View properties dialog box includes a field for defining the alias.
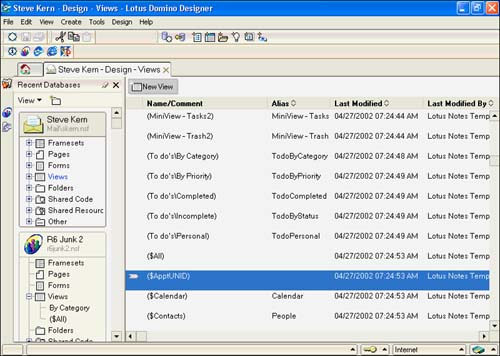
Some views are actually hidden from users. These views appear in the View Design folder with parentheses around them. Placing the view title in parentheses hides the view.
NOTE
Hidden views can be useful. I often use a hidden view for populating keyword fields in a form by using @DbLookup() and @DbColumn() formulas to access the data in the view. To distinguish this type of hidden view from other hidden views, I use LU for "look up" as the first two letters of the name. (LUDept) and (LUCustomer) are typical examples. I try to avoid using regular views for lookup purposes because if users want a change to the view, it's easy to forget that it's a lookup view and make changes that cause the lookups to fail.
You can collect views into folders and cascade them by naming them with the backslash (). Everything to the right of the slash appears either inside a folder or cascaded on the menu. This allows the designer to collect related views together easily. Up to 200 cascading views can be added to a database ”a limit that, in practice, you'll never reach. If the views are included on the View menu, there is a limit of nine views per level, after which Other appears on the menu. Clicking Other produces a dialog box that displays all the views. In my opinion, it is best to leave the views completely off the View menu, avoiding the Other window altogether. Another reason to keep views from the View menu is that users are accustomed to working with the Navigation pane, not the View menu, to navigate the database. Users typically won't look at the View menu to navigate. If for some reason, however, the design calls for the views to be on the View menu, take all possible precautions to keep the levels to nine or fewer.
A field called Comment can be used for a simple description of the view. Although the text scrolls in the field, it is impossible to view the complete comment. Practically speaking, the comment is limited to the visible area of the field. Oddly enough, the comment does not even appear in the design synopsis of the view.
The last field on the View Info tab is the Style field. Not to be confused with the Style tab, this field has two selections: Standard Outline (the default) and Calendar. Most views are created in the Standard Outline style; the Calendar style creates a view similar to the Calendar view in your mail database.
Setting View Options Properties
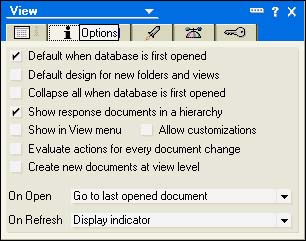
Many of the choices on the Options tab are self-explanatory (see Figure 6.6). Here you define a default view for your database, which appears when the database is first opened. You can also set the property Default Design for New Folders and Views. As described earlier, when you do so, the default view is automatically chosen as the template for all new views that you create.
Figure 6.6. The Options tab of the View properties box is where the default view for the database is selected.
TIP
It is often a good idea to make sure that the view you select as the default design does not exclude any documents. This is the view upon which new views and folders will be based.
If the view includes sorted and categorized columns, documents appear under the categories. Choosing Collapse All When Database Is First Opened causes only the top-level categories to appear. Show Response Documents in a Hierarchy is chosen by default; this selection causes response documents to be indented under the parent document. This is commonly used in discussion databases. Selecting Show in View Menu causes the view to appear in the View menu.
The Allow Customizations check box is new to Notes and Domino 6. If you click this check box, users can customize the view. This includes moving columns in the view, resizing columns, and changing colors. Note that sticky column sorts are available even if you set this option.
The setting Evaluate Actions for Every Document Change is also new to Notes and Domino 6. If you select this feature, each time you move to a new document, actions such as hide-when are evaluated. As you can imagine, this can have a negative impact on performance, so use this feature carefully .
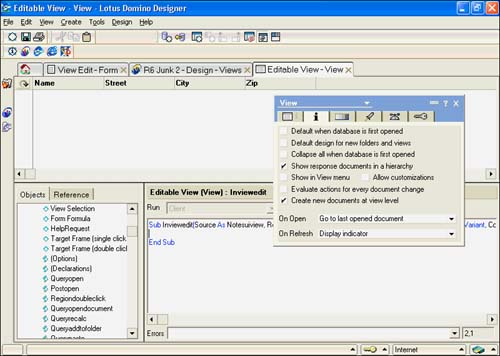
By selecting the option Create New Documents at the View Level, also new to Notes and Domino 6, you can save users some time by letting them create and edit documents at the view level, instead of using a form. For this to work, you must program the InViewEdit event for the view and, for each column that is editable, select the property Editable Column from the Column Properties dialog box. The view displays with the text Ctrl+Click Here to Add a New Document after the last row.
On Open has three choices: Go to Last Opened Document (the default), Go to Top Row, and Go to Bottom Row. The last two choices are useful if the documents are sorted by date, for example. If the first column in the view is sorted by descending date, Go to Top Row moves the document highlight to the most recent entry.
On Refresh has four choices: Display Indicator, Refresh Display, Refresh Display from Top Row, and Refresh Display from Bottom Row. In my experience, these settings are rarely used; I prefer to leave this field set at the default. The display indicator is visible in Figure 6.7 and is a small circular arrow that appears to the left of the view column header. This visual cue lets the user know that the view needs to be refreshed; clicking the display indicator refreshes the view. Visual cues are an important facet of UI design, and you should use them when they're available.
Figure 6.7. The view refresh indicator displays whenever a new document has been added to the database that is not showing in the view.
Setting Style Properties
The numerous settings on the Style tab (see Figure 6.8) fall into six categories:
- Body ” Sets color for the rows and alternate rows. Choose a background image and how it is displayed.
- Grid ” Choose a grid style from None, Solid, Dashed, Dots, and Dashes and Dots. Select a color for the grid.
- Header ” Select a header style from None, Flat, Simple, and Beveled. Also choose a color and a height from 1 to 5.
- Rows ” Choose a height for rows from 1 to 9, and choose the spacing between rows. With multiple lines per row, you can shrink rows to content; this setting is useful for stacking lists stored in multivalue fields and for text fields that store information such as comments or descriptions. You can also choose not to show empty categories and to colorize view icons. You can also choose a color for unread rows, and you can set them to Bold or Transparent. The last choice is for the color of the column total text.
- Other ” In this section, you can choose to show the selection margin and to hide the margin border. The selection margin is an area to the left of the rows in the view that shows a check mark when documents are selected, the Delete icon, and, with appropriate settings, an asterisk when documents are unread. Marking Extend Last Column to Window Width is a good choice to display text fields such as comments fields.
- Margin ” Settings for this category are similar to the settings for table borders. You can change the thickness of the borders individually or in a group . You can also select a color for the margins.
Figure 6.8. The Style tab of the View properties box has many settings for the developer.

Setting Launch Properties
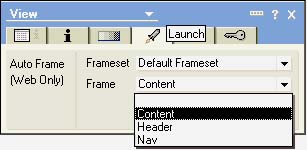
The Launch tab can be seen in Figure 6.9. Once you have chosen a frameset from the list, you can specify which frame the view will use. This is available only to Web browsers, as the caption on the properties box indicates. The frameset must already exist, and the individual frames must be named.
Figure 6.9. The Content frame is specified on the Launch tab of this View properties box.
Setting Advanced Properties
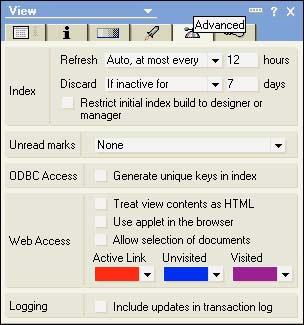
The Advanced tab has many settings of interest to developers (see Figure 6.10). There are five groups of settings on this tab:
- Index ” The Index section has settings that control the refresh period of indexes, the discard period, and the access level for the initial index build. For the most part, Domino Administrators rather than developers will use these settings.
- Unread Marks ” There are three choices: None, Unread Documents Only, and Standard (Compute in Hierarchy). If you choose Unread Documents Only, asterisks will appear only for main and response documents; they will not appear for collapsed categories. This setting improves performance over Standard, which displays an asterisk for every document, regardless of its position.
- ODBC Access ” Only one check box exists, Generate Unique Keys in Index. You use this with the NotesSQL DISTINCT clause to retrieve unique (nonduplicate) data from an ODBC relational data source.
- Web Access ” This section determines how the view will function when accessed from a Web browser. Choosing the setting Treat View Contents as HTML enables you to fill contents of the columns with HTML. The HTML displays for Web browsers, and the Formula language displays for Notes clients . The view applet gives Web browsers some of the functionality that a standard Notes client has. Clicking the check box Allow Selection of Documents gives Web browsers the capability to select documents. As with a Notes client, a check mark appears in the selection margin. Three options determine what colors display for the active link and unvisited and visited links in the view.
- Logging ” The setting Include Updates in Transaction Log works in conjunction with database transaction logging.
Figure 6.10. The Advanced "propeller beanie" tab has choices for Index, Unread Marks, ODBC Access, Web Access, and Logging.
TIP
The Refresh Index options can be changed from automatic to one of the other choices to improve performance. If a column formula is based on @Now or another time-dependent function (such as you might use to "age" documents), the refresh indicator displays constantly. To eliminate this, you can either turn off the display indicator or change the Refresh Index options to Manual or Auto, at Most Every XX Hours. Changing the Discard Index options from the default of Never can be used to conserve disk space. If the index is discarded, displaying it subsequently can be very time-consuming .
The view applet provides Web clients with the following abilities for manipulating a view from the Web:
- Resizing columns
- Collapsing and expanding views without regenerating the page
- Using a vertical scrollbar
- Refreshing view with F9
- Selecting multiple documents
- Marking documents for deletion by pressing the Del key
Setting Security Properties
The Security tab (see Figure 6.11) controls access to the view. Access is normally set to All readers and above, but by deselecting this, you can restrict the readers of a view. The window is scrollable and displays the users and groups in the ACL, as well as the roles for the database. The button to the right of the window allows access to the Domino directory. Using roles in conjunction with Author access in the database ACL is a powerful way to extend editing privileges to certain documents without giving the user Editor access to the entire database. You can further extend this control by not allowing certain forms to appear on the Create menu and using a view with limited access. Putting an Action bar button on that view or views to create documents using a specific form effectively restricts create access to those documents.
Figure 6.11. The Security tab (the Key icon) controls read access to the view.
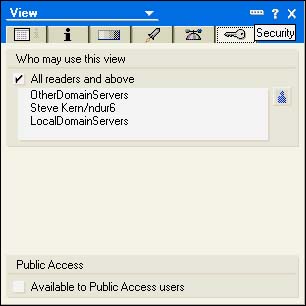
The option Available to Public Access Users works in conjunction with the ACL properties Read Public Documents and Write Public Documents. Your mail database uses these properties to allow access to your calendar.
Part I. Introduction to Release 6
Whats New in Release 6?
- Whats New in Release 6?
- A Brief History of Lotus Notes
- Major Features of Lotus Notes
- Types of Applications
- Whats New in Domino Designer?
- New Design Element Features
- New Language Features
The Release 6 Object Store
- The Release 6 Object Store
- Defining a Domino Database
- Understanding the Database Structure
- Creating a Database
- Working with Database Properties
- Understanding Design Templates
- Creating Your Own Templates
- Inheriting Designs from Templates
- Using Templates to Replicate Design Changes
- Using Templates as Design Libraries
- Archiving Versions with Templates
The Integrated Development Environment
- The Integrated Development Environment
- Working in the Application Design Environment
- Working with the Properties Box
- Understanding the Work Pane
- Using the Programmers Pane
- Understanding the Info List
- Understanding the Action Pane
- Customizing the Tools Menu
- Printing Source Code
- Using the HTML Editor
- Locking Design Elements
Part II. Foundations of Application Design
Forms Design
- Forms Design
- Designing Forms
- Setting Form Properties
- Working with Text Properties
- Working with Fields
- Writing Formulas in Fields
Advanced Form Design
- Advanced Form Design
- Working with Tables
- Using Graphic Objects on Forms
- Working with Form-Level Events
- Using Form Actions
- Working with Hotspots
- Understanding Sections and Section Properties
- Using Layout Regions
- Working with Special Forms
- Creating Reusable Design Objects
- Using Embedded Elements
- Using the Form Design Document
Designing Views
- Designing Views
- Defining the Elements of a View
- Creating a View
- Setting View Properties
- Creating Advanced View Selections
- Adding and Editing View Columns
- Using View Column Properties
- Adding Actions to a View
- Creating Calendar Views
- Understanding Folders
Using Shared Resources in Domino Applications
- Shared Resources
- Sharing Images Within a Database
- Creating Shared Files
- Creating Shared Applets
- Shared Code
- Creating Subforms
- Creating Shared Fields
- Creating Shared Actions
- Script Libraries
- Database Resources
Using the Page Designer
- Using the Page Designer
- Understanding Pages
- Working with the Page Properties Box
- Using the Page Designer
- Adding Layers to Your Pages
Creating Outlines
- Creating Outlines
- Creating an Outline
- Working with Outline Entries
- Embedding Outlines
- Adding an Outline to a Frameset
Adding Framesets to Domino Applications
- Adding Framesets to Domino Applications
- Creating a Frameset
- Using the Frameset Designer
- Working with Frames
- Viewing the HTML Source of Your Frameset
- Launching the Frameset
Automating Your Application with Agents
- Automating Your Application with Agents
- Working with Agents
- Creating an Agent
- Working in the Agent Builder Design Window
- Using @Commands in Agents
- Putting Your Agent to Work
- Creating a Complex Agent
- Using LotusScript in Agents
- Creating Web Agents Using Formulas and LotusScript
- Using Java in Agents
- Testing and Debugging Agents, the Agent Log, and Agent Properties
- Agent Properties via the Agent InfoBox
Part III. Programming Domino Applications
Using the Formula Language
- Using the Formula Language
- Overview of the Formula Language
- Knowing Where to Use @Functions and @Commands
- Formula Syntax
- Limitations of the Formula Language
- Working with Statements
- Using Logical @Functions
- Working with Date and Time @Functions
- Working with Strings
- Getting Session and User Information
- Working with Documents
- Retrieving Data with @DbColumn and @DbLookup
- Working with Lists
- Getting User Input
- Controlling the Flow of a Formula
- Error Handling
Real-World Examples Using the Formula Language
- Real-World Examples Using the Formula Language
- Programming Practices
- Using Formulas in Forms and Subforms
- Writing Field Formulas
- Writing View Formulas
- Using Hide When Formulas
- Working with Forms, Views, and Shared Actions
Writing LotusScript for Domino Applications
- Writing LotusScript for Domino Applications
- Software Construction
- Fundamental Elements of LotusScript
- New Technologies and LotusScript
Real-World LotusScript Examples
- Real-World LotusScript Examples
- Real-World Example 1: Importing a Delimited Text File
- Real-World Example 2: Delete a Parent Document and All Its Children: DeleteParentAndChildren
- Real-World Example 3: Schedule an Agent Robot to Refresh All the Documents in a View: Robot-DailyRefreshAllDocs
- Real-World Example 4: Return a Web User to the Place Where He Started After a Document Is Submitted: WebQuerySave-DocSubmit
Writing JavaScript for Domino Applications
- Writing JavaScript for Domino Applications
- What Is JavaScript?
- JavaScript Is Not Java
- JavaScript and the Domino IDE
- The Document Object Model
- JavaScript Support in Domino 6
- When to Use JavaScript
- A Look at JavaScript in Domino
- JavaScript Libraries in Domino
- JavaScript Principles 101
- Syntax and Command Blocks
- Statements
- Output
- Functions
- Objects
- Input Validation
- Validating Check Boxes
- Validating Radio Buttons
- Validating Selection Lists
- Calculations
- JavaScript Application
Real-World JavaScript Examples
- Real-World JavaScript Examples
- Real-World Example 1: Dynamic Drop-Down Lists on the Web
- Real-World Example 2: Dialog Boxes and window. opener on the Web
- Real-World Example 3: Dynamic Tables
- Real-World Example 4: Useful JavaScript Utilities
Writing Java for Domino Applications
- Writing Java for Domino Applications
- Introduction to Java
- Choosing a Java Solution in Domino
- Understanding the Notes Object Interface
- Writing Java Agents
- Using Other Java IDEs
- Other Uses for Java
Real-World Java Examples
Enhancing Domino Applications for the Web
- Enhancing Domino Applications for the Web
- Whats New in Designer 6
- Understanding the Domino Web Application Server
- Understanding the Basics of HTML
- Using HTML in Domino Designer
- Adding Power with Domino URLs
- Views and Forms Working Together on the Web
- Incorporating Flash into Your Web Pages
- What Its All About: XML Exposed
- How Does Domino Use XML?
Part IV. Advanced Design Topics
Accessing Data with XML
Accessing Data with DECS and DCRs
- Accessing Data with DECS and DCRs
- What Is DECS?
- The External Data Source
- DECS Administrator
- Creating the Activity
- Accessing the Application
- DECS Summary
- Data Connection Resources
- DCR Example
- Tips on External Data Access
Security and Domino Applications
- Security and Domino Applications
- How Does Domino Security Work?
- Enabling Physical Security
- Setting Server Access
- Database Access Control Lists
- The Role of the Domino Directory in Application Security
- ACL Privileges
- Enabling Database Encryption
- Using Roles
- Implementing View-Level Security
- Implementing Form-Level Security
- Implementing Document-Level Security
- Applying Field-Level Security
- Hiding the Design of Your Application
Creating Workflow Applications
- Creating Workflow Applications
- The Evolution of Groupware
- Introducing Workflow
- Creating Mail-Enabled Applications
- Using Triggers to Send Email
- Sending Mail with LotusScript
Analyzing Domino Applications
Part V. Appendices
Appendix A. HTML Reference
Appendix B. Domino URL Reference
EAN: 2147483647
Pages: 288
- Step 1.1 Install OpenSSH to Replace the Remote Access Protocols with Encrypted Versions
- Step 2.1 Use the OpenSSH Tool Suite to Replace Clear-Text Programs
- Step 4.3 How to Generate a Key Pair Using OpenSSH
- Step 4.4 How to Generate a Key Using PuTTY
- Step 6.2 Using Port Forwarding Within PuTTY to Read Your E-mail Securely
