Creating a View
Of all the major design elements, views are perhaps the easiest to create. I don't mean to imply that all views will be simple; indeed, some views can take a considerable amount of time to create. However, the actual process is relatively easy, and a simple view can be constructed in a short period of time.
There are two view styles: Outline and Calendar. An Outline view displays documents in a tabular format, and a Calendar view displays documents in day, week, and month formats. Your Notes All Documents view is an example of a standard Outline view, and your Notes Calendar is an example of a Calendar view. Both can be found in your mail database.
There are two types of views: shared and private. When you create a view, you must specify the type, and you cannot change it. Essentially, there are six types of views:
- Shared
- Shared, Contains Documents Not in Any Folders
- Shared, Contains Deleted Documents (used with soft deletions)
- Shared, Private on First Use
- Shared, Desktop Private on First Use
- Private
In Notes and Domino 6, Shared is the default view type of view. Users with Reader access to the database can create their own private views if given the access through the Create Personal Folders/Views option in the Access Control List (ACL) for the database. Users with Editor access and above can create shared views as long as Create Shared Folders/Views is checked in the ACL for that user or a group to which the user belongs. For designers and managers, it is checked by default. Views can be created from the Designer by selecting Views in the design tile, and clicking the New View button. Alternatively, you can choose Create, Design View from the menu. To create a shared view, select Shared from the drop-down box at the top of the Create View dialog box. See Figure 6.2.
Figure 6.2. The default view type from the Create View dialog box is Shared in Notes and Domino 6. You can see the choices in the View Type drop-down list.
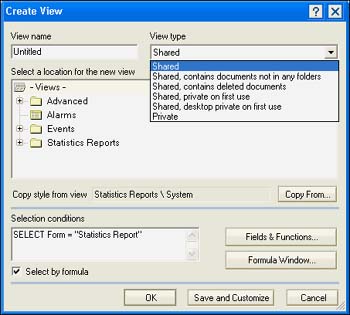
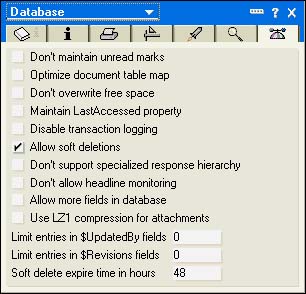
Shared is the most common type of view. The second view type, Shared, Contains Documents Not in Any Folder, speaks for itself. The third view type, Shared, Contains Deleted Documents, is quite useful for reviewing documents that are marked for deletion before actually deleting them. To use this properly, you must also set the database property Allow Soft Deletions, on the Advanced tab, as shown in Figure 6.3. In combination with the setting on the same tab titled Soft Delete Expire Time in Hours, this determines how long deleted documents will remain in the database before being permanently deleted. Documents in the deleted view can be undeleted by dragging them to another folder. Alternatively, you can program a button to accomplish the task.
Figure 6.3. Enabling soft deletions in the database properties requires a Shared, Contains Deleted Documents view.
The fourth view type, Shared, Private on First Use, and the fifth, Shared, Desktop Private on First Use, are useful for displaying a subset of documents unique to individual users. Essentially, this is a design that is shared, in the sense that it appears to all users ”but when it is first used, it becomes personal to the user. In a contact-management database, a view such as this could be used to display accounts specific to a salesperson. The difference between these two views is that one is stored with the database and the other is stored in the desktop.dsk file.
The sixth view type, Private, is created by the user. If the user has the rights to create private views in the ACL, the private view is stored on the server. Otherwise, the view is stored in the desktop.dsk file. For this reason, many administrators do not permit the option Create Personal Views/Folders to be set. Of the six views available, the type you will create most often will be a shared view.
Navigating the Create View Dialog Box
Quite a few decisions must be made when first creating the view, as you can see from Figure 6.2. Selecting the view type is just one of them.
Naming a view is the first step. In selecting a name for a view, choose one that's descriptive and that reflects the contents of the view. In earlier versions of Notes and Domino, the view name was used as the link to access the view from the UI; therefore, it was necessary to make the name something that would make sense to the user. However, it's easy to customize the label displayed to the user through the use of outlines, which were introduced in Release 5. Therefore, the name can be a bit less wordy and still be meaningful to you without having to worry about the UI. After you've named the view, you can decide where to place it.
If your database will have a large number of views, it is a good idea to set up a hierarchy that will organize your views. The hierarchical structure that you create can then be used to automatically generate an outline. For example, the Monitoring Results database used by Domino Administrators has multiple layers of views. You create a view hierarchy by including the slash () character in the name, as in EventsBy Severity, which has one levels or folders, or EventsBy GeneratorTCP Server, which has two. Once you have your hierarchy created, you can place views into folders.
You might notice in Figure 6.2 that the Copy Style from View field already contains a view name. If you are creating a new view in an existing database and a view is set as the default, the default view for that database will appear in this field. You can also use the Copy From button to select a view design that is similar to a view that already exists, or you can select Folders and Views if you want to create a view from scratch. By using an existing view design, you avoid having to re-create all those columns, and you can cut any columns that you won't need.
I'll skip the Selection conditions for now and come back to them later in this chapter. For now, simply be aware that you can write your selection formula up front rather than waiting to enter the IDE by clicking the Add Condition button, or by clicking the Select by Formula check box and then clicking either the Fields and Functions button or the Formula Window button that appear.
If you are not going to actually work on the design of the view at this time, choose the OK button to save your new view without taking you into design mode. However, most of the time you should choose the Save and Customize button so that you can get into design mode and create your new view.
It almost goes without saying that it is a good idea to put some thought into what you are about to create. At minimum, you need to determine the following:
- What documents will be displayed (view selection)
- How those documents will be sorted and grouped ( categorized, in Notes parlance)
- What fields (items), images, or text should be displayed in the view columns
Of course, there are many other elements for you to consider; I'll discuss those in the coming pages.
Creating a View Design Checklist
You might find it useful to create a view design checklist. When complete, the checklist can become part of the project documentation. The list in Table 6.2 is not necessarily complete, and not all the items are necessary for all views.
Table 6.2. View Design Checklist
| Item | Description |
|---|---|
| View Name | Name of the view. |
| View Alias | Alias of the view. |
| Description | Describes the audience and the purpose of the view. |
| View Contents | A simple description of which documents will appear in the view. |
| View Style | Outline, Calendar. |
| View Type | Shared, private, and so on. |
| View Selection | Describes the documents that appear in the view. |
| View Access | General availability, or secured. |
| Document Hierarchy | Describes the response hierarchy or other hierarchy used in the view. |
| Document Categorization | Briefly indicates any document categorization used. |
| Form Formula | If a Form formula is used, describes its purpose. |
| Column 1 xx | Description of the contents of columns and include sort and categorize settings. Column formula. |
Part I. Introduction to Release 6
Whats New in Release 6?
- Whats New in Release 6?
- A Brief History of Lotus Notes
- Major Features of Lotus Notes
- Types of Applications
- Whats New in Domino Designer?
- New Design Element Features
- New Language Features
The Release 6 Object Store
- The Release 6 Object Store
- Defining a Domino Database
- Understanding the Database Structure
- Creating a Database
- Working with Database Properties
- Understanding Design Templates
- Creating Your Own Templates
- Inheriting Designs from Templates
- Using Templates to Replicate Design Changes
- Using Templates as Design Libraries
- Archiving Versions with Templates
The Integrated Development Environment
- The Integrated Development Environment
- Working in the Application Design Environment
- Working with the Properties Box
- Understanding the Work Pane
- Using the Programmers Pane
- Understanding the Info List
- Understanding the Action Pane
- Customizing the Tools Menu
- Printing Source Code
- Using the HTML Editor
- Locking Design Elements
Part II. Foundations of Application Design
Forms Design
- Forms Design
- Designing Forms
- Setting Form Properties
- Working with Text Properties
- Working with Fields
- Writing Formulas in Fields
Advanced Form Design
- Advanced Form Design
- Working with Tables
- Using Graphic Objects on Forms
- Working with Form-Level Events
- Using Form Actions
- Working with Hotspots
- Understanding Sections and Section Properties
- Using Layout Regions
- Working with Special Forms
- Creating Reusable Design Objects
- Using Embedded Elements
- Using the Form Design Document
Designing Views
- Designing Views
- Defining the Elements of a View
- Creating a View
- Setting View Properties
- Creating Advanced View Selections
- Adding and Editing View Columns
- Using View Column Properties
- Adding Actions to a View
- Creating Calendar Views
- Understanding Folders
Using Shared Resources in Domino Applications
- Shared Resources
- Sharing Images Within a Database
- Creating Shared Files
- Creating Shared Applets
- Shared Code
- Creating Subforms
- Creating Shared Fields
- Creating Shared Actions
- Script Libraries
- Database Resources
Using the Page Designer
- Using the Page Designer
- Understanding Pages
- Working with the Page Properties Box
- Using the Page Designer
- Adding Layers to Your Pages
Creating Outlines
- Creating Outlines
- Creating an Outline
- Working with Outline Entries
- Embedding Outlines
- Adding an Outline to a Frameset
Adding Framesets to Domino Applications
- Adding Framesets to Domino Applications
- Creating a Frameset
- Using the Frameset Designer
- Working with Frames
- Viewing the HTML Source of Your Frameset
- Launching the Frameset
Automating Your Application with Agents
- Automating Your Application with Agents
- Working with Agents
- Creating an Agent
- Working in the Agent Builder Design Window
- Using @Commands in Agents
- Putting Your Agent to Work
- Creating a Complex Agent
- Using LotusScript in Agents
- Creating Web Agents Using Formulas and LotusScript
- Using Java in Agents
- Testing and Debugging Agents, the Agent Log, and Agent Properties
- Agent Properties via the Agent InfoBox
Part III. Programming Domino Applications
Using the Formula Language
- Using the Formula Language
- Overview of the Formula Language
- Knowing Where to Use @Functions and @Commands
- Formula Syntax
- Limitations of the Formula Language
- Working with Statements
- Using Logical @Functions
- Working with Date and Time @Functions
- Working with Strings
- Getting Session and User Information
- Working with Documents
- Retrieving Data with @DbColumn and @DbLookup
- Working with Lists
- Getting User Input
- Controlling the Flow of a Formula
- Error Handling
Real-World Examples Using the Formula Language
- Real-World Examples Using the Formula Language
- Programming Practices
- Using Formulas in Forms and Subforms
- Writing Field Formulas
- Writing View Formulas
- Using Hide When Formulas
- Working with Forms, Views, and Shared Actions
Writing LotusScript for Domino Applications
- Writing LotusScript for Domino Applications
- Software Construction
- Fundamental Elements of LotusScript
- New Technologies and LotusScript
Real-World LotusScript Examples
- Real-World LotusScript Examples
- Real-World Example 1: Importing a Delimited Text File
- Real-World Example 2: Delete a Parent Document and All Its Children: DeleteParentAndChildren
- Real-World Example 3: Schedule an Agent Robot to Refresh All the Documents in a View: Robot-DailyRefreshAllDocs
- Real-World Example 4: Return a Web User to the Place Where He Started After a Document Is Submitted: WebQuerySave-DocSubmit
Writing JavaScript for Domino Applications
- Writing JavaScript for Domino Applications
- What Is JavaScript?
- JavaScript Is Not Java
- JavaScript and the Domino IDE
- The Document Object Model
- JavaScript Support in Domino 6
- When to Use JavaScript
- A Look at JavaScript in Domino
- JavaScript Libraries in Domino
- JavaScript Principles 101
- Syntax and Command Blocks
- Statements
- Output
- Functions
- Objects
- Input Validation
- Validating Check Boxes
- Validating Radio Buttons
- Validating Selection Lists
- Calculations
- JavaScript Application
Real-World JavaScript Examples
- Real-World JavaScript Examples
- Real-World Example 1: Dynamic Drop-Down Lists on the Web
- Real-World Example 2: Dialog Boxes and window. opener on the Web
- Real-World Example 3: Dynamic Tables
- Real-World Example 4: Useful JavaScript Utilities
Writing Java for Domino Applications
- Writing Java for Domino Applications
- Introduction to Java
- Choosing a Java Solution in Domino
- Understanding the Notes Object Interface
- Writing Java Agents
- Using Other Java IDEs
- Other Uses for Java
Real-World Java Examples
Enhancing Domino Applications for the Web
- Enhancing Domino Applications for the Web
- Whats New in Designer 6
- Understanding the Domino Web Application Server
- Understanding the Basics of HTML
- Using HTML in Domino Designer
- Adding Power with Domino URLs
- Views and Forms Working Together on the Web
- Incorporating Flash into Your Web Pages
- What Its All About: XML Exposed
- How Does Domino Use XML?
Part IV. Advanced Design Topics
Accessing Data with XML
Accessing Data with DECS and DCRs
- Accessing Data with DECS and DCRs
- What Is DECS?
- The External Data Source
- DECS Administrator
- Creating the Activity
- Accessing the Application
- DECS Summary
- Data Connection Resources
- DCR Example
- Tips on External Data Access
Security and Domino Applications
- Security and Domino Applications
- How Does Domino Security Work?
- Enabling Physical Security
- Setting Server Access
- Database Access Control Lists
- The Role of the Domino Directory in Application Security
- ACL Privileges
- Enabling Database Encryption
- Using Roles
- Implementing View-Level Security
- Implementing Form-Level Security
- Implementing Document-Level Security
- Applying Field-Level Security
- Hiding the Design of Your Application
Creating Workflow Applications
- Creating Workflow Applications
- The Evolution of Groupware
- Introducing Workflow
- Creating Mail-Enabled Applications
- Using Triggers to Send Email
- Sending Mail with LotusScript
Analyzing Domino Applications
Part V. Appendices
Appendix A. HTML Reference
Appendix B. Domino URL Reference
EAN: 2147483647
Pages: 288
