Putting Masks in Motion
Putting masks in motion for visual effects work is also known as rotoscoping and is covered in greater depth in Chapter 7. Preceding that, consider this overview of some things to pay attention to when putting a mask in motion.
Interpolation Basics
You can set a temporal ease on a mask keyframe (and adjust it in the Graph Editor), but there is no corresponding spatial curve to adjust, as there is with Position keyframes. Each point will travel in a linear fashion to its next keyframed position. Thus in order to precisely mask an object traveling in an arc, you must set many more keyframes than for an object traveling in a single direction.
The real bummer about mask keyframes is that you can't select a group of them and translate the mask; as soon as you move, rotate, or scale it, your selection snaps to the current keyframe only.
There is a workaround. You can duplicate the layer being masked and use it as an alpha track matte for an unmasked source of the same layer, in which case you're free to transform (or even motion track) the duplicate using the normal layer transforms. It's not a perfect solution by any means, but it is often useful and hardly anyone thinks of it.
Moving, Copying, Pasting, and Masks
You can freely copy a mask shape from one source (a different mask, a different keyframe in the same mask animation, Illustrator, or Photoshop) and paste it into an existing mask channel, where it takes the place of the Mask Shape. You should, however, note some rather strict situational rules:
- With no Mask Shape keyframes in the source or target: Copying the mask and pasting it to another layer automatically either creates a new mask, or applies it to any mask that is selected.
- Source mask contains Mask Shape keyframes, target has none: Highlighting the mask (not the specific keyframes) and pasting creates a new mask as if pasting from time 0. Highlighting any or all Mask Shape keyframes pastes a new mask with keyframes starting at the current time.
- Target layer contains masks (with or without keyframes): To paste Mask Shape keyframes into a particular mask at a particular time, highlight the target mask before pasting. Highlighting the target Mask Shape property highlights any keyframes and replaces them (not usually what you want).
In all cases, if the target layer is a different size or dimension from the source, the mask stretches to maintain its relationship to the layer boundaries.
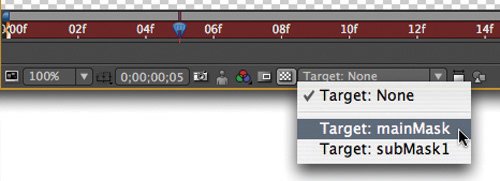
In many situations, pasting Mask Shape keyframes blindly in this manner is not what you're after, but a rather obscure feature in the Layer window will help you. The Target pulldown along the bottom of the window has a unique function: When you choose an existing mask as the target, you can start drawing a new mask anywhere in frame and it will replace the shape in the target mask layer (Figure 3.21).
Figure 3.21. This pull-down menu along the bottom of the Layer panel makes it easy to create a new mask shape that replaces the shape in the target mask. If the target mask has keyframes, After Effects creates a new keyframe wherever the new shape is drawn.
First Vertex
When pasting in shapes or radically changing the existing mask by adding and deleting points, you may run into difficulty lining up the points. Hidden away in the Layer > Mask (or mask context) menu, and available only with a single vertex of the mask selected, is the Set First Vertex command. If your mask points twist around to the wrong point during an interpolation, setting the First Vertex to two points that definitely correspond should help straighten things out. This also can be imperative for effects that rely on mask shapes, such as the Reshape tool (described in Chapter 7).
Notes
Smart Mask Interpolation (available via a panel in the Window menu) is designed to smooth transitions between two radically different shapes. It's useful for stylized motion graphics of detailed masks transitioning from one to the next, but less useful for effects masking and rotoscoping because it's a bit too automated. The result, although sometimes pleasing, doesn't usually obviate the need to more carefully keyframe an accurate mask transition.
Blending Modes The Real Deal |
Section I. Working Foundations
The 7.0 Workflow
- The 7.0 Workflow
- Workspaces and Panels
- Making the Most of the UI
- Settings: Project, Footage, Composition
- Previews and OpenGL
- Effects & Presets
- Output: The Render Queue
- Study a Shot like an Effects Artist
The Timeline
- The Timeline
- Organization
- Animation Methods
- Keyframes and The Graph Editor
- Uber-mastery
- Transform Offsets
- Motion Blur
- Manipulating Time Itself
- In Conclusion
Selections: The Key to Compositing
- Selections: The Key to Compositing
- The Many Ways to Create Selections
- Compositing: Science and Nature
- Alpha Channels and Premultiplication
- Masks
- Combining Multiple Masks
- Putting Masks in Motion
- Blending Modes: The Real Deal
- Track Mattes
Optimizing Your Projects
- Optimizing Your Projects
- Navigating Multiple Compositions
- Precomposing and Nesting
- Adjustment and Guide Layers
- Understanding Rendering Order
- Optimizing After Effects
- Onward to Effects
Section II. Effects Compositing Essentials
Color Correction
Color Keying
- Color Keying
- Good Habits and Best Practices
- Linear Keyers and Hi-Con Mattes
- Blue-Screen and Green-Screen Keying
- Understanding and Optimizing Keylight
- Fixing Typical Problems
- Conclusion
Rotoscoping and Paint
- Rotoscoping and Paint
- Articulated Mattes
- Working Around Limitations
- Morphing
- Paint and Cloning
- Conclusion
Effective Motion Tracking
- Effective Motion Tracking
- The Essentials
- Optimizing Tracking Using 3D
- Extending a Track with Expressions
- Tracking for Rotoscoping
- Using 3D Tracking Data
- Conclusion
Virtual Cinematography
- Virtual Cinematography
- 5D: Pick Up the Camera
- Storytelling and the Camera
- Camera Blur
- The Role of Grain
- Film and Video Looks
- Conclusion
Expressions
- Expressions
- Logic and Grammar
- Muting Keyframes
- Linking Animation Data
- Looping Animations
- Smoothing and Destabilizing
- Offsetting Layers and Time
- Conditionals and Triggers
- Tell Me More
Film, HDR, and 32 Bit Compositing
- Film, HDR, and 32 Bit Compositing
- Details
- Film 101
- Dynamic Range
- Cineon Log Space
- Video Gamma Space
- Battle of the Color Spaces
- Floating Point
- 32 Bits per Channel
- Conclusion
Section III. Creative Explorations
Working with Light
- Working with Light
- Light Source and Direction
- Creating a Look with Color
- Backlighting, Flares, Light Volume
- Shadows and Reflected Light
- HDR Lighting
- Conclusion
Climate: Air, Water, Smoke, Clouds
- Climate: Air, Water, Smoke, Clouds
- Particulate Matter
- Sky Replacement
- The Fog, Smoke, or Mist Rolls In
- Billowing Smoke
- Wind
- Water
- Conclusion
Pyrotechnics: Fire, Explosions, Energy Phenomena
- Pyrotechnics: Fire, Explosions, Energy Phenomena
- Firearms
- Sci-Fi Weaponry
- Heat Distortion
- Fire
- Explosions
- In a Blaze of Glory
Learning to See
Index
EAN: 2147483647
Pages: 157
