Organization
The Timeline is a dynamic environment; as you work with it, you constantly alter not only its contents, but also your view of the environment itself. Thus a good number of the tips offered in this chapter are workflow improvements (views and shortcuts) designed to speed you on your way.
The Timeline panel's top-level customizable views are its columns. Right-clicking on any column heading shows a menu list containing all of the possible views. You won't work with all of them revealed, however, as it's a pointless waste of space (even on a huge monitor); there are much better organized ways to keep what you need in front of you as you work.
Column Views
After Effects 7.0 has streamlined the ways in which you can organize your Timeline panel without rendering it unfamiliar to users of previous versions. Many UI elements are gone, yet no essential functionality has been lost.
You can context-click on any column heading to see and toggle all the different columns of data available in the Timeline, but there are smarter ways to turn these on and off. We begin with a setup as shown in Figure 2.1, the most minimal column setup that would ever be useful. I can't imagine why you would ever turn off the first four items in the Columns menu; these require minimal space and are useful all of the time. From there, you have a few useful contextual options:
- Lower-left icons: You can access most (but not all) of the extra data you need via the three toggles found at the lower left of the Timeline (Figure 2.2). More about how, exactly to use all of the various controls they contain follows throughout this chapter and the rest of Section I; for now, focus only on revealing and concealing these controls.
- Layer Switches/Transfer Controls: You can save space by reversing the toggle between those first two switches. Enable one of them, and either press F4 or simply click in the space at the bottom of the displayed column (where the "Switches/Modes" label used to appear), and the toggle is reversed.
Tip
If both Layer Switches and Transfer Controls are displayed, you can use the F4 toggle to hide both of them, regaining the maximum amount of horizontal space to view keyframes and the Graph Editor.
- Layer/Source: Another toggle lives atop the Layer Name column, the one you can never hide. Click on the column heading to toggle from Layer Name to Source Name. Source Name is always the name of the source file itself (typically as it appears in the Project panel). Layer Name defaults to the Source Name, in brackets (to show that it's unchanged); assign your own name by selecting the layer, pressing Return (don't use Enter on the numeric keypad), and typing.
- Time Stretch: The third icon at the lower left toggles In, Out, Duration, and Stretch together. It's easy to forget these are here, because there are other more visual ways of setting everything besides Stretch, whose most useful function is to time-reverse a layer, giving it a stripy appearance. (See "Manipulating Time Itself," ahead.)
Tip
Even if your source names are unwieldy or hard to distinguish, or you are reusing the same source for multiple layers, you can develop a logical system for naming each instance (Figures 2.3a and b).
- Parent: The odd-man-out with the toggles is the Parent column, which is often left on in compositions that use no parenting, wasting horizontal space. (More on putting it to use in "Transform Offsets" later in this chapter).
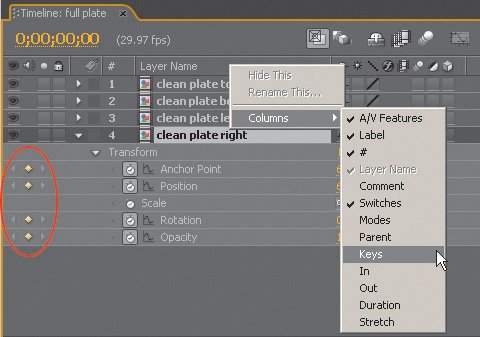
- AV Features/Keys: Why anyone would ever hide A/V Features, or show the Keys column when these controls appear below A/V Features in the same column (Figure 2.4), is beyond me.
Figure 2.1. This is a good minimal column layout if screen real estate is at a premium. All columns other than Parent and Comment are available via a single left-click or a shortcut.
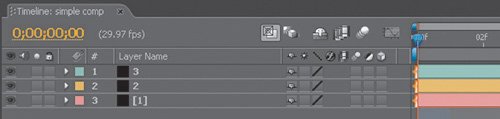
Figure 2.2. These icons at the lower left of the Timeline expand (or collapse) the most used panes: Layer Switches, Transfer Controls, and the various timing controls for a layer.
![]()
Figure 2.3. Give multiple iterations of the same source (a) individual layer names (b) in order to make them easier to distinguish as you work with them.
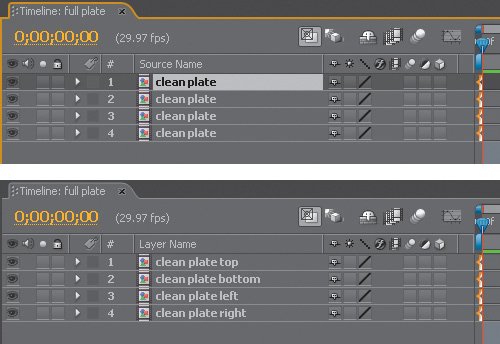
Figure 2.4. Don't bother choosing to view the Keys column separately; the data from this column tucks in nicely underneath A/V Features (circled).
No matter how big a monitor you have for the Timeline, the game is always to preserve as much horizontal space as you can for keyframe data, keeping only the relevant controls in front of you.
Comments and Color
Ever try to make sense of someone else's project? As with computer programming, it's almost like looking at the way someone thinks.
Everyone prefers to work with clear thinkers, and you can be one for your coworkers by color-coding your layers and using plenty of comments (again, just like computer programming).
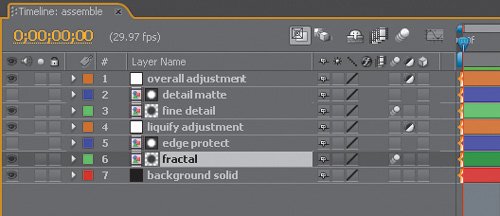
Choosing a distinct color for each layer can provide intuitive visual clues. It can even help you find and group items more quickly as you work. How you handle colors is really up to you; Figure 2.5 shows an example of a Timeline with several layers that are color coded by type.
Figure 2.5. A unique color is assigned to each type of layer, so you can easily and quickly discern among them.
Tip
You are not stuck with the interior decorator colors Adobe assigns by defaultonly the order and number of them. In Preferences > Label Colors, go ahead and change them to some nice bold primary colors.
The manner in which label colors are assigned by default is specified in Preferences > Label Defaults; these make more sense in the Project panel context, and you will develop criteria of your own (not listed here) in the Timeline. For example, you may wish to call out special types of layers, such as track mattes and adjustment layers, with particular colors.
Notes
Layer Comments are upgraded in After Effects 7.0; there is no character limit. To see long comments twirl down the layer, click in the Comment field; a scrollbar appears to display more text, as needed.
Included in the Redefinery folder on your disk is a script called rd_commentron.jsx. It takes advantage of the long-text handling ability of the Comments fields in the Timeline and Project panels by duplicating information that is truncated in other fields, such as example, layer, and footage names that exceed 31 characters or other useful information.
Comments may be the most neglected column in the Timeline, but if you know that you're going to be handing your project off to another artist, or you are creating a template for several people to use, you can offer full contextual explanations of what's going on.
A more useful and obvious way to show comments is to add them via a layer marker. With a target layer highlightedand, if desired, at a specific timepress the * key on your numeric keypad. Double-click the layer marker, and a Marker dialog appears; enter text in the Comment field and click OK. The Comments column can be hidden, but if the layer is visible, the result appears right on it.
Solo, Lock, and Shy
Several toggles on the A/V Features and Switches columns pertain to how layers are edited and viewed (or heard) as you work. Because I've seen users who should know better miss or forget them, here's a refresher.
Notes
Pay little or no attention to the other options in the Marker dialog; the Chapter and Web Links fields work only when you are writing to a medium that supports them, such as QuickTime or SWF. It's a nifty feature, but you may never use it.
The round, white icon (Figure 2.6) in A/V Features is the Solo switch. Solo a layer, and you see only it; render a comp with a layer toggled solo, and the Solo Switches menu in Render Settings determines whether it outputs that way.
Figure 2.6. You may already use the Solo switch, engaged here for three individual layers; remember that leaving a layer solo in a subcomposition displays it that way in the main comp, a common gotcha.

The Lock toggle is useful in situations when you know a layer is done and should not be touched; you can't even select a locked layer.
Shy is (literally) a more elusive feature; toggle a layer to shy and nothing happens, until you also activate the Shy toggle for the entire composition (Figure 2.7). Suddenly, all shy layers disappear from view in the Timeline, although they still display in the comp itself, as before. Because you might not always have as much vertical space to display the Timeline as you might like, this helps keep only the layers you're editing in front of you.
Figure 2.7. Hey, what happened to layers 2, 5, and 7? The track matte and background layers have been set to shy (and thus are hidden) by enabling the Shy toggle at the top of the Timeline (highlighted). Very useful for showing only the layers you're still adjusting, but don't forget about those hidden layers.

Tip
To change the visibility (rather than the solo state) of selected layers, use Layer > Switches > Hide Other Video.
Tip
To unlock a number of layers at once, use Layer > Switches > Unlock All Layers (Ctrl+Shift+L/Cmd+Shift+L).
Navigation and Shortcuts
More than anywhere else in After Effects, the Timeline is the place where keyboard shortcutslots of themcome into play. There's plenty you can do via either a single keyboard shortcut or a single click of the mouse, where a beginner might use several clicks of the mouse.
Notes
Shy layers can greatly reduce clutter in the Timeline, but bewareif you're scratching your head wondering where that layer went, take a close look at the Index numbers. If they are no longer in sequential order, then the missing number belongs to a layer that is now shy.
Time Navigation
Many usersparticularly those with an editing backgroundlearn time navigation shortcuts right away. Others seem content to drag the time needle around all of the time, a policy opposed on the grounds that it quickly becomes tedious. Here are your time navigation shortcuts:
- The Home, End, Page Up, and Page Down keys correspond to moving to the first frame, the last frame, one frame backward, and one frame forward. Shift+Page Up and Shift+Page Down skip ten frames backward or forward, respectively. Press Shift+Home or Shift+End, and you are taken to the In and Out points of the Work Area.
- Click on the blue time status at the upper left of the timeline to open the Go to Time dialog (press Ctrl+G/Cmd+G). This is the way to navigate to a specific point in time.
- To navigate an arbitrary but precise number of frames or seconds (say, 48 frames following the current time), in the Go to Time dialog, replace the current time with your increment, in the format +48, click OK, and After Effects calculates the increment for you.
Notes
There's no need to add punctuation when entering time values into a number field in After Effects. 1000 is ten seconds (10:00) in Timecode mode or frame 1000 in Frames mode.
If instead you need to navigate backward in time 48 frames, you can't simply enter 48 in the Go to Time dialog. If you do, you're transported to negative 48 (frames or seconds, either of which probably moves the time needle right off the timelinevery confusing). Instead, you must use the format "+48" to enter the offset; think of it as adding a negative number, rather than subtracting. It's weird, but it works (Figure 2.8).
Figure 2.8. Setting this value to 48 would set the current time to that negative frame value, probably not what you want. But entering +48 adds an offset of 48 frames, which might very well be useful.

Make Layers Behave
I was reviewing film-outs of shots from The Day After Tomorrow with the other artists at The Orphanage when my shot looking out a window at stragglers making their way across a snow-covered plaza, featuring a beautiful matte painting by Mike Pangrazio, began to loop. About two-thirds through the shot came a subtle pop. At some point, the shot had been lengthened, and a layer of noise and dirt I had included at approximately 3% transparency (for the window itself) had remained shorter in some subcomposition.
Tip
The add-a-negative number offset operates in several types of number fields in the program. For example, you can subtract 30 degrees to Rotation by entering +30; you can multiply or divide as well, using the * and / symbols, respectively. This feature works throughout number fields in the Timeline, as well as the Effect Controls and Render Queue, but not everywhere (not, for example, Duration in Composition Settings).
This is a primary reason some effects artists don't like to work with a timeline-based application; in other compositing programs, such as Shake, this would not inadvertently happen because static elements don't have a length.
After Effects 7.0 offers one significant improvement: Any static element you add to a composition (a single frame, a solid, an adjustment layer, and so on) is automatically added at frame 0 and extends the full length of the composition.
If you want to add a layer beginning at a specific time, you can drag the element below the Time Ruler (to the area containing the layers/Graph Editor) and you'll see a second Time Indicator appear that moves with your cursor (horizontally). This determines the layer's start frame. If other layers are present and visible, you can also determine the depth of the added layer (vertically).
Notes
To avoid the gotcha in which a layer ends up too short for its host composition if either is edited, some users prefer to make all of their comps longer (in duration) than they ever expect to need, and manage their length using only the Work Area.
Here are some other useful tips and shortcuts:
- Set the current frame to the previous or next keyframe (or layer marker) by pressing J and K, respectively. This works for any visible keyframe or layer marker.
Tip
The keyboard shortcut Ctrl+/ (Cmd+/) adds selected items as the top layer(s) of the active composition.
- Navigate to the beginning or end frame of the Work Area by pressing Shift+Home or Shift+End, respectively.
- To reset the Work Area to the length of the composition, double-click it; to set it to the exact length of the currently active layer, press Ctrl+Alt+B/Cmd+Option+B.
- Besides clicking on a layer to select it, you can enter the layer's index number using the numeric keypad.
Tip
To trim a composition's Duration to the current Work Area, choose Composition > Trim Comp to Work Area.
- To select an adjacent layer without touching the mouse, use Ctrl+Up Arrow (Cmd+Up Arrow) to select the next layer up, and Down Arrow to select the next layer down.
- Add the Alt (Option) key to move a layer up or down in the stack, which you can also do with Ctrl+] and Ctrl+[ (as in other Adobe applications). Ctrl+Shift+] moves a layer to the top of the stack and Ctrl+Shift+[ moves it to the bottom.
- You can invert the layers currently selected: Context-click on a selected layer, and choose Invert Selection. (Locked layers are not selected, but Shy layers are selected even if invisible.)
Tip
It can be annoying that the Work Area controls both which frames preview and, by default, which frames render, because the two are often used exclusively of one another. If you employ a separate "Render Final" composition that contains all of the settings for the final render, you can leave that one untouched and mess with your other composition Work Areas as much as you want.
- Duplicate any layer (or virtually any selected item) using Ctrl+D (Cmd+D). If you duplicate a layer and its track matte (Chapter 3, "Selections: The Key to Compositing"), they retain proper orientation, both moving above the source.
- For various reasons you might instead wish to split a layer (Ctrl+Shift+D/Cmd+Shift+D); the source ends and the duplicate continues from the current time. This is useful, for example, when you need one layer to straddle another.
- To move a layer In point to the current time, use the [ key, or press ] to move the Out point. Add the Alt (Option) key to set the current frame as the In or Out point, trimming the layer.
- To slide a trimmed layer, preserving the In and Out points but translating the footage and its layer markers (but not keyframes), drag using the double-ended arrow you see over the area outside the In and Out points.
- To nudge a layer forward or backward in time (including its keyframes) use Alt+Page Up Page Down (Option+Page Up/Page Down).
Notes
There is even a preference controlling whether split layers are created above or below the source layer (Preferences > General; the toggle is labeled Create Split Layers Above Original Layer).
Often, you may add elements whose size or pixel aspect doesn't match those of the composition, yet which are meant to fill the frame (or one axis). No need to break open the Scale controls and guess; you can use the Fit to Comp shortcuts (which are included in the Layer > Transform menu).
The standard Fit to Comp, Ctrl+Alt+F (Cmd+Option+F) can be dangerous in that it ignores the aspect ratio of the layer, stretching X and Y scale individually to match each to the comp itself.
Tip
To memorize the H and G options for Fit to Comp, notice that they are adjacent on your keyboard to the standard command: F G & H.
More commonly useful are the shortcuts for Fit to Comp on a single axis (X or Y), which retain the aspect ratio to scale the non-dominant axis. You can Fit to Comp Width (Ctrl+Alt+Shift+H/Cmd+Option+Shift+H), or Fit to Comp Height (twisting your fingers around Ctrl+Alt+Shift+G/Cmd+Option+Shift+G).
Timeline View Options
And what about working with keyframe data? This has changed drastically with the Graph Editor, but some useful workflow enhancements remain, whether or not you're in Graph Editor mode:
- The ; key toggles between a fully zoomed-in view of the current frame and a fully zoomed-out view of the whole Timeline.
- The slider at the bottom of the Timeline zooms in and out more selectively (Figure 2.9).
Figure 2.9. Unless your mouse includes a scroll wheel, this click-and-drag interface at the bottom of the Timeline panel is probably the fastest method of zooming in and out.

- If your mouse includes a scroll wheel, there's a cooler option: Not only can you scroll up and down the layer stack, and Shift-scroll left and right in a zoomed Timeline view, but Alt-scrolling (Option-scrolling) dynamically zooms you in and out of time. Shift-scrolling navigates back and forth. Position your cursor over the Timeline panel to try these.
Tip
The scroll wheel also zooms in and out of viewer panels when the cursor is placed over them, no modifier or selection needed.
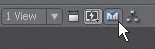
At the right edge of the Timeline is the Comp button (Figure 2.10a), which brings the Composition view associated with that Timeline forward. The Composition panel similarly has a Timeline button for the same purpose in reverse (Figure 2.10b). Neither of these is necessary, however; if you need to make either panel appear, or toggle between the two of them, use the backslash () key.
Figures 2.10a and b. Need to get to the Timeline related to the displayed composition, or vice versa? Each shortcut button is shown here, in respective order, but if you can remember the key, you don't need either of them. Just above the cursor in 2.10b is the Comp marker bin, from which you can drag up to 10 numbered markers.

Tip
The Current Time Indicator is capable of going where your Timeline panel cannot: to time frames previous to the first frame of the composition or beyond the last frame (usually because the trimmed area of a layer extends there). In such cases, the indicator disappears from the Timeline entirely. Have no fear. Clicking in the Time Ruler to place the indicator, or using any of the time shortcuts outlined above recovers it.
Just above the Comp button is the Comp marker bin, where you can drag out a marker to a point on your Timeline. Markers are numbered sequentially. Holding down the Shift key as you drag the time needle snaps the needle to any comp or layer markers present.
Tip
To add a specific numbered comp marker, press Shift and one of the numbers at the top of your keyboard (not the numeric keypad): 1 through 0.
Replacing Layers
You will often want to replace the source of a layer with an alternate take or a different element in the Project panel, while keeping all of the settings you have added to it thus far.
You can easily do this by highlighting the layer to be replaced in the Timeline and holding down the Alt (Option) key while dragging the new source to the Timeline. An even easier method is to select both the existing layer and the new source and then press Ctrl+Alt+/ (Cmd+Option+/). All of the settings from the previous layer, along with any applied effects, translate to the new layer automatically.
Notes
Beware if you are replacing with source material of a different size or aspect, as the mask and transform values may no longer work properly. Mask values are relative and will scale to the dimensions of the new layer; other values (transforms and effects settings) are absolute and, generally speaking, do not.
How do you neutralize a layer that is taking up a disproportionate amount of render time? Replacing it on the fly is not the recommended method; Chapter 4 covers some much more elegant methods for assigning proxies and pre-rendering embedded compositions.
Animation Methods |
Section I. Working Foundations
The 7.0 Workflow
- The 7.0 Workflow
- Workspaces and Panels
- Making the Most of the UI
- Settings: Project, Footage, Composition
- Previews and OpenGL
- Effects & Presets
- Output: The Render Queue
- Study a Shot like an Effects Artist
The Timeline
- The Timeline
- Organization
- Animation Methods
- Keyframes and The Graph Editor
- Uber-mastery
- Transform Offsets
- Motion Blur
- Manipulating Time Itself
- In Conclusion
Selections: The Key to Compositing
- Selections: The Key to Compositing
- The Many Ways to Create Selections
- Compositing: Science and Nature
- Alpha Channels and Premultiplication
- Masks
- Combining Multiple Masks
- Putting Masks in Motion
- Blending Modes: The Real Deal
- Track Mattes
Optimizing Your Projects
- Optimizing Your Projects
- Navigating Multiple Compositions
- Precomposing and Nesting
- Adjustment and Guide Layers
- Understanding Rendering Order
- Optimizing After Effects
- Onward to Effects
Section II. Effects Compositing Essentials
Color Correction
Color Keying
- Color Keying
- Good Habits and Best Practices
- Linear Keyers and Hi-Con Mattes
- Blue-Screen and Green-Screen Keying
- Understanding and Optimizing Keylight
- Fixing Typical Problems
- Conclusion
Rotoscoping and Paint
- Rotoscoping and Paint
- Articulated Mattes
- Working Around Limitations
- Morphing
- Paint and Cloning
- Conclusion
Effective Motion Tracking
- Effective Motion Tracking
- The Essentials
- Optimizing Tracking Using 3D
- Extending a Track with Expressions
- Tracking for Rotoscoping
- Using 3D Tracking Data
- Conclusion
Virtual Cinematography
- Virtual Cinematography
- 5D: Pick Up the Camera
- Storytelling and the Camera
- Camera Blur
- The Role of Grain
- Film and Video Looks
- Conclusion
Expressions
- Expressions
- Logic and Grammar
- Muting Keyframes
- Linking Animation Data
- Looping Animations
- Smoothing and Destabilizing
- Offsetting Layers and Time
- Conditionals and Triggers
- Tell Me More
Film, HDR, and 32 Bit Compositing
- Film, HDR, and 32 Bit Compositing
- Details
- Film 101
- Dynamic Range
- Cineon Log Space
- Video Gamma Space
- Battle of the Color Spaces
- Floating Point
- 32 Bits per Channel
- Conclusion
Section III. Creative Explorations
Working with Light
- Working with Light
- Light Source and Direction
- Creating a Look with Color
- Backlighting, Flares, Light Volume
- Shadows and Reflected Light
- HDR Lighting
- Conclusion
Climate: Air, Water, Smoke, Clouds
- Climate: Air, Water, Smoke, Clouds
- Particulate Matter
- Sky Replacement
- The Fog, Smoke, or Mist Rolls In
- Billowing Smoke
- Wind
- Water
- Conclusion
Pyrotechnics: Fire, Explosions, Energy Phenomena
- Pyrotechnics: Fire, Explosions, Energy Phenomena
- Firearms
- Sci-Fi Weaponry
- Heat Distortion
- Fire
- Explosions
- In a Blaze of Glory
Learning to See
Index
EAN: 2147483647
Pages: 157
