Optimizing Tracking Using 3D
So you have a good idea how to set and apply a tracker successfully. Is that all there is to know about tracking in After Effects? Not by a long shotyou've only laid the groundwork for the good stuff. Say you want to track an arbitrary number of overlaid elements into a scene, matching the movement of a camera. You might think that you would have to track each layer individually or parent one to another (if that would even work, given that parenting changes the center of a rotation or scale transform).
Wrong. There is a way to set up tracking so that adding in tracked elements, including motion blur, rotation, and even scaling of elements, requires no extra or individual steps. You drop new elements into the scene and they track in as easily as if you added them when the shot was taken, and they look just as natural. That's right, you can approximate the look of 3D tracking on many shots without a 3D tracker.
The key is to stabilize the background layer (which will not appear stabilized in the final shot, unless you want it to, or perhaps you want to smooth it) and then parent a camera to that stabilization. You now have the motion of the scene captured in the movement of a camera, just as it was when shot, so that any elements you add to the scene pick up on that motion. It's quite cool.
The 3D Camera: The One-Stop Solution
Suppose you need to add an arbitrary number (more than one, or more as you go along, and so on) of foreground layers to a motion-tracked background plate: CG objects, color corrections, effects with hold-out masks, you name it. Applying track data to each of those layers individually would be a time-consuming headache.
Notes
The clip used for these steps, as well as a completed project, appears on the book's DVD as 08_tracking.aep.
Skip it. Don't apply a tracker at all. Instead, create whatever type of track your shot needs: Position only or with the addition of Rotation or even Scale. Now try this:
- In the Tracker Controls, change the Track Type from Transform (the default) to Stabilize. (This method is not meant for corner pinning.)
- Apply Stabilize, which by default goes to the track that generated the track. You actually have no other choice; try choosing a different layer than the source track layer by clicking Edit Target, and you'll find the other layers grayed out.
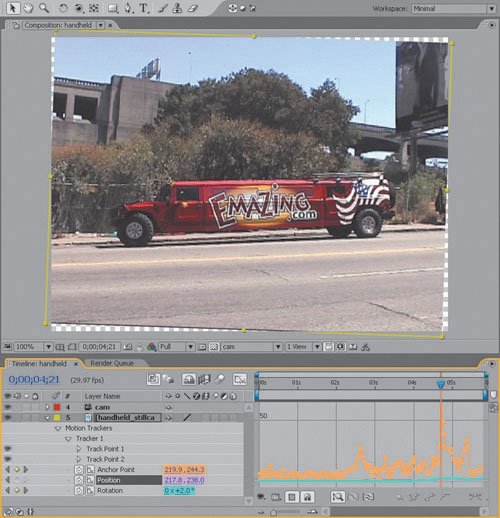
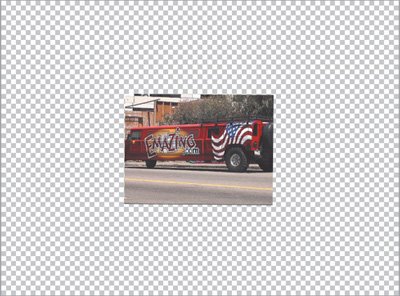
- The layer is stabilized and will probably slip and slide around in the frame (Figure 8.20). Don't worry; it's one step from looking normal again.
Figure 8.20. A handheld shot creates wobble, even when shooting the world's most obnoxious stretch Humvee. The Graph Editor shows the extent to which the tracker has had to stabilize the shot.
- Return to the first frame of the track (quite possibly frame 0 of the comp). Turn on the stabilized layer's 3D switch. Add a 3D camera (context-click in an empty area of the Timeline) and parent it to the stabilized layer (Figure 8.21).
Figure 8.21. A 3D camera is parented to the stabilized background layer, whose 3D is switched on; some orange triangular pylons are added as reference. The shot looks just as it did, except for the pylons, which follow the motion of the shot.
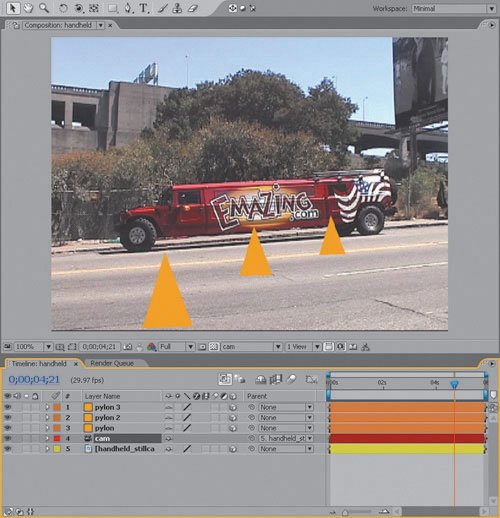
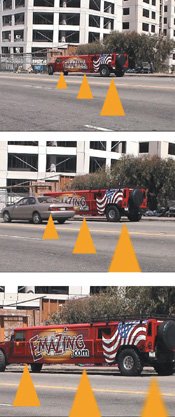
Everything now seems back to normal, but any new item that you add to the scene joins the motion track as soon as you toggle its 3D switch. Any layer that shouldn't follow the track, such as an adjustment layer, can remain 2D (Figure 8.22).
Figure 8.22. The camera is locked to the borders of the plate on every frame, and those orange markers now hold their position on the roadway throughout the shot. This look at the perspective view shows that all layers are essentially 2D, but only the camera and background move (in sync).
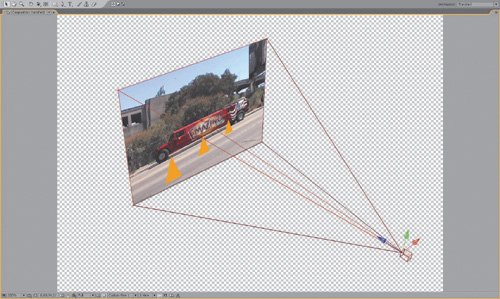
The Z-depth value of all layers will typically be 0, so the pylons in Figure 8.22 have been scaled and repositioned, rather than moved in 3D space. It also works to reposition them in 3D space, although it's more work to get the relative Z depth values proportioned so that each object sits where it is supposed to, in perspective; there is no reference or grid (Figure 8.23).
Figure 8.23. Rather than fake perspective of elements in 2D, they can be repositioned in 3D space. View angle and relative distance of the camera and objects must be correct, or they will start to slip and slide in the shot.
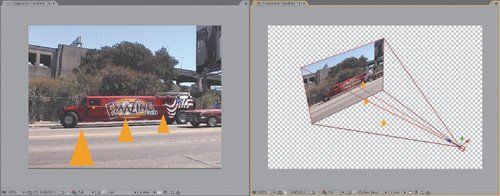
Relocating added layers in Z space might be worth the trouble in extreme cases. On The Day After Tomorrow, The Orphanage had to create several shots of a helicopter pilot inside a moving cockpit, with a blue screen outside the window to be replaced with a matte painting of the distant horizon. By moving it back several thousand pixels on the Z axis to approximate extreme depth, we added parallax for free. Of course, we didn't have to worry about anything looking as if it was sitting right on the ground plane, as in the Humvee example.
Notes
A 50 mm camera lens in After Effects offers a neutral perspective; a set of 3D layers with a Z Position of 0 will appear the same as they would as 2D layers. Generally, that's a good thing. It is conceivable, of course, that your scene was shot with a wider (or longer) lens, changing relative perspective. If so and you're positioning items in Z space, you may want to try to match it. See Chapter 9, "Virtual Cinematography" for details.
Fake 3D Tracking
If you really enjoying hacking composites, you can even derive something like 3D tracking from a zoom shot. Figure 8.24 shows a tracked shot in which the camera zooms in. Track Type is set to Stabilize with Rotation and Scale on, resulting in an end frame like the one in Figure 8.25. Not right, but it's an interim step.
Figure 8.24. This zoom shot tracks easily in reverse. Most of the movement is straight in (Scale), but there is also some wobble (Position and Rotation)note that all three are enabled.
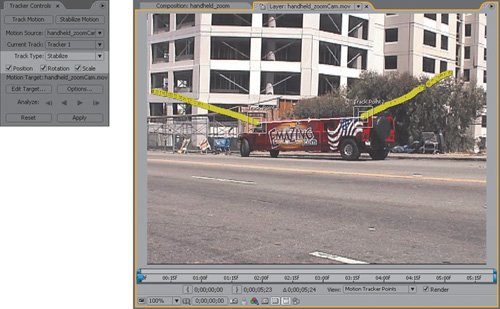
Figure 8.25. By the end of a scale/rotation/position stabilization (the point at which the shot is most zoomed in) it looks as though the original framing in Figure 8.24 was cropped; as before, a 3D camera will be parented to reestablish the framing and capture the changes in the camera.
Next, add a 3D camera, parent it to this plate layer, then enable the plate layer's 3D toggle. The scaled-down shot pops back to 100% size. As before, the magic begins when you drop objects into the scene, but in this case, enabling their 3D toggles adds changes to their proportions as you zoom in (Figures 8.26a, b, and c).
Figures 8.26a, b, and c. The result at the beginning (a), middle (b), and end (c) of the shot, with Depth of Field on to blur the nearest pylon as we zoom in. The pylons are fairly well locked to the pavement, but the quality of the result mostly comes down to how good the track was in the first place, because any slight bump ripples out to all of the objects (see the example on your disc).
Now before you get too excited, let me remind you that this works only in limited cases and that true 3D trackers generate true 3D data (distinguishing between a camera zoom and a push, which this one decidedly does not). Scaling a camera is not something you could do in the real world, but it is akin to zooming its lens in the virtual world.
Smooth a Moving Camera
But wait, there's more.
What about smoothing shaky camera movement? There's no "Smooth" track type, and simply choosing Stabilize obviously locks the shot in place. Is there any way to reduce the jitter or rotation in a shot without removing the camera movement altogether?
Naturally there is, or should I say, there is a natural way to do this. By re-creating the physical camera as an After Effects camera, you generate animation that can be smoothed. Barring extreme jolts that cause sufficient motion blur to blow the gag, it just works.
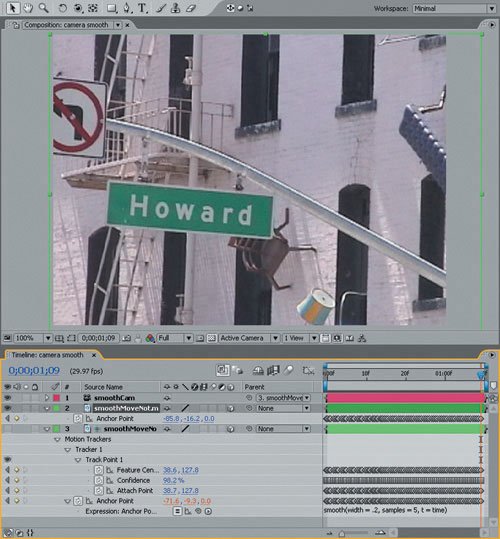
Figure 8.27 features a very rough hand-held pan across the face of the "defenestration" building in San Francisco, a public art piece where the furniture appears to be leaping out the windows. This example appears in the 08_tracking.aep composition on your disc.
Figure 8.27. The basic steps for smoothing a camera move are in place for this shaky pan shot. The camera is parented to a duplicate of the stabilized layer and a smooth operation is applied to that layer; its visibility is off. The original smoothed layer, with no stabilization, is visible and has been scaled up to provide padding for the smooth operation.
There is one small problem: The camera has no data of its own to smooth; its motion is derived only from being parented to the stabilized layer. You don't want to apply a smooth to that source layer either, as the smoothing effect will be derived from the difference between that layer's motion and that of the camera. Ideally, you would like to be able to adjust the amount of smoothing after applying it, too.
Therefore, duplicate the tracked layer and turn off its visibility. Rename it "stabilizer," or something like that. Just to be on the safe side, make it a guide or adjustment layer as well; that way, there's no possibility of it rendering should its visibility inadvertently be enabled. Figure 8.27 shows this preparation on the example shot; remember that 3D should be enabled for this added layer.
There are a couple of ways to apply smoothing to the motion data of the camera:
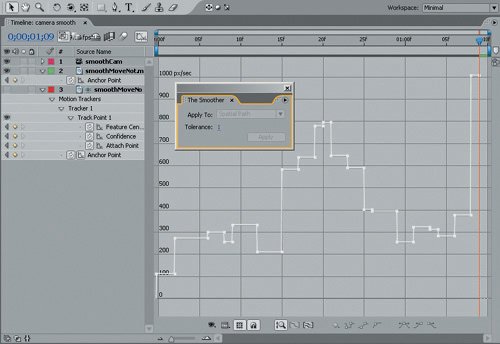
- Use The Smoother (Figure 8.28)
Figure 8.28. Avoid The Smoother! It is a relic from the pre-expressions days of After Effects. Behold its lack of adjustments! Original keyframes are destroyed, replaced by a hodgepodge of (fewer) new ones.
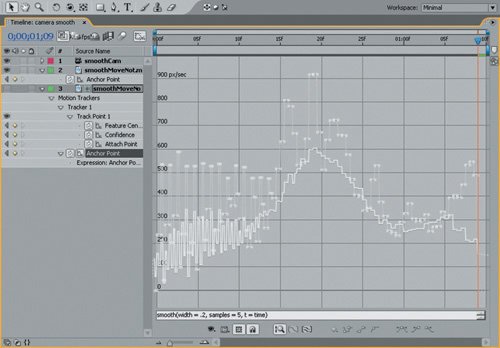
- Use a smooth expression (Figure 8.29)
Figure 8.29. Ah, much better: Source (ghosted vertices) and result (white curve) motion are easily compared and adjusted after the fact, by changing those little numbers in between the parentheses, which are known as arguments (Chapter 10 tells more about working with these).
I advise the latter option. The main problem with The Smoother is that it's a one-shot deal: Once you've applied it, you can undo or delete it, but you cannot adjust it. The Smoother is a destructive edit: It changes the keyframe data to which it is applied. Even if you want to adjust it, there is only one setting, for Tolerance; only by trial and error can you know how that setting will influence the track. Expressions are completely nondestructive and offer several adjustable properties.
To apply a smooth expression
- Alt/Option-click on the Anchor Point stopwatch of the layer to which the camera is parented.
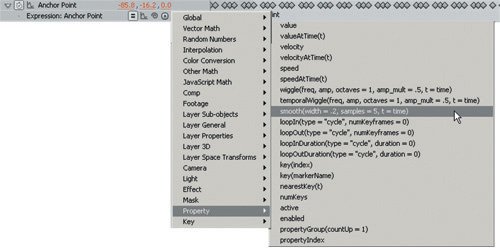
- With the default expression (anchorPoint) still highlighted, go to the Expressions menu (Figure 8.30) and under Property choose the smooth default: smooth(width = .2, samples = 5, t = time).
Figure 8.30. No need to typenot much, anyhowbecause the expression you need is waiting for you in this menu, and the default arguments are fine in this case.
Notes
If the very idea of expressions and arguments appears to be sheer gobbledygook, take a look at Chapter 10, then revisit this section.
In many cases, this default setting will do the trick. If it doesn't, try changing the width value from the default of 0.2, which is the width of time sampled (raising it will use a larger sampled area but take longer), or increase samples from 5 (increase the number of samples within the specified time) for more smoothing. The final argument, t = time, is not applicable unless you need to offset the smoothing function in time for some reason.
What about rotation? In the example, the amount of rotation is negligible, but with a shot containing unwanted rotation, you can stabilize it, then either smooth it or eliminate it altogether by deleting keyframes from the Rotation property of the invisible parent layer (leaving them in the visible layer).
To composite other layers into this now smoother scene, and have them share the smooth motion: Toggle their 3D switches and parent them to the smoothed layer. You're golden, as we like to say in the Golden State.
Tip
The same basic approach can destabilize, rather than smooth, a camera motion. Because the expression involved requires a bit of tweaking, discussion is punted to Chapter 10.
Extending a Track with Expressions |
Section I. Working Foundations
The 7.0 Workflow
- The 7.0 Workflow
- Workspaces and Panels
- Making the Most of the UI
- Settings: Project, Footage, Composition
- Previews and OpenGL
- Effects & Presets
- Output: The Render Queue
- Study a Shot like an Effects Artist
The Timeline
- The Timeline
- Organization
- Animation Methods
- Keyframes and The Graph Editor
- Uber-mastery
- Transform Offsets
- Motion Blur
- Manipulating Time Itself
- In Conclusion
Selections: The Key to Compositing
- Selections: The Key to Compositing
- The Many Ways to Create Selections
- Compositing: Science and Nature
- Alpha Channels and Premultiplication
- Masks
- Combining Multiple Masks
- Putting Masks in Motion
- Blending Modes: The Real Deal
- Track Mattes
Optimizing Your Projects
- Optimizing Your Projects
- Navigating Multiple Compositions
- Precomposing and Nesting
- Adjustment and Guide Layers
- Understanding Rendering Order
- Optimizing After Effects
- Onward to Effects
Section II. Effects Compositing Essentials
Color Correction
Color Keying
- Color Keying
- Good Habits and Best Practices
- Linear Keyers and Hi-Con Mattes
- Blue-Screen and Green-Screen Keying
- Understanding and Optimizing Keylight
- Fixing Typical Problems
- Conclusion
Rotoscoping and Paint
- Rotoscoping and Paint
- Articulated Mattes
- Working Around Limitations
- Morphing
- Paint and Cloning
- Conclusion
Effective Motion Tracking
- Effective Motion Tracking
- The Essentials
- Optimizing Tracking Using 3D
- Extending a Track with Expressions
- Tracking for Rotoscoping
- Using 3D Tracking Data
- Conclusion
Virtual Cinematography
- Virtual Cinematography
- 5D: Pick Up the Camera
- Storytelling and the Camera
- Camera Blur
- The Role of Grain
- Film and Video Looks
- Conclusion
Expressions
- Expressions
- Logic and Grammar
- Muting Keyframes
- Linking Animation Data
- Looping Animations
- Smoothing and Destabilizing
- Offsetting Layers and Time
- Conditionals and Triggers
- Tell Me More
Film, HDR, and 32 Bit Compositing
- Film, HDR, and 32 Bit Compositing
- Details
- Film 101
- Dynamic Range
- Cineon Log Space
- Video Gamma Space
- Battle of the Color Spaces
- Floating Point
- 32 Bits per Channel
- Conclusion
Section III. Creative Explorations
Working with Light
- Working with Light
- Light Source and Direction
- Creating a Look with Color
- Backlighting, Flares, Light Volume
- Shadows and Reflected Light
- HDR Lighting
- Conclusion
Climate: Air, Water, Smoke, Clouds
- Climate: Air, Water, Smoke, Clouds
- Particulate Matter
- Sky Replacement
- The Fog, Smoke, or Mist Rolls In
- Billowing Smoke
- Wind
- Water
- Conclusion
Pyrotechnics: Fire, Explosions, Energy Phenomena
- Pyrotechnics: Fire, Explosions, Energy Phenomena
- Firearms
- Sci-Fi Weaponry
- Heat Distortion
- Fire
- Explosions
- In a Blaze of Glory
Learning to See
Index
EAN: 2147483647
Pages: 157
