Output: The Render Queue
Output The Render Queue
The Render Queue itself is not terribly puzzling, but like many other key portions of the After Effects UI it contains a few features that many users miss, and a few gotchas that loom from time to time.
There are two key sections for each Render Queue item: Render Settings and Output Module. You can click on each to adjust settings, but I find that almost immediately you will want to get into the habit of choosing a preset, or template, from the pull-down menu. And in the altogether likely case that one does not already exist, you choose the selection at the bottom of each menu: Make Template.
Why make a template for each render? Render Settings tends to be standardized across a project, and you likely will use one of just a few output modules throughout the duration of the project. So why waste time thinking about settings each time you render, when that only leads to a higher likelihood of careless errors (which are, if you ask me, the bane of a compositor's existence)?
Placing an Item in the Queue
After Effects is flexible about how you add an item to the Render Queue. You have a choice of two keyboard shortcuts: Ctrl+M/Cmd+M and the one I always tend to use, Ctrl+Shift+/ (Cmd+Shift+/). You can also select a number of items in the Project panel and drag them to the Render Queue. If you drag footage without a comp to the Render Queue, After Effects makes a default comp for you to render the footage as is, which can be handy for quick file conversions such as creating a QuickTime output from an image sequence.
Notes
The output path you choose for the first of your active Render Queue items becomes the default for the rest of them.
Render Settings: Your Manual Overrides
There's probably one set of parameters from the Render Settings dialog that you will prefer throughout a given project; in many cases it will simply be the default Best.
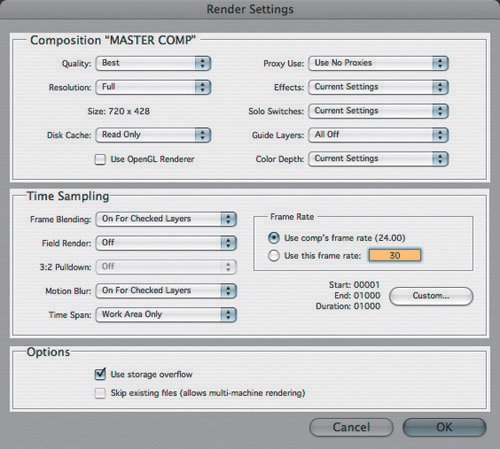
The Render Settings dialog consists mostly of manual overrides for the settings in your composition itself (Figure 1.39). It contains three sections:
- The Composition section (top) includes a series of options to override Quality and Resolution settings for the composition, Disk Cache settings for the project, and layer-by-layer Proxy, Effects, Solo, and Guide Layer toggles. The Best setting ignores proxies, hidden effects, and guide layers, but respects current solo settings, with Quality forced to Best and Resolution at Full.
Disciplined artists who never leave an effect that they don't intend to have on and never solo a layer and intend to render it that way may prefer to override the current settings, but most people (myself included) will curse such a decision.
Figure 1.39. The Render Settings dialog has three sections: overrides for the composition settings (top), specific time sampling overrides and settings (center), and two extra options for where and how files are rendered (bottom).
Proxy settings are trickier. An investigation into the ways you can employ them (as well as guide layers) is found in Chapter 4.
- The Time Sampling section (center) contains settings that override decisions that exist for the overall composition: the Frame Blending and Motion Blur switches for the composition (not individual layers), plus the Shutter Angle setting overriding the composition's motion blur setting (more on that in the next chapter). Field Render and 3:2 Pulldown pertain only to preparing the comp for broadcast video output; on projects you will either use them all the time or not at all for final output. The Time Span setting comes into play in situations where you need to re-render some portion of your total comp (otherwise, Work Area or Length of Comp should be preferable).
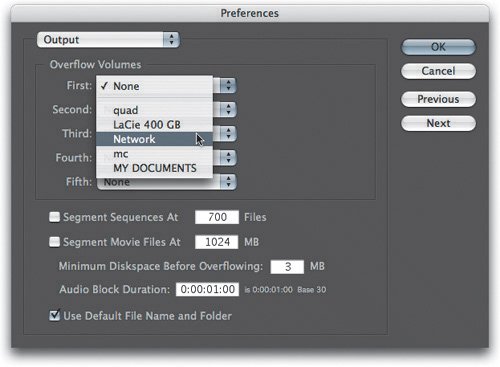
- The Options section (bottom) contains precisely two mutually exclusive options: If you check Use Storage Overflow then the overflow volumes that you can specify in Preferences > Output come into play (Figure 1.40). If the first one fills up, the second is used, and so on. If you do not check this option, you can let After Effects look in the destination folder and skip any files that it finds whose output names match files already in that folder. This is designed specifically for the Watch Folder option, but you can use it in any case where you are creating an image sequence and have some, but not all, of the rendered images already completed.
Figure 1.40. Storage overflow is insurance against failed planning; if you run out of space on the primary rendering drive, the volumes specified in this Preference dialog can be set to handle the overflow. With ample disk space, you should not need this, but it's preferable to a failed overnight render.
The way to use Render Settings overall is as a checklist of all the things you need to think about to get your output footage to look the way you want. It may work to simply use Best settings and walk away, or you may be reminded of something specific that needs to be custom set.
Output Modules: As Many as You Need
Throughout the course of your After Effects career you will probably create a large number of Output Module templates. The settings themselves are not so tricky if you know what you're after: Once you've chosen a format, and set the appropriate options (under Video Output), you have the additional options of stretching or cropping the output, and adding audio.
Note that Output Module appears after Render Settings, item by item. This is with good reason: As you will see in detail in Chapter 4, the order in the user interface shows the rendering order, and so Render Settings are applied to the render prior to the application of the Output Module settings.
This becomes important, for example, when scaling output: To scale down a clip and retain the highest quality, you will in most cases want to apply the scaling as a Stretch setting in the Output Module rather than a Resolution setting in the Render Settings (unless speeding up the render is more important than quality, in which case the inverse advice applies).
There are several elegant problem-solving tools embedded in the Output Module setup, some of which many users tend to miss. Among the most significant are
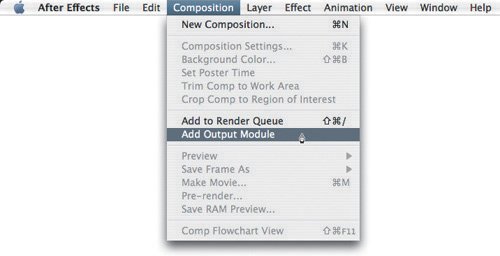
- You are allowed more than one Output Module per Render Queue item (Figure 1.41).
Figure 1.41. So many usersand not just beginners, by any meansfail to notice that you can add multiple Output Modules to a single render queue item, via Composition > Add Output Module. This can be an immense timesaver, as several versions of a render can be created in one pass (for example, one at full resolution stills and a Web-compressed version).
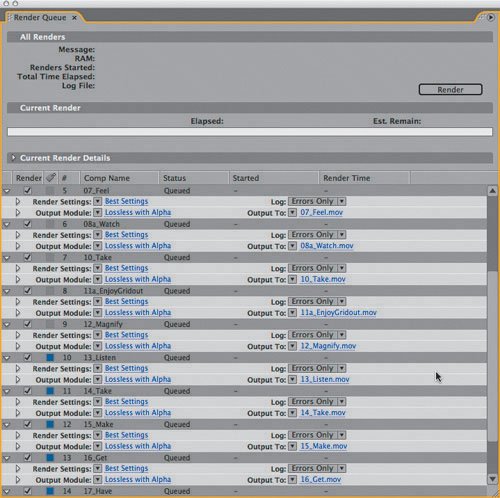
- You can change the Output Module of all of your Render Queue items by selecting the Output Module (rather than the Render Queue item itself) of the first item and then Shift-selecting the Output Module (again, rather than the item itself) of the last item (Figure 1.42).
Figure 1.42. Oh no, I have to change all those? Fear not, you can select any number of consecutive Output Modules to change them, but don't select the render queue items themselves. Instead, select the first Output Module in the group and Shift-select the last, then change any of the selected ones and they all follow.
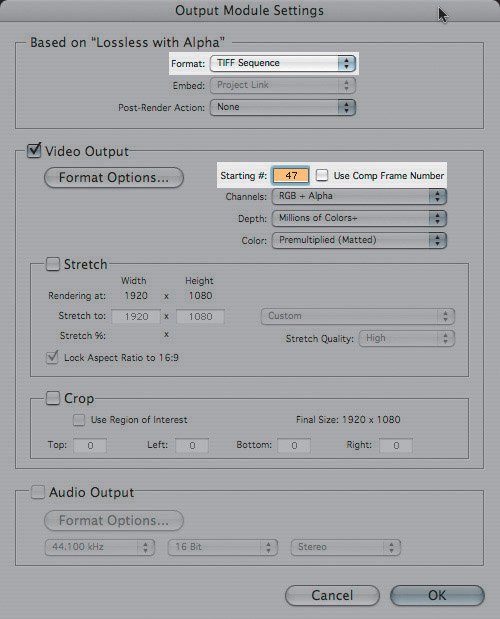
- You can start numbering an image sequence using the integer of your choice (Figure 1.43).
Figure 1.43. To custom-number your frame sequence, clear Use Comp Frame Number and enter your own.
- Stretching and cropping your output is often a quick, elegant solution to an otherwise thorny rendering problem.
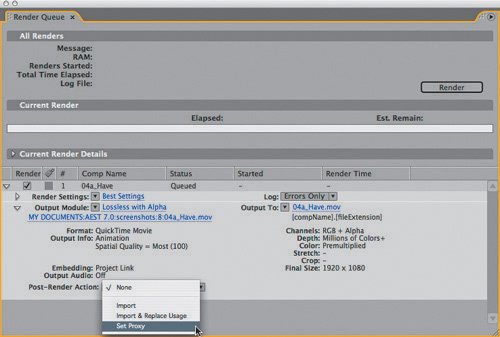
- Included in the Output Module Settings, and also hidden under the twirl-down arrow (Figure 1.44) is an extra option, to perform one of three Post-Render Actions to import or replace the composition that was the source of the render. Chapter 4 contains more about how to use these.
Figure 1.44. Post-Render Actions save you steps, if you intend to view your render in After Effects (Import) or replace a pre-comp with the render permanently (Import & Replace Usage) or just temporarily (Set Proxy).
- The shorthand for creating a numbered image sequence is simple if you follow the rules: After Effects replaces the string [###] within the overall output name with a three-digit sequential number. The number of # characters in this string corresponds to the amount of digits in the sequential number; if you want extra padding, add extra # characters.
Paying attention to the options available with Output Modules and taking the time to customize and apply presets that you can use again and again are big parts of getting optimum output out of After Effects.
Optimizing Output Settings
Here are some general guidelines for the output settings (Render Settings and Output Modules) that you can use in specific situations:
- Lossless output Interframe compression (QuickTime with Animation/Most) is acceptable for movie files, lossless encoding (TGA with RLE, TIFF with LZW, or PNG) and for still images.
- Low-loss output: QuickTime with Photo-JPEG at 75% is ideal for creating test renders that are relatively small at full resolution yet show little in the way of compression artifacts. The newcomer in this territory is QuickTime H.264, which is also quite stunning at similar settings.
- Web review: This is a fast-changing area, subject to many variables. At this writing, QuickTime with MPEG-4 or H.264 offer some of the best results, but some studios prefer to use the Sorenson compressor that is supported on systems that haven't been recently updated to the latest versions of QuickTime. In some cases, QuickTime will not be the answer and Divx or another encoding scheme will be preferred, particularly among Windows and Linux users.
- DV/HDV: If working with these or other compressed source formats, remember that they recompress prerenders, so make all of your edits to the source file and render once!
Notes
Whenever rendering to a format that adds compression, be aware that colors and overall gamma (brightness) can shift noticeably in a clip that otherwise shows few, if any, compression artifacts.
Obviously, there is much more to choosing your output settings than is covered here; the intention is to help you get started. In many cases, the settings you need to use will be dictated by your delivery format or by what is needed by the next person after you in the production pipeline.
Study a Shot like an Effects Artist |
Section I. Working Foundations
The 7.0 Workflow
- The 7.0 Workflow
- Workspaces and Panels
- Making the Most of the UI
- Settings: Project, Footage, Composition
- Previews and OpenGL
- Effects & Presets
- Output: The Render Queue
- Study a Shot like an Effects Artist
The Timeline
- The Timeline
- Organization
- Animation Methods
- Keyframes and The Graph Editor
- Uber-mastery
- Transform Offsets
- Motion Blur
- Manipulating Time Itself
- In Conclusion
Selections: The Key to Compositing
- Selections: The Key to Compositing
- The Many Ways to Create Selections
- Compositing: Science and Nature
- Alpha Channels and Premultiplication
- Masks
- Combining Multiple Masks
- Putting Masks in Motion
- Blending Modes: The Real Deal
- Track Mattes
Optimizing Your Projects
- Optimizing Your Projects
- Navigating Multiple Compositions
- Precomposing and Nesting
- Adjustment and Guide Layers
- Understanding Rendering Order
- Optimizing After Effects
- Onward to Effects
Section II. Effects Compositing Essentials
Color Correction
Color Keying
- Color Keying
- Good Habits and Best Practices
- Linear Keyers and Hi-Con Mattes
- Blue-Screen and Green-Screen Keying
- Understanding and Optimizing Keylight
- Fixing Typical Problems
- Conclusion
Rotoscoping and Paint
- Rotoscoping and Paint
- Articulated Mattes
- Working Around Limitations
- Morphing
- Paint and Cloning
- Conclusion
Effective Motion Tracking
- Effective Motion Tracking
- The Essentials
- Optimizing Tracking Using 3D
- Extending a Track with Expressions
- Tracking for Rotoscoping
- Using 3D Tracking Data
- Conclusion
Virtual Cinematography
- Virtual Cinematography
- 5D: Pick Up the Camera
- Storytelling and the Camera
- Camera Blur
- The Role of Grain
- Film and Video Looks
- Conclusion
Expressions
- Expressions
- Logic and Grammar
- Muting Keyframes
- Linking Animation Data
- Looping Animations
- Smoothing and Destabilizing
- Offsetting Layers and Time
- Conditionals and Triggers
- Tell Me More
Film, HDR, and 32 Bit Compositing
- Film, HDR, and 32 Bit Compositing
- Details
- Film 101
- Dynamic Range
- Cineon Log Space
- Video Gamma Space
- Battle of the Color Spaces
- Floating Point
- 32 Bits per Channel
- Conclusion
Section III. Creative Explorations
Working with Light
- Working with Light
- Light Source and Direction
- Creating a Look with Color
- Backlighting, Flares, Light Volume
- Shadows and Reflected Light
- HDR Lighting
- Conclusion
Climate: Air, Water, Smoke, Clouds
- Climate: Air, Water, Smoke, Clouds
- Particulate Matter
- Sky Replacement
- The Fog, Smoke, or Mist Rolls In
- Billowing Smoke
- Wind
- Water
- Conclusion
Pyrotechnics: Fire, Explosions, Energy Phenomena
- Pyrotechnics: Fire, Explosions, Energy Phenomena
- Firearms
- Sci-Fi Weaponry
- Heat Distortion
- Fire
- Explosions
- In a Blaze of Glory
Learning to See
Index
EAN: 2147483647
Pages: 157
