The Many Ways to Create Selections
After Effects offers a number of ways to create selections, yet far fewer than exist in Photoshop. Why? To Photoshop's advantage, its selection tools must operate only with still images. This is a much simpler development problem, believe it or not, than creating selection tools for moving images, in which results must appear consistent across the changing array of frames that makes up a single clip.
So what are the After Effects methods for creating selections? Take a look.
Pull a Matte
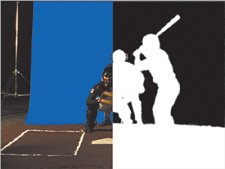
You may think that pulling a matte refers to keying out the blue or green from an effects film shoot (Figure 3.1). True enough, but there are other types of mattes too. Even more common than blue-screen keys are high-contrast, or hi-con, mattes. You create these by maximizing the contrast of a particular channel or area of the image. There are other types of mattes possible as well, such as the elusive difference matte. Chapter 6, "Color Keying," discusses pulling mattes in depth.
Figure 3.1. This split-screen image shows a blue-screen shoot (left) and the resulting matte. (All baseball images courtesy of Tim Fink Productions.)
Use an Existing Alpha Channel
Using an existing alpha channel sounds like a no-brainer, right? The source footage was created with an alpha channel (typically in a 3D animation program); just bring it in as is (Figure 3.2). No worries, done deal, right?
Figure 3.2. This close-up of a computer-generated baseball is split into color (left) and alpha channels.

That's theoretically true, except that After Effects mostly conceals an issue that is quite explicit in other similar software packages (such as Apple's Shake): the interpretation of the alpha channel. Is the edge premultiplied or not, and what do you do in either case? The questions are raised not only when you import the initial image (as you do in After Effects) but also when applying effects to layers with an alpha.
How does After Effects get around this, and is it a good or a bad thing for compositors? For the answer, see the "Alpha Channels and Premultiplication" section later in this chapter.
Create a Mask (or Several)
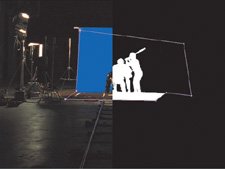
A mask, by contrast, is a vector shape that determines the opaque and transparent areas of an image (Figure 3.3). Masks are generally created by hand, although After Effects does include a provision to generate them automatically by examining the raster data of an image.
Figure 3.3. In this split-screen view, you can see the garbage matte mask that was added to remove areas of the stage that didn't have a blue screen.
Notes
Because Auto-trace now also includes a Preview toggle, it's much easier to test values for its various settings and arrive at a useful result.
The Layer > Auto-trace command is new and improved in version 7.0 of After Effects. With sufficient contrast on any channel you may find that it automatically creates detailed and accurate outlines. The downside of this approach is that, with all but the very simplest shots, it will create lots of overlapping outlinesdozens, typicallywhen you might want one or two. Combine this with changes over time and you can end up with far more than you can manage.
This chapter focuses on the basics of creating and combining masks. You can find a follow-up discussion in Chapter 7, "Rotoscoping and Paint," which focuses specifically on rotoscoping, the art of animating selections over time.
Use Blending Modes Instead
It's even possible to composite without selections at all, instead using blending modes (Add, Multiply, Screen) to combine color channels mathematically, pixel by pixel, in ways that mimic how light and shadow play out in the world (Figure 3.4). You can also use selections combined with blending modes to get the best of both worlds.
Figure 3.4. Blending modes are the preferred way for compositing elements that are composed of light rather than matter, such as fire.

This chapter goes over the modes that are relevant to effects compositing and gets into the nitty-gritty of what these blending modes are actually doing as they combine pixel data.
Use an Effect
Certain effects can be used to create transparency selections or to refine the ones you have. Section II discusses these in detail. Many common effects, such as Levels and Curves, include control of the transparency (alpha) channel, while most of the effects in the Channel menu permit you to create or alter the alpha channel directly.
Combine Techniques
As with blending modes, there is no reason not to combine techniques, using a garbage matte to clean up a color key or a hi-con matte to enhance the effect of a blending mode. This is very common in advanced effects work, where no two shots are exactly the same and where a single frame or clip can require a variety of approaches.
So What's the Big Deal?
The real skills here are knowing which approach to apply for a given situation, knowing how to apply it, and knowing when to try something else, either to enhance or to replace what you already have. None of these techniques or approaches is particularly sophisticated by itself, but applying them properly requires a clear vision of what the shot needs and how to supply it.
Compositing Science and Nature |
Section I. Working Foundations
The 7.0 Workflow
- The 7.0 Workflow
- Workspaces and Panels
- Making the Most of the UI
- Settings: Project, Footage, Composition
- Previews and OpenGL
- Effects & Presets
- Output: The Render Queue
- Study a Shot like an Effects Artist
The Timeline
- The Timeline
- Organization
- Animation Methods
- Keyframes and The Graph Editor
- Uber-mastery
- Transform Offsets
- Motion Blur
- Manipulating Time Itself
- In Conclusion
Selections: The Key to Compositing
- Selections: The Key to Compositing
- The Many Ways to Create Selections
- Compositing: Science and Nature
- Alpha Channels and Premultiplication
- Masks
- Combining Multiple Masks
- Putting Masks in Motion
- Blending Modes: The Real Deal
- Track Mattes
Optimizing Your Projects
- Optimizing Your Projects
- Navigating Multiple Compositions
- Precomposing and Nesting
- Adjustment and Guide Layers
- Understanding Rendering Order
- Optimizing After Effects
- Onward to Effects
Section II. Effects Compositing Essentials
Color Correction
Color Keying
- Color Keying
- Good Habits and Best Practices
- Linear Keyers and Hi-Con Mattes
- Blue-Screen and Green-Screen Keying
- Understanding and Optimizing Keylight
- Fixing Typical Problems
- Conclusion
Rotoscoping and Paint
- Rotoscoping and Paint
- Articulated Mattes
- Working Around Limitations
- Morphing
- Paint and Cloning
- Conclusion
Effective Motion Tracking
- Effective Motion Tracking
- The Essentials
- Optimizing Tracking Using 3D
- Extending a Track with Expressions
- Tracking for Rotoscoping
- Using 3D Tracking Data
- Conclusion
Virtual Cinematography
- Virtual Cinematography
- 5D: Pick Up the Camera
- Storytelling and the Camera
- Camera Blur
- The Role of Grain
- Film and Video Looks
- Conclusion
Expressions
- Expressions
- Logic and Grammar
- Muting Keyframes
- Linking Animation Data
- Looping Animations
- Smoothing and Destabilizing
- Offsetting Layers and Time
- Conditionals and Triggers
- Tell Me More
Film, HDR, and 32 Bit Compositing
- Film, HDR, and 32 Bit Compositing
- Details
- Film 101
- Dynamic Range
- Cineon Log Space
- Video Gamma Space
- Battle of the Color Spaces
- Floating Point
- 32 Bits per Channel
- Conclusion
Section III. Creative Explorations
Working with Light
- Working with Light
- Light Source and Direction
- Creating a Look with Color
- Backlighting, Flares, Light Volume
- Shadows and Reflected Light
- HDR Lighting
- Conclusion
Climate: Air, Water, Smoke, Clouds
- Climate: Air, Water, Smoke, Clouds
- Particulate Matter
- Sky Replacement
- The Fog, Smoke, or Mist Rolls In
- Billowing Smoke
- Wind
- Water
- Conclusion
Pyrotechnics: Fire, Explosions, Energy Phenomena
- Pyrotechnics: Fire, Explosions, Energy Phenomena
- Firearms
- Sci-Fi Weaponry
- Heat Distortion
- Fire
- Explosions
- In a Blaze of Glory
Learning to See
Index
EAN: 2147483647
Pages: 157
- The Four Keys to Lean Six Sigma
- Beyond the Basics: The Five Laws of Lean Six Sigma
- When Companies Start Using Lean Six Sigma
- Making Improvements That Last: An Illustrated Guide to DMAIC and the Lean Six Sigma Toolkit
- The Experience of Making Improvements: What Its Like to Work on Lean Six Sigma Projects
