Masks
Although hand-created and animated for the most part, masks open up all kinds of possibilities in After Effects. Masks are the principal method for defining transparency regions in a clip without regard to actual pixels because they are vector shapes. This section lays down the basics for smart use of masks.
Typical Mask Workflow
There are three tools for creating masks: two basic shape tools and the Pen. To activate the Rectangular Mask tool, use the keyboard shortcut Q; press Q again to toggle the tool to the Elliptical Mask tool. If your mask doesn't conform well to a rectangle or an ellipse, you can draw it point by point with the Pen tool (G).
Tip
If you're looking for other common primitive mask shapesa rectangle with rounded corners, a hexagon, or the likeyou may be best off drawing the shape in Adobe Illustrator (if you have it), then copying and pasting it. This, however, will not work unless the preferences in Illustrator are set properly. Under Illustrator's File Handling & Clipboard preference, choose AICB with Preserve Paths checked. This is not the default. You can also select and copy paths in Photoshop for use as masks.
Whether you draw the mask in the Composition panel or the Layer window is up to you. It is somewhere between difficult and impossible to draw or see a mask accurately in the Composition panel if, say, the layer was offset and rotated in 3D space, but if you want to see the layer over its background, the Composition panel must at least be visible. Given sufficient monitor space, an ideal compromise is to keep both windows open side by side, working in the Layer window and watching the Composition panel for live updates.
Remember that your target shape doesn't have to be an ellipse to benefit from starting by drawing an ellipse. Indeed, if the shape calls for a perfectly circular curve on one side, you might do well to draw an ellipse (holding down Shift to make it perfectly circular) and then editing other sides of it with the Pen tool.
When drawing a rectangle or ellipse
- Double-click the Mask tool (in the Tools palette) to set the boundaries of the mask to match those of the layer.
- Use Shift to constrain the shape and/or Ctrl/Cmd to draw the shape from the center rather than from a corner.
- Try the Mask Shape dialog for those rare cases in which you must set the boundaries to exact dimensions and can't do it visually. Although this dialog's use is quite limited, you access it by clicking the underlined word "Shape" under Mask options (highlight the layer and click M to reveal it).
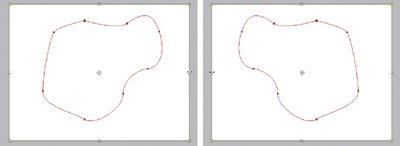
- Double-click a point on the shape to activate Free Transform mode, which enables you to offset, rotate, or scale the entire mask shape (Figure 3.13). As always, hold down Shift to keep the scale proportional, snap the rotation to 45 degree increments, or constrain movement to one axis.
Figure 3.13. Flipping a custom mask symmetrically on one axis is no easy trick in After Effects. Holding down the Shift key scales both axes proportionally, flipping it on both axes. Instead, with View > Show Grid enabled and View Snap to Grid turned on, double-click the Rectangular Mask tool to create a second mask that is the size of the layer. Select both masks in the Timeline, and double-click a point on one of the masks to set the Free Transform tool. Now drag the handles at either side of the image and swap their positions, deleting the layer-sized mask when you're done.
Highlighting a layer with a mask and pressing MM (the M key twice in rapid succession) reveals the full Mask options for that layer. Some tips for those include
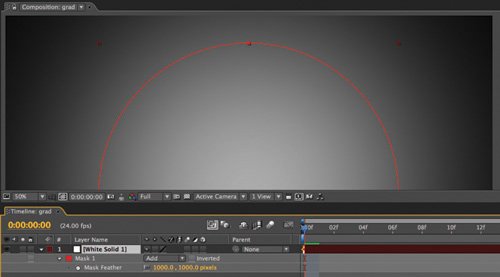
- Feather is set for the entire mask and operates in both directions (to the inside and outside of the mask shape); there is no way around these defaults. All kinds of lighting, smoke, and glow effects can begin with a masked solid that is heavily feathered. In other words, the feather setting is approximately half the width of the mask at its narrowest crossing, meaning the masked solid is now a big, soft gradient (Figure 3.14).
Figure 3.14. The Feather of this mask is set roughly equal to its radius, creating a big, diffuse gradient in the shape of the mask (in this case, elliptical), useful for many types of lighting effects.
- Pressing the F key reveals only the Mask Feather property in the Timeline.
- A hidden gem is Mask Expansion: You can use it to expand or, with a negative value, to contract the mask area. This has all sorts of uses, including creating an edge mask using one mask duplicated into two, each with a Mask Expansion value that is the inverse of the other, and the inner mask subtracted from the outer.
Keyboard shortcuts help eliminate a lot of the fuss and bother that comes with masking in After Effects.
Drawing Bezier Masks
By default, the Pen tool draws Bezier curves, and in After Effects you can do everything you need to create a mask by keeping the Pen tool active throughout the mask edit.
I sometimes draw a Bezier mask first as straight lines only, clicking to place points at key transitions and corners. Once I've completed the basic mask shape, with the Pen tool still active, I can go back point by point and edit the shape, because I have instant access to all of the mask shortcuts:
- Clicking on a point with the Pen tool active deletes it.
- Clicking on a segment between points with the Pen tool active adds a point.
- Alt/Option-clicking on a point with the Pen tool enables the Convert Vertex tool: Apply it to a point with no handles, and you can drag out to create handles. Apply it to a point with handles, and you cancel the handles.
- Clicking on a Bezier handle with the Pen tool breaks the center point of the Bezier, enabling you to adjust the handles individually; Alt/Option-clicking on a handle restores a linear connection between the handles.
- Context-clicking on the mask shape with the Pen tool (or the Selection tool, for that matter) enables the context menu of options for that mask, including all of its settings on the Timeline, the ability to specify a First Vertex, and Motion Blur settings for the mask, which can be unlocked from the layer itself.
Only when you want to double-click to free transform the entire mask is it necessary to switch to the Selection tool, which you can do either by pressing V or by holding down Ctrl/Cmd while you double-click a vertex. The Ctrl/Cmd key toggles back and forth between the Pen and Selection tools, regardless of which one is currently active.
Tip
As with most selectable UI elements in After Effects, pressing F2 or Ctrl+Shift+A (Cmd+Shift+A) deselects the active mask. This is handy when you're done drawing one mask and want to create the next one without switching tools.
Combining Multiple Masks |
Section I. Working Foundations
The 7.0 Workflow
- The 7.0 Workflow
- Workspaces and Panels
- Making the Most of the UI
- Settings: Project, Footage, Composition
- Previews and OpenGL
- Effects & Presets
- Output: The Render Queue
- Study a Shot like an Effects Artist
The Timeline
- The Timeline
- Organization
- Animation Methods
- Keyframes and The Graph Editor
- Uber-mastery
- Transform Offsets
- Motion Blur
- Manipulating Time Itself
- In Conclusion
Selections: The Key to Compositing
- Selections: The Key to Compositing
- The Many Ways to Create Selections
- Compositing: Science and Nature
- Alpha Channels and Premultiplication
- Masks
- Combining Multiple Masks
- Putting Masks in Motion
- Blending Modes: The Real Deal
- Track Mattes
Optimizing Your Projects
- Optimizing Your Projects
- Navigating Multiple Compositions
- Precomposing and Nesting
- Adjustment and Guide Layers
- Understanding Rendering Order
- Optimizing After Effects
- Onward to Effects
Section II. Effects Compositing Essentials
Color Correction
Color Keying
- Color Keying
- Good Habits and Best Practices
- Linear Keyers and Hi-Con Mattes
- Blue-Screen and Green-Screen Keying
- Understanding and Optimizing Keylight
- Fixing Typical Problems
- Conclusion
Rotoscoping and Paint
- Rotoscoping and Paint
- Articulated Mattes
- Working Around Limitations
- Morphing
- Paint and Cloning
- Conclusion
Effective Motion Tracking
- Effective Motion Tracking
- The Essentials
- Optimizing Tracking Using 3D
- Extending a Track with Expressions
- Tracking for Rotoscoping
- Using 3D Tracking Data
- Conclusion
Virtual Cinematography
- Virtual Cinematography
- 5D: Pick Up the Camera
- Storytelling and the Camera
- Camera Blur
- The Role of Grain
- Film and Video Looks
- Conclusion
Expressions
- Expressions
- Logic and Grammar
- Muting Keyframes
- Linking Animation Data
- Looping Animations
- Smoothing and Destabilizing
- Offsetting Layers and Time
- Conditionals and Triggers
- Tell Me More
Film, HDR, and 32 Bit Compositing
- Film, HDR, and 32 Bit Compositing
- Details
- Film 101
- Dynamic Range
- Cineon Log Space
- Video Gamma Space
- Battle of the Color Spaces
- Floating Point
- 32 Bits per Channel
- Conclusion
Section III. Creative Explorations
Working with Light
- Working with Light
- Light Source and Direction
- Creating a Look with Color
- Backlighting, Flares, Light Volume
- Shadows and Reflected Light
- HDR Lighting
- Conclusion
Climate: Air, Water, Smoke, Clouds
- Climate: Air, Water, Smoke, Clouds
- Particulate Matter
- Sky Replacement
- The Fog, Smoke, or Mist Rolls In
- Billowing Smoke
- Wind
- Water
- Conclusion
Pyrotechnics: Fire, Explosions, Energy Phenomena
- Pyrotechnics: Fire, Explosions, Energy Phenomena
- Firearms
- Sci-Fi Weaponry
- Heat Distortion
- Fire
- Explosions
- In a Blaze of Glory
Learning to See
Index
EAN: 2147483647
Pages: 157
