Understanding Rendering Order
To truly master After Effects and become an expert compositor, you must precisely understand the order in which actions occur. For example, you need to know whether a mask is applied before an effect and whether an effect is applied to a track matte. You must fully comprehend the render pipeline.
For the most part the render pipeline is plainly visible in the Timeline and follows consistent rules:
- 2D layers are calculated from bottom to top of the layer stack
- Masks, effects, transforms, paint, and type are calculated from top to bottom (as seen when twirling down layer properties)
- 3D layers are calculated based on their distance from the camera; coplanar 3D layers use stacking order just like 2D layers
Tip
3D calculations are precise well below the decimal level, but do round at some point. Coplanar 3D layers can thus introduce rendering errors and should generally be avoided by precomposing them in 2D.
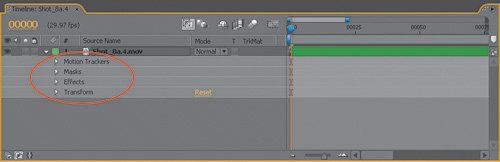
So, in a 2D composition, After Effects starts with the bottom layer, calculates any adjustments to it in the order properties are shown, top to bottom, then calculates adjustments to the layer above it, composites the two of them together, and so on up to the top layer of the stack. If you want to know what order is used to calculate layer properties, you need only reveal them in the Timeline (Figure 4.12).
Figure 4.12. Just because After Effects lacks a tree/node interface doesn't mean you can't see the render order in the Timeline easily. Layer properties render in top to bottom order (as shown here: Motion Trackers, then Masks, Effects, and finally Transforms).
Tip
The Transform effect offers an alternative method to transform a layer, allowing you to transform before a given effect is applied instead of precomposing (because transforms otherwise always follow effects).
This, then, adds an extra advantage to adjustment layers. They behave just like other 2D layers in the stack, so that they are always rendered after all calculations on layers below them are completed. Effects within layers, on the other hand, always calculate prior to transforms.
And what about track mattes? Track mattes (and Blending modes) are calculated after all of the other layer properties (masks, effects, and transforms) have been calculated. Of course, before track mattes are applied, their own mask, effect, and transform data are applied to them. Therefore, it should not be necessary to pre-render a track matte in order to see these edits affect the matte.
Notes
After Effects is often more clever than you might guess about optimizing what to calculate and what to ignore or cache. Portions of layers that are not visible (because they are occluded, masked, or otherwise outside of the visible frame) often will not be calculated. You can't control this process, but you often reap the benefits (via faster renders) without even realizing it.
As I mentioned in the previous chapter, you are taking your chances if you try to apply two consecutive track mattes (in other words, you apply a track matte to a track matte). Sometimes the method works, and the UI does not specifically prohibit you from doing it; however, it's inconsistent. I recommend precomposing instead. Better safe than sorry.
Optimizing Previews and Renders
I sometimes surprise directors and supervisors with the speed and interactivity I squeeze out of After Effects, even at full 2K film resolution. Here's my secret: As I work, I organize portions of my master comp that I consider finished into their own subcomps, and if they require any render cycles at all, I pre-render them.
Tip
Apply an Add mask to a layer set as a Luma Track Matte and the areas outside the mask contain the equivalent of solid black (transparent) pixels.
It is astonishing how many veteran compositing artists waste redundant rendering time by failing to commit to their own decisions, especially given how easy it is to make changes if you've guessed wrong. For example, on effects shots that begin with a blue-screen key, but develop into very complex shots, artists often fail to pre-render the keying results for fear that they might need to tweak them later. This can add several seconds to each individual frame update and minutes or even hours to a film-resolution render. Every time you want to see the result of a new color correction, you end up waiting for your keyer to redo its work. Collectively, you can waste hours of your day in this fashion.
Tip
The Info panel can show you what exactly is rendering at any time. To view these descriptive updates, choose Preferences > Display and check Show Rendering in Process in Info Panel and Flowchart.
After Effects does have a RAM cache (which is further optimized with each major upgrade of the application) to keep track of what has not changed when you make adjustments and avoid unnecessary re-rendering. This is a great feature, but you should not rely on that alone to speed your workflow.
Post-Render Options
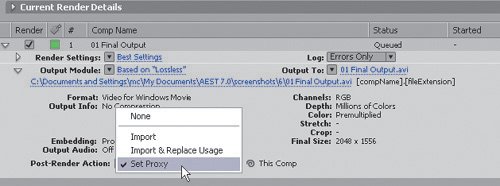
The After Effects UI anticipates the need to pre-render nested compositions and replace usage in the project, then potentially change your mind later. Tucked away in the Render Queue panel, but easily visible if you twirl down the arrow next to Output Module (Figure 4.13), is a menu of three post-render actions. After the render is complete, you can choose
- Import: Imports the result
- Import & Replace Usage: Does not eliminate the source comp from the project; only takes its place (or that of any other item you specify) in the project
- Set Proxy: Makes the rendered output a proxy (temporary substitute) of the source comp (or of any other item you specify)
Figure 4.13. Twirl down the arrow beside the Output Module settings for a Render Queue item and you reveal options to perform actions following the render. The last two options are particularly useful for speeding up future renders, if you apply them to subcompositions and render those.
If you choose either of the latter two options, the pickwhip icon appears adjacent to the menu. Click and drag from this icon to whatever item in the Project panel you wish to replace. By default, the rendered composition is replaced.
What if you choose Import & Replace Usage and change your mind? To change usage back to the comp, bypassing rendered footage, hold down the Alt (Option) key as you drag and drop the comp over the footage in the Project panel; this replaces usage throughout the project. The same method of Alt-drag into a Timeline panel replaces only that individual instance (useful in other cases).
If your intention is only to work faster, and you anticipate re-rendering everything from scratch when outputting the final version, you can use proxies.
Proxies
Any visual item in your Project panel can be set with a proxy, which is an imported image or sequence that stands in for that item. Its pixel dimensions, color space, compression, and even its length can differ from the item it replaces; for example, you can use a low-resolution, JPEG-compressed still image to stand-in for a full-resolution, moving image background.
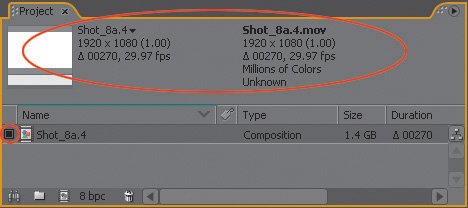
Figure 4.14 shows how a proxy appears in the Project panel. Although the scale of the proxy differs from that of the source item, transform settings within the comps that use this item remain consistent; that's the beauty of it.
Figure 4.14. The black square icon to the left of an item in the Project panel indicates that a proxy is enabled; a hollow square indicates that a proxy is assigned but not currently active. Both items are listed atop the Project panel, the active one in bold.
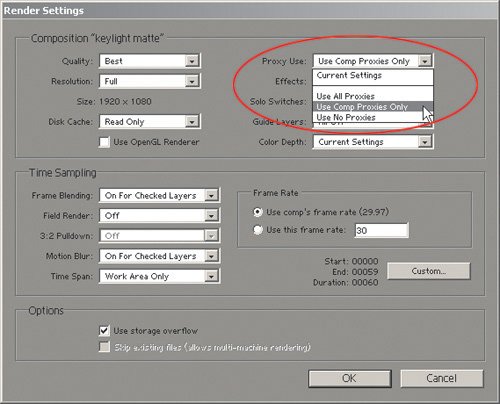
Proxies need not only be temporary stand-ins; you can use them to pre-render compositions, as long as you remember to manage their usage in Render Settings > Proxy Use. The Use Comp Proxies Only, Use All Proxies, and Current Settings options (Figure 4.15) will all use proxies in the final render. The source composition remains in place as a backup but no longer expends rendering resources.
Figure 4.15. Use Comp Proxies Only offers you the best of both worlds with proxies. Source footage can employ low-resolution stand-ins that do not appear in the final render, while source compositions use fully rendered stand-ins that can save gobs of rendering time thereafter. Some users prefer to use the Current Settings option and manage proxy use in the Project panel.
Proxies are relatively easy to blow away when no longer desired. Select the items, context-click (or go to the File menu), and choose Set Proxy > None. Alternatively, you can simply rely on the default Proxy Use > Use No Proxies in Render Settings, which will ignore them.
Network Renders
A single system, even one with multiple processor cores, can only do so much to render an After Effects project. If your studio is large enough that it includes a server network, it makes sense to look into network rendering, in which all available machines are used to render a shotsimultaneously.
Close-Up: GridIron renders
New with After Effects Professional 6.5 was X-Factor, a plug-in developed by GridIron Software (www.gridironxfactor.com) that distributes the RAM previewing task over any number of peer machines (render nodes) that are available on the network.
Now, GridIron has added a plug-in to help users of a single multiprocessor/multicore system: Nucleo. Nucleo is designed to take over your previewing and rendering process and optimize it to make the most of what your system can do. It is relatively simple to install and try out, and you can enable or disable it via a menu in After Effects.
There are two basic network rendering options. The built-in solution is File > Watch Folder, which looks in a given folder for projects ready to be rendered. This works reasonably well on small, intimate networks, but it has to be set up manually on each machine that will run it (by opening the application and setting it to watch a specific folder). This rapidly becomes impractical in a facility with a render farm, a rack (or room full) of servers dedicated only to rendering.
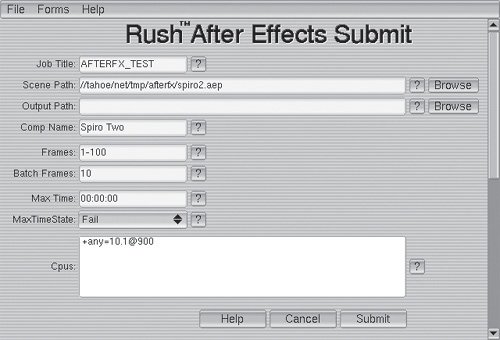
In such a case, it is easily worth the extra expense and effort to invest in a third-party rendering solution that takes advantage of After Effects' command-line rendering capabilities (aerender), such as Rush Render Queue (http://seriss.com/rush/). These programs run scripts that manage the process of rendering on multiple machines (Figure 4.16), and can manage many complicated rendering permutations, such as dependent or time-delayed renders, as well as managing error messages and machines that crash (as will inevitably occur with 150 machines on the job).
Figure 4.16. Rush Render Queue may not have a pretty front-end, but it's pretty sophisticated; This Submit panel allows you to specify which boxes will pick up the render, at what priority, how many to use, and how much time to give each of them to render before timing out. At big studios, this is indispensable.
Unfortunately this software is not plug-and-play, nor is it even implemented via a standard installer; required instead are the implementation skills of a system administrator or equivalent technical expert. Most larger facilities have such a person on staff, and many advanced After Effects users are themselves capable of setting this up in smaller studios.
If you want to use Watch Folder, and aren't certain how to do it, the online documentation provided by Adobe is complete and helpful. The help topic "Rendering" on the "Network: Using a Watch Folder" page includes everything you need to know, so there's no reason to reiterate it here.
Finally, you can simply run aerender from the command line on either platform; this is what Rush and all of the other render management applications are doing behind the scenes.
Multiple Copies of After Effects
A simpler way to hot-rod your machine so that you can render and keep working simultaneously is to run multiple copies of After Effects on a single system. This will almost certainly reduce system performance and can even cause the application to be less stable, but many After Effects consider this one of their most used tricks.
On a Mac, all you need to do is locate Adobe After Effects 7.0.app in the Finder (most likely in Applications/Adobe After Effects 7.0) and duplicate it (Cmd+D). You now have two versions of the application that will open separately, and you are free to render a project in one version while continuing to work in the other. One downside is that it can be hard to tell the two of them apart (unless you hack the icon of one of them), although the duplicate application will retain whatever name you give it (Adobe After Effects 7.0 copy.app by default).
Notes
You can run After Effects from the Terminal in OS X and the same m flag operates in Unix. It's just simpler for most Mac users to work directly in the Finder.
On Windows, you can open a second version of After Effects from the command line, assuming you have some basic DOS navigation skills. From the Start menu, choose Run, type cmd, and click OK. In the DOS shell that opens, navigate to the location of AfterFX.exe and then enter AfterFX.exe m (that's "m" as in "multiple"). Voila, a second version initializes. If you know how to write a DOS batch script, you can create a .bat file that does all of this for you with a double-click.
Note that this is not an officially sanctioned activity, and that it's a good idea not to work on the same project that is rendering so that you don't trip yourself up inadvertently saving over your own work in the wrong application. Note also that you are not limited to running just two copies at a time, but for most systems, this is a sensible limit.
To prevent the two copies of After Effects from competing with one another, you can even lower the priority of the background copy of the application so that full interactivity is maintained as you continue to work in the forward copy. This is easily done on a Windows system: Open the Task Manager (Ctrl+Alt+Del), click on the Processes tab, locate the background application, and right-click to decrease the Set Priority setting. On the Mac, this involves use of the nice command in Terminal (man nice to learn more); the trick is getting the path to After Effects entered correctly, which, like DOS, is beyond scope for this book.
Optimizing After Effects |
Section I. Working Foundations
The 7.0 Workflow
- The 7.0 Workflow
- Workspaces and Panels
- Making the Most of the UI
- Settings: Project, Footage, Composition
- Previews and OpenGL
- Effects & Presets
- Output: The Render Queue
- Study a Shot like an Effects Artist
The Timeline
- The Timeline
- Organization
- Animation Methods
- Keyframes and The Graph Editor
- Uber-mastery
- Transform Offsets
- Motion Blur
- Manipulating Time Itself
- In Conclusion
Selections: The Key to Compositing
- Selections: The Key to Compositing
- The Many Ways to Create Selections
- Compositing: Science and Nature
- Alpha Channels and Premultiplication
- Masks
- Combining Multiple Masks
- Putting Masks in Motion
- Blending Modes: The Real Deal
- Track Mattes
Optimizing Your Projects
- Optimizing Your Projects
- Navigating Multiple Compositions
- Precomposing and Nesting
- Adjustment and Guide Layers
- Understanding Rendering Order
- Optimizing After Effects
- Onward to Effects
Section II. Effects Compositing Essentials
Color Correction
Color Keying
- Color Keying
- Good Habits and Best Practices
- Linear Keyers and Hi-Con Mattes
- Blue-Screen and Green-Screen Keying
- Understanding and Optimizing Keylight
- Fixing Typical Problems
- Conclusion
Rotoscoping and Paint
- Rotoscoping and Paint
- Articulated Mattes
- Working Around Limitations
- Morphing
- Paint and Cloning
- Conclusion
Effective Motion Tracking
- Effective Motion Tracking
- The Essentials
- Optimizing Tracking Using 3D
- Extending a Track with Expressions
- Tracking for Rotoscoping
- Using 3D Tracking Data
- Conclusion
Virtual Cinematography
- Virtual Cinematography
- 5D: Pick Up the Camera
- Storytelling and the Camera
- Camera Blur
- The Role of Grain
- Film and Video Looks
- Conclusion
Expressions
- Expressions
- Logic and Grammar
- Muting Keyframes
- Linking Animation Data
- Looping Animations
- Smoothing and Destabilizing
- Offsetting Layers and Time
- Conditionals and Triggers
- Tell Me More
Film, HDR, and 32 Bit Compositing
- Film, HDR, and 32 Bit Compositing
- Details
- Film 101
- Dynamic Range
- Cineon Log Space
- Video Gamma Space
- Battle of the Color Spaces
- Floating Point
- 32 Bits per Channel
- Conclusion
Section III. Creative Explorations
Working with Light
- Working with Light
- Light Source and Direction
- Creating a Look with Color
- Backlighting, Flares, Light Volume
- Shadows and Reflected Light
- HDR Lighting
- Conclusion
Climate: Air, Water, Smoke, Clouds
- Climate: Air, Water, Smoke, Clouds
- Particulate Matter
- Sky Replacement
- The Fog, Smoke, or Mist Rolls In
- Billowing Smoke
- Wind
- Water
- Conclusion
Pyrotechnics: Fire, Explosions, Energy Phenomena
- Pyrotechnics: Fire, Explosions, Energy Phenomena
- Firearms
- Sci-Fi Weaponry
- Heat Distortion
- Fire
- Explosions
- In a Blaze of Glory
Learning to See
Index
EAN: 2147483647
Pages: 157
