The Essentials
There's no point in learning about all the cool tricks you can perform with the tracker if you're still fighting it for a good basic track. If you still find your tracks going astray after reviewing the After Effects documentation (if you haven't read it, at least skim Motion Tracking in the Adobe Help Center, F1), read on and don't despair. Just because it is automated doesn't mean that it's automatic; you sometimes have to come to a certain "understanding" with this feature set.
Tracking is a two-step process: First, you set up and run the tracker, then you apply the tracking data thus created. Each step contains unique pitfalls. Once you learn to recognize these and take action, however, they can be avoided easily enough.
Choosing a Good Reference Point
There are trackers that don't require you to choose track points (predominantly dedicated third-party 3D and planar trackers, discussed later in this chapter). After Effects, however, relies on you to choose a reference point that will track effectively, and it is the most important choice you will make (Figure 8.1).
Figure 8.1. You set After Effects tracking points in the Layer panel, via the Tracker Controls panel.
![]()
Make sure the feature you plan to track
- Contrasts in color, luminance, or saturation from the surrounding area
- Has defined edges entirely within the feature region
- Is identifiable throughout the shot
- Does not have to compete with similar distinct features within the search region at any point during the track
- Is close to the area where the tracked object or objects will be added
Tip
As you choose search and feature regions, keep in mind: They don't have to be square! If the feature you want to track is wide and short, widen the feature region to match. Or, if the shot motion is unidirectionalsay, a left-to-right panthe search region should not only be wider (and barely taller) than the feature region, but offset to the right.
To find a good candidate for tracking, look for "corners" in your imageplaces where two or more edges meet (Figures 8.2a, b, and c).
Figures 8.2a, b, and c. Here are shown excellent (a), fair (b), and poor (c) track point candidates. A high-contrast, clearly defined corner, such as that of the painted flag (a) is optimal. The sun glint off the back of the spare tire (b) has clearly defined edges, but as light conditions in the shot change, the track may fail. Although the region in the trees has contrast (c), there is insufficient distinction between the patterns inside the feature region (the small center box) and the search region (the larger outer box); the wind will deform this target over time.

Tip
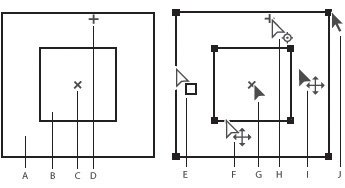
Be forewarned: The track point is perhaps the most-difficult-to-manipulate user interface item in all of After Effects because of the number of draggable items adjacent to one another; you can easily drag the wrong thing (Figure 8.3). Even worse, completed tracks include a point for each tracked frame, more targets to accidentally click and drag, with no undo. Watch carefully for the compass arrow icon before clicking and dragging the feature region (the control you will adjust most of the time).
Figure 8.3. Many interactive controls are clustered close together in the tracker. Identified here are: A. Search region, B. Feature region, C. Keyframe marker, D. Attach point, E. Moves search region, F. Moves both regions, G. Moves entire track point, H. Moves attach point, I. Moves entire track point, J. Resizes region. Zoom in to assure you're clicking the right one.
Notes
Tracking points in After Effects slow down (requiring more processor cycles) in direct proportion to their size. Although systems are relatively fast and capable these days, the smaller the track region, the faster the track.
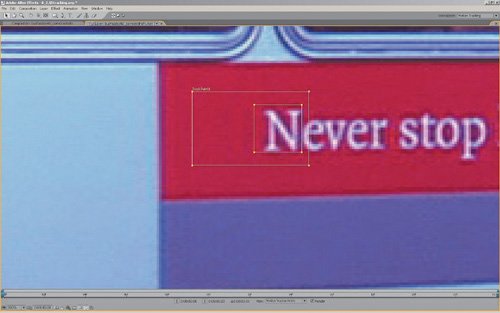
The search region needs to include only the area where you think the feature region is likely to appear on the very next frameno more, and certainly no less. Be generous when setting this region, but don't give the tracker any reason to search where there is no helpful detail (Figure 8.4).
Figure 8.4. Knowing that the bus is moving from screen right to left, I offset the search region (the outer box) to the left of the feature region (inner box). Customizing the track regions in this manner speeds up the track and reduces the margin of error considerably.
No Good Reference Point in Sight
Sometimes you get lucky, and you discover a trackable feature right where the target layer belongs. A successful track here is almost like returning to the shoot and placing the object directly on set.
Notes
If the best target feature changes or even disappears as the shot progresses, look for strategies later in the chapter for dealing with this.
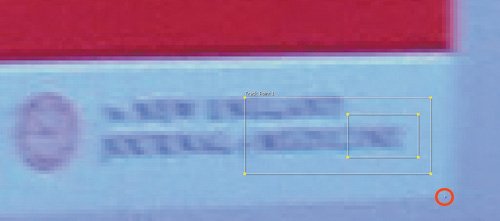
At other times, however, you may not find very many suitable features in a shot, or a feature may exit frame at an inconvenient moment (one potential solution to this is described in "Continuing a Track with Expressions"). In such cases, you can edit the attach point, that little x in Figure 8.5. The attach point defaults to the center of the feature region, but you can offset it anywhere in the frame.
Figure 8.5. You may need to zoom way in to see controls such as the attach point, which has been offset in this case to the low contrast corner. This solves a common problem: a more trackable feature is nearby, but not exactly where the track point needs to be.
This chapter will show you how to more or less ignore the attach point by using nulls and parenting instead, which let you offset this point and do all sorts of other useful things when tracking. This isn't how the documentation would have you do it, but it tends to solve more problems.
Optimizing Tracker Options
Prior to version 6, the After Effects tracker was rather notorious. With default settings geared toward slow systems rather than optimal results, it was practically guaranteed not to produce a good track. Simply pressing Play after setting tracking regions now often yields an effective result.
Nevertheless, defaults will take you only so far. The tracker is packed with plenty of powerful options designed for specific scenarios that, sooner or later, you are bound to encounter.
Typology
It's easy enough to get an idea of the types of tracks available in After Effects: Just have a look at the Track Type menu (Figure 8.6). But what exactly are the differences?
Figure 8.6. The various available track types are set in the Tracker Controls panel.
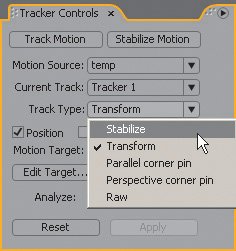
Stabilize and Transform tracking are virtually identical except for how they are applied. Pressing Edit Target shows the singular difference between them: Stabilize tracks are always applied to the anchor point of the tracked layer. Transform tracks are applied to the position of a layer other than the tracked layer.
Using Stabilize, the animated anchor point (located at the center of the image by default) moves the layer in opposition to Position. Increasing the anchor point's X value (assuming Position remains the same, which it does when you adjust the Anchor Point value directly in the Timeline) moves the layer to the left, just as decreasing the Position value does.
Tip
You can, and likely should, use Stabilize, exclusively, even when tracking elements to match a background scene. Methodology follows in the "Optimize Tracking Via 3D" section.
Animating only the anchor point lends Stabilize certain advantages. Any scale or rotation applied to the layer occurs from the corrected (and now consistent) center of the layer. You can freely edit or even animate the position of the layer without inadvertently disrupting the tracking data.
Corner Pin tracking is something else altogetheressentially a cheat to skew a rectangular source so that its four corners appear to translate in 3D space. This is not true 3D tracking in any sense. Instead, Corner Pin tracking applies data to a 2D layer via the Corner Pin plug-in, animating its 2D corner values. Imagine replacing a sign on the side of a moving bus (something you can attempt later in the chapter), and you get the idea. Corner pins are classically for adding a plane (monitor screen content, billboard, and so on) to a framed area of a source shot.
Tip
A corner pin track does two things simultaneously: It tracks the deformation of a rectangular area, applying the result to the Corner Pin effect, and it translates that layer, applying the result to Position for the same layer. The corner pin points may thus move very little, and in some cases you can reduce or eliminate keyframes from it, should all four points not track properly.
There are two types of Corner Pin tracking. Both generate four points of data, one for each corner of the target layer, but Parallel Corner Pin does so with only three track points. This works as long your target is perfectly rectangular and remains so throughout the shota shot of a door, head-on, with the camera at a perpendicular angle, for example. In most cases, you will employ Perspective Corner Pin (Figures 8.7).
Figure 8.7. The basic corner pin setup. Corner pin tracking is normally applied to a target layer with the same rough dimensions as the source. The results are applied to the Corner Pin effect on that layer. Offsetting a corner like this (lower right) typically does not work with a corner pin, as it cannot properly account for shifts in perspective.
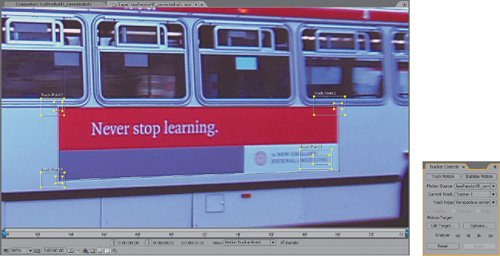
Finally, Raw tracks generate track data only, graying out the Edit Target button. What good is track data that isn't applied anywhere? It can be used to drive expressions or saved to be applied later. It's no different than simply never clicking Edit Target; the raw track data is stored within the source layer (Figure 8.8).
Figure 8.8. Each motion track generates raw data, whether or not it is specified as a Raw track. The data is found here, under Motion Trackers. As shown, the track and its points can be named for future reference, useful on a difficult track requiring multiple attempts.
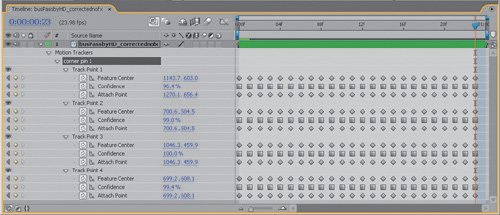
Tip
Rotation and Scale rarely look right when applied directly to a target layer because the relationship between the tracker and the layer is arbitrary. After Effects has no reference for the target layer's proper scale and rotation; it can only make all the frames internally consistent. See the section "Using Nulls to Solve Transform Problems."
Rotation and Scale
Stabilize and Transform tracks can also include rotation and scale data. This method is straightforward enough, employing two track points instead of one, which should be roughly co-planar to one another and the object being tracked because of the phenomenon of parallax. Imagine where in Z space the object belongs and track points that are both at that relative depth. Otherwise no bag of tricksnot offsets, not 3D extrapolationis likely to help.
When tracking rotation and scale, features being tracked typically change from frame to frame (they rotate and scale). In Motion Tracker Options you'll find the Adapt Feature on Every Frame setting, which is like restarting the track on each and every frame. This is not a good default because, theoretically at least, it adds a greater margin of error per frame, but it can solve tracks of features whose appearance changes over the course of the shot. If you know that a feature being tracked is going to change its orientation, or size, or color, or the like over the course of the shot, consider enabling it; for example, try it using the tracker on one of the dolly or zoom shots included with this chapter's project.
Tip
Tracking in reverse is particularly useful when tracking an object moving away from the camera, whose features and track region otherwise diminish to the point of being untrackable. Adapt Feature on Every Frame is an effective option in this case as well.
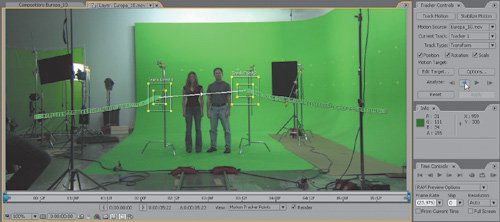
If a track keeps slipping going forward, try starting at the end of the clip and tracking in reverse (note that the "play" icons in Tracker Controls go both directions (Figure 8.9).
Figure 8.9. When tracking items that become more prominent later in the shot (as do the C stands in this camera dolly), try tracking in reverse. The tracker does a much more effective job of tracking a large pattern as it gets smaller, than the opposite.
Confidence
Below the Adapt Feature check box you'll find a pull-down menu that defines After Effects' mysterious Confidence settings. Take a closer look at the properties listed under a track point (Figure 8.10); twirling open Confidence displays a graph of how effective After Effects believes this track point was at a given frame.
Figure 8.10. Revealing Confidence graphs in the Graph Editor clearly shows where the tracker's confidence has been shaken, so to speak. Just because a frame has low confidence doesn't mean there's a problem, although in this case it is clear that specific frames seem to have slipped, where the graph drops drastically.
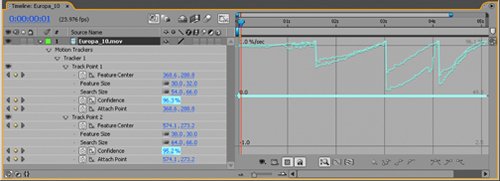
What does the Confidence figure mean? It's an algorithm used to extrapolate the relative accuracy of a given track point according to pre-established criteriawhich still doesn't explain much, without some frame of reference (so to speak). My experience is that good tracks tend to stay in the 80% to 90% region, and as soon as there is a major problem, confidence drops way off to 30% or less.
After Effects can take specific actions as the track is created, depending on the Confidence settings at the bottom of Motion Tracker Options (Figure 8.11). You can assign the track to continue no matter what or to simply stop tracking if confidence drops so that you can manually reset the track at that frame. The Extrapolate Motion option is there for tracked features that disappear for a few frames, retaining more or less steady motion while out of view.
Figure 8.11. The menu at the bottom of Motion Tracker Options (accessible via the Tracker palette) specifies what to do should the Confidence rating drop below a certain threshold during the track.
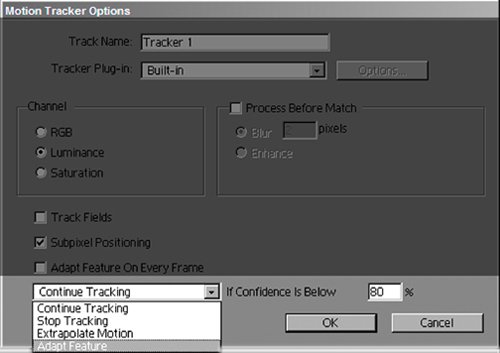
The default setting Adapt Feature If Confidence Is Below 80% is effective in many cases; this is the setting with which you're most likely to get lucky and have the track solved without much extra managing.
Other Options
The rest of the Motion Tracker Options (Figure 8.12) have to do with methods of examining and analyzing footage. Instead of tracking a clip's luminance, you can use RGB (for unique cases where you have contrasting colors of a similar luminance) or Saturation (should the feature have extraordinarily high and low color saturation but flat color and contrast, which would be unusual). Luminance is preferable most of the time, provided you can locate the aforementioned "corners" with strong bright/dark contrast.
Figure 8.12. These tracker options pertain to options for analyzing pixel data.
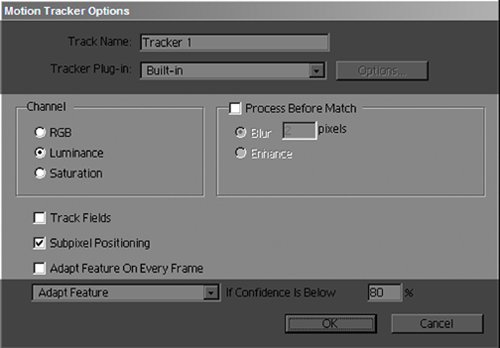
The Track Fields option is more like a reminder to separate them on import (maybe better to just change the Footage Settingseither way, make sure you're working with individual fields if they exist). Likewise, you set Process Before Match to pre-blur or pre-sharpen (Enhance) a clip, but honestly, it may indicate that your footage needs degraining or, conversely, is too blurry to track effectively in After Effects.
Close-Up: Tracker Plug-In
So, what's with the mystery pull-down menu with one choice and the grayed-out Options button (Figure 8.13)?
Figure 8.13. What exactly does that mean, "options?" The tantalizing Tracker Plug-in pull-down yields but one choice, and the Options button is in a permanent state of gray. Evidently no third party has, as yet, seen a market for a custom After Effects tracking plug-in.

Where possible, the relatively small After Effects developer team leaves specialized features to third-party developers. Hence, the professional keying tools do not come from Adobe (including Keylight, which is licensed from The Foundry).
A lot of effort went into refining the built-in tracker, but the idea was to open the API for tracking so that one of the many tracking-software specialists could offer one of its own. Thus far, however, no developer seems to have stepped up.
Fixing Tracks That Go Wrong
The feature you're tracking changes as the shot progresses, and the tracker suddenly jumps to a different, similar feature within the search region. You didn't set Stop Tracking if Confidence dropsor maybe it didn't drop. You pounce on the Stop button in the tracker controls (Figure 8.14). Now what? The tracker has created a few frames' worth of bad data.
Figure 8.14. All was well, then the left tracker suddenly lost its way for a few frames. You only need to move current time back to the last good frame, and restart the track; in many cases, depending on the Confidence options (Figure 8.10), this will solve whatever problem occurred on the previous pass.
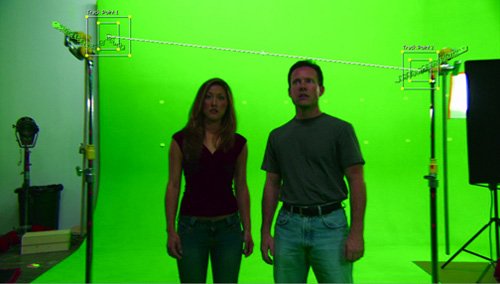
It's no big deal! Just drag the Current Time Indicator (in the Layer panel) back to the last correctly tracked frame and click Play. In so doing, you have reset the Feature Region contents, so there is a higher likelihood that the tracker will succeed without changing anything. If not, and the tracker continues to drift, the next line of defense is Adapt Feature on Every Frame, followed by altering the Confidence options:
- If the problem was caused by some other object briefly passing in front of the object you're tracking, try the Extrapolate Motion option when Confidence is below 80% (or whatever threshold at which your track went wrong, which you can check in the Timeline).
- If the problem was caused by a feature that has changed its shape, color, or luminance, try Adapt Feature in the pull-down menu (as shown back in Figure 8.11) on the chance that the tracker can understand the change automatically.
- If there is truly a problem for which neither of these helps, then Stop Tracking is probably your best option. Sometimes manually resetting the track point at certain key moments of failure is worth the trouble.
Remain flexible, be creative about your choice of points, and be ready to bail and start over if things aren't working too well, and a good track will result with the minimum of hassle.
Close-Up: Subpixel Motion
The key feature of the After Effects tracker is subpixel positioning. You could never achieve this degree of accuracy manually; most supposedly "locked off" scenes require stabilization despite that the range of motion is less than a full pixel. Your eye's ability to detect motion is that good. Zoom in on the motion of a scene that is supposedly locked off, and you can actually spot motion occurring below the single-pixel level.
Although it is on by default, you can disable subpixel positioning in Motion Tracker Options if for some reason your shot requires motion in integer values. In most cases, this will make the track look strange and crude.
Do not be fooled as you watch a track in progress, however; the tracker icons preview in whole pixel values, bouncing around as if deriving a very crude track. Only after you've seen the result, or checked the tracked values to see that they go down to 1/10,000 of a pixel (that's right, four places below the decimal point) do you discover that the tracker is, in fact, properly doing its job (Figure 8.15).
Figure 8.15. Highlight a tracked keyframe value to reveal its accuracy extending to four decimal places below the whole-pixel level. This level of precision is essential to a realistic-looking track.

Using the Timeline
It seems as though the Tracker Controls panel is where all the tracking happens, but the decisions you make there end up in the Timeline, and that's where you can edit and recover tracks.
For example, let's say you explore the various Track Type options and discover that Corner Pin tracks four points. You don't want four points, so you switch back to a simple Transform, but four track points remain in the layer, where you can't delete them. The Timeline panel is the place to find and destroy unneeded track points.
Matching Motion Blur
Don't neglect the possibility of motion blur! It can be your friend until it appears unwanted, and then it's like a malingering houseguestimpossible to ignore. There are a couple of situations in which you must carefully consider motion blur when tracking:
- When foreground layers need motion blur to match the appearance of the background plate; for example, you don't have motion blur and you want it
- When motion blur already exists in a shot you're trying to stabilize; for example, you have motion blur and you don't want it
Notes
Any track that you set for a layer remains a property of that layer until you twirl down the layer's properties and then delete it.
Tip
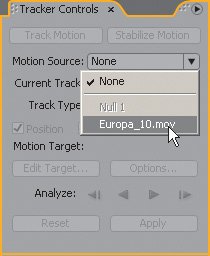
Should you need to reapply track data, look in the Motion Source pull-down menu of the Tracker Controls (Figure 8.16). Layers that can accept tracks are black, and those with track data show tracks in the Current Track menu.
Figure 8.16. Easily overlooked, the Motion Source pull-down menu is a one-stop location for all layers in the timeline containing motion tracks.
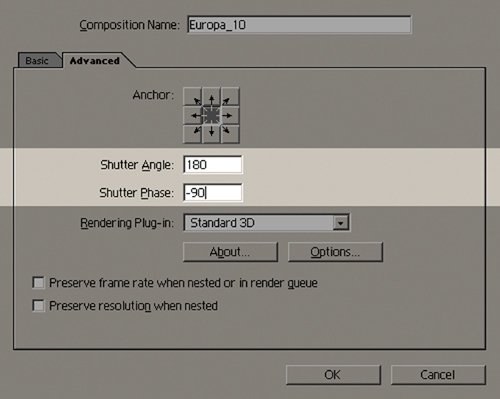
The solution to the former problem is relatively simple, and the methodology is similar to that of color matching (as in Chapter 5, "Color Correction"). Zoom into an area of the image that would have well-defined contours were there no motion blura solid object with well-defined, high-contrast edges, if possible. Enable motion blur for tracked foreground layers, and see if the length of the blur matches at the default settings. If not, adjust accordingly, via the Composition Settings panel (Ctrl+K/Cmd+K), Advanced tab (Figure 8.17). You may have to revisit this panel multiple times to nail the adjustment, as there is no interactivity with this setting.
Figure 8.17. In case you missed the discussion of motion blur in Chapter 2, "The Timeline," this is the one and only place you can adjust motion blur settings for layers that have keyframed motion.
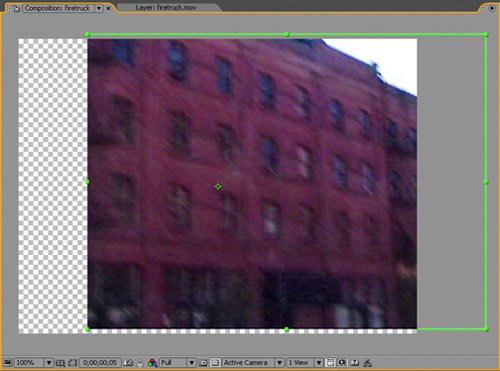
The latter problem is more formidable, that of removing existing blur. Even if you could easily do this in After Effects, footage that is heavily blurred will probably exhibit other problems when stabilized, such as a visible gutter area around the tracked image (Figure 8.18). The best solution is probably to forgo a completely locked stabilization in favor of smoothing the camera motion, but leaving some of the movement. This is explained more thoroughly in the "Smoothing a Moving Camera" section.
Figure 8.18. The perils of stabilization: gaps around the repositioned layer, which can be fixed only by scaling and repositioning the shot; that strategy won't work in this case anyhow because of the heavy motion blur on the source plate.
Tip
Should you need to track and motion blur multiple foreground elements to match a background plate, the section, "Optimize Tracking with the 3D Camera," offers a non-obvious method to simplify this process, saving you the trouble of tracking each added layer.
Use Nulls to Solve Transform Problems
Having difficulty placing your track correctly? Nulls are often the solution. It can be disconcerting to apply a track to a layer and see it repositioned, rotated, or scaled from its correct placement. There's a relatively easy (and easily overlooked) fix: Apply the track to a null, then parent the target layer to the null, and its transform data doesn't change.
Tip
Applying tracking data to a null is a universally good ideayou might consider making a habit of it. Why? In addition to the benefit described here, you can lock a null, preventing you from inadvertently transforming one of its keyframes.
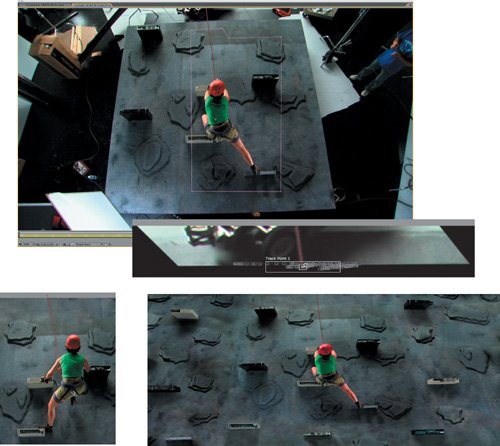
Figures 8.19a through d shows a particularly fiendish rig removal that was aided by the use of tracked nulls. One section of the moving rope that was not over the set had to be replaced and matched to the movement of the rest of the rope. The problem area was isolated and the movement of the rope along its edges tracked, then a substitute rope section was created using Stroke. By parenting this to the null containing the motion, motion blur was created procedurally as well, selling the final shot.
Figures 8.19a, b, c, and d. Obviously it is essential that the rope reach the edge of frame, yet the set does not (a). The point where the rope meets the edge of the set can be tracked however (b) and a two-point mask with a Stroke effect added to replace it (c). The final image has motion blur applied, offsets to the shape of the added rope animated as needed, and the colors carefully matched, selling the effect (d).
As you'll see in the next section, and again in the next chapter, nulls are particularly useful to animate a 3D camera, given that it has no anchor point and cannot be the target of a motion track. Parenting a camera to a null is the most sensible and straightforward method to apply tracker data to it.
If you prefer not to add a null object layer, if only because it's just one more layer to manage, there is, of course, an alternative: Apply an expression to offset the tracked transform data. If that sounds tempting, check out Chapter 10, "Expressions." Most users will find the use of nulls simpler and more convenient.
Optimizing Tracking Using 3D |
Section I. Working Foundations
The 7.0 Workflow
- The 7.0 Workflow
- Workspaces and Panels
- Making the Most of the UI
- Settings: Project, Footage, Composition
- Previews and OpenGL
- Effects & Presets
- Output: The Render Queue
- Study a Shot like an Effects Artist
The Timeline
- The Timeline
- Organization
- Animation Methods
- Keyframes and The Graph Editor
- Uber-mastery
- Transform Offsets
- Motion Blur
- Manipulating Time Itself
- In Conclusion
Selections: The Key to Compositing
- Selections: The Key to Compositing
- The Many Ways to Create Selections
- Compositing: Science and Nature
- Alpha Channels and Premultiplication
- Masks
- Combining Multiple Masks
- Putting Masks in Motion
- Blending Modes: The Real Deal
- Track Mattes
Optimizing Your Projects
- Optimizing Your Projects
- Navigating Multiple Compositions
- Precomposing and Nesting
- Adjustment and Guide Layers
- Understanding Rendering Order
- Optimizing After Effects
- Onward to Effects
Section II. Effects Compositing Essentials
Color Correction
Color Keying
- Color Keying
- Good Habits and Best Practices
- Linear Keyers and Hi-Con Mattes
- Blue-Screen and Green-Screen Keying
- Understanding and Optimizing Keylight
- Fixing Typical Problems
- Conclusion
Rotoscoping and Paint
- Rotoscoping and Paint
- Articulated Mattes
- Working Around Limitations
- Morphing
- Paint and Cloning
- Conclusion
Effective Motion Tracking
- Effective Motion Tracking
- The Essentials
- Optimizing Tracking Using 3D
- Extending a Track with Expressions
- Tracking for Rotoscoping
- Using 3D Tracking Data
- Conclusion
Virtual Cinematography
- Virtual Cinematography
- 5D: Pick Up the Camera
- Storytelling and the Camera
- Camera Blur
- The Role of Grain
- Film and Video Looks
- Conclusion
Expressions
- Expressions
- Logic and Grammar
- Muting Keyframes
- Linking Animation Data
- Looping Animations
- Smoothing and Destabilizing
- Offsetting Layers and Time
- Conditionals and Triggers
- Tell Me More
Film, HDR, and 32 Bit Compositing
- Film, HDR, and 32 Bit Compositing
- Details
- Film 101
- Dynamic Range
- Cineon Log Space
- Video Gamma Space
- Battle of the Color Spaces
- Floating Point
- 32 Bits per Channel
- Conclusion
Section III. Creative Explorations
Working with Light
- Working with Light
- Light Source and Direction
- Creating a Look with Color
- Backlighting, Flares, Light Volume
- Shadows and Reflected Light
- HDR Lighting
- Conclusion
Climate: Air, Water, Smoke, Clouds
- Climate: Air, Water, Smoke, Clouds
- Particulate Matter
- Sky Replacement
- The Fog, Smoke, or Mist Rolls In
- Billowing Smoke
- Wind
- Water
- Conclusion
Pyrotechnics: Fire, Explosions, Energy Phenomena
- Pyrotechnics: Fire, Explosions, Energy Phenomena
- Firearms
- Sci-Fi Weaponry
- Heat Distortion
- Fire
- Explosions
- In a Blaze of Glory
Learning to See
Index
EAN: 2147483647
Pages: 157
