Sci-Fi Weaponry
Now we shift into a more imaginary area, albeit one with a few roots in our own world. How do you create the look of pure energy used for the blasters and lightsabers in Star Wars or the phasers and photon torpedoes in Star Trek (whose distinctions are familiar to me as an ex-Lucas employee). These are now visual clichés, yet they tap into an area of visual effects that seems to come up regularly.
The key seems to be that even these imaginary weapons of pure energy contain recognizable resemblances to phenomena from our own world: high-powered lasers and high-voltage electrical arcs, for example. The other key is that 32 bit per channel compositing makes the play of the superbright forces in a scene more natural, provided you know how to set them up.
The final key is really to take these effects beyond the tried and true, but that involves art direction concerns that are mostly beyond the scope of this book. The basic look is relatively simple: a hot white core surrounded by a luminescent glow.
Notes
Disclaimer: Although the author of this book and the guy who shot the footage used in this section both ex-Lucas employees who worked on Star Wars movies (in Matt's case) and related projects (in Mark's case), this bears no relationship to the "official" method for creating a lightsaber at ILM, which will never be publicly divulged by any soul, living or otherwise.
Full Control
A couple of effects in the Render category of the Effects menu automatically create an element with a core and a surrounding glow. For your basic blaster or lightsaber effect, you might be tempted to reach for Beam. And why not, especially now that you can supercharge the look of Beam by working in 32 bpc?
True, a canned effect such as this surrenders artistic control for convenience, but it lays the groundwork necessary for what this section is all about by providing an element with built-in thresholding (albeit in 8 bitI'll review why that doesn't particularly matter in a moment). Other than the shape, it's customizable, as follows:
- Apply the Beam effect to a solid layer above the plate layer. Beam can be applied directly to the plate by checking Composite on Original, but working with the element in HDR requires that it be a separate layer.
- Extend the length to 100% and set the Starting and Ending points to the ends of the stick.
- Add some Thickness: 24 for Starting and 30 for Ending (the non-uniform settings lend an artificial impression of three-dimensionality with 3D Perspective checked on, as it is by default).
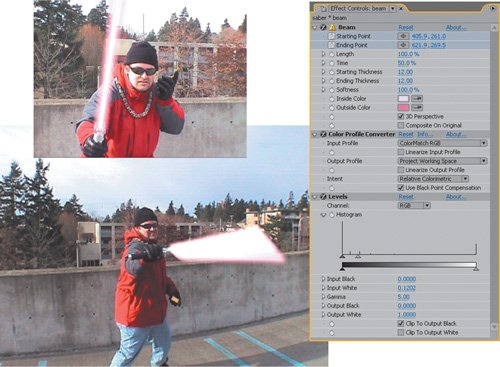
- The basic element is there but it's not looking too cool. Switch the Project to 32 bpc mode and apply the Levels effect. Uncheck Clip to Output White and lower Input White way down (to around 30%), and you'll see the beam get white hot.
- Finesse the look by manipulating the Softness and Outside Color settings in Beam and Gamma in Levels (Figure 14.11).
Figure 14.11. If you're still unconvinced about the power of 32 bit per channel HDR mode, check out how good this effect looks even though it's based on a simple (cheesy, really) 8 bit per channel Beam effect, with a Color Profile Converter to make it linear (optional) and, most essentially, Levels set to push the threshold areas into overbright land. (Source footage courtesy markandmatty.com.)
Tip
With Length in Beam set to less than 100%, you can animate the beam traveling between the Starting and Ending Points using the Time setting: this is designed as a quick way to animate a blaster shot, or power-up of the saber in this case.
What happens next is what gives it the cool factor, and just offhand there are several available options:
- Animate the saber being waved around and enable motion blur
- For other types of shots: add interactive lighting where needed, such as the glow on nearby faces and passing objects
- Add bullet hits, either like those discussed earlier or your own special version of energy coursing through the target
- Create this effect for yourself, without Beam, using the same basic formula: a bright (or white) core layer and a darker-colored, blurred duplicate (or several) to create the basic element, which is then made to glow in 32 bpc using Levels (Figure 14.12).
Figure 14.12. All kinds of trippy sci-fi looks can result from blending the type of "high energy" elements described in this section via HDR compositing.

Heat Distortion |
Section I. Working Foundations
The 7.0 Workflow
- The 7.0 Workflow
- Workspaces and Panels
- Making the Most of the UI
- Settings: Project, Footage, Composition
- Previews and OpenGL
- Effects & Presets
- Output: The Render Queue
- Study a Shot like an Effects Artist
The Timeline
- The Timeline
- Organization
- Animation Methods
- Keyframes and The Graph Editor
- Uber-mastery
- Transform Offsets
- Motion Blur
- Manipulating Time Itself
- In Conclusion
Selections: The Key to Compositing
- Selections: The Key to Compositing
- The Many Ways to Create Selections
- Compositing: Science and Nature
- Alpha Channels and Premultiplication
- Masks
- Combining Multiple Masks
- Putting Masks in Motion
- Blending Modes: The Real Deal
- Track Mattes
Optimizing Your Projects
- Optimizing Your Projects
- Navigating Multiple Compositions
- Precomposing and Nesting
- Adjustment and Guide Layers
- Understanding Rendering Order
- Optimizing After Effects
- Onward to Effects
Section II. Effects Compositing Essentials
Color Correction
Color Keying
- Color Keying
- Good Habits and Best Practices
- Linear Keyers and Hi-Con Mattes
- Blue-Screen and Green-Screen Keying
- Understanding and Optimizing Keylight
- Fixing Typical Problems
- Conclusion
Rotoscoping and Paint
- Rotoscoping and Paint
- Articulated Mattes
- Working Around Limitations
- Morphing
- Paint and Cloning
- Conclusion
Effective Motion Tracking
- Effective Motion Tracking
- The Essentials
- Optimizing Tracking Using 3D
- Extending a Track with Expressions
- Tracking for Rotoscoping
- Using 3D Tracking Data
- Conclusion
Virtual Cinematography
- Virtual Cinematography
- 5D: Pick Up the Camera
- Storytelling and the Camera
- Camera Blur
- The Role of Grain
- Film and Video Looks
- Conclusion
Expressions
- Expressions
- Logic and Grammar
- Muting Keyframes
- Linking Animation Data
- Looping Animations
- Smoothing and Destabilizing
- Offsetting Layers and Time
- Conditionals and Triggers
- Tell Me More
Film, HDR, and 32 Bit Compositing
- Film, HDR, and 32 Bit Compositing
- Details
- Film 101
- Dynamic Range
- Cineon Log Space
- Video Gamma Space
- Battle of the Color Spaces
- Floating Point
- 32 Bits per Channel
- Conclusion
Section III. Creative Explorations
Working with Light
- Working with Light
- Light Source and Direction
- Creating a Look with Color
- Backlighting, Flares, Light Volume
- Shadows and Reflected Light
- HDR Lighting
- Conclusion
Climate: Air, Water, Smoke, Clouds
- Climate: Air, Water, Smoke, Clouds
- Particulate Matter
- Sky Replacement
- The Fog, Smoke, or Mist Rolls In
- Billowing Smoke
- Wind
- Water
- Conclusion
Pyrotechnics: Fire, Explosions, Energy Phenomena
- Pyrotechnics: Fire, Explosions, Energy Phenomena
- Firearms
- Sci-Fi Weaponry
- Heat Distortion
- Fire
- Explosions
- In a Blaze of Glory
Learning to See
Index
EAN: 2147483647
Pages: 157
