Adding 3D Text to the Photo Editor Application
|
The implementation consists of two parts. First, we implement and test the 3D Text DLL, using the graphics hardware for rendering. In the next step we add the user interface to the photo editor to complete the integration of the 3D text feature. |
9.5.1 The 3D Text DLL Extension
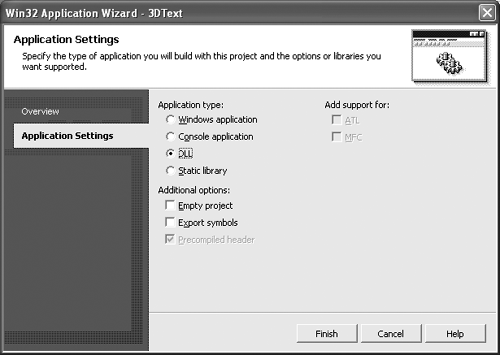
Let's begin by creating a new project for the 3D text extension. Start Visual Studio, and open the Photo Editor solution. Then add a new project to the Photo Editor solution (right-click on it in Solution Explorer). Choose Visual C++ Projects, and then Win32 Project in the Win32 folder. Set the project name to 3DText and press OK. In the Win32 Application wizard, switch to the Application Settings window and set the application type to DLL before pressing Finish (see Figure 9.4).
Figure 9.4. Win32 Application Wizard
The Application wizard creates a project. Using its context menu, make it the default startup project. Additionally, we change the configuration setting for Output Directory under the project properties to bind in debug configuration and bin in release configuration. As in all other projects, the build targets are now stored in a common bin (bind) folder.
The project contains the 3DText.cpp file, to which we will add all code necessary for rendering three-dimensional text. Unlike typical C++ DLLs, there is no need to declare all exported functions in a separate header file because it cannot be used (included) from a .NET application. Later we discuss how interfaces to external DLLs can be declared within .NET applications.
OpenGL Window and Rendering Context
First, let's implement the basics. We start by creating an OpenGL window and rendering context, which are needed for any kind of OpenGL rendering. To access the OpenGL functions, add the includes shown in Listing 9.1 to the stdafx.h file.
Listing 9.1 stdafx.h: OpenGL includes
// stdafx.h : include file for standard system include files,
// or project-specific include files that are used frequently, but
// are changed infrequently
//

#pragma once

#define WIN32_LEAN_AND_MEAN // Exclude rarely used stuff from
 // Windows headers
// Windows Header Files:
#include

// TODO: reference additional headers your program requires here
#include  // OpenGL32
#include  // Glu32
#include  // Glaux
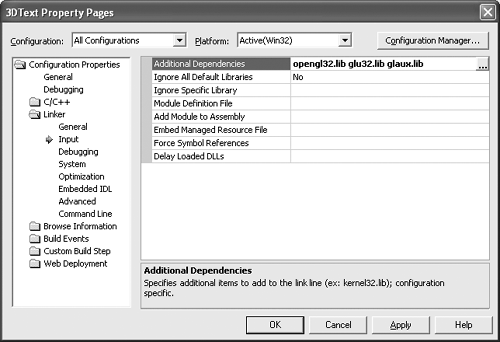
We must also update the project configuration to reflect the dependencies on the OpenGL libraries. Open the 3D Text Property Pages window, and add the following libraries under Linker | Input | Additional Dependencies for all configurations (see Figure 9.5):
- opengl32.lib
- glu32.lib
- glaux.lib
Figure 9.5. Adding OpenGL Libraries to Linker Dependencies
Next, we implement the API function CreateRC. This function sets up an OpenGL rendering context in which we will render the text object. The initialization involves six steps:
- Create a new (invisible) window: OpenGL needs a window handle in order to create a rendering context. Because we do not want to display the rendered result directly but instead want to copy it into the photo editor application, the window is not made visible and remains in the hidden state. Because there is no need for special handling of any window messages (such as mouse events), we simply use the predefined system class for static windows. Furthermore, the window is created frameless so that its client area exactly matches the window size. In this way, the window will be exactly the same size as the rendering context, something that simplifies the later reading of the image buffer of the rendering context.
- Check supported pixel formats: Some graphics cards may not support the required color depth or resolution. Therefore, we first query whether the installed graphics hardware supports the 24-bit RGB color format.
- Set a suitable pixel format: After confirming that the 24-bit RGB color format is supported, we set the pixel format for the rendering context.
- Create the rendering context: The rendering context is our interface to the graphics hardware. Before we can issue any OpenGL rendering calls, we must create and activate (make current) a rendering context.
- Set up for 3D rendering: As discussed during the requirements analysis, there are many things to configure when we render 3D objects. After we create the rendering context, we can initially set those options that are static and not customizable by the user. When rendering with OpenGL, you can select an area within the rendering context where the rendering results are written. In our case, the viewport should match the size of the window. Also, the projection is set to perspective to achieve a better 3D impression. Finally, we define the camera or eye position within this method using the gluLookAt command. This command also lets us play a little trick to overcome a coordinate incompatibility between OpenGL and GDI+. Whereas in GDI+ the first image row at index zero refers to the top of an image, OpenGL assumes the opposite. However, by passing a negative up vector to gluLookAt we can compensate for this.
- Store the dimensions of the rendering context: If we store the dimensions of the rendering context after it is initialized, there is no need to pass those arguments again when the text is later rendered.
The implementation of DeleteRC is far simpler; this function releases rendering and the device context and then destroys the window. Listing 9.2 shows the code for the both CreateRC and DeleteRC.
Listing 9.2 3DText.cpp: The CreateRC and DeleteRC Functions
// 3DText.cpp : Defines the entry point for the DLL application.
//

#include "stdafx.h"

static HWND hWnd; // OpenGL Window Handle
static HDC hDC; // Device Context (needed to create RC)
static HGLRC hRC; // Rendering Context
static int imageDim[2];// Dimensions of Offline Image Buffer
// Creates OpenGL window and rendering context of the specified size.
extern "C" BOOL PASCAL CreateRC(int width, int height)
{
 /////////////////////////////
 // 1.) Create Window

 if ((width <= 0) || (height <= 0))
 {
 // invalid window size
 return FALSE;
 }

 // create window; do not need message handler, so use "Static" class
 hWnd = CreateWindowEx(0, "Static",
 "OpenGL Offline Rendering Context", WS_POPUP, 0, 0,
 width, height, NULL, NULL, GetModuleHandle(NULL), NULL);
 if (!hWnd)
 {
 // couldn't create a window
 return FALSE;
 }

 // get Windows device context
 hDC = GetDC(hWnd);
 if (!hDC)
 {
 // no device context
 return FALSE;
 }

 /////////////////////////////
 // 2.) Check Supported Pixel Format
 // set a default OpenGL pixel format descriptor, ask for 24-bit RGB
 static PIXELFORMATDESCRIPTOR pfd =
 {
 sizeof(PIXELFORMATDESCRIPTOR), 1,
 PFD_DRAW_TO_WINDOW | PFD_SUPPORT_OPENGL | PFD_DOUBLEBUFFER,
 PFD_TYPE_RGBA, 24,
 0, 0, 0, 0, 0, 0, 0, 0, 0, 0, 0, 0, 0, 16, 0, 0,
 PFD_MAIN_PLANE, 0, 0, 0, 0
 };

 // find a suitable pixel format
 GLuint pixelFormat = ChoosePixelFormat(hDC,&pfd);
 if (!pixelFormat)
 {
 // desired format not supported
 return FALSE;
 }

 /////////////////////////////
 // 3.) Set Pixel Format

 // set pixel format
 if(!SetPixelFormat(hDC, pixelFormat, &pfd))
 {
 // error setting pixel format
 return FALSE;
 }

 /////////////////////////////
 // 4.) Create Rendering Context

 // create OpenGL rendering context
 hRC = wglCreateContext(hDC);
 if (!hRC)
 {
 // error creating RC
 return FALSE;
 }

 // activate OpenGL RC
 if(!wglMakeCurrent(hDC,hRC))
 {
 // activation of RC failed
 return FALSE;
 }

 /////////////////////////////
 // 5.) OpenGL Setup

 // init viewport to window size
 glViewport(0, 0, width, height);

 // set perspective projection
 glHint(GL_PERSPECTIVE_CORRECTION_HINT, GL_NICEST);
 glMatrixMode(GL_PROJECTION);
 glLoadIdentity();
 gluPerspective(45.0f,(GLfloat)width/(GLfloat)height,0.1f, 100.0f);

 // set eye position and viewing direction
 glMatrixMode(GL_MODELVIEW);
 glLoadIdentity();
 gluLookAt(0, 0, -10, 0, 0, 0, 0, -1, 0);
 // depth buffer setup
 glClearDepth(1.0f);
 glEnable(GL_DEPTH_TEST);
 glDepthFunc(GL_LEQUAL);

 // shading setup
 glShadeModel(GL_SMOOTH);
 glEnable(GL_LIGHT0);
 glEnable(GL_LIGHTING);
 glEnable(GL_COLOR_MATERIAL);

 /////////////////////////////
 // 6.) Store Dimensions of Image Buffer

 imageDim[0] = width;
 imageDim[1] = height;

 return TRUE;
}

// deletes OpenGL window and rendering context
extern "C" void PASCAL DeleteRC()
{
 if (hRC)
 {
 // release and delete rendering context
 wglMakeCurrent(NULL, NULL);
 wglDeleteContext(hRC);
 hRC = NULL;
 }

 if (hDC)
 {
 // release device context
 ReleaseDC(hWnd, hDC);
 hDC = NULL;
 }

 if (hWnd)
 {
 // destroy window
 DestroyWindow(hWnd);
 hWnd = NULL;
 }

 imageDim[0] = 0;
 imageDim[1] = 0;
}
OpenGL Font Creation
As mentioned earlier in this chapter, text output is not covered by the OpenGL standard. However, on Windows platforms there is a simple extension in place that lets you convert a TrueType font into an outline font that can be rendered by OpenGL. The conversion function stores each converted letter in a separate OpenGL list. Those lists can be invoked later in an arbitrary order, thereby allowing users to assemble words and sentences.
The CreateOutlineFont function must generate a set of OpenGL lists that store the outline font. Let's store the base of this list in static variables such as hWnd, hDC, and hRC. Furthermore, we must add a static array of type GLYPHMETRICSFLOAT that holds the information about the placement and size of each character. Using this array we can later compute the exact center of a string and position it correctly. Listing 9.3 contains the code for the CreateOutlineFont and DeleteOutlineFont functions.
Listing 9.3 3DText.cpp: The CreateOutlineFont and DeleteOutlineFont Functions
[View full width]
static GLuint fontBase; // Base for Font CallLists
static GLYPHMETRICSFLOAT fontFormat[256]; // Descriptors of Font Format

// creates an OpenGL font
extern "C" BOOL PASCAL CreateOutlineFont(char *name, BOOL bold, BOOL italic)
{
 // activate OpenGL RC
 if(!wglMakeCurrent(hDC,hRC))
 {
 // activation of RC failed
 return FALSE;
 }

 // CallLists for 256 characters
 fontBase = glGenLists(256);

 HFONT font = CreateFont(-12, 0, 0, 0, bold ? FW_BOLD : FW_NORMAL,
 italic, 0, 0, ANSI_CHARSET,
 OUT_TT_PRECIS, CLIP_DEFAULT_PRECIS,
 ANTIALIASED_QUALITY, FF_DONTCARE | DEFAULT_PITCH, name);
 if (!font)
 {
 // error creating Windows font
 return FALSE;
 }

 HGDIOBJ oldObject = SelectObject(hDC, font);
 if (!oldObject)
 {
 // error selecting font
 return FALSE;
 }

 // convert to 3D outline font (20% depth)
 if (!wglUseFontOutlines(hDC, 0, 255, fontBase, 0.0f, 0.2f, WGL_FONT_POLYGONS,
fontFormat))
 {
 // creating font outlines failed
 return FALSE;
 }

 // unselecting font
 SelectObject(hDC, oldObject);

 return TRUE;
}

// delete an OpenGL font
extern "C" void PASCAL DeleteOutlineFont()
{
 glDeleteLists(fontBase, 256);
}
fontFormat))
{
// creating font outlines failed
return FALSE;
}
// unselecting font
SelectObject(hDC, oldObject);
return TRUE;
}
// delete an OpenGL font
extern "C" void PASCAL DeleteOutlineFont()
{
glDeleteLists(fontBase, 256);
}
Rendering 3D Text
Now that we have in place all the utility functions for creating and deleting an OpenGL rendering context and outline font, we can implement the actual rendering function for three-dimensional text.
First, we set the current content of the offline buffer as OpenGL background so that the rendered text overlays the loaded digital picture. Because we used a negative up vector when initializing our OpenGL rendering in CreateRC, there is no need to flip the GDI+ image horizontally before copying it into the OpenGL rendering context. Next, the OpenGL state is modified so that the text line is centered and then rotated according to the passed parameters. After this, we render the text using the glCallList command. Then the rendering context is read back into the offline buffer provided by the calling application. Listing 9.4 shows the implementation of the RenderText function.
Listing 9.4 3DText.cpp: The RenderText Function
[View full width]
// renders 3D text extern "C" BOOL PASCAL RenderText(char *text, int size, int color, int rotX, int rotY,
Exporting API Functions
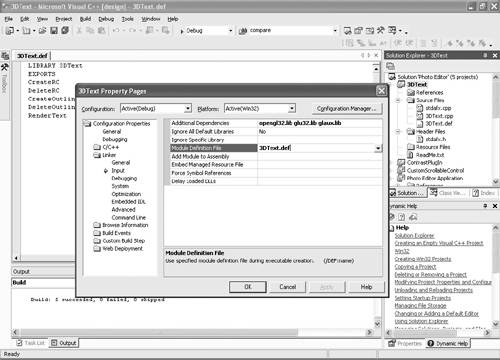
To make the functions available to other applications, the functions need to be marked so that they will be exported. You can do this in a separate module definition file. In Solution Explorer, add a new item to the source folder and choose Module Definition File. Name the file 3DText.def, and add the EXPORTS keyword. After EXPORTS list the API functions CreateRC, DeleteRC, CreateOutlineFont, DeleteOutlineFont, and RenderText. Then make sure that the file is set in the Linker Input section of the project properties (see Figure 9.6).
Figure 9.6. Setting a Module Definition File
9.5.2 Using PInvoke to Integrate the 3D Text DLL into .NET
A separate DLL is now available that provides rendering features for three-dimensional text. It's a good practice to write a wrapper class for these DLL functions that enables easy integration into the existing photo editor.
Writing a Wrapper Class
For the convenience of the application programmer and to reduce the likelihood of bugs and resource or memory leaks, we implement a wrapper class for the 3D Text DLL. The API functions provided by the DLL enforce a certain sequence, as shown earlier in the sequence diagram (Figure 9.3). A wrapper class can take the responsibility of ensuring the correct sequence as well as reduce the number of calls by caching certain information. As the OpenGL state machine, this wrapper class can manage its internal state and execute the necessary API functions when text is rendered.
Let's switch to the photo editor application project and add a new class called OGL3DText to it. First, we add the external DLL functions as private methods to the class, as shown in Listing 9.5. Because the function RenderText has a pointer argument, it must be declared unsafe. The .NET Framework enforces the rule that all code dealing directly with pointers must be declared unsafe because this code is often the source of malfunctions. A project containing unsafe code also must be compiled with the /unsafe option, which can be set via the project properties. To enable the use of pointers in this project, open the project properties window and set the Allow Unsafe Code Blocks option under Configuration Properties | Build to True.
Listing 9.5 OGL3DText.cs: External DLL Function Declaration
[View full width]
using System;
using System.Runtime.InteropServices;
using System.Drawing;
using System.Drawing.Imaging;

namespace Photo_Editor_Application
{
 ///
/// Wrapper class for 3D Text DLL. All methods of this class are /// static because the 3D Text DLL does not support multiple /// instances. ///
public class OGL3DText { private const string DLLNAME = "3DText.dll"; // extern DLL function declaration [DllImport(DLLNAME)] private static extern bool CreateRC(int width, int height); [DllImport(DLLNAME)] private static extern void DeleteRC(); [DllImport(DLLNAME, CharSet=CharSet.Ansi)] private static extern bool CreateOutlineFont(string name, bool bold, bool italic); [DllImport(DLLNAME)] private static extern void DeleteOutlineFont(); [DllImport(DLLNAME, CharSet=CharSet.Ansi)] private unsafe static extern void RenderText(string text, int size, int color, int rotX, int rotY, int rotZ, void *buffer); } }
In the next step, we add set properties for all parameters that can be passed to the 3D Text DLL. Each set property changes flags that control whether the font or rendering context needs to be re-created due to a change in the font name, the font style, or the size of the rendering context. These flags are then checked in the render method, and the appropriate API functions of the 3D Text DLL are called. For cleanup purposes, it is desirable to have a method to delete the rendering context and the OpenGL outline font after the form for 3D text is closed and no further rendering takes place. Table 9.4 summarizes the class members, and Listing 9.6 shows their implementation.
|
Member |
Type |
Summary |
|---|---|---|
|
Text |
Property |
Sets the text string to render. |
|
Font |
Property |
Sets the font. Only font name, size, bold, and italic style properties are considered. |
|
Color |
Property |
Sets the text color. |
|
Image |
Property |
Sets the image on which the text is rendered. |
|
Placement |
Property |
Rectangle that defines an area within the background image where the text is rendered. |
|
RotationX |
Property |
Sets the rotation along the x-axis. |
|
RotationY |
Property |
Sets the rotation along the y-axis. |
|
RotationZ |
Property |
Sets the rotation along the z-axis. |
|
Render |
Method |
Method that renders 3D text using the properties of the class. It internally creates a rendering context and OpenGL outline font. The method returns a new bitmap with the rendered text. |
|
Close |
Method |
Cleanup method that can be invoked to force the deletion of the rendering window and OpenGL outline font. |
Listing 9.6 OGL3DText.cs: Class Member Implementation
[View full width]
 . . .

///
/// Indicates whether the OpenGL font needs to be re-created. ///
private static bool fontChanged = true; ///
/// Indicates whether the OpenGL rendering context needs to be re-created. /// This is the case if its size (not its position) changed. ///
private static bool sizeChanged = true; // private members for set properties private static string text = ""; private static int fontSize = 24; private static string fontName = "Arial"; private static bool fontBold = false; private static bool fontItalic = false; private static int fontColor = System.Drawing.Color.White.ToArgb(); private static System.Drawing.Bitmap image = null; private static System.Drawing.Rectangle placement; private static int rotX = 0; private static int rotY = 0; private static int rotZ = 0; ///
/// Sets a text string to render. ///
static public string Text { set { text = value; } } ///
/// Sets the font. Only font name, size, bold, and italic style /// properties are considered from the Font class. ///
static public System.Drawing.Font Font { set { // font size is changed via scaling // no need to re-create the font fontSize = System.Convert.ToInt32(value.Size); // all other attributes require us to re-create the font if (fontName != value.Name) { fontName = value.Name; fontChanged = true; } if (fontItalic != value.Italic) { fontItalic = value.Italic; fontChanged = true; } if (fontBold != value.Bold) { fontBold = value.Bold; } } } ///
/// Sets the text color. ///
static public System.Drawing.Color Color { set { fontColor = value.ToArgb(); } } ///
/// Sets the background image. ///
static public System.Drawing.Bitmap Image { set { image = value; } } ///
/// Defines a rectangle within the background image where the text /// is rendered. ///
static public System.Drawing.Rectangle Placement { set { if (placement.Size != value.Size) { sizeChanged = true; } placement = value; } } ///
/// Sets the rotation along the x-axis. ///
static public int RotationX { set { rotX = value; } } ///
/// Sets the rotation along the y-axis. ///
static public int RotationY { set { rotY = value; } } ///
/// Sets the rotation along the z-axis. ///
static public int RotationZ { set { rotZ = value; } } ///
/// Renders three-dimensional text. Internally creates the rendering /// context and font if necessary. ///
/// /// The method returns a new bitmap with the rendered text. static public unsafe System.Drawing.Bitmap Render() { // no background set if (image == null) return null; // limit placement to boundaries of background image if (placement.Right > image.Width) { placement.X = image.Width - placement.Width; } if (placement.Bottom > image.Height) { placement.Y = image.Height - placement.Height; } if ((placement.X < 0) | (placement.Y < 0) | (placement.Width <= 0) | (placement.Height <= 0)) { return null; } // create new rendering context? if (sizeChanged) { DeleteRC(); CreateRC(placement.Width, placement.Height); } // create new font? if (fontChanged) { DeleteOutlineFont(); CreateOutlineFont(fontName, fontBold, fontItalic); } // clone region of interest (ROI) to get OpenGL rendering buffer Bitmap roi = image.Clone(placement, PixelFormat.Format24bppRgb); // lock memory and render 3D text into it BitmapData renderData = roi.LockBits(new Rectangle(0, 0, roi.Width, roi.Height), ImageLockMode.ReadWrite, PixelFormat.Format24bppRgb); byte *renderBuffer = (byte*) renderData.Scan0.ToPointer(); RenderText(text, fontSize, fontColor, rotX, rotY, rotZ, renderBuffer); // clone the background to get full size output buffer Bitmap output = image.Clone(new Rectangle(0, 0, image.Width, image.Height), PixelFormat. Format24bppRgb); // get pointer to output buffer and copy ROI into it BitmapData targetData = output.LockBits(placement, ImageLockMode.ReadWrite, PixelFormat. Format24bppRgb); byte *targetBuffer = (byte*) targetData.Scan0.ToPointer(); // copy the rendered buffer (subregion) into the final image for (int y = 0; y < (roi.Height); y++) { // copy one line, each pixel 3 bytes (RGB) for (int x = 0; x < (3 * roi.Width); x++) { targetBuffer[targetData.Stride * y + x] = renderBuffer[renderData.Stride * y + x]; } } // unlock memory roi.UnlockBits(renderData); output.UnlockBits(targetData); // return a new Bitmap containing the final image return new Bitmap(output, new Size(output.Width, output.Height)); } ///
/// Deletes font and rendering context. Must be called to destroy the /// rendering context and OpenGL outline font after calling Render(). ///
static public void Close() { DeleteOutlineFont(); DeleteRC(); }
9.5.3 First 3D Text: A Unit Test
|
In contrast to previous iterations of the construction phase, we have implemented a set of classes in this chapter without doing any formal or informal testing. This has happened mainly because most of the implementation was done in unmanaged C++. We would have had to create a separate unmanaged C++ program to exercise and test this code earlier. However, our project goal is to add all unit tests to the NUnit framework for better test automation. Now that the .NET wrapper class has been implemented, it is easy to add a new test case to the NUnit framework. |
It is often a challenge to evaluate the result of functionality as complex as rendering three-dimensional objects. This is especially true in real-life projects, where time and funding are usually limited. A common practice to test this kind of functionality is to conduct a manual review to validate the rendering output together with the test code. However, this approach interferes with our goal of developing a fully automated test suite at least for unit tests. Also, it requires that the author of the test code as well as an imaging expert be present each time the test is performed.
To overcome these obstacles at least to an extent, a good practice is to generate reference output, which is initially reviewed manually. After this reference output is reviewed, it can be stored in the depository and used for comparison in later test runs. In this way, we can perform the tests in a fully automated fashion as long as the reference output does not need to be modified. However, each change requires a new evaluation of the new rendering output and an update of the reference image in the depository. Using this approach, we add to the UnitTest class the utility method CompareBitmaps, which checks whether two given bitmaps are identical. Listing 9.7 shows the implementation of this method.
Listing 9.7 UnitTest.cs: The CompareBitmaps Method
///
/// Compares two bitmaps. ///
///First bitmap. ///Second bitmap. /// True if the two bitmaps are identical, otherwise false. public bool CompareBitmaps(Bitmap bitmap1, Bitmap bitmap2) { // compare image size if (bitmap1.Size != bitmap2.Size) { return false; } // compare all pixels for (int y = 0; y < bitmap1.Height; y++) { for (int x = 0; x < bitmap1.Width; x++) { if (bitmap1.GetPixel(x, y) != bitmap2.GetPixel(x, y)) return false; } } // size and all pixels are the same return true; }
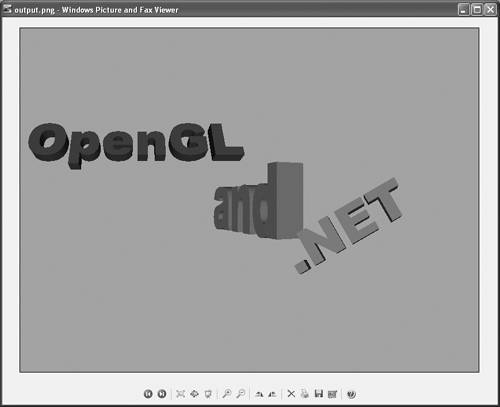
Listing 9.8 shows the implementation of the unit test class for the 3D Text DLL and its wrapper class. This code renders three strings using the colors red, green, and blue and a different rotation axis for each string. In this way, it verifies that the color components (red, green and blue) are converted correctly and that the rotation matches the correct axis. The method CompareBitmaps is invoked at the end of the test to compare the rendering result with a stored reference image.
Listing 9.8 OGL3DTextUnitTest.cs: Unit Test for 3D Text
[View full width]
///
/// Renders 3 strings in the different colors and orientation. ///
/// F:image_3dtext [Test] public void OGL3DTextTest() { Bitmap output = null; Bitmap input = new Bitmap(800, 600); // Set each pixel in image to gray. for (int Xcount = 0; Xcount < input.Width; Xcount++) { for (int Ycount = 0; Ycount < input.Height; Ycount++) { input.SetPixel(Xcount, Ycount, Color.DarkGray); } } OGL3DText.Image = input; OGL3DText.Color = Color.Red; OGL3DText.Text = "OpenGL"; OGL3DText.Font = new Font("Arial Black", 40); OGL3DText.Placement = new Rectangle(0, 0, 400, 400); OGL3DText.RotationX = 30; output = OGL3DText.Render(); Assertion.AssertNotNull("First string.", output); OGL3DText.Image = output; OGL3DText.Color = Color.LightBlue; OGL3DText.Text = "and"; OGL3DText.Placement = new Rectangle(200, 0, 600, 600); OGL3DText.RotationX = 0; OGL3DText.RotationY = 60; output = OGL3DText.Render(); Assertion.AssertNotNull("Second string.", output); OGL3DText.Image = output; OGL3DText.Color = Color.LightGreen; OGL3DText.Text = ".NET"; OGL3DText.Placement = new Rectangle(400, 200, 400, 400); OGL3DText.RotationY = 0; OGL3DText.RotationZ = 30; output = OGL3DText.Render(); Assertion.AssertNotNull("Third string.", output); /*/ temporarily remove * on the left to create the reference output if (output != null) { output.Save("output.png", System.Drawing.Imaging.ImageFormat.Png); } // */ // load reference image and compare with the one just rendered Bitmap reference = new Bitmap("output.png"); Assertion.AssertEquals("Compare with reference image", true, CompareBitmaps(output, reference)); }
The commented code in the test function stores the rendered image in a file; this image will become the reference output. Uncomment these lines the first time the test is executed, and manually validate the output. The image should match Figure 9.7, showing "OpenGL and .NET" in the colors red, blue, and green rotated along the x-, y-, and z-axes. After successful validation, you restore the comments to the code from which you earlier removed them, and you put the output file under version control (or at least write-protect it).
Figure 9.7. Reference Output for 3D Text Unit Test
9.5.4 Implementing the User Interface
|
The integration into the photo editor application is not complete until we add the user interface for the 3D text feature. According to the user interface guidelines of the photo editor, we start by adding a new tabbed dialog to the main form. We follow these steps: |
- Open PhotoEditor.cs by double-clicking on it in Solution Explorer.
- Add a new tab for 3D text via the properties window of the Tab control.
- Open the TabPages Collection Editor via the Tab control properties, and change the name of the new tab to 3D Text.
|
Name |
Type |
Summary |
|---|---|---|
|
textBox |
TextBox |
Receives the text to render. |
|
fontButton |
Button |
Button to invoke the font dialog. |
|
fontDialog |
FontDialog |
Dialog that lets the user select a font and its style. The default font is defined in via the Font property. |
|
colorButton |
Button |
Button to invoke the color dialog. |
|
colorDialog |
ColorDialog |
Dialog that lets the user pick a text color. The default color is set via the Color property. |
|
placementButton |
Button |
Button to enter text placement mode. |
|
rotationX |
NumericUpDown |
Input for rotation along the x-axis. |
|
rotationY |
NumericUpDown |
Input for rotation along the y-axis. |
|
rotationZ |
NumericUpDown |
Input for rotation along the z-axis. |
|
textApplyButton |
Button |
Applies the text to the image. |
|
textUndoButton |
Button |
Undo button. Restores original image. |
Now we add the form controls according to Figure 9.1. Table 9.5 summarizes the names and types of the controls that must be added.
It's simple to link the Font and Color buttons to the corresponding standard system dialogs. Add an event handler for the buttons by double-clicking them in the design view, and invoke the standard dialogs by calling the ShowDialog() member (see Listing 9.9).
Listing 9.9 PhotoEditor.cs: Font and Color Button Event Handler
///
/// Invokes the font selection dialog for 3D text. ///
/// /// private void fontButton_Click(object sender, System.EventArgs e) { fontDialog.ShowDialog(); } ///
/// Invokes the color selection dialog for 3D text. ///
/// /// private void colorButton_Click(object sender, System.EventArgs e) { colorDialog.ShowDialog(); }
The user interface is now implemented. What remains is to add event handlers for the following buttons:
- Apply: We set all text attributes in the OGL3DText helper class and then render the text onto the image. After the text is rendered, the display must be updated.
- Undo: Reverting to the previous image is already implemented in the Picture class. Here, we simply call the Reset() method.
- Placement: The photo editor already provides a tool to select a region of interest (ROI). This tool can be used to select the text placement as well. The handler for this method need only enter the region selection tool mode.
To update the image stored in the Picture class, we must first implement the set accessor for the LoadedImage property. Before replacing the current image, we clone it into the backUpImage field to fulfill the undo function (see Listing 9.10).
Listing 9.10 Picture.cs: The LoadedImage Property
///
/// Accessor to get the currently loaded image. ///
public Bitmap LoadedImage { get { return loadedImage; } set { backUpImage = (Bitmap) loadedImage.Clone(); loadedImage = value; } }
To add the event handler, again we just double-click on the buttons in the design view. Within the handler for the Apply button, we copy the attributes of the text into the OGL3DText helper class. We also check whether the region of interest is initialized, and we use this information to place the text. If the region object has not been created, the placement rectangle defaults to the entire image. After we set all attributes, we replace the loaded image in the photo editor with the image containing the rendered text. Listing 9.11 shows the event handler for the Apply, Undo, and Placement buttons.
Listing 9.11 PhotoEditor.cs: Event Handler for Apply, Undo, and Placement Buttons
///
/// Event handler that renders 3D text into the image. ///
/// /// private void textApplyButton_Click(object sender, System.EventArgs e) { // Apply was pressed, copy all attributes to OGL3DText OGL3DText.Image = this.PictureObject.LoadedImage; OGL3DText.Color = colorDialog.Color; OGL3DText.Text = this.textBox.Text; OGL3DText.Font = fontDialog.Font; if (regionComponent != null) { // use selected region OGL3DText.Placement = new Rectangle( regionComponent.StartPoint.X, regionComponent.StartPoint.Y, regionComponent.EndPoint.X - regionComponent.StartPoint.X, regionComponent.EndPoint.Y - regionComponent.StartPoint.Y); } else { // full image OGL3DText.Placement = new Rectangle( 0, 0, this.PictureObject.LoadedImage.Width, this.PictureObject.LoadedImage.Height); } OGL3DText.RotationX = System.Convert.ToInt32(rotationX.Value); OGL3DText.RotationY = System.Convert.ToInt32(rotationY.Value); OGL3DText.RotationZ = System.Convert.ToInt32(rotationZ.Value); // render text and replace LoadedImage this.PictureObject.LoadedImage = OGL3DText.Render(); // now update display this.DisplayImage(); } ///
/// Event handler for 3D text Undo button. ///
/// /// private void textUndoButton_Click(object sender, System.EventArgs e) { // revert to previous image and update display this.PictureObject.Reset(); this.DisplayImage(); } ///
/// Enters the 3D text placement mode. ///
/// /// private void placementButton_Click(object sender, System.EventArgs e) { if(toolSelected == toolSelection.None) { toolSelected = toolSelection.ROITool; } }
Implementing the event handler is the final step in integrating three-dimensional text rendering into the photo editor application. Figure 9.8 shows the finished result.
Figure 9.8. Finished Integration of 3D Text Feature

Introducing .NET
- Introducing .NET
- The Need for .NET
- The .NET Framework
- The C# Language
- Debugging and the IDE
- References for Further Reading
Introducing Software Engineering
- Introducing Software Engineering
- Introducing Software Engineering Practices
- Choosing a Software Development Model
- Commonly Used Software Development Models
- Conclusion
- References for Further Reading
A .NET Prototype
- Getting Started
- Evaluating .NET for Windows Client Applications
- Our First .NET Application
- Prototyping
- Implementing the SmartNotes Application
- Visual Studio.NET: Platform of Choice
- References for Further Reading
Project Planning
- Project Planning
- The Project Vision and Business Case
- The Initial Use Case Model
- Project Requirements
- Initial Project Planning
- Initial Risk Analysis
- Initial Requirements Analysis and Design
- Conclusion
- References for Further Reading
The Photo Editor Application
- The Photo Editor Application
- The Refined Project Vision and Business Case
- Refined Requirements for Online Photo Shop
- Analysis of the Photo Editor Requirements
- Design of the Photo Editor Application
- The Detailed Project Schedule
- Implementation of the Photo Editor Application
- Unit Tests
- Conclusion
- References for Further Reading
GDI+ Graphics Extensions
- GDI+ Graphics Extensions
- Requirements for the GDI+ Extensions
- Analysis of the GDI+ Extensions Requirements
- Design of the GDI+ Extensions
- Project Management Issues
- GDI+ Programming
- Drawing GDI+ Primitives
- Unit Tests
- Conclusion
- References for Further Reading
Advanced GDI+ Operations
- Advanced GDI+ Operations
- Advanced GDI+ Extensions
- Analysis of the Advanced GDI+ Extensions Requirements
- Design of the Advanced GDI+ Extensions
- Project Management Issues
- Using Pens and Brushes in GDI+
- Implementation of Regions, Pens, and Brushes
- Unit Tests
- Conclusion
Dynamic Loading of Components
- Dynamic Loading of Components
- Requirements for Image Postprocessing Components
- Analysis of the Image Postprocessing Requirements
- Design of the Image-Processing Components Using Late Binding
- Project Management Issues
- Implementing Dynamically Loadable Image Postprocessing Plugins
- Unit Tests
- Conclusion
- References for Further Reading
Accessing System Resources
- Accessing System Resources
- Refining Requirements for 3D Text Display
- Three-Dimensional Rendering Technologies
- Analyzing User Interface Needs
- Using OpenGL.NET
- Adding 3D Text to the Photo Editor Application
- Conclusion: Dont Reinvent the Wheel
- References for Further Reading
Performance Optimization, Multithreading, and Profiling
- Performance Optimization, Multithreading, and Profiling
- Requirements for Performance Optimization
- Analysis of the Editor Optimization Requirement
- Design of the Optimizations
- Project Management Issues
- Multithreading and Optimization Implementation
- Unit Tests
- Conclusion
- References for Further Reading
Building the Web Application with ASP.NET
- Building the Web Application with ASP.NET
- Online Store Requirements
- Analyzing Interfaces and Activities
- Breakdown of the Code Modules
- Implementation of Online Photo Shop
- Conclusion
Security and Database Access
- Security and Database Access
- Secure Checkout
- Integrating Externally Supplied Software
- E-mail, Password, Credit Card: Creating a Customer Profile
- Secure Web Applications
- Database Access with ADO.NET
- Putting It All Together
- No Longer under Construction
- References for Further Reading
Product Release
EAN: 2147483647
Pages: 123
