Implementing the SmartNotes Application
|
Let's start with some practical exercises. It is assumed that you have successfully installed and started Microsoft Visual Studio.NET on your machine. Figure 3.1 shows the default startup screen. |
Figure 3.1. Microsoft Development Environment

Microsoft's development environment layout is by default tiled into three windows. The main window in the center is the document window, which displays the Start Page tab. On the right side of the screen are two windows. The upper window contains Solution Explorer and Class View as well as Help Index and Help Search. The lower window displays either Dynamic Help (shown) or properties of selected objects. All the windows are tabbed, and you can switch between different contents using the tabs on the top or bottom of each window. You will learn more about these windows as we develop our first .NET application.
3.5.1 Creating a New Project
To create a new project for the SmartNotes application, click on the New Project button on the start page. In the New Project dialog, you can choose among various project types and templates. Click on Windows Application in the Visual C# Projects category. Then name the project SmartNotes, and choose a location to store the project files. The application wizard will then create a workspace containing a simple Windows application: an empty dialog box. Figure 3.2 shows the generated workspace.
Figure 3.2. SmartNotes Project Workspace
Next, run the application generated by the application wizard. Compile and run it via the Build menu, or press F5 to do both. An empty window will be displayed.
3.5.2 Modifying Form Properties
Now we start modifying the appearance of the window to look something like a sticky note. To do so, close the window and choose the form in the design view (Form1.cs [Design]). Figure 3.3 shows the lower-right window on the screen, which now contains the properties of the form. You can modify a property value by selecting it in the Properties window and changing the value in the second column.
Figure 3.3. Properties Window
Let's try it out by changing the background color in the BackColor field to Info. We also want to give our form the look and feel of a window with a smaller frame. To achieve this, change the field FormBorderStyle to SizableToolWindow. Finally, we set the window title by changing the Text field to SmartNotes. Running the application again shows a small yellow window that is starting to look more like a little sticky note.
We encourage you to experiment further with the properties of a form. For example, you can prevent other applications from overlapping the notes window, or you can play with the opacity, a new feature introduced for Windows forms in .NET. In the remainder of this book we no longer describe the procedure for changing object properties in detail but only give a table of properties and their new values.
|
Properties of Form1 |
|
|---|---|
|
BackColor |
Info |
|
FormBorderStyle |
SizableToolWindow |
|
Text |
SmartNotes |
|
TopMost |
True |
|
Opacity |
85% |
Some controls provide a large number of properties. Therefore, it might be easier to locate the properties given in the tables by pressing the alphabetic button in the Properties window.
3.5.3 Adding Controls to a Form
Next we will bring the notes window to life by adding a text field to the form. To do this, open the Toolbox (displayed in the far left of the screen) and drag a TextBox element into the design view of Form1. Alternatively, you can use a RichTextBox element, which offers additional features like colored text. If the Toolbox is not visible in your environment, select it from the View menu.
In the design view we can modify the location of the text field, but to resize it to the height of the form, we must set the Multiline property. Also, accept the property that lets users use the Return key to jump to the next line while editing text. After these modifications are finished, we can resize the text field to entirely fill the form window. Also change the background color, remove the border around the text box, and change the default text to something meaningful. If you wish, you also can change the font for the text field by expanding the Font property first and then adjusting the font face, style, size, or color.
|
Properties of textBox1 |
|
|---|---|
|
AcceptsReturn |
True |
|
Multiline |
True |
|
BackColor |
Info |
|
BorderStyle |
None |
|
Text |
Enter your notes here... |
When running the application now, you can enter multiple lines of text in the SmartNotes window. However, if you resize the window you will observe that the text field is not adjusted to the size of the window. To change this behavior, modify the Anchor setting in the Layout property. After you click on Anchor, a small window appears, as shown in Figure 3.4. Select all four boxes to bind all sides of the text box to the form size. Now the size of the text box will adjust to the size of the form window in which it is contained.
Figure 3.4. Anchor Settings
Without doing any "real" programming, we have created a simple notes application. What remains is to add the "smart" to it by implementing the "remind me later" functionality. This requires the user to pick a reminder date and time. For that, we add a link label that will open a new input form. Drag and drop a link label control from the Toolbox onto the form in the design view, and adjust its properties.
|
Properties of linkLabel1 |
|
|---|---|
|
(Name) |
myReminderLabel |
|
TextAlign |
MiddleRight |
|
Anchor |
Bottom, Right |
|
Text |
Remind me later… |
3.5.4 Adding a Form to the Project
A new input form is needed for the user to select the reminder date and time. To add a new form, go to Solution Explorer (upper-right window) and right-click on the SmartNotes project. This will display a context menu. There, first choose Add and then Add Windows Form, as shown in Figure 3.5.
Figure 3.5. Adding a Windows Form
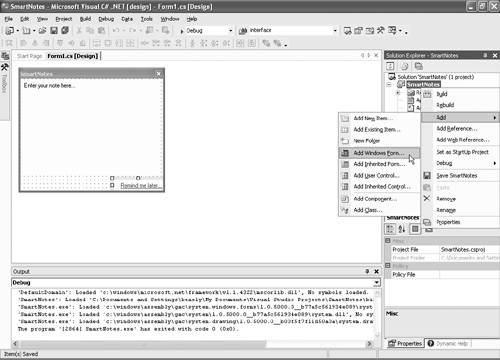
Set the name of the new form to Reminder.cs, and click Open. This will automatically show the form's design view (Reminder.cs [Design]). As with creating a new Windows application project, the form is initially empty. First, we change the TopMost property to True to prevent the yellow notes window from overlapping this dialog, which also has the TopMost property set to True. This form does not need to be resizable. Change the FormBorderStyle to FixedDialog.
|
Properties of Reminder |
|
|---|---|
|
TopMost |
True |
|
FormBorderStyle |
FixedDialog |
Next we will add the functionality that lets users suspend a note until a certain date and time. First let's add a control for picking the time. We drag and drop the DateTimePicker control from the Toolbox into the form's design view.
|
Properties of dateTimePicker1 |
|
|---|---|
|
(Name) |
myTimePicker |
|
Modifiers |
Public |
|
Format |
Time |
|
ShowUpDown |
True |
After adjusting the properties, drag and drop a MonthCalendar control from the Toolbox onto the form. Users will use this control to choose the date when the note will be activated again.
|
Properties of monthCalendar1 |
|
|---|---|
|
Name |
myMonthCalendar |
|
Modifiers |
Public |
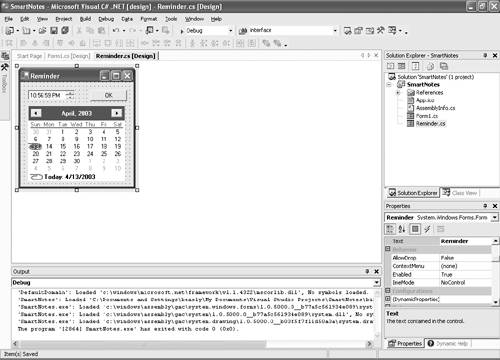
Finally we place an OK button on the form, which completes the task of picking a reminder time and date. For this, add a Button control to the form and modify its properties to result in an OK command. Figure 3.6 shows the design view of the completed input form.
Figure 3.6. Completed Reminder Input Form
|
Properties of Button1 |
|
|---|---|
|
Text |
OK |
|
DialogResult |
OK |
3.5.5 Creating an Event Handler
Now that the design of our new input form is completed, it will be called when the user clicks on the link label in the yellow notes window. Generating an event handler for this link label is simple. You switch to the Form1.cs design view and double-click on the label. Visual Studio.NET automatically creates a stub for the event handler, so you simply fill in the blanks with customized code to react to the event.
Listing 3.1 shows the generated method for the mouse click event. We fill this stub with code that first creates a new instance of the reminder form (class Reminder) and then calls the ShowDialog() member to display it. If the input form was closed with the OK button, a conditional block is entered in which the window will be temporarily hidden (we'll look at this code next). For now we check our progress by starting the application. Clicking on the link label now should show the input form for the reminder date and time.
Listing 3.1 Event Handler for Link Label
private void myReminderLabel_LinkClicked(object sender,
 System.Windows.Forms.LinkLabelLinkClickedEventArgs e)
{
 Reminder dlg = new Reminder();
 if (dlg.ShowDialog() == System.Windows.Forms.DialogResult.OK)
 {
 // retrieve user inputs and hide window
 }
}
3.5.6 Implementing a Timer
To complete the SmartNotes prototype we must go a bit deeper into C# programming. These are the three main steps that remain to be implemented:
- Retrieve the reminder date and time from the input form, and store it in a member variable.
- Hide the window.
- Periodically check the reminder against the current time, and restore the notes window if the reminder date has expired.
We begin by adding a member variable to the Form1 class that stores the reminder time and date. This task can be done easily with the help of the IDE. Switch from Solution Explorer to Class View in the upper-right window, and open the context menu of the class Form1 by right-clicking on the class name. Then select the menu Add and then Add Field. A dialog will prompt you to add the access, type, and name of the field. Because this member is accessed only within the class itself, we change the field access to private. As shown in Figure 3.7, enter DateTime in the field type and set the field name to myReminderTime.
Figure 3.7. C# Field Wizard
The value of myReminderTime can easily be computed by adding the values of the selected date to the hours, minutes, and seconds of the selected time from the reminder dialog form. After we compute and store the time until the note should be suspended, the window is hidden from the desktop. Listing 3.2 shows the code for these two steps.
Listing 3.2 Added Member and Completed Event Handler for Link Label
// member field that stores the wakeup time
private System.DateTime myReminderTime;

private void myReminderLabel_LinkClicked(object sender,
 System.Windows.Forms.LinkLabelLinkClickedEventArgs e)
{
 Reminder dlg = new Reminder();
 if (dlg.ShowDialog() == System.Windows.Forms.DialogResult.OK)
 {
 // retrieve inputs and add date and time
 myReminderTime =
 dlg.myMonthCalendar.SelectionStart
 .AddHours(dlg.myTimePicker.Value.Hour)
 .AddMinutes(dlg.myTimePicker.Value.Minute)
 .AddSeconds(dlg.myTimePicker.Value.Second);

 // hide window
 this.Visible = false;
 }
}
Before we run the application again we also must add the code that restores the window after it is hidden. To periodically check the current time against the reminder time, drag and drop a Timer control from the Toolbox onto the Form1.cs design view. Then enable the timer, and set the interval to 1000 ms.
|
Properties of timer1 |
|
|---|---|
|
Enabled |
True |
|
Interval |
1000 |
You associate an event handler with the timer by double-clicking on the control in the design view. Within the handler you must add a conditional statement that displays the window when the reminder time is up. The code for the timer is shown in Listing 3.3.
Listing 3.3 Event Handler for Timer
private void timer1_Tick(object sender, System.EventArgs e)
{
 if (myReminderTime.CompareTo(DateTime.Now) < 0)
 {
 // time is up, show window
 this.Visible = true;
 }
}
This concludes the implementation of the SmartNotes prototype. Figure 3.8 shows our first fully functional .NET application in action. Next we will assess what we have learned so far about using Microsoft Visual Studio.NET for developing smart Windows client applications.
Figure 3.8. SmartNotes Prototype Application
Introducing .NET
- Introducing .NET
- The Need for .NET
- The .NET Framework
- The C# Language
- Debugging and the IDE
- References for Further Reading
Introducing Software Engineering
- Introducing Software Engineering
- Introducing Software Engineering Practices
- Choosing a Software Development Model
- Commonly Used Software Development Models
- Conclusion
- References for Further Reading
A .NET Prototype
- Getting Started
- Evaluating .NET for Windows Client Applications
- Our First .NET Application
- Prototyping
- Implementing the SmartNotes Application
- Visual Studio.NET: Platform of Choice
- References for Further Reading
Project Planning
- Project Planning
- The Project Vision and Business Case
- The Initial Use Case Model
- Project Requirements
- Initial Project Planning
- Initial Risk Analysis
- Initial Requirements Analysis and Design
- Conclusion
- References for Further Reading
The Photo Editor Application
- The Photo Editor Application
- The Refined Project Vision and Business Case
- Refined Requirements for Online Photo Shop
- Analysis of the Photo Editor Requirements
- Design of the Photo Editor Application
- The Detailed Project Schedule
- Implementation of the Photo Editor Application
- Unit Tests
- Conclusion
- References for Further Reading
GDI+ Graphics Extensions
- GDI+ Graphics Extensions
- Requirements for the GDI+ Extensions
- Analysis of the GDI+ Extensions Requirements
- Design of the GDI+ Extensions
- Project Management Issues
- GDI+ Programming
- Drawing GDI+ Primitives
- Unit Tests
- Conclusion
- References for Further Reading
Advanced GDI+ Operations
- Advanced GDI+ Operations
- Advanced GDI+ Extensions
- Analysis of the Advanced GDI+ Extensions Requirements
- Design of the Advanced GDI+ Extensions
- Project Management Issues
- Using Pens and Brushes in GDI+
- Implementation of Regions, Pens, and Brushes
- Unit Tests
- Conclusion
Dynamic Loading of Components
- Dynamic Loading of Components
- Requirements for Image Postprocessing Components
- Analysis of the Image Postprocessing Requirements
- Design of the Image-Processing Components Using Late Binding
- Project Management Issues
- Implementing Dynamically Loadable Image Postprocessing Plugins
- Unit Tests
- Conclusion
- References for Further Reading
Accessing System Resources
- Accessing System Resources
- Refining Requirements for 3D Text Display
- Three-Dimensional Rendering Technologies
- Analyzing User Interface Needs
- Using OpenGL.NET
- Adding 3D Text to the Photo Editor Application
- Conclusion: Dont Reinvent the Wheel
- References for Further Reading
Performance Optimization, Multithreading, and Profiling
- Performance Optimization, Multithreading, and Profiling
- Requirements for Performance Optimization
- Analysis of the Editor Optimization Requirement
- Design of the Optimizations
- Project Management Issues
- Multithreading and Optimization Implementation
- Unit Tests
- Conclusion
- References for Further Reading
Building the Web Application with ASP.NET
- Building the Web Application with ASP.NET
- Online Store Requirements
- Analyzing Interfaces and Activities
- Breakdown of the Code Modules
- Implementation of Online Photo Shop
- Conclusion
Security and Database Access
- Security and Database Access
- Secure Checkout
- Integrating Externally Supplied Software
- E-mail, Password, Credit Card: Creating a Customer Profile
- Secure Web Applications
- Database Access with ADO.NET
- Putting It All Together
- No Longer under Construction
- References for Further Reading
Product Release
EAN: 2147483647
Pages: 123
- Challenging the Unpredictable: Changeable Order Management Systems
- The Effects of an Enterprise Resource Planning System (ERP) Implementation on Job Characteristics – A Study using the Hackman and Oldham Job Characteristics Model
- Context Management of ERP Processes in Virtual Communities
- A Hybrid Clustering Technique to Improve Patient Data Quality
- Development of Interactive Web Sites to Enhance Police/Community Relations
