Programming
In this chapter, you will learn
- The different approaches used to program a home automation system controller
- The areas of a controller that require programming or configuration
- The processes used to back up and secure the controller’s configuration
When you configure and set up a home automation system controller, as discussed in Chapter 39, the detailed steps you take to configure the controller require you to program the system. This doesn’t mean programming in the sense of computer programming necessarily, but it does mean you need to specify the hardware connected to the controller, set system parameters, identify scheduled events, and create any desired macros.
This chapter provides an overview of the programming methods used on a cross-section of home system controllers, including those programmed directly on the controller, those that support a user interface for programming, and those that are programmed through interactions with PC-based software.
Programming Methods
Programming or setting up a home automation control system is first and foremost an exercise in organization. First you need to identify what the system is supposed to do and what you need to organize in terms of sequence and hierarchy before actually beginning to program.
Planning Ahead
Before beginning the actual programming on the controller or its programming software, draw a sketch of how the functions should flow logically; this can help to organize the steps. In the sketch shown in Figure 40-1, a “Home” key is planned for a keypad control placed near the front door of a home. The sketch shows a simplified version of what should happen in the controller when it receives a signal from the keypad that the “Home” key has been pressed. As illustrated, a “Home” macro is to be activated, and the controller issues command signals to the lighting, Heating, Ventilating, Air Conditioning (HVAC), and music systems to take certain actions.
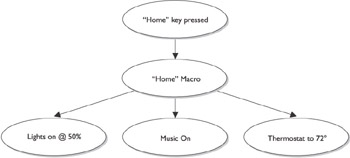
Figure 40-1: A sketch of the logical flow of the actions that should be performed by the system controller when a key is pressed on a keypad control
With the sketches or perhaps an outline of what actions are included in what functions, you have a road map to follow to complete the programming. Planning out the process in this way helps to prevent overlooking any of the required actions planned for the system. It also helps you to identify repeated actions that can be turned into macros or subroutines and called by different buttons, saving on programming time.
When setting up and programming a home controller, you usually take the following steps. By always following this procedure, you will minimize programming time and ensure that most, if not all, items are completed the first time around.
- Set up controller parameters and user information
- Define and set up all devices to be controlled (should already be done in previous documentation)
- Identify and enter all programmed events
- Define and enter all macros
- Test, test, test
Ways to Program
There are essentially four ways to program a control system: standard code programming, proprietary code programming, wizards, and application driven programming.
Standard code programming requires the knowledge of standard programming languages such as C++ or PERL. Few systems exist today that use standard programming languages; almost all have been simplified with either proprietary code programming or wizards, or they have applications already set up.
There are also a variety of independent devices that can be custom configured to create a home control system, but we are not addressing this option in this book. This requires the creation of a programming language script and extensive programming. This type of system is very dependent on the programmer’s abilities and can take longer to debug and test, which is why a proven system from a well-known manufacturer that offers a warranty should be installed in a customer’s home.
Most of the higher-end home automaton control systems have built-in proprietary software interfaces for programming and configuring of the controller. These utilities are typically menu-driven or structured as a function or device hierarchy, as illustrated in Figure 40-2.
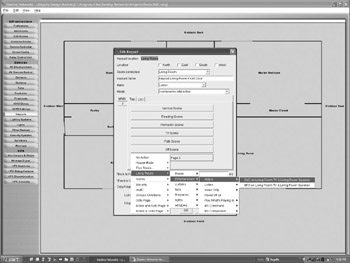
Figure 40-2: A sample configuration menu for a home system controller
Image courtesy of Destiny Networks, Inc.
Whenever working with propriety programming software, it is strongly recommended, and often required, to participate in the manufacturer’s training courses before selling, installing, and programming a home control system for a customer.
The manufacturers of the most popular systems, also typically the most expensive, have designed their systems with the end user and installer in mind. This effort is reflected in their programming interfaces. The programming interface on these systems is either embedded in the system control unit as firmware or is software that is installed on a PC with a hard-wired or wireless interface for uploading and downloading to the control unit.
If the controller’s programming software is PC-based, it usually incorporates several features to simplify the process and to aid in the navigation within the programming software. For example, menu bars, drop-down menu options, utilities, and wizards (see Figure 40-3) guide the programmer through the process of setting up devices and programming controls (see Figure 40-4). On these systems, if the programmer is familiar with the interfaces on a Microsoft Windows, Macintosh OS, or a UNIX/Linux X-Windows system, he or she should have little trouble navigating the programming software that includes wizard setup and application programming.

Figure 40-3: An example of a wizard utility in the setup software for a home automation control system
Image courtesy of Lantronix Corporation.
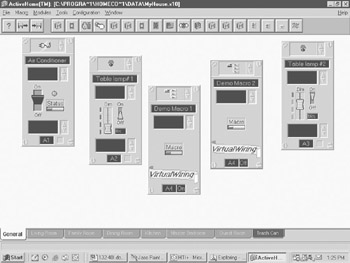
Figure 40-4: The configuration interface of a PLC home system control software package
| Note |
A wizard is a software routine that guides you through a process, such as programming lighting controls or setting up audio zones. A wizard allows you to configure a system or subsystem by answering questions or choosing options. |
Application programming uses drop-down menus, making inputting information easy. Also, with application programming the software can automatically generate control programming and user interfaces. And it is much easier to make edits and changes, which is good for the programmer and the end user. This can allow the homeowner to make changes without always having to rely on the installation company to make modifications to their system.
Macro Generation
The creation of a macro first requires an understanding of what the macro is to accomplish, as identified at the planning discussion mentioned at the beginning of this chapter. Once you are sure you know what the macro is to do, the process of creating the macro in the home system controller’s programming software is usually a straightforward process.
Many programming systems offer applets (mini-applications or utilities) to assist with creating a macro or scene. In some cases, the applet is a wizard and in others it is a series of questions with check boxes and fill-in-the-blank spaces. At the completion of the input process, the applet generates the macro, control sequence, or scene. It can then be tested and tweaked until it is exactly what you intended.
Some systems include templates that can be used to re-create new or modify standard devices, groups, and scripts, which can be timesavers for installers. On the logical control level, many homes require the same types of device controls, and after a few installations a programmer can build up a library of portable and reusable devices, templates, and macros.
A Programming Example
Here is an example of how to program a device control, including the general steps used in a sample home control software system.
To create a macro to control the powered curtains in a home theater room, you use the following general steps:
- Create a new device, class or group for the curtains or add this control to an existing device grouping, such as a group of lighting fixtures.
- Set the timer control for this device or for the entire group. Separate events may be necessary for morning, evening, and on-demand timing events. A timer control is used to activate or deactivate events based on the time of day or a time duration, such as minutes, hours, or days.
- Select the action or activity script to be linked to each timing event. If an action script doesn’t exist, you will need to modify an existing script or create a new one. A script is a series of command instructions that are executed one at a time in sequence by the controller.
- If there are any conditional exceptions to any of the actions, a logic stream, or in some cases a logic diagram, should be created to indicate the logic test for the exceptions and the actions to be taken when the conditions meet the logic test. The test for a logical exception is known as an if-then-else condition. If the test is true (for example, if the day is Tuesday), then the action linked to the test is taken (in this case, don’t open the curtains). Otherwise, the normal actions are taken.
- Save and name the new macro. Macros can also be exported on some systems for use with other installations.
Programming Control
The purpose of the home controller is to control the devices in the system. These devices can be controlled in any of the following ways:
- Direct Device control
- Scheduled events
- Conditional control
As illustrated in Figures 40-2 and 40-4 earlier in the chapter, the programming interfaces on home system control configuration and programming modules typically include a menu, dialog box, or tree format for selecting specific devices for configuration, timing, and functions.
Provided that little or no scripting has been included in the system, the device interfaces are where most debugging and later modifications are typically made. How intuitive a user interface or menu system is should be a key criteria when selecting a system for a homeowner or yourself.
Direct Device Control
The simple ON/OFF control of a device can happen directly through programming or remote keypads, or touch screens can be set up to always control if a device is ON or OFF. The key word here is always; this means that whenever the button is touched, it always controls the device it is defined to control. An example would be the top center button on the keypad in the kitchen that controls (turns ON or OFF) the kitchen ceiling lights every time it is pushed.
Scheduled Events
Timer routines are at the heart of any home control system. Once the cable, wire, devices, and interfaces are installed and working properly, much of the remaining programming involves setting timer events (what comes on or goes off at what time of the day) or grouping devices into scenes.
The system timer continuously scans its list of configured timer events, also called scheduled events on some systems, looking for a match. Items it checks for a match include the current time, day, date, sunrise or sunset, and the scheduled event times. This kind of programming is often referred to as “When statements” because when the timer detects a match for a scheduled event, it passes control of the event to the system’s processor and the commands, scripts, and actions defined in the event are then performed. For example, if the outside lights of a home are to come on at 6:30 P.M., a scheduled event is predefined to execute this action, “When 6:30 P.M. turn on outside lights.” At 6:30 P.M., the timer would detect that the time criteria is met, this event is to be executed, and notifies the system processor, which then executes the event’s commands to turn on the outside lights. The same sequence of actions takes place to execute another timed event that turns off the lights the next morning at the designated time.
Conditional Control
Conditional control is just what it sounds like it is: the control of the device depends on one or more conditions being met. The conditions are tested and if all are met, the command is executed. This type of control is often referred to as If/Then programming because the statement reads, “If then .” An example would be, “If security system is AWAY, then turn ON sink light at 6:30 P.M.” Conditional statements can be nested and combined with AND and OR statements. An example would be, “If security is Away AND temperature in living room is greater than 80 degrees, then close drapes.” This would protect the house from heating up from direct sun and fading the furniture fabric. Remember that with an AND statement both conditions must be met for the command to be executed. With an OR statement only one of the conditions must be met for the command to be performed.
How Boolean Logic Works
Boolean logic has three operators: AND, OR, and NOT, but the basic premise that only true is true is applied to all three. Here are some simple examples of how the Boolean logic operations work:
- AND logic: True is represented in the computer as a one (1) and false is represented as a zero (0). So, if an expression tests if two values, say value A and value B, are both true, the statement is likely to be “if A and B equal true.” This expression is the same as testing “if A and B are both equal to 1.” If A and B both happen to be equal to 1, the result is a 1, which means “true.” If either A or B are 0 (the only other value they can be), then they aren't both equal to true and the result is 0, which means “false.”
- OR logic: The OR operator tests for any one of the values to be true. So, if A is equal to 1 and B is equal to 0, the result will be true. True would also be the result if A is equal to 0 and B is equal to 1. An OR test is true if only one of the values is 1 (true). However, if neither A nor B is equal to 1, the result is false (0).
- NOT logic: Boolean NOT logic tests only a single value for true or false, meaning it tests a value for either a 1 or a 0. If value A is equal to a 1, then NOT A would result in a false. The NOT operator asks the question, “Is the value not true?” If the value is true (equal to a 1), then the answer to the question is, “No, the value is true.” However, if the value is equal to a 0, the answer to the question is, “Yes, the value is not true.”
Documentation and Preventive Action
The complete documentation of the entire configuration and programming of a home system controller is required. The procedures used to back up and restore the controller after modifications are made or in case of a system failure need also to be documented. These are the final pieces of any programming and setup job.
Documentation
No matter how well executed a manufacturer’s documentation is, this documentation is general in nature and cannot possibly cover each specific installation. Every home control system must be treated as if it is a completely unique and custom installation, and the documentation you make should record everything about the system. Documentation should exist in two places: your office and on-site at the home with the installed control system.
The documentation you provide to the homeowner should address any concerns the customer may have after the system is installed and operating. This doesn’t mean you can’t include documentation supplied by the manufacturer, but the final documentation of the system should include all of the information the homeowner needs.
A full copy of the documentation should be stored on-site for reference by a technician applying upgrades or making modifications to the system. Another full copy of the documentation should be stored in your company’s files for future reference. Storing copies of the documentation at both the home and your office ensures that it is available when it’s needed, in either location.
The documentation for the programming, configuration, and setup of the system controller should include at least the following:
- A narrative description of the system including details on the devices controlled and any special features supported. In effect, this is a summary of the information gained from the customer during the pre-configuration interview.
- A diagram of the hardware components of the home automation system, including all controlled or monitored devices, including their connections.
- A list of the locations of each of the software modules used to create and maintain the system’s programming. By location, I mean the PCs or the controller(s) where any copies of the configuration files are located. If the software is located only on the original programmer’s PC, a note should be included to this effect. However, if this is the case, a backup should absolutely be created and its location noted as well. If the configuration software is embedded as firmware in the controller itself, this should be indicated, along with the commands used to access and start the configuration routines. Any passwords required should also be documented.
- An overview logic diagram of the control system and its relationships to controls or events defined for each major subsystem.
- A logic diagram of all timer and conditional events that have been configured or scripted.
- A maintenance and version log that tracks the date and technician for all installation, troubleshooting, upgrade, additions, and modifications made to the system beginning with its initial installation.
- A hard copy of the system configuration, setup, and programming should be created, if at all possible. In many cases, these files can be saved to a text file and printed. A copy of the hard copy should be stored at the office in the customer file and another kept on-site for a maintenance and debug reference.
- A hard media (floppy disk or CD) backup that contains copies of all programming and configuration files specific to the system.
Preventive Action
Throughout the programming process, the system controller’s programming should be copied electronically to create a backup of the programming created to a certain milestone or development point. You can’t create too many backups, and the relatively small amount of time it takes to create a backup is an investment in your ability to recover the data or programming in the event of a catastrophe that strikes during the programming process.
Backups
Any number of things can happen to wipe out the programming: power failure, somebody tripping over the power cord, the press of the wrong button, or even bad controller hardware or software.
The control systems that run on a PC typically include backup, restore, and reset functions that are used to copy the system configuration to a removable medium (such as tape, disk, or CD), restore the configuration should the PC where the controller is running fail, and remove any configuration changes made to the standard or default configuration, respectively.
The backup function should be used after each major event or device is programmed, at the end of each day of programming activities, and finally when all programming is completed. The final backup of a system should be created even before the system is tested. If any changes are made during testing, additional backups should be created. Creating these electronic backups ensures that should the system fail, the programming is lost, or you simply wish to start over, the fallback point is not too far in the past.
If the homeowner will also have the ability to make changes to the system, the documentation should include instructions on how to create and restore backups. Of course, the best scenario is that you or your company is contracted to make all future programming changes, which ensures that all changes have been tested and the system backup has been created.
Upgrades
Periodically, manufacturers release upgraded or improved versions of their software and hardware products. There are two schools of thought on upgrades: the first believes that “if it ain’t broke, don’t fix it,” and the second believes that all upgrades should be installed regardless of need or the customer’s configuration. The best approach to upgrades falls somewhere in the middle of these two philosophies. You should analyze the upgrade’s documentation carefully to determine if a new feature or function will improve a customer’s system or provide better performance with regard to the homeowner’s expectations of the system. If the answer is yes, the upgrade will improve the customer’s system, the upgrade should be applied. However, if the upgrade has no effect on the current configuration or performance of a customer’s system, it is probably better to not install this particular upgrade at this time. Don’t worry about losing track of which customer has which version; if the maintenance log part of the documentation is steadfastly maintained, there should be no mysteries.
Review
Programming a home automation control system is an exercise in organization. Before beginning the programming on a controller, draw a sketch of the logical flow of the control activities to be set up. The sketch proves a road map to completing the programming. Planning out the process in this way helps to prevent overlooking any of the required actions planned for the system.
Most higher-end home automaton control systems have built-in graphical user interfaces (GUIs) that are typically menu-driven or displayed as a function or device hierarchy. User interfaces on home system control configuration and programming modules typically include a menu, dialog box, or tree format for selecting specific devices for configuration, timing, and functions.
The programming interfaces on controller systems are either embedded as firmware or installed on a PC linked to the controller. Many systems offer applets or wizards to assist with programming a macro. Some include templates that are used to re-create new or modify standard devices, groups, and scripts.
The documentation of the completed programming and the procedures used to back up and restore the controller a system failure are key pieces of a programming and setup job.
A manufacturer’s documentation is general and cannot cover each specific installation. It can be included, but the final documentation for a system should include the information needed by the homeowner and the next technician to work on the system.
Any number of things can happen to wipe out the programming: power failure, somebody tripping over the power cord, the press of the wrong button, or even bad controller hardware or software. The backup function should be used after each major event or device is programmed. The final backup of a system should be created before the system is tested. Creating backups ensures that the fallback point to which the system can be restored is not too far in the past.
The best approach to home controller hardware and software upgrades is to analyze the release information to determine if new features or functions may improve a customer’s system. If the answer is yes, the upgrade should be applied. If it’s no, don’t install the upgrade.
Questions
- What should be completed prior to programming a home system controller?
- Backup of system software
- User wish list
- Sketch or outline of system controller functions to be created
- Programming language training
- Which of the following aids can be found in home system controller programming software?
- GUI
- Menu-driven options
- Device tree
- Wizard
- All of the above
- A module that groups together several actions that are activated through a single command or button is called a(n)
- Event
- Macro
- Program
- Wizard
- What is the last step in the actions used to create a macro?
- Create if-then-else logical relationships
- Create new classes or groups
- Create scripts
- Create timer events
- Export macro
- Save and name macro
- None of the above
- A sequence of logical programming statements that specify a certain action is a(n)
- Device event
- Macro
- Script
- Timer event
- What type of home system controller action is executed based on the system clock?
- Device event
- Macro
- Script
- Timer event
- What should be created at the end of the programming to communicate a system’s history to programmers in the future?
- Macro listings
- Maintenance activity log
- User instructions
- Printout of all system programming
- The manufacturer’s documentation is generally sufficient for documenting a home system controller and its configuration.
- True
- False
- It depends on the system
- Which of the following is typically not included in the system documentation?
- Description of the system
- Diagram of hardware components
- Price list of system components and software modules
- Logic diagram of the control system and the relationships to controls
- During the programming process, when should backups be created?
- Only after the system is complete, fully tested, and debugged
- After completing each major milestone
- At the end of each work session
- At the end of the programming project
Answers
- C. You don’t really need to sketch out the system functions, but some form of a sequenced outline should be created. Any of the other choices could be done before you begin programming, but some form of an outline or sketch should absolutely be created.
- E. Not that any system will necessarily have all of these features, but chances are good that a quality system has most of them.
- B. Macros are comprised of events, which are created during programming, which is accomplished through a wizard in many cases.
- F. The other steps listed are used to create and control the macro’s functions.
- C. Not to be confused with a macro, which may involve more than just logic statements.
- D. Timer or scheduled events are executed based on a clock time.
- B. If the next programmer to work on a customer’s system is a year or more after the initial programming is completed, chances are nobody will remember what the last action completed was or what version of the software is installed.
- B. And it really doesn’t depend on the system.
- C. This information belongs on an invoice or an accounting statement, but not in the documentation.
- B, C, and D. In other words, just about anytime you need the peace of mind.
Part I - Home Technology Installation Basics
- Wire and Cable Basics
- Connector Types and Uses
- Wiring Installation Practices
- Codes, Standards, and Safety Practices
Part II - Structured Wiring
- Infrastructure Wiring Basics
- Planning a Structured Wiring Installation
- Rough-In Installation
- Trim-Out Installation
- Troubleshooting Structured Wiring
Part III - Home Computer Networks
- Computer Network Basics
- Computer Network Hardware
- Computer Network Software
- Designing and Installing a Computer Network
- Troubleshooting a Home Network
Part IV - Audio/Video Systems
- Distributed Audio System Basics
- Designing and Installing Distributed Audio Systems
- Distributed Video Basics
- Designing and Installing Distributed Video Systems
- Troubleshooting Audio Systems
- Troubleshooting Video Systems
Part V. Home Lighting Management Systems
- Home Lighting Basics
- Home Lighting Devices
- Designing a Home Lighting Control System
- Installing a Home Lighting Control System
- Troubleshooting and Maintaining Lighting Control Systems
Part VI - Telecommunications
- Home Communication System Basics
- Designing and Installing a Home Telephone System
- Troubleshooting a Home Communication System
Part VII - HVAC and Water Management
Part VIII - Security System Basics
- Security System Basics
- Designing a Home Security System
- Installing a Home Security System
- Troubleshooting and Maintaining a Home Security System
- Home Security Surveillance Systems
- Home Access Control Systems
Part IX - Home Technology Integration
- Defining Users Needs and Desires
- User Interfaces
- Home Automation Controllers
- Programming
- Integrating the Connected Home
- Other Home Technology Integration Devices
Part X - Appendices
EAN: N/A
Pages: 300
