Basic Commands to Get Started
Basic Commandsto Get Started
Overview
- Understanding coordinate systems
- Drawing your first figure
- Erasing, offsetting, filleting, extending, and trimming lines in a drawing
Now that you have taken a quick tour of the AutoCAD and LT screens, you are ready to begin drawing. In this chapter, you will be introduced to a few basic commands used in drawing with AutoCAD and AutoCAD LT. To get you started, I will guide you through the process of drawing a box (see Figure 2.1).
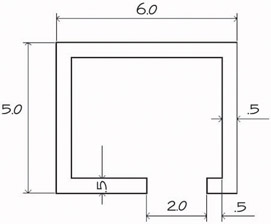
Figure 2.1: The box to be drawn
You need to use only five or six commands to draw the box. First, you’ll become familiar with the Line command and how to make lines a specific length. Then I’ll go over the strategy for completing the box.
The Line Command
In traditional architectural drafting, lines were often drawn to extend slightly past their endpoints (see Figure 2.2). This is no longer done in CAD except for special effects.
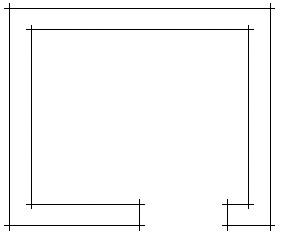
Figure 2.2: The box drawn with overlapping lines
The Line command draws a line between locations on existing lines, between geometric figures, or between two points that you can choose anywhere within the drawing area. You can designate these points by clicking them on the screen, by entering the X and Y coordinates for each point in the Command window, or by entering distances and angles at the command line. After you draw the first segment of a line, you can end the command or draw another line segment from the end of the first one. You can continue to draw adjoining line segments for as long as you like. Let’s see how this works.
To be sure that you start with your drawing area set up the way it is set up for this book, choose File Close to close any open drawings. If multiple drawings are open, repeat the Close command for each drawing until you have no drawings open. Your drawing area will be gray and blank with no crosshair cursor, your toolbars will disappear except for five buttons on the Standard toolbar, and you will have only four drop-down menus.
- Click the New button at the left end of the Standard toolbar. In the Create New Drawing dialog box, click the Start From Scratch icon, if it’s not already selected, and click OK. The menus, crosshair cursor, and toolbars return, and you now have a blank drawing in the drawing area.
- Glance down at the status bar at the bottom of your screen. All buttons except Model should be off—that is, in an unpushed state. If any of the others appear to be pushed, click them to turn them off.
- Be sure that the Draw and Modify toolbars are docked on the left side of the drawing area, as shown in Figure 2.3. Refer to Chapter 1 if you need a reminder on how to display or move toolbars.
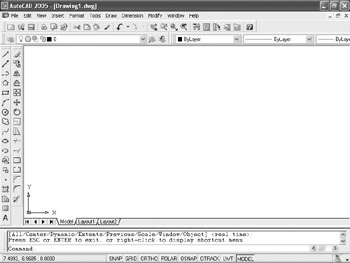
Figure 2.3: The Draw and Modify toolbars docked on the left side of the drawing area, and all status bar buttons except Model turned off - Click the Line button at the top of the Draw toolbar.
Look at the bottom of the Command window and see how the Command: prompt has changed.

The prompt now tells you that the Line command is started (Command: _line) and that AutoCAD is waiting for you to designate the first point of the line (Specify first point:).
You can also start the Line command by choosing Draw Line or by typing L and pressing the Enter key.
- Move the cursor onto the drawing area, and using the left mouse button, click a random point to start a line.
- Move the cursor away from the point you clicked, and notice how a line segment appears that stretches like a rubber band from the point you just picked to the cursor. The line changes length and direction as you move the cursor.
- Look at the Command window again, and notice that the prompt has changed.

It is now telling you that AutoCAD is waiting for you to designate the next point (Specify next point or [Undo]:).
- Continue picking points and adding lines as you move the cursor around the screen (see Figure 2.4). After you draw the third segment, the Command window repeats the Specify next point or [Close/Undo]: prompt each time you pick another point.

Figure 2.4: Drawing several line segments - When you’ve drawn six or seven line segments, press Enter to end the Line command. The cursor separates from the last drawn line segment. Look at the Command window once again.

The Command: prompt has returned to the bottom line. This tells you that no command is running.
In this exercise, you used the left mouse button to select the Line button from the Draw toolbar and also to pick several points in the drawing area to make the line segments. You then pressed Enter () on the keyboard to end the Line command.
| Note |
In the exercises that follow, the Enter symbol () will be used. When I say to “type” or “enter” something, it means to type the data that follows the word type or enter and then to press the Enter key (). For example, rather than writing “type L and press the Enter key,” I’ll write “type L.” |
Using Coordinates
Try using the Line command again, but instead of picking points in the drawing area with the mouse as you did before, this time enter X and Y coordinates for each point from the keyboard. To see how, follow these steps:
- Click the Erase button on the Modify toolbar.
You can also start the Erase command by typing e or by choosing Modify Erase.
- Type all.
- Press to clear the screen.
Now start drawing lines again by following these steps:
- Start the Line command again by clicking the Line button on the Draw toolbar.
- Type 2,2.
- Type 6,3.
- Type 4,6.
- Type 1,3.
- Type 10,6.
- Type 10,1.
- Type 2,7.
- Press again to end the command.
The lines will be similar to those you drew previously, but this time you know where each point is located relative to the 0,0 point. In the drawing area, every point has an absolute X and Y coordinate. In steps 2 through 8, you entered the X and Y coordinates for each point. For a new drawing, such as this one, the origin (0,0 point) is in the lower-left corner of the drawing area, and all points in the drawing area have positive X and Y coordinates (see Figure 2.5).
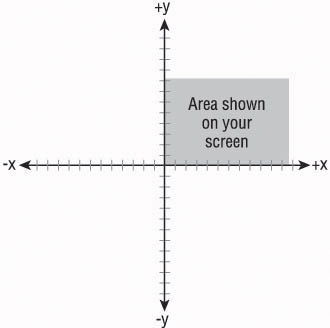
Figure 2.5: The X and Y coordinates on the drawing area
Let’s explore how the cursor is related to the coordinates in the drawing.
- Move the cursor around, and notice the left end of the status bar at the bottom of the screen. This is the coordinate readout, and it displays the coordinates of the cursor’s position.

- Move the cursor as close to the lower-left corner of the drawing area as you can without it changing into an arrow. The coordinate readout should be close to 0.0000,0.0000,0.0000.
Note In AutoCAD, you will see a readout for the Z coordinate as well, but you can ignore it for now because you will be working in only two dimensions for the majority of this book. The Z coordinate will always read 0 until you work in three dimensions (see the Appendix). AutoCAD LT does not have the readout for the Z coordinate.
- Move the cursor to the top-left corner of the drawing area. The readout will change to something close to 0.0000,9.0000,0.0000, indicating that the top of the screen is 9 units from the bottom.
- Move the cursor one more time to the upper-right corner of the drawing area. The readout will still have a Y coordinate of approximately 9.0000, and the X coordinate will now have a value between 12.0000 and 16.0000, depending on the size of your monitor and how the various parts of the AutoCAD Graphics window are laid out on your screen. (See Chapter 1 for a recap.)
The drawing area of a new drawing is preset to be 9 units high and 12–16 units wide, with the lower-left corner of the drawing at the coordinates 0,0.
| Note |
For the moment, it doesn’t matter what measure of distance these units represent. I’ll address that topic in Chapter 3. And don’t worry about the four decimal places in the coordinate readout. The number of places is controlled by a setting you will learn about soon. |
Relative Coordinates
Once you understand the coordinate system used by AutoCAD, you can draw lines to any length and in any direction. Look at the box shown earlier in Figure 2.1. Because you know the dimensions, you can calculate, by adding and subtracting, the absolute coordinates for each vertex—the connecting point between two line segments—and then use the Line command to draw the shape by entering these coordinates from the keyboard. But AutoCAD offers you several tools for drawing this box much more easily. Two of these tools are the relative Cartesian and the relative polar coordinate systems.
When drawing lines, these systems use a set of new points based on the last point designated, rather than the 0,0 point of the drawing area. They are called “relative” coordinate systems because the coordinates used are relative to the last point specified. If the first point of a line is located at the coordinate 4,6, and you want the line to extend 8 units to the right, the coordinate that is relative to the first point is 8,0 (8 units in the positive X direction and 0 units in the positive Y direction), while the actual—or absolute—coordinate of the second point is 12,6.
The relative Cartesian coordinate system uses relative X and Y coordinates in just the manner shown, and the relative polar coordinate system relies on a distance and an angle relative to the last point specified. You will probably favor one system over the other, but you need to know both systems because at times, because of the information you have at hand, you will be able to use only one of the two. A limitation of this nature will be illustrated in Chapter 4.
When entering relative coordinates, you need to type an “at” symbol (@) before the coordinates. In the previous example, you would enter the relative Cartesian coordinates as @8,0. The @ lets AutoCAD know that the numbers following it represent coordinates that are relative to the last point designated.
Relative Cartesian Coordinates
The Cartesian system of coordinates, named after the philosopher Ren Descartes, who invented the X,Y coordinate system in the 1600s, uses a horizontal (X) and vertical (Y) component to locate a point relative to the 0,0 point. The relative Cartesian system uses the same components to locate the point relative to the last point picked, so it’s a way of telling AutoCAD how far left or right and up or down to extend a line or to move an object from the last point picked (see Figure 2.6). If the direction is to the left, the X coordinate will be negative. Similarly, if the direction is down, the Y coordinate will be negative. Use this system when you know the horizontal and vertical distances from point 1 to point 2. To enter data using this system, use this form: @x,y.
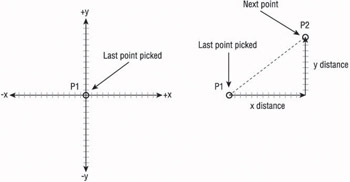
Figure 2.6: The relative Cartesian coordinate system
Relative Polar Coordinates
This system requires a known distance and direction from point 1 to point 2. Calculating the distance is straightforward: it’s always positive and is simply the distance away from point 1 that point 2 will be placed. The direction requires a convention for determining an angle. AutoCAD defines right (toward three o’clock) as the direction of the 0 angle. All other directions are determined from a counterclockwise rotation (see Figure 2.7). On your screen, up is 90, left is 180, down is 270, and a full circle is 360. To let AutoCAD know that you are entering an angle and not a relative Y coordinate, use the “less than” symbol (<) before the angle and after the distance. So in the previous example, to designate a point 8 units to the right of the first point, you would enter @8<0.
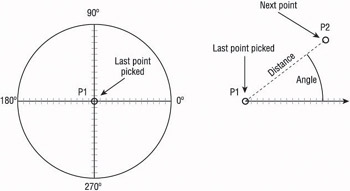
Figure 2.7: The relative polar coordinate system
| Note |
Remember, use the relative polar coordinates method to draw a line from the first point when you know the distance and direction to its next point. Enter data using this form: @distance<angle. |
Drawing the Box
Now that you have the basics, the following exercises will take you through the steps to draw the four lines that form the outline of the box using both relative coordinate systems.
Using Relative Cartesian Coordinates
To begin drawing the box, we’ll use the same drawing.
- If your drawing is already blank, jump to step 2. If you still have lines on your drawing, start the Erase command, type all, and then press again.
- Click the Line button at the top of the Draw toolbar.
- At the Specify First point: prompt in the Command window, type 3,3. This is an absolute Cartesian coordinate and will be the first point.
- Type @6,0.
- Type @0,5.
- Type @-6,0.
- Type c. The letter c stands for close. Entering this letter after drawing several lines closes the shape by extending the next line segment from the last point specified to the first point (see Figure 2.8). It also ends the Line command. Notice that in the Command window the prompt is Command:. This signifies that AutoCAD is ready for a new command.
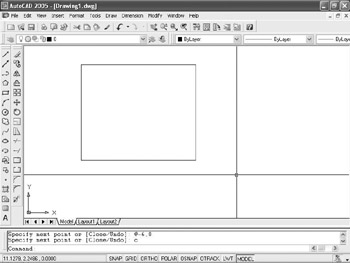
Figure 2.8: The first four lines of the box
Erasing Lines
To prepare to draw the box again, use the Erase command to erase the four lines you have just drawn.
- Start the Erase command. Notice how the cursor changes from the crosshair to a little square. This is called the pickbox. When you see it on the screen, it’s a sign that AutoCAD is ready for you to select objects on the screen. Also, notice the Command window. It is prompting you to select objects.
- Place the pickbox on one of the lines and click. The line changes to a dashed line. This is called ghosting or highlighting.
- Do the same thing with the rest of the lines.
- Press . The objects are erased, and the Erase command ends.
Note You have been introduced to two methods of selecting lines to be erased: typing all and using the pickbox to select them. Throughout the book, you will be introduced to several other ways to select objects. The selection process is important in AutoCAD because you need to be able to quickly and precisely select objects.
Using Relative Polar Coordinates
Now draw the box again using the polar method by following these steps:
- Start the Line command. (Click the Line button on the Draw toolbar.)
- Type 3,3 to start the box at the same point.
- Type @6<0.
- Type @5<90.
- Type @6<180.
- Type c to close the box and end the Line command. Your box will once again resemble the box shown earlier in Figure 2.8.
You can see from this exercise that you can use either method to draw a simple shape. When the shapes you are drawing get more complex and the amount of available information about the shapes varies from segment to segment, one of the two relative coordinate systems will turn out to be more appropriate. As you start drawing the floor plan of the cabin in Chapters 3 and 4, you will get more practice using these systems.
Some additional tools make the process of drawing simple, orthogonal lines like these much easier. I’ll introduce these tools in the following three chapters.
The Offset Command
The next task is to create the lines that represent the inside walls of the box. Because they are all equidistant from the lines you have already drawn, the Offset command is the appropriate command to use. You will offset the existing lines 0.5 units to the inside.
The Offset command involves three steps:
- Setting the offset distance
- Picking the object to offset
- Indicating the offset direction
Here’s how it works:
- Be sure the prompt line in the Command window reads Command:. If it doesn’t, press the Esc key until it does. Then click the Offset button on the Modify toolbar. The prompt changes to Specify offset distance or [Through] <1.0000>:. This is a confusing prompt, but it will become clear soon. For now, let’s specify an offset distance through the keyboard.
You can also start the Offset command by choosing Modify Offset or by typing o.
Warning As important as it is to keep an eye on the Command window, some of the prompts may not make sense to you until you get used to them.
- Type .5 for a distance. Now you move to the second stage of the command.
Note that the cursor has changed to a pickbox, and the prompt changes to say Select object to offset or <exit>:.
- Place the pickbox on one of the lines and click. The selected line ghosts (see Figure 2.9), the cursor changes back to the crosshair, and the prompt changes to Specify point on side to offset:. AutoCAD is telling you that to determine the direction of the offset, you must specify a point on one side of the line or the other. You make the choice by picking anywhere in the drawing area, on the side of the line where you want the offset to occur.
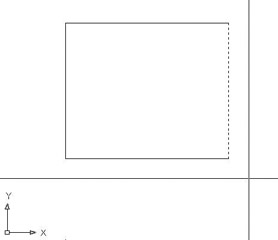
Figure 2.9: The first line to be offset is selected. - Pick a point somewhere inside the box. The offset takes place, and the new line is exactly 0.5 units to the inside of the chosen line (see Figure 2.10). Notice that the pickbox comes back on. The Offset command is still running, and you can offset more lines the same distance.
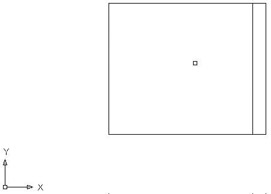
Figure 2.10: The first line is offset.You have three more lines to offset.
- Click another line; then click inside the box again. The second line is offset.
- Click a third line, click inside the box, click the fourth line, and then click again inside the box (see Figure 2.11).
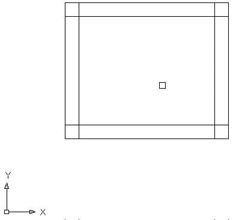
Figure 2.11: Four lines have been offset.You can cancel a command at any time by pressing Esc.
Note The offset distance stays set at the last distance you specify—0.5, in this case—until you change it.
- Press to end the Offset command.
This command is similar to the Line command in that it keeps running until it is stopped. With Offset, after the first offset, the prompts switch between Select object to offset or <exit>: and Specify point on side to offset: until you press to end the command.
The inside lines are now drawn, but to complete the box, you need to clean up the intersecting corners. To handle this task efficiently, we will use a new tool called the Fillet command.
Specifying Distances for the Offset Command
The prompt you see in the Command window after starting the Offset command is:
Specify offset distance or
[Through] <1.0000>:
This prompt is actually describing several options for setting the offset distance.
- Enter a distance from the keyboard.
- Pick two points on the screen to establish the offset distance as the distance between those two points.
- Press to accept the offset distance that is displayed in the prompt in the angle brackets.
- Type t to use the Through option. When you select this option, you are prompted to select the line to offset. You are then prompted to pick a point. The line will be offset to that point. When you pick the next line to offset, you then pick a new point to locate the position of the new line. The Through option allows each line to be offset a different distance.
As you get used to using Offset, you will find uses for each of these options.
The Fillet Command
The Fillet command lets you round off a corner formed by two lines. You control the radius of the curve, so if you set the curve’s radius to zero, the lines will form a sharp corner. In this way, you can clean up corners such as the ones formed by the lines inside the box.
- At the Command: prompt, click the Fillet button on the Modify toolbar. Notice the Command window:

You can also start the Fillet command by choosing Modify Fillet or by typing f.
The default fillet radius should be 0.0000 units. Like the Offset distance, the Fillet radius remains set at whatever length you specify until you change it.
- If your command window displays a radius of 0.0000, go on to step 3. Otherwise, type r, and then type ) to change the radius to zero.
- Move the cursor—now a pickbox—to the box, and click two intersecting lines, as shown in Figure 2.12. The intersecting lines will both be trimmed to make a sharp corner (see Figure 2.13). The Fillet command automatically ends.
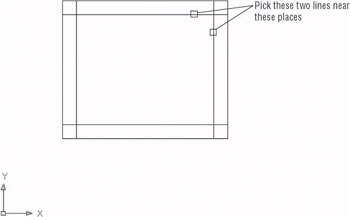
Figure 2.12: Pick two lines to execute the Fillet command.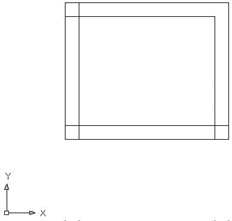
Figure 2.13: The first cleaned-up corner - Press to restart the command, and then fillet two more lines in a similar fashion.
- Continue restarting the command and filleting the lines for each corner until all corners are cleaned up (see Figure 2.14).
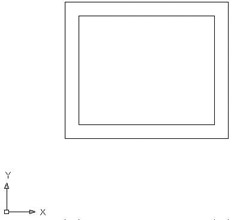
Figure 2.14: The box with all corners cleaned upOnce a command has ended, you can restart it by pressing either or the spacebar or by right-clicking and choosing Repeat from the shortcut menu.
Tip In most cases, you will get the same effect by pressing the spacebar as you get by pressing . The exception is when you are entering data in the Command window; in that case, pressing the spacebar just makes a space.
Note If you make a mistake and pick the wrong part of a line or the wrong line, press Esc to end the command and then type u. This will undo the effect of the last command.
Used together like this, the Offset and Fillet commands are a powerful combination of tools to lay out walls on a floor plan drawing. Because these commands are so important, let’s take a closer look at them to see how they work. Both commands are on the Modify toolbar or drop-down menu, both have the option to enter a numeric value or accept the current value—for offset distance and fillet radius—and both hold that value as the default until it is changed. However, the Offset command keeps running until you stop it, and the Fillet command stops after each use and must be restarted for multiple fillets. These two commands are probably the most frequently used tools in AutoCAD. You will learn about more of their uses in later chapters.
The Fillet command has a sister command, the Chamfer command, that is used to bevel corners with straight lines. When the distances for the Chamfer command are set to 0, you can use it to clean up corners in the same way that you use the Fillet command. Some users prefer to use Chamfer rather than Fillet because they don’t bevel corners but may at times use Fillet to round off corners. By using Chamfer to clean up corners, Fillet can have any radius and won’t have to constantly be reset to 0. You will develop your own preference.
Completing the Box
The final step in completing the box (see Figure 2.1 earlier in this chapter) is to make an opening in the bottom wall. From the diagram, you can see that the opening is 2 units wide and set off from the right inside corner by 0.5 units. To make this opening, you will use the Offset command twice, changing the offset distance for each offset, to create marks for the opening.
Offsetting Lines to Mark an Opening
Follow these steps to establish the precise position of the opening:
- At the Command: prompt, start the Offset command, either from the Modify toolbar or the Modify menu. Notice the Command window. The default distance is now set at 0.5, the offset distance you previously set to offset the outside lines of the box to make the inside lines. You want to use this distance again. Press to accept this preset distance.
- Pick the inside vertical line on the right, and then pick a point to the left of this line. The line is offset to make a new line 0.5 units to its left (see Figure 2.15).
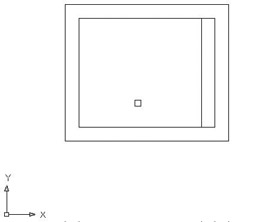
Figure 2.15: Offsetting the first line of the opening - Press to end the Offset command, and then press it again to restart the command. This will allow you to reset the offset distance.
- Enter 2 as the new offset distance and press .
- Click the new line, and then pick a point to the left. Press to end the Offset command (see Figure 2.16).
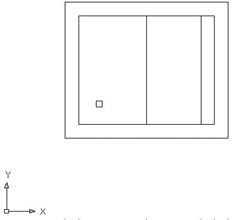
Figure 2.16: Offsetting the second line of the opening
You now have two new lines indicating where the opening will be. You can use these lines to form the opening using the Extend and Trim commands.
| Tip |
The ”buttons” you have been clicking in this chapter are also referred to as “icons” and “tools.” When they are in dialog boxes or on the status bar, they have icons (little pictures) on them and actually look like buttons to push. When they are on the toolbars, they look like icons. But when you move the pointer arrow cursor onto one, it takes on the appearance of a button with an icon on it. I will use all three terms—button, icon, and tool— interchangeably in this book. |
Extending Lines
You use the Extend command to lengthen (extend) lines to meet other lines or geometric figures (called boundary edges). Executing the Extend command may be a little tricky at first until you see how it works. Once you understand it, however, it will become automatic. The command has two steps: first, you pick the boundary edge or edges, and second, you pick the lines you want to extend to meet those boundary edges. After selecting the boundary edges, you must press before you begin selecting lines to extend.
- To begin the Extend command, click the Extend button on the Modify toolbar. Notice the Command window.

The bottom line says Select objects:, but in this case you need to observe the bottom two lines of text in order to know that AutoCAD is prompting you to select boundary edges.
- Pick the very bottom horizontal line (see Figure 2.17) and press .
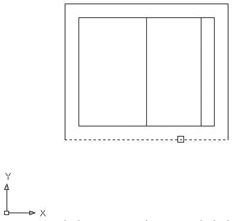
Figure 2.17: Selecting a line to be a boundary edgeYou can also start the Extend command by choosing Modify Extend from the Modify drop-down menu or by typing ex.
Tip The Select Objects: prompt would be more useful if it said, “Select objects and press Enter when finished selecting objects.” But it doesn’t. You have to train yourself to press when you finish selecting objects in order to get out of selection mode and move on to the next step in the command.
- Pick the two new vertical lines created by the Offset command. Be sure to place the pickbox somewhere on the lower halves of these lines, or AutoCAD will ignore your picks. The lines are extended to the boundary edge line. Press to end the Extend command (see Figure 2.18).
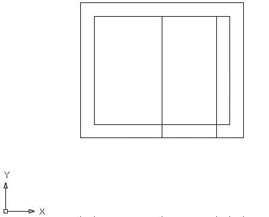
Figure 2.18: The lines are extended to the boundary edge.
Trimming Lines
The final step is to trim away the horizontal lines to complete the opening. To do this, you use the Trim command. As with the Extend command, there are two steps. The first is to select reference lines—in this case, they’re called cutting edges because they determine the edge or edges to which a line is trimmed. The second step is to pick the lines that are to be trimmed.
- Click the Trim button on the Modify toolbar to start the Trim command. Notice the Command window. Similar to the Extend command, the bottom line prompts you to select objects, but the second line up tells you to select cutting edges.
- Pick the two vertical offset lines that were just extended as your cutting edges, and then press (see Figure 2.19).
You can also start the Trim command by choosing Modify Trim from the Modify drop-down menu or by typing tr.
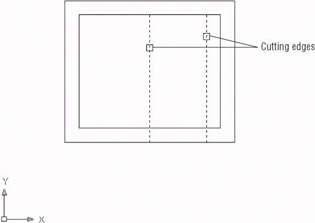
Figure 2.19: Lines selected to be cutting edges - Pick the two horizontal lines across the opening somewhere between the cutting edge lines (see Figure 2.20).
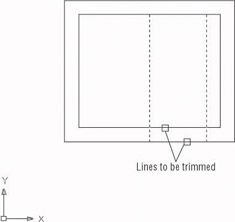
Figure 2.20: Lines selected to be trimmed
The opening is trimmed away (see Figure 2.21).
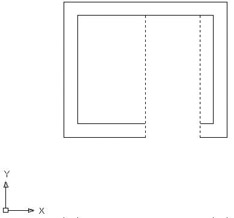
Figure 2.21: Lines are trimmed to make the opening.
| Note |
If you trim the wrong line or wrong part of a line, you can click the Undo button on the Standard toolbar. This will undo the last trim without canceling the Trim command, and you can try again. |
Now let’s remove the extra part of our trimming guide lines.
- Press twice—once to end the Trim command and again to restart it. This will allow you to pick new cutting edges for another trim operation.
- Pick the two upper horizontal lines next to the opening as your cutting edges, shown in Figure 2.22, and press .
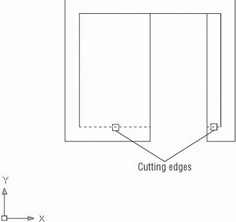
Figure 2.22: Lines picked to be cutting edges - Pick the two vertical lines that extend above the new opening. Be sure to pick them above the opening (see Figure 2.23). The lines are trimmed away, and the opening is complete. Press to end the Trim command (see Figure 2.24).
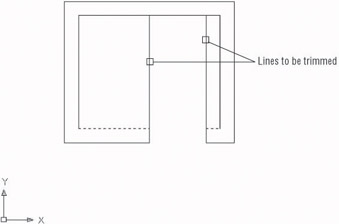
Figure 2.23: Lines picked to be trimmed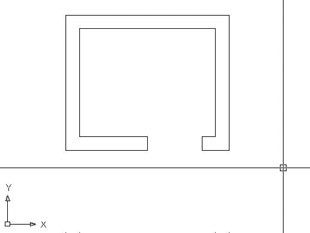
Figure 2.24: The completed trim
Congratulations! You have just completed the first drawing project in this book and have covered all the tools in this chapter. These skills will be useful as you learn how to work on drawings for actual projects.
A valuable exercise at this time would be to draw this box two or three more times, until you can do it without the instructions. This will be a confidence-builder and will get you ready to take on new information in the next chapter, in which you will set up a drawing for a building.
The box you drew was 6 units by 5 units, but how big was it? You really don’t know at this time, because the units could represent any actual distance: inches, feet, meters, miles, and so on. Also, the box was positioned conveniently on the screen so you didn’t have any problem viewing it. What if you were drawing a building that was 200 feet long and 60 feet wide? In the next chapter, you will learn how to set up a drawing for a project of a specific size.
You can exit AutoCAD now without saving this drawing. To do so, choose File Exit. When the dialog box asks if you want to save changes, click No. Or you can leave AutoCAD open and go on to the following practice section or the next chapter.
If You Would Like More Practice
Draw the following object shown in Figure 2.25.
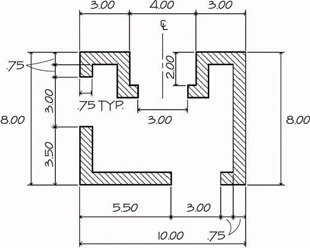
Figure 2.25: Practice drawing
You can use the same tools and strategy used to draw the box. Choose File New to start a new drawing, and click the Start From Scratch button in the Create New Drawing dialog box. Here’s a summary of the steps to follow:
- Ignore the three openings at first.
- Draw the outside edge of the shape using one of the relative coordinate systems. To make sure the box fits on your screen, start the outline of the box in the lower-left corner at the absolute coordinate of 1,0.5.
- Offset the outside lines to create the inside wall.
- Fillet the corners to clean them up.
- Use the Offset, Extend, and Trim commands to create the three openings.
- Don’t worry about trying to put in the dimensions, center line, or hatch lines. You’ll learn how to create those objects later in the book.
Are You Experienced?
Now you can
- understand the basics of coordinates
- discern between the two relative coordinate systems used by AutoCAD
- use the Line, Erase, Offset, Fillet, Extend, and Trim commands to create a drawing
Introduction
- Getting to Know AutoCAD
- Basic Commands to Get Started
- Setting Up a Drawing
- Gaining Drawing Strategies: Part 1
- Gaining Drawing Strategies: Part 2
- Using Layers to Organize Your Drawing
- Grouping Objects into Blocks
- Generating Elevations
- Working with Hatches and Fills
- Controlling Text in a Drawing
- Dimensioning a Drawing
- Managing External References
- Using Layouts to Set Up a Print
- Printing an AutoCAD Drawing
- Appendix A Look at Drawing in 3D
EAN: N/A
Pages: 159
