OSPF
Open Shortest Path First is a link-state protocol. It's a good choice for networks that need a more sophisticated routing protocol than RIP but are not standardized on a single router vendor and therefore have problems using EIGRP. It has a number of significant advantages, most of which it shares with EIGRP: it doesn't use a lot of network bandwidth, it supports VLSM, and it converges quickly when the network's state changes. Its biggest advantage over EIGRP is that it is an open standard and is supported by almost all router vendors.
OSPF has a reputation for being very complex and, to some extent, this reputation is deserved. However, in small networks it can be configured quickly. This book does not give a comprehensive look at OSPF or its capabilities.
As you'll see, OSPF forces you to use a certain topological design. OSPF divides your network into areas ; area 0 is the "backbone" to which all other areas must connect. While this design fits many (perhaps even most) networks, and while there are some tools for giving you additional flexibility, you might reasonably object to using a routing protocol that limits your network's flexibility in the future. However, some people feel that this aspect of OSPF is an advantage, as it forces the use of decent network-design practices.
One possible disadvantage of OSPF is that it tends to use a lot of CPU time on the router because the OSPF LSA maintenance algorithms are CPU-intensive. This tendency to be a CPU hog can be controlled by restricting the number of routers per area, another good network-design practice.
9.4.1. OSPF Concepts
Before saying anything significant about OSPF, it's important to introduce the basic building blocks. Again, I won't try to explain all the detailsjust enough of the important concepts to get you started.
9.4.1.1. Areas
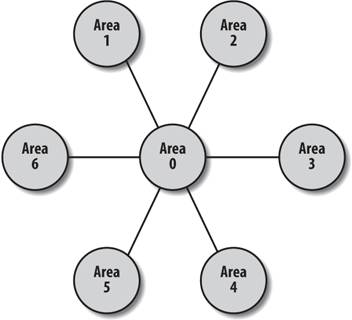
An area is a group of routers; a good design should have no more than 50 routers per area (or 100 interfaces). Each area is assigned a number, starting at 0. Area 0 is the backbone area; it must exist in any OSPF network. Figure 9-5 shows how the areas of a network must be ordered in a topological design.
In Figure 9-5, area 0 is the backbone area, with all other areas connecting to it. Areas allow summarization of network addresses, which in turn allows for smaller routing tables. Smaller routing tables mean faster convergence, less routing-protocol bandwidth, and better route determination. However, using a large number of relatively small areas can also mean a more difficult configuration.
9.4.1.2. Router types
An OSPF router can be classified as one of the following types:
ASBR (autonomous system border router)
A router with one or more interfaces connected to an external network or a network with a different local-AS number.
Figure 9-5. OSPF area topology
ABR (area border router)
A router with one or more interfaces connected to different areas. Information about each area that it is connected to is stored within this router.
Area-internal
A router whose interfaces are all within the same area.
Backbone
A router with one or more interfaces connected to the OSPF backbone area. The backbone area is area 0.
9.4.1.3. Link-state advertisements (LSAs)
Before we discuss the different types of OSPF areas, let's look at how updates are sent between areas. These updates are called "link-state advertisements," or LSAs. An LSA is an OSPF multicast that describes a routing change or routing update to other routers or areas.
There are six different types of LSAs. An LSA's type defines the type of route that is being advertised and how the announcements are processed. LSAs are sent every 30 minutes or at every link-state change. Here are the different LSA types:
Type 1Router Link
Type 1 LSAs are flooded (i.e., broadcast to all routers) within an area. These LSAs contain all the link-state information.
Type 2Network
Type 2 LSAs contain network-specific information. The designated router of the OSPF network (discussed later) broadcasts this LSA to all area routers.
Type 3Internal Summary
Type 3 LSAs contain route information for internal networks. This information is broadcast by the ABR to all backbone routers.
Type 4External Summary
Type 4 LSAs contain route information for ASBR routers.
Type 5Autonomous System
Type 5 LSAs contain route information about external networks. Only ASBR routers send these LSAs.
Type 6Multicast OSPF (MOSPF)
Type 6 LSAs multicast specific information. A Cisco router will ignore this type and generate a syslog entry if it does receive one. To suppress the syslog message, use the command ignore lsa mospf.
Type 7NSSA External LSA
Type 7 LSAs are used by NSSAs (not-so-stubby areas) .
9.4.1.4. Area types
There are several possible area types in an OSPF network:
Backbone
All OSPF designs require a backbone area that connects multiple areas together. The backbone area is always area 0.
Standard
A standard area connects to the backbone area and accepts both internal and external LSAs.
Stub
A stub area doesn't need all the routes other areas receive; all it needs is a default route and summary LSAs. It doesn't receive external routes. A stub area generally contains, at most, 50 routers, and its addresses can easily be summarized to areas above it. All areas, except for area 0, can be stubby if they don't contain an ASBR. To create a stub network, use the stub command (for example, area 1 stub).
Totally stubby
A totally stubby area does not accept external or summary LSAs. It's just like a stub area, except that it doesn't receive any summary information at all; it receives only a default route. To configure a totally stubby area, add the no-summary command to the area configuration (for example, area 1 stub no-summary).
Not-so-stubby
A not-so-stubby area (NSSA) is like a stub area, but it shares routing information with an external network that uses a different routing protocol. In other words, it is a regular stub area, but it has an ASBR router. The remote network becomes an area of our OSPF network, eliminating the need to implement the different routing protocol within the OSPF network. The ASBR of our NSSA area injects routes redistributed from the other routing protocol and passes them back into the area 0 backbone. To define a network as an NSSA, use the command area 1 nssa.
Totally stubby not-so-stubby
Yep, you read that name correctly. As if the area names weren't confusing enough, this command comes along. Basically, to create this area, we add the command no-summary to the end of the nssa command. By doing this, we block type-3 and type-4 LSAs into our NSSA area. So the command now looks like area 1 nssa no summary.
9.4.1.5. Router ID
Each OSPF router must have a unique router ID to identify it to the OSPF network. By default, the router ID is the address of its loopback interface. If no loopback address is defined, the router ID is the highest IP address of any active interface. Remember that the loopback interface of a Cisco router is an interface that is always up by definition and that has an IP address that is unique on the network (i.e., not 127.0.0.1).
9.4.1.6. Designated router (DR)
Each network segment needs a designated router, known as the DR, before it can exchange routing information. OSPF elects a DR on each multi-access segment. When an OSPF broadcast arrives at the DR, it is the job of the DR to multicast the update to all routers within its area. This keeps OSPF traffic to a minimum, because each router communicates with only the DR to get the routing information. If this didn't happen, the broadcast would have to go to each router, which would in turn broadcast again until every router got the message. In other words, the DR gives us a one-to-many relationship instead of a many-to-many relationship. With DR routers, there is only one place to send an update and one router that updates all the routers within the segment.
A backup designated router (BDR) must also be selected. This router becomes the DR if the DR becomes unavailable. If both the DR and BDR are unavailable, new ones are chosen automatically.
9.4.2. Enabling OSPF on the Network
You configure OSPF much like you configure other routing protocols: use the router command to establish the protocol and a process number, and use the network command to tell the router which networks it's responsible for. It's easy to become confused: with OSPF the network command takes a wildcard mask, not a subnet mask. For more information on wildcard masks , see Chapter 7. Here's an example:
router ospf 99
 network 10.10.1.0 0.0.0.255 area 0
Here, we establish an OSPF routing process with the process ID 99. This routing process is responsible for the network 10.10.1.0/24, which belongs to area 0. Therefore, this router is part of the OSPF backbone area. Do not confuse the process ID (99) with the area ID (0).
OSPF will run over all interfaces that match the network commands.
9.4.3. Sample OSPF Configurations
Figure 9-6 shows a network in which the backbone consists of one router. There are three other areas, each with a single router. In this configuration, Router 1 is the backbone router, and Router 2, Router 3, and Router 4 are area border routers (ABRs) with interfaces in different areas. One interface for each of these routers connects to the backbone area.
Figure 9-6. An OSPF network with a single backbone router
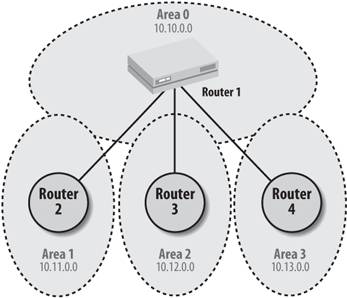
Router 1 is configured like this:
router ospf 99
 network 10.10.0.0 0.0.255.255 area 0
The configuration for Router 2 is:
router ospf 99
 network 10.10.0.0 0.0.255.255 area 0
 network 10.11.0.0 0.0.255.255 area 1
The configuration for Router 3 is:
router ospf 99
 network 10.10.0.0 0.0.255.255 area 0
 network 10.12.0.0 0.0.255.255 area 2
And here's the configuration for Router 4:
router ospf 99
 network 10.10.0.0 0.0.255.255 area 0
 network 10.13.0.0 0.0.255.255 area 3
Each router has a network statement for every area in which it participates. Router 1 needs a network statement only for area 0, because it doesn't have interfaces in areas 1, 2, and 3; its only area is the 10.10.0.0 network (area 0). It's important to understand that it's interfaces, not routers, that belong to areas.
The rest of the routers (Router 2, Router 3, and Router 4) are all area border routers, and they need two network statements because they each participate in two areas. Each network statement specifies the subnet that is associated with the area. Therefore, Router 2, Router 3, and Router 4 specify 10.10.0.0 0.0.255.255 for area 0, which is their backbone connection, and they each have an entry for their own areas (1, 2, and 3). Also note that the routers have the same OSPF process ID (99). Unlike local-AS numbers in IGRP and EIGRP, the process ID has no effect outside of the router. If the process IDs were different, routing would still occur.
Now let's look at a variation of this configuration in which we don't have a dedicated backbone router. In Figure 9-7, all three routers share area 0, which makes them all area border routers with no backbone router. The backbone still existsit just doesn't have its own router. This configuration increases reliability because there's no longer a single point of failure.
Figure 9-7. An OSPF network with a backbone across three ABRs
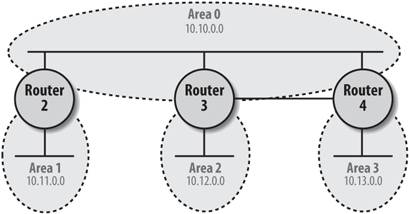
Here are the configurations. Not much has changed, except that we have dropped Router 1 from the configuration, and Router 2, Router 3, and Router 4 are all connected on one network segment.
The configuration for Router 2 is:
router ospf 99
 network 10.11.0.0 0.0.255.255 area 1
 network 10.10.0.0 0.0.255.255 area 0
The configuration for Router 3 is:
router ospf 99
 network 10.12.0.0 0.0.255.255 area 2
 network 10.10.0.0 0.0.255.255 area 0
And the configuration for Router 4 is:
router ospf 99
 network 10.13.0.0 0.0.255.255 area 3
 network 10.10.0.0 0.0.255.255 area 0
9.4.4. Route Summarization in OSPF
As with any routing protocol, route summarization helps reduce the routing table size. OSPF distinguishes between two summarization types: inter-area and external.
9.4.4.1. Inter-area summarization
Inter-area summarization occurs when the ABR summarizes an area's routes. An ABR can summarize routes within its area and beyond, as long as all the subnets are contiguous (bitwise) and summarizable. Just because areas are adjacent doesn't mean their addressing is set up to be summarizable.
To enable inter-area summarization, use the area range command. For example, on Router 2 in Figure 9-7, we can summarize the 10.11.0.0 network in the following manner:
router ospf 99
 network 10.11.0.0 0.0.255.255 area 1
 network 10.10.0.0 0.0.255.255 area 0
 ! summarize the areas for this router
 area 1 range 10.11.0.0 255.255.0.0
We can do this because we know that all the 10.11.0.0 networks are below this router. In an upcoming example, we will use this exact scenario and show the routing tables to prove that they actually get smaller as the router summarizes.
9.4.4.2. External summarization
External summarization occurs at ASBRs, where the entire network is summarized. We can use external summarization when we are injecting external routes into OSPF. To enable external summarization, use the summary-address command. For example:
summary-address 10.0.0.0 255.0.0.0
We're summarizing the entire network (10.0.0.0/8). Later, in the redistributing example, we will use this command to summarize the EIGRP routes that get redistributed into OSPF.
9.4.5. Virtual Backbone Links
There may be times when it's not possible to have a contiguous backbone, perhaps for political or even design issues. Although OSPF requires a single connected backbone, it includes a mechanism that lets you create a backbone out of two separate areas. Such a backbone is called a "virtual link."
Figure 9-8 shows a network that requires a virtual link. In OSPF, all areas must be contiguous, meaning that they must physically be connected to each other. When two areas are not contiguous, we solve the problem by creating a virtual link.
In this example, we want to make Router 1 and Router 2 part of area 0, even though they are not contiguous. Since they share area 5, we can mend the partitioned area 0 by adding a virtual link to tunnel area 0 (the backbone) across area 5. This tunneling brings the two distant routers together to act as though they are actually connected.
Figure 9-8. An OSPF network with a partitioned Area 0
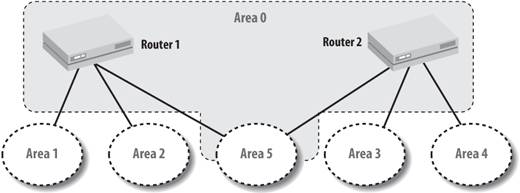
The virtual link affects the configuration of Routers 1 and 2. First, we should define a loopback interface, which we use as an unambiguous identifier for the router. (Remember that a loopback interface is always up, has a unique address, and is not associated with any hardware.) Then we must create the virtual link with the area command.
Here is Router 1's configuration:
interface loopback0
 ip address 10.10.7.4 255.255.255.0
router ospf 99
 network 10.10.1.0 0.0.0.255 area 0
 network 10.10.7.0 0.0.0.255 area 0
 network 10.10.2.0 0.0.0.255 area 1
 network 10.10.3.0 0.0.0.255 area 2
 network 10.10.6.0 0.0.0.255 area 5
 ! Create the virtual link to Router2's ID
 area 5 virtual-link 10.10.8.5
And here's the configuration for Router 2, which is very similar:
interface loopback0
 ip address 10.10.8.5 255.255.255.0
router ospf 99
 network 10.10.1.0 0.0.0.255 area 0
 network 10.10.9.0 0.0.0.255 area 0
 network 10.10.4.0 0.0.0.255 area 3
 network 10.10.5.0 0.0.0.255 area 4
 network 10.10.6.0 0.0.0.255 area 5
 ! Create the virtual link to Router1's ID
 area 5 virtual-link 10.10.7.4
The major rule to remember is that virtual links cannot cross more than one area.
9.4.6. Interoperability with Other Vendors
Cisco routers use bandwidth as the cost of OSPF links. Other vendors might select another method for calculating the cost value. The ospf cost command allows you to define a cost value for OSPF links when talking to another router. A general rule for calculating cost is to take 108 (100,000,000) and divide it by the bandwidth. So a T1 link would have a cost of 100,000,000/1,544,000, which is about 64.
interface serial0
 ip ospf cost 64
9.4.7. Default Routes in OSPF
With the default-information command, an ASBR can generate a default route into an OSPF domain. In this example, the ASBR is told to propagate its default route (172.168.10.1) into the OSPF domain:
ip route 0.0.0.0 0.0.0.0 172.168.10.1
router ospf 99
 network 10.1.1.0 0.0.0.255 area 0
 default-information originate
9.4.8. NSSAs (Not-So-Stubby Areas)
Before NSSAs existed, if a remote site on your network ran another routing protocol, it was difficult to provide full routing and also take advantage of stub areas. But with an NSSA, redistribution within a stub area is possible.
Here's a configuration that uses an NSSA to incorporate a remote network that is using RIP as its routing protocol. Router 2 is an offsite router running RIP; we want to incorporate it into our OSPF network. Router 1 is connected to our OSPF backbone. Area 2 joins Router 1 and Router 2 with an address of 192.168.44.0, and will be our NSSA.
Here's the configuration for Router 1, which is our main office router. It's a simple OSPF configuration, merely specifying that area 2 is an NSSA.
router ospf 99
 network 192.168.42.0 0.0.0.255 area 0
 network 192.168.43.0 0.0.0.255 area 1
 network 192.168.44.0 0.0.0.255 area 2
 area 2 nssa
Router 2 is the remote office router running RIP:
router rip
 network 10.0.0.0
!
! add OSPF and redistribute the RIP routes into it
router ospf 99
 redistribute rip subnets
 network 192.168.44.0 0.0.0.255 area 2
 area 2 nssa
This router needs to run both OSPF and RIP, but we have managed to shield Router 1 and the rest of our network from knowing about RIP. The redistribute command brings the RIP information into the OSPF process; we have a simple network command to define area 2; and we specify that area 2 is not so stubby.
9.4.9. OSPF Configuration Example
Figure 9-9 shows an OSPF network consisting of four areas. Area 0 has two ABR routers. Router 1 is the ABR for areas 1 and 2, while Router 4 is the ABR for area 3.
Figure 9-9. An OSPF network
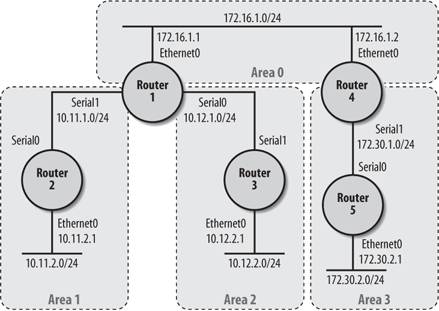
The configuration for Router 1 is:
hostname Router1
!
interface Ethernet0
 ip address 172.16.1.1 255.255.255.0
!
interface Serial0
 ip address 10.12.1.1 255.255.255.0
!
interface Serial1
 ip address 10.11.1.1 255.255.255.0
!
router ospf 100
 network 10.11.0.0 0.0.255.255 area 1
 network 10.12.0.0 0.0.255.255 area 2
 network 172.16.1.0 0.0.0.255 area 0
The configuration for Router 2 is:
hostname Router2
!
interface Ethernet0
 ip address 10.11.2.1 255.255.255.0
!
interface Serial0
 ip address 10.11.1.2 255.255.255.0
!
router ospf 100
 network 10.11.0.0 0.0.255.255 area 1
The configuration for Router 3 is:
hostname Router3
!
interface Ethernet0
 ip address 10.12.2.1 255.255.255.0
!
interface Serial1
 ip address 10.12.1.2 255.255.255.0
!
router ospf 100
 network 10.12.0.0 0.0.255.255 area 2
The configuration for Router 4 is:
hostname Router4
!
interface Ethernet0
 ip address 172.16.1.2 255.255.255.0
!
interface Serial1
 ip address 172.30.1.1 255.255.255.0
!
router ospf 100
 network 172.16.0.0 0.0.255.255 area 0
 network 172.30.0.0 0.0.255.255 area 3
And the configuration for Router 5 is:
hostname Router5
!
interface Ethernet0
 ip address 172.30.2.1 255.255.255.0
!
interface Serial0
 ip address 172.30.1.2 255.255.255.0
!
router ospf 100
 network 172.30.0.0 0.0.255.255 area 3
To test our configuration, we will run a few commands on Router 1 and Router 4. First, let's look at the output from the show ip route command on Router 1:
Router1#show ip route
Codes: C - connected, S - static, I - IGRP, R - RIP, M - mobile, B - BGP
 D - EIGRP, EX - EIGRP external, O - OSPF, IA - OSPF inter area
 N1 - OSPF NSSA external type 1, N2 - OSPF NSSA external type 2
 E1 - OSPF external type 1, E2 - OSPF external type 2, E - EGP
 i - IS-IS, L1 - IS-IS level-1, L2 - IS-IS level-2, * - candidate default
 U - per-user static route, o - ODR

Gateway of last resort is not set

 172.16.0.0/24 is subnetted, 1 subnets
C 172.16.1.0 is directly connected, Ethernet0
 172.30.0.0/24 is subnetted, 2 subnets
O IA 172.30.2.0 [110/84] via 172.16.1.2, 00:03:59, Ethernet0
O IA 172.30.1.0 [110/74] via 172.16.1.2, 00:03:59, Ethernet0
 10.0.0.0/24 is subnetted, 4 subnets
C 10.11.1.0 is directly connected, Serial1
O 10.11.2.0 [110/74] via 10.11.1.2, 00:08:25, Serial1
O 10.12.2.0 [110/74] via 10.12.1.2, 00:08:25, Serial0
C 10.12.1.0 is directly connected, Serial0
In this output, we see that we have routes to all networks in our diagram. Routes to networks that are directly connected to Router 1 are noted by a "C" in the left-hand column. All the OSPF routes are noted by an "O". Of course, we have four OSPF routes for the four networks that are not directly connected to Router 1.
Now let's look at the output of show ip ospf neighbor:
Router1#show ip ospf neighbor

Neighbor ID Pri State Dead Time Address Interface
172.30.1.1 1 FULL/DR 00:00:37 172.16.1.2 Ethernet0
10.12.2.1 1 FULL/ - 00:00:35 10.12.1.2 Serial0
10.11.2.1 1 FULL/ - 00:00:30 10.11.1.2 Serial1
Here we have three routers listed: Router 2, Router 3, and Router 4. Router 5 is not in this list because it is not a neighbor of Router 1. Finally, to test connectivity, we will ping the other routers:
Router1#ping 10.11.2.1
Type escape sequence to abort.
Sending 5, 100-byte ICMP Echos to 10.11.2.1, timeout is 2 seconds:
!!!!!
Success rate is 100 percent (5/5), round-trip min/avg/max = 28/29/32 ms
Router1#ping 10.12.2.1
Type escape sequence to abort.
Sending 5, 100-byte ICMP Echos to 10.12.2.1, timeout is 2 seconds:
!!!!!
Success rate is 100 percent (5/5), round-trip min/avg/max = 32/32/32 ms
Router1#ping 172.30.2.1
Type escape sequence to abort.
Sending 5, 100-byte ICMP Echos to 172.30.2.1, timeout is 2 seconds:
!!!!!
Success rate is 100 percent (5/5), round-trip min/avg/max = 32/32/36 ms
9.4.9.1. Putting route summarization to use
Everything looks good so far. But now let's look at the output of show ip route on Router 4:
Router4#show ip route
Codes: C - connected, S - static, I - IGRP, R - RIP, M - mobile, B - BGP
 D - EIGRP, EX - EIGRP external, O - OSPF, IA - OSPF inter area
 N1 - OSPF NSSA external type 1, N2 - OSPF NSSA external type 2
 E1 - OSPF external type 1, E2 - OSPF external type 2, E - EGP
 i - IS-IS, L1 - IS-IS level-1, L2 - IS-IS level-2, * - candidate default
 U - per-user static route, o - ODR

Gateway of last resort is not set

 172.16.0.0/24 is subnetted, 1 subnets
C 172.16.1.0 is directly connected, Ethernet0
 172.30.0.0/24 is subnetted, 2 subnets
O 172.30.2.0 [110/74] via 172.30.1.2, 00:18:15, Serial1
C 172.30.1.0 is directly connected, Serial1
 10.0.0.0/24 is subnetted, 4 subnets
O IA 10.11.1.0 [110/74] via 172.16.1.1, 00:10:17, Ethernet0
O IA 10.11.2.0 [110/84] via 172.16.1.1, 00:10:17, Ethernet0
O IA 10.12.2.0 [110/84] via 172.16.1.1, 00:10:08, Ethernet0
O IA 10.12.1.0 [110/74] via 172.16.1.1, 00:10:08, Ethernet0
While there is nothing wrong with this configuration, you should notice that there are four routes pointing to 172.16.1.1 for the various 10.x.x.x networks. We can simplify the routing table by changing the configuration on Router 1. Let's change the configuration on Router 1 to use the area range command we discussed earlier in the section "Inter-area summarization":
hostname Router1
!
interface Ethernet0
 ip address 172.16.1.1 255.255.255.0
!
interface Serial0
 ip address 10.12.1.1 255.255.255.0
!
interface Serial1
 ip address 10.11.1.1 255.255.255.0
!
router ospf 100
 network 10.11.0.0 0.0.255.255 area 1
 network 10.12.0.0 0.0.255.255 area 2
 network 172.16.1.0 0.0.0.255 area 0
 ! Add the commands to summarize the 10.11.0.0 and 10.12.0.0 networks
 area 1 range 10.11.0.0 255.255.0.0
 area 2 range 10.12.0.0 255.255.0.0
The addition of the two area range commands changed the way the areas are summarized. Running the show ip route command on Router 4 proves that the routing table is smaller:
Router4#sh ip route
Codes: C - connected, S - static, I - IGRP, R - RIP, M - mobile, B - BGP
 D - EIGRP, EX - EIGRP external, O - OSPF, IA - OSPF inter area
 N1 - OSPF NSSA external type 1, N2 - OSPF NSSA external type 2
 E1 - OSPF external type 1, E2 - OSPF external type 2, E - EGP
 i - IS-IS, L1 - IS-IS level-1, L2 - IS-IS level-2, * - candidate default
 U - per-user static route, o - ODR

Gateway of last resort is not set

 172.16.0.0/24 is subnetted, 1 subnets
C 172.16.1.0 is directly connected, Ethernet0
 172.30.0.0/24 is subnetted, 2 subnets
O 172.30.2.0 [110/74] via 172.30.1.2, 00:21:41, Serial1
C 172.30.1.0 is directly connected, Serial1
 10.0.0.0/16 is subnetted, 2 subnets
O IA 10.11.0.0 [110/74] via 172.16.1.1, 00:01:22, Ethernet0
O IA 10.12.0.0 [110/74] via 172.16.1.1, 00:01:13, Ethernet0
Now you see only two routes for the 10.11.0.0 and 10.12.0.0 networks. In this example, the savings aren't really significant. But on a real network with much larger routing tables, simplifying the tables by using summarization can have a significant impact on your network's performance.
9.4.10. Redistributing Other Protocols into OSPF
Instead of listing how each protocol can be redistributed into OSPF, I'll concentrate on one example with more detail. Look at Figure 9-9 and imagine that area 3 is an EIGRP network instead of an OSPF area; i.e., Router 4 runs EIGRP on interface Serial1, and Router 5 runs EIGRP exclusively. The challenge is getting redistribution between OSPF and EIGRP working. Let's start by modifying the configuration on Router 4 to support OSPF and EIGRP with redistribution:
hostname Router4
!
interface Ethernet0
 ip address 172.16.1.2 255.255.255.0
!
interface Serial1
 ip address 172.30.1.1 255.255.255.0
!
router eigrp 100
 ! List the EIGRP network
 network 172.30.0.0
 ! Disable EIGRP on the Ethernet0 interface
 passive-interface Ethernet0
 ! Redistribute our static route into EIGRP
 redistribute static
 ! Stop EIGRP from summarizing routes
 no auto-summary
!
!
router ospf 100
 network 172.16.0.0 0.0.255.255 area 0
 ! Use the summary-address command because we are injecting a route into
 ! OSPF (not the area range command, which summarizes OSPF internal
 ! routes)
 summary-address 172.30.0.0 255.255.0.0
 ! Redistribute EIGRP into OSPF
 redistribute eigrp 100 subnets
 default-metric 10
!
! Status default route for EIGRP
ip route 0.0.0.0 0.0.0.0 172.16.1.1
Things are much simpler on Router 5. We just need to configure our interfaces and start up EIGRP:
hostname Router5
!
interface Ethernet0
 ip address 172.30.2.1 255.255.255.0
!
interface Serial0
 ip address 172.30.1.2 255.255.255.0
!
router eigrp 100
 network 172.30.0.0
To verify our configuration, let's look at the route table on Router 1:
Router1#show ip route
Codes: C - connected, S - static, I - IGRP, R - RIP, M - mobile, B - BGP
 D - EIGRP, EX - EIGRP external, O - OSPF, IA - OSPF inter area
 N1 - OSPF NSSA external type 1, N2 - OSPF NSSA external type 2
 E1 - OSPF external type 1, E2 - OSPF external type 2, E - EGP
 i - IS-IS, L1 - IS-IS level-1, L2 - IS-IS level-2, * - candidate default
 U - per-user static route, o - ODR

Gateway of last resort is not set

 172.16.0.0/24 is subnetted, 1 subnets
C 172.16.1.0 is directly connected, Ethernet0
O E2 172.30.0.0/16 [110/10] via 172.16.1.2, 00:07:12, Ethernet0
 10.0.0.0/24 is subnetted, 5 subnets
C 10.11.1.0 is directly connected, Serial1
O 10.11.2.0 [110/74] via 10.11.1.2, 00:07:51, Serial1
O 10.12.2.0 [110/74] via 10.12.1.2, 00:07:51, Serial0
C 10.12.1.0 is directly connected, Serial0
O 10.0.0.0 is a summary, 00:07:45, Null0
Router1#
The route to the EIGRP router is there. And since we used the summary-address command, there is only one route to the 172.30.0.0/16 network. To verify connectivity, we ping Router 5:
Router1#ping 172.30.2.1

Type escape sequence to abort.
Sending 5, 100-byte ICMP Echos to 172.30.2.1, timeout is 2 seconds:
!!!!!
Success rate is 100 percent (5/5), round-trip min/avg/max = 32/33/36 ms
And everything looks good.
9.4.11. OSPF show Commands
The following show commands are particularly useful when you're working with OSPF. We've already seen some of them in this chapter.
9.4.11.1. show ip ospf border routers
This command shows the border routers that this router knows about:
Router1#show ip ospf border-routers

OSPF Process 100 internal Routing Table

Codes: i - Intra-area route, I - Inter-area route

i 172.30.1.1 [10] via 172.16.1.2, Ethernet0, ABR, Area 0, SPF 28
9.4.11.2. show ip ospf neighbor
This command gives you a list of OSPF neighbors that are directly connected to the router:
Router1#show ip ospf neighbor

Neighbor ID PRI State Dead Time Address Interface
172.30.1.1 1 FULL/DR 00:00:37 172.16.1.2 Ethernet0
10.12.2.1 1 FULL/ - 00:00:35 10.12.1.2 Serial0
10.11.2.1 1 FULL/ - 00:00:30 10.11.1.2 Serial1
The Neighbor ID is the OSPF router ID for the neighbor. A router's ID is either the highest IP address of any interface on the router or the IP address of the loopback interface (if it has been defined). PRI indicates priority. Priorities are used to establish the DR router; the router with the highest priority is the DR router. The State column reports the state of the connection to the neighbor. The state can be FULL, DOWN, or 2-WAY. FULL means that the routers are fully adjacent. Dead Time is the amount of time the router will wait without hearing a hello from the router before changing the neighbor's state to DOWN. Address is the IP address of the interface to which the neighbor is connected, and Interface shows the interface through which the neighbor is reached.
9.4.11.3. show ip ospf database
This command is very verbose, as it displays the entire OSPF database for the router. For each entry, there is a Link ID, ADV Router (short for "advertising router"), Age, Seq#, and Checksum. Some entries have Link and Count information as well.
 OSPF Router with ID (172.16.1.1) (Process ID 100)


 Router Link States (Area 0)

Link ID ADV Router Age Seq# Checksum Link Count
10.10.5.2 10.10.5.2 2484 0x8000008D 0xAAC3 3
10.10.5.3 10.10.5.3 2526 0x8000008D 0xDE8A 3
172.16.1.1 172.16.1.1 1617 0x80000002 0xF239 1
172.30.1.1 172.30.1.1 1549 0x80000002 0xE727 1

 Net Link States (Area 0)

Link ID ADV Router Age Seq# Checksum
172.16.1.2 172.30.1.1 1550 0x80000001 0xEE33

 Summary Net Link States (Area 0)

Link ID ADV Router Age Seq# Checksum
10.11.0.0 172.16.1.1 149 0x80000001 0x65C3
10.12.0.0 172.16.1.1 140 0x80000001 0x59CE
172.30.1.0 172.30.1.1 70 0x80000002 0xC0A2
172.30.2.0 172.30.1.1 70 0x80000002 0x1A3E
This command can be expanded to provide even more information by adding the router, network, or summary keywords.
9.4.11.4. show ip ospf interface
This command provides a wealth of OSPF information on a per-interface basis:
Router1#show ip ospf interface
Ethernet0 is up, line protocol is up
 Internet Address 172.16.1.1/24, Area 0
 Process ID 100, Router ID 172.16.1.1, Network Type BROADC*, Cost: 10
 Transmit Delay is 1 sec, State BDR, Priority 1
 Designated Router (ID) 172.30.1.1, Interface address 172.16.1.2
 Backup Designated router (ID) 172.16.1.1, Interface address 172.16.1.1
 Timer intervals configured, Hello 10, Dead 40, Wait 40, Retransmit 5
 Hello due in 00:00:00
 Neighbor Count is 1, Adjacent neighbor count is 1
 Adjacent with neighbor 172.30.1.1 (Designated Router)
 Suppress hello for 0 neighbor(s)
Serial0 is up, line protocol is up
 Internet Address 10.12.1.1/24, Area 2
 Process ID 100, Router ID 172.16.1.1, Network Type POINT_TO_POINT, Cost: 64
 Transmit Delay is 1 sec, State POINT_TO_POINT,
 Timer intervals configured, Hello 10, Dead 40, Wait 40, Retransmit 5
 Hello due in 00:00:00
 Neighbor Count is 1, Adjacent neighbor count is 1
 Adjacent with neighbor 10.12.2.1
 Suppress hello for 0 neighbor(s)
Serial1 is up, line protocol is up
 Internet Address 10.11.1.1/24, Area 1
 Process ID 100, Router ID 172.16.1.1, Network Type POINT_TO_POINT, Cost: 64
 Transmit Delay is 1 sec, State POINT_TO_POINT,
 Timer intervals configured, Hello 10, Dead 40, Wait 40, Retransmit 5
 Hello due in 00:00:09
 Neighbor Count is 1, Adjacent neighbor count is 1
 Adjacent with neighbor 10.11.2.1
 Suppress hello for 0 neighbor(s)
Serial2 is administratively down, line protocol is down
 OSPF not enabled on this interface
Serial3 is administratively down, line protocol is down
 OSPF not enabled on this interface
Getting Started
- Getting Started
- IOS User Modes
- Command-Line Completion
- Get to Know the Question Mark
- Command-Line Editing Keys
- Pausing Output
- show Commands
IOS Images and Configuration Files
- IOS Images and Configuration Files
- IOS Image Filenames
- The New Cisco IOS Packaging Model
- Loading Image Files Through the Network
- Using the IOS Filesystem for Images
- The Routers Configuration
- Loading Configuration Files
Basic Router Configuration
- Basic Router Configuration
- Setting the Router Name
- Setting the System Prompt
- Configuration Comments
- The Enable Password
- Mapping Hostnames to IP Addresses
- Setting the Routers Time
- Enabling SNMP
- Cisco Discovery Protocol
- System Banners
Line Commands
- Line Commands
- The line Command
- The Console Port
- Virtual Terminals (VTYs)
- Asynchronous Ports (TTYs)
- The Auxiliary (AUX) Port
- show line
- Reverse Telnet
- Common Configuration Items
Interface Commands
- Interface Commands
- Naming and Numbering Interfaces
- Basic Interface Configuration Commands
- The Loopback Interface
- The Null Interface
- Ethernet, Fast Ethernet, and Gigabit Ethernet Interfaces
- Token Ring Interfaces
- ISDN Interfaces
- Serial Interfaces
- Asynchronous Interfaces
- Interface show Commands
Networking Technologies
Access Lists
IP Routing Topics
- IP Routing Topics
- Autonomous System (AS) Numbers
- Interior and Exterior Gateway Protocols
- Distance-Vector and Link-State Routing Protocols
- Static Routes
- Split Horizon
- Passive Interfaces
- Fast Switching and Process Switching
Interior Routing Protocols
Border Gateway Protocol
- Border Gateway Protocol
- Introduction to BGP
- A Simple BGP Configuration
- Route Filtering
- An Advanced BGP Configuration
- Neighbor Authentication
- Peer Groups
- Route Reflectors
- BGP Confederacies
- BGP TTL Security
Quality of Service
- Quality of Service
- Marking
- Older Queuing Methods
- Modern IOS QoS Tools
- Congestion Avoidance
- Traffic Policing
- Traffic Shaping
- AutoQoS
- QoS Device Manager
Dial-on-Demand Routing
- Dial-on-Demand Routing
- Configuring a Simple DDR Connection
- Sample Legacy DDR Configurations
- Dialer Interfaces (Dialer Profiles)
- Multilink PPP
- Snapshot DDR
Specialized Networking Topics
- Specialized Networking Topics
- Bridging
- Hot Standby Routing Protocol (HSRP)
- Network Address Translation (NAT)
- Tunnels
- Encrypted Tunnels
- Multicast Routing
- Multiprotocol Label Switching (MPLS)
Switches and VLANs
- Switches and VLANs
- Switch Terminology
- IOS on Switches
- Basic Switch Configuration
- Trunking
- Switch Monitor Port for IDS or Sniffers
- Troubleshooting Switches
Router Security
- Router Security
- Securing Enable Mode Access
- Routine Security Measures
- Restricting Access to Your Router
Troubleshooting and Logging
Quick Reference
Appendix A Network Basics
Index
EAN: 2147483647
Pages: 1031
