Specific Topics
Here are a few ideas and tricks that will help you write access lists that are appropriate for your network.
7.3.1. Adding Comments to an Access List
You can add comments to access lists by using the remark keyword. Place any descriptive text you want after this keyword. Remarks work in named and numbered access lists.
access-list 110 remark Block traffic to 192.168.1.0. They cause trouble
access-list 110 deny ip 192.168.1.0 0.0.0.255 any
access-list 110 remark Worker bob surfs the internet all day, so stop him
access-list 110 deny tcp host 192.168.2.1 any eq www
7.3.2. Timed Access Lists
Sometimes, we want to control traffic based on the time of day. For example, we might want to prevent staff members from browsing the Web during work hours. So far, we don't have a way to do that aside from reconfiguring access lists every day at 8 A.M. and 5 P.M. IOS provides an easy solution to this problem. We can use the time-range command to establish a time range; then we can apply the time range to access list rules, establishing times when the rule is active.
For example, let's build a time range that includes working hours on weekdays:
! This is a global command
time-range block-http
 periodic weekdays 8:00 to 17:00
This time range has the name block-http and is periodic, which means that the time range repeats. (In contrast, an absolute time range has a single fixed starting and ending point.) Now, it is just a matter of adding the time range to a rule in an extended access list:
! Timed range works only in extended access lists
ip access-list extended list1
 ! block-http is the name of the time range we defined earlier
 deny tcp any any eq www time-range block-http
 permit any any
The first rule blocks all HTTP traffic whenever it is in effect; the time range block-http defines when the rule is active. The second rule allows all other traffic.
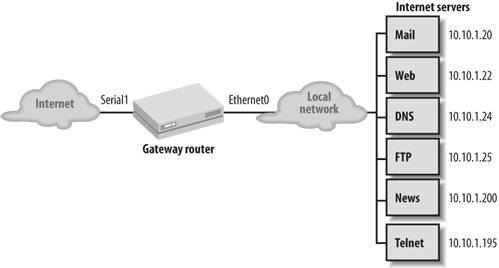
7.3.3. Building a Gateway Router
Figure 7-2 shows a common configuration in which a router serves as a gateway from a local network to the Internet. If a firewall is unavailable, adding an access list on this router can dramatically increase network security.
Figure 7-2. A gateway router
|

Before we build the list, we need to review some topics the list will cover.
7.3.3.1. IP address spoofing
IP spoofing is the act of forging network packets that appear to come from an internal IP address. Because most sites trust their internal hosts more than they trust hosts on the Internet, spoofing allows crackers to evade security restrictions that would otherwise keep them out. For example, packets with a spoofed (internal) IP address might make it through an access list that was designed to prevent access from hosts on the Internet. Once inside your network, these packets may be able to access services that shouldn't be available to the outside world.
Preventing spoofing attacks is relatively easy. Packets originating from our network should never arrive from the Internet or any other external network. Hence, we can easily set up an access list that blocks all IP traffic with our network addresses as the source address, then apply this list to incoming packets on our Internet interface. For example, if our network address is 198.168.10.0/24, the access list for spoofing would be:
! List to block spoofing
access-list 111 deny ip 198.168.10.0 0.0.0.255 any
access-list 111 permit ip any any

! Internet interface; to block spoofing, apply 111 to incoming packets
interface serial0
 ip access-group 111 in
This access list blocks any traffic with a source address in the 198.168.10.0/24 network.
Another suggestion is to apply an outgoing list that denies packets with source addresses that don't belong to our network. Doing so will keep users from within our network from spoofing to the outside.
7.3.3.2. Permitting FTP through an access list
FTP has a number of quirks that make it difficult to allow through an access list. "Classic" (nonpassive) FTP is a particular problem. A nonpassive connection proceeds as follows:
- The client requests an FTP session to the FTP server using port 21 (ftp), and the server authenticates.
- The FTP client sends a PORT command to the FTP server. This command tells the server which port to use for the session. The FTP client waits on this new port for the data.
- The server opens a new connection from port 20 (ftp-data) to the given port on the FTP client.
- The client and server can now communicate with each other on the new port.
The problem lies in the acceptance of the new port for the FTP session: as it arrives, the access list blocks it because it looks like a new incoming session, not an established one. The new port number for the connection is never known. Therefore, we need to add a line to the access list that allows incoming connections from the ftp-data port to any host on the network:
access-list 110 permit tcp any eq ftp-data any gt 1024
This line allows incoming FTP connections with two restrictions: the source must be a packet from the ftp-data port on any host, and the destination must be a host on the network with a port greater than 1024.
If you don't add this line to your gateway router's access list, your users will probably complain that they can't FTP to the outside world.
7.3.3.3. Passive FTP
Passive FTP is an alternative to traditional FTP that is supported by most clients and servers today. However, it isn't the default; you may need to configure the client to use passive mode when it initiates a connection. With passive FTP, the client sends a PASV command to the server instead of a PORT command. PASV tells the FTP server to communicate with the FTP client on the same port it is using. Thus, the incoming packets look like they belong to an established connection on the FTP port. If you use the established keyword in your access list rule for FTP (or if you have a more general rule that permits all established connections), it will allow the packets from the server back into your network.
The FTP client software must support the passive option for this to work. If you decide to go this route, you must configure all your internal network hosts to use passive FTP, which may prove to be quite a chore.
7.3.3.4. The actual access list
List 110 implements a simple access policy for our Internet gateway router:
! Block spoofing of our IP addresses
access-list 110 deny ip 10.10.1.0 0.0.0.255 any
!
! Permit any outgoing TCP connections to come back into our network
access-list 110 permit tcp any any established
!
! Allow email (SMTP port 25) to our SMTP server
access-list 110 permit tcp any host 10.10.1.20 eq smtp
!
! Allow web traffic (port 80) to our web server only
access-list 110 permit tcp any host 10.10.1.22 eq www
!
! Allow DNS traffic to our DNS server, both TCP and UDP
access-list 110 permit tcp any host 10.10.1.24 eq domain
access-list 110 permit udp any host 10.10.1.24 eq domain
!
! Allow Internal hosts to access the outside DNS server (192.168.1.100)
access-list 110 permit upd host 192.168.1.100 eq domain any gt 1023
!
! Allow FTP traffic to our FTP server
access-list 110 permit tcp any host 10.10.1.25 eq ftp
access-list 110 permit tcp any host 10.10.1.25 eq ftp-data
!
! Allow news only from legit NNTP servers to our internal NNTP client
access-list 110 permit tcp host 198.168.1.98 host 10.10.1.200 eq nntp
access-list 110 permit tcp host 192.168.1.99 host 10.10.1.200 eq nntp
!
! Allow telnet (port 23) to only one host!
access-list 110 permit tcp any host 10.10.1.195 eq telnet
!
! Some things we know we want to deny: Xwindows, NFS
access-list 110 deny tcp any any range 6000 6003
access-list 110 deny tcp any any range 2000 2003
access-list 110 deny tcp any any eq 2049
access-list 110 deny udp any any eq 2049
!
! Since we are doing nonpassive FTP on our FTP clients, we need the
! following line to allow their FTP sessions back in. If you have an
! FTP server, you have to create a separate entry for it.
access-list 110 permit tcp any eq ftp-data any gt 1024
!
! Allow ICMP into our network
! Warning! ICMP is more than just ping. If you decide to deny it, you
! should explictly deny specific ICMP types (echo, echo-reply, etc.).
! MTU path discovery and source quench rely on ICMP and are very
! important to some links.
! First disallow ICMP redirects broadcasts
access-list 110 deny icmp any any redirect
! Then allow everything else
access-list 110 permit icmp any any
!
! Allow NTP time messages to all our internal machines
access-list 110 permit udp any any eq ntp
!
! Implicit deny
! It is here by default, but we list it so that the show access-list
! command will show the number of packets blocked by the implicit deny.
access-list 110 deny ip any any
Apply the list to interface serial1 with the following commands:
interface serial1
 ip access-group 110 in
7.3.4. Optimizing Your Access Lists
You can list and view all access lists with the show access-list command. If you are interested in only one specific list, use the number of the list at the end of the show command:
Router#show access-list 124
Extended IP access list 124
 deny ip 10.10.1.0 0.0.0.255 any (1855 matches)
 permit tcp any any established (6105063 matches)
 permit tcp any host 10.10.1.20 eq smtp (10246 matches)
 permit tcp any host 10.10.1.21 eq pop3 (11220 matches)
 permit tcp any host 10.10.1.22 eq www (72583 matches)
At the end of each line, the router lists the number of times that particular access list rule has been matched. Bear in mind that the numbers are from the last router reboot or counter reset. You must check the number of matches several times over a long period before you get numbers that reflect your actual network traffic. Traffic fluctuates for many reasons, so you're really interested in long-term averages.
The number of matches is useful information because access lists are processed in order, and processing terminates with the last match. Putting the lines with the most matches at the beginning of the list reduces the load on the router because most matches will occur earlier. In this case, we can move the line allowing WWW connections higher in the list. Note, however, that this line can't become the first line in the list; in order to work effectively, the rule that prevents spoofing attacks must be applied to all incoming packets and therefore must be first in the list. There's a moral here: don't get too excited about optimizing your access lists. Think through the consequences of your changes. Here's how our reordered list would look:
! We can't change the first line: it is looking for spoofing and must be
! the first entry.
access-list 124 deny ip 10.10.1.0 0.0.0.255 any
access-list 124 permit tcp any any established
access-list 124 permit tcp any host 10.10.1.22 eq www
access-list 124 permit tcp any host 10.10.1.21 eq pop3
access-list 124 permit tcp any host 10.10.1.20 eq smtp
7.3.5. Emulating a Packet Sniffer
You can use some clever access list commands to emulate a simple packet sniffer that logs all traffic arriving at an interface. First, build an access list that catches all IP traffic. Then add a debug statement for the list (debugging is discussed in Chapter 16):
access-list 110 permit ip any any
debug ip packet 110
Now apply the list to an interface in both directions:
interface ethernet0
 ip access-group 110 in
 ip access-group 110 out
All traffic traveling across this interface will now be logged by the debug command. This example can be taken a few steps further by redirecting the debugging output to a syslog server; the commands for doing so are also covered in Chapter 16. (This can be dangerous: if the route to the syslog server goes through the interface you're trying to debug, you'll create an infinite loop.) When you are done sniffing traffic, turn off logging:
no debug ip packet 110
|
7.3.6. Logging Access List Violations
You can log access list violations with IP accounting:
ip accounting access-violations
You can also use the extended access list keywords log and log-input to log information about packets that attempt to violate an access list. The log keyword causes entries that match that line to be logged:
access-list 110 deny tcp any host 10.10.1.22 eq www log
The log-input keyword not only logs the packet, but also supplies the packet's source interface.
If you configure the router with the command logging buffered, you will be able to use the show log command to view the stored log entries.
7.3.7. Securely Updating Access Lists
The most secure method for modifying access lists is to shut down the router's interfaces, make your modifications, and then bring the interfaces back up. This method is unpopular for an obvious reason: no traffic is being routed while the lists are being edited. This means that your users will have a broken network while you're doing your work, and that's often unacceptable.
Another way to provide the same security without shutting down the interface is to let the access-group command handle it. At any time, an interface can have only one "in" and one "out" access list. For example:
interface ethernet 0
 ip address 10.10.1.1 255.255.255.0
 ip access-group 110 in
 ip access-group 115 out
Let's say we want to modify access list 110. To do this, we might shut down the interface, delete list 110, write a new list, and bring the interface back up. Alternatively, we could create a new list, 112, that reflects the changes we want. We can then apply the list to the interface with a single command:
interface ethernet 0
 ip access-group 112 in
There is no need to do a no access-group 110 in, because the router automatically replaces list 110 with list 112. Since this happens in real time, the change is immediate and there is no need to shut down the interface. List 110 still exists, but it's inactive. You should probably delete it so it won't confuse you later. Happily, you can now delete it without inconveniencing your users.
The only drawback to this trick is that it can be confusing to network administrators, since your access list numbers change every time you edit the list. However, that's a small price to pay for satisfied users.
7.3.8. Getting the List to a Router with TFTP, RCP, or SCP
When you need to edit an access list, you can TFTP the router's configuration from the router to the TFTP server, edit the configuration on the server, and then TFTP the access list back to the router. This technique lets you use a familiar editor to modify your access lists, which is much more reliable than trying to type access lists directly into the router's configuration.
Here's an outline of the steps:
- TFTP, RCP, or SCP the entire configuration to your server:
Router#copy running-config tftp
- Edit the configuration file, removing everything except the access lists.
- Add a no access-list command before each access list in the file:
no access-list 10
access-list 10 deny 1.2.3.4 1.5.6.7
- Edit the access lists and save the file so you do not have to repeat Steps 1-3 in the future.
- Use TFTP, RCP, or SCP to copy the file back to your router. This file contains only the access lists, not the entire router configuration. It deletes each access list, then creates a new access list with the desired configuration.
Router#copy tftp running-config
- Once you are satisfied that the modified access lists work, save the running configuration:
Router#copy running-config startup-config
Getting Started
- Getting Started
- IOS User Modes
- Command-Line Completion
- Get to Know the Question Mark
- Command-Line Editing Keys
- Pausing Output
- show Commands
IOS Images and Configuration Files
- IOS Images and Configuration Files
- IOS Image Filenames
- The New Cisco IOS Packaging Model
- Loading Image Files Through the Network
- Using the IOS Filesystem for Images
- The Routers Configuration
- Loading Configuration Files
Basic Router Configuration
- Basic Router Configuration
- Setting the Router Name
- Setting the System Prompt
- Configuration Comments
- The Enable Password
- Mapping Hostnames to IP Addresses
- Setting the Routers Time
- Enabling SNMP
- Cisco Discovery Protocol
- System Banners
Line Commands
- Line Commands
- The line Command
- The Console Port
- Virtual Terminals (VTYs)
- Asynchronous Ports (TTYs)
- The Auxiliary (AUX) Port
- show line
- Reverse Telnet
- Common Configuration Items
Interface Commands
- Interface Commands
- Naming and Numbering Interfaces
- Basic Interface Configuration Commands
- The Loopback Interface
- The Null Interface
- Ethernet, Fast Ethernet, and Gigabit Ethernet Interfaces
- Token Ring Interfaces
- ISDN Interfaces
- Serial Interfaces
- Asynchronous Interfaces
- Interface show Commands
Networking Technologies
Access Lists
IP Routing Topics
- IP Routing Topics
- Autonomous System (AS) Numbers
- Interior and Exterior Gateway Protocols
- Distance-Vector and Link-State Routing Protocols
- Static Routes
- Split Horizon
- Passive Interfaces
- Fast Switching and Process Switching
Interior Routing Protocols
Border Gateway Protocol
- Border Gateway Protocol
- Introduction to BGP
- A Simple BGP Configuration
- Route Filtering
- An Advanced BGP Configuration
- Neighbor Authentication
- Peer Groups
- Route Reflectors
- BGP Confederacies
- BGP TTL Security
Quality of Service
- Quality of Service
- Marking
- Older Queuing Methods
- Modern IOS QoS Tools
- Congestion Avoidance
- Traffic Policing
- Traffic Shaping
- AutoQoS
- QoS Device Manager
Dial-on-Demand Routing
- Dial-on-Demand Routing
- Configuring a Simple DDR Connection
- Sample Legacy DDR Configurations
- Dialer Interfaces (Dialer Profiles)
- Multilink PPP
- Snapshot DDR
Specialized Networking Topics
- Specialized Networking Topics
- Bridging
- Hot Standby Routing Protocol (HSRP)
- Network Address Translation (NAT)
- Tunnels
- Encrypted Tunnels
- Multicast Routing
- Multiprotocol Label Switching (MPLS)
Switches and VLANs
- Switches and VLANs
- Switch Terminology
- IOS on Switches
- Basic Switch Configuration
- Trunking
- Switch Monitor Port for IDS or Sniffers
- Troubleshooting Switches
Router Security
- Router Security
- Securing Enable Mode Access
- Routine Security Measures
- Restricting Access to Your Router
Troubleshooting and Logging
Quick Reference
Appendix A Network Basics
Index
EAN: 2147483647
Pages: 1031
