Tunnels
Tunnels take packets from one network, encapsulate them within an IP protocol, and transfer them to another network. This sounds inefficient, and in a sense it is. Why would you want to take perfectly good packets, wrap them up in some other protocol, send them to another location, and unwrap them? For two reasons. First, many protocols can't be routed. If you want to connect two sites using nonroutable protocols, the only way to do so is to wrap the nonroutable protocols within a routable protocol, such as IP. Second, it's increasingly common to use the Internet to connect remote sites to a central office. But this connection has its perils, the most significant of which is security. Do you really want corporate data flowing over the public Internet? To minimize security problems, you can establish a tunnel between the offices and then encrypt all the traffic on the tunnel.
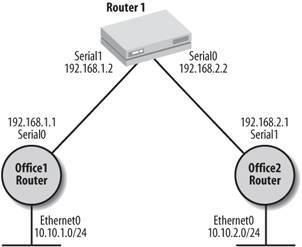
In this section, we'll first look at how to establish a tunnel, then at how to encrypt the traffic traveling over the tunnel. We won't discuss encapsulating nonroutable protocols within IP in any detail. Figure 13-3 shows two offices connected by an ISP. The ISP has assigned two IP addresses for our use: 192.168.1.1 and 192.168.2.1. The network numbers used by Offices 1 and 2 are 10.10.1.0/24 and 10.10.2.0/24, respectively.
Here's the configuration for Office 1:
Figure 13-3. A tunnel through an ISP
 hostname Office1
 !
 ! Configure the interface tunnel
 interface tunnel1
 ! Use an unnummbered IP address to stay in sync with serial0 and make our
 ! configuration easier
 ip unnumbered serial0
 ! Set up the tunnel's source IP and destination IP, and enable checksums
 tunnel source serial0
 tunnel destination 192.168.2.1
 tunnel checksum
 ! GRE IP is the default tunnel mode, so this command is optional
 ! GRE IP stands for Generic Route Encapsulation over IP
 tunnel mode gre ip
 no shutdown
 !
 ! Configure the serial interface
 interface serial0
 ip address 192.168.1.1 255.255.255.0
 no shutdown
 !
 ! Our ISP is our default route
 ip route 0.0.0.0 0.0.0.0 192.168.1.2
 ! Set up a static route to the other side of the tunnel
 ip route 10.10.2.0 255.255.255.0 tunnel1
The trickiest part of the configuration is the routing. We set up a static default route, and then set up a more specific static route that sends any traffic destined for 10.10.2.0 through the tunnel.
Here's the configuration for Office 2; it's very similar to that for Office 1:
 hostname Office2
 !
 ! Configure the interface tunnel
 ! We used a different name here (tunnel2) just to show that they
 ! don't have to match.
 interface tunnel2
 ! Use an unnummbered IP address to stay in sync with serial0 and make our
 ! configuration easier
 ip unnumbered serial1
 ! Set up the tunnel's source IP and destination IP, and enable checksums
 tunnel source serial1
 tunnel destination 192.168.1.1
 tunnel checksum
 ! GRE IP is the default tunnel mode, so this command is optional
 ! GRE IP stands for Generic Route Encapsulation over IP
 tunnel mode gre ip
 no shutdown
 !
 ! Configure the serial interface
 interface serial1
 ip address 192.168.2.1 255.255.255.0
 !
 ! Default route
 ip route 0.0.0.0 0.0.0.0 192.168.2.2
 ! Set up a static route to the other side of the tunnel
 ip route 10.10.1.0 255.255.255.0 tunnel1
We can ping Office 2 from Office 1 using the tunnel:
 Office1#ping 10.10.2.1

 Type escape sequence to abort.
 Sending 5, 100-byte ICMP Echos to 10.10.2.1, timeout is 2 seconds:
 !!!!!
 Success rate is 100 percent (5/5), round-trip min/avg/max = 68/68/68 ms
13.4.1. show Commands for Tunnels
The most useful show commands for tunnels are two that we've already seen: show ip route and show interface. This makes sensetunnels are really just special interfaces, and the most difficult problem with creating tunnels is getting the routing to work correctly.
The command show ip route shows that we have an active route for the 10.10.2.0 network through the tunnel1 interface:
 office1#show ip route
 Codes: C - connected, S - static, I - IGRP, R - RIP, M - mobile, B - BGP
 D - EIGRP, EX - EIGRP external, O - OSPF, IA - OSPF inter area
 N1 - OSPF NSSA external type 1, N2 - OSPF NSSA external type 2
 E1 - OSPF external type 1, E2 - OSPF external type 2, E - EGP
 i - IS-IS, L1 - IS-IS level-1, L2 - IS-IS level-2, * - candidate default
 U - per-user static route, o - ODR

 Gateway of last resort is 192.168.1.2 to network 0.0.0.0

 10.0.0.0/24 is subnetted, 2 subnets
 C 10.10.1.0 is directly connected, Ethernet0
 S 10.10.2.0 is directly connected, Tunnel1
 C 192.168.1.0/24 is directly connected, Serial0
 S* 0.0.0.0/0 [1/0] via 192.168.1.2
The command show interface tunnel1 gives results like any other show interface command. We see that the interface is up, the hardware associated with the interface is Tunnel (i.e., this is a virtual interface rather than a specific hardware interface), the encapsulation is TUNNEL, and the source and destination ports are properly set.
 office1#show interface tunnel 1
 Tunnel1 is up, line protocol is up
 Hardware is Tunnel
 Interface is unnumbered. Using address of Serial0 (192.168.1.1)
 MTU 1514 bytes, BW 9 Kbit, DLY 500000 usec, rely 255/255, load 1/255
 Encapsulation TUNNEL, loopback not set, keepalive set (10 sec)
 Tunnel source 192.168.1.1 (Serial0), destination 192.168.2.1
 Tunnel protocol/transport GRE/IP, key disabled, sequencing disabled
 Checksumming of packets enabled, fast tunneling enabled
 Last input never, output never, output hang never
 Last clearing of "show interface" counters never
 Queueing strategy: fifo
 Output queue 0/0, 0 drops; input queue 0/75, 0 drops
 5 minute input rate 0 bits/sec, 0 packets/sec
 5 minute output rate 0 bits/sec, 0 packets/sec
 0 packets input, 0 bytes, 0 no buffer
 Received 0 broadcasts, 0 runts, 0 giants, 0 throttles
 0 input errors, 0 CRC, 0 frame, 0 overrun, 0 ignored, 0 abort
 0 packets output, 0 bytes, 0 underruns
 0 output errors, 0 collisions, 0 interface resets
 0 output buffer failures, 0 output buffers swapped out
Getting Started
- Getting Started
- IOS User Modes
- Command-Line Completion
- Get to Know the Question Mark
- Command-Line Editing Keys
- Pausing Output
- show Commands
IOS Images and Configuration Files
- IOS Images and Configuration Files
- IOS Image Filenames
- The New Cisco IOS Packaging Model
- Loading Image Files Through the Network
- Using the IOS Filesystem for Images
- The Routers Configuration
- Loading Configuration Files
Basic Router Configuration
- Basic Router Configuration
- Setting the Router Name
- Setting the System Prompt
- Configuration Comments
- The Enable Password
- Mapping Hostnames to IP Addresses
- Setting the Routers Time
- Enabling SNMP
- Cisco Discovery Protocol
- System Banners
Line Commands
- Line Commands
- The line Command
- The Console Port
- Virtual Terminals (VTYs)
- Asynchronous Ports (TTYs)
- The Auxiliary (AUX) Port
- show line
- Reverse Telnet
- Common Configuration Items
Interface Commands
- Interface Commands
- Naming and Numbering Interfaces
- Basic Interface Configuration Commands
- The Loopback Interface
- The Null Interface
- Ethernet, Fast Ethernet, and Gigabit Ethernet Interfaces
- Token Ring Interfaces
- ISDN Interfaces
- Serial Interfaces
- Asynchronous Interfaces
- Interface show Commands
Networking Technologies
Access Lists
IP Routing Topics
- IP Routing Topics
- Autonomous System (AS) Numbers
- Interior and Exterior Gateway Protocols
- Distance-Vector and Link-State Routing Protocols
- Static Routes
- Split Horizon
- Passive Interfaces
- Fast Switching and Process Switching
Interior Routing Protocols
Border Gateway Protocol
- Border Gateway Protocol
- Introduction to BGP
- A Simple BGP Configuration
- Route Filtering
- An Advanced BGP Configuration
- Neighbor Authentication
- Peer Groups
- Route Reflectors
- BGP Confederacies
- BGP TTL Security
Quality of Service
- Quality of Service
- Marking
- Older Queuing Methods
- Modern IOS QoS Tools
- Congestion Avoidance
- Traffic Policing
- Traffic Shaping
- AutoQoS
- QoS Device Manager
Dial-on-Demand Routing
- Dial-on-Demand Routing
- Configuring a Simple DDR Connection
- Sample Legacy DDR Configurations
- Dialer Interfaces (Dialer Profiles)
- Multilink PPP
- Snapshot DDR
Specialized Networking Topics
- Specialized Networking Topics
- Bridging
- Hot Standby Routing Protocol (HSRP)
- Network Address Translation (NAT)
- Tunnels
- Encrypted Tunnels
- Multicast Routing
- Multiprotocol Label Switching (MPLS)
Switches and VLANs
- Switches and VLANs
- Switch Terminology
- IOS on Switches
- Basic Switch Configuration
- Trunking
- Switch Monitor Port for IDS or Sniffers
- Troubleshooting Switches
Router Security
- Router Security
- Securing Enable Mode Access
- Routine Security Measures
- Restricting Access to Your Router
Troubleshooting and Logging
Quick Reference
Appendix A Network Basics
Index
EAN: 2147483647
Pages: 1031
