Printing Text
So far we have printed simple text and graphics items from the program itself. How about reading a text file and printing it from our program? Do you remember the GDI+ editor from Chapter 5? We can make the editor open a text file and add print functionality to print the text file. In this section we will read a text file and print it.
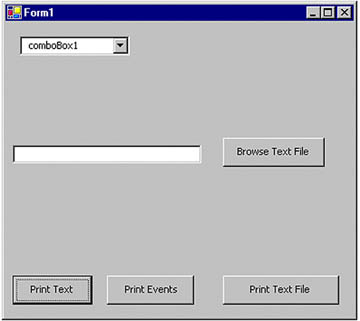
As usual, we create a Windows application and add a reference to the System.Drawing.Printing namespace. We then add a text box and four buttons to the form. We also change the Name and Text properties of the button controls. The final form looks like Figure 11.12. As you might guess, the Browse Text File button allows us to browse for text files.
Figure 11.12. The form with text file printing options
The code for the Browse Text File button is given in Listing 11.21. This button allows you to browse a file and adds the selected file name to the text box. Clicking the Print Text File button prints the selected text file. We use an OpenFileDialog object to open a text file and set textBox1.Text as the selected file name. The functionality of the Print Text and Print Events buttons is obvious.
Note
C# Corner's FAQ (http://www.c-sharpcorner.com/faq.asp) includes a long list of .NET how-tos and frequently asked questions and contains the code for these simple functionalities.
Listing 11.21 The Browse Text File button click event handler
private void BrowseBtn_Click(object sender,
 System.EventArgs e)
{
 // Create an OpenFileDialog object
 OpenFileDialog fdlg = new OpenFileDialog();
 // Set its properties
 fdlg.Title = "C# Corner Open File Dialog" ;
 fdlg.InitialDirectory = @"c:" ;
 fdlg.Filter =
 "Text files (*.txt)|*.txt|All files (*.*)|*.*" ;
 fdlg.FilterIndex = 2 ;
 fdlg.RestoreDirectory = true ;
 // Show dialog and set the selected file name
 // as the text of the text box
 if(fdlg.ShowDialog() == DialogResult.OK)
 {
 textBox1.Text = fdlg.FileName ;
 }
}
Now let's add code for the Print Text File button click. First we add two private variables to the application as follows:
private Font verdana10Font;
private StreamReader reader;
Then we proceed as shown in Listing 11.22. The code is pretty simple. First we make sure that the user has selected a file name. Then we create a StreamReader object and read the file by passing the file name as the only argument. Next we create a font with font family Verdana and size 10 (see Chapter 5 for more on fonts). After that we create a PrintDocument object, add a PrintPage event handler, and call the Print method. The rest is done by the PrintPage event handler.
Note
The StreamReader class is defined in the System.IO namespace.
Listing 11.22 The Print Text File button click event handler
 private void PrintTextFile_Click(object sender,
 System.EventArgs e)
{
 // Get the file name
 string filename = textBox1.Text.ToString();
 // Check if it's not empty
 if(filename.Equals(string.Empty))
 {
 MessageBox.Show("Enter a valid file name");
 textBox1.Focus();
 return;
 }
 // Create a StreamReader object
 reader = new StreamReader(filename);
 // Create a Verdana font with size 10
 verdana10Font = new Font("Verdana", 10);
 // Create a PrintDocument object
 PrintDocument pd = new PrintDocument();
 // Add PrintPage event handler
 pd.PrintPage += new PrintPageEventHandler
 (this.PrintTextFileHandler);
 // Call Print method
 pd.Print();
 // Close the reader
 if(reader != null)
 reader.Close();
}
The code for the PrintPage event handler PrintTextFileHandler is given in Listing 11.23. Here we read one line at a time from the text file, using the StreamReader.ReadLine method, and call DrawString, which prints each line until we reach the end of the file. To give the text a defined size, we use the verdana10Font.GetHeight method.
Note
See Chapter 3 and 5 for details about the DrawString method and fonts, respectively.
Listing 11.23 Adding a print-page event handler
private void PrintTextFileHandler(object sender,
 PrintPageEventArgs ppeArgs)
{
 // Get the Graphics object
 Graphics g = ppeArgs.Graphics;
 float linesPerPage = 0;
 float yPos = 0;
 int count = 0;
 // Read margins from PrintPageEventArgs
 float leftMargin = ppeArgs.MarginBounds.Left;
 float topMargin = ppeArgs.MarginBounds.Top;
 string line = null;
 // Calculate the lines per page on the basis of
 // the height of the page and the height of
 // the font
 linesPerPage = ppeArgs.MarginBounds.Height /
 verdana10Font.GetHeight(g);
 // Now read lines one by one, using StreamReader
 while(count < linesPerPage &&
 ((line = reader.ReadLine()) != null))
 {
 // Calculate the starting position
 yPos = topMargin + (count *
 verdana10Font.GetHeight(g));
 // Draw text
 g.DrawString(line, verdana10Font, Brushes.Black,
 leftMargin, yPos, new StringFormat());
 // Move to next line
 count++;
 }
 // If PrintPageEventArgs has more pages
 // to print
 if(line != null)
 ppeArgs.HasMorePages = true;
 else
 ppeArgs.HasMorePages = false;
}
You should be able to add code for the Print Text and Print Events buttons yourself. Their functionality should be obvious.
Now run the application, browse a text file, and hit the Print Text File button, and you should be all set.
Note
Using the same method, you can easily add printing functionality to the GDI+ editor. You can add a menu item called Print to the editor that will print an opened text file.
GDI+: The Next-Generation Graphics Interface
- GDI+: The Next-Generation Graphics Interface
- Understanding GDI+
- Exploring GDI+ Functionality
- GDI+ from a GDI Perspective
- GDI+ Namespaces and Classes in .NET
- Summary
Your First GDI+ Application
- Your First GDI+ Application
- Drawing Surfaces
- The Coordinate System
- Tutorial: Your First GDI+ Application
- Some Basic GDI+ Objects
The Graphics Class
- The Graphics Class
- Graphics Class Properties
- Graphics Class Methods
- The GDI+Painter Application
- Drawing a Pie Chart
Working with Brushes and Pens
- Working with Brushes and Pens
- Understanding and Using Brushes
- Using Pens in GDI+
- Transformation with Pens
- Transformation with Brushes
- System Pens and System Brushes
- A Real-World Example: Adding Colors, Pens, and Brushes to the GDI+Painter Application
Colors, Fonts, and Text
- Colors, Fonts, and Text
- Accessing the Graphics Object
- Working with Colors
- Working with Fonts
- Working with Text and Strings
- Rendering Text with Quality and Performance
- Advanced Typography
- A Simple Text Editor
- Transforming Text
Rectangles and Regions
- Rectangles and Regions
- The Rectangle Structure
- The Region Class
- Regions and Clipping
- Clipping Regions Example
- Regions, Nonrectangular Forms, and Controls
Working with Images
- Working with Images
- Raster and Vector Images
- Working with Images
- Manipulating Images
- Playing Animations in GDI+
- Working with Bitmaps
- Working with Icons
- Skewing Images
- Drawing Transparent Graphics Objects
- Viewing Multiple Images
- Using a Picture Box to View Images
- Saving Images with Different Sizes
Advanced Imaging
- Advanced Imaging
- Rendering Partial Bitmaps
- Working with Metafiles
- Color Mapping Using Color Objects
- Image Attributes and the ImageAttributes Class
- Encoder Parameters and Image Formats
Advanced 2D Graphics
- Advanced 2D Graphics
- Line Caps and Line Styles
- Understanding and Using Graphics Paths
- Graphics Containers
- Reading Metadata of Images
- Blending Explained
- Alpha Blending
- Miscellaneous Advanced 2D Topics
Transformation
- Transformation
- Coordinate Systems
- Transformation Types
- The Matrix Class and Transformation
- The Graphics Class and Transformation
- Global, Local, and Composite Transformations
- Image Transformation
- Color Transformation and the Color Matrix
- Matrix Operations in Image Processing
- Text Transformation
- The Significance of Transformation Order
Printing
- Printing
- A Brief History of Printing with Microsoft Windows
- Overview of the Printing Process
- Your First Printing Application
- Printer Settings
- The PrintDocument and Print Events
- Printing Text
- Printing Graphics
- Print Dialogs
- Customizing Page Settings
- Printing Multiple Pages
- Marginal Printing: A Caution
- Getting into the Details: Custom Controlling and the Print Controller
Developing GDI+ Web Applications
- Developing GDI+ Web Applications
- Creating Your First ASP.NET Web Application
- Your First Graphics Web Application
- Drawing Simple Graphics
- Drawing Images on the Web
- Drawing a Line Chart
- Drawing a Pie Chart
GDI+ Best Practices and Performance Techniques
- GDI+ Best Practices and Performance Techniques
- Understanding the Rendering Process
- Double Buffering and Flicker-Free Drawing
- Understanding the SetStyle Method
- The Quality and Performance of Drawing
GDI Interoperability
Miscellaneous GDI+ Examples
- Miscellaneous GDI+ Examples
- Designing Interactive GUI Applications
- Drawing Shaped Forms and Windows Controls
- Adding Copyright Information to a Drawn Image
- Reading and Writing Images to and from a Stream or Database
- Creating Owner-Drawn List Controls
Appendix A. Exception Handling in .NET
