Blending Explained
If you have experience working with graphics, you may have heard some terms related to blending. Blending, alpha blending, and color blending are a few of these. In general, blending refers to mixing or combining two colors: a source color and a background color. The resulting blended color is used to draw graphics shapes, lines, and curves.
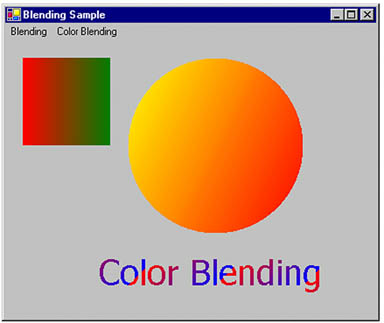
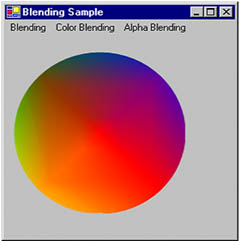
In this chapter blending is divided into three categories: color blending, alpha blending, and mixed blending. Color blending, which produces what are known as color gradients, involves drawing and filling graphics shapes, lines, and curves starting with a color at one end and finishing with another color at the other end. Figure 9.26 shows a good example of color blending.
Figure 9.26. Color blending examples
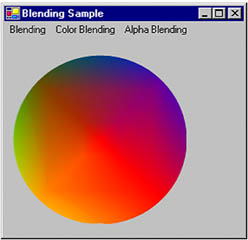
Alpha blending is used to draw and fill transparent shapes, lines, and curves. Pens and brushes are used to create alpha blending. First we create a pen or brush using the alpha component value as the color of a brush or pen, and then we use that brush or pen to fill and draw shapes, lines, and curves. Semitransparent or translucent graphics shapes, lines, and curves are examples of alpha blending. For example, Figure 9.27 contains three lines with opaque and semitransparent colors, and a string with semitransparent color on top of an imagea perfect example of alpha blending.
Figure 9.27. Transparent graphics shapes in an image using alpha blending
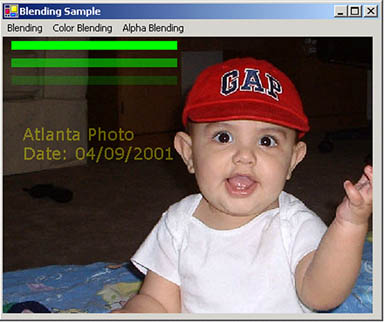
Note
Images in this book are not colored, so you may not see the exact effects described in the text. To see the exact effects, run the sample code.
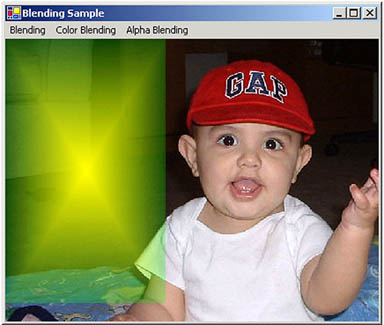
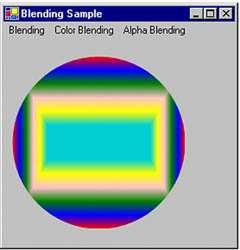
Mixed blending is probably a new concept to most readers. You won't find it mentioned in the MSDN documentation. Mixed blending is a combination of color and alpha blending. Figure 9.28 shows an example. If you run the sample code, you will see that the output consists of not only a transparent image, but also a color blending sample.
Figure 9.28. Mixed blending effects
9.5.1 Color Blending
Gradient brushes play a major role in color blending. LinearGradientBrush and PathGradientBrush both represent brush objects with color blending.
As we discussed in Chapter 4, a linear gradient brush is a brush with two colors: a starting color and an ending color. A path gradient brush is used to fill graphics paths. Instead of starting a color from one end, the path gradient brush starts a color from the center of the path and ends with the second color at the outer boundary of the path.
A blend pattern is a combination of two colors (a starting color and an ending color) defined by factors and positions. The Blend class represents a blend pattern in the .NET Framework. It provides two properties: Factors and Positions. The Factors property specifies the percentage of the starting color and the ending color to be used at the corresponding position. The Positions property specifies the percentages of distance for each gradation of color along the gradient line. The values of Factors and Positions must be between 0 and 1, where 0 represents the starting position and 1 represents the ending position. For example, 0.4f specifies that a point is 40 percent of the total distance from the starting point.
After creating a Blend object, you can attach it to a linear gradient brush by setting the Blend property of the LinearGradientBrush object. In Listing 9.18 we create a Blend object and its Factors and Positions properties, and then we set the Blend property of the LinearGradientBrush object. We can use this brush to fill graphics shapes.
Listing 9.18 Creating a Blend object and setting its Factors and Positions properties
LinearGradientBrush brBrush = new LinearGradientBrush(
 new Point(0, 0), new Point(50, 20),
 Color.Blue, Color.Red);
Blend blend = new Blend();
float[] factArray = {0.0f, 0.3f, 0.5f, 1.0f};
float[] posArray = {0.0f, 0.2f, 0.6f, 1.0f};
blend.Factors = factArray;
blend.Positions = posArray;
brBrush.Blend = blend;
The ColorBlend class defines arrays of colors and positions used for interpolating color blending in a multicolor gradient. The Positions property, an array of floating points (values vary between 0.0 and 1.0), represents the positions of the colors along a gradient line; and the Colors property, an array of Color objects, represents the color to use at corresponding positions. Each position defined in Positions has a corresponding color in the Colors array. Hence if six positions are defined in the Positions array, the Colors array will have six Color objects.
To use a ColorBlend object, create the object and set its Positions and Colors properties, as shown in Listing 9.19. The InterpolationColors property of the LinearGradientBrush and PathGradientBrush classes uses the ColorBlend object.
Listing 9.19 Creating a ColorBlend object and setting its Colors and Positions properties
LinearGradientBrush brBrush = new LinearGradientBrush(
 new Point(0, 0), new Point(50, 20),
 Color.Blue, Color.Red);
// Create color and points arrays
Color[] clrArray =
{
 Color.Red, Color.Blue, Color.Green,
 Color.Pink, Color.Yellow,
 Color.DarkTurquoise
};
float[] posArray =
{
 0.0f, 0.2f, 0.4f,
 0.6f, 0.8f, 1.0f
};
// Create a ColorBlend object and set its Colors and
// Positions properties
ColorBlend colorBlend = new ColorBlend();
colorBlend.Colors = clrArray;
colorBlend.Positions = posArray;
brBrush.InterpolationColors = colorBlend;
9.5.2 Blending Using LinearGradientBrush Objects
The LinearGradientBrush object represents a linear gradient brush, which lets us specify the starting and ending colors, and the starting and ending points, of the gradient pattern.
Note
See Chapter 4 for more detail on brushes and pens.
The linear gradient brushes work differently from solid and hatch brushes. For solid and hatch brushes, an application creates a brush and uses the brush to fill graphics shapes; the brush pattern applies to the entire shape. For linear gradient brushes, an application creates a linear gradient brush with a rectangle. The rectangle passed in the constructor of the LinearGradientBrush object defines the boundaries of a gradient pattern. For example, Listing 9.20 creates a linear gradient brush with starting point (0, 0), ending point (50, 50), starting color red, and ending color green. Then the code fills a rectangle starting at point (0, 0) and ending at point (200, 50):
Listing 9.20 Creating a LinearGradientBrush object
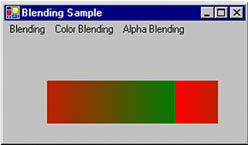
LinearGradientBrush rgBrush =
new LinearGradientBrush
(
 new RectangleF(0, 0, 50, 50),
 Color.Red, Color.Green,
 LinearGradientMode.Horizontal
);
g.FillRectangle(rgBrush, 0, 0, 200, 50);
Figure 9.29 shows the output from Listing 9.20. After point (50, 50) the gradient pattern repeats itself.
Figure 9.29. Using linear gradient brushes

Now let's create one more linear gradient brush using code from Listing 9.21. The brush's range is greater, and the rectangle starts at point (50, 50), with height and width 200 and 50, respectively.
Listing 9.21 Setting a brush's rectangle
LinearGradientBrush rgBrush =
new LinearGradientBrush
(
 new RectangleF(0, 0, 200, 200),
 Color.Red, Color.Green,
 LinearGradientMode.Horizontal
);
g.FillRectangle(rgBrush, 50, 50, 200, 50);
As the output of Listing 9.21 shows (see Figure 9.30), the pattern repeats after it crosses point (200, 200).
Figure 9.30. Using a rectangle in the linear gradient brush
The LinearGradientBrush class also provides two methodsSetBlendTriangularShape and SetSigmaBellShapewhich can be used to set gradient properties. SetBlendTriangularShape creates a gradient with a center color and a linear falloff color. This method takes two parametersrepresenting focus and scaleboth floating point values that vary from 0 to 1. The focus parameter is optional. Listing 9.22 shows the SetBlendTriangularShape method being used.
Listing 9.22 Using the SetBlendTriangularShape method
private void SetBlendTriangularShapeMenu_Click(object sender,
 System.EventArgs e)
{
 Graphics g = this.CreateGraphics();
 g.Clear(this.BackColor);
 // Create a rectangle
 Rectangle rect = new Rectangle(20, 20, 100, 50);
 // Create a linear gradient brush
 LinearGradientBrush rgBrush =
 new LinearGradientBrush(
 rect, Color.Red, Color.Green,
 0.0f, true);
 // Fill rectangle
 g.FillRectangle(rgBrush, rect);
 rect.Y = 90;
 // Set blend triangular shape
 rgBrush.SetBlendTriangularShape(0.5f, 1.0f);
 // Fill rectangle again
 g.FillRectangle(rgBrush, rect);
 // Dispose of object
 g.Dispose();
}
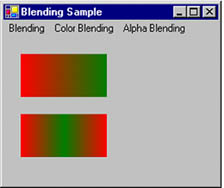
Figure 9.31 shows the output from Listing 9.22. The first image starts with red and ends with green; the second image has green as the center, and red as both the starting and the ending edge color.
Figure 9.31. Using the SetBlendTriangularShape method
The SetSigmaBellShape method creates a gradient falloff based on a bell-shaped curve. Much like SetBlendTriangularShape, this method takes two parametersrepresenting focus and scale (the focus parameter is optional)whose values vary from 0 to 1. Listing 9.23 shows the SetSigmaBellShape method being used.
Listing 9.23 Using the SetSigmaBellShape method
private void SetSigmaBellShapeMenu_Click(object sender,
 System.EventArgs e)
{
 Graphics g = this.CreateGraphics();
 g.Clear(this.BackColor);
 // Create a rectangle
 Rectangle rect = new Rectangle(20, 20, 100, 50);
 // Create a linear gradient brush
 LinearGradientBrush rgBrush =
 new LinearGradientBrush(
 rect, Color.Red, Color.Green,
 0.0f, true);
 // Fill rectangle
 g.FillRectangle(rgBrush, rect);
 rect.Y = 90;
 // Set signma bell shape
 rgBrush.SetSigmaBellShape(0.5f, 1.0f);
 // Fill rectangle again
 g.FillRectangle(rgBrush, rect);
 // Dispose of object
 g.Dispose();
}
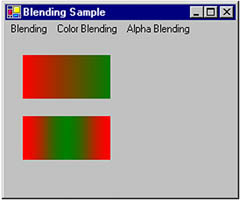
Figure 9.32 shows the output from Listing 9.23. The first image starts with red and ends with green. After the sigma bell shape is set, the image's center is green, and its starting and ending edges are red.
Figure 9.32. Using the SetSigmaBellShape method
Now let's compare the effects of SetSigmaBellShape and SetBlendTriangularShape. Listing 9.24 draws three rectangles: one using the LinearGradient brush with no effects, one using SetSigmaBellShape, and one using SetBlendTriangularShape.
Listing 9.24 Comparing the effects of SetBlendTriangularShape and SetSigmaBellShape
private void CompBlendTSigmaBell_Click(object sender,
 System.EventArgs e)
{
 Graphics g = this.CreateGraphics();
 g.Clear(this.BackColor);
 // Create a rectangle
 Rectangle rect = new Rectangle(0, 0, 40, 20);
 // Create a linear gradient brush
 LinearGradientBrush rgBrush =
 new LinearGradientBrush(
 rect, Color.Black, Color.Blue,
 0.0f, true);
 // Fill rectangle
 g.FillRectangle(rgBrush,
 new Rectangle(10, 10, 300, 100));
 // Set sigma bell shape
 rgBrush.SetSigmaBellShape(0.5f, 1.0f);
 // Fill rectangle again
 g.FillRectangle(rgBrush,
 new Rectangle(10, 120, 300, 100));
 // Set blend triangular shape
 rgBrush.SetBlendTriangularShape(0.5f, 1.0f);
 // Fill rectangle again
 g.FillRectangle(rgBrush,
 new Rectangle(10, 240, 300, 100));
 // Dispose of object
 g.Dispose();
}
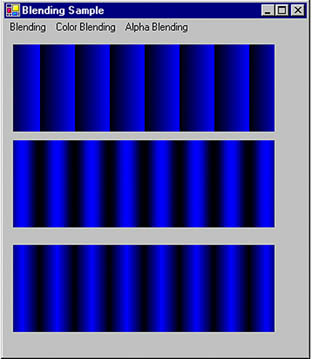
Figure 9.33 shows the output from Listing 9.24. The first image is the original image, the second image is a sigma bell shape, and the third image is a blend triangular shape. SetBlendTriangularShape produces a glassy effect in the center of the color, and SetSigmaBellShape produces a faded effect.
Figure 9.33. Comparing the effects of SetBlendTriangularShape and SetSigmaBellShape
The first parameter of SetBlendTriangularShape and SetSigmaBellShape represents the center of the gradient (color), which varies between 0.0f and 1.0f, where 0.0f is the starting point and 1.0f is the ending point of the gradient.
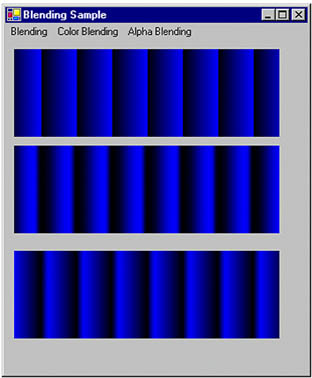
Now let's change the center of the gradient by modifying the two relevant lines of Listing 9.24 as follows:
rgBrush.SetSigmaBellShape(0.8f, 1.0f);
rgBrush.SetBlendTriangularShape(0.2f, 1.0f);
The new output looks like Figure 9.34. The center of the gradient in the second and third images is visibly different.
Figure 9.34. Setting the center of a gradient
9.5.3 Adding Multicolor Support to Gradients
So far in this section, we have been using only two colors (the default supported by LinearGradientBrush). What if we want to use more than two colors? No problem!
The LinearGradientBrush class provides properties that are useful for blending. Two of these properties are InterpolationColors and Blend. The Blend property is represented by the Blend object, and InterpolationColors is represented by the ColorBlend object. To apply multicolor gradients, simply create Blend and ColorBlend objects, attach these objects to a LinearGradientBrush object, and use the brush to fill shapes.
Listing 9.25 creates a ColorBlend object, sets its Colors and Positions properties, and sets the InterpolationColors property of the brush.
Listing 9.25 Using the InterpolationColors property of LinearGradientBrush
private void InterpolationColorsMenu_Click
 (object sender, System.EventArgs e)
{
 Graphics g = this.CreateGraphics();
 g.Clear(this.BackColor);
 // Create a LinearGradientBrush object
 LinearGradientBrush brBrush =
 new LinearGradientBrush(
 new Point(0, 0), new Point(50, 20),
 Color.Blue, Color.Red);
 Rectangle rect =
 new Rectangle(20, 20, 200, 100);
 // Create color and points arrays
 Color[] clrArray =
 {
 Color.Red, Color.Blue, Color.Green,
 Color.Pink, Color.Yellow,
 Color.DarkTurquoise
 };
 float[] posArray =
 {
 0.0f, 0.2f, 0.4f,
 0.6f, 0.8f, 1.0f
 };
 // Create a ColorBlend object and
 // set its Colors and Positions properties
 ColorBlend colorBlend = new ColorBlend();
 colorBlend.Colors = clrArray;
 colorBlend.Positions = posArray;
 // Set InterpolationColors property
 brBrush.InterpolationColors = colorBlend;
 // Draw shapes
 g.FillRectangle(brBrush, rect);
 rect.Y = 150;
 rect.Width = 100;
 rect.Height = 100;
 g.FillEllipse(brBrush, rect);
 // Dispose of object
 g.Dispose();
}
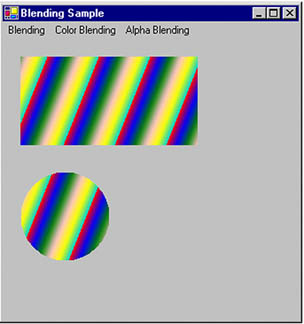
Figure 9.35 shows the output from Listing 9.25. The gradient has multiple colors.
Figure 9.35. A multicolor gradient
The Blend property of LinearGradientBrush allows you to attach a Blend object to the brush, which represents the positions and factors of the blend. Listing 9.26 creates a Blend object and sets its Factors and Positions properties, as well as the Blend property of the brush.
Listing 9.26 Using the Blend property of LinearGradientBrush
private void BlendPropMenu_Click(object sender,
 System.EventArgs e)
{
 Graphics g = this.CreateGraphics();
 g.Clear(this.BackColor);
 // Create a linear gradient brush
 LinearGradientBrush brBrush =
 new LinearGradientBrush(
 new Point(0, 0), new Point(50, 20),
 Color.Blue, Color.Red);
 // Create a Blend object
 Blend blend = new Blend();
 float[] factArray = {0.0f, 0.3f, 0.5f, 1.0f};
 float[] posArray = {0.0f, 0.2f, 0.6f, 1.0f};
 // Set Blend's Factors and Positions properties
 blend.Factors = factArray;
 blend.Positions = posArray;
 // Set Blend property of the brush
 brBrush.Blend = blend;
 // Fill a rectangle and an ellipse
 g.FillRectangle(brBrush, 10, 20, 200, 100);
 g.FillEllipse(brBrush, 10, 150, 120, 120);
 // Dispose of object
 g.Dispose();
}
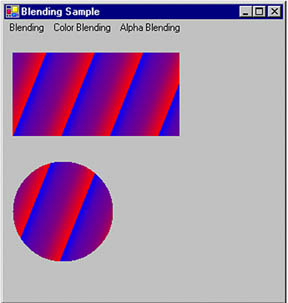
Figure 9.36 shows the output from Listing 9.26. The blend's position and colors are controlled by the Factors property.
Figure 9.36. Using blending in a linear gradient brush
9.5.4 Using Gamma Correction in Linear Gradient Brushes
We use gamma correction when we want to display a drawing accurately on a computer screen. Gamma correction controls the overall brightness of an image. Images that are not properly corrected may look either too dark or bleached out. By setting the gamma correction, we tell GDI+ to change the brightness and set the best ratios of red to green to blue.
The GammaCorrection property, a Boolean type, is used to apply gamma correction on a linear gradient brush. This property can be true (enabled) or false (disabled). Brushes with gamma correction have more uniform intensity than brushes with no gamma correction.
Listing 9.27 draws two rectangles. The first has no gamma correction; the second does have gamma correction. If you run this code, you will notice that the second rectangle has a more uniform gradation.
Listing 9.27 Applying gamma correction on linear gradient brushes
private void GammaCorrectionMenu_Click(
 object sender, System.EventArgs e)
{
 Graphics g = this.CreateGraphics();
 g.Clear(this.BackColor);
 // Create a rectangle
 Rectangle rect =
 new Rectangle(20, 20, 100, 50);
 // Create a linear gradient brush
 LinearGradientBrush rgBrush =
 new LinearGradientBrush(
 rect, Color.Red, Color.Green,
 0.0f, true);
 // Fill rectangle
 g.FillRectangle(rgBrush, rect);
 rect.Y = 90;
 // Set gamma correction of the brush
 rgBrush.GammaCorrection = true;
 // Fill rectangle
 g.FillRectangle(rgBrush, rect);
 // Dispose of object
 g.Dispose();
}
9.5.5 Blending Using PathGradientBrush Objects
As we discussed in Chapter 4 (Section 4.1.6), the PathGradientBrush object is used to fill a graphics path with a gradient. We can specify the center and boundary colors of a path.
The CenterColor and SurroundColors properties are used to specify the center and boundary colors. Listing 9.28 uses the CenterColor and SurroundColors properties; it sets the center color of the path to red and the surrounding color to green.
Listing 9.28 Blending using PathGradientBrush
private void PathGBBlend_Click(object sender,
 System.EventArgs e)
{
 Graphics g = this.CreateGraphics();
 g.Clear(this.BackColor);
 // Create Blend object
 Blend blend = new Blend();
 // Create point and position arrays
 float[] factArray = {0.0f, 0.3f, 0.5f, 1.0f};
 float[] posArray = {0.0f, 0.2f, 0.6f, 1.0f};
 // Set Factors and Positions properties of Blend
 blend.Factors = factArray;
 blend.Positions = posArray;
 // Set smoothing mode of Graphics object
 g.SmoothingMode = SmoothingMode.AntiAlias;
 // Create path and add a rectangle
 GraphicsPath path = new GraphicsPath();
 Rectangle rect = new Rectangle(10, 20, 200, 200);
 path.AddRectangle(rect);
 // Create path gradient brush
 PathGradientBrush rgBrush =
 new PathGradientBrush(path);
 // Set Blend and FocusScales properties
 rgBrush.Blend = blend;
 rgBrush.FocusScales = new PointF(0.6f, 0.2f);
 Color[] colors = {Color.Green};
 // Set CenterColor and SurroundColors properties
 rgBrush.CenterColor = Color.Red;
 rgBrush.SurroundColors = colors;
 g.FillEllipse(rgBrush, rect);
 // Dispose of object
 g.Dispose();
}
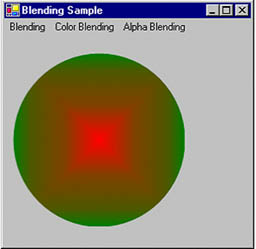
If you run the code from Listing 9.28, you will see that the focus is the center of the ellipse, and there is scattering in a faded color toward the boundary of the ellipse. The center is red, and the border is green (see Figure 9.37).
Figure 9.37. Blending using PathGradientBrush
The FocusScales property changes the focus point for the gradient falloff. The following code snippet sets the FocusScales property:
rgBrush.FocusScales = new PointF(0.6f, 0.2f);
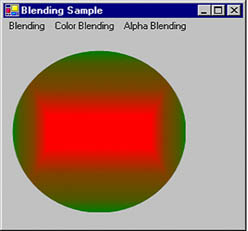
After FocusScales is set, the color of the ellipse changes from the center of the ellipse to a rectangle. Figure 9.38 shows the new output.
Figure 9.38. Setting the focus scale
We can even specify multiple surrounding colors. For example, we can create an array of different colors and use them for the SurroundColors property of the brush. To do so, we replace the following line of Listing 9.28:
Color[] colors = {Color.Green};
with the following code snippet:
Color[] colors =
{Color.Green, Color.Blue,
Color.Red, Color.Yellow};
rgBrush.SurroundColors = colors;
If you add this code to the application, you will see a totally different output. As Figure 9.39 shows, the new ellipse has four different boundary colors.
Figure 9.39. Blending multiple colors
Like LinearGradientBrush, the PathGradientBrush class provides Blend and InterpolationColors properties. Listing 9.29 shows the InterpolationColors property in use.
Listing 9.29 Using the InterpolationColors property of PathGradientBrush
private void PathGBInterPol_Click(object sender,
 System.EventArgs e)
{
 Graphics g = this.CreateGraphics();
 g.Clear(this.BackColor);
 // Create color and points arrays
 Color[] clrArray =
 {Color.Red, Color.Blue, Color.Green,
 Color.Pink, Color.Yellow,
 Color.DarkTurquoise};
 float[] posArray =
 {0.0f, 0.2f, 0.4f, 0.6f, 0.8f, 1.0f};
 // Create a ColorBlend object and set its Colors and
 // Positions properties
 ColorBlend colorBlend = new ColorBlend();
 colorBlend.Colors = clrArray;
 colorBlend.Positions = posArray;
 // Set smoothing mode of Graphics object
 g.SmoothingMode = SmoothingMode.AntiAlias;
 // Create a graphics path and add a rectangle
 GraphicsPath path = new GraphicsPath();
 Rectangle rect = new Rectangle(10, 20, 200, 200);
 path.AddRectangle(rect);
 // Create a path gradient brush
 PathGradientBrush rgBrush =
 new PathGradientBrush(path);
 // Set interpolation colors and focus scales
 rgBrush.InterpolationColors = colorBlend;
 rgBrush.FocusScales = new PointF(0.6f, 0.2f);
 Color[] colors = {Color.Green};
 // Set center and surrounding colors
 rgBrush.CenterColor = Color.Red;
 rgBrush.SurroundColors = colors;
 // Draw ellipse
 g.FillEllipse(rgBrush, rect);
 // Dispose of object
 g.Dispose();
}
Figure 9.40 shows the output from Listing 9.29.
Figure 9.40. Using the InterpolationColors property of PathGradientBrush
You can even apply blending on a path gradient brush using the Blend property. Listing 9.30 creates a Blend object and sets the Blend property of the brush.
Listing 9.30 Using the Blend property of PathGradientBrush
private void PathGBBlend_Click(object sender,
 System.EventArgs e)
{
 Graphics g = this.CreateGraphics();
 g.Clear(this.BackColor);
 // Create Blend object
 Blend blend = new Blend();
 // Create point and position arrays
 float[] factArray = {0.0f, 0.3f, 0.5f, 1.0f};
 float[] posArray = {0.0f, 0.2f, 0.6f, 1.0f};
 // Set Factors and Positions properties of Blend
 blend.Factors = factArray;
 blend.Positions = posArray;
 // Set smoothing mode of Graphics object
 g.SmoothingMode = SmoothingMode.AntiAlias;
 // Create path and add a rectangle
 GraphicsPath path = new GraphicsPath();
 Rectangle rect = new Rectangle(10, 20, 200, 200);
 path.AddRectangle(rect);
 // Create path gradient brush
 PathGradientBrush rgBrush =
 new PathGradientBrush(path);
 // Set Blend and FocusScales properties
 rgBrush.Blend = blend;
 rgBrush.FocusScales = new PointF(0.6f, 0.2f);
 Color[] colors =
 {
 Color.Green, Color.Blue,
 Color.Red, Color.Yellow
 };
 // Set CenterColor and SurroundColors
 rgBrush.CenterColor = Color.Red;
 rgBrush.SurroundColors = colors;
 g.FillEllipse(rgBrush, rect);
 // Dispose of object
 g.Dispose();
}
Figure 9.41 shows the output from Listing 9.30. Blending is done with four different colors.
Figure 9.41. Multicolor blending using PathGradientBrush
Just as with LinearGradientBrush, you can use the SetBlendTriangularShape and SetSigmaBellShape methods with PathGradientBrush.
GDI+: The Next-Generation Graphics Interface
- GDI+: The Next-Generation Graphics Interface
- Understanding GDI+
- Exploring GDI+ Functionality
- GDI+ from a GDI Perspective
- GDI+ Namespaces and Classes in .NET
- Summary
Your First GDI+ Application
- Your First GDI+ Application
- Drawing Surfaces
- The Coordinate System
- Tutorial: Your First GDI+ Application
- Some Basic GDI+ Objects
The Graphics Class
- The Graphics Class
- Graphics Class Properties
- Graphics Class Methods
- The GDI+Painter Application
- Drawing a Pie Chart
Working with Brushes and Pens
- Working with Brushes and Pens
- Understanding and Using Brushes
- Using Pens in GDI+
- Transformation with Pens
- Transformation with Brushes
- System Pens and System Brushes
- A Real-World Example: Adding Colors, Pens, and Brushes to the GDI+Painter Application
Colors, Fonts, and Text
- Colors, Fonts, and Text
- Accessing the Graphics Object
- Working with Colors
- Working with Fonts
- Working with Text and Strings
- Rendering Text with Quality and Performance
- Advanced Typography
- A Simple Text Editor
- Transforming Text
Rectangles and Regions
- Rectangles and Regions
- The Rectangle Structure
- The Region Class
- Regions and Clipping
- Clipping Regions Example
- Regions, Nonrectangular Forms, and Controls
Working with Images
- Working with Images
- Raster and Vector Images
- Working with Images
- Manipulating Images
- Playing Animations in GDI+
- Working with Bitmaps
- Working with Icons
- Skewing Images
- Drawing Transparent Graphics Objects
- Viewing Multiple Images
- Using a Picture Box to View Images
- Saving Images with Different Sizes
Advanced Imaging
- Advanced Imaging
- Rendering Partial Bitmaps
- Working with Metafiles
- Color Mapping Using Color Objects
- Image Attributes and the ImageAttributes Class
- Encoder Parameters and Image Formats
Advanced 2D Graphics
- Advanced 2D Graphics
- Line Caps and Line Styles
- Understanding and Using Graphics Paths
- Graphics Containers
- Reading Metadata of Images
- Blending Explained
- Alpha Blending
- Miscellaneous Advanced 2D Topics
Transformation
- Transformation
- Coordinate Systems
- Transformation Types
- The Matrix Class and Transformation
- The Graphics Class and Transformation
- Global, Local, and Composite Transformations
- Image Transformation
- Color Transformation and the Color Matrix
- Matrix Operations in Image Processing
- Text Transformation
- The Significance of Transformation Order
Printing
- Printing
- A Brief History of Printing with Microsoft Windows
- Overview of the Printing Process
- Your First Printing Application
- Printer Settings
- The PrintDocument and Print Events
- Printing Text
- Printing Graphics
- Print Dialogs
- Customizing Page Settings
- Printing Multiple Pages
- Marginal Printing: A Caution
- Getting into the Details: Custom Controlling and the Print Controller
Developing GDI+ Web Applications
- Developing GDI+ Web Applications
- Creating Your First ASP.NET Web Application
- Your First Graphics Web Application
- Drawing Simple Graphics
- Drawing Images on the Web
- Drawing a Line Chart
- Drawing a Pie Chart
GDI+ Best Practices and Performance Techniques
- GDI+ Best Practices and Performance Techniques
- Understanding the Rendering Process
- Double Buffering and Flicker-Free Drawing
- Understanding the SetStyle Method
- The Quality and Performance of Drawing
GDI Interoperability
Miscellaneous GDI+ Examples
- Miscellaneous GDI+ Examples
- Designing Interactive GUI Applications
- Drawing Shaped Forms and Windows Controls
- Adding Copyright Information to a Drawn Image
- Reading and Writing Images to and from a Stream or Database
- Creating Owner-Drawn List Controls
Appendix A. Exception Handling in .NET
- Chapter VII Objective and Perceived Complexity and Their Impacts on Internet Communication
- Chapter XII Web Design and E-Commerce
- Chapter XIII Shopping Agent Web Sites: A Comparative Shopping Environment
- Chapter XV Customer Trust in Online Commerce
- Chapter XVI Turning Web Surfers into Loyal Customers: Cognitive Lock-In Through Interface Design and Web Site Usability
