Line Caps and Line Styles
In previous chapters we saw how to draw lines and curves using Draw-Line, DrawCurve, and related methods of the Graphics class. In these cases we drew only solid lines and curves. Lines and curves can also have styles. For example, you can draw a dotted line with circular caps.
A line has three parts: the line body, starting cap, and ending cap. The line starts with a starting cap and ends with an ending cap. The part that connects these two caps is the line body. The caps and body of a line can have different styles. Figure 9.1 shows two lines with different starting and ending cap and body styles.
Figure 9.1. Lines with different starting cap, ending cap, and dash styles
The ends of a line can have different caps. Table 9.2 shows some of the available line cap styles.
A line body can have its own style, called the dash style. Figure 9.2 shows four different dash styles.
Figure 9.2. Line dash style

Each line dash style can also have its own cap style, which is called a line dash cap. Figure 9.3 shows three different line dash caps.
Figure 9.3. Line dash caps

|
Style |
Description |
|---|---|
|
|
Triangle |
|
|
AnchorMask (or flat or square) |
|
|
ArrowAnchor |
|
|
DiamondAnchor |
|
|
Round |
|
|
RoundAnchor |
|
|
SquareAnchor |


9.1.1 Line Caps and Styles Specified by the Pen Class
The Pen object specifies the line caps and line styles being used to draw lines. To create a line with caps and styles, we create a Pen object, set its line cap and line style properties (or methods) and use the Pen object to draw the lines.
Table 9.3 lists the members of the Pen class that can be used to set line caps and line styles.
9.1.2 Adding Line Caps and Styles
There is no direct way to apply line caps and line styles to a line. We must go through the Pen object. As we covered in previous chapters, to draw a line we must have a Pen object specifying the color and width of the pen used when we call the DrawLine method of the Graphics class. The Pen object also provides members for attaching line caps and line styles to a pen. After we attach line caps and styles to a pen, we use this pen to draw lines.
In Listing 9.1 we create a Pen object with a specified color and width. Then we set the line caps using the StartCap and EndCap properties of the Pen class, followed by the DashStyle and DashOffset properties. After that we call DrawLine and dispose of the objects.
|
Member |
Description |
|---|---|
|
StartCap |
Property that gets or sets the cap style used at the beginning of the line. Takes a LineCap enumeration member. |
|
EndCap |
Property that gets or sets the cap style used at the end of the line. Takes a LineCap enumeration member. |
|
CustomStartCap |
Property that gets or sets a custom cap to use at the beginning of the line. Takes a CustomLineCap object. |
|
CustomEndCap |
Property that gets or sets a custom cap to use at the ending of the line. Takes a CustomLineCap object. |
|
DashCap |
Property that gets or sets the cap style used at the end of the dashes that make up a dashed line. Takes a DashCap enumeration, which has only three members: Flat, Round, and Triangle. |
|
DashOffset |
Property that gets and sets the dash offsetthat is, the distance from the start of a line to the beginning of a dash pattern. |
|
DashPattern |
Property that specifies the length of each dash and space in a dash pattern. Takes an array of floating values. The first element of this array sets the length of a dash, the second element sets the length of a space, the third element sets the length of a dash, and so on. |
|
DashStyle |
Dash lines can have their own styles. This property gets and sets dash line styles, which are represented by the DashStyle enumeration. The DashStyle enumeration has six membersCustom, Dash, DashDot, DashDotDot, Dot, and Solidthat represent lines consisting of a custom pattern, dashes, a dash-dot repeating pattern, a dash-dot-dot repeating pattern, dots, and a solid line, respectively. |
|
SetLineCap |
Method that sets the values of all three parts (the starting line cap, ending line cap, and dash style) of a line. |
Listing 9.1 Setting line caps and line styles
Graphics g = this.CreateGraphics();
g.Clear(this.BackColor);
// Create a pen
Pen blackPen = new Pen(Color.Black, 10);
// Set the line caps and line styles
blackPen.StartCap = LineCap.Triangle;
blackPen.EndCap = LineCap.Triangle;
blackPen.DashStyle = DashStyle.Dash;
blackPen.DashOffset = 40;
g.DrawLine(blackPen, 20, 10, 200, 10);
// Dispose of objects
blackPen.Dispose();
g.Dispose();
We will cover line caps and styles in more detail in Sections 9.1.3 through 9.1.5.
9.1.3 Getting and Setting Line Caps and Styles
In the previous sections we discussed the LineCap, DashStyle, and DashCap enumerations, which represent the line cap, line dash style, and dash cap, respectively. Now we will write an application and use these enumerations.
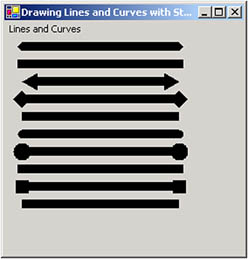
We create a Windows application and a MainMenu control with three menu items on the form. We call these menu items GetCapStyle, LineDashStyle, and LineDashCap, respectively, and write menu click event handlers by double-clicking on them. On the GetCapStyle menu item click event handler, we will read different line caps and generate output using these line caps; on the LineDashStyle menu item click event handler, we will generate lines with different dash styles; and on the LineDashCap menu item click event handler, we will generate output with different line dash caps.
The GetCapStyle menu item click event handler is shown in Listing 9.2. We create a pen and set the starting and ending caps using the StartCap and EndCap properties of the Pen object, and then we draw a line.
Listing 9.2 Getting line caps
private void GetCapStyles_Click(object sender,
 System.EventArgs e)
{
 Graphics g = this.CreateGraphics();
 g.Clear(this.BackColor);
 // Create a pen
 Pen blackPen = new Pen(Color.Black, 10);
 // Set line styles
 blackPen.StartCap = LineCap.Triangle;
 blackPen.EndCap = LineCap.Triangle;
 g.DrawLine(blackPen, 20, 10, 200, 10);
 blackPen.StartCap = LineCap.Square;
 blackPen.EndCap = LineCap.AnchorMask;
 g.DrawLine(blackPen, 20, 30, 200, 30);
 blackPen.StartCap = LineCap.ArrowAnchor;
 blackPen.EndCap = LineCap.ArrowAnchor;
 g.DrawLine(blackPen, 20, 50, 200, 50);
 blackPen.StartCap = LineCap.DiamondAnchor;
 blackPen.EndCap = LineCap.DiamondAnchor;
 g.DrawLine(blackPen, 20, 70, 200, 70);
 blackPen.StartCap = LineCap.Flat;
 blackPen.EndCap = LineCap.Flat;
 g.DrawLine(blackPen, 20, 90, 200, 90);
 blackPen.StartCap = LineCap.Round;
 blackPen.EndCap = LineCap.Round;
 g.DrawLine(blackPen, 20, 110, 200, 110);
 blackPen.StartCap = LineCap.RoundAnchor;
 blackPen.EndCap = LineCap.RoundAnchor;
 g.DrawLine(blackPen, 20, 130, 200, 130);
 blackPen.StartCap = LineCap.Square;
 blackPen.EndCap = LineCap.Square;
 g.DrawLine(blackPen, 20, 150, 200, 150);
 blackPen.StartCap = LineCap.SquareAnchor;
 blackPen.EndCap = LineCap.SquareAnchor;
 g.DrawLine(blackPen, 20, 170, 200, 170);
 blackPen.StartCap = LineCap.Flat;
 blackPen.EndCap = LineCap.Flat;
 g.DrawLine(blackPen, 20, 190, 200, 190);
 // Dispose of objects
 blackPen.Dispose();
 g.Dispose();
}
The output of Listing 9.2 looks like Figure 9.4, in which the lines have different caps.
Figure 9.4. Reading line caps
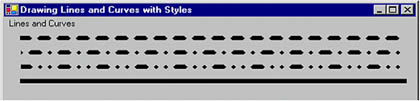
The LineDashStyle menu item click event handler code is given in Listing 9.3. We create a pen and set the dash style and dash offset values using the DashStyle and DashOffset properties of the Pen object, and then we draw lines.
Listing 9.3 Getting line dash styles
private void LineDashStyle_Click(object sender,
 System.EventArgs e)
{
 Graphics g = this.CreateGraphics();
 g.Clear(this.BackColor);
 // Create a pen
 Pen blackPen = new Pen(Color.Black, 6);
 // Set line styles
 blackPen.DashStyle = DashStyle.Dash;
 blackPen.DashOffset = 40;
 blackPen.DashCap = DashCap.Triangle;
 g.DrawLine(blackPen, 20, 10, 500, 10);
 blackPen.DashStyle = DashStyle.DashDot;
 g.DrawLine(blackPen, 20, 30, 500, 30);
 blackPen.DashStyle = DashStyle.DashDotDot;
 g.DrawLine(blackPen, 20, 50, 500, 50);
 blackPen.DashStyle = DashStyle.Dot;
 g.DrawLine(blackPen, 20, 70, 500, 70);
 blackPen.DashStyle = DashStyle.Solid;
 g.DrawLine(blackPen, 20, 70, 500, 70);
 // Dispose of objects
 blackPen.Dispose();
 g.Dispose();
}
Figure 9.5 shows the output from Listing 9.3. The lines have different dash styles.
Figure 9.5. Reading line dash styles
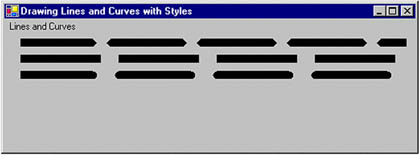
The GetCapStyle menu item click event handler code is given in Listing 9.4. We create a pen and set the dash cap styles using the DashCap property of the Pen object.
Listing 9.4 Getting dash caps
private void LineDashCap_Click(object sender,
 System.EventArgs e)
{
 Graphics g = this.CreateGraphics();
 g.Clear(this.BackColor);
 // Create a pen
 Pen blackPen = new Pen(Color.Black, 10);
 // Set DashCap styles
 blackPen.DashStyle = DashStyle.DashDotDot;
 blackPen.DashPattern = new float[]{10};
 blackPen.DashCap = DashCap.Triangle;
 g.DrawLine(blackPen, 20, 10, 500, 10);
 blackPen.DashCap = DashCap.Flat;
 g.DrawLine(blackPen, 20, 30, 500, 30);
 blackPen.DashCap = DashCap.Round;
 g.DrawLine(blackPen, 20, 50, 500, 50);
 // Dispose of objects
 blackPen.Dispose();
 g.Dispose();
}
Figure 9.6 shows the output from Listing 9.4. The lines have different dash caps: triangular, flat, and round, respectively.
Figure 9.6. Getting line dash caps
9.1.4 Drawing Other Objects with Line Caps and Styles
So far we have applied line caps and line styles only to lines, but these effects can also be applied to other objects, including curves, rectangles, and ellipses. However, some of these objects impose limitations. For example, rectangles, ellipses, and closed curves do not have starting and ending caps, so the StartCap and EndCap properties of a pen will not affect them.
Let's add one more menu item to MainMenu, called OtherObjects. The code for its menu item click event handler is given in Listing 9.5. We create three pens with different colors and widths; set their line cap, dash style, and dash cap properties; and draw a rectangle, an ellipse, and a curve.
Listing 9.5 Drawing other objects using line caps, dash styles, and dash caps
private void OtherObjects_Click(object sender,
 System.EventArgs e)
{
 Graphics g = this.CreateGraphics();
 g.Clear(this.BackColor);
 g.SmoothingMode = SmoothingMode.AntiAlias;
 // Create pen objects
 Pen blackPen = new Pen(Color.Black, 5);
 Pen bluePen = new Pen(Color.Blue, 8);
 Pen redPen = new Pen(Color.Red, 4);
 // Set DashCap styles
 blackPen.StartCap = LineCap.DiamondAnchor;
 blackPen.EndCap = LineCap.SquareAnchor;
 blackPen.DashStyle = DashStyle.DashDotDot;
 blackPen.DashPattern = new float[]{10};
 blackPen.DashCap = DashCap.Triangle;
 // Set blue pen dash style and dash cap
 bluePen.DashStyle = DashStyle.DashDotDot;
 bluePen.DashCap = DashCap.Round;
 // Set red pen line cap and line dash styles
 redPen.StartCap = LineCap.Round;
 redPen.EndCap = LineCap.DiamondAnchor;
 redPen.DashCap = DashCap.Triangle;
 redPen.DashStyle = DashStyle.DashDot;
 redPen.DashOffset = 3.4f;
 // Draw a rectangle
 g.DrawRectangle(blackPen, 20, 20, 200, 100);
 // Draw an ellipse
 g.DrawEllipse(bluePen, 20, 150, 200, 100);
 // Draw a curve
 PointF pt1 = new PointF( 90.0F, 40.0F);
 PointF pt2 = new PointF(130.0F, 80.0F);
 PointF pt3 = new PointF(200.0F, 100.0F);
 PointF pt4 = new PointF(220.0F, 120.0F);
 PointF pt5 = new PointF(250.0F, 250.0F);
 PointF[] ptsArray =
 {
 pt1, pt2, pt3, pt4, pt5
 };
 g.DrawCurve(redPen, ptsArray);
 // Dispose of objects
 blackPen.Dispose();
 g.Dispose();
}
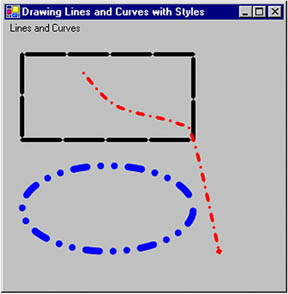
Figure 9.7 shows the output from Listing 9.5. Each graphics objectrectangle, ellipse, and curvehas a different style.
Figure 9.7. A rectangle, an ellipse, and a curve with different line styles
9.1.5 Customizing Line Caps
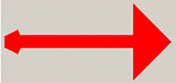
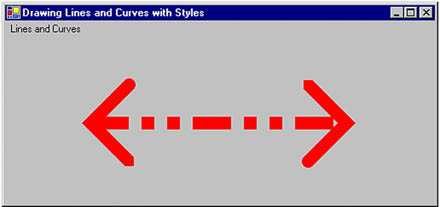
Sometimes we need to use custom caps. Figure 9.8 shows a line with customized caps of different sizes.
Figure 9.8. A line with custom caps
The CustomLineCap and AdjustableArrowCap classes provide functionality to draw custom line caps. CustomLineCap allows us to define custom caps, which can be attached to a penthen an application can use the pen to draw graphics objects.
The CustomLineCap class constructor takes two parameters of type GraphicsPath. The first parameter defines the fill path, which identifies the fill for the custom cap. The second parameter defines the stroke path, which defines the outline of the custom cap. The fill path and stroke path parameters cannot be used at the same time.
To create a CustomLineCap object, first we create a GraphicsPath object and add items to the path such as a line, ellipse, or rectangle using any of the add methods. Then we pass the GraphicsPath object as an argument to CustomLineCap. The following code snippet shows how to create a CustomLineCap object:
GraphicsPath path1 = new GraphicsPath();
// Add items to GraphicsPath
CustomLineCap cap1 = new CustomLineCap(null, path1);
Once we have a CustomLineCap object, we can set the CustomStartCap and CustomEndCap properties of the pen to apply custom line caps. We will see a full working example of custom line caps in a moment.
Table 9.4 describes the properties of the CustomLineCap class.
9.1.5.1 Line Joins
A line join defines how lines and curves are joined in a graphics path. The LineJoin enumeration represents a line join. Its members are described in Table 9.5.
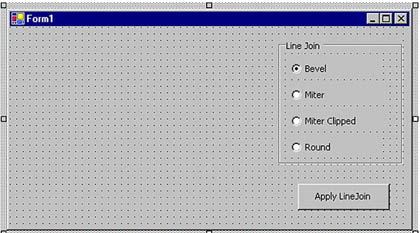
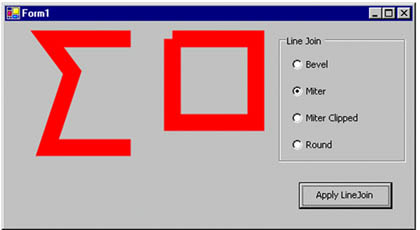
We can set the line join of a pen using its LineJoin property. To see the line joins, we create a Windows application and add a group box, four radio buttons, and a button to the form. The final form looks like Figure 9.9.
Figure 9.9. The line join test application
|
Property |
Description |
|---|---|
|
BaseCap |
The base line cap. LineCap enumeration type. |
|
BaseInset |
The distance between the cap and the line. |
|
StrokeJoin |
How lines and curves in the path that will be stroked are joined. LineJoin enumeration type. |
|
WidthScale |
Width scale of custom line cap. A WidthScale value of 2 means that the cap will be double the pen size that is drawing the line cap. |
|
Member |
Description |
|---|---|
|
Bevel |
Beveled join with a diagonal corner. |
|
Miter |
Mitered join with a sharp corner or a clipped corner. |
|
MiterClipped |
Mitered join with a sharp corner or a beveled corner. |
|
Round |
Circular join with a smooth, circular arc between the lines. |
When we select different line join types and hit the Apply LineJoin button, the application draws lines with different joins.
The code for the Apply LineJoin button click event handler and DrawJoinedLines method is given in Listing 9.6. As the listing shows, the Apply LineJoin button click event handler calls the DrawJoinedLines method with a LineJoin value determined by the current selection.
Listing 9.6 The Apply LineJoin button click event handler
private void ApplyJoin_Click(object sender,
System.EventArgs e)
{
// Create a Graphics object
Graphics g = this.CreateGraphics();
g.Clear(this.BackColor);
// Line join type
if(BevelRadBtn.Checked)
{
DrawJoinedLines(g, LineJoin.Bevel);
}
if(MiterRadBtn.Checked)
{
DrawJoinedLines(g, LineJoin.Miter);
}
if(MiterClippedRadBtn.Checked)
{
DrawJoinedLines(g, LineJoin.MiterClipped);
}
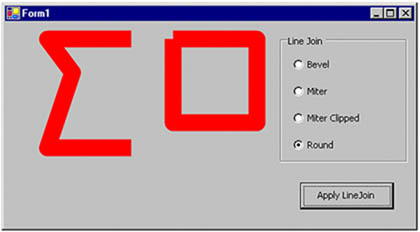
if(RoundRadBtn.Checked)
{
DrawJoinedLines(g, LineJoin.Round);
}
// Dispose of object
g.Dispose();
}
private void DrawJoinedLines(Graphics g,
LineJoin joinType)
{
// Set smoothing mode
g.SmoothingMode = SmoothingMode.AntiAlias;
// Create a pen with width 20
Pen redPen = new Pen(Color.Red, 20);
// Set line join
redPen.LineJoin = joinType;
// Create an array of points
Point[] pts =
{
new Point(150, 20),
new Point(50, 20),
new Point(80, 60),
new Point(50, 150),
new Point(150, 150)
};
// Create a rectangle using lines
Point[] pts1 =
{
new Point(200, 20),
new Point(300, 20),
new Point(300, 120),
new Point(200, 120),
new Point(200, 20)
};
// Draw lines
g.DrawLines(redPen, pts);
g.DrawLines(redPen, pts1);
// Dispose of object
redPen.Dispose();
}
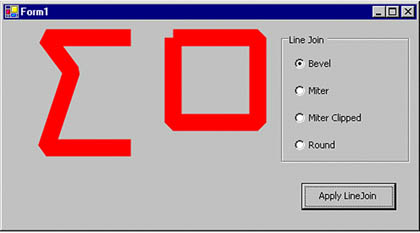
Now if we run the code, the Bevel line join output looks like Figure 9.10.
Figure 9.10. The Bevel line join effect
The Miter line join output looks like Figure 9.11.
Figure 9.11. The Miter line join effect
The Round line join output looks like Figure 9.12.
Figure 9.12. The Round line join effect
9.1.5.2 Stroke Caps
We have already seen how to use the StartCap and EndCap properties of a Pen object to set the starting and ending caps of lines. We have also seen how to use the StartCustomCap and EndCustomCap properties to set customized starting and ending caps.
To understand caps better, take a look at Figure 9.13. The rectangle A is a line cap. The starting cap is triangular, and the ending cap is round.
Figure 9.13. Customized starting and ending caps
The GetStrokeCaps and SetStrokeCaps methods of the CustomLineCap class can also be used to get and set the starting and ending caps of a custom cap. The SetStrokeCaps method takes two arguments of type LineCap enumeration and sets the caps for the starting and ending points of lines. Listing 9.7 creates custom line caps and sets them using the SetStrokeCaps method. After creating custom line caps, we create a pen and set its CustomStartCap and CustomEndCap properties, which use the pen to draw a line.
Listing 9.7 Using SetStrokeCaps
private void SetStrokeCapsMenu_Click(object sender,
 System.EventArgs e)
{
 // Create a Graphics object
 Graphics g = this.CreateGraphics();
 g.Clear(this.BackColor);
 // Create a path for custom line cap. This
 // path will have two lines from points
 // (-3, -3) to (0, 0) and (0, 0) to (3, -3).
 Point[] points =
 {
 new Point(-3, -3),
 new Point(0, 0),
 new Point(3, -3)
 };
 GraphicsPath path = new GraphicsPath();
 path.AddLines(points);
 // Create a custom line cap from the path
 CustomLineCap cap =
 new CustomLineCap(null, path);
 // Set the starting and ending caps of the custom cap
 cap.SetStrokeCaps(LineCap.Round, LineCap.Triangle);
 // Create a Pen object and set its starting and ending
 // caps
 Pen redPen = new Pen(Color.Red, 15);
 redPen.CustomStartCap = cap;
 redPen.CustomEndCap = cap;
 redPen.DashStyle = DashStyle.DashDotDot;
 // Draw the line
 g.DrawLine(redPen,
 new Point(100, 100),
 new Point(400, 100));
 // Dispose of object
 g.Dispose();
}
Figure 9.14 shows the output from Listing 9.7.
Figure 9.14. Setting customized starting and ending caps
9.1.5.3 Adjustable Arrow Caps
Adjustable arrow caps allow you to set the size of the cap's base cap, height, width, and joins. The AdjustableArrowCap class, which is inherited from the CustomLineCap class, represents an adjustable arrow-shaped line cap.
The AdjustableArrowCap class constructor takes three parameters: the width of the arrow as a floating value, the height of the arrow as a floating value, and a Boolean value (optional) that, if true, indicates that the arrow cap is filled.
The following code snippet creates an AdjustableArrowCap object:
float w = 2;
float h = 5;
bool fill = false;
AdjustableArrowCap myArrow =
 new AdjustableArrowCap(w, h, fill);
Besides having CustomLineCap methods and properties, AdjustableArrowCap provides four properties: Filled, Height, Width, and MiddleInset. The Height and Width properties represent the height and the width, respectively, of an arrow cap. The Filled property indicates whether an arrow cap is filled. The MiddleInset property represents the distance between the outline of the arrow cap and the fill.
Now let's add an AdjustableArrowCap option to our application. We add one menu item to the form, along with a menu item click event handler, as shown in Listing 9.8. We create two AdjustableArrowCap objects and set their BaseCap, BaseInset, StrokeJoin, and WidthScale properties. Then we create a black Pen object with a width of 15 and set the CustomStartCap and CustomEndCap properties of the pen as AdjustableArrowCap objects. Finally, we use this pen to draw a line with DrawLine.
Listing 9.8 Using adjustable arrow caps
private void AdjustableRowCapMenu_Click(object sender,
 System.EventArgs e)
{
 // Create a Graphics object
 Graphics g = this.CreateGraphics();
 g.Clear(this.BackColor);
 // Create two AdjustableArrowCap objects
 AdjustableArrowCap cap1 =
 new AdjustableArrowCap(1, 1, false);
 AdjustableArrowCap cap2 =
 new AdjustableArrowCap(2, 1);
 // Set cap properties
 cap1.BaseCap = LineCap.Round;
 cap1.BaseInset = 5;
 cap1.StrokeJoin = LineJoin.Bevel;
 cap2.WidthScale = 3;
 cap2.BaseCap = LineCap.Square;
 cap2.Height = 1;
 // Create a pen
 Pen blackPen = new Pen(Color.Black, 15);
 // Set CustomStartCap and CustomEndCap properties
 blackPen.CustomStartCap = cap1;
 blackPen.CustomEndCap = cap2;
 // Draw line
 g.DrawLine(blackPen, 20, 50, 200, 50);
 // Dispose of objects
 blackPen.Dispose();
 g.Dispose();
}
Figure 9.15 shows the output from Listing 9.8. The end caps have different sizes.
Figure 9.15. Adjustable arrow caps
GDI+: The Next-Generation Graphics Interface
- GDI+: The Next-Generation Graphics Interface
- Understanding GDI+
- Exploring GDI+ Functionality
- GDI+ from a GDI Perspective
- GDI+ Namespaces and Classes in .NET
- Summary
Your First GDI+ Application
- Your First GDI+ Application
- Drawing Surfaces
- The Coordinate System
- Tutorial: Your First GDI+ Application
- Some Basic GDI+ Objects
The Graphics Class
- The Graphics Class
- Graphics Class Properties
- Graphics Class Methods
- The GDI+Painter Application
- Drawing a Pie Chart
Working with Brushes and Pens
- Working with Brushes and Pens
- Understanding and Using Brushes
- Using Pens in GDI+
- Transformation with Pens
- Transformation with Brushes
- System Pens and System Brushes
- A Real-World Example: Adding Colors, Pens, and Brushes to the GDI+Painter Application
Colors, Fonts, and Text
- Colors, Fonts, and Text
- Accessing the Graphics Object
- Working with Colors
- Working with Fonts
- Working with Text and Strings
- Rendering Text with Quality and Performance
- Advanced Typography
- A Simple Text Editor
- Transforming Text
Rectangles and Regions
- Rectangles and Regions
- The Rectangle Structure
- The Region Class
- Regions and Clipping
- Clipping Regions Example
- Regions, Nonrectangular Forms, and Controls
Working with Images
- Working with Images
- Raster and Vector Images
- Working with Images
- Manipulating Images
- Playing Animations in GDI+
- Working with Bitmaps
- Working with Icons
- Skewing Images
- Drawing Transparent Graphics Objects
- Viewing Multiple Images
- Using a Picture Box to View Images
- Saving Images with Different Sizes
Advanced Imaging
- Advanced Imaging
- Rendering Partial Bitmaps
- Working with Metafiles
- Color Mapping Using Color Objects
- Image Attributes and the ImageAttributes Class
- Encoder Parameters and Image Formats
Advanced 2D Graphics
- Advanced 2D Graphics
- Line Caps and Line Styles
- Understanding and Using Graphics Paths
- Graphics Containers
- Reading Metadata of Images
- Blending Explained
- Alpha Blending
- Miscellaneous Advanced 2D Topics
Transformation
- Transformation
- Coordinate Systems
- Transformation Types
- The Matrix Class and Transformation
- The Graphics Class and Transformation
- Global, Local, and Composite Transformations
- Image Transformation
- Color Transformation and the Color Matrix
- Matrix Operations in Image Processing
- Text Transformation
- The Significance of Transformation Order
Printing
- Printing
- A Brief History of Printing with Microsoft Windows
- Overview of the Printing Process
- Your First Printing Application
- Printer Settings
- The PrintDocument and Print Events
- Printing Text
- Printing Graphics
- Print Dialogs
- Customizing Page Settings
- Printing Multiple Pages
- Marginal Printing: A Caution
- Getting into the Details: Custom Controlling and the Print Controller
Developing GDI+ Web Applications
- Developing GDI+ Web Applications
- Creating Your First ASP.NET Web Application
- Your First Graphics Web Application
- Drawing Simple Graphics
- Drawing Images on the Web
- Drawing a Line Chart
- Drawing a Pie Chart
GDI+ Best Practices and Performance Techniques
- GDI+ Best Practices and Performance Techniques
- Understanding the Rendering Process
- Double Buffering and Flicker-Free Drawing
- Understanding the SetStyle Method
- The Quality and Performance of Drawing
GDI Interoperability
Miscellaneous GDI+ Examples
- Miscellaneous GDI+ Examples
- Designing Interactive GUI Applications
- Drawing Shaped Forms and Windows Controls
- Adding Copyright Information to a Drawn Image
- Reading and Writing Images to and from a Stream or Database
- Creating Owner-Drawn List Controls
Appendix A. Exception Handling in .NET
