Instrumenting .NET Applications with WMI
Overview
The material presented up to this point has been primarily concerned with consuming the management data for the purposes of either retrieving or modifying the system configuration information, or for proactively monitoring and troubleshooting various aspects of systems behavior. While on several occasions I mentioned the WMI data providers that are responsible for maintaining the management data exposed through WMI, I have not yet focused on the gory details of provider implementation and operations. Although it is not in my nature to withhold information, in the first four chapters, I consciously avoided delving into the provider machinery for a few reasons.
First, conventional provider programming is complex. The complexity stems mainly from the choice of available programming languages and tools; until the introduction of .NET and FCL, this choice was pretty much limited to C++. Though a hard core developer may feel very much at home implementing COM interfaces with C++, cautious system administrators who wish to remain sane often walk away as soon as somebody as much as mentions IUnknown. Even with the help of various utilities and wizards distributed with WMI SDK, C++ provider programming still remains outside the realm of most system managers.
Yet another reason for taking providers for granted is the versatility of WMI and the Windows Operating Environment, both of which come equipped with enough WMI providers to monitor just about any aspect of systems operations. Thus, if you are only concerned with monitoring the health of the operating system and its services, you may never need to bother learning the provider framework. After all, understanding the WMI client API is often all that is required to accomplish the majority of monitoring and configuration tasks, and the rest of the WMI infrastructure may as well be viewed as a black box.
Your perspective may change, however, as soon as you face the necessity of administering the numerous custom applications and third-party software packages that are spread across dozens of computing nodes. On a rare occasion, you may get lucky and find out that your favorite third-party software is already outfitted with a provider and can be managed with WMI. More often, you will have to deal with in-house developed systems, which are, at best, equipped with some rudimentary logging facilities but have no provisions for remote monitoring and administration. This is where you may roll up your sleeves and turn your undivided attention to the subject of WMI provider development. Unfortunately, this is also where you discover that the WMI Client API is just a small tip of a very large iceberg.
Although the complexity of provider programming may be the main reason for the slow acceptance of WMI as a primary instrumentation framework for vendor software systems, the current state of affairs is somewhat reassuring. The gloomy prospect of digging into the nuts and bolts of the WMI provider architecture became much less gloomy once Microsoft introduced .NET and FCL. Besides the elegant interface to WMI Client API that is housed in the System.Management namespace, FCL offers extensive functionality for exposing application events and data for management in an easy and trouble-free manner. This functionality, designed specifically to instrument .NET applications for WMI, is packaged into the System.Management.Instrumentation namespace and distributed within the System.Management.dll module. System.Management.Instrumentation types are envisioned as a collection of helpers and attributes intended to simplify the process of exposing management events and data to WMI, and as such, they nearly completely shield the developer from the intricacies of provider programming. In fact, the preferred instrumentation model is declarative so that the bulk of management data can be made available through WMI with very little coding.
Although the types of System.Management.Instrumentation namespace are the primary focus of this chapter, I will also touch upon some aspects of WMI provider programming and deployment. Not only will this discussion help you appreciate the simplicity and elegance of .NET instrumentation types, but it will also shed some light onto the underpinnings of System.Management.Instrumentation types.
Fundamentals of Provider Programming
A provider is nothing but a COM server that implements a slew of WMI interfaces. Depending on the expected functionality and type of the provider, you may be required to supply an implementation for different provider interfaces and methods. However, one interface, which must be implemented by absolutely all providers, is IWbemProviderInit. This interface has a single method, Initialize, which is invoked by WMI following the successful load of a provider COM server. As its name implies, Initialize is designed to let the providers initialize themselves and report the initialization status back to WMI so that CIMOM may start forwarding client requests to the provider. IWbemProviderInit::Initialize has the following signature:
HRESULT IWbemProviderInit::Initialize(
 LPWSTR wszUser,
 LONG lFlags,
 LPWSTR wszNamespace,
 LPWSTR wszLocale,
 IWbemServices *pNamespace,
 IWbemContext *pContext,
 IWbemProviderInitSink *pInitSink
);
where the parameters are defined as follows:
- wszUser : A pointer to a user name. This parameter is only used if the PerUserInitialization property of the corresponding __Win32Provider registration instance is set to TRUE. If PerUserInitialization is FALSE, the provider is initialized once for all users, in which case, wszUser should be set to NULL.
- lFlags : This parameter is reserved for future use and must be set to zero.
- wszNamespace : A pointer to the name of the namespace for which a provider is being initialized.
- wszLocale : A pointer to the name of the locale for which the provider is being initialized. The locale name has the format of MS_XXXX, where XXX is a standard Microsoft LCID, such as MS_409. This parameter is optional and may be set to NULL.
- pNamespace : A pointer to IWbemServices that a provider may use to call into WMI during its initialization.
- pContext : A pointer to IWbemContext used to communicate provider-specific information between a provider and WMI.
- pInitSink : A pointer to IWbemProviderInitSink used by the provider to report its initialization status back to WMI.
Depending on its type, the provider may carry out different operations during its initialization. For instance, a push provider will store its data into the CIM Repository and shut down, while a pull provider may just set up its execution environment. Typically, an implementation of IWbemProviderInit::Initialize will look somewhat similar to the following code:
HRESULT SampleProvider::Initialize(
 LPWSTR wszUser,
 LONG lFlags,
 LPWSTR wszNamespace,
 LPWSTR wszLocale,
 IWbemServices *pNamespace,
 IWbemContext *pContext,
 IWbemProviderInitSink *pInitSink
) {
 if (pNamespace)
 pNamespace->AddRef();
 m_pNamespace = pNamespace;
 // perform other initialization activities
 pInitSink->SetStatus(WBEM_S_INITIALIZED,0);
 return WBEM_S_NO_ERROR;
};
Note that if a provider intends to use the pointer to IWbemServices to make calls into WMI, it must call AddRef on it. After it has finished its initialization, the provider must report the status back to WMI by calling the IWbemProviderInitSink::SetStatus method. This method takes two parameters: the provider's initialization status and an unused LONG, which is commonly set to zero. The status may take one of the following values: WBEM_S_INITIALIZED and WBEM_E_FALIED. The former indicates that the provider has completed its initialization sequence and is ready to service the client's requests. The latter is a sign of initialization failure and marks the provider as not functional. Interestingly, if the provider initialization fails, IWbemProviderInit::Initialize does not have to invoke IWbemProviderInitSink::SetStatus; instead it may simply return the WBEM_E_FAILED return code.
As I mentioned before, a push provider does not have to implement any interfaces other than IWbemProviderInit. When it comes to building instance, class, event, method, and property providers, however, the situation is much more complicated. Table 5-1 lists the interfaces that must be implemented depending on the provider type.
|
PROVIDER TYPE |
INTERFACE |
COMMENTS |
|---|---|---|
|
Class Provider |
IWbemServices |
Only asynchronous methods of IWbemServices need to be implemented. |
|
Instance Provider |
IWbemServices |
Only asynchronous methods of IWbemServices need to be implemented. |
|
Property Provider |
IwbemPropertyProvider |
N/A |
|
Method Provider |
IWbemServices |
Only IWbemServices::ExecMethodAsync needs to be implemented. |
|
Event Provider |
IwbemEventProvider |
N/A |
|
Event Consumer Provider |
IwbemConsumerProvider |
N/A |
The easiest to implement and, perhaps, the predominant type of WMI provider is an instance provider. After all, most application monitoring and configuration issues can often be reduced to retrieving and modifying the instance-level management data. When instrumenting an application, you are most likely to build a custom instance provider, which would act as an intermediary between WMI and your application environment. Thus, for the sake of providing a reasonably complete example while keeping the size of this chapter reasonable, I will concentrate on developing a simple instance provider. Those of you who are interested in implementing other provider types will have to dig into the WMI SDK documentation, although, the following text should supply enough background information to ease the pain a bit.
Since an instance provider is responsible for retrieving the management data, which represents an individual instance, one of the primary methods, to be implemented while developing such a provider is IWbemServices::GetObjectAsync. The method has the following signature:
HRESULT IWbemServices::GetObjectAsync(
 const BSTR bstrObjPath,
 LONG lFlags,
 IWbemContext *pContext,
 IWbemObjectSink *pObjSink
);
where the parameters are defined as follows:
- bstrObjPath: A path to the instance to be retrieved.
- lFlags: One or more bit flags that affect the behavior of the method. See the WMI SDK for details.
- pContext: A pointer to IWbemContext used to communicate provider-specific information between a provider and WMI.
- pObjSink: A pointer to IWbemObjectSink interface used to return the retrieved instance data to WMI and report on the status of the operation.
A typical implementation of IWbemServices::GetObjectAsync may resemble the following code:
HRESULT SampleProvider::GetObjectAsync(
 const BSTR bstrObjPath,
 LONG lFlags,
 IWbemContext *pContext,
 IWbemObjectSink *pObjSink
) {
 IWbemClassObject *pObj = NULL;
 if (bstrObjPath == NULL || pObjSink == NULL || m_pNamespace == NULL)
 return WBEM_E_INVALID_PARAMETER;
 // retrieve instance based on path
 if (RetrieveInstanceByPath(bstrObjPath, &pObj) == S_OK) {
 pObjSink->Indicate(1, &pObj);
 pObj->Release();
 pObjSink->SetStatus(WBEM_STATUS_COMPLETE, WBEM_S_NO_ERROR, NULL, NULL);
 return WBEM_S_NO_ERROR;
 } else {
 pObjSink->SetStatus(WBEM_STATUS_COMPLETE, WBEM_E_NOT_FOUND, NULL, NULL);
 return WBEM_E_NOT_FOUND;
 }
};
Here the most interesting thing is the call to IWbemObjectSink::Indicate method, which is used to pass the retrieved instance back to WMI. This method takes two parameters: a count that indicates how many objects are being returned, and an array of pointers to IWbemClassObject interfaces. Each interface pointer is a handle to the instance that is discovered by the retrieval operation and passed back to WMI.
Following the completion of IWbemObjectSink::Indicate the status of the operation is reported back to WMI via the IWbemObjectSink::SetStatus method. This method takes four parameters: a bitmask status of the operation, an HRESULT of the operation, a string, and an object parameter. The bitmask status indicates whether an operation is still in progress or completed and may be one of the following: WBEM_STATUS_COMPLETE or WBEM_STATUS_PROGRESS. The HRESULT parameter is simply an error code, if there is any, generated by the retrieval operation. The string parameter is optional and is only used when an operation is expected to return a string. For instance, when updating or creating an instance, IWbemObjectSink::SetStatus may be called with this parameter set to the object path of an updated or newly created instance. Finally, the last parameter, the pointer to the IWbemClassObject interface, is used whenever it is necessary to report any extended status information. In such cases, the pointer may be associated with an instance of the __ExtendedStatus WMI class.
Besides returning individual instances directly based on the object path, instance provides are expected to be able to enumerate all management objects. This is achieved via IWbemServices::CreateInstanceEnumAsync method:
HRESULT IWbemServices::CreateInstanceEnumAsync(
 const BSTR bstrClass,
 LONG lFlags,
 IWbemContext *pContext,
 IWbemObjectSink *pObjSink
);
where the parameters are defined as follows:
- bstrClass: The name of the class for which instances are being retrieved. This is a mandatory parameter and cannot be set to NULL.
- lFlags: One or more bit flags that affect the behavior of the method. See the WMI SDK for details.
- pContext: A pointer to IWbemContext used to communicate provider-specific information between a provider and WMI.
- pObjSink: A pointer to IWbemObjectSink interface used to return the retrieved instance data to WMI and report on the status of the operation.
IWbemServices::CreateInstanceEnumAsync can be implemented as follows:
HRESULT SampleProvider::CreateInstanceEnumAsync(
 const BSTR bstrClass,
 LONG lFlags,
 IWbemContext *pContext,
 IWbemObjectSink *pObjSink
) {
 IWbemClassObject *pClass = NULL;
 IWbemClassObject *pInst = NULL;
 HRESULT hr = S_OK;
 // retrieve class definition using IWbemServices pointer cached
 // during initialization
 hr = m_pNamespace->GetObject(strClass, 0, NULL, &pClass, 0);
 if (hr != S_OK)
 return hr;
 while(GetNextInstance(pClass, &pInst, pContext)) {
 pObjSink->Indicate(1, &pInst);
 pInst->Release();
 }
 pObjSink->SetStatus(WBEM_STATUS_COMPLETE, WBEM_S_NO_ERROR, NULL, NULL);
 return WBEM_S_NO_ERROR;
};
As you can see, the implementation is very similar to that of IWbemServices::GetObjectAsync. The only difference here is that instead of retrieving an object based on its path, the code continuously calls a hypothetical function GetNextInstance, which assembles new WMI objects based on some kind of management data. These objects are then returned to WMI one-by-one using the IWbemObjectSink::Indicate method. When the enumeration completes (GetNextInstance returns a FALSE value), WMI is notified on the operation's status via a call to IWbemObjectSink::SetStatus.
Once IWbemProviderInit::Initialize, IWbemServices::GetObjectAsync, and IWbemServices::CreateInstanceEnumAsync are implemented, the provider is functional and ready to be deployed. However, it will only be able to provide the management data to WMI in a read-only fashion. In order for a provider to support updates to the instances that it manages, it must implement both the IWbemServices::PutInstanceAsync and IWbemServices::DeleteInstanceAsync methods.
IWbemServices::PutInstanceAsync is used to create or update an instance of a given WMI class. The method has the following signature:
HRESULT IWbemServices::PutInstanceAsync(
 IWbemClassObject *pInstance,
 LONG lFlags,
 IWbemContext *pContext,
 IWbemObjectSink *pObjSink
);
where the parameters are defined as follows:
- pInstance: A pointer to the IWbemClassObject interface that represents an instance to be created or updated.
- lFlags: One or more bit flags that affect the behavior of the method. See the WMI SDK for details.
- pContext: A pointer to IWbemContext used to communicate provider-specific information between a provider and WMI.
- pObjSink: A pointer to the IWbemObjectSink interface used to report on the status of the operation.
Implementing IWbemServices::PutInstanceAsync is trivial since the structure of this method is very similar to one of the methods described earlier, such as IWbemServices::GetObjectAsync. One thing you should keep in mind, though, is that for instances of subclasses, an update operation is compound. In other words, if pInstance points to an object of a class that has nonabstract superclasses, WMI automatically invokes IWbemServices::PutInstance for each of these superclasses starting from the top of the hierarchy. The update operation succeeds only if all the providers responsible for each of the classes within the inheritance tree handle the update successfully. You may assume that the same principle works for subclasses as well, meaning that whenever an instance of a class is updated, the update is propagated to instances of all its subclasses. Unfortunately, this is not the case—instead, if an application updates properties of an object, which are inherited by subclass instances, it must explicitly call IWbemServices::PutInstance on each of the affected subclass instances.
IWbemServices::DeleteInstanceAsync deletes an instance of a designated class, residing in a current namespace. The method has the following signature:
HRESULT IWbemServices::DeleteInstanceAsync(
 IWbemClassObject *pInstance,
 LONG lFlags,
 IWbemContext *pContext,
 IWbemObjectSink *pObjSink
);
where the parameters are defined as follows:
- pInstance: A pointer to the IWbemClassObject interface that represents an instance to be deleted.
- lFlags: One or more bit flags that affect the behavior of the method. See the WMI SDK for details.
- pContext: A pointer to IWbemContext used to communicate provider-specific information between a provider and WMI.
- pObjSink: A pointer to IWbemObjectSink interface used to report on the status of the operation.
Again, implementing IWbemServices::DeleteInstanceAsync is very similar to coding the other provider methods that were described earlier. Similarly to IWbemServices::PutInstanceAsync, WMI automatically invokes IWbemServices::DeleteInstance for each of the superclass instances. It starts from the top of the hierarchy in case pInstance points to an object of a class that has nonabstract superclasses. However, the success of the delete operation depends only on the success of the IWbemServices::DeleteInstance call for the top-level nonabstract class.
Optionally, instance providers may support query processing. When a provider elects to handle queries, it must implement the IWbemServices::ExecQueryAsync method:
HRESULT IWbemServices::ExecQueryAsync(
 const BSTR bstrQueryLangauge,
 const BSTR bstrQuery,
 LONG lFlags,
 IWbemContext *pContext,
 IWbemObjectSink *pObjSink
);
where the parameters are defined as follows:
- bstrQueryLanguage: A string that contains the name of one of the query languages supported by WMI. Currently, the only supported language is WQL, thus, the value of this parameter should always be set to WQL.
- bstrQuery: A string that contains the text of the query. This is a mandatory parameter that cannot be NULL.
- lFlags: One or more bit flags that affect the behavior of the method. See the WMI SDK for details.
- pContext: A pointer to IWbemContext used to communicate provider-specific information between a provider and WMI.
- pObjSink: A pointer to the IWbemObjectSink interface used to deliver the results of the query back to WMI and report on the status of the operation.
A typical implementation of IWbemServices::ExecQueryAsync must be capable of parsing the query test, retrieving the qualifying objects, and returning the results back to WMI. If for some reason, a provider cannot handle the query, it may choose to refuse the query by returning the WBEM_E_PROVIDER_NOT_CAPABLE result code. In such cases, WMI may attempt to either simplify the query and resend it to the provider, or just enumerate all instances of a class, for which the query is invoked.
Other types of providers, such as event or method providers, may need to implement additional interfaces and interface methods. For instance, in order to allow a client to execute object methods, a provider must implement the IWbemServices::ExecMethodAsync method. However, supporting the interfaces and methods described above, is usually sufficient for a provider that satisfies the majority of typical system management needs.
Once a provider COM server is coded and compiled, it must be registered just like any other COM object. To register a provider, use regsvr32.exe as follows:
regsvr32.exe SampleProvider.DLL
COM registration, although required, is not the only piece of information that WMI needs in order to use the provider. As I mentioned earlier, WMI maintains its own provider registration information in the CIM Repository. A provider is described by an instance of the __Win32Provider system class and an instance of a subclass of __ProviderRegistration. For example, in order to register an instance provider "SampleProvider", the following two instances must be added to the repository:
instance of __Win32Provider as $Prov {
 Name = "SampleProvider";
 ClsId = "{fe9af5c0-d3b6-11ce-a5b6-00aa00680c3f}";
};
instance of __InstanceProviderRegistration {
 Provider = $Prov;
 InteractionType = 0;
 SupportsPut = TRUE;
 SupportsGet = TRUE;
 SupportsDelete = TRUE;
 SupportsEnumeration = TRUE;
 QuerySupportLevels = {"WQL:UnarySelect"};
};
This first instance of the __Win32Provider class simply describes the provider to WMI and establishes a link to an external COM server by setting the ClsId property to the Class ID of the COM object. To allow for finer control over the provider initialization, __Win32Provider offers a few other properties, such as PerLocaleInitialization and PerUserInitialization, which indicate whether a provider is initialized only one time or once per each locale and user. However, under normal circumstances the defaults are usually sufficient so that Name and ClsId are the only properties that need to be set. Because Name is a key, it cannot be left blank. WMI also needs ClsId to load the appropriate provider COM server.
The __InstanceProviderRegistration object serves as a description of the provider's capabilities. Most of its properties are self-explanatory, with the exception of InteractionType and QuerySupportLevels. The former identifies the type of the provider—the value of zero (default) stands for pull providers, while the value of one is associated with push providers. QuerySupportLevels is a bit more complex. As its name implies, this property indicates what kind of query support the provider guarantees. Setting this property to NULL would mark the provider as not capable of processing any queries. For those providers that do support query processing, this property may be set to one or more of the following values: WQL:UnarySelect, WQL:References, WQL:Associators, and WQL:V1ProviderDefined. Under the current release, WMI only delivers simple unary SELECT WQL queries to providers, hence the WQL:UnarySelect designation. Interestingly, marking the provider as capable of handling only the unary SELECT queries does not seem to preclude it from processing the REFERENCES OF or ASSOCIATORS OF queries. WMI takes care of translating such queries into simple SELECT statements before sending them to providers, which enables the providers to handle all types of queries in a uniform fashion.
As you can see, building a provider, while not terribly complex, involves a fair amount of low-level coding and assumes working knowledge of COM. To make provider programming more appealing for a less sophisticated audience, Microsoft developed the Provider Framework, which ships as a part of the WMI SDK. The Provider Framework is nothing but a set of C++ classes that encapsulate most of the boilerplate code necessary to create an instance or method provider. The good thing about the Provider Framework is that it completely shields the developer from the intricacies of COM programming because it handles all interactions with COM. The bad thing, of course, is that it still requires fairly sophisticated C++ coding skills.
The Provider Framework includes a set of classes that implement IWbemProviderInit, IWbemServices, and IWbemClassObject interfaces (such as CWbemProviderGlue, Provider, and CInstance respectively), as well as some utility classes, which facilitate time conversions, time span calculations, string operations, and more. Typically, a developer will create a new provider class by subclassing the Provider class and overriding some of its methods. The base class supplies a default implementation for all of its methods that simply returns WBEM_E_PROVIDER_NOT_CAPABLE when invoked.
Still, coding a provider by hand, even with the help of the Framework classes, is quite an effort. That is why WMI SDK includes a handy utility called the Provider Code Generator wizard, which spits out the stab implementation for all required C++ classes and methods and creates all necessary MOF definitions. The Provider Code Generator wizard is shown in Figure 5-1.
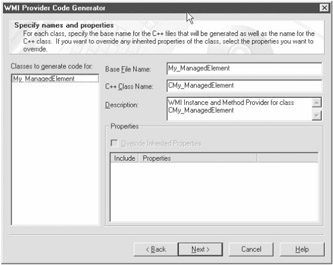
Figure 5-1: Provider Code Generation wizard
You can access the Provider Code Generator through the CIM Studio interface. In order to generate the code for a provider, you must select one of the existing classes and then invoke the wizard by clicking a button in the upper-right corner of the CIM Studio GUI. The wizard will output several CPP files, a header file, a makefile, a MOF definition, and a DEF file. Most files will be named after the initially selected WMI class (although this base name can be overridden) and will have the appropriate extensions. For instance, if you select a hypothetical class My_ManagedElement, the wizard will produce the following files:
- My_ManagedElement.CPP: C++ source file that contains the stab implementation for the provider.
- My_ManagedElement.H: C++ header file that contains the declaration of the provider class.
- Maindll.CPP: C++ source file that contains the implementation for the DllMain, DllGetClassObject, DllCanUloadNow, DllRegisterServer, and DllUnregisterServer functions.
- My_ManagedElementProv.DEF: A definition file with the list of exports.
- My_ManagedElementProv.MAK: A makefile used to compile and link the provider DLL.
- My_ManagedElementProv.MOF: A MOF file that contains the MOF declarations necessary to register the provider with WMI. This file would create instances of the __Win32Provider class as well as instances of the __InstanceProviderRegistration and __MethodProviderRegistration classes.
Once the source files are generated, all that you have left to do is fill out the blanks in the default method implementations and then build and register the provider DLL. As you can see, with the help of the Provider Code Generation wizard, developing a working WMI provider is trivial, although there are still a few things left to be desired. First, the resulting provider does not allow you to expose management events, which can be a severe limitation for some managed environments. Second, you still need to engage in some, although much less complex, C++ coding exercises. As a result, despite all the nifty WMI SDK utilities, WMI provider development is often perceived as one of the more advanced subjects, and as a result, it remains largely unexplored.
Exposing Applications for Management with System Management Instrumentation
The goal of the System.Management.Instrumentation namespace is to make instrumenting .NET applications easier by providing extensive support for exposing the application data and events for management. However, rather than following the familiar path of supplying the helper and utility types for provider development, the designers of the System.Management.Instrumentation namespace took a completely different and quite innovative approach. The idea behind .NET application instrumentation is very simple, yet elegant, and it revolves around some common traits that are shared by .NET and WMI. Both platforms are based on the same object-oriented design principle and operate in terms of the same entities—classes, objects, properties, and so on. Therefore, you can establish a mapping between the managed elements modeled as .NET types, and WMI schema elements so that an arbitrary .NET type would correspond to a WMI class and its properties, and events would map to corresponding facets of a WMI class.
Thus, once a translation scheme between the .NET application types and the WMI classes is defined, any software system can be instrumented for WMI simply by creating the metadata, which describes the .NET-to-WMI mapping. Naturally, such a concept of mapping metadata fits very well with the overall philosophy of .NET and can easily be supported through the .NET Framework attribution capabilities. Rather than coding to WMI interfaces, you may decorate the existing .NET application types, properties, and events with the appropriate attributes so that the .NET Framework itself takes care of all the necessary translation and marshalling of the application data.
The instrumentation model employed by the designers of System.Management.Instrumentation namespace is largely declarative. This means that the namespace contains mostly the .NET attribute types that are used to mark up the appropriate .NET assemblies, types, properties, and events. Besides the attributes, there are a few helper types. These can be used to customize the process of exposing the application data to WMI and to account for complex situations that cannot be easily handled through attribution. The remainder of this chapter is dedicated to addressing various scenarios for exposing the data and events for management using the attributes as well as the helper types.
Instrumentation Basics
When you are instrumenting a particular .NET application, you must first mark the application's assembly as capable of providing the management data to WMI. You can achieve this with the custom attribute type InstrumentedAttribute, which is a part of System.Management.Instrumentation namespace:
using System.Management;
using System.Management.Instrumentation;

[assembly:Instrumented(@" rootCIMV2")]
namespace InstrumentedApplication {
// instrumented application types go here
...
};
There are a few things happening here. First, when you look at its disassembly listing, you can easily deduce that InstrumentedAttribute is an assembly-level attribute:
.class public auto ansi beforefieldinit InstrumentedAttribute
 extends [mscorlib]System.Attribute {
 .custom instance void [mscorlib]System.AttributeUsageAttribute::.ctor(
 valuetype [mscorlib]System.AttributeTargets) = (01 00 01 00 00 00 00 00)
}
Here, the definition for the InstrumentedAttribute type is decorated with another attribute, AttributeUsageAttribute, which defines a set of elements to which a given attribute can be applied. The hexadecimal string, used to initialize the AttributeUsageAttribute represents the bytes in the InstrumentedAttribute value blob. In this case, the sequence of hexadecimal digits corresponds to the Assembly member (with a value of 0x00000001) of the AttributeTargets enumeration, which is used as a parameter to the constructor of the AttributeUsageAttribute type. Thus, InstrumentedAttribute can only be applied to an assembly—if you try to use it any place else, it will trigger a compiler error. This attribute should be marked with the assembly keyword and placed at the assembly level, prior to all type definitions.
Yet another thing you should notice is the parameter that is passed to the constructor of InstrumentedAttribute. This is a string that represents the target namespace for the instrumented types contained within the assembly. In this particular case, all management classes, instances, and events will be imported into the rootCIMV2 WMI namespace. In fact, the constructor, which takes the namespace parameter, is not the only constructor featured by InstrumentedAttribute. There is also a parameterless constructor that causes all instrumented entities to be loaded into the rootdefault namespace. Finally, there is a constructor that takes not only the namespace parameter, but also a security descriptor (SD) that specifies the security restrictions for the instrumented assembly. The security descriptor parameter is a string formatted using the Security Description Definition Language (SDDL). The SDDL is a special notation that allows components of a SD to be represented in a textual form. Essentially, this parameter is a sequence of tokens that correspond to the four components of a SD: owner, primary group, discretionary access control list (DACL), and system access control list (SACL). Thus, a security descriptor string may take the following form:
O:G:D:(ace1)(ace2)...S:(ace1)(ace2)...
where the individual elements are defined as follows:
- O: : Designates the owner portion of a SD string.
- owner_sid: A security identifier (SID) string that represents the owner of an object. A SID string can be encoded either using a standard notation (S-R-I-S-S...) or one of the string constants, defined in the sddl.h header file. Thus, AO stands for Account operators, AU for Authenticated users, and so on.
- G: : Designates the group portion of a SD.
- group_sid: A SID string that represents the object's primary group. This component uses the same encoding scheme as the owner_sid.
- D: : Designates the DACL portion of a SD.
- dacl_flags: A combination of SD control flags that apply to DACL. For a complete description of these flags, see the MSDN documentation.
- S: : Designates the SACL portion of a SD.
- sacl_flags: A combination of security descriptor control flags that apply to SACL. For a complete description of these flags, see MSDN documentation.
- ace: An access control list entry (ACE) encoded as string. This is a sequence of semicolon-separated tokens that represent various components of an ACE. For more information on ACE string encoding, see the MSDN documentation.
Assembling such string security descriptors by hand is rather convoluted and error-prone. A better idea is to use the ConvertSecurityDescriptorToStringSecurityDescriptor function, which takes a regular Windows SD (SECURITY_DESCRIPTOR structure) and outputs its string representation. The downside, of course, is that typing the name of this function is nearly as cumbersome as assembling a string SD manually.
Once the application's assembly is decorated with the InstrumentedAttribute attribute, its manifest will include the information necessary for the Framework to detect an instrumented application:
.assembly InstrumentedApplication {
...
.custom instance void
[System.Management]
System.Management.Instrumentation.InstrumentedAttribute::.ctor(string)
 = (01 00 0A 72 6F 6F 74 5C 43 49 4D 56 32 00 00) //...rootCIMV2..
...
}
The next step is to ensure that the application is registered and its schema is published in the CIM Repository. This is achieved using the standard installer mechanism, which is a part of .NET Framework. Typically, whenever the .NET Framework encounters a type that is a subclass of the System.Configuration.Install.Installer type such that this type is decorated with System.ComponentModel.RunInstallerAttribute, it checks the attribute's properties to determine whether the installation is requested. To request the installation services, the RunInstallerAttribute attribute's constructor has to be invoked with the Boolean TRUE value, which sets its RunInstaller property to TRUE. Thus, in order to ensure that all necessary installation steps are taken, an instrumented application would include some code similar to the following:
using System.ComponentModel;
using System.Configuration.Install;

[RunInstaller(true)]
public class MyInstaller : Installer {
...
};
Given such code, it is your responsibility as a developer to override the Install, Commit, and Uninstall methods of the Installer type and manually code all the installation procedures, such as publishing the application schema into the CIM Repository and registering all required components. This may get quite tricky because some of the installation steps may involve nontrivial coding. Fortunately, the System.Management.Instrumentation namespace offers a helper type, DefaultManagementProjectInstaller, which takes upon itself the task of analyzing the application's assembly and fulfilling all installation requirements. Therefore, the code just shown can be simplified as follows:
using System.ComponentModel;
using System.Configuration.Install;
using System.Management.Instrumentation;
[RunInstaller(true)]
public class MyInstaller : DefaultManagementProjectInstaller {};
Note that you are no longer required to override the methods of the Installer type and supply your own implementation of the installation procedures. DefaultManagementProjectInstaller already contains all the necessary implementation code, which takes care of the registration and schema publishing. Curiously, if you look at the disassembly listing of DefaultManagementProjectInstaller, you will see that this type does not override any of the Installer methods. Instead, its constructor does the following:
.method public hidebysig specialname rtspecialname
 instance void .ctor() cil managed {
 .maxstack 2
 .locals init (class System.Management.Instrumentation.ManagementInstaller V_0)
 IL_0000: ldarg.0
 IL_0001: call instance void
 [System.Configuration.Install]System.Configuration.Install.Installer::.ctor()
 IL_0006: newobj instance void
 System.Management.Instrumentation.ManagementInstaller::.ctor()
 IL_000b: stloc.0
 IL_000c: ldarg.0
 IL_000d: call instance class
 [System.Configuration.Install]
 System.Configuration.Install.InstallerCollection
 [System.Configuration.Install]
 System.Configuration.Install.Installer::get_Installers()
 IL_0012: ldloc.0
 IL_0013: callvirt instance int32
 [System.Configuration.Install]
 System.Configuration.Install.InstallerCollection::Add(
 class [System.Configuration.Install]System.Configuration.Install.Installer)
 IL_0018: pop
 IL_0019: ret
}
Without going into too much detail, suffice it to say that this code simply creates an instance of another instrumentation helper type, ManagementInstaller, and adds this newly created instance to the Installers collection of the Installer object. Whenever the installation services are invoked, the Install, Rollback, or Commit methods iterate through the Installers collection and invoke the respective methods of each installer object found in the collection. The ManagementInstaller type houses the implementations for the Install, Rollback, and Commit methods that are suitable for publishing the application's schema to the CIM Repository and registering all the necessary application's components. Thus, whenever the installation services are requested, the respective methods of the ManagementInstaller object are called to carry out the necessary installation steps.
The technique demonstrated by the preceding code brings up an interesting thought. Say that your instrumented application already has an installer that takes care of all installation chores, such as copying the binaries, setting up configuration files, and so on. Then, in order to ensure that WMI-related installation steps are taken at the appropriate time, you may want to add the following line of code to the existing project installer's constructor:
Installers.Add(new ManagementInstaller());
This has exactly the same effect as the earlier code—it adds an instance of the ManagementInstaller type to the Installers collection of the project installer.
However, just having an installer embedded into your instrumented application is not enough. Somehow, the appropriate methods of the installer must be invoked at the right time to ensure that the instrumented application is correctly registered and its schema is published to the CIM Repository. The simplest and most versatile way of performing the installation is with the help of the .NET SDK utility installutil.exe. This is a command-line program that can be invoked simply with the name of the assembly to be installed. Thus, in order to install the assembly contained in the InstrumentedApplication.exe file, you can issue the following command:
installutil.exe InstrumentedApplication.exe
When this command finishes, the CIM Repository will be updated with the application's schema and provider registration information.
The complete list of command-line options for installutil.exe is shown in Table 5-2.
|
OPTION |
DESCRIPTION |
|---|---|
|
/h[elp] |
Prints syntax and command-line option information. |
|
/help |
Prints any additional command-line options that are honored by individual installers contained within the assembly pointed to by the parameter. |
|
/logFile= |
Causes installutil.exe to record the progress of the installation to a file pointed to by the parameter. If this option is omitted, the progress of the installation is recorded into a file called the .InstallLog. |
|
/logToConsole= |
Instructs installutil.exe to output the progress messages to the system console (true) or suppress the output altogether (false). By default, the output is suppressed. |
|
/showCallStack |
Causes installutil.exe to dump the call stack to the log file whenever an exception occurs. |
|
/u[ninstall] |
Requests uninstallation of the specified assembly. |
|
/? |
Same as /help . |
|
/? |
Same as /h. |
Note that you can install multiple assemblies at once by specifying several assembly files on the command line. The command-line options that occur within the command line prior to the name of the assembly will apply to that assembly's installation. When multiple assemblies are installed, the installation process is transactional—if one assembly fails to install, the utility performs a rollback for all the assemblies installed up to that point. On the other hand, uninstallation is not transactional.
If installutil.exe is invoked without any command-line options, when it is finished it outputs the following files into the current directory:
- InstallUtil.InstallLog: Contains the general description of the installation steps.
- assemblyName.InstallLog: Contains information regarding the commit phase of the installation process for a particular assembly.
- assemblyName.InstallState: Contains uninstallation information for a particular assembly.
An assembly can also be installed programmatically. For example, the following code, if placed at the beginning of the Main function of your instrumented application, will invoke the installation services:
Type t = typeof(InstrumentedClass);
string[] args = new string[] { t.Assembly.Location };
System.Configuration.Install.ManagedInstallerClass.InstallHelper(args);
Here, I assume that the instrumented application contains a type called InstrumentedClass. The first line of code obtains the System.Type object, associated with InstrumentedClass, which is subsequently utilized to get the location of the instrumented assembly. The location string is then packaged into the arguments array and passed to the InstallHelper method of the System.Configuration.Install.ManagedInstallerClass type, which actually invokes the installers. The location of the instrumented assembly is not the only argument taken by the InstallHelper method—in fact, you can use the same parameters as you would use for installutil.exe:
Type t = typeof(InstrumentedClass);
string[] args = new string[] {
 "/logFile=MyLogFile.Log",
 "/showCallStack",
 t.Assembly.Location
};
System.Configuration.Install.ManagedInstallerClass.InstallHelper(args);
You will find that invoking the installers programmatically is very straightforward and does not involve extensive coding. There is, however, a downside. For obvious reasons, the application's schema as well as its registration information will not be available in the CIM Repository until the first time the application is run. Thus, it is probably not a good idea to use this approach for production application deployment. Moreover, supplying such installation code is not really necessary. In fact, whenever an instrumented application first publishes an instance or raises an event, the .NET Framework performs auto-installation, which takes care of application and schema registration. Note that autoinstallation only succeeds if the user running the application belongs to the Local Administrators group. Again, this is intended as a convenience to facilitate rapid prototyping and testing, and relying on this feature when deploying an application is generally not recommended.
There are also other ways to perform an installation of an instrumented application. For instance, when an application is distributed as an MSI package, the application's installers will be invoked automatically as long as the option of running .NET installers is turned on.
Lastly, there is a question of how the application's management information is actually fed into WMI. Under normal circumstances, a provider (for instance, a COM server managed by WMI itself) would interact with its associated application and gather the appropriate management data. This is not the case when it comes to instrumenting .NET applications. Here, the provider is embedded into the application itself, which allows WMI to interact with the managed subsystem directly rather than having the provider communicate with the application via the application's API. An added benefit of this approach is the degree of control the application has over the provider's life span. Since the provider is no longer controlled by WMI, it is up to the application to determine when to expose its data and events to WMI.
A provider embedded into an application is referred to as a decoupled provider. Each decoupled provider must implement two special interfaces: IWbemDecoupledRegistrar and IWbemDecoupledEventProvider. The former allows the provider to register itself with WMI and define its life span. The latter facilitates the forwarding of management events to WMI.
Even a decoupled provider has to be registered in the CIM Repository. You may find registering the decoupled provider a bit tricky because the process differs from that of registering a regular provider. For instance, rather than using a conventional class __Win32Provider, for this type of registration you must use a brand new class, MSFT_DecoupledProvider, which is the derivative of __Win32Provider. Fortunately, the .NET Framework generates all the necessary registration entries automatically. Although a description of the decoupled provider registration details is beyond the scope of this book, those of you who are curious may want to take a look at the generated MOF files. These files are typically placed into the %SystemRoot%WINNTSystem32WBEMFramework oot directory, where the namespace is the target namespace for the application's schema; and the name is based on the name of the instrumented application's assembly.
Exposing Management Data
Exposing an application's type for management is beyond simple—all you have to do is mark the type with InstrumentationClassAttribute, and pass the InstrumentationType.Instance enumeration member to its constructor. The following code demonstrates how to expose an arbitrary MyManagedClass to WMI:
using System.ComponentModel;
using System.Configuration.Install;
using System.Management.Instrumentation;

[assembly:Instrumented(@" rootCIMV2")]
namespace InstrumentedApplication {
 [RunInstaller(true)]
 public class MyInstaller : DefaultManagementProjectInstaller {};

 [InstrumentationClass(InstrumentationType.Instance)]
 public class MyManagedClass {
 public int Prop1;
 public string Prop2;
 public static void Main(string[] args) {}
 }
}
If you save this code to a file, compile it, and run installutil.exe, your CIM Repository will contain the following WMI class definition in the rootCIMV2 namespace:
class MyManagedClass {
 [key] string ProcessId;
 [key] string InstanceId;
 sint32 Prop1;
 string Prop2;
};
As you can see, both the int Prop1 and string Prop2 properties of MyManagedClass type are translated into the respective properties of the WMI class. However, the WMI class has two more properties, marked with the Key qualifier: ProcessID and InstanceID. These properties are added automatically to ensure the uniqueness of any instance of the class, which may be subsequently created.
Mapping .NET Types to WMI Classes
So how do .NET types and type members map to their respective entities within WMI? Fortunately, there is striking similarity between .NET and WMI types, which makes this mapping trivial. Actually, all .NET primitive value types map one-to-one to the corresponding CIM types. Certain reference types, such as String, DateTime, and TimeSpan also map to CIM string, CIM datetime in DMTF date and time format, or datetime in DMTF interval format, respectively. Mapping .NET arrays is also straightforward—they are translated into WMI arrays of appropriate types. For example, the following .NET type
public class MyManagedClass {
 public string[] StrProp;
 public static void Main(string[] args) {}
}
has the following MOF representation:
class MyManagedClass {
 [key] string ProcessId;
 [key] string InstanceId;
 string StrProp[];
};
The situation is a bit more complex when it comes to embedded objects and references. The latest release of System.Management.Instrumentation only supports WMI embedded objects; it is impossible to generate a WMI class definition with properties of a reference type. Thus, any .NET type members of reference types other than String, DateTime, and TimeSpan, are mapped to embedded objects in WMI. Consider the following .NET types:
[InstrumentationClass(InstrumentationType.Instance)]
public class EmbeddedClass {
 public int EmbProp;
}

[InstrumentationClass(InstrumentationType.Instance)]
public class MyManagedClass {
 public EmbeddedClass EmbClassProp;
 public static void Main(string[] args) {}
}
The .NET Framework will translate these .NET types into the following WMI definitions:
class EmbeddedClass {
 [key] string ProcessId;
 [key] string InstanceId;
 sint32 EmbProp;
};
class MyManagedClass {
 [key] string ProcessId;
 [key] string InstanceId;
 EmbeddedClass EmbClassProp;
};
Interestingly, both EmbeddedClass and MyManagedClass types have to be decorated with the InstrumentationClass attribute. If, for some reason, you forget to mark the embedded type with this attribute, any property of the embedded type will simply be ignored. Thus, in the example above, if EmbeddedClass does not have the InstrumentationClass attribute, the EmbClassProp property will not be included in the CIM definition for MyManagedClass. This seemingly odd behavior actually makes sense—in order to support the definition for MyManagedClass, the CIM Repository has to contain the definition for its dependency, EmbeddedClass.
There is another caveat, which has to do with property access modifiers. Only public members of an instrumented type are mapped to WMI class properties. Take a look at the following example:
[InstrumentationClass(InstrumentationType.Instance)]
public class MyManagedClass {
 public string PublicProp;
 string PrivateProp;
 public static void Main(string[] args) {}
}
The corresponding MOF definition will be the following:
class MyManagedClass {
 [key] string ProcessId;
 [key] string InstanceId;
 string PublicProp;
};
As you may see, only the PublicProp, which has a public access modifier, is mapped to WMI class definition. The private field PrivateProp is simply ignored. This brings up another interesting thought. Normally, the .NET Framework does not distinguish between fields and properties—i.e., both are mapped to WMI class properties. Thus, if a given property is based upon a member field, both the property and the field will be translated into WMI class properties, essentially creating duplicate fields. This point is illustrated the following example:
[InstrumentationClass(InstrumentationType.Instance)]
public class MyManagedClass {
 public string StrPropertyField;
 public string StrProperty {
 get {return StrPropertyField; }
 set {StrPropertyField = value; }
 }
 public static void Main(string[] args) {}
}
The resulting MOF definition is the following:
class MyManagedClass {
 [key] string ProcessId;
 [key] string InstanceId;
 string StrPropertyField;
 string StrProperty;
};
When translating .NET fields and properties, the .NET Framework has no knowledge of any relationship between StrPropertyField and StrProperty, therefore both these elements end up as properties of the corresponding WMI class. By declaring StrPropertyField as private, which is a normal practice for property definitions, you ensure that only StrProperty is exposed to WMI, thus eliminating duplication.
Using access modifiers is not the only way to exclude certain .NET type members from the corresponding WMI class definition. In fact, there is a much cleaner approach based on the System.Management.Instrumentation.IgnoreMemberAttribute custom attribute. All type members that you decorate with this attribute will not be considered when their respective .NET type is mapped to WMI. Thus, the example above can be changed as follows:
[InstrumentationClass(InstrumentationType.Instance)]
public class MyManagedClass {
 [IgnoreMember]
 public string StrPropertyField;
 public string StrProperty {
 get {return StrPropertyField; }
 set {StrPropertyField = value; }
 }
 public static void Main(string[] args) {}
}
In fact it is a good idea to always use IgnoreMemberAttribute not only for public type members, which are to be excluded from the WMI class, but also for the private type elements. Although decorating private type members with IgnoreMemberAttribute is redundant, it does not hurt and may certainly add clarity to your code.
Normally, an instrumented .NET type is translated into a WMI class that has the same name. Thus, in the example above, MyManagedClass maps to a WMI class also called MyManagedClass. Every once in a while, you may want to create a WMI class with a different name from that of the corresponding .NET type. For instance, it is a good idea to prefix all WMI classes that belong to a particular application with some kind of schema name to provide for logical grouping. Of course, you could use the same prefix for the respective .NET application types, but it would be a bit inconvenient and just plain ugly. A better approach is to use the ManagedNameAttribute custom attribute to rename .NET types and type members while you are translating them to WMI. Consider the following example:
[InstrumentationClass(InstrumentationType.Instance)]
[ManagedName("MYAPP_MyManagedClass")]
public class MyManagedClass {
 [ManagedName("MYAPP_StrProp")]
 public string StrProp;
 public static void Main(string[] args) {}
}
Here, the MyManagedClass .NET type is exposed to WMI as MYAPP_MyManagedClass so that the schema name of MYAPP is added to the class name. At the same time, its property, StrProp, is translated into the corresponding WMI class property, MYAPP_StrProp:
class MYAPP_MyManagedClass {
 [key] string ProcessId;
 [key] string InstanceId;
 string MYAPP_StrProp;
};
Mapping .NET Type Hierarchies to WMI
Normally, all .NET types, even those that are subclasses of some other .NET types, are translated into root-level WMI classes. Consider the following example:
public class MyBaseClass {
 public int IntField;
}
[InstrumentationClass(InstrumentationType.Instance)]
public class MyManagedClass : MyBaseClass {
 public string StrProp;
 public static void Main(string[] args) {}
}
Contrary to what you may expect, MyManagedClass will be translated to WMI as follows:
class MyManagedClass {
 [key] string ProcessId;
 [key] string InstanceId;
 string StrProp;
};
As you may see, the base type MyBaseClass is ignored and the resulting WMI class definition does not include IntField, which is inherited from the superclass. An obvious remedy for this seems to be marking the base type with InstrumentationClassAttribute:
[InstrumentationClass(InstrumentationType.Instance)]
public class MyBaseClass {
 public int IntField;
}
[InstrumentationClass(InstrumentationType.Instance)]
public class MyManagedClass : MyBaseClass {
 public string StrProp;
 public static void Main(string[] args) {}
}
Unfortunately, when you attempt to install the compiled assembly, installutil.exe will produce the following error message:
An exception occurred during the Install phase.
System.Exception: Instance instrumentation classes must
derive from abstract WMI classes.
It turns out that only leaf-level .NET types—types that do not have any subclasses—can publish instances to WMI. This means that applying InstrumentationClassAttribute with InstrumentationType.Instance to a base class is illegal. Somehow, the base class should be marked as abstract to indicate that it cannot expose any of its instances to WMI. You can achieve this by using another member of InstrumentationType enumeration, Abstract:
[InstrumentationClass(InstrumentationType.Abstract)]
public class MyBaseClass {
 public int IntField;
}
[InstrumentationClass(InstrumentationType.Instance)]
public class MyManagedClass : MyBaseClass {
 public string StrProp;
 public static void Main(string[] args) {}
}
Now the installation process will complete just fine and the CIM Repository will be updated with the following class definitions:
[abstract]
class MyBaseClass {
 sint32 IntField;
};
class MyManagedClass : MyBaseClass {
 [key] string ProcessId;
 [key] string InstanceId;
 string StrProp;
};
Note that the InstrumentationClassAttribute attribute is inherited by subclasses, so if a type hierarchy includes more than two types, only the root-level type and the leaf-level type should be decorated with InstrumentationClassAttribute. To clarify this point, look at the following example:
[InstrumentationClass(InstrumentationType.Abstract)]
class RootLevelClass {
}
class IntermediateLevelClass : RootLevelClass {
}
[InstrumentationClass(InstrumentationType.Instance)]
class LeafLevelClass : IntermediateLevelClass {
}
Here, IntermediateLevelClass inherits InstrumentationClassAttribute from its parent, and therefore, it is considered abstract. The attribute, however, has to be overridden for the leaf-level type LeafLevelClass, otherwise, this type will be translated into an abstract WMI class.
Deriving from Existing WMI Classes
So far, we have discussed mapping .NET type hierarchies to WMI class hierarchies. However, what if you want to produce a WMI class that is derived from one of the existing classes that are not related to any of the instrumented application's types? For instance, how can you map an application type to a WMI class that is derived from CIM_ManagedSystemElement? This is, actually, surprisingly simple. It turns out that InstrumentationClassAttribute has an alternative constructor that not only takes the InstrumentationType parameter, but also takes a name of the existing base class. Thus, to create a WMI class MyManagedClass, which is a derivative of CIM_ManagedSystemElement, you may write the following code:
[InstrumentationClass(InstrumentationType.Instance, "CIM_ManagedSystemElement")]
class MyManagedElement {
}
Curiously, if you attempt to supply the name of a nonexistent WMI class to the constructor of InstrumentationClassAttribute, the installutil.exe will fail and produce an error message similar to the one shown earlier. Furthermore, if the name of a nonabstract WMI class such as Win32_Process is used as a parameter to the InstrumentationClassAttribute constructor, the installation will still fail with the same error message. The bottom line is that every class that supports instance instrumentation must either be a root-level class, or derive from an abstract WMI class.
There is, however, one exception to this rule. It turns out that you can define a .NET type marked with the InstrumentationClass(InstrumentationType.Instance) attribute as a derivative of another type that is also attributed for instance instrumentation. As the following disassembly listing demonstrates, the System.Management.Instrumentation.Instance type is decorated with the InstrumentationClass(InstrumentationType.Instance) attribute; the hexadecimal initialization string corresponds to the InstrumentationType.Instance enumeration member (int32 value 0x00000000):
.class public abstract auto ansi beforefieldinit Instance
 extends [mscorlib]System.Object
 implements System.Management.Instrumentation.IInstance {
 .custom instance void
 System.Management.Instrumentation.InstrumentationClassAttribute::.ctor(
 valuetype System.Management.Instrumentation.InstrumentationType) =
 ( 01 00 00 00 00 00 00 00 )
}
Nevertheless, the following compiles and passes the installation process just fine:
[InstrumentationClass(InstrumentationType.Instance)]
public class MyManagedElement : Instance {
 public static void Main(string[] args) {}
}
However, the outcome may be a bit surprising. Rather than creating two WMI classes: one that corresponds to the .NET Instance type, and the other as the subclass of this class, the .NET Framework updates the CIM Repository with the following class definition:
class MyManagedElement {
 [key] string ProcessId;
 [key] string InstanceId;
};
So why is this possible and how does the Instance type differ from all the other application types? Well, as I said before, this is a special case—the Framework simply ignores the Instance type when it is used as a base class. This brings up another couple of questions: what is the purpose of Instance and why is it a part of the System.Management.Instrumentation namespace? As you may remember, the InstrumentationClass attribute propagates from the base class to its subclasses, which means that a subclass of Instance does not have to be decorated with this attribute to indicate its ability to support instance instrumentation. Therefore, it is, possible to expose a given class for management by simply deriving it from Instance:
public class MyManagedElement : Instance {
 public static void Main(string[] args) {}
}
Thus, the only purpose of Instance type is to provide a nice alternative to the declarative instrumentation model, used throughout the System.Management.Instrumentation namespace. If, for some reason, you are not fond of custom attributes, you can always achieve the same effect by using Instance as a base for your application types.
When modeling type hierarchies with Instance, there is again a caveat. Since Instance is decorated with InstrumentationClass(InstrumentationType.Instance), which propagates to its subclasses, this attribute must be explicitly overridden for all intermediate and leaf-level types. Consider the following example:
[InstrumentationClass(InstrumentationType.Abstract)]
public class MyIntermediateClass1 : Instance {
}
public class MyIntermediateClass2 : MyIntermediateClass1 {
}
[InstrumentationClass(InstrumentationType.Instance)]
public class MyLeafClass : MyIntermediateClass2 {
}
Here, MyIntermediateClass1, which has subclasses and therefore cannot support instance instrumentation, has to be marked with InstrumentationClass(InstrumentationType.Abstract) to override the InstrumentationClass(InstrumentationType.Instance) attribute inherited from Instance. MyIntermediateClass2 is fine because it inherits InstrumentationClass(InstrumentationType.Abstract) from its parent. Lastly, MyLeafClass is a leaf-level type that can support instance instrumentation and, therefore, has to be explicitly marked as such in order to override the inherited attribute.
As you can see, using Instance to instrument single, top-level types is straightforward. However, when it comes to type hierarchies, you still have to resort to using attributes, which, sort of defeats the purpose of using Instance in the first place.
Providing Instance Data to WMI
So far, I have talked about mapping .NET application types to WMI classes. Although important, having a WMI schema that reflects the instrumented types within an application by itself is not sufficient. The schema is just a skeleton, and the meat is the instance-level management data, which somehow has to be exposed to WMI. In other words, once the schema mapping is complete, there has to be a way to create instances of the application types and make them accessible to management clients just like instances of regular WMI classes.
The process of providing the instance-level data to WMI is surprisingly simple. All you have to do is create an instance of an appropriate .NET type and invoke certain helper methods to make such instances visible to management clients. The following is a complete (although fairly useless) example of creating and publishing an instance of an instrumented application type MyManagedElement:
using System;
using System.Management;
using System.ComponentModel;
using System.Configuration.Install;
using System.Management.Instrumentation;

[assembly:Instrumented(@" rootCIMV2")]
namespace InstrumentedApplication {
 [RunInstaller(true)]
 public class MyInstaller : DefaultManagementProjectInstaller {}

 [InstrumentationClass(InstrumentationType.Instance)]
 public class MyManagedElement {
 public string Description;
 public int Count;
 public static void Main(string[] args) {
 MyManagedElement el = new MyManagedElement();
 el.Description = "SAMPLE INSTANCE";
 el.Count = 256;
 Instrumentation.Publish(el);
 Console.ReadLine();
 Instrumentation.Revoke(el);
 }
 }
}
When this code is complied and run, a console window will pop up and wait for the user input. The program will terminate whenever any key is pressed. For the duration of this code's run, the CIM Repository will contain a single instance of MyManagedElement class, which, when expressed in MOF, will look similar to the following:
instance of MyManagedElement {
 Count = 256;
 Description = "SAMPLE INSTANCE";
 InstanceId = "3839";
 ProcessId = "3c702745-c84b-11d6-9159-000255f41c79";
};
As you can see, the Count and Description properties of this instance reflect the initialization values for their respective .NET fields. Two other mysterious properties—InstanceID and ProcessID—represent the unique identifier for the newly created instance and the process identity of the running .NET application respectively. The InstanceID is just a sequence number that is incremented automatically for each published instance. The ProcessID, contrary to what you may think, has nothing to do with OS process ID (PID) of the running program. It is just a GUID generated once per process so that it guarantees the uniqueness of a particular application's session in time and space. The choice of GUIDs vs. conventional PIDs is obvious: PIDs are recycled by the operating system and may, therefore, cause collisions. The .NET Framework automatically adds these two properties to any WMI class that represents a .NET type and automatically assigns the appropriate values when an instance is published. This is done to ensure that any instance created by a .NET application always has a unique identifier; as you may remember, these two properties are marked with the Key qualifier within the WMI class definition.
The code used to publish the instance of a .NET type is remarkably simple. In fact, there are only two lines that may look somewhat new: calls to Publish and Revoke methods of the helper type Instrumentation. As its name implies, Publish takes an instance of a .NET type as a parameter and makes it visible through WMI. Once published, the instance remains accessible to WMI clients until the application exits or the Revoke method is called. Revoke is the opposite of Publish; it essentially erases all traces of a given instance from the CIM Repository. If an instance is to remain visible for the entire lifetime of the application, calling Revoke is optional—the .NET Framework cleans up after itself automatically when an application shuts down.
When you are managing multiple instances, sometimes you may want to keep track of which of these instances are published. Generally, the .NET Framework is very good about ensuring that a given instance is not duplicated in the CIM Repository. Even if you invoke Publish on a particular instance more than once, all but the first invocation will have no effect and the CIM Repository will only contain a single version of the instance. Nevertheless, to avoid confusion and application errors, it might be a good idea to somehow record that a particular instance has been exposed to WMI. To do so, you can add a Boolean flag to your instances and set it to TRUE every time an instance is published, but unfortunately, it is easy to make a mistake that may eventually wreak havoc on your application. This is where subclassing System.Management.Instrumentation.Instance rather than using custom attributes may prove to be advantageous. All subclasses of Instance will automatically inherit its Published property, which is set to TRUE by the .NET Framework as soon as the instance is published, and updated back to FALSE whenever the Revoke is called on this instance. Consider the following code:
using System;
using System.Management;
using System.ComponentModel;
using System.Configuration.Install;
using System.Management.Instrumentation;

[assembly:Instrumented(@" rootCIMV2")]
namespace InstrumentedApplication {
 [RunInstaller(true)]
 public class MyInstaller : DefaultManagementProjectInstaller {}

public class MyManagedElement : Instance {
 public string Description;
 public int Count;
 public static void Main(string[] args) {
 MyManagedElement el = new MyManagedElement();
 el.Description = "SAMPLE INSTANCE";
 el.Count = 256;
 Instrumentation.Publish(el);
 Console.WriteLine("Instance published (true/false): {0}", el.Published);
 Console.ReadLine();
 Instrumentation.Revoke(el);
 Console.WriteLine("Instance published (true/false): {0}", el.Published);
 }
 }
}
Upon its invocation, this code will print the following message on the console:
Instance published (true/false): True
Once a key is pressed, the program will terminate and print another message:
Instance published (true/false): False
Exposing Management Events
Although exposing the application's data for management through WMI is invaluable, being able to send out notifications when some application-specific events occur is even more important. Thus, you may rightly expect the System.Management.Instrumentation namespace to provide extensive functionality in support of management events. This is indeed the case, and armed with .NET instrumentation types, you can easily outfit your applications with full-fledged event notification capabilities.
Generating management events is as easy (if not easier) as supporting instance instrumentation. Working in concert with the principles of the declarative instrumentation model, you can simply mark the application types with the appropriate attributes and then use helper methods to route the notifications to WMI. For instance the following snippet of code, creates the application-defined event and sends it to the consumers:
using System;
using System.Management;
using System.ComponentModel;
using System.Configuration.Install;
using System.Management.Instrumentation;

[assembly:Instrumented(@" rootCIMV2")]
namespace InstrumentedApplication {
 [RunInstaller(true)]
 public class MyInstaller : DefaultManagementProjectInstaller {}

[InstrumentationClass(InstrumentationType.Event)]
public class MyManagementEvent {
 public string Description;
 public int EventNo;
 public static void Main(string[] args) {
 MyManagementEvent ev = new MyManagementEvent();
 ev.Description = "SAMPLE MANAGEMENT EVENT";
 ev.EventNo = 256;
 Instrumentation.Fire(ev);
 Console.ReadLine();
 }
 }
}
This code has a lot in common with the previous code fragment that was used to supply instance-level data to WMI. The first noticeable difference is the InstrumentationType enumeration member that is passed to the constructor of the InstrumentationClass attribute, which decorates MyManagementEvent type. To indicate that a certain application type represents a management event, such a type must be marked with InstrumentationClass(InstrumentationType.Event) attribute.
If you save this code to a file and then compile and install it using installutil.exe, the CIM Repository will contain the following definition for the application event class:
class MyManagementEvent : __ExtrinsicEvent {
 string Description;
 sint32 EventNo;
};
The first thing to notice here is that the event class is derived from the system class __ExtrinsicEvent. This is logical because all application event classes are, indeed extrinsic events. Although it is certainly possible to create application-specific event hierarchies by building the respective hierarchies of .NET types, the top-level class of the resulting WMI event tree will always be __ExtrinsicEvent.
Another aspect of this generated event class definition that makes it different from the previously shown WMI classes that were generated in support of instance instrumentation is the absence of the ProcessID and InstanceID properties. Since WMI events are transient, they do not have to be stored in the CIM Repository, and therefore, they do not need unique identities.
The process of routing an application event to a consumer is also very similar to publishing an instance. The difference here is that rather than using the Publish method of the Instrumentation helper type, you must use the Fire method that belongs to the same type. Just like Publish, Fire takes a single parameter—an object that represents an application event to be sent to the consumers. Note that a call to Fire does not have to be followed by a call to Revoke; the events are transient and do not have to be unpublished.
Similar to the Instance type, which can be used as a superclass for management types, this process uses a BaseEvent type that is designed as a top-level type for modeling events. Subclassing BaseEvent is a nice alternative to decorating the event types with the InstrumentationClass(InstrumentationType.Event) attribute—the base type is already marked with this attribute, which propagates down to its children. Thus, the code example shown earlier can be rewritten as follows:
using System;
using System.Management;
using System.ComponentModel;
using System.Configuration.Install;
using System.Management.Instrumentation;

[assembly:Instrumented(@" rootCIMV2")]
namespace InstrumentedApplication {
 [RunInstaller(true)]
 public class MyInstaller : DefaultManagementProjectInstaller {}

public class MyManagementEvent : BaseEvent {
 public string Description;
 public int EventNo;
 public static void Main(string[] args) {
 MyManagementEvent ev = new MyManagementEvent();
 ev.Description = "SAMPLE MANAGEMENT EVENT";
 ev.EventNo = 256;
 ev.Fire();
 Console.ReadLine();
 }
 }
}
The effect of this code is exactly the same as that of the earlier code and the generated WMI definition for the event class remains unchanged. The only substantial difference here is that to fire an event that is a subclass of BaseEvent, you no longer need to use Instrumentation.Fire method. Instead, you can use the Fire method inherited from BaseEvent.
Using BaseEvent as a base type is especially convenient when it comes to modeling complex event hierarchies. Consider the following:
public class MyTopLevelEvent : BaseEvent {
};
public class MyIntermediateLevelEvent : MyTopLevelEvent {
};
public class MyLeafLevelEvent : MyIntermediateLevelEvent {
};
Since BaseEvent is marked with the InstrumentationClass(InstrumentationType.Event) attribute, which is applicable to all of its children, the attribute does not have to be overridden anywhere within the type hierarchy. By the same token, when you are using the declarative approach, you only have to apply the attribute to the top-level type:
[InstrumentationClass(InstrumentationType.Event)]
public class MyTopLevelEvent {
};
public class MyIntermediateLevelEvent : MyTopLevelEvent {
};
public class MyLeafLevelEvent : MyIntermediateLevelEvent {
};
This makes modeling event hierarchies a bit less complex than building instance inheritance trees, which is a big help, considering that event hierarchies often come in handy. The apparent value of having all application events be subclasses of a common base event type comes from the ability to issue catch-all event queries against the root-level event class. Thus, given the event tree, shown earlier, you may write the following query to subscribe to all three of the events, MyTopLevelEvent, MyIndermediateLevelEvent, and MyLeafLevelEvent:
SELECT * FROM MyTopLevelEvent
By issuing such a generalized event query, you ask an application to instruct WMI to route to it not only the events that belong to the class that is specified in the query, but also all other events that are the subclasses of that class.
Summary
Instrumenting applications is a notoriously complex task that many developers and system administrators have been dreading for years. Fortunately, even the first release of FCL and the System.Management.Instrumentation namespace has made a significant number of the challenges commonly associated with exposing custom programs for management simply go away. Nowadays, it is possible to publish the management data and distribute management events through WMI with minimal coding effort.
This chapter has been a comprehensive introduction to the subject of instrumenting .NET applications with System.Management.Instrumentation types. Although, the scope of this book does not allow me to delve deeper into the guts of the .NET instrumentation framework, after having read the material presented here, you should be at least aware of
- The fundamentals and mechanics of the WMI provider framework
- The basics of publishing a .NET application's schema to the CIM Repository
- The techniques you can use to expose an application's data and events for management using either the declarative model or the base types that are provided as part of System.Management.Instrumentation namespace
Although extremely helpful, the System.Management.Instrumentation namespace is not perfect. There are no major issues and it is fair to say that Microsoft developers did a great job, especially considering that this is the first release of the .NET Framework. Nevertheless, there are a few things that need improvement:
- The schema publishing and installation facilities, although very robust and easy to use, do not provide a way to easily uninstall the schema once it is registered in the CIM Repository. In fact, running installutil.exe with the /u switch does not seem to do anything useful. This means that all the application's class definitions and provider registration information have to be removed from the CIM Repository manually.
- Certain aspects of WMI class modeling cannot be represented through their respective .NET types. For instance, due to the lack of support for reference data types, it is impossible to model the association classes. Yet, another deficiency is the lack of support for defining the default values for class properties, since the .NET field initializers are simply ignored by the .NET Framework. Finally, there is no support for building method providers. Although, some people may consider the ability to invoke an application's methods through WMI an unnecessary luxury, methods often come in handy and may, on occasion, streamline the process of designing an instrumentation model for a particular application.
- The auto-generated key object properties, ProcessID and InstanceID, make for a very poor instance identification scheme. Since the values for these properties are system-generated rather than application-supplied, retrieving an instance based on the values of its key properties is virtually impossible. Thus, in most cases, the only way to retrieve an instance of a WMI class that is backed by a .NET application is by using complex WQL queries, which are bound to cause substantial performance degradation. Moreover, such an auto-generated identity is contradictory to one of the most basic principles of CIM modeling—using natural object keys. It is conceivable that handing excessive control over the process of generating object identities out to developers is dangerous and may result in CIM Repository corruption. Nevertheless, there has to be a reasonable compromise to allow for easier and faster object lookup.
- Although System.Management.Instrumentation custom attributes are extremely simple and easy to use, they may not always provide the necessary degree of control over the generated WMI class definitions. For instance, it is impossible to directly assign certain qualifiers to the generated WMI classes and class properties. While fairly minor, this restriction may seriously complicate the development of some management functionality, and it may make the existing management applications unusable for managing the classes and instances that are backed by .NET applications.
Despite all the deficiencies, System.Management.Instrumentation is still a great framework for instrumenting custom applications. Its most attractive characteristic is simplicity and, even if it does not satisfy all your instrumentation needs, it is still a big step forward. Again, its goal is to bring the joy of instrumenting .NET applications to a wider audience and it is fair to say that it achieves this.
Of course, there will always be people reaching out for more control or flexibility, or there will be those who try to cater to a unique management situation, not covered by the System.Management.Instrumentation framework. Hopefully, such people will represent just a small percentage of the developers and system administrators, but even for them, .NET has something to offer.
In fact, Visual Studio .NET offers two new ATL wizards to make the conventional COM-based provider development more accessible: the WMI Event Provider Wizard and the WMI Instance Provider Wizard. These wizards generate most of the code required to get a full-fledged event, instance, or method provider up and operational in a reasonably short time with minimal coding efforts. Unfortunately, digging into the practical aspects of these wizards is well beyond the scope of this book, so the adventurous reader will have to resort to Visual Studio .NET documentation.
EAN: 2147483647
Pages: 79
