Tables
Tables are very useful for handling tabular data. In this chapter, you learn how to use the SWT Table control to display, navigate, and edit data. Additionally, the JFace TableViewer is introduced to help you simplify these tasks by enabling you to take advantage of MVC programming.
Using Tables
In SWT, the org.eclipse.swt.widgets.Table class represents a table. A table may have many columns and rows. The TableColumn class represents a column in a table, and the TableItem class represents a row in a table. The labels of data to be presented in the table are stored in TableItems. TableColumns are lightweight objects that can be used to specify the properties of each column, such as the column width, column header, and so on.
To create a table, you follow these basic steps:
- Construct a Table instance and set its property.
- Define columns by using TableColumn objects.
- Add rows by creating TableItem objects.
Creating a Table
The only constructor in the Table class is:
public Table(Composite parent, int style)
You specify the parent composite in the first argument and styles in the second argument.
Possible styles that you can specify for a table are as follows:
- SWT.SINGLE, SWT.MULTI: By default, at most one row in a table is allowed to be selected at any time. If SWT.MULTI is specified, more than one row can be selected at the same time. You can specify only one of these two styles.
- SWT.CHECK: If this style is set, a checkbox is displayed in the first column of each row. You can use the getChecked method of the TableItem class to check whether the checkbox associated with this item is checked. You probably want to use this style if you need to perform operations on multiple items "selected" by the user.
- SWT.FULL_SELECTION: By default, you can select a table item only by clicking its cell in the first row. Setting this style enables you to select a row by clicking any cell in the row.
- SWT.HIDE_SELECTION: If you want the selection hidden when the table control does not have focus, you can set this style.
In this chapter, we are going to develop a simple bug tracking system, as shown in Figure 10-1. A table is used to display all the bugs maintained by this system.

Figure 10-1
You create the main table in the user interface using the following code:
Table table = new Table(shell, SWT.BORDER | SWT.FULL_SELECTION);
Then you make the grid line and the table header visible:
 table.setLinesVisible(true);
 table.setHeaderVisible(true);
The header text displayed in Figure 10-1 is provided by TableColumn instances.
Defining Table Columns
To define a table column, you simply create an instance of the TableColumn class. There are two constructors in the TableColumn class.
 public TableColumn(Table parent, int style)
 public TableColumn(Table parent, int style, int index)
You can specify the alignment of the cell label in the style argument. Possible values are SWT.LEFT, SWT.CENTER, and SWT.RIGHT. The first constructor appends a new column in the table, while the second constructor allows you to specify the index at which to place the column.
Optionally, you can set a text label and an image label for a column by using the setText method and the setImage method.
 public void setText(String string)
 public void setImage(Image image)
The text label and the image label will be displayed as the column header if the table is configured to display a table header.
You can set the width of a column by using the setWidth method:
public void setWidth(int width)
To enable or disable the user to resize a column, you can use the setResizable method.
public void setResizable(boolean resizable)
Even if a column is set to be not resizable, you can still resize it in your code.
Now you can add the required columns for our bug tracking system:
 TableColumn tcID = new TableColumn(table, SWT.LEFT);
 tcID.setText("ID");

 TableColumn tcSummary = new TableColumn(table, SWT.NULL);
 tcSummary.setText("Summary");

 TableColumn tcAssignedTo = new TableColumn(table, SWT.NULL);
 tcAssignedTo.setText("Assigned to");

 TableColumn tcSolved = new TableColumn(table, SWT.NULL);
 tcSolved.setText("Solved");

 tcID.setWidth(60);
 tcSummary.setWidth(200);
 tcAssignedTo.setWidth(80);
 tcSolved.setWidth(50);
Adding Data into a Table
To add a row of data to a table, you simply need to create an instance of TableItem with the table as the parent composite.
Creating TableItems
You can use the two constructors of the TableItem class to create table rows:
 public TableItem(Table parent, int style)
 public TableItem(Table parent, int style, int index)
You specify the target table in the first argument. Because TableItem does not support any styles, you simply pass SWT.NULL in the second argument. The first constructor appends a TableItem in the list of rows of a table. The second constructor allows you to insert a TableItem at the given index in the list of rows.
Setting Text Labels and Image Labels for Cells in a TableItem
A table row contains as many cells as the number of columns in the table. You can set the text label and the image label for a certain cell in the row using the setText method and the setImage method:
 public void setText(int index, String string)
 public void setImage(int index, Image image)
You specify the cell index in the first argument in the preceding methods.
The TableItem class provides several convenient methods to set labels for cells.
The following methods set the text label and the image label for the first cell (index = 0) in a TableItem:
 public void setText(String string)
 public void setImage(Image image)
If you want to specify labels for multiple cells in one call, you can use the following methods:
 public void setText(String[] strings)
 public void setImage(Image[] images)
To get the text label and the image label of a cell in a TableItem, you can use the following methods:
 public String getText(int index)
 public Image getImage(int index)
In both of the preceding methods, you specify the index of the target cell in the argument.
Setting Background and Foreground Colors for Cells in a TableItem
To set the background and foreground colors for an entire row of a table, you can use the following methods:
 public void setBackground(Color color)
 public void setForeground(Color color)
If the passed argument is null, the background color (or foreground color) will be set to the system default.
Similarly, you can use the following methods to set the background and foreground colors for a particular cell in a row:
 public void setBackground(int index, Color color)
 public void setForeground(int index, Color color)
With the usage of TableItems introduced in the preceding text, you are ready to add bug information into the main table of the bug tracking application:
 ...
 loadBugs();

 ...
 private void loadBugs() {
 // Load bugs from a file.
 DataInputStream in = null;

 try {
 File file = new File("bugs.dat");
 if (!file.exists())
 return;
 in = new DataInputStream(new FileInputStream(file));

 while (true) {
 String id = in.readUTF();
 String summary = in.readUTF();
 String assignedTo = in.readUTF();
 boolean solved = in.readBoolean();

 TableItem item = new TableItem(table, SWT.NULL);
 item.setImage(bugIcon);
 item.setText(
 new String[] {
 id,
 summary,
 assignedTo,
 solved ? "Yes" : "No" });
 }
 } catch (IOException ioe) {
 // Ignore.
 } finally {
 try {
 if(in != null)
 in.close();
 } catch (IOException e) {
 e.printStackTrace();
 }
 }
 }
The loadBugs function tries to load bug information from a file. If a bug record is successfully loaded, a new TableItem is created with the information provided in the record.
To enable the user to create new TableItems, you add an action in a toolbar.
 Action actionAddNew = new Action("New bug") {
 public void run() {
 // Append.
 TableItem item = new TableItem(table, SWT.NULL);
 item.setImage(bugIcon);
 table.select(table.getItemCount() - 1);
 }
 };

 ...
 ToolBar toolBar = new ToolBar(shell, SWT.RIGHT | SWT.FLAT);

 ToolBarManager manager = new ToolBarManager(toolBar);
 manager.add(actionAddNew);
 manager.update(true);
 ...
When the action is invoked, an empty TableItem is created and appended to the table. The select method selects the newly created TableItem in the table.
Removing TableItems
The Table class provides four methods to help you remove TableItems from a table:
 public void remove(int index)
 public void remove(int[] indices)
 public void remove(int start,int end)
 public void removeAll()
You can use the first method to remove the TableItem at the specified index. The second and third methods are capable of removing multiple TableItems. Finally, the last method can be used to remove all the TableItems from a table.
You add the following action to enable the user to remove the selection TableItem.
 ...
 Action actionDelete = new Action("Delete selected") {
 public void run() {
 int index = table.getSelectionIndex();
 if (index < 0) {
 System.out.println("Please select an item first. ");
 return;
 }
 MessageBox messageBox = new MessageBox(shell, SWT.YES | SWT.NO);
 messageBox.setText("Confirmation");
 messageBox.setMessage(
 "Are you sure to remove the bug with id #"
 + table.getItem(index).getText(0));
 if (messageBox.open() == SWT.YES) {
 table.remove(index);
 }
 }
 };
 ...
 manager.add(actionDelete);
The getSelectionIndex method returns the currently selected TableItem in a table. If a TableItem is selected, a confirmation message box pops up. If the user confirms the deletion, the selected TableItem is removed using the remove(int index) method.
Handling Selections
You can add a selection listener to a table for selection events.
The following selection listener simply listens for selection events and prints out the first selected TableItem:
 table.addListener(SWT.Selection, new Listener() {
 public void handleEvent(Event event) {
 System.out.println("Selected: " + table.getSelection()[0]);
 }
 });
When the user clicks the second row in the table (see Figure 10-1), the following line is displayed:
Selected: TableItem {007}
The getSelection method returns all the selected TableItems:
public TableItem[] getSelection()
If no TableItem is selected currently, an empty array is returned. If a table has the SWT.SINGLE style, then at most one TableItem is selected at any time.
You can get the indices of all the selected TableItems using the getSelectionIndices method:
public int[] getSelectionIndices()
The getSelectionIndex returns the index of the currently selected TableItem:
public int getSelectionIndex()
If no TableItem is selected, the method returns -1. In the case of SWT.MULTI tables, this method returns the selected item, which has the focus.
To get the total number of selected items, you can use the getSelectionCount method:
public int getSelectionCount()
You can use the following methods to make selections programmatically:
 public void select(int index)
 public void select(int[] indices)
 public void select(int start, int end)
 public void selectAll()
The deselection counterparts of the preceding selection methods are as follows:
 public void deselect(int index)
 public void deselect(int[] indices)
 public void deselect(int start, int end)
 public void deselectAll()
Finally, there are setSelection methods:
 public void setSelection(int index)
 public void setSelection(int[] indices)
 public void setSelection(int start, int end)
 public void setSelection(TableItem[] items)
The setSelection methods first clear any existing selection and then make the selection. For example, setSelection(int index) is equivalent to:
 table.deselectAll()
 table.select(index)
For a table with the SWT.CHECK style, when the user clicks the checkboxes in front of TableItems, selection events are generated. The detail field of such event objects has the value SWT.CHECK. You can get and set the check status of a table item using the following methods:
 public boolean getChecked()
 public void setChecked(boolean checked)
Using TableEditors
You can use table editors to let the user edit data in a table on the fly, as shown in Figure 10-2.
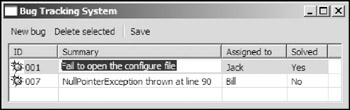
Figure 10-2
To add editing functions to a table, first you need to create a TableEditor (org.eclipse.swt.custom.TableEditor) based on the table. A table editor manages controls that can be used to edit data. A control managed by a table editor usually appears superimposed above a cell in a table and tracks with the moving and resizing of the cell.
Let's enable the cells in the first three columns to accept user input using the Text controls.
First, you need to create a TableEditor:
final TableEditor editor = new TableEditor(table);
Then you add the following MouseDown listener to the table:
 table.addListener(SWT.MouseDown, new Listener() {
 public void handleEvent(Event event) {
 // Locate the cell position.
 Point point = new Point(event.x, event.y);
 final TableItem item = table.getItem(point);
 if (item == null)
 return;
 int column = -1; // The column that the cell belongs to.
 for (int i = 0; i < table.getColumnCount(); i++) {
 Rectangle rect = item.getBounds(i);
 if (rect.contains(point))
 column = i;
 }
 if (column < 0 || column >= 3)
 return;

 // Cell position located, now open the table editor.

 final Text text = new Text(table, SWT.NONE);
 text.setText(item.getText(column));

 editor.horizontalAlignment = SWT.LEFT;
 editor.grabHorizontal = true;

 editor.setEditor(text, item, column);

 final int selectedColumn = column;
 Listener textListener = new Listener() {
 public void handleEvent(final Event e) {
 switch (e.type) {
 case SWT.FocusOut :
 item.setText(selectedColumn, text.getText());
 text.dispose();
 break;
 case SWT.Traverse :
 switch (e.detail) {
 case SWT.TRAVERSE_RETURN :
 item.setText(selectedColumn, text.getText());

 case SWT.TRAVERSE_ESCAPE :
 text.dispose();
 e.doit = false;
 }
 break;
 }
 }
 };

 text.addListener(SWT.FocusOut, textListener);
 text.addListener(SWT.Traverse, textListener);

 text.setFocus();
 }

 });
When a mouse down event is generated, the listener is notified. First, the cell that the mouse pointer is pointing to is determined. If the cell is not in one of the first three columns, nothing happens. However, if it is, a Text control is created with the table as its parent composite. You then configure the table editor. The properties of table editors that can be configured are:
- horizontalAlignment, verticalAlignment: These fields specify how the editor should be aligned relative to the cell horizontally and vertically. Possible values for horizontalAlignment are SWT.LEFT, SWT.CENTER, and SWT.RIGHT. Possible values for verticalAlignment are SWT.TOP, SWT.CENTER, and SWT.BOTTOM.
- grabHorizontal, grabVertical: These two properties specify whether the editor should be sized to use the entire width and the entire height of the cell.
- minimumWidth, minimumHeight: You can specify the minimum width and the minimum height of the editor by using these properties. The default value for both is 0.
After the properties of the editor have been configured, you then set the control for the editor by using the setEditor method:
public void setEditor(Control editor, TableItem item, int column)
This method specifies the control to be displayed over the given cell.
The text control is displayed and focused on.
Notice that we also add a listener to the text control for focus out events and traverse events. When the user clicks outside the cell currently being edited or navigates to another cell, the content of the text control is set as the table item text and the text control is disposed of.
Similarly, you can use check buttons to enable the user to edit the cells in the fourth column (see Figure 10-3).
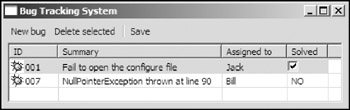
Figure 10-3
 table.addListener(SWT.MouseDown, new Listener() {
 public void handleEvent(Event event) {
 // Locate the cell position.
 Point point = new Point(event.x, event.y);
 final TableItem item = table.getItem(point);
 if (item == null)
 return;
 int column = -1;
 for (int i = 0; i < table.getColumnCount(); i++) {
 Rectangle rect = item.getBounds(i);
 if (rect.contains(point))
 column = i;
 }
 if (column != 3)
 return;

 // Cell position located, now open the table editor.

 final Button button = new Button(table, SWT.CHECK);
 button.setSelection(item.getText(column).equalsIgnoreCase("YES"));

 editor.horizontalAlignment = SWT.LEFT;
 editor.grabHorizontal = true;

 editor.setEditor(button, item, column);

 final int selectedColumn = column;
 Listener buttonListener = new Listener() {
 public void handleEvent(final Event e) {
 switch (e.type) {
 case SWT.FocusOut :
 item.setText(selectedColumn, button.getSelection()
 ? "YES" : "NO");
 button.dispose();
 break;
 case SWT.Traverse :
 switch (e.detail) {
 case SWT.TRAVERSE_RETURN :
 item.setText(selectedColumn,
 button.getSelection()? "YES" : "NO");

 case SWT.TRAVERSE_ESCAPE :
 button.dispose();
 e.doit = false;
 }
 break;
 }
 }
 };

 button.addListener(SWT.FocusOut, buttonListener);
 button.addListener(SWT.Traverse, buttonListener);

 button.setFocus();

 }
 });
Sorting a Table by Column
In order to present the data in a well-organized manner, you need to improve the table with the ability to sort any column.
The following is a utility function that sorts the table items in a table by the given column in the ascending order of the item text:
 /**
 * Sorts the given table by the specified column.
 * @param columnIndex
 */
 public static void sortTable(Table table, int columnIndex) {
 if(table == null || table.getColumnCount() <= 1)
 return;
 if(columnIndex < 0 || columnIndex >= table.getColumnCount())
 throw new IllegalArgumentException(
 "The specified column does not exist. ");

 final int colIndex = columnIndex;
 Comparator comparator = new Comparator() {
 public int compare(Object o1, Object o2) {
 return ((TableItem)o1).getText(colIndex).
 compareTo(((TableItem)o2).getText(colIndex));
 }

 public boolean equals(Object obj) {
 return false;
 }
 };

 TableItem[] tableItems = table.getItems();
 Arrays.sort(tableItems, comparator);

 for(int i=0; iTableItem item = new TableItem(table, SWT.NULL);
 for(int j=0; jtableItems[i].dispose();
 }
 }
The function first validates the passed arguments. Then it creates a comparator, which is used during the sorting process. The getItems() method of the Table class returns an array of the TableItems. The returned array is not the actual structure used by the table, so modifying the returned array does not modify the table in any way. The array of table items is then sorted with the comparator. Now the array is sorted, and you can duplicate table items from the array in order. Once a table item is duplicated, the old table item is disposed of. As a result, the newly created table item is added to the table, while the disposed table item is removed from the table.
Like most other applications, you let the user sort the table by a certain column when the user clicks the column header. To do that, you simply need to add selection listeners to all the columns:
 Listener sortListener = new Listener() {
 public void handleEvent(Event event) {
 if(! (event.widget instanceof TableColumn))
 return;
 TableColumn tc = (TableColumn)event.widget;
 sortTable(table, table.indexOf(tc));
 System.out.println("The table is sorted by column #" +
 table.indexOf(tc));
 }
 };

 for(int i=0; i((TableColumn)table.getColumn(i)).addListener(SWT.Selection, sortListener);
The indexOf(TableColumn tc) method of the Table class returns the index of the specified table column. The table items are then sorted with this column.
Now, when you click the "Assigned to" column header in the table, the table items are sorted with this column (see Figure 10-4).
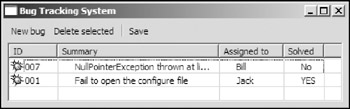
Figure 10-4
Using TableViewers
The JFace viewer framework provides the TableViewer class for you to program with tables using an MVC approach. You learned how to use a ListViewer in Chapter 7. Programming a TableViewer is very similar to programming a ListViewer. The basic steps are as follows:
- Create domain-specific model objects.
- Create TableViewers.
- Set content providers and content.
- Set label providers (optional).
- Set cell editors.
- Add selection listeners (optional).
- Add filters (optional).
- Set sorters (optional).
- Handle events (optional).
Note that the only difference between programming with TableViewers and with ListViewers is that TableViewers can have cell editors (see Step 5) whereas ListViewers don't.
We are going to rewrite the bug tracking application using a TableViewer.
Creating Domain Specific Model Objects
In previous sections, we simply read the data from a file into TableItem directly. However, here it's better to create a class to represent a bug and a collection to represent the collection of all the bugs.
 /**
 * Represents a bug report.
 *
 */
 public static class Bug {
 // For the sake of simplicity, all variables are public.
 public String id;
 public String summary;
 public String assignedTo;
 public boolean isSolved;

 public Bug(String id, String summary, String assignedTo, boolean isSolved)
 {
 this.id = id;
 this.summary = summary;
 this.assignedTo = assignedTo;
 this.isSolved = isSolved;
 }

 // Loads bug reports from a file.
 public static Vector loadBugs(File file) {
 Vector v = new Vector();
 // Load bugs from a file.
 DataInputStream in = null;

 try {
 if (!file.exists())
 return v;
 in = new DataInputStream(new FileInputStream(file));

 while (true) {
 String id = in.readUTF();
 String summary = in.readUTF();
 String assignedTo = in.readUTF();
 boolean solved = in.readBoolean();
 v.add(new Bug(id, summary, assignedTo, solved));
 }

 } catch (IOException ioe) {
 // Ignore.
 } finally {
 try {
 if (in != null)
 in.close();
 } catch (IOException e) {
 e.printStackTrace();
 }
 }

 return v;
 }
 }

 Vector bugs;
A class named Bug is created to represent a bug report, and we will use a Vector to contain all the bugs.
Creating a TableViewer
You can create a TableViewer using any of the constructors of the TableViewer class:
 public TableViewer(Composite parent)
 public TableViewer(Composite parent, int style)
 public TableViewer(Table table)
The first two constructors create the TableViewer instance and the associated Table control automatically. The third constructor creates a TableViewer based on an existing Table control. We are going to the use the third constructor here:
 Table table;
 TableViewer tableViewer;

 String[] colNames = new String[]{"ID", "Summary", "Assigned to", "Solved"};

 table = new Table(shell, SWT.BORDER | SWT.FULL_SELECTION);

 TableColumn tcID = new TableColumn(table, SWT.LEFT);
 tcID.setText(colNames[0]);

 TableColumn tcSummary = new TableColumn(table, SWT.NULL);
 tcSummary.setText(colNames[1]);

 TableColumn tcAssignedTo = new TableColumn(table, SWT.NULL);
 tcAssignedTo.setText(colNames[2]);

 TableColumn tcSolved = new TableColumn(table, SWT.NULL);
 tcSolved.setText(colNames[3]);

 tcID.setWidth(60);
 tcSummary.setWidth(200);
 tcAssignedTo.setWidth(80);
 tcSolved.setWidth(50);

 tableViewer = new TableViewer(table);

 tableViewer.getTable().setLinesVisible(true);
 tableViewer.getTable().setHeaderVisible(true);
 tableViewer.getTable().setLayoutData(new GridData(GridData.FILL_BOTH));
We first create the table with four columns. Then, the table viewer is created. You can use the getTable method of the TableViewer class to get the table embedded by a table viewer.
public Table getTable()
Setting the Content Provider
A Vector of Bugs is used as the input to the table viewer, so you need to set the content provider for the table viewer as follows:
 // Sets the content provider.
 tableViewer.setContentProvider(new IStructuredContentProvider() {
 public Object[] getElements(Object inputElement) {
 Vector v = (Vector)inputElement;
 return v.toArray();
 }

 public void dispose() {
 System.out.println("Disposing ...");
 }

 public void inputChanged(
 Viewer viewer,
 Object oldInput,
 Object newInput) {
 System.out.println("Input changed: old=" +
 oldInput + ", new=" + newInput);
 }
 });
You can use the following code to load data into the table viewer:
 bugs = Bug.loadBugs(new File("bugs.dat"));
 tableViewer.setInput(bugs);
For details on content providers, please refer to Chapter 7.
Setting the Label Provider
A label provider maps an element of the viewer's model to an optional image and optional text string used to display the element in the viewer's control. In Chapter 7, we set a LabelProvider to the ListViewer. However, for TableViewers, you should use an instance of ITableLabelProvider.
If you use ILabelProvider, this label provider provides the text label and image label for the first column only, and any remaining columns are blank.
The following is the code to set a label provider for the table viewer:
 // Sets the label provider.
 tableViewer.setLabelProvider(new ITableLabelProvider() {
 public Image getColumnImage(Object element, int columnIndex) {
 if(columnIndex == 0)
 return bugIcon;

 return null;
 }

 public String getColumnText(Object element, int columnIndex) {
 Bug bug = (Bug)element;
 switch(columnIndex) {
 case 0:
 return bug.id;
 case 1:
 return bug.summary;
 case 2:
 return bug.assignedTo;
 case 3:
 return bug.isSolved ? "YES" : "NO";
 }
 return null;
 }

 public void addListener(ILabelProviderListener listener) {
 }

 public void dispose() {
 }

 public boolean isLabelProperty(Object element, String property) {
 return false;
 }

 public void removeListener(ILabelProviderListener listener) {
 }
 });
The getColumnImage returns the image label for the given element at the specified column, and getColumnText returns the text label.
Setting Cell Editors
When programming with table control directly, we use tedious code to support cell editing. The task is simplified significantly in TableViewer.
To enable cell editing, you first set cell editors for the table viewer:
 // Sets cell editors.

 String[] colNames = new String[]{"ID", "Summary", "Assigned to", "Solved"};
 tableViewer.setColumnProperties(colNames);

 CellEditor[] cellEditors = new CellEditor[4];

 cellEditors[0] = new TextCellEditor(table);
 cellEditors[1] = cellEditors[0];
 cellEditors[2] = cellEditors[0];
 cellEditors[3] = new CheckboxCellEditor(table);

 tableViewer.setCellEditors(cellEditors);
First, you set the column property name for each column in the table using the setColumnProperties method. A column property name is used to identify the column in cell modifiers (discussed shortly).
Then you set a cell editor for each column in the table. A cell editor is an instance of the org.eclipse.jface.viewers.CellEditor class. The CellEditor class itself is abstract, and there are several concrete implementations of the CellEditor class:
- CheckboxCellEditor: This editor can be used to edit Boolean values.
- ComboBoxCellEditor: A combo box editor presents list items in a combo box.
- ColorCellEditor: A color editor manages a color field.
- TextCellEditor: Text editors are used to manage text entry fields.
In the preceding code, we set a TextCellEditor for the first three columns and a CheckboxCellEditor for the last column using the setCellEditors method of the TableViewer class.
public void setCellEditors(CellEditor[] editors)
Setting cell editors alone does not make a cell editor function; you have to set a cell modifier for the table viewer. A cell modifier is used to access the data model, and it offers the following functions:
- Checks whether a property of the element is editable or not
- Gets the current value of a property of the element
- Stores the new value to the element
The following is code to set a cell modifier for our bug tracking application:
 tableViewer.setCellModifier(new ICellModifier() {
 public boolean canModify(Object element, String property) {
 return true;
 }

 public Object getValue(Object element, String property) {
 // Gets the index first.
 int index = -1;
 for(int i=0; ipublic void modify(Object element, String property, Object value) {
 System.out.println("Modify: " + element + ", " + property + ", " + value);
 // Get the index first.
 int index = -1;
 for(int i=0; iBug bug = null;
 if(element instanceof Item) {
 TableItem item = (TableItem)element;
 bug = (Bug)item.getData();
 }else{
 bug = (Bug)element;
 }
 switch(index) {
 case 0:
 bug.id = (String)value;
 break;
 case 1:
 bug.summary = (String)value;
 break;
 case 2:
 bug.assignedTo = (String)value;
 break;
 case 3:
 bug.isSolved = ((Boolean)value).booleanValue();
 break;
 }

 tableViewer.update(bug, null);
 }
 });
You need to implement three methods in the interface org.eclipse.jface.viewers.ICellModifier. All the methods have an argument named property. The value of the property argument is one of the column property names set in the previous section using the setColumnProperties method.
The canModify method checks whether the specified property of the given element can be modified. The getValue method is usually queried by cell editors to set their initial values. It returns the value for the given property of the specified element as an object.
The modify method is called when the user modifies a value in a cell editor. The element argument passed can be the model element itself or a TableItem representing it; thus you use the if-else clause to
handle this situation. After the model element to be edited is determined, you update the model object and then notify the table viewer to update its corresponding representation.
For more details on viewer updating and refreshing, please consult Chapter 7.
Column Wise Sorting Using Sorters
You can use ViewerSorters to implement the column-wise sorting function:
 // Sorter.
 class BugSorter extends ViewerSorter {
 private String property;
 private int propertyIndex;

 public BugSorter(String sortByProperty) {
 for(int i=0; ipublic int compare(Viewer viewer, Object e1, Object e2) {
 Bug bug1 = (Bug)e1;
 Bug bug2 = (Bug)e2;

 switch(propertyIndex) {
 case 0:
 return bug1.id.compareTo(bug2.id);
 case 1:
 return bug1.summary.compareTo(bug2.summary);
 case 2:
 return bug1.assignedTo.compareTo(bug2.assignedTo);
 case 3:
 if(bug1.isSolved == bug2.isSolved)
 return 0;

 if(bug1.isSolved)
 return 1;
 else
 return -1;
 default:
 return 0;
 }

 }

 }

 ...
 // Setting sorters.
 tcID.addListener(SWT.Selection, new Listener() {
 public void handleEvent(Event event) {
 tableViewer.setSorter(new BugSorter(colNames[0]));
 }
 });

 tcSummary.addListener(SWT.Selection, new Listener() {
 public void handleEvent(Event event) {
 tableViewer.setSorter(new BugSorter(colNames[1]));
 }
 });

 tcAssignedTo.addListener(SWT.Selection, new Listener() {
 public void handleEvent(Event event) {
 tableViewer.setSorter(new BugSorter(colNames[2]));
 }
 });

 tcSolved.addListener(SWT.Selection, new Listener() {
 public void handleEvent(Event event) {
 tableViewer.setSorter(new BugSorter(colNames[3]));
 }
 });
First, we create a class to extend the ViewerSort class. The compare method is overridden. Then we add a selection listener to each table column. When a table column is selected, rows of the table viewer are sorted according to the values of cells in that column.
Adding a Filter
In this section, we are going to use a filter to filter out solved bugs (see Figure 10-5).
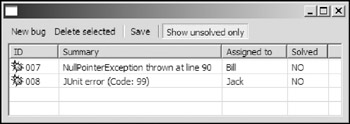
Figure 10-5
The code to implement the filter is very simple, as shown here:
 final ViewerFilter filter = new ViewerFilter() {
 public boolean select(
 Viewer viewer,
 Object parentElement,
 Object element) {
 if(! ((Bug)element).isSolved)
 return true;
 return false;
 }
 };

 Action actionShowUnsolvedOnly = new Action("Show unsolved only") {
 public void run() {
 if(! isChecked())
 tableViewer.removeFilter(filter);
 else
 tableViewer.addFilter(filter);
 }
 };
 actionShowUnsolvedOnly.setChecked(false);

 ToolBar toolBar = new ToolBar(shell, SWT.RIGHT | SWT.FLAT);

 ToolBarManager manager = new ToolBarManager(toolBar);
 manager.add(actionAddNew);
 manager.add(actionDelete);
 manager.add(new Separator());
 manager.add(actionSave);
 manager.add(new Separator());
 manager.add(actionShowUnsolvedOnly);

 manager.update(true);
An inner class with ViewerFilter as its parent class is created to filter out solved bug reports. If the "Show unsolved only" button is checked, this filter is applied to the table viewer by using the addFilter method. If the button is unchecked, the filter is removed from the table viewer by using the removeFilter method.
The complete source code for the bug tracking application implemented with TableViewer is in the file BugTrackerJFace.java.
Summary
This chapter showed you how to manipulate tabular data with the SWT Table control. You learned how to create a table, define table columns, add data to it, and remove data from it. By adding selection listeners, you can listen to cell selection events. You used table editors to enable the user to edit the table content on the fly. The JFace viewer framework provides the TableViewer class, which you can use to program tables through the MVC approach. Using a sample application, you learned about creating a table viewer, setting label providers, setting cell editors, setting a column-wise sorter, adding filters, and so on.
Part I - Fundamentals
- Overview of Java UI Toolkits and SWT/JFace
- SWT/JFace Mechanisms
- Jump Start with SWT/JFace
- SWT Event Handling, Threading, and Displays
- Basic SWT Widgets
- Layouts
Part II - Design Basics
Part III - Dynamic Controls
- Scales, Sliders, and Progress Bars
- Other Important SWT Components
- SWT Graphics and Image Handling
- Drag and Drop and the Clipboard
- Printing
- JFace Windows and Dialogs
Part IV - Application Development
EAN: 2147483647
Pages: 147
