Combos and Lists
In this chapter, you learn about two kinds of SWT controls: Combo and List. Both combos and lists allow the user to choose items from a list of items. The primary difference between them is that a Combo (also know as a "drop-down") allows only one selected item while a List may have multiple items selected at a time. Additionally, the chapter introduces ListViewer, an MVC viewer based on the List control.
Using Combos
Combos are controls that enable the user to choose an item from a list of items, or optionally enter a new value by typing it into a text field. In SWT, the org.eclipse.swt.widgets.Combo class represents a combo. Although the Combo class is a subclass of Composite, it does not make sense to add children to it.
Styles
There are two Combo styles:
- READ_ONLY: By default, a combo allows the user to enter new values that are not in the list. To disable this feature, you can set READ_ONLY.
- DROP_DOWN, SIMPLE: Combos with DROP_DOWN and SIMPLE styles are shown in Figure 7-1. The left combo has the DROP_DOWN style set, while the right one has the SIMPLE style set. Combos with the SIMPLE style occupy more space than those with the DROP_DOWN style.
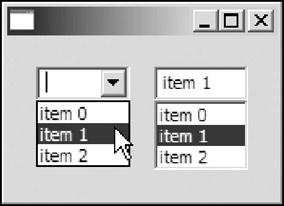
Figure 7-1
Building Combos and Capturing Item Selections
The following code creates a simple programming language survey form that's shown in Figure 7-2.
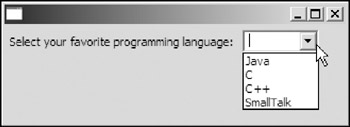
Figure 7-2
 Display display = new Display();
 Shell shell = new Shell(display);

 shell.setLayout(new GridLayout(2, false));

 (new Label(shell, SWT.NULL)).
 setText("Select your favorite programming language: ");
 final Combo combo = new Combo(shell, SWT.NULL);

 String[] languages = new String[]{"Java", "C", "C++", "SmallTalk"};

 for(int i=0; icombo.add(languages[i]);
A combo is created with default styles (editable; DROP_DOWN). Then you add string items to it by calling the add method.
To track the user's selection, you can register a selection listener:
 combo.addSelectionListener(new SelectionListener() {
 public void widgetSelected(SelectionEvent e) {
 System.out.println("Selected index: " + combo.getSelectionIndex() +
 ", selected item: " + combo.getItem(combo.getSelectionIndex()) +
 ", text content in the text field: " + combo.getText());
 }
 public void widgetDefaultSelected(SelectionEvent e) {
 System.out.println("Default selected index: " + combo.getSelectionIndex() +
 ", selected item: " +
 (combo.getSelectionIndex() == -1 ?
 "" : combo.getItem(combo.getSelectionIndex())) +
 ", text content in the text field: " + combo.getText());
}
});
The widgetSelected method of the selection listener is called when the combo's list selection changes; the widgetDefaultSelected method is typically called when the user presses the Enter key in the combo's text field. The preceding code calls the following method to retrieve the selection information:
public int getSelectionIndex()
The getSelectionIndex method returns the index of items currently selected or -1 if no item is selected. To get the item text, you can call:
public String getItem(String index)
This method throws IllegalArgumentException if the argument is not in the range ([0, combo.getItemCount()-1]) of the current list of the combo. To retrieve the content text of the text field of a combo, you can use the following:
public String getText()
For example, when the user selects "Java" from the list, the following line prints out:
Selected index: 0, selected item: Java, text content in the text field: Java
Suppose the user's favorite programming language is Perl. Because Perl is not in the list, the user needs to type the word. During the typing process, no selection events are generated. When the user presses the carriage return key after he or she finishes typing, a default selection event is generated and the widgetDefaultSelected method is called. As a result, the following line prints out:
Default selected index: -1, selected item: , text content in the text field: Perl
Because the user does not select an item from the list, the selected index is -1.
To programmatically select an item from the list, use this method:
public void select(int index)
If the index is out of range of the list, the request is ignored. To deselect an item, use the following:
public void deselect(int index)
If the item is not currently selected, this method does nothing. Otherwise, the selection is cleared and a call of the getSelectionIndex method returns -1. To deselect all selected items in the list, use the following:
public void deselectAll()
Accessing Items in Combos
The Combo class provides many methods that you can use to get, set, find, add, and remove items in the list.
Getting Items
The getItem method returns the item at the specified index:
public String getItem(int index)
An IllegalArgumentException is thrown if the index is not in the range of the list. Remember that the range of the list is [0, getItemCount()-1]. The getItemCount method gives the total number of items in the list:
public int getItemCount()
To get all the items in the list, you can use the getItems method.
public String[] getItems()
This method returns an array of strings. Note that modifying the returned array of getItems does not affect the combo.
Setting Items
The preceding section introduced how to get methods for items in the list. The corresponding setting methods are:
 public void setItem(int index, String text)
 public void setItems(String[] items)
The setItem method sets the text of the item at a specified index. If the index specified is out of range of the list, an IllegalArgumentException is thrown.
The setItems method sets the list to be the specified array of items.
Finding Items
The Combo class provides two indexOf methods. These two methods function in a very similar way as the indexOf methods in the java.lang.String class.
The following method searches a combo's list from the given index until an item is found that is equal to the argument and returns the index of the found item. If no such item is found, -1 is returned.
public int indexOf(String text, int startIndex)
The other indexOf method starts the search from 0:
public int indexOf(String text)
which is equivalent to
indexOf(text, 0);
Adding Items
To add an item to the specified position in the list, use the following:
public void add(String text, int index)
If the specified index is less than zero (0) or greater than the total number of items currently in the list, an IllegalArgumentException is thrown. If the specified index is in the middle of the range, all the items with an index equal to or larger than the specified index will move downward by one position. The convenient add method appends an item to the end of the list:
public void add(String text)
This is equivalent to the following:
public void add(String text, getItemCount());
Removing Items
To remove a single item from the list, use the following:
public void remove(int index)
Naturally, if the index is out of range of the list, an IllegalArgumentExeption is thrown.
To remove multiple items, use the following:
public void remove(int startIndex, int endIndex)
The preceding method removes all the items between the specified start index and the end index (inclusive).
The following method removes the first found item with given text:
public void remove(String text)
To remove all the items, use the following:
public void removeAll()
Creating a Combo with Sorted List
Using alphabetically sorted lists with combos makes the user interface more accessible and user friendly. In this section, we are going to improve the sample application by implementing alpha-beta list sorting and automatic item adding functions. The automatic item adding function enables the user to put the newly added value into the list by pressing the carriage return. The new features are demonstrated in Figure 7-3.
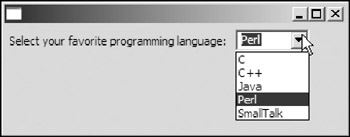
Figure 7-3
The following code provides a sample implementation of these features:
 final Combo combo = new Combo(shell, SWT.NULL);

 String[] languages = new String[]{"Java", "C", "C++", "SmallTalk"};

 Arrays.sort(languages);

 for(int i=0; i" :
 combo.getItem(combo.getSelectionIndex())) +
 ", text content in the text field: " + combo.getText());
 String text = combo.getText();
 if(combo.indexOf(text) < 0) { // Not in the list yet.
 combo.add(text);

 // Re-sort
 String[] items = combo.getItems();
 Arrays.sort(items);
 combo.setItems(items);
 }
 }
 });
New code added appears in boldface. The sort method of the java.util.Arrays class is used to sort arrays of strings into ascending order. When a default selection event is detected, the application first checks whether the content of the text field is in the list or not. If it is not in the list, the new text will be added to the list. After adding the new item, the program resorts the items in the list.
About the CCombo Class
In previous sections, we use the org.eclipse.swt.widgets.Combo class to implement combo boxes. The org.eclipse.swt.custom.CCombo class can also be used to create combo boxes. CCombo is very similar to Combo, except that it supports the FLAT style without supporting the SIMPLE style. CCombos are usually used inside table cells.
Using Lists
A list is very similar to a combo, except a list allows the user to select more than one item. In SWT, lists are represented by the org.eclipse.swt.widgets.List class.
Single and Multi Selection
While creating a list, you can specify its selection mode using one of the following styles:
- SINGLE: If SINGLE is set, the list allows, at most, one item to be selected at any time. This is the default selection mode for lists.
- MULTI: Lists with MULTI style allow multiple items to be selected. To select multiple items, the user may need to hold the Ctrl key while clicking an item.
Figure 7-4 shows two lists with different selection modes. The list on the left side allows, at most, one item to be selected at any time, while the other one allows multiple items to be selected.

Figure 7-4
Building Lists and Capturing Item Selections
In previous sections, you learned how to use combos through the survey form sample application. Here, let's use a list to create another survey form (as shown in Figure 7-5) to see how a list works. In this survey, the user can select one or more programming languages in which he or she is proficient.
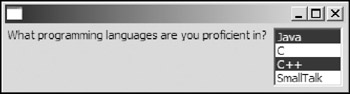
Figure 7-5
First, you need to create a shell and add a label and a list:
 Display display = new Display();
 Shell shell = new Shell(display);

 RowLayout rowLayout = new RowLayout();
 shell.setLayout(rowLayout);
 (new Label(shell, SWT.NULL)).
 setText("What programming languages are you proficient in? ");

 final List list = new List(shell, SWT.MULTI | SWT.BORDER | SWT.V_SCROLL);

 String[] languages = new String[]{"Java", "C", "C++", "SmallTalk"};

 for(int i=0; ilist.add(languages[i]);
The list is created with multiple selection enabled. The V_SCROLL style enables the user to scroll the list if there is not enough vertical space to display all the items. The H_SCROLL style also enables horizontal scrolling. After that, you can add items to the list by using its add method.
For the purposes of this example, a RowLayout is fine, so you can establish that with the following code:
 RowLayout rowLayout = new RowLayout();
 shell.setLayout(rowLayout);
Next, set the label for the combo, and create the list:
 (new Label(shell, SWT.NULL)).setText("blah blah blah");
 final List list = new List(shell, SWT.MULTI | SWT.BORDER | SWT.V_SCROLL);
When you create a list, you have to add it to its shell (or other composite). You also have to specify the format of the list. In this case, you're saying you'd like a multiselection list, with a basic border and vertical scroll capability. That last parameter enables the user to scroll the list if there isn't enough vertical
space to display all of the items. (You can add H_SCROLL to enable horizontal scrolling for wide lists.) Now that the list is set up, populate it with this code:
 String[] languages = new String[]{"Java", "C", "C++", "SmallTalk"};
 for(int i=0 ...
To capture the user's selections, you have to add a selection listener:
 list.addSelectionListener(new SelectionListener() {
 public void widgetSelected(SelectionEvent e) {
 int[] indices = list.getSelectionIndices();
 String[] items = list.getSelection();
 StringBuffer sb = new StringBuffer("Selected indices: ");
 for(int i=0; i < indices.length; i++) {
 sb.append(indices[i]);
 sb.append("(");
 sb.append(items[i]);
 sb.append(")");
 if(i == indices.length-1)
 sb.append('.');
 else
 sb.append(", ");
 }
 System.out.println(sb.toString());
 }
 public void widgetDefaultSelected(SelectionEvent e) {
 int[] indices = list.getSelectionIndices();
 String[] items = list.getSelection();
 StringBuffer sb = new StringBuffer("Default selected indices: "); for(int i=0; i < indices.length; i++) {
 sb.append(indices[i]);
 sb.append("(");
 sb.append(items[i]);
 sb.append(")");
 if(i == indices.length-1)
 sb.append('.');
 else
 sb.append(", ");
 }
 System.out.println(sb.toString());
 }
 });
The selection listener listens for selection and default selection events and prints out the selected items as strings. The getSelectedIndices method returns indices of the items that are currently selected:
public int[] getSelectionIndices()
To retrieve all the selected items as a string array, you can use the getSelection method:
public String[] getSelection()
When the user single-clicks the first item, "Java," a selection event is generated. The widgetSelected method of the listener is called, and the following line prints out:
Selected indices: 0(Java).
Suppose this user is proficient in both Java and C++. The user then single-clicks the third item, "C++", while holding the Ctrl key. Another selection event is generated, and as a result, the following prints out:
Selected indices: 0(Java), 2(C++).
A selection event is generated when the user single-clicks an item. If the user makes another click in such a short period that the two clicks are deemed to be a double-click, a default selection event is generated. The following lines print out if the user double-clicks the last item, "SmallTalk":
 Selected indices: 3(SmallTalk).
 Default selected indices: 3(SmallTalk).
You have seen getSelection and getSelectionIndices in action. Here, I show you some other selection-related methods.
The getSelectionCount method returns the index of the currently selected item. If there is no item selected, this method returns -1. If more than one item are selected, the index of the latest selected item is returned.
public int getSelectionCount()
To programmatically make selections, you can use the following methods:
- public void select(int index): This method selects the item at the given index. If the item is already selected, it does nothing. If the index is out of range, the request is ignored with no exceptions being thrown.
- public void select(int[] indices): This method selects all the items in the specified index array. Indices that are out of range or duplicated are ignored. If the list allows at most one item to be selected, the item at the first index (if the array is not empty) will be selected.
- public void select(int start, int end): This one selects items with indices falling in the specified range. The bounds of the range are included in the selection. Indices that are out of range will be ignored. If the end argument is less than the start argument, this method does nothing. If the list is of the SINGLE style, the last item in the range will be selected.
- public void selectAll(): This method selects all of the items. If the list is of the SINGLE style, this method has no effect on the selection status of the list.
Corresponding to the select methods listed previously, there are a few deselect methods:
- public void deselect(int index): This method deselects the item at the index specified. If the index is out of range, the request is ignored. If the item is already deselected, it remains deselected.
- public void deselect(int[] indices): This method can be used to deselect multiple items in one call. Indices that are out of range or duplicated are ignored.
- public void deselect(int start, int end): You can use this method to deselect a series of items. The bounds of the indices are inclusive. Any index that is out of range is ignored.
- public void deselectAll(): This method deselects all the items in the list.
If the newly selected items are not visible, you can use the following method to scroll down the list until the selection is visible.
public void showSelection()
To check whether a particular item is selected or not, you can use the isSelected method:
public boolean isSelected(int index)
Accessing Items in Lists
Item-handling methods in the List class are very similar to those in the Combo class described in the previous section.
Getting Items
The getItem method returns the item at the specified index:
public String getItem(int index)
An IllegalArgumentException is thrown if the index is not in the range of the list. Remember that the range of the list is [0, getItemCount()-1]. The getItemCount method gives the total number of items in the list:
public int getItemCount()
To get all the items in the list, you can use the getItems method:
public String[] getItems()
This method returns an array of strings. Note that modifying the returned array of getItems does not affect the list.
Setting Items
The preceding section introduced how to get methods for items in the list; the corresponding setting methods are:
 public void setItem(int index, String text)
 public void setItems(String[] items)
The setItem method sets the text of the item at a specified index. If the specified index is out of range of the list, an IllegalArgumentException is thrown.
The setItems method sets the list to be the specified array of items.
Finding Items
The List class provides two indexOf methods. The way these two methods function is very similar to indexOf methods in the java.lang.String class.
The following method searches a combo's list from the given index until an item is found that is equal to the argument, and returns the index of the found item. If no such item is found, -1 is returned.
public int indexOf(String text, int startIndex)
The other indexOf methods start the search from 0:
public int indexOf(String text)
which is equivalent to:
indexOf(text, 0);
Adding Items
To add an item to the specified position in the list, use the following:
public void add(String text, int index)
If the specified index is less than zero (0) or greater than the total number of items currently in the list, an IllegalArgumentException is thrown. If the specified index is in the middle of the range, all the items with an index equal to or larger than the specified index will be moved downward by one position. The convenient add method appends an item to the end of the list:
public void add(String text)
which is equivalent to:
public void add(String text, getItemCount());
Removing Items
To remove a single item from the list, use the following:
public void remove(int index)
Naturally, if the index is out of range of the list, an IllegalArgumentExeption is thrown.
To remove multiple items, use the following:
 public void remove(int[] indices)
 public void remove(int startIndex, int endIndex)
The first method removes all the items with specified indices, and the second one removes all the items between the specified start index and end index (inclusive).
The following method removes the first found item with the given text:
public void remove(String text)
To remove all the items, use the following:
public void removeAll()
Using ListViewers
Chapter 2 introduced the model-view-controller architecture. JFace viewers are one of the MVC frameworks available in JFace. In the preceding section, you learned how to program with Lists in a traditional way. In this section, you look at how to use ListViewers to accomplish the same tasks using the MVC approach.
JFace viewers (org.eclipse.jface.viewers.Viewer) are model-based adapters on widgets. Structured viewers (org.eclipse.jface.viewers.StructuredViewer) are structure-oriented viewers that support custom sorting, filtering, and rendering. A ListViewer is a StructuredViewer based on an SWT List control.
The steps to program with StructuredViewers are as follows:
- Create domain-specific model objects.
- Create StructuredViewers.
- Set content providers and content.
- Set label providers (optional).
- Add selection listeners (optional).
- Add filters (optional).
- Set sorters (optional).
- Handle events (optional).
Let's rewrite the proficient languages survey application using a ListViewer.
Creating Domain Specific Model Objects
Domain-specific model objects are queried by the list viewer to create a corresponding label. A programming language has a name and it can be object-oriented or not. The following code models programming languages with the Language subclass:
 public class SampleListViewer {
 Display display = new Display();
 Shell shell = new Shell(display);

 ListViewer listViewer;

 /**
 * Represents programming languages.
 *
 */
 public static class Language {
 public String genre;
 public boolean isObjectOriented;

 public Language() { }
 public Language(String genre, boolean isObjectOriented) {
 this.genre = genre;
 this.isObjectOriented = isObjectOriented;
 }
 public String toString() {
 return "Lang: " + genre + " [" +
 (isObjectOriented ? "Object-oriented" : "Procedural") + "]";
 }
 } // End of the Language subclass.
 ...
The Language class has two properties: genre and isObjectOriented. For the sake of simplicity, these properties can be accessed directly (declared public) instead of using getters and setters. Here, you create a Language object for each programming language and add each language to the list:
 Vector languages = new Vector();

 languages.add(new Language("Java", true));
 languages.add(new Language("C", false));
 languages.add(new Language("C++", true));
 languages.add(new Language("SmallTalk", true));
You put all of the Language instances in a Vector in order to configure the ListViewer more easily.
Creating a ListViewer
The ListViewer class provides two constructors that enable you to create a ListViewer in much the same way that you create a List control:
 public ListViewer(Composite parent)
 public ListViewer(Composite parent, int style)
The first constructor creates a List control with MULTI | H_SCROLL | V_SCROLL | BORDER styles, and "hooks" the List control with the new ListViewer instance. You can create a custom styled ListViewer with the second constructor. Additionally, you can create a ListViewer based on an existing List control:
public ListViewer(List list)
In the sample application, the following line creates the ListViewer instance:
listViewer = new ListViewer(shell);
Setting the Content Provider and the Content
Before you can feed the domain-specific model into the ListViewer, you have to set a content provider for the ListViewer. A content provider mediates between the viewer's model and the viewer itself. Because ListViewer is a structure-oriented viewer, you have to set a structure-oriented content provider:
 listViewer.setContentProvider(new IStructuredContentProvider() {
 public Object[] getElements(Object inputElement) {
 Vector v = (Vector)inputElement;
 return v.toArray();
 }
 public void dispose() {
 System.out.println("Disposing ...");
 }
 public void inputChanged(Viewer viewer, Object oldInput, Object newInput) {
 System.out.println("Input changed: old=" +
 oldInput + ", new=" + newInput);
 }
 });
The getElements method is called by the ListViewer to get an array of elements from the input object. In the sample application, we are going to use the languages vector as the input, so the getElements method simply returns an array with all the elements in the vector as the content. When input is changed, the inputChanged method will be called. While the list viewer is being disposed of, the dispose method is called. The content provider has been set. Now, you can set the model as the input to the ListViewer:
listViewer.setInput(languages);
At runtime, the previous line triggers the following output:
 Input changed: old=null, new=[Lang: Java [Object-oriented], Lang: C [Procedural],
 Lang: C++ [Object-oriented], Lang: SmallTalk [Object-oriented]]
The preceding content provider takes a Vector as the input element. In many cases, the input element is a Collection or an array. JFace provides a convenient class, the org.eclipse.jface.viewers.ArrayContentProvider class, to handle such cases. The input element for ArrayContentProviders must be Collection or Object[]. You can replace the setContentProvider code with this line:
listViewer.setContentProvider(new ArrayContentProvider());
If there is an input element set for a ListViewer while no content provider is being set, an exception is thrown.
Setting the Label Provider
All the elements (instances of Language) returned by the getElements method of the content provider are displayed on the list. The text representation for each element is determined using a label provider. If you do not set a label provider for a ListViewer, a default label provider is used. The default label provider simply takes the return value of the toString() method of each element as its text representation, as shown in Figure 7-6.
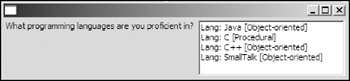
Figure 7-6
The item texts seem quite tedious. To display only the genre of a programming language, you need to supply a custom label provider:
 listViewer.setLabelProvider(new LabelProvider() {
 public Image getImage(Object element) {
 return null;
 }
 public String getText(Object element) {
 return ((Language)element).genre;
 }
 });
In the preceding code, an inner class subclassing LabelProvider is created. Alternatively, you can implement the ILabelProvider interface. The getText method returns a text label for the given element object. The ListViewer shows this text label in its associated List control. Because ListViewer does not support images, the getImage method simply returns a null object. If you need to display images, you should consider a TableViewer, which is covered in Chapter 10.
The ListViewer with custom label provider is shown in Figure 7-7.
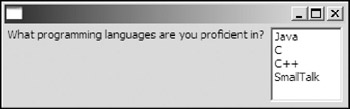
Figure 7-7
Capturing Events and Getting Selections
In the preceding section, we use a SelectionListener to capture selection events. Viewers support ISelectionChangedListeners instead of SelectionListeners. The following code registers a listener listening for a selection changed event and printing out the selected items:
 listViewer.addSelectionChangedListener(new ISelectionChangedListener() {
 public void selectionChanged(SelectionChangedEvent event) {

 IStructuredSelection selection =
 (IStructuredSelection)event.getSelection();

 StringBuffer sb = new StringBuffer("Selection - ");
 sb.append("total " + selection.size() + " items selected: ");
 for(Iterator iter = selection.iterator(); iter.hasNext(); ) {
 sb.append(iter.next() + ", ");
 }
 System.out.println(sb);
 }
 });
When a selection changes, the selectionChanged method is called with an event object of type SelectionChangedEvent as the argument. To retrieve the selection from a SelectionChangedEvent object, you can call its getSelection method. For structure-oriented viewers, selection objects are of the IStructuredSelection type, so you need to cast the return object of getSelection into an IStructuredSelection object. Important methods of the IStructuredSelection interface are as follows:
- public int size(): This method returns the total number of elements selected.
- public Iterator iterator(): This method returns an iterator over elements of this selection.
- public Object[] toArray(): This method returns the selected elements as an array.
- public Object getFirstElement(): This convenient method returns the first selected element if it exists.
When you program with the raw List control, you get selections as indices or text labels. For the ListViewer viewer, you get selections as domain-specific element objects. This property of MVC-based viewers enables you to focus on a business model and logic without spending too much time on the implementation details of the UI controls.
When you click the first item in the list, the following line appears:
Selection - total 1 items selected: Lang: Java [Object-oriented],
Now, press and hold the Shift key and click the third item to select the first three items. The selection now changes to:
 Selection - total 3 items selected: Lang: Java [Object-oriented], Lang: C
 [Procedural], Lang: C++ [Object-oriented],
At any time, you can always use the following method to track the selection status:
public ISelection getSelection()
Again, you need to cast the return object into an IStructuredSelection object. To set selection programmatically, you can use the setSelection method:
public void setSelection(ISelection selection, boolean reveal)
The selection argument is the selection to be made, and the reveal argument indicates whether the selection should be made visible. One convenient method available in the Viewer class is setSelection(ISelection selection), which is equivalent to setSelection(selection, false) .
For example, the following code sets the last two elements selected:
 Object[] toBeSelectedItems = new Object[2];
 toBeSelectedItems[0] = languages.elementAt(languages.size()-1);
 toBeSelectedItems[1] = languages.elementAt(languages.size()-2);
 IStructuredSelection selection = new StructuredSelection(toBeSelectedItems);

 listViewer.setSelection(selection, true);
In addition to selection changed events, you can also register listeners to listen to post selection changed events using the addPostSelectionChangedListener method. A post selection changed event is equivalent to a selection changed event, except it has a delay when the selection change is triggered by keyboard navigation.
The following table shows all the events that StructuredViewers support.
|
Event (Event Object Class) |
Remarks |
Declared in Class |
Methods |
|---|---|---|---|
|
Double-clicks (DoubleClickEvent) |
Generated when double-clicks occur |
StructuredViewer |
addDoubleClickListener removeDoubleClick-Listener |
|
Help (HelpEvent) |
Viewer |
addHelpListener removeHelpListener |
|
|
Open (OpenEvent) |
Selection-open for trees |
StructuredViewer |
addOpenListener removeOpenListener |
|
Post Selection Changed (SelectionChanged-Event) |
StructuredViewer |
addPostSelection-ChangedListener removePostSelection-ChangedListener |
|
|
Selection Changed (SelectionChanged-Event) |
Viewer |
addSelection-ChangedListener removeSelection-ChangedListener |
In rare cases, you may need to listen for other low-level events, such as mouse movement. In such cases, you can first obtain the wrapped control of a viewer and then register corresponding listeners to the control. The following method returns the wrapped control:
public Control getControl()
After obtaining the control, you can then cast the object into its appropriate type. ListViewer provides a convenient method to get the wrapper List control:
public List getList()
which is equivalent to (List)getControl().
Adding Filters
Filters can be used to filter out unwanted elements. You can add one or more filters to a StructuredViewer. An element is not displayed unless it passes through every one of the filters.
For example, to display object-oriented languages only, you can apply a filter to the list viewer.
 listViewer.addFilter(new ViewerFilter() {
 public boolean select(Viewer viewer, Object parentElement, Object element){
 if(((Language)element).isObjectOriented)
 return true;
 else
 return false;
 }
 });
In the preceding code, we create an inner class subclassing the ViewFilter class. The select method is the only method that has to be implemented. It returns whether the given element makes it through the filter. The ListViewer queries this method with three arguments. The first argument passed is the viewer itself. The second one, parentElement, is the input object. The last argument is the element to be checked.
The addFilter method not only adds a ViewerFilter to the viewer, it also triggers refiltering and resorting of the elements.
When you run the program, only the object-oriented languages are shown (see Figure 7-8).
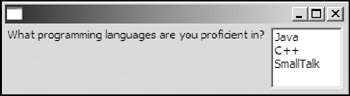
Figure 7-8
Setting a Sorter
Sorters can be used to reorder the elements provided by content providers. A viewer can have no more than one sorter. In JFace, a sorter is represented by the ViewerSorter class.
The following sorter sorts the elements by their genres alphabetically, and the result is shown in Figure 7-9.
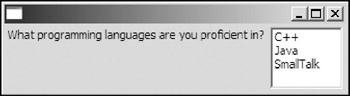
Figure 7-9
 listViewer.setSorter(new ViewerSorter(){
 public int compare(Viewer viewer, Object e1, Object e2) {
 return ((Language)e1).genre.compareTo(((Language)e2).genre);
 }
 });
Behind the scenes, the list viewer calls the following method of the sorter:
public void sort(Viewer viewer, Object[] elements)
The default implementation of this sort method uses the Arrays.sort algorithm on the given array, calling the compare method to compare elements. So you can also override the sort method to implement the sorting logic.
The setSorter method of the StructuredViewer class also triggers viewers to refresh elements displayed.
Updating Refreshing the Viewer
When you make some changes on the model, you need to notify the viewer to update itself. The following method can be used to update the presentation of a particular element:
public void update(Object element, String[] properties)
The element argument is the element object whose representation is to be updated. The second argument, properties, can be used by the viewer to optimize the update. For example, if a label provider is not affected by changes of specified properties, an update is not required. Setting the properties argument to null forces a full update of the element. If the viewer has a sorter, the element position is updated to maintain the order. Filters of the viewer are also applied to the element.
If you need to update multiple elements at the same time, you can use the following method:
public void update(Object[] elements, String[] properties)
Neither of preceding update methods handles structural changes — for example, addition or removal of elements. To handle structural changes, you can use the refresh methods. The following method refreshes the viewer with information freshly obtained from the model (the input object).
public void refresh(boolean updateLabels)
If updateLabels is set to true, all labels of the existing elements are updated, too. The method:
public void refresh()
is equivalent to refresh(true).
Finally, the following method refreshes the viewer, starting with the given element:
public void refresh(Object element)
This method is useful for table and tree viewers only. When you add or remove children from a particular element, you can call this method.
To illustrate how to use such update and refresh methods, let's extend the sample application to allow addition, removal, and modification of programming languages (see Figure 7-10).
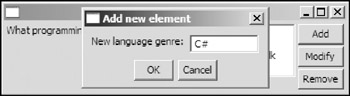
Figure 7-10
The corresponding code is listed here:
 Button buttonAdd;
 Button buttonRemove;
 Button buttonModify;

 buttonAdd = new Button(composite, SWT.PUSH);
 buttonAdd.setText("Add");

 buttonModify = new Button(composite, SWT.PUSH);
 buttonModify.setText("Modify");

 buttonRemove = new Button(composite, SWT.PUSH);
 buttonRemove.setText("Remove");

 buttonAdd.addSelectionListener(new SelectionAdapter() {
 public void widgetSelected(SelectionEvent e) {
 InputDialog dialog = new InputDialog(shell,
 "Add new element", "New language genre: ", "", null);

 dialog.open();
 String newGenre = dialog.getValue();
 if (newGenre != null) {
 languages.add(new Language(newGenre, true));
 }
 listViewer.refresh(false);
 }
 });

 buttonModify.addSelectionListener(new SelectionAdapter() {
 public void widgetSelected(SelectionEvent e) {
 IStructuredSelection selection =
 (IStructuredSelection) listViewer.getSelection();
 Language language = (Language) selection.getFirstElement();
 if (language == null) {
 System.out.println("Please select a language first.");
 return;
 }

 InputDialog dialog = new InputDialog(shell,
 "Modify genre", "Rename: ", language.genre, null);
 dialog.open();
 String newName = dialog.getValue();
 if (newName != null) {
 language.genre = newName;
 }
 listViewer.update(language, null);
 }
 });
 buttonRemove.addSelectionListener(new SelectionAdapter() {
 public void widgetSelected(SelectionEvent e) {
 IStructuredSelection selection =
 (IStructuredSelection)listViewer.getSelection();
 Language language = (Language)selection.getFirstElement();
 if(language == null) {
 System.out.println("Please select a language first.");
 return;
 }
 languages.remove(language);
 System.out.println("Removed: " + language);

 listViewer.refresh(false);
 }
 });
The three buttons are put into a composite located at the right part of the shell. When the Add or Modify buttons are pressed, dialogs appear. Those dialogs are used to get user input. For more details on the SWT dialog, please refer to Chapter 12.
When an element is added or removed, refresh(false) is called to refresh the viewer. If an element has been modified, then the update method is capable of performing viewer updating. You can always use refresh methods to replace update methods; however, refresh methods are more computationally expensive that update ones.
Summary
This chapter covers two kinds of SWT widgets: Combos and Lists. You learned how to create combos and capture item selections. Items in a combo can be gotten, set, found, added, and removed easily with methods provided by the Combo class. Similarly, you can create lists and capture single or multiple selections.
The ListViewer class is an MVC-based JFace viewer based on the List control. To develop a ListViewer-based program, you need to create domain-specific model objects first. Then you need to create an instance of the ListViewer and set the content provider and the content for it. Optionally, you can set a label provider, filters, and sorters for it. Because structured viewers hide UI implementation details, you can program with other structured viewers in a very similar way. Table viewers and tree viewers are introduced in Chapter 10 and Chapter 11, respectively.
Part I - Fundamentals
- Overview of Java UI Toolkits and SWT/JFace
- SWT/JFace Mechanisms
- Jump Start with SWT/JFace
- SWT Event Handling, Threading, and Displays
- Basic SWT Widgets
- Layouts
Part II - Design Basics
Part III - Dynamic Controls
- Scales, Sliders, and Progress Bars
- Other Important SWT Components
- SWT Graphics and Image Handling
- Drag and Drop and the Clipboard
- Printing
- JFace Windows and Dialogs
Part IV - Application Development
EAN: 2147483647
Pages: 147
