Sample Application
In this chapter, you are guided through the steps to develop a simple FTP client application using SWT/JFace. By drawing on knowledge acquired in previous chapters, you can create full-fledged practical applications. With the FTP client sample application, you learn how to use application windows, actions, menu bars, and toolbars. Furthermore, you learn how to make main UI components resizable by using sash forms properly. You can use drag and drop to improve the user interface and make it more accessible to the user.
Introduction
The previous chapters cover the SWT/JFace framework extensively. This chapter shows you how to combine all the knowledge acquired to create full-fledged practical applications. You learn step by step how to create an FTP client application such as the one shown in Figure 24-1.
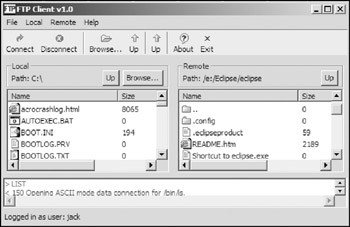
Figure 24-1
The FTP client allows the user to connect to any FTP server and navigate both the local and remote file systems. The user can download a file from the server easily by using the intuitive drag-and-drop feature. Most of the main user interface components can be resized easily by the user to suit his or her needs.
For this application, we focus on the construction of the user interface rather than the FTP protocol details. Apache Commons/Net library is used to communicate with FTP servers and execute FTP commands. You can download the library (commons-net-x.x.x.jar) from http://jakarta.apache.org/commons/net/index.html. Additionally, you need to add Commons/Net library's dependent package Apache Jakarta ORO library to your Java path, which can be downloaded from http://jakarta.apache.org/oro/.
The following sections explain the main steps to create the FTP client. Before you begin, you should have a good understanding of how the UI components are organized. Figure 24-2 dissects the FTP client window.
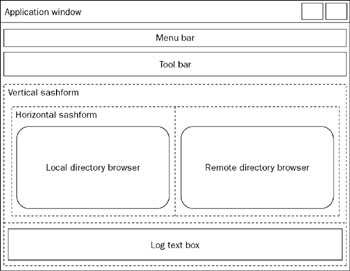
Figure 24-2
The FTP client window is an ApplicationWindow with its menu bar and toolbar. Below the toolbar is the content area. Sash forms are used to make main UI components resizable. A vertical sash form separates the content area into two portions. The top portion displays local and remote file systems, and the bottom portion prints log information. Additionally, a horizontal sash form is used to separate the local file system navigation components from the remote ones. Next, you learn about each step to complete the whole user interface.
Building the Skeleton
This section builds the skeleton for the FTP client application window.
Creating the Application Window
You create the FTP client application window by extending the ApplicationWindow class as follows:
 public class FTPWindow extends ApplicationWindow {
 TableViewer localDirBrowser;
 TableViewer remoteDirBrowser;
 Label labelPathLocal;
 Label labelPathRemote;
 StyledText textLog;

 ConnectionDialog connectionDialog;

 Action actionUpLocalDir;
 Action actionUpRemoteDir;
 Action actionBrowseLocalDir;
 Action actionConnect;
 Action actionDisconnect;

 Action actionDisplayAbout;
 Action actionExit;

 FTPClient ftp;
 ConnectionInfo connectionInfo;

 /**
 * @param parentShell
 */
 public FTPWindow(Shell parentShell) {
 super(parentShell);

 createActions();

 addStatusLine();
 addToolBar(SWT.FLAT);
 addMenuBar();

 ftp = new FTPClient();
 ftp.addProtocolCommandListener(new ProtocolCommandListener() {
 public void protocolCommandSent(ProtocolCommandEvent e) {
 logMessage("> " + e.getCommand(), false);
 }

 public void protocolReplyReceived(ProtocolCommandEvent e) {
 logMessage("< " + e.getMessage(), false);
 }
 });

 }
 ...
All the fields are declared above the constructor. Two table viewers, localDirBrowser and remoteDirBrowser, are used to display local and remote file systems, respectively. You learn how to implement each of them in the next section. A StyledText is used to print log information. ConnectionDialog is a simple JFace dialog that acquires connection setting input from the user (see Figure 24-3).
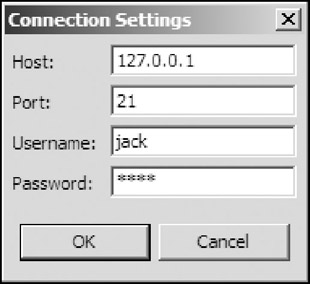
Figure 24-3
The FTPClient class is in the Apache Commons/Net library. We use the FTPClient class to execute FTP commands. For more details, you can consult the Javadoc of Commons/Net library.
The constructor first invokes the createActions method to create all the actions, such as connection and disconnection actions. Then it configures the toolbar and menu bar for the application window. Finally, you create the FTP client object and register a protocol command listener. The protocol command listener logs the command and replies to the styled text control through the logMessage method:
 private void logMessage(String message, boolean showInStatusBar) {
 StyleRange styleRange1 = new StyleRange();
 styleRange1.start = textLog.getCharCount();
 styleRange1.length = message.length();
 styleRange1.foreground = getShell().getDisplay().
 getSystemColor(SWT.COLOR_DARK_GREEN);
 styleRange1.fontStyle = SWT.NORMAL;

 textLog.append(message + "
");
 textLog.setStyleRange(styleRange1);
 textLog.setSelection(textLog.getCharCount());

 if(showInStatusBar) {
 setStatus(message);
 }
 }
Creating Actions
Before you create the menu bar and the toolbar, you must construct action objects. In this application, you use the createActions method to create all the actions:
 private void createActions() {
 // Up one level - local dir
 actionUpLocalDir = new Action() {
 public void run() {
 if (localDirBrowser.getInput() == null)
 return;
 File dir = ((File) localDirBrowser.getInput()).getParentFile();
 if (dir != null) {
 localDirBrowser.setInput(dir);
 labelPathLocal.setText("Path: " + dir);
 }
 }
 };
 actionUpLocalDir.setText("Up");
 actionUpLocalDir.setToolTipText("Up one level - local dir");
 actionUpLocalDir.setImageDescriptor(
 ImageDescriptor.createFromFile(null, "icons/ftp/up.gif"));

 // browse for local dir
 actionBrowseLocalDir = new Action() {
 public void run() {
 DirectoryDialog dialog = new DirectoryDialog(getShell());
 String path = dialog.open();
 if (path == null)
 return;
 File file = new File(path);
 localDirBrowser.setInput(file);
 labelPathLocal.setText("Path: " + file);
 }
 };
 actionBrowseLocalDir.setText("Browse...");
 actionBrowseLocalDir.setToolTipText("Browse local directory");
 actionBrowseLocalDir.setImageDescriptor(
 ImageDescriptor.createFromFile(null, "icons/ftp/browse.gif"));

 // connect
 actionConnect = new Action() {
 public void run() {
 if (connectionDialog == null)
 connectionDialog = new ConnectionDialog(FTPWindow.this);
 if (connectionDialog.open() == Dialog.OK) {
 connectionInfo = connectionDialog.getConnectionInfo();
 if (connectionInfo == null) {
 logError("Failed to get connection information.");
 } else {
 // connects to remote host.
 logMessage("Connecting to " + connectionInfo.host, true);
 try {
 ftp.connect(connectionInfo.host, connectionInfo.port);
 if (!FTPReply
 .isPositiveCompletion(ftp.getReplyCode()))
 throw new RuntimeException(
 "FTP server refused connection.");
 logMessage("Connected to " + connectionInfo.host, true);
 } catch (Exception e) {
 logError(e.toString());
 return;
 }
 try {
 // logins in.
 if (ftp
 .login(
 connectionInfo.username,
 connectionInfo.password)) {
 logMessage(
 "Logged in as user: "
 + connectionInfo.username, true);
 }
 // gets current working directory.
 labelPathRemote.setText(
 "Path: " + ftp.printWorkingDirectory());
 // Lists files.
 FTPFile[] files = ftp.listFiles();
 remoteDirBrowser.setInput(files);
 } catch (IOException e1) {
 logError(e1.getMessage());
 try {
 ftp.disconnect();
 } catch (IOException e2) {
 //
 }
 }
 }
 }
 }
 };
 actionConnect.setText("Connect");
 actionConnect.setToolTipText("Connect to remote host");
 actionConnect.setImageDescriptor(
 ImageDescriptor.createFromFile(null, "icons/ftp/connect.gif"));

 // disconnect
 actionDisconnect = new Action() {
 public void run() {
 try {
 ftp.logout();
 ftp.disconnect();
 }catch(Exception e) {
 logError(e.toString());
 }
 }
 };
 actionDisconnect.setText("Disconnect");
 actionDisconnect.setToolTipText("Disconnect from remote host");
 actionDisconnect.setImageDescriptor(
 ImageDescriptor.createFromFile(null, "icons/ftp/stop.gif"));

 // up one level - remote dir.
 actionUpRemoteDir = new Action() {
 public void run() {
 try {
 if (ftp.changeToParentDirectory()) {
 // gets current working directory.
 labelPathRemote.setText(
 "Path: " + ftp.printWorkingDirectory());

 // Lists files.
 FTPFile[] files = ftp.listFiles();
 remoteDirBrowser.setInput(files);
 }
 } catch (Exception e) {
 logError(e.toString());
 }
 }
 };
 actionUpRemoteDir.setText("Up");
 actionUpRemoteDir.setToolTipText("Up one level - remote dir");
 actionUpRemoteDir.setImageDescriptor(
 ImageDescriptor.createFromFile(null, "icons/ftp/up.gif"));

 actionDisplayAbout = new Action() {
 public void run() {
 MessageDialog.openInformation(getShell(), "About",
 "FTP Client v1.0
All right reserved by Jack Li Guojie.");
 }
 };
 actionDisplayAbout.setText("About");
 actionDisplayAbout.setImageDescriptor(
 ImageDescriptor.createFromFile(null, "icons/ftp/about.gif"));

 actionExit = new Action() {
 public void run() {
 if(! MessageDialog.openConfirm(getShell(), "Confirm",
 "Are you sure you want to exit?"))
 return;
 try {
 ftp.disconnect();
 }catch(Exception e) {
 // ignore.
 }
 close();
 }
 };
 actionExit.setText("Exit");
 actionExit.setImageDescriptor(
 ImageDescriptor.createFromFile(null, "icons/ftp/close.gif"));

 }
The purpose for each action is as follows:
- actionUpLocalDir: Changes the current local directory to the parent directory
- actionBrowseLocalDir: Browses for the local directory
- actionConnect: Prompts the connection dialog and tries to connect to the specified FTP server
- actionDisconnect: Disconnects from the FTP server
- actionUpRemoteDir: Changes the current remote directory to the parent directory
- actionDisplayAbout: Displays information about the application
- actionExit: Exits the application
Creating the Menu Bar
After you create all the actions, you can create the menu bar by overwriting the createMenuManager method of the ApplicationWindow class:
 /*
 * (non-Javadoc)
 *
 * @see org.eclipse.jface.window.ApplicationWindow#createMenuManager()
 */
 protected MenuManager createMenuManager() {
 MenuManager bar = new MenuManager();

 MenuManager menuFile = new MenuManager("&File");
 menuFile.add(actionConnect);
 menuFile.add(actionDisconnect);
 menuFile.add(new Separator());
 menuFile.add(actionExit);

 MenuManager menuLocal = new MenuManager("&Local");
 menuLocal.add(actionBrowseLocalDir);
 menuLocal.add(actionUpLocalDir);

 MenuManager menuRemote = new MenuManager("&Remote");
 menuRemote.add(actionUpRemoteDir);

 MenuManager menuHelp = new MenuManager("&Help");
 menuHelp.add(actionDisplayAbout);

 bar.add(menuFile);
 bar.add(menuLocal);
 bar.add(menuRemote);
 bar.add(menuHelp);
 bar.updateAll(true);

 return bar;
 }
Construct the Toolbar
Similarly, the toolbar is created by overwriting the createToolBarManager method:
 /* (non-Javadoc)
 * @see org.eclipse.jface.window.ApplicationWindow#createToolBarManager(int)
 */
 protected ToolBarManager createToolBarManager(int style) {
 ToolBarManager manager = super.createToolBarManager(style);

 addAction(manager, actionConnect, true);
 addAction(manager, actionDisconnect, true);

 manager.add(new Separator());

 addAction(manager, actionBrowseLocalDir, true);
 addAction(manager, actionUpLocalDir, true);

 manager.add(new Separator());

 addAction(manager, actionUpRemoteDir, true);

 manager.add(new Separator());

 addAction(manager, actionDisplayAbout, true);
 addAction(manager, actionExit, true);


 manager.update(true);

 return manager;
 }

 public static void addAction(
 ToolBarManager manager,
 Action action,
 boolean displayText) {
 if (!displayText) {
 manager.add(action);
 return;
 } else {
 ActionContributionItem item = new ActionContributionItem(action);
 item.setMode(ActionContributionItem.MODE_FORCE_TEXT);
 manager.add(item);
 }
 }
By default, the text of an action is not shown if it has an image associated. Instead of adding an action to the toolbar manager directly, you use the addAction method to force the text to be displayed even if the action has an image. The addAction method does this by creating an ActionContributionItem object and configuring its mode to force the text to be displayed.
You've created the menu bar and the toolbar. Now you are ready to create the contents for the application window.
Creating Application Window Contents
The application window contents are created by overwriting the createContents method:
 /*
 * (non-Javadoc)
 *
 * @see org.eclipse.jface.window.Window#createContents(Composite)
 */
 protected Control createContents(Composite parent) {
 Composite composite = new Composite(parent, SWT.NULL);
 composite.setLayout(new FillLayout());

 // the vertical sashform.
 SashForm verticalForm = new SashForm(composite, SWT.VERTICAL);

 // the horizontal sashform.
 SashForm horizontalForm = new SashForm(verticalForm, SWT.HORIZONTAL);

 // Local dir browser.
 Composite compositeLocalDir = new Composite(horizontalForm, SWT.NULL);
 GridLayout gridLayout = new GridLayout();
 gridLayout.horizontalSpacing = 1;
 gridLayout.verticalSpacing = 1;
 compositeLocalDir.setLayout(gridLayout);

 Group compositeLocalDirTop = new Group(compositeLocalDir, SWT.NULL);
 compositeLocalDirTop.setText("Local");
 GridLayout gridLayout2 = new GridLayout(3, false);
 gridLayout2.marginHeight = 0;
 compositeLocalDirTop.setLayout(gridLayout2);
 compositeLocalDirTop.setLayoutData(
 new GridData(GridData.FILL_HORIZONTAL));

 labelPathLocal = new Label(compositeLocalDirTop, SWT.NULL);
 labelPathLocal.setLayoutData(new GridData(GridData.FILL_HORIZONTAL));
 labelPathLocal.setText("Path: ");

 Button buttonUpLocalDir = new Button(compositeLocalDirTop, SWT.PUSH);
 buttonUpLocalDir.setText(actionUpLocalDir.getText());
 buttonUpLocalDir.addListener(SWT.Selection, new Listener() {
 public void handleEvent(Event event) {
 actionUpLocalDir.run();
 }
 });

 Button buttonBrowseLocalDir =
 new Button(compositeLocalDirTop, SWT.PUSH);
 buttonBrowseLocalDir.setText(actionBrowseLocalDir.getText());
 buttonBrowseLocalDir.addListener(SWT.Selection, new Listener() {
 public void handleEvent(Event event) {
 actionBrowseLocalDir.run();
 }
 });

 Table table = new Table(compositeLocalDir, SWT.BORDER);
 TableColumn tcFile = new TableColumn(table, SWT.LEFT);
 tcFile.setText("Name");

 TableColumn tcSize = new TableColumn(table, SWT.NULL);
 tcSize.setText("Size");

 TableColumn tcDate = new TableColumn(table, SWT.NULL);
 tcDate.setText("Date");

 tcFile.setWidth(200);
 tcSize.setWidth(100);
 tcDate.setWidth(100);
 table.setHeaderVisible(true);

 table.setLayoutData(new GridData(GridData.FILL_BOTH));
 localDirBrowser = new LocalDirectoryBrowser(table);

 table.addListener(SWT.MouseDoubleClick, new Listener() {
 public void handleEvent(Event event) {
 IStructuredSelection selection =
 (IStructuredSelection) localDirBrowser.getSelection();
 File file = (File) selection.getFirstElement();
 if (file != null && file.isDirectory()) {
 localDirBrowser.setInput(file);
 labelPathLocal.setText("Path: " + file);
 }
 }
 });

 // Remote directory browser.

 Composite compositeRemoteDir = new Composite(horizontalForm, SWT.NULL);
 gridLayout = new GridLayout();
 gridLayout.horizontalSpacing = 1;
 gridLayout.verticalSpacing = 1;
 compositeRemoteDir.setLayout(gridLayout);

 Group compositeRemoteDirTop = new Group(compositeRemoteDir, SWT.NULL);
 compositeRemoteDirTop.setText("Remote");
 gridLayout2 = new GridLayout(2, false);
 gridLayout2.marginHeight = 0;
 compositeRemoteDirTop.setLayout(gridLayout2);
 compositeRemoteDirTop.setLayoutData(
 new GridData(GridData.FILL_HORIZONTAL));

 labelPathRemote = new Label(compositeRemoteDirTop, SWT.NULL);
 labelPathRemote.setLayoutData(new GridData(GridData.FILL_HORIZONTAL));
 labelPathRemote.setText("Path: ");

 Button buttonUpRemoteDir = new Button(compositeRemoteDirTop, SWT.PUSH);
 buttonUpRemoteDir.setText(actionUpLocalDir.getText());
 buttonUpRemoteDir.addListener(SWT.Selection, new Listener() {
 public void handleEvent(Event event) {
 actionUpRemoteDir.run();
 }
 });

 Table tableRemote = new Table(compositeRemoteDir, SWT.BORDER);
 TableColumn tcFileRemote = new TableColumn(tableRemote, SWT.LEFT);
 tcFileRemote.setText("Name");

 TableColumn tcSizeRemote = new TableColumn(tableRemote, SWT.NULL);
 tcSizeRemote.setText("Size");

 TableColumn tcDateRemote = new TableColumn(tableRemote, SWT.NULL);
 tcDateRemote.setText("Date");

 tcFileRemote.setWidth(200);
 tcSizeRemote.setWidth(100);
 tcDateRemote.setWidth(100);
 tableRemote.setHeaderVisible(true);

 tableRemote.setLayoutData(new GridData(GridData.FILL_BOTH));
 remoteDirBrowser = new RemoteDirectoryBrowser(tableRemote);

 tableRemote.addListener(SWT.MouseDoubleClick, new Listener() {
 public void handleEvent(Event event) {
 IStructuredSelection selection =
 (IStructuredSelection) remoteDirBrowser.getSelection();
 FTPFile file = (FTPFile) selection.getFirstElement();
 if (file != null && file.isDirectory()) {
 try {
 ftp.changeWorkingDirectory(file.getName());
 labelPathRemote.setText(
 "Path: " + ftp.printWorkingDirectory());
 remoteDirBrowser.setInput(ftp.listFiles());
 } catch (IOException e) {
 logError(e.toString());
 }
 }
 }
 });

 // the log box.
 textLog =
 new StyledText(
 verticalForm,
 SWT.BORDER | SWT.H_SCROLL | SWT.V_SCROLL);

 localDirBrowser.setInput(File.listRoots()[0]);
 labelPathLocal.setText("Path: " + File.listRoots()[0]);

 // resize sashform children.
 verticalForm.setWeights(new int[]{4, 1});

 // adding drag and drop support.
 dragNDropSupport();

 getToolBarControl().setBackground(
 new Color(getShell().getDisplay(), 230, 230, 230));

 getShell().setImage(new Image(getShell().getDisplay(), "icons/ftp/ftp.gif"));
 getShell().setText("FTP Client v1.0");

 return composite;
 }
In the preceding code, we created the complete widget tree. We created two sash forms to make the main user interface components resizable. We constructed two tables for two table viewers. We created a StyledText control at the bottom of the window to print log information. We added drag-and-drop support through the dragNDropSupport method, which is covered in the last section of this chapter. Finally, you set the image icon and title for the application window.
Until now, only the skeleton of the user interface has been completed. Next, let's see how to implement table viewers for displaying local and remote file systems.
Implementing Table Viewers
In this application, two table viewers are used to display local and remote file systems. The local file system table viewer takes a file directory as an input and displays all the files contained by it. The implementation for the local file system table viewer is listed here:
 public class LocalDirectoryBrowser extends TableViewer {

 /**
 * @param table
 */
 public LocalDirectoryBrowser(Table table) {
 super(table);
 init();
 }

 private void init() {
 // the content provider.
 setContentProvider(new IStructuredContentProvider() {
 public Object[] getElements(Object inputElement) {
 File dir = (File)inputElement;
 return dir.listFiles();
 }

 public void dispose() {
 }

 public void inputChanged(
 Viewer viewer,
 Object oldInput,
 Object newInput) {
 }
 });

 // the label provider.
 setLabelProvider(new ITableLabelProvider() {
 public Image getColumnImage(Object element, int columnIndex) {
 if(columnIndex == 0)
 return FileIconUtil.getIcon((File)element);
 return null;
 }

 public String getColumnText(Object element, int columnIndex) {
 switch(columnIndex) {
 case 0:
 return ((File)element).getName();
 case 1:
 return ((File)element).length() + "";
 case 2:
 return new Date(((File)element).lastModified()).toString();
 default:
 return "";
 }
 }

 public void addListener(ILabelProviderListener listener) {
 }

 public void dispose() {
 }

 public boolean isLabelProperty(Object element, String property) {
 return false;
 }

 public void removeListener(ILabelProviderListener listener) {
 }
 });
 }

 }
Similarly, the table viewer for displaying the remote file system can be created.
Adding Drag and Drop Support
When the user drags a file from the remote file browser and drops it to the local file browser, the application tries to download the file from the FTP server to the current local directory. The following code implements this feature:
 private void dragNDropSupport() {
 // --- Drag source ---

 // Allows text to be copied and moved.
 int operations = DND.DROP_COPY | DND.DROP_MOVE;
 final DragSource dragSource =
 new DragSource(remoteDirBrowser.getControl(), operations);

 // Data should be transferred in plain text format.
 Transfer[] formats = new Transfer[] { TextTransfer.getInstance()};
 dragSource.setTransfer(formats);

 dragSource.addDragListener(new DragSourceListener() {
 public void dragStart(DragSourceEvent event) {
 System.out.println("DND starts");
 // disallows DND if no remote file is selected.
 IStructuredSelection selection =
 (IStructuredSelection) remoteDirBrowser.getSelection();
 FTPFile file = (FTPFile) selection.getFirstElement();
 if (file == null || file.isDirectory()) {
 event.doit = false;
 }
 }

 public void dragSetData(DragSourceEvent event) {
 // Provides the text data.
 if (TextTransfer
 .getInstance()
 .isSupportedType(event.dataType)) {
 IStructuredSelection selection =
 (IStructuredSelection) remoteDirBrowser.getSelection();
 FTPFile file = (FTPFile) selection.getFirstElement();
 if (file == null || file.isDirectory()) {
 event.doit = false;
 } else {
 // the name of the selected file is used as the text data
 event.data = file.getName();
 }
 }
 }

 public void dragFinished(DragSourceEvent event) {
 }
 });

 remoteDirBrowser
 .getControl()
 .addDisposeListener(new DisposeListener() {
 public void widgetDisposed(DisposeEvent e) {
 dragSource.dispose();
 }
 });

 // --- Drop target ---
 final DropTarget dropTarget =
 new DropTarget(localDirBrowser.getControl(), operations);

 dropTarget.setTransfer(formats);

 dropTarget.addDropListener(new DropTargetListener() {
 public void dragEnter(DropTargetEvent event) {
 }

 public void dragLeave(DropTargetEvent event) {
 }

 public void dragOperationChanged(DropTargetEvent event) {
 }

 public void dragOver(DropTargetEvent event) {
 }

 public void drop(DropTargetEvent event) {
 if (TextTransfer
 .getInstance()
 .isSupportedType(event.currentDataType)) {
 String text = (String) event.data;
 File target =
 new File((File) localDirBrowser.getInput(), text);
 if (target.exists()) {
 if (!MessageDialog
 .openConfirm(
 getShell(),
 "Overwriting confirmation",
 "Overwrite file " + target + "?")) {
 return;
 }
 }

 try {
 FileOutputStream stream = new FileOutputStream(target);
 if(ftp.retrieveFile(text, stream)) {
 logMessage("File retrieved successfully.", true);
 // refreshes the file list.
 localDirBrowser.refresh();
 }else{
 logError("Failed to retrieve file: " + text);
 }
 stream.close();
 } catch (IOException e) {
 e.printStackTrace();
 }
 }
 }

 public void dropAccept(DropTargetEvent event) {
 }
 });

 localDirBrowser.getControl().addDisposeListener(new DisposeListener() {
 public void widgetDisposed(DisposeEvent e) {
 dropTarget.dispose();
 }
 });
 }
The table viewer for the remote file system is set as the drag source and the table viewer for the local file system is set as the drop target. When drag and drop occurs, the FTP file downloading is initiated with the retrieveFile method of the FTPClient class.
The preceding code enables file downloading only from the server to the local machine. As an exercise, you can try to use similar code to equip the application with file uploading.
Summary
This chapter provided a sample application to show you how to combine various UI components and techniques that were covered in previous chapters in order to create a practical application. First, an application window was created with a menu bar and a toolbar. Then the user interface contents (widget tree) were created in the createContents method. By using sash forms, you made main UI components resizable. You created two table viewers to display local and remote file systems. Finally, you equipped the application with drag and drop to make it much easier to use and more intuitive.
For those who are familiar with Swing, you can spend a lot of time rewriting the sample application in Swing. You will be surprised (or maybe not) by how complicated Swing is to use. SWT/JFace's superior design makes it possible to develop GUI applications with Java quickly and easily.
This book provided comprehensive coverage of the SWT/JFace UI toolkit. You learned how to use SWT widgets. The chapter also covered frameworks that are available in JFace and showed you how to use them to simplify common UI programming tasks. You also learned about topics such as Eclipse Forms and Draw2D. You should now be able to develop practical Java UI applications with SWT/JFace. If you encounter difficulties, you can refer to this book for answers.
Part I - Fundamentals
- Overview of Java UI Toolkits and SWT/JFace
- SWT/JFace Mechanisms
- Jump Start with SWT/JFace
- SWT Event Handling, Threading, and Displays
- Basic SWT Widgets
- Layouts
Part II - Design Basics
Part III - Dynamic Controls
- Scales, Sliders, and Progress Bars
- Other Important SWT Components
- SWT Graphics and Image Handling
- Drag and Drop and the Clipboard
- Printing
- JFace Windows and Dialogs
Part IV - Application Development
EAN: 2147483647
Pages: 147
