Accessing FileMaker Data Using ODBC and JDBC
So far, the techniques detailed in this chapter have involved pushing data out of FileMaker into static export files. Its also possible to pull data out of FileMaker from the outside, using the ODBC or JDBC technologies. ODBC (Open Database Connectivity) is an open standard for accessing databases from various client applications. JDBC (often taken to stand for Java Database Connectivity) provides standardized database access for Java-based applications. Well refer to the two technologies together as xDBC from time to time for convenience.
For more information on importing data into FileMaker via ODBC, see "Importing from an ODBC Data Source," 584. |
Its possible to grant xDBC access to FileMaker data in a couple of ways. FileMaker Server Advanced can be configured to provide xDBC access to hosted files. An individual copy of FileMaker Pro or FileMaker Pro Advanced can also be configured to provide local xDBC access to any files hosted by the client. There are two differences between these methods:
- FileMaker Server Advanced can support up to 50 simultaneous xDBC connections. The client version of FileMaker can support no more than 5.
- FileMaker Server Advanced permits xDBC connections from remote computers. The FileMaker client can accept xDBC connections only from client applications running locally (on the same computer).
Regardless of which specific means of access you use, a number of things are constant during setup of an xDBC connection. In the first place, its necessary to configure the data source to accept xDBC connections. In the second place, its necessary to configure the client application environment correctly, which generally means installing and configuring a driver of some sort. Well first look at configuring the FileMaker Pro client for local ODBC access, and then consider how to configure FileMaker Server Advanced for remote ODBC access. First, though, well look at how to configure individual databases to permit xDBC access by either means.
Getting Your Databases Ready for ODBC/JDBC Access
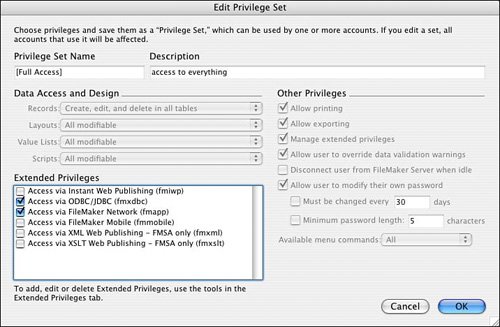
Like other means of external access, such as access via FileMaker Mobile, or access via XML, access via xDBC requires that a specific extended privilege be enabled in each file to be accessed. Any privilege set that has the Access via ODBC/JDBC extended privilege enabled will permit all accounts using that privilege set to access the file via xDBC. As with other external access methods, it may make sense to create a special user for xDBC access, and limit xDBC to that user alone. Figure 20.13 shows the extended privilege in question.
Figure 20.13. You must enable the fmxdbc privilege in at least one privilege set to grant ODBC/JDBC access to a database.
If this extended privilege is not enabled, xDBC access to the file will not be possible, regardless of any other configuration that has been performed. If you e having trouble accessing a file by xDBC or another remote access method, first check to make sure that the extended privileges in the file are in order before delving into complex troubleshooting of other parts of your configuration.
Configuring FileMaker Pro for Local ODBC/JDBC Access
You can use FileMaker Pro or FileMaker Pro Advanced to permit local access to hosted databases. Other ODBC-capable applications on the same computer will then be able to access data in your files. To do this, first open the files you want to host. Make sure that the appropriate extended privileges are enabled in each file, and assigned to the correct users. Then open the ODBC/JDBC settings dialog (Edit, Sharing, ODBC/JDBC on Windows, FileMaker Pro or FileMaker Pro Advanced; or Sharing, ODBC/JDBC on Mac OS). Make sure that ODBC/JDBC sharing is set to On in the upper area of the dialog. The lower half of the dialog simply represents an alternative way to enable the fmxdbc extended privilege in each of the open files. If you have already configured all your privileges, there should be no need to make any changes in this area of the dialog.
After the FileMaker files are hosted and configured correctly, its necessary to configure client application access. Prerequisites to ODBC client access are that the FileMaker ODBC driver be installed locally, and that there exist at least one DSN (Data Source Name) configured to use the FileMaker ODBC driver.
Note
Its possible to get a bit lost in the abundance of drivers and configuration options. When we refer to the "FileMaker ODBC driver" or "FileMaker JDBC driver," we e referring to drivers provided by FileMaker, Inc., on the FileMaker install disks, that provide other applications access to FileMaker data via ODBC or JDBC. Youll need to explicitly install these drivers from the FileMaker install mediathey are not installed by default when you install FileMaker Pro or FileMaker Pro Advanced.
The preceding chapter went into some detail on installing ODBC drivers and configuring DSNs. Its recommended that you read that chapter if you need a bit of background on those topics. The ODBC and JDBC drivers are available on the FileMaker install media, along with detailed installation instructions. Rather than repeating the install instructions, well assume that youve installed the drivers on your platform of choice, and proceed to look at how to configure a working DSN to access FileMaker data.
Configuring a DSN for FileMaker Access (Windows)
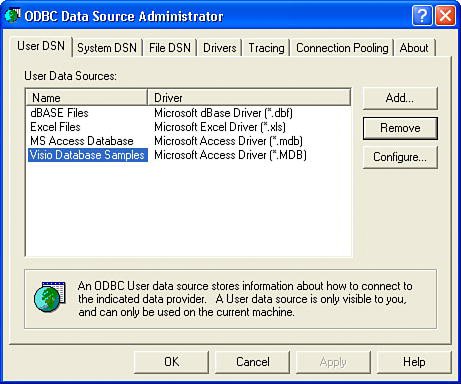
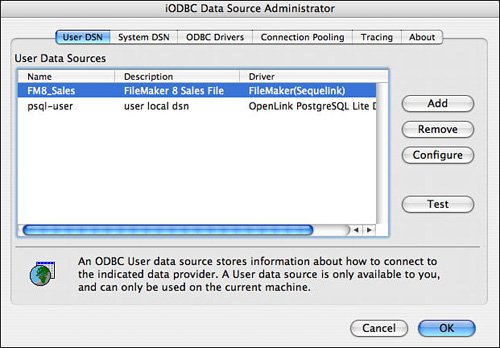
As with the process of configuring DSNs in general, the steps to reach a working DSN differ on Mac and Windows. On Windows, open the Control Panel, and then open Administrative Tools and choose the Data Sources (ODBC) tool to open the ODBC Data Source Administrator window, shown in Figure 20.14.
Figure 20.14. On Windows, ODBC settings are configured via the ODBC Data Source Administrator.
Click the Add button to create a new DSN. You should see the Create New Data Source dialog, shown in Figure 20.15.
Figure 20.15. Its necessary to create a DSN to access data via ODBC.
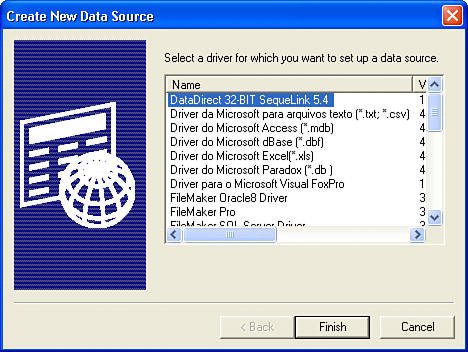
The FileMaker ODBC driver is technically best known as the DataDirect SequeLink 5.4 driver. If you don see that driver as an available choice when configuring, it may mean that the driver has not been installed, or that there was a problem with the installation.
If you installed the driver on Windows but don see it in the ODBC data administrator, see "ODBC Driver Missing on Windows" in the "Troubleshooting" section at the end of this chapter. |
When the DataDirect SequeLink driver is available, click Finish, and youll be taken to the setup dialog shown in Figure 20.16.
Figure 20.16. The new DSN will need several settings configured.

The Data Source Name field is for your own information; name it anything you like (its best to avoid spaces). You can likewise enter anything you like for the description. Because the FileMaker data source is local (in other words, on the same machine as the DSN), you should enter localhost for the server host. For the port, enter 2399. This is the standard port for accessing FileMaker via xDBC, both on the client and on the server, and it cannot be changed.
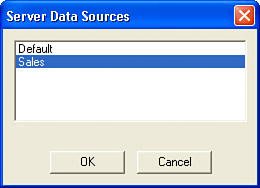
Finally, you need to make a selection in the Server Data Source field. Whether you e hosting via the client or via FileMaker Server Advanced, you may be making several files available, and you need to specify which file you intend to access. (This means that you need one DSN for each file you want to access via xDBC, unless the files are joined via relationships.) Clicking the button to the right of the Server Data Source field will allow you to choose a file to access, as shown in Figure 20.17.
Figure 20.17. Specify the particular data source you want to access with this DSN.
Note that if you know the files name, you can simply type it into the box, minus any .fp7 extension. Choosing via the dialog has the useful side effect of testing the ODBC connection. If the connection is not functioning correctly, no list of files will appear.
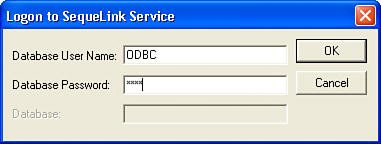
Even if the data source is correctly broadcasting the availability of files, youll also want to test access to the specific chosen file. To do so, click the Test Connect button (shown previously in Figure 20.16), and then enter the username and password for the chosen file in the resulting dialog, as shown in Figure 20.18.
Figure 20.18. Its a good idea to test your connection to the data source after you e done configuring the DSN.
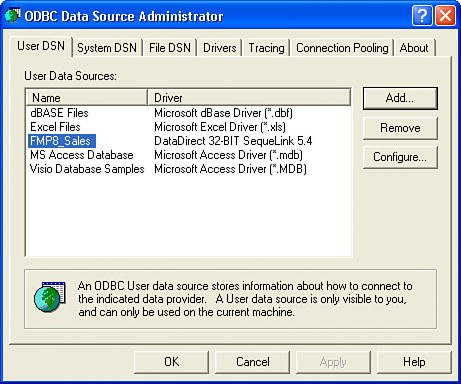
If there are no problems with configuration or passwords, you should see a message stating that the test was successful. If you get an error, such as a TCP/IP error, check to make sure that the file is correctly enabled for ODBC access. If the test was successful, you can click OK to return to the ODBC Data Source Administrator window, shown in Figure 20.19.
Figure 20.19. When you e done configuring the DSN, it will be available for use.
Configuring a DSN for FileMaker Access (Mac OS)
The process for configuring a FileMaker DSN on the Mac OS is generally similar, but ODBC is a bit less tightly integrated into the Mac OS. As a result, you have a bit more work to do.
First, youll need to have an ODBC administration tool installed. Mac OS ships with Apples ODBC Administrator. OpenLink makes a somewhat more full-featured replacement for the Apple utility. You should consider downloading and installing the OpenLink utility if you e planning to do much with ODBC on the Mac OS. The utility is free; examine the OpenLink web site (www.openlinksw.com) and search out the latest version of the iODBC SDK.
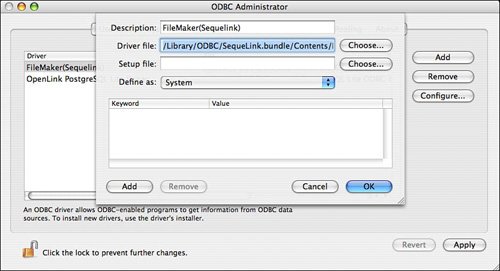
Presumably youve also already installed the FileMaker ODBC driver, according to the instructions that came with the installer files on the FileMaker disk. Unlike on Windows, simply installing the driver won automatically make it available for use. You need to take another step and register the driver as well. To do so, open the ODBC Administrator, click on the Drivers tab, and then choose Add. Youll be able to give the driver a descriptive name of your own choosing. Youll also need to specify the full path to the location of the installed driver file. This path depends on whether you installed the driver to be accessible just to a single user, or to all users on the system. This choice, and the specific paths it entails, are discussed in the driver install instructions. Unless you have specific reasons for limiting driver use to just one user, its simpler to install it as a system driver, available to all users. In that case, the install location will be /Library/ODBC/SequeLink.bundle/Contents/MacOS/ivslk18.dylib, as shown in Figure 20.20.
Figure 20.20. Youll need to do a little extra driver configuration on the Mac OS.
After the driver is installed and configured, you can go ahead and create a DSN that uses that driver. As on Windows, you can create either a User DSN or a System DSN. Switch to the appropriate tab of the ODBC Administrator, depending on which you plan to create. Click Add, and then pick the FileMaker driver you just configured. Youll see the Generic ODBC Driver Setup dialog, shown in Figure 20.21. The SequeLink driver has a fairly bare-bones interface on the Mac OS. Rather than having specific slots already set aside, its necessary instead for you to specify the names of the configuration parameters yourself.
Figure 20.21. Youll need to set several driver keywords manually when creating a DSN for the Mac OS.
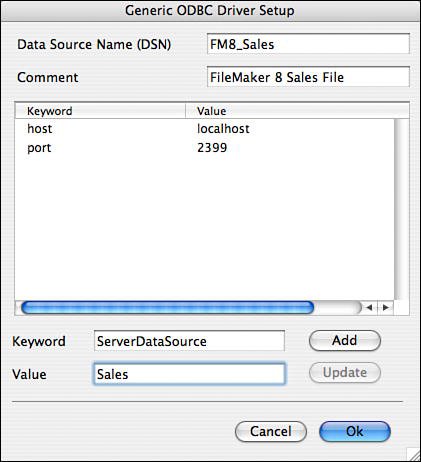
Specify host, port, and ServerDataSource as keywords, and also specify the appropriate values. The host and port should be localhost and 2399, respectively; the ServerDataSource is the name of the database you want to access, minus any file extensions.
If you e using the OpenLink ODBC Administrator, youll have access to a Test button that lets you test the connection, as shown in Figure 20.22.
Figure 20.22. The iODBC Data Source Administrator gives you a useful Test button.
Using Microsoft Excel as a Local Access ODBC Client
In a typical local access scenario, an application needs to extract data from a copy of FileMaker running on the same machine. Microsoft Excel is an easy example, especially because it has a full-featured toolset for external data access. The techniques discussed in this section work equally well on the Mac OS and on Windows, assuming that you have configured a DSN on the local machine to access FileMaker, as described in the preceding two sections. This functionality relies on the presence of Microsoft Query. Its installed by default under certain circumstances, but you may need to install it separately if its missing.
To access FileMaker data from Excel, open a new Excel workbook. Choose Data, Import External Data, New Database Query. The Choose Data Source dialog, shown in Figure 20.23, will open.
Figure 20.23. To access FileMaker data via ODBC, youll need to choose an appropriate data source.
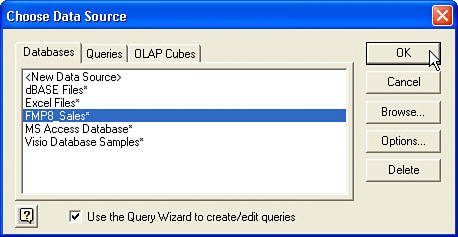
Select your FileMaker DSN (FMP8_Sales in this case), and click OK. Youll be prompted to enter a username and password.
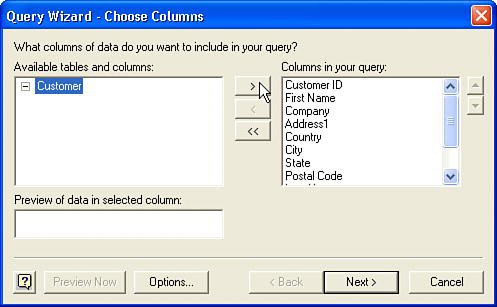
After you enter the correct username and password for ODBC access to the file, the Query Wizard dialog, shown in Figure 20.24, will open.
Figure 20.24. The Microsoft Excel Query Wizard may (temporarily) spare you from having to write any SQL.
ODBC database access is based around the SQL query language. Most databases accessible via ODBC support SQL natively. Although FileMaker does not support SQL natively, the FileMaker ODBC driver effectively emulates a subset of SQL, allowing you to write SQL queries to access FileMaker data via ODBC. This means that youll find some basic familiarity with SQL helpful in order to be able to perform these operations. Still, using the various query wizards that are often part of the ODBC client application, you can make quite a lot of progress without writing any SQL yourself.
Microsofts Query Wizard allows you to choose from a list of "tables" on the left of the dialog. Take careful note: These will in fact be the names of table occurrences from the designated FileMaker file. A simple operation might consist of selecting a single table occurrence, and then clicking the > button to move all of its fields over to the right at once. This would select all columns of data from the underlying source table. Subsequent screens in the Query Wizard allow you impose filter criteria on the records being returned (a WHERE clause, if you e familiar with SQL) and to specify a sort order (an ORDER BY clause in SQL). Finally, youll have the option of specifying what to do with the selected data, as shown in Figure 20.25.
Figure 20.25. After youve specified a query, the Microsoft Query Wizard lets you decide where to put the resulting data.
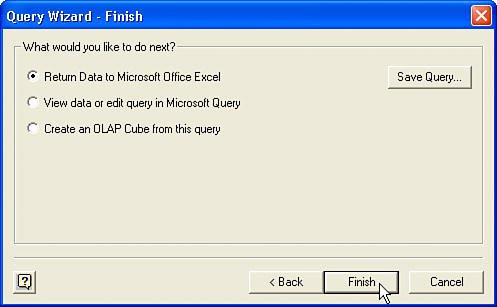
Microsoft Excel, like many client applications, also enables you to store queries for future use, much like storing an import or export routine in a FileMaker script. If this query is one you foresee reusing, it would be wise to save it for later use via the Save Query button, also shown in Figure 20.25.
If you have persistent troubles connecting to FileMaker as an ODBC data source, see "ODBC Connection Checklist" in the "Troubleshooting" section at the end of this chapter. |
Configuring FileMaker Server Advanced for xDBC Access
If you want your FileMaker data to be available via ODBC to various client applications on different computers, even on different networks, youll need to serve your files via FileMaker Server Advanced. As when hosting files for local access, youll need to have the privileges in each file configured correctly for xDBC access first.
Hosting a file via FileMaker Server or FileMaker Server Advanced is straightforward, and is covered in Chapter 25. Here well concentrate on what specifically needs to be configured on the server itself.
For more information on configuring FileMaker Server, see "FileMaker Server and Server Advanced," 779. |
Note
Remember that youll need FileMaker Server Advanced to host xDBC connections. FileMaker Server alone cannot host xDBC connections.
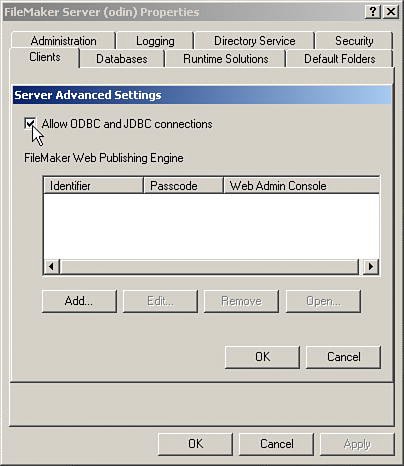
To configure the server to accept xDBC connections, open the Server Administration Tool (SAT). On Windows, youll need to connect to the server using the SAT, right-click the server and choose Properties, and then choose the Clients tab and click the Server Advanced Settings button, as shown in Figures 20.26 and 20.27.
Figure 20.26. Its necessary to use FileMaker Server Advanced to provide ODBC/JDBC connectivity to remote computers.
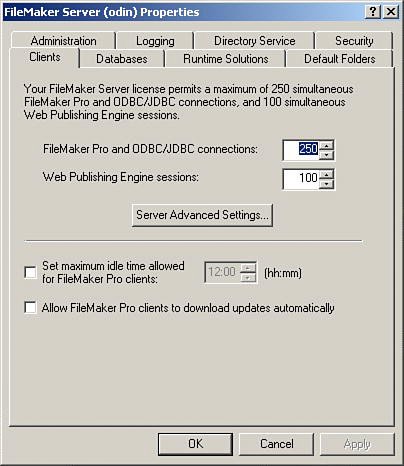
Figure 20.27. Configuring ODBC/JDBC connectivity is a matter of clicking a single check box.
On the Mac OS, youll likewise need to connect to the server using the SAT, and then choose the Configure area and select the Clients tab, as shown in Figure 20.28.
Figure 20.28. Configuration of ODBC/JDBC connectivity is similar on the Mac OS.
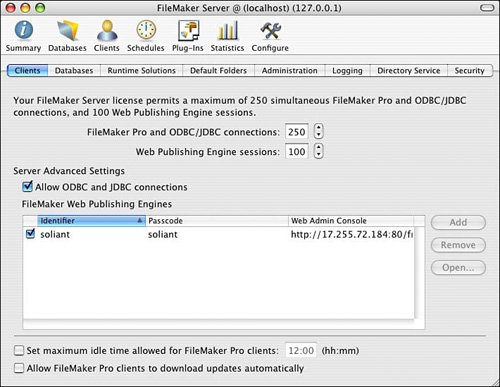
Regardless of platform, youll need to check the check box labeled Allow ODBC and JDBC Connections. After this check box is checked, any database hosted on the server that is correctly configured for xDBC (that is, it has one or more privilege sets that have the fmxdbc extended privilege) can now be accessed by xDBC client applications. (Those clients still depend on a correct local client configuration, including driver installation and configuration, and DSN creation, as detailed in previous sections.)
