Audit Trails in FileMaker Pro
Data integrity is vital in a multiuser database. A well designed database properly structured, will go a long way toward ensuring proper data integrity, but no database will ever be perfect. Pesky humans have a habit of introducing a certain unpredictability into the mix. Although $.02 may very well be a perfectly valid number as an invoice total, the truth that the invoice in question was actually $200.00 isn't something a database will ever be able to discern. Then there are cases where a client accidentally makes alterations across a number of records using an import or replace function.
For cases like these, you may choose to build a mechanism to first identify and then undo changes. Possible problem records might be identifiable by date, by user, or by some other criteria. In some cases, maybe only a field needs addressing. The process of undoing changes is referred to as a rollback, and for it to be possible, you first need an audit trail of logged transactions in your database to provide the breadcrumbs necessary for a series of undo steps.
Audit trails track the edits made to a database at the granular field level. Changes tracked usually include the field name, a timestamp, and the user account for the person (or function) that made the change. Although FileMaker Pro doesn't have audit trail capabilities built in by default, it is entirely possible to build them. The following sections illustrate three increasingly complete techniques.
Record Create/Modify Meta Data
The simplest way to track the evolution of your data is to create fields for creation and modification events. This alone doesn't allow for rollbacks, but it certainly gives you visibility into the events of your database and provides a layer of accountability.
This sort of data is not related to a given business or organization, but helps describe when and by whom data is entered into a database. It is often referred to as meta data: data about data.
When building a system for multiuser deployment, we recommend establishing timestamps for creation and modification of records, along with account names. (We don't recommend recording the machine username because this can easily be modified by the user.) This enables you to track who's responsible and when edits have been made to your database so that you can, at a minimum, identify problems. For example, if one of your users consistently makes a data entry error, or if a bug in development leads to wrong lookup values, you can isolate such records by timestamp and account name.
Caution
You might have noticed that we specified account name rather than username for these meta fields. Individual users can modify their names in the preferences dialogs of FileMaker Pro clients, and there's no corresponding authentication for such. Because this data isn't reliable, we always opt to use the account name.
 |
To explore error trapping practices, refer to "Trapping for Errors" in the "Troubleshooting" section at the end of this chapter. |
Script-Controlled Editing
A second technique for controlling edits to your database solutions is scripting-intensive, but allows for the most control. It's conceptually straightforward: Lock down the actual fields of your database in Browse mode and have your users make edits in global fields with a Submit or Cancel button. The script attached would then move the data from temporary fields into actual fields. This allows you to control, via script, any checks you might want to make on the data, and also allows you to write records to an audit trail database to record changes.
One of the more difficult aspects of this approach is what to do with portals and related records. A technique that works well (but again will have you working in ScriptMaker quite a bit) is to use a temporary scratch table. Users place edits in its temporary child records and if they click Cancel, those records are simply discarded. Your audit trail would then need to track to which table a given row of data belonged.
This scripted approach isn't for the faint-of-heart. You'll need to be quite adept with scripting, and this sort of approach will dramatically add to the time it takes for you to deliver a solution. You can also run into significant performance issues when forcing users through a script-intensive process for every record edit they want to make. The upside, of course, is a solid system that does everything it can to protect against honest mistakesboth in terms of trapping data changes and providing a complete, deliberately designed user experience.
Auto-Entry Technique for Audit Trails
The third technique in building audit trails relies on the auto-entry options of FileMaker Pro and the capability for fields to modify their own contents (see Figure 11.2. An audit trail should track when and by whom a change was made, and also the change itself. For situations that require an audit trail, more often than not the auto-entry approach is the one we choose. It is practical, it doesn't require scripting, and it doesn't impede typical use of the system.
Figure 11.2. Notice that the AuditLog field on the bottom has a chronological (time stamped) history.
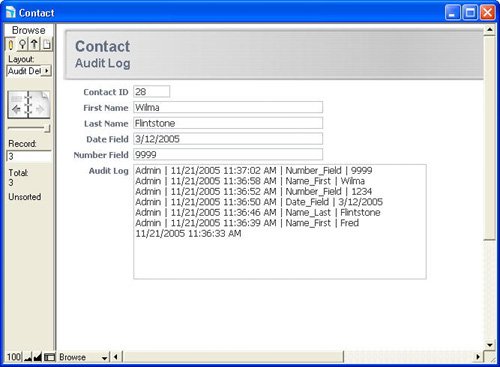
This technique might seem somewhat advanced, but it's actually quite simple. The system stores a text string for each edit made to a given field or record; you may see some performance issues arise as your database grows, so we recommend moving this data into an archive when (if) you need.
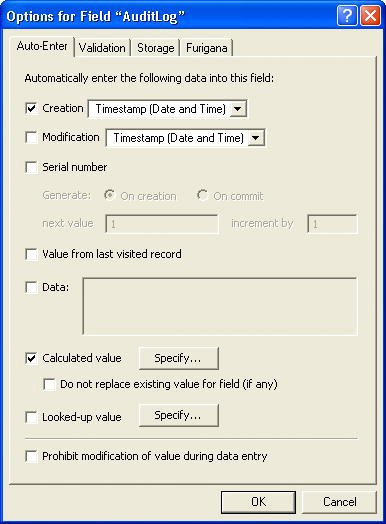
The AuditLog field displayed in Figure 11.2 is nothing more than a text field with auto-entry options enabled. Specify that you want to have a calculation result auto-populate the AuditLog field, be certain to turn off the Do Not Replace Existing Value for Field (If Any) option, and add some seed data to the field as well via the another Auto Entry option (see Figure 11.3).
Figure 11.3. Notice that you need two auto-entry options enabled where the timestamp seeds the field.
Define your calculation as shown in Figure 11.4.
Figure 11.4. Use the Evaluate function's optional trigger field parameters to cause the AuditLog field to be reevaluated.
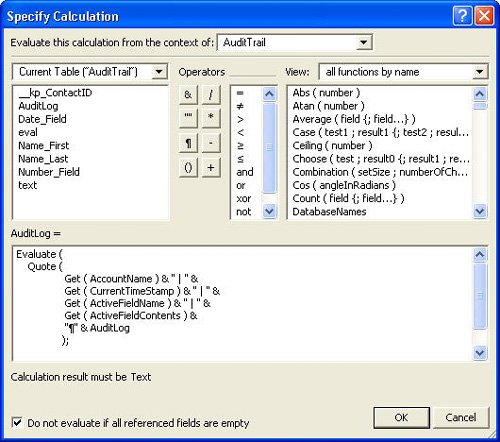
You need to combine a few different functions and elements to assemble this auto-entry calculation:
- Evaluate Evaluate returns the results from an expression passed to it. You might wonder why we're bothering with it; after all, this is a calculation entryby definition it will be evaluated. However, any fields added to the optional properties of an Evaluate function serve as triggers (much as a Lookup function works). When they are changed, so too will be the Audit_Trail field. Be sure to add however many trigger fields as you'd like tracked in your audit trail.
- Quote Quote in this approach will allow you to treat text as data and prevent it from being evaluated within the Evaluate function. With it you can properly concatenate the label and text values in the function. Without the Quote function, your evaluated result would be a "?".
- Get (CurrentAccount) Returns the account currently signed in from the database's security settings.
- Get (CurrentTimeStamp) This simply returns the time and date at which the user changed one of the trigger fields. An exceedingly minor point: The timestamp occurs when the audit log field is written/committed, not when the actual edit occurred.
- Get (ActiveFieldName) This Get function returns the active field name of the field being edited. Because the field in question (say, for example Name_First) is also listed as a trigger in the Evaluate function, there's a brief moment as the record is being committed that FileMaker Pro resolves the Evaluate function while still recognizing the trigger field as active. It is this behavior that enables the audit trail to work.
- Get (ActiveFieldConntent) Just as Get (ActiveFieldName) works at the moment of a trigger to capture the edited field name, Get (ActiveFieldContents) captures the actual contents of the field in question.
- & "¶" & AuditLog If you append the AuditLog field itself to the end of your calculation, you'll be able to save prior entries and simply keep adding to the top of the log. If you prefer to have your entries sorted chronologically, begin your formula with AuditLog & "¶" &.
- [Name_First; Name_Last; Date_Field; Number_Field] These last elements of the formula are the optional criteria for the Evaluate function. They serve as your triggers.
The seed data you added on the Auto-Entry Options dialog (creation timestamp) allows you to leave the Do Not Evaluate If All Referenced Fields Are Empty option turned on; otherwise you'd need to turn this option off to get the calculation to work the first time (when the AuditLog field was empty). Despite the triggers, it is the only actual field referenced in the calculation.
Caution
If you turn off the Do Not Evaluate If All Referenced Fields Are Empty option, you'll end up with a blank row in your audit log. Somehow that didn't feel proper to us, and theoretically it's possible for someone to create a record and leave it unedited for a period of time. Adding at least the initial timestamp to initialize the Audit_Log at least offers more information.
You'll want to consider some additional issues before using this technique in your database solutions. First, FileMaker cannot recognize the current field name or field contents while a replace function is being performed. The audit trail will record that a change was made, but it will lack both the data itself and the field name in question. This same issue applies in the case of imports, and all script steps that don't actively mimic user actions. Set Field, for example, does not actively enter a field. In the case of using Set Field, the symptoms are identical to the case of a Replace or Import; however, presumably because Set Field exists in a script, you could opt to record whatever audit information your system required.
Second, keep in mind that your data still lives with the record in question. If you were to delete a record, you would presumably lose your audit trail. To preserve all audit trails and to ensure the capability to perform a rollback, we suggest writing a script routine that controls delete processes and properly records all data in an audit table before erasing it from your system.
Related records work in the same manner: Their audit trail routines would live in their respective records, just as in a parent record. If you delete a related record, you will need to store that state in an audit table of some kind.
|
For help with controlling auto-entry behaviors, refer to "Making Sure That Your Auto-Entry Always Edits" in the "Troubleshooting" section at the end of this chapter. |
Creating Rollback Functionality
Regardless of whether you choose to move your audit information into its own table or leave it in each record to which it pertains, a rollback follows the same basic principles.
A rollback, true to its name, allows a database administrator, in backward fashion, to re-create the state of a database as it existed at any point in time. She can do so without having to resort to deploying a backup (which may not include the latest functionality of the system).
This involves writing a script to walk through each record's audit trail (from top to bottom as an audit trail writes its data), using Set Field script steps, and re-creating a record at a given date and time. The logic relies on a loop that tests to see whether each iterative row in your audit trail data is older than (or equal to) the point in time you've selected for rollback. If the result of the test is true, your script would be set to parse the data at the end of the line (using the Middle function), and by referencing the stored field name in that row, it would populate your data.
Caution
If your database relies on Set Field script steps (for possibly tracking various status flags or data you've scripted), don't forget that you need to re-create that information via other means. It is not just the data a user sees that needs to be rolled back.
Part I: Getting Started with FileMaker 8
FileMaker Overview
- FileMaker Overview
- FileMaker and Its Marketplace
- Introduction to Database Software
- FileMaker Deployment Options
- Whats New in FileMaker Pro 8
Using FileMaker Pro
- Getting Started
- Working in FileMaker Pro
- Troubleshooting
- FileMaker Extra: Becoming a FileMaker Pro Power User
Defining and Working with Fields
- Defining and Working with Fields
- Working Under the Hood
- Working with Fields
- Working with Field Types
- Assigning Field Options
- Troubleshooting
- FileMaker Extra: Indexing in FileMaker
Working with Layouts
- Working with Layouts
- Whats a Layout?
- Creating and Managing Layouts
- Working with Parts
- Working with Objects on a Layout
- Working with the Tab Control Object
- Working with Fields
- Portals
- Troubleshooting
- FileMaker Extra: Designing Cross-PlatformFriendly Layouts
Part II: Developing Solutions with FileMaker
Relational Database Design
- Relational Database Design
- Understanding Database Design
- Database Analysis
- Working with Entities and Attributes
- Understanding Relationships
- Relationship Optionality
- Understanding the Role of Keys in Database Design
- Many-to-Many Relationships: Solving the Puzzle
- The Basics of Process Analysis
- FileMaker Extra: Complex Many-to-Many Relationships
Working with Multiple Tables
- Working with Multiple Tables
- Multitable Systems in FileMaker Pro
- Creating a One-to-Many Relationship in FileMaker
- Working with Keys and Match Fields
- Understanding Table Context
- Working with Related Data
- Creating a Many-to-Many Relationship
- Relational Integrity
- Rapid Multitable Development
- Troubleshooting
- FileMaker Extra: Building a Three-Way Join
Working with Relationships
- Working with Relationships
- Relationships Graphs and ERDs
- Relationships as Queries
- Creating Self-Relationships
- Creating Ranged Relationships
- Creating Cross-Product Relationships
- Working with Data from Distant Tables
- Working with Multiple Files
- How and When to Use Multiple Files
- Troubleshooting
- FileMaker Extra: Managing the Relationships Graph
Getting Started with Calculations
- Getting Started with Calculations
- Understanding How and Where Calculations Are Used
- Exploring the Calculation Dialog Box
- Essential Functions
- Using Conditional Functions
- Aggregate Functions
- Learning About the Environment
- Troubleshooting
- FileMaker Extra: Tips for Becoming a Calculation Master
Getting Started with Scripting
- Getting Started with Scripting
- Scripts in FileMaker Pro
- Creating Scripts
- Common Scripting Topics
- Triggering Scripts
- Working with Buttons on Layouts
- Troubleshooting
- FileMaker Extra: Creating a Script Library
Getting Started with Reporting
- Getting Started with Reporting
- Deriving Meaning from Data
- Working with Lists of Data
- Summarized Reports
- Delivering Reports
- Troubleshooting
- FileMaker Extra: Incorporating Reports into the Workflow
Part III: Developer Techniques
Developing for Multiuser Deployment
- Developing for Multiuser Deployment
- Developing for Multiple Users
- Sessions in FileMaker Pro
- Concurrency
- Audit Trails in FileMaker Pro
- Launch Files
- Troubleshooting
- FileMaker Extra: Development with a Team
Implementing Security
- Approaching Security
- User-Level Internal Security
- File-Level Access Security
- Troubleshooting
- FileMaker Extra: Working with Multiple Files
Advanced Interface Techniques
- Advanced Interface Techniques
- User Interfaces in FileMaker Pro
- Navigation
- Multiwindow Interfaces
- Working with Custom Menus
- Showing/Hiding Layout Elements
- Dedicated Find Layouts
- Data Presentation
- Working with Table View
- Troubleshooting
- FileMaker Extra: User Interface Heuristics
Advanced Calculation Techniques
- Advanced Calculation Techniques
- Whats an Advanced Calculation Technique?
- Logical Functions
- Text Formatting Functions
- Array Functions
- The Filter-ing Functions
- Custom Functions
- GetNthRecord
- Troubleshooting
- FileMaker Extra: Creating a Custom Function Library
Advanced Scripting Techniques
- Advanced Scripting Techniques
- What Is Advanced Scripting?
- Script Parameters and Script Results
- Script Variables
- Window Management Techniques
- Go to Related Record
- Troubleshooting
- FileMaker Extra: Recursive Scripts
Advanced Portal Techniques
- Advanced Portal Techniques
- Portals in FileMaker Pro
- Portal Basics
- New Record Only Relationships
- Horizontal Portals
- Using Portals to Create Calendars
- Selection Portals
- Filtered Portals
- Dynamic Portal Sorting
- Troubleshooting
- FileMaker Extra: Portals and Record Locking
Debugging and Troubleshooting
- Debugging and Troubleshooting
- What Is Troubleshooting?
- Staying Out of Trouble
- Planning for Trouble
- Troubleshooting Scripts and Calculations
- Troubleshooting in Specific Areas: Performance, Context, Connectivity, and Globals
- File Maintenance and Recovery
- FileMaker Extra: Other Tools of the Trade
Converting Systems from Previous Versions of FileMaker Pro
- Converting Systems from Previous Versions of FileMaker Pro
- Migration Choices
- Converting Files
- Pre-Conversion Tasks
- Post-Conversion Tasks
- Troubleshooting
- FileMaker Extra: Converting Web-Enabled Databases
Part IV: Data Integration and Publishing
Importing Data into FileMaker Pro
- Importing Data into FileMaker Pro
- Working with External Data
- Flat-File Data Sources
- Importing Multiple Files from a Folder
- Importing Photos from a Digital Camera
- Importing from an ODBC Data Source
- Importing from an XML Data Source
- Using a Script to Import Data
- Troubleshooting
- FileMaker Extra: Exploiting the FileMaker-to-FileMaker Import
Exporting Data from FileMaker
- Exporting Data from FileMaker
- Getting Out What You Put In
- The Basic Mechanics of Exporting
- Export File Formats
- Formatting Exported Data
- Exporting Related Fields
- Exporting Grouped Data
- Exporting to Fixed-Width Formats
- Working with Large Fields and Container Fields
- Scripted Exports
- Accessing FileMaker Data Using ODBC and JDBC
- Using FileMaker Pro as an ODBC Client
- Troubleshooting
- FileMaker Extra: Accessing FileMaker Data via JDBC
Instant Web Publishing
- Instant Web Publishing
- An Overview of Instant Web Publishing
- Enabling and Configuring IWP
- Designing for IWP Deployment
- Using an IWP Solution
- Troubleshooting
- FileMaker Extra: Building Your Own Next and Previous Page Buttons
FileMaker and Web Services
- FileMaker and Web Services
- About Web Services
- FileMaker and XML
- Transforming XML
- XML Import: Understanding Web Services
- Working with Web Services
- Troubleshooting
- FileMaker Extra: Write Your Own Web Services
Custom Web Publishing
- Custom Web Publishing
- About Custom Web Publishing
- Custom Web Publishing Versus Instant Web Publishing
- Custom Web Publishing Versus XML Export
- Getting Your Databases Ready for Custom Web Publishing
- Publishing FileMaker Data as XML
- Using XSLT with Custom Web Publishing
- Building Web Applications with XSLT-CWP
- Other Custom Web Publishing Commands and Parameters
- About the FileMaker XSLT Extensions
- Troubleshooting
- FileMaker Extra: About the Custom Web Publishing Tools
Part V: Deploying a FileMaker Solution
Deploying and Extending FileMaker
- Deploying and Extending FileMaker
- FileMaker Deployment Options
- Single User
- Peer-to-Peer Hosting
- FileMaker Server
- Web Publishing
- ODBC/JDBC
- Citrix/Terminal Services
- Runtime Solutions
- Deploying to Handheld Devices
- Customized Deployment Options
- Troubleshooting
- FileMaker Extra: The Limits of Customization
FileMaker Server and Server Advanced
- FileMaker Server and Server Advanced
- About FileMaker Server
- Installing FileMaker Server
- Running FileMaker Server
- Using the Server Administration Tool
- Configuring and Administering FileMaker Server Using the SAT
- Managing Clients
- Managing Databases
- Administration from the Command Line
- Working with External Services
- Automatically Updating Plug-ins
- Scheduled Tasks
- Monitoring FileMaker Server
- Troubleshooting
- FileMaker Extra: Best Practices Checklist
FileMaker Mobile
- FileMaker Mobile
- FileMaker Mobile 8 Overview
- Using FileMaker Mobile on Your Handheld Device
- Troubleshooting
- FileMaker Extra: Publishing Related Data
Documenting Your FileMaker Solutions
- Documenting Your FileMaker Solutions
- Why Is Documentation Important?
- Developing Naming Conventions
- Using Comments Effectively
- Documenting the Relationships Graph
- Using the Database Design Report
- Using Third-Party Documentation Tools
- Putting the Finishing Touches on Your Documentation
- Final Thoughts on Documentation
- FileMaker Extra: Soliant Development Standards
EAN: 2147483647
Pages: 296
