Text Formatting Functions
In versions of FileMaker Pro before version 7, there was no way to affect the display of a field (that is, color, size, font, style) via calculation formulas. Developers had to come up with workarounds for seemingly simple tasks, such as having the contents of a field change color based on some conditional test. For example, a typical workaround was stacking two calculation fields on top of one another, each formatted with a different text color on the layout, and then having a conditional test in each turn it "on" or "off" to simulate the effect of the text changing color.
In FileMaker Pro 8, nine text formatting functions obviate the need for many of these old workaround options. They are each discussed in detail in our FileMaker 8 Functions and Scripts Desk Reference, but here we demonstrate some examples of how and why you might use these functions.
Text Color, Font, and Size
The TextColor, TextFont, and TextSize functions are quite similar. The first parameter of each is the text string you want to act on; the second parameter contains the formatting instructions you want to apply.
For example, perhaps you have a Tasks table, and you want to have any tasks due within the next week be displayed in red. To accomplish this task, you would define a calculation field called TaskDisplay with the following formula:
Case (DueDate <= Get (CurrentDate) + 7;
 TextColor (TaskName; RGB (255; 0; 0)); // Red
 TextColor (TaskName; 0)) // Black
The TaskDisplay field displays the task name in either red or black, depending on the due date.
The second parameter of the TextColor function needs to be an integer from 0 to 16777215 (which is 256^31), which represents a unique RGB color. If you know the integer value of the color you want (for example, black is 0), you can simply use that integer. More typically, you'll use the RGB function, which returns the integer representation of the color specified. Each of the three parameters in the RGB function must be an integer between 0 and 255. The first parameter represents the red component of the color; the second, the green component; and the third, the blue. The RGB function determines the integer representation by the following formula:
((255^2) * Red) + (255 * Green) + Blue
Text Style
The next two text formatting functions are TextStyleAdd and TextStyleRemove. Each of these takes two parameters. The first is a text string to act on; the second is a style or styles to apply to the text string. If listing multiple styles, you need to separate them with a plus sign (+). The style names are keywords and should not appear in quotes. They also must be hard-coded in the formula; you can't substitute a field that contains style instructions. The valid styles for both TextStyleAdd and TextStyleRemove are listed here:
Plain
Bold
Italic
Underline
Condense
Extend
Strikethrough
SmallCaps
Superscript
Subscript
Uppercase
Lowercase
Titlecase
WordUnderline
DoubleUnderline
AllStyles
To remove all styles from a chunk of text, you can either add Plain as a style, or remove AllStyles. Additionally, there are numeric equivalents for each of the text style keywords. Unlike the keywords themselves, the numeric equivalents can be abstracted as field values.
|
For a listing of the numeric style equivalents and some sample usage, see Chapter 6, "Calculation Functions," in FileMaker 8 Functions and Scripts Desk Reference. |
Removing Text Formatting
 |
In addition to functions for selectively adding formatting to text strings, FileMaker has functions for removing formatting from text. In addition to TextStyleRemove, mentioned previously, there are also functions called TextFontRemove, TextColorRemove, TextSizeRemove, and TextFormatRemove. The first three of these remove some specific styling attribute from the designated text. TextFormatRemove removes all formatting from the selected text in one operation. |
For most of these functions, you can specify an optional second parameter that specifies exactly what value you want to remove. For example,
TextSizeRemove( text )
will remove all text sizing from text, causing all of text to return to whatever text size was specified for the field in Layout mode, whereas
TextSizeRemove( text; 14 )
will remove only the 14-point size from text, causing any characters in a 14-point size to revert to the field default size.
TextFormatRemove, as mentioned, is the exception to this pattern. TextFormatRemove takes just one parameter, the text string to be reformatted, and strips all formatting from the field.
Note
|
The TextFontRemove, TextColorRemove, and TextSizeRemove functions are new in FileMaker 8. |
 |
You might have difficulty when applying text formatting functions within calculations that return something other than plain text. See "Text Formatting in Nontext Calculations" in the "Troubleshooting" section at the end of this chapter. |
Examples Involving Text Formatting Functions
There are many practical, everyday uses for the text formatting functions. For instance, you might have a database where you've tracked books and articles pertaining to a research project. You could define a field called BibliographyDisplay that performs the appropriate bibliographic formatting of the data elements.
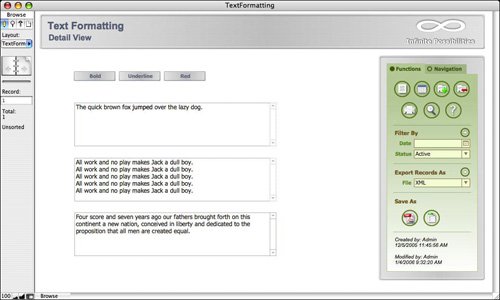
Another use is to create tools so that users can highlight and format field data without using the built-in menu commands. For this example, imagine that you have a simple layout with three text fields on it called Text1, Text2, and Text3. The end goal is to add buttons to the layout that perform some formatting action on a text snippet selected by the user, no matter in which field the user has highlighted a selection. For the example, the formatting options are limited to Bold, Underline, and Red, but you'll easily be able to extend it to perform any formatting you require. Believe it or not, you can do this with a single, one-line script!
Figure 14.15 depicts the layout, buttons, and some sample text. For now, the buttons don't do anything.
Figure 14.15. Users can highlight a section of text in any field on the layout and use the buttons at the top of the screen to format their selections.
The script that does the formatting is called Apply Format. Its single step will be a Set Field. Normally with Set Field, you specify the field you want to alter. However, with the field unspecified, the currently selected field, where the user has highlighted some text, is affected. The formula needed to actually do the formatting is as follows:
[View full width]
Let( [ param = Get (ScriptParameter); // will be Bold, Underline, or Red ... oldText = Get ( ActiveFieldContents ); highlightedText = Middle (oldText; Get ( ActiveSelectionStart ); Get (  ActiveSelectionSize )); newText = Case (param = "Red" ; TextColor (highlightedText ; RGB (255 ; 0 ; 0)); TextStyleAdd (highlightedText; param) ) ]; Replace (oldText; Get ( ActiveSelectionStart ); Get ( ActiveSelectionSize ); newText) )
The three buttons each use a script parameter to pass in a formatting request, enabling you to use this single script to do any and all formatting. Notice also that Get(ActiveFieldContents), Get(ActiveSelectionStart), and Get(ActiveSelectionSize) are used to identify and isolate the snippet highlighted by the user. Then the appropriate formatting is applied to that snippet, and the Replace function is used to swap it into the old text.
With the script written, all that's left is to go back to the three buttons and define them to call the Apply Format script. Each button needs to pass formatting instructions (Bold, Underline, "Red") to the script through the script parameter. Creating buttons to perform additional formatting would simply be a matter of duplicating an existing button and changing its script parameter.
Figure 14.16 shows the results after some formatting has been performed on the three text fields.
Figure 14.16. A single, one-line script is used to format the user's selection appropriately.

Even though the example is complete as it stands, you might want to add a nice additional bit of functionality to the Apply Format script. Currently, after the formatting is applied, the user's selection is no longer highlighted. If the user wants to perform multiple format operations, such as bold and red, she needs to manually rehighlight the desired text. Alternatively, you can use the Set Selection script step to leave the user's selection highlighted. The Set Selection script step needs to know three things: in what field to operate, what character number should start the selection, and what character number should end the selection. Just as with Set Field, if you don't explicitly specify a field on which to act, the currently selected field is used, which is exactly what's desired in this case. For the start and end positions, you can use the Get(ActiveSelectionStart) and Get(ActiveSelectionSize) functions. The problem is that in reformatting the field, those values are lost. Therefore, you need to capture those two values at the very beginning of the script in some way you can refer to later. One way to do this would be simply to create two global number fields (one for each value), but because we're discussing interesting applications of functions, let's look at a method for storing and passing both values as part of a single global text field. As the first step of the Apply Format script, add a Set Field that sets a script variable ($selectionParams) to the following:
[View full width]
"start = " & Get ( ActiveSelectionStart ) & " ; stop= " & Get ( ActiveSelectionSize ) + Get ( ActiveSelectionStart ) - 1
After this step has executed, $selectionParams might contain something like the following:
"start = 16 ; stop = 23"
What we've done here is captured the two values in which we're interested, in a format that can be dropped into the middle of a Let function and evaluated with the Evaluate function.
As the final step of the script, the Set Selection script step needs to be told the starting and ending positions of the selection. The starting position would be "unpacked" from $selectionParams by the following formula:
Evaluate ( "Let ([ " & $selectionParams & "]; start)")
The wonderful thing about this method is that you can pass any number of variables quite easily. When unpacking it for later use, you simply swap in the appropriate variable at the end of the Evaluate function.
Array Functions |
Part I: Getting Started with FileMaker 8
FileMaker Overview
- FileMaker Overview
- FileMaker and Its Marketplace
- Introduction to Database Software
- FileMaker Deployment Options
- Whats New in FileMaker Pro 8
Using FileMaker Pro
- Getting Started
- Working in FileMaker Pro
- Troubleshooting
- FileMaker Extra: Becoming a FileMaker Pro Power User
Defining and Working with Fields
- Defining and Working with Fields
- Working Under the Hood
- Working with Fields
- Working with Field Types
- Assigning Field Options
- Troubleshooting
- FileMaker Extra: Indexing in FileMaker
Working with Layouts
- Working with Layouts
- Whats a Layout?
- Creating and Managing Layouts
- Working with Parts
- Working with Objects on a Layout
- Working with the Tab Control Object
- Working with Fields
- Portals
- Troubleshooting
- FileMaker Extra: Designing Cross-PlatformFriendly Layouts
Part II: Developing Solutions with FileMaker
Relational Database Design
- Relational Database Design
- Understanding Database Design
- Database Analysis
- Working with Entities and Attributes
- Understanding Relationships
- Relationship Optionality
- Understanding the Role of Keys in Database Design
- Many-to-Many Relationships: Solving the Puzzle
- The Basics of Process Analysis
- FileMaker Extra: Complex Many-to-Many Relationships
Working with Multiple Tables
- Working with Multiple Tables
- Multitable Systems in FileMaker Pro
- Creating a One-to-Many Relationship in FileMaker
- Working with Keys and Match Fields
- Understanding Table Context
- Working with Related Data
- Creating a Many-to-Many Relationship
- Relational Integrity
- Rapid Multitable Development
- Troubleshooting
- FileMaker Extra: Building a Three-Way Join
Working with Relationships
- Working with Relationships
- Relationships Graphs and ERDs
- Relationships as Queries
- Creating Self-Relationships
- Creating Ranged Relationships
- Creating Cross-Product Relationships
- Working with Data from Distant Tables
- Working with Multiple Files
- How and When to Use Multiple Files
- Troubleshooting
- FileMaker Extra: Managing the Relationships Graph
Getting Started with Calculations
- Getting Started with Calculations
- Understanding How and Where Calculations Are Used
- Exploring the Calculation Dialog Box
- Essential Functions
- Using Conditional Functions
- Aggregate Functions
- Learning About the Environment
- Troubleshooting
- FileMaker Extra: Tips for Becoming a Calculation Master
Getting Started with Scripting
- Getting Started with Scripting
- Scripts in FileMaker Pro
- Creating Scripts
- Common Scripting Topics
- Triggering Scripts
- Working with Buttons on Layouts
- Troubleshooting
- FileMaker Extra: Creating a Script Library
Getting Started with Reporting
- Getting Started with Reporting
- Deriving Meaning from Data
- Working with Lists of Data
- Summarized Reports
- Delivering Reports
- Troubleshooting
- FileMaker Extra: Incorporating Reports into the Workflow
Part III: Developer Techniques
Developing for Multiuser Deployment
- Developing for Multiuser Deployment
- Developing for Multiple Users
- Sessions in FileMaker Pro
- Concurrency
- Audit Trails in FileMaker Pro
- Launch Files
- Troubleshooting
- FileMaker Extra: Development with a Team
Implementing Security
- Approaching Security
- User-Level Internal Security
- File-Level Access Security
- Troubleshooting
- FileMaker Extra: Working with Multiple Files
Advanced Interface Techniques
- Advanced Interface Techniques
- User Interfaces in FileMaker Pro
- Navigation
- Multiwindow Interfaces
- Working with Custom Menus
- Showing/Hiding Layout Elements
- Dedicated Find Layouts
- Data Presentation
- Working with Table View
- Troubleshooting
- FileMaker Extra: User Interface Heuristics
Advanced Calculation Techniques
- Advanced Calculation Techniques
- Whats an Advanced Calculation Technique?
- Logical Functions
- Text Formatting Functions
- Array Functions
- The Filter-ing Functions
- Custom Functions
- GetNthRecord
- Troubleshooting
- FileMaker Extra: Creating a Custom Function Library
Advanced Scripting Techniques
- Advanced Scripting Techniques
- What Is Advanced Scripting?
- Script Parameters and Script Results
- Script Variables
- Window Management Techniques
- Go to Related Record
- Troubleshooting
- FileMaker Extra: Recursive Scripts
Advanced Portal Techniques
- Advanced Portal Techniques
- Portals in FileMaker Pro
- Portal Basics
- New Record Only Relationships
- Horizontal Portals
- Using Portals to Create Calendars
- Selection Portals
- Filtered Portals
- Dynamic Portal Sorting
- Troubleshooting
- FileMaker Extra: Portals and Record Locking
Debugging and Troubleshooting
- Debugging and Troubleshooting
- What Is Troubleshooting?
- Staying Out of Trouble
- Planning for Trouble
- Troubleshooting Scripts and Calculations
- Troubleshooting in Specific Areas: Performance, Context, Connectivity, and Globals
- File Maintenance and Recovery
- FileMaker Extra: Other Tools of the Trade
Converting Systems from Previous Versions of FileMaker Pro
- Converting Systems from Previous Versions of FileMaker Pro
- Migration Choices
- Converting Files
- Pre-Conversion Tasks
- Post-Conversion Tasks
- Troubleshooting
- FileMaker Extra: Converting Web-Enabled Databases
Part IV: Data Integration and Publishing
Importing Data into FileMaker Pro
- Importing Data into FileMaker Pro
- Working with External Data
- Flat-File Data Sources
- Importing Multiple Files from a Folder
- Importing Photos from a Digital Camera
- Importing from an ODBC Data Source
- Importing from an XML Data Source
- Using a Script to Import Data
- Troubleshooting
- FileMaker Extra: Exploiting the FileMaker-to-FileMaker Import
Exporting Data from FileMaker
- Exporting Data from FileMaker
- Getting Out What You Put In
- The Basic Mechanics of Exporting
- Export File Formats
- Formatting Exported Data
- Exporting Related Fields
- Exporting Grouped Data
- Exporting to Fixed-Width Formats
- Working with Large Fields and Container Fields
- Scripted Exports
- Accessing FileMaker Data Using ODBC and JDBC
- Using FileMaker Pro as an ODBC Client
- Troubleshooting
- FileMaker Extra: Accessing FileMaker Data via JDBC
Instant Web Publishing
- Instant Web Publishing
- An Overview of Instant Web Publishing
- Enabling and Configuring IWP
- Designing for IWP Deployment
- Using an IWP Solution
- Troubleshooting
- FileMaker Extra: Building Your Own Next and Previous Page Buttons
FileMaker and Web Services
- FileMaker and Web Services
- About Web Services
- FileMaker and XML
- Transforming XML
- XML Import: Understanding Web Services
- Working with Web Services
- Troubleshooting
- FileMaker Extra: Write Your Own Web Services
Custom Web Publishing
- Custom Web Publishing
- About Custom Web Publishing
- Custom Web Publishing Versus Instant Web Publishing
- Custom Web Publishing Versus XML Export
- Getting Your Databases Ready for Custom Web Publishing
- Publishing FileMaker Data as XML
- Using XSLT with Custom Web Publishing
- Building Web Applications with XSLT-CWP
- Other Custom Web Publishing Commands and Parameters
- About the FileMaker XSLT Extensions
- Troubleshooting
- FileMaker Extra: About the Custom Web Publishing Tools
Part V: Deploying a FileMaker Solution
Deploying and Extending FileMaker
- Deploying and Extending FileMaker
- FileMaker Deployment Options
- Single User
- Peer-to-Peer Hosting
- FileMaker Server
- Web Publishing
- ODBC/JDBC
- Citrix/Terminal Services
- Runtime Solutions
- Deploying to Handheld Devices
- Customized Deployment Options
- Troubleshooting
- FileMaker Extra: The Limits of Customization
FileMaker Server and Server Advanced
- FileMaker Server and Server Advanced
- About FileMaker Server
- Installing FileMaker Server
- Running FileMaker Server
- Using the Server Administration Tool
- Configuring and Administering FileMaker Server Using the SAT
- Managing Clients
- Managing Databases
- Administration from the Command Line
- Working with External Services
- Automatically Updating Plug-ins
- Scheduled Tasks
- Monitoring FileMaker Server
- Troubleshooting
- FileMaker Extra: Best Practices Checklist
FileMaker Mobile
- FileMaker Mobile
- FileMaker Mobile 8 Overview
- Using FileMaker Mobile on Your Handheld Device
- Troubleshooting
- FileMaker Extra: Publishing Related Data
Documenting Your FileMaker Solutions
- Documenting Your FileMaker Solutions
- Why Is Documentation Important?
- Developing Naming Conventions
- Using Comments Effectively
- Documenting the Relationships Graph
- Using the Database Design Report
- Using Third-Party Documentation Tools
- Putting the Finishing Touches on Your Documentation
- Final Thoughts on Documentation
- FileMaker Extra: Soliant Development Standards
EAN: 2147483647
Pages: 296
