Understanding Transaction Isolation Levels and Concurrent Processing
Understanding the Necessity of Cascading Deletes and Updates
Whenever you DELETE, INSERT, or UPDATE rows in a table, you run the risk of making the table's data inconsistent with other tables in the database. Consider for a moment the parent/child relationships between tables shown in Figure 342.1.
|
INVOICES table |
|||
|---|---|---|---|
|
CUST_ID |
INV_NO |
INV_DATE |
INV_TOTAL |
|
101 |
1001 |
10/25/00 |
5000.00 |
|
202 |
1002 |
10/26/00 |
450.00 |
|
303 |
1003 |
10/27/00 |
3200.00 |
|
. |
. |
. |
. |
|
. |
. |
. |
|
|
. |
. |
. |
. |
|
INVOICE_DETAILS table |
|||
|---|---|---|---|
|
INV_NO |
ITEM_NO |
QTY |
COST |
|
1001 |
7002 |
5 |
2500.00 |
|
1001 |
7005 |
5 |
2500.00 |
|
1002 |
6500 |
2 |
1500.00 |
|
1002 |
5500 |
5 |
2500.00 |
|
1002 |
5300 |
10 |
500.00 |
|
. |
. |
. |
. |
|
. |
. |
. |
. |
|
. |
. |
. |
. |
|
ITEM_MASTER table |
||
|---|---|---|
|
ITEM_NO |
DESCRIPTION |
PRICE |
|
7002 |
Widget |
500.00 |
|
7005 |
Gidget |
500.00 |
|
6500 |
Gadget |
750.00 |
|
5500 |
Fiber Relay |
500.00 |
|
5300 |
Sonic Coupler |
50.00 |
|
. |
. |
. |
|
. |
. |
. |
|
. |
. |
. |
Figure 342.1: INVOICES table related to INVOICE_DETAILS by INV_NO, and INVOICE_DETAILS related to ITEM_MASTER by ITEM_NO
Each row in the group of rows in INVOICE_DETAILS with the same value in the INV_NO column is the child of the row in the INVOICES table with a matching value in its INV_NO column. Similarly, each row in the INVOICE_DETAILS table is related to the row in the ITEM_MASTER table that has a matching value in the ITEM_NO column. Thus, the three tables are consistent with each other when there are no rows in the INVOICE_DETAILS table that have INV_NO values not found in the INVOICES_TABLE; and when there are no rows in the INVOICE_DETAILS table that have ITEM_NO values not found in the ITEM_MASTER table.
If you change the item number (ITEM_NO) of an item by executing an UPDATE statement such as
 UPDATE item_master SET item_no = 17002
 WHERE item_no = 7002
the ITEM_MASTER and INVOICE_DETAILS tables become inconsistent with each other because ITEM_NO 7002 is now an orphan since it no longer has a parent (a row with a matching value for ITEM_NO) in the ITEM_MASTER table. Similarly, if you execute a DELETE statement such as
DELETE FROM invoices WHERE inv_no = 1002
or an INSERT statement such as
INSERT INTO INVOICE_DETAILS VALUES (1009,7005,5,2500)
you destroy the referential integrity between the INVOICE_DETAILS and INVOICES table because the INVOICE_DETAILS table will have rows with INV_NO values that have no parent (a row with a matching value for INV_NO) in the INVOICES table.
To avoid creating orphan rows in child tables, you must cascade any updates and deletes performed on rows in a parent table to corresponding rows in the child table. Thus, in the current example, rather than simply changing ITEM_NO 7002 to 17002 in the ITEM_MASTER table, to maintain referential integrity, you would execute the following SQL statement batch:
INSERT INTO item_master VALUES(17002,'Widget',500.00)
UPDATE invoice_details SET item_no = 17002
 WHERE item_no = 7002
DELETE FROM item_master WHERE item_no = 7002
Similarly, if you want to DELETE the invoice "header" row for the invoice with INV_NO 1002 from the INVOICES table, to maintain referential integrity in the database, you must execute a DELETE statement such as
DELETE FROM invoice_details WHERE inv_no = 1002
to remove any child rows for INV_NO 1002 from the INVOICE_DETAILS table prior to executing the DELETE statement that removes the parent row.
Unfortunately, most SQL products, like MS-SQL Server, do not support cascading deletes and updates. As such, to maintain database integrity, you must execute the appropriate sequence of statements (in the proper order) to avoid creating orphan rows in a child table when you execute a DELETE, INSERT, or UPDATE statement.
| Note |
The DBMS will assist you in maintaining referential database integrity if you apply FOREIGN KEY constraints (which you learned about in Tip 173, "Understanding Foreign Keys") to columns used in parent/child relationships between tables. For example, if you attempt to INSERT a row in a child table with a FOREIGN KEY value that has no matching value in the corresponding key column in the parent table, the DBMS will abort the INSERT and display an error message. Similarly, the DBMS will abort any UPDATE or DELETE statements attempted on rows in the parent table that have key values that match the corresponding FOREIGN KEY values in child tables. |
Using an INSERT Statement with a Correlated Subquery to Create a Snapshot Table
You can uses a subquery in an INSERT statement to return not only multiple rows, but also multiple columns of data. (When you used the keyword IN, ANY, SOME, or ALL to introduce each subquery in Tips 327–330, the subquery could return multiple rows but only a single column.) Therefore, to transfer the entire contents of one table into another, you can execute an INSERT statement similar to
INSERT INTO table2 (SELECT * FROM table1)
as long as TABLE1 and TABLE2 have exactly the same structure (the same number and type of columns and in the same order).
If you want to copy data in only some of the columns from TABLE1 into TABLE2, simply modify the INSERT statement and subquery to include the list of columns to copy. For example, suppose you want to create a PRICE_LIST table for your salespeople based on data values stored in the ITEM_MASTER table. An INSERT statement with a subquery such as
 INSERT INTO price_list (product_code, description, price)
 (SELECT item_number, description, ROUND(cost * 1.20,2)
 FROM item_master)
will copy the ITEM_NUMBER and DESCRIPTION from ITEM_MASTER and build a 20 percent profit margin into the PRICE stored in PRICE_LIST vs. the actual COST stored in ITEM_MASTER.
A snapshot table, as its name implies, is a table with a copy (or picture) of the data in another table at a particular moment in time. Suppose, for example, that you want to store a snapshot of your month-end inventory. (Having a copy of the inventory as of the month end will let you run various reports on the inventory as of a specific date, such as total value, item quantities, and a comparison of item quantities from one month to the next without interrupting the fulfillment of customer orders.) If you create a table such as INVENTORY_10_31_2000, for example, with the same structure as the inventory table (INVENTORY), you can submit the INSERT statement
INSERT INTO inventory_10_31_2000 (SELECT * FROM inventory)
to store a "snapshot" of the contents of the INVENTORY table as of 10/31/2000 in the INVENTORY_10_ 31_2000 table.
If you want a snapshot of only some of the data in a table, simply add a WHERE clause to the subquery. For example, to store a snapshot of all orders recorded in the ORDERS table during October 2000, submit an INSERT statement similar to:
INSERT INTO orders_Oct_2000
 (SELECT * FROM orders
 WHERE order_date BETWEEN '10/01/2000' AND '10/31/2000')
Or, to take a snapshot of only orders for product XYZ taken during the month of October 2000, submit an INSERT statement such as:
INSERT INTO XYZ_orders_Oct_2000
 (SELECT * FROM orders
 WHERE order_date BETWEEN '10/01/2000' AND '10/31/2000'
 AND product_code = 'XYZ')
Understanding the Role of the Database Administrator (DBA)
As soon as your DBMS installation has more than a few users, someone will be drafted into the job of database administrator (DBA). The DBA has all usage, execution, and access rights to all database objects. Moreover, the DBA has the ability to add and remove user accounts and to GRANT and REVOKE access rights on any object to other users. In short, the DBA is the supreme authority for a database.
While being assigned the role of DBA can give one a rush of power, the job also carries with it a great deal of responsibility. In short, the DBA is responsible for:
- Installing DBMS upgrades and service packs (maintenance releases), which includes having a working plan for restoring the DBMS (and its data) to a preupdate state in case of an unsuccessful upgrade
- Monitoring and tuning DBMS performance
- Managing system resources by increasing the size of the transaction log as necessary and adding new hard drives before the DBMS storage requirements exceed the available physical disk space
- Backing up and recovering data by scheduling (daily) database backups, making sure backups are successful, and testing the ability to restore from backup—before doing so is necessary due to the inevitable system failure
- Managing database security by GRANTING and REVOKING privileges and adding and removing user accounts
- Importing data into and exporting data from the DBMS
- Working with developers to implement a data warehouse
- Setting up and maintaining data replication (for a distributed database)
Perhaps the best way to sum up the DBA's job is that he or she is the one person responsible for protecting all database objects and equipment so that the database server is up and its data is accessible 24 hours a day, 7 days a week.
| Note |
The easiest way to become the DBA is to be the person who installs the DBMS. When you install a DBMS, the installation process creates a "superuser" account such as DBO (database owner), SA (system administrator), or DBA, depending on the DBMS product you are installing. The first thing you should do after installing the DBMS is to log in to the DBA account and change its password. After all, you do not want an unauthorized user who happens to read the installation manual to have DBA privileges. (The system manual documents the DBA account login name and its default password.) After you change the DBA account's password, be sure to write it down and put it in a safe, but accessible place—just in case you win the lottery or get vested with millions in stock options, and your colleagues have to carry on without you while you sit on the beach of your own tropical island. |
Understanding the Role of the Database Object Owner (DBOO)
Whenever you create a database object (such as a table, index, view, trigger, or stored procedure), you become the owner of that database object—that is, you are the object's database object owner (DBOO). Therefore, the only thing required to be a DBOO is the right to execute the CREATE TABLE, CREATE VIEW, or CREATE PROCEDURE statement.
As the DBOO, you have all applicable rights to the objects you create. Moreover, you can GRANT and REVOKE access rights to objects you own to other users. In fact, after you create an object, only you and the database owner (DBA) (normally the system administrator or SA account on MS-SQL Server) have any rights to the object. While the DBMS implicitly GRANTs the DBOO all rights to objects he or she creates, the DBOO must explicitly GRANT others permission to use the objects before they can access them.
If you create a stored procedure, then, no one but you (or the DBO) can execute it until you GRANT others EXECUTE rights to the routine. Similarly, if you are the DBOO of a table or view, you must GRANT DELETE, INSERT, REFERENCES, SELECT, or UPDATE before another can execute a DELETE, INSERT, SELECT, or UPDATE statement on the database object you own. Moreover, to even use a column in one of your tables or views as the target of a FOREIGN KEY reference, you must GRANT the user desiring to do so REFERENCES privilege on the table or view.
In short, as the DBOO, you become the database administrator for the set of database objects you create. While you will still rely on the actual DBA to take care of such things as backup and recovery of the database objects, as the DBOO you have the responsibility for ensuring that you give DELETE access, for example, only to someone who will not wipe out another person's work. Moreover, once you give other users access to your database objects (tables and views), you must be careful in the statements you execute. After all, you will turn friends into enemies very quickly if you execute a TRUNCATE TABLE or DROP TABLE statement that destroys the data it took another user (perhaps) hundreds of hours to create.
| Note |
Every object in a database must have an owner (a DBOO). As such, before the DBA (or DBO/system administrator) can remove a username from the DBMS, the ownership of all objects for which the username is the DBOO must be transferred to another user (or other users). |
Using the GRANT Statement to Give Someone DELETE Privilege
In Tip 345, "Understanding the Role of the Database Object Owner (DBOO)," you learned that as a database object owner (DBOO), you have all privileges (INSERT, UPDATE, and DELETE) on the database objects you create. Moreover, you can GRANT any one or all of these privileges to other users. Therefore, if you create an EMPLOYEES table and a TIME-CARDS table, for example, you will probably give the people in Personnel (or Human Resources) the ability to remove (DELETE) rows of employee information and timecards when employees leave the company. Similarly, if you create a CUSTOMERS table, you may GRANT DELETE privilege to your sales managers so they can remove customers who have not made purchases for an extended period of time.
The syntax of the GRANT DELETE statement is:
 GRANT DELETE ON | TO
 [...,][WITH GRANT OPTION]
Thus, to allow usernames MARY, SUE, and FRANK to remove rows from the EMPLOYEES table, execute the GRANT DELETE statement:
GRANT DELETE ON employees TO mary, sue, frank
Similarly, if users TOM, HELEN, SUSAN, and RODGER are members of the PERSONNEL role (group), you can grant all of them DELETE privilege on the TIMECARDS table with a GRANT DELETE statement such as:
GRANT DELETE ON timecards TO personnel
(You learned about group security (i.e. Database Roles) in Tips 139, 142, and 143.)
If you include the WITH GRANT OPTION in the GRANT DELETE statement, you allow the usernames to whom you are granting the DELETE privilege to grant it to other users as well. As such, be careful whenever you use the WITH GRANT OPTION. In so doing, you must trust the person to whom you GRANT the DELETE privilege not only to remove only table rows that are no longer needed, but also to show judgment as good as yours in GRANTING the DELETE privilege to other users. Therefore, if SUE and BILL are your sales department managers, for example, you can allow the two of them and anyone else they choose to remove rows from the CUSTOMERS table by executing the GRANT DELETE statement:
GRANT DELETE ON customers TO sue, bill WITH GRANT OPTION
| Note |
When you GRANT DELETE privilege to a user, you should also use GRANT SELECT. If you use only GRANT DELETE, then the user cannot be selective as to which rows the DBMS is to remove from the table. For example, if you use only GRANT DELETE on the TIMECARDS table to username SUE, then SUE can execute the DELETE statement DELETE timecards which removes all rows from the TIMECARDS file. However, if SUE wants to remove only timecards that are more than 4 years old by executing the DELETE statement DELETE timecards WHERE card_date < GETDATE() - 1460 the DBMS will abort the DELETE statement and display an error message similar to: Server: Msg229, level 14, State 5, Line 1 SELECT permission denied on object 'timecards', database 'SQLTips', owner 'dbo'. |
Therefore, since you seldom (if ever) want a user to whom you GRANT DELETE privilege to be able to DELETE all of the rows from a table, be sure to GRANT both SELECT and DELETE privileges when you want a user to be able to remove specific rows from a table.
Understanding the Security Implications of Granting USAGE on Domains Used as Constraints
As you learned in Tip 15, "Understanding Constraints," a constraint is a restriction on the values that a user can store in a column. For example, if you define a column as being of type INTEGER, the DBMS will constrain (or prevent) a user from putting letters, symbols, non-whole numbers, and whole numbers outside the range 2**-31 to 2**31 -1 into the column. A domain lets you further limit the values a user can place in a column by specifying that the column's values must be from a subrange of all values allowed for a particular SQL data type.
For example, if you know that you will never carry more than 500 of any one item in your inventory, you can execute a CREATE DOMAIN statement such as:
 CREATE DOMAIN qty_on_hand_domain AS INTEGER
 CONSTRAINT value_range CHECK (VALUE BETWEEN 0 AND 500)
The DBMS will allow users to insert only INTEGERS in the range 0–500 (inclusive) into any column defined as being of data type QTY_ON_HAND. Similarly, if you want the PRODUCT_CODE for each of the items in the INVENTORY table to be of data type CHARACTER(5) and start with a letter (A–Z), and end with a digit 5, 7, or 9, then you could execute a CREATE DOMAIN statement such as
 CREATE DOMAIN product_code_domain AS CHARACTER(5)
 CONSTRAINT first_character
 CHECK (SUBSTRING (VALUE, 1, 1) BETWEEN 'A' AND 'Z')
 CONSTRAINT last_character
 CHECK (SUBSTRING (VALUE IN ('5','7','9'))
to set up the constraint.
To apply a domain, simply use it instead of the standard SQL data type definition for the columns to which the domain applies. For example, the CREATE statement for an INVENTORY table using the QTY_ON_HAND_DOMAIN and PRODUCT_CODE_DOMAIN used as examples in the current tip might be:
CREATE TABLE inventory
 (product_code product_code_domain,
 qty_on_hand qty_on_hand_domain,
 qty_on_backorder INTEGER)
As is the case with other database objects, after you create a domain, only you (as the DBOO) and the database owner (DBO) have access to the domain. If you want others to be able to create table using a domain you define, GRANT them the privilege to use the domain by executing a GRANT statement such as
GRANT USAGE ON qty_on_hand_domain TO warehouse_staff
which allows every username in the WAREHOUSE_STAFF group (role) to use the QTY_ON_HAND_DOMAIN as a column data type.
Granting usage on a domain becomes a security issue when you use a domain to limit the values in a column, and you do not want users to know the actual limits of the domain. Suppose, for example, that you define an EXECUTIVE_SALARY domain constraints as:
 CREATE DOMAIN executive_salary AS REAL
 CONSTRAINT salary_range
 CHECK (VALUE BETWEEN 10000.00 AND 25000.00)
If you GRANT USAGE on the EXECUTIVE SALARY domain to username FRANK, for example (who has CREATE TABLE privilege as well), then FRANK could execute a CREATE table statement such as:
 CREATE TABLE find_executive_salary_range
 (executive_pay executive_salary)
He could then INSERT increasing values into the EXECUTIVE_PAY column until the DBMS accepted the value he inserted (once the value he inserted reached the lower end of the EXECUTIVE_SALARY range). If FRANK then continued to INSERT increasing values for EXECUTIVE_PAY into the table until the DBMS aborted the INSERT statement with an error message, FRANK would know both the upper and lower boundaries of the EXECUTIVE_SALARY domain.
Understanding the Effects of Revoking GRANT Privilege (CASCADE and Non CASCADE)
As you learned in Tip 146, "Understanding the REVOKE Statement," the REVOKE statement lets you remove a privilege you previously granted to a user. Moreover, since the ability to GRANT a privilege is itself a privilege, you can use the REVOKE statement syntax
 REVOKE [GRANT OPTION FOR]  ON
 FROM [..., ]
 [RESTRICT|CASCADE]
to remove a user's ability to GRANT a privilege to others, while leaving the original privilege in place. For example, if you execute the GRANT statement
GRANT INSERT ON employees TO sue WITH GRANT OPTION
username SUE will have the privilege to INSERT new rows into the EMPLOYEES table and the privilege to GRANT INSERT privilege on the employees table to other users. If SUE then executes the GRANT statement
GRANT INSERT ON employees TO frank, mary WITH GRANT OPTION
FRANK and MARY, too, will be able to INSERT rows into the EMPLOYEES table. Moreover, both of these users can themselves GRANT the INSERT privilege on the EMPLOYEES table to other users.
If you later decide the REVOKE SUE's ability to GRANT INSERT privilege on the EMPLOYEES table to other users, you can do so either with or without the CASCADE option. By executing the REVOKE statement
REVOKE GRANT OPTION FOR INSERT ON employees FROM sue
you allow SUE, any users to whom SUE has granted INSERT privilege (FRANK and MARY, in the current example), and any users to whom those users have granted INSERT privilege (since SUE granted INSERT on the EMPLOYEES table WITH GRANT OPTION) to continue adding rows to the EMPLOYEES table. On the other hand, if you include the CASCADE option when you execute the REVOKE statement
 REVOKE GRANT OPTION FOR INSERT ON employees FROM sue
 CASCADE
SUE will still be able to INSERT rows into the EMPLOYEES table. However, SUE will no longer be able to GRANT INSERT privilege on the EMPLOYEES table to other users, and any users to whom she granted INSERT privilege on the EMPLOYEES table (and any users to whom they granted INSERT privilege on the EMPLOYEES table) will no longer be able to INSERT rows into the EMPLOYEES table—unless they also received the same INSERT privilege from someone else. Therefore, after executing the REVOKE statement in the current example, SUE will be able to INSERT rows into the EMPLOYEES table, but FRANK and MARY will no longer be able to do so, since they received their ability to INSERT rows into the EMPLOYEES table from SUE's GRANT INSERT privilege (which you revoked).
| Note |
Some DBMS products, such as MS-SQL Server, will not allow you to REVOKE a privilege or the GRANT OPTION for a privilege without including the CASCADE option. If you attempt to do so, MS-SQL Server, for example, will abort the REVOKE statement with an error message similar to: Server: Msg 4611, Level 16, State 1, Line 1 To revoke grantable privileges, specify the CASCADE option with REVOKE. |
Therefore, be sure to check your system manual to see if your DBMS product allows you to omit the CASCADE option when executing a REVOKE statement to remove the GRANT OPTION for a privilege you previously granted.
Understanding How to Use GRANT and REVOKE Statements Together to Save Time When Granting Privileges
When you need to grant privileges on multiple columns in a table (or several tables) to several users, you can sometimes save yourself some typing by granting a broad range of privileges to all users and then revoking the few that only some of them should have. Suppose, for example, that you have an EMPLOYEES table and you want everyone to have SELECT privilege on it. However, only the department managers (ROBERT, RICHARD, LINDA, and JULIE) should be able to update the pay columns, and only human resources (HR) personnel (LINDA, DOREEN, and FRED) should be able to UPDATE the personal information, DELETE rows (to remove terminated employees), or INSERT information on new employees. Finally, no one should be able to change the employee ID in the EMP_ID column.
To set up the security on the EMPLOYEES table, you could execute a series of GRANT statements such as:
 GRANT INSERT, DELETE, SELECT ON employees
 TO linda, doreen, fred
 GRANT UPDATE ON employees
 (f_name, l_name, address, city, SSAN, state, zip_code,
 phone1, phone2, email_address, emergency_contact,
 sheriff_card, bond_amount, bond_number)
 TO linda, doreen, fred
 GRANT UPDATE ON employees
 (quota, bonus_rate, weekly_salary) TO robert, richard, linda, julie
 GRANT SELECT ON employees
 TO lori, samantha, helen, william, james, joyce, nick,
 donna, karen, amber, vivian, george
Or, you can achieve the same result with a little less typing by combining GRANT and REVOKE statements, as follows:
 GRANT SELECT ON employees TO public
 GRANT INSERT, DELETE, UPDATE ON employees
 TO linda, doreen, fred
 REVOKE UPDATE ON employees
 (emp_ID, quota, bonus_rate, weekly_salary)
 FROM doreen, linda, fred
 GRANT UPDATE ON employees
 (quota, bonus_rate, weekly_salary)
 TO robert, richard, linda, Julie
Notice that using the PUBLIC role to GRANT the SELECT privilege to all users with DBMS access eliminated the need for typing each and every username into a GRANT SELECT statement. Meanwhile, granting UPDATE to all columns in the EMPLOYEES table to the HR personnel and then using the REVOKE statement to remove UPDATE privilege from the few columns that they should not update eliminated having to type the full list of column names in the EMPLOYEES table in the GRANT UPDATE statement for the HR users.
Understanding Concurrent Transaction Processing Problems and Isolation Levels
When multiple users access and update a database at the same time, the DBMS must ensure that work performed while processing a transaction for one user does not supply inconsistent database values to statements in another user's transaction. Ideally, every user should be able to work with the database without being concerned about the concurrent actions of others.
In general, there are four fundamental problems that can occur if the DBMS does not handle concurrent transaction processing properly:
- The lost update. Suppose that Rob and Lori each go to a different automated teller machine (ATM) at the same time and attempt to withdraw $150 from a single joint checking account that has a $200 balance. Rob starts his transaction by entering his account number and requesting a withdrawal of $150. The ATM responds with the current balance in the account and asks Rob to confirm the withdrawal. In the meantime, Lori starts her transaction and is also given the balance of $200 and asked to confirm her $150 with-drawal request. If each then confirms the withdrawal, Rob's ATM dispenses $150 and updates the balance in the account to be $50. In the meantime, Lori's ATM, too, dispenses $150 and updates the account balance to be $50. Depending on which transaction the DBMS completed first, the effect of the other transaction on the account balance is lost. Both Rob and Lori are happy since each was able to withdraw $150 ($300 in total) from the joint account, and the account shows a credit balance of $50 instead of being overdrawn by $100.
- The uncommitted data/dirty read. Suppose that Rob and Lori are shopping in separate stores for anniversary gifts for each other. They each find the "right" gift and take it to a register and attempt to use a credit card for the same account, which has $750 available credit remaining. Lori starts the checkout transaction as the clerk swipes her card in the machine and enters the purchase price of $500. While Lori thinks about her purchase while waiting for the clerk to complete the sales transaction, Rob hands another clerk his charge card (for the same account), and the clerk starts the transaction by swiping the card in the machine and entering the $400 purchase price. However, because Lori's transaction already reduced the available credit in the account by $500 (leaving only $250 available), Rob's transaction is declined. Moments later, Lori changes her mind about the gift and has the clerk cancel the charge. Thus, Rob now thinks there is less than $400 available on the credit card, while there is really $750 remaining because his transaction was able to "see" the uncommitted update from Lori's transaction.
- The inconsistent data/nonrepeatable read. Rob decides that he really wants the anniversary gift he selected, so he goes to an ATM to transfer money from savings into the joint checking account. He begins the transaction by requesting the balance in the savings account, which shows $2,000. Rob then requests the balance in the checking account, which shows $50. In the meantime, Lori is at the bank withdrawing money from savings to pay the electric bill of $250. As the teller finishes Lori's withdrawal transaction, Rob continues his transaction of transferring $750 from savings into checking, only this time, when the ATM shows him the savings account balance again, it reads $1,750 and not $2,000. Thus, the balance shown in the savings account was always a correct reflection of reality. However, "something" happened during the course of Rob's savings-to-checking transfer transaction that caused the program at the ATM to show him first one balance in the savings account and then another. In other words, a "read" of the BALANCE column was nonrepeatable because it produced two different results at different times during Rob's transaction.
- The phantom insert/delete. Now Rob, confused by the changing balances in the savings and checking accounts, cancels the transaction and starts over. He requests the balance in the savings account and the ATM displays $1,750-so far so good. Rob then requests the balance in the checking account and is told it is still $50. He then continues the transfer transaction by entering $750 as the amount to move from savings to checking. In the meantime, Lori deposits her net pay of $1,500 into the checking account. When the teller completes the deposit transaction just before Rob completes his transfer transaction by requesting a balance in both accounts, Rob's transaction falls victim to the phantom insert problem. The balance in the checking account at the beginning of the transaction ($50) plus the $750 he transferred into the checking account should have made the new account balance $800. However, there is now $2,300 in the account because, as far as Rob's transaction is concerned, the $1,500 showed up "out of nowhere" the second time it queried the checking account balance. (A phantom delete occurs if, for example, Lori deposits her check just before Rob starts his transaction and then withdraws the cash during Rob's funds transfer.)
Isolation levels are advanced DBMS locking techniques that attempt to maintain the fiction of each user's exclusive use of the database in a multi-user environment, while still trying to give as many users as possible simultaneous access to the data in the database. Although a transaction can prevent the four concurrent transaction processing problems by locking the set of tables it uses, doing so will make the DBMS appear sluggish as users have to wait for multiple transactions to finish before they get any response from the system. You will learn all about isolation levels in Tips 351-360. For now, the important thing to understand is that isolation levels give you a way to tell the DBMS that a program (or batch of SQL statements in a transaction) will not re-retrieve data, which allows the DBMS to release locks before the transaction ends.
Understanding READ UNCOMMITTIED and Dirty Reads
READ UNCOMMITTED is the weakest of the four transaction isolation levels. In fact, READ UNCOMMITTED is the same as having no locks on the database at all. If you submit the statement:
SET TRANSACTION ISOLATION LEVEL READ UNCOMMITTED
the DBMS will set your session's environment so that your transactions will not issue any shared (or exclusive) locks on the data they process. Moreover, statements in your transactions will not observe any locks held by others. Therefore, if another user submits a transaction that makes changes to the database, your query will see these changes before they are committed. In fact, transactions executed at the READ UNCOMMITTED isolation level are subject to all four of the concurrent transaction processing problems you learned about in Tip 350, "Understanding Concurrent Transaction Processing Problems and Isolation Levels."
Performing a dirty read (that is, reading updated but as yet uncommitted data) is problematic because users updating the database may roll back uncommitted transactions and undo any changes. As a result, the data values retrieved and being used by transactions working at the READ UNCOMMITTED isolation-level environment may not match those that exist in the actual database tables.
The main advantage of setting the isolation level to READ UNCOMMITTED is that statements processed in a READ UNCOMMITTED environment avoid the overhead involved in concurrency control. The DBMS does not have to issue locks (which reduces database management overhead), the statements do not have to wait for other transactions to finish (which lets you retrieve information more quickly), and others do not have to wait for your transaction to complete its work (which makes the overall system appear more responsive). Unfortunately, the performance gains come at a price-transaction results in a READ UNCOMMITTED environment are based on inaccurate input values when dirty (uncommitted) data is rolled back (undone) and not finalized (written permanently into the database).
Use the READ UNCOMMITTED isolation level only for applications such as reports that are statistically unaffected by the average change that might occur while the DBMS is processing your transaction-for example, if you want to know the average, minimum, or maximum delay in filling orders, or if you want to know the average amount of an employee's sales or a customer's purchases during the past three months.
| Note |
Most DBMS products (like MS-SQL Server) set the transaction isolation level for the entire time a session is connected to the database. As such, if you have an application that sets the isolation level to READ UNCOMMITTED, make sure that the program sets the isolation level back to the default (READ COMMITTED) prior to exiting or executing a section of code that requires a higher (more protective) isolation level. |
Understanding READ COMMITTED and Nonrepeatable Reads
The isolation level READ COMMITTED solves the dirty read concurrent transaction processing problems by hiding any uncommitted changes. Thus, if your application executes the SET statement
SET TRANSACTION ISOLATION LEVEL READ COMMITTED
any statements executed during the session will see (work with) only data values committed (permanently written) to the database. Therefore, if SUE, for example, is taking a customer order for 10 of the 20 hammers you currently have in inventory and her program executes the UPDATE statement
 UPDATE inventory SET qty = qty - 10
 WHERE description = 'hammer'
your query
SELECT qty FROM inventory WHERE description = 'hammer'
will return the QTY as 20 (and not 10) until such time as SUE's application either terminates or executes a COMMIT statement and the DBMS commits (permanently writes) SUE's UPDATE to the INVENTORY table.
An interesting side effect of the READ COMMITTED isolation level is that a transaction may end up working with data no longer found in the database. Suppose, for example, that MARY in the payroll department is performing a period end closing procedure that executes the DELETE statement
 DELETE FROM timecards
 WHERE card_date BETWEEN @period_start and @period_end
to remove TIMECARDS rows inserted during the pay period she is closing. If you are running queries and reports that involve TIMECARDS rows with CARD_DATE values between @PERIOD_START and @PERIOD_END, your application will continue to "see" these rows even though SUE's DELETE statement has removed them from the TIMECARDS table.
Now, after SUE's application executes a COMMIT to finalize the DELETE statement's actions, the deleted TIMECARDS rows will "disappear" as far as your application is concerned. Thus, the READ COMMITTED isolation level does not prevent the phantom INSERT or phantom DELETE concurrent transaction processing problems.
Moreover, while READ COMMITTED eliminates dirty reads to prevent the inconsistent data problem, it does not prevent nonrepeatable reads. Suppose, for example, that MARY and SUE are each taking an order from a customer. MARY queries to INVENTORY table to find that she has 25 copies of 1001 FrontPage 2000 Tips and lets her customer know. In the meantime, SUE completes her order for 20 copies of the book, and the DBMS commits her work to the INVENTORY table. When MARY's customer says, "I'll take all 25 copies," she finds that she is unable to process the order because a second query as to the number of copies available shows there are now only 5. As such, the same query executed at two different points in the one sales transaction produced two different results, with the results of the first read (query) being nonrepeatable.
Understanding REPEATABLE READ and Phantom Inserts
REPEATABLE READ, which is one step above READ COMMITTED in the four isolation-level hierarchy, prevents both the dirty read problem and (as its name implies) the nonrepeatable read problem. Instead of simply ignoring any uncommitted updates and deletes, the DBMS issues a lock that prevents other users from changing any data read by a transaction executed at the REPEATABLE READ isolation level. Moreover, if a transaction running at the REPEATABLE READ isolation level is unable to lock the portion of the database it needs to query (because another user's transaction already has a lock on it), the DBMS waits until the lock is released before executing the transaction.
Thus, in the previous tip's example where both MARY and SUE were taking orders for the same 25 copies of the 1001 FrontPage 2000 Tips book, the repeatable read problem occurred because both MARY and SUE were able to access the same rows of data in the INVENTORY table at the same time. If the order entry program is executed at the REPEATABLE READ isolation level (instead of the READ COMMITTED isolation level), then only one of the two operators will be able to work with a specific portion of the INVENTORY table at a time. Therefore, if the order entry program operates at the REPEATABLE READ isolation level, MARY's request for a count of the copies of the book locks a portion of the INVENTORY table from modification and query requests in other transactions operating at the same or higher isolation level. As such, when SUE later starts a transaction for the same book (which will involve reading the same section of the INVENTORY table on which MARY's transaction has a lock), the DBMS refuses the lock requested by SUE's transaction. As a result, SUE's transaction must wait until MARY's transaction completes its work and releases its lock on the portion of the INVENTORY table that SUES's transaction wants to read.
Because the REPEATABLE READ isolation level prevents other users from modifying only data an open transaction has read, transactions running at the REPEATABLE READ isolation level are still subject to the phantom INSERT (and DELETE) problem. Suppose, for example, that you execute the statement batch:
 SET TRANSACTION ISOLATION LEVEL REPEATABLE READ
 SELECT SUM(order_total) FROM orders WHERE cust_ID = 101
 SELECT * FROM orders WHERE cust_ID = 101
It is possible for the value returned by the aggregate function, SUM(ORDER_TOTAL), to be different than the total you get if you were to add up the values in the ORDER_TOTAL column of the rows returned by the SELECT statement (the third statement in the batch). This error, or anomaly, occurs if users INSERT additional orders for CUST_ID 101 into the ORDERS table between the time the DBMS computes the SUM of the ORDER_TOTAL column and the SELECT statement displays the rows of ORDERS for CUST_ID 101.
Understanding Table, Page, and Row Level Locking
Although you can set the isolation level of your DBMS session to insulate you from the concurrent actions of other users (as discussed in Tips 351–353), you should not write applications that access the database without regard for others that may need to work with its data. Suppose, for example, that you write a program that sets its isolation level to REPEATABLE READ and then executes a series of large queries and requests for user input. Executing the program without a COMMIT statement after each query and before each prompt for user interaction will prevent everyone else from updating (and perhaps even reading) an ever-increasing portion of the database for an extended period of time.
Even if a program makes no changes to the data in the database, the DBMS automatically starts a transaction when it executes the first statement in the application. Without a COMMIT statement, the transaction will not end until the application terminates. In the meantime, the DBMS prevents others from modifying data read during a transaction (while the program is running) in order to keep the data self-consistent. (As you learned in Tip 353, "Understanding REPEATABLE READ and Phantom Inserts," the REPEATABLE READ isolation level requires that the system keep data read during a transaction unaffected by transactions executed concurrently on behalf of other users.) Locking the data against changes from other users is the only way the DBMS has to ensure that data values read at the start of a transaction will be the same if the program reads the same rows again later in the transaction.
The physical mechanism used for locking and unlocking portions of the database is automatically controlled by the DBMS and is transparent to the user. Therefore, you do not have to understand database locks to use SQL transactions. However, if you write your transactions with an understanding that a lock gives you exclusive access to a portion of the database, you will use COMMIT statements to break a single, large transaction into a group of smaller transactions—thereby preventing other users' transactions from waiting for a long time while parts of the database they need are locked by your application.
There are basically four levels of locking available to the DBMS. The crudest and easiest to implement is database-level locking. In database-level locking, the DBMS locks the entire database at the start of a transaction, and all other transactions must wait for the transaction to complete before they can start. No commercial DBMS products use database-level locking because processing one transaction at a time leads to unacceptably slow performance in a multi-user environment.
The next step up in the lock-level hierarchy is table-level locking, in which the DBMS locks only those tables accessed by a transaction. Therefore, if Transaction A uses data in the OFFICES and CUSTOMERS tables, for example, then Transaction B needs to wait only for Transaction A to complete if it uses one or both of these tables. If Transaction B uses other tables such as EMPLOYEES and TIMECARDS, for example, the DBMS will execute the statements in Transaction A and Transaction B concurrently. Unfortunately, table-level locking leads to unacceptably slow DBMS performance in applications such as online order processing, where many users need simultaneous access to the same tables.
Currently, many DBMS products use page-level locking by segregating tables into 2KB, 4KB, 8KB, and 16KB blocks. Since most large tables may span hundreds or even thousands of pages, two transactions trying to access data in the same table will often use data from different segments (or pages) of the file. Therefore, with page-level locking, if Transaction A and Transaction B both need to work with data in the ORDERS table, the system will process the transactions concurrently, as long as the ORDERS data needed by Transaction A is on different pages than that being used by Transaction B.
Some DBMS products (such as MS-SQL Server) use row-level locking to allow an even greater amount of concurrent processing. In row-level locking, the DBMS locks only the specific rows used by a transaction. Row-level locking fixes a shortcoming of page-level locking in processing small tables (such as an EMPLOYEES table) where different EMPLOYEE rows
needed by separate transactions happen to reside in the same 2KB, 4KB, 8KB, or 16KB disk block. In row-level locking, the DBMS will process Transaction A and Transaction B concurrently even if both use the same tables—as long as each transaction is working with different rows in the tables.
In theory, it is possible to increase lock granularity beyond the row level and implement attribute-level locking, in which the DBMS locks only specific columns in a row. Unfortunately, while each level of locking (from table level to page level to row level) increases database concurrency, it also increases the overhead necessary to manage the locks. As a result, no commercial DBMS products currently implement attribute-level locking because the overhead involved in managing locks on individual columns in a row outweighs the potential advantages of doing so.
Understanding MS SQL Server Lock Escalation
As mentioned in Tip 354, "Understanding Table-, Page-, and Row-Level Locking," maintaining row-level locking requires more overhead than maintaining page-level locking, which requires more overhead than managing table-level locking. By default, MS-SQL Server will lock data at the row level. Therefore, any query executed by the system will hold locks on at least one row in a table. As the system executes the statement(s) in a transaction, the DBMS keeps track of the number of locks it holds on each 8KB page of data. At a certain point, based on the percentage of rows locked per page, the DBMS will escalate the lock level so that it will begin using page-level locking instead of row-level locking.
For example, if a transaction executes an UPDATE statement such as
 UPDATE employees SET hourly_rate = hourly_rate * 1.2
 WHERE office = 1
the DBMS will lock individual EMPLOYEES table rows given that there are only a few rows per 8KB page in the EMPLOYEES table that have a value of 1 in the OFFICE column. If, on the other hand, the transaction executes a query such as
 SELECT * FROM orders
 WHERE order_date BETWEEN '01/01/2000' AND '12/31/2000'
which reads (and locks) a large number of rows on a page, the DBMS will lock the ORDERS table an 8KB page at a time instead of a single row at a time. Moreover, if a transaction exceeds the table-level escalation threshold with a statement such as
SELECT * FROM customers
which will eventually lock every row and page in a table, the DBMS will begin using table-level locking on the CUSTOMERS table.
Lock escalation, then, is the process of converting a large number of highly granular row-level locks into fewer, coarser page-level locks and, if necessary, table-level locks-all in an effort to reduce system overhead. MS-SQL Server dynamically sets the lock escalation thresholds, so you need not configure them. For example, when a transaction requests rows from a table, MS-SQL Server locks rows used by statements in the transaction and places page-level intent locks on pages that contain the locked rows. If the transaction later exceeds the page-level threshold, the DBMS attempts to change the higher-level intent locks to actual locks. After acquiring the (fewer) page-level locks, the DBMS drops the (many) row-level locks, thereby reducing the system's lock overhead. (The DBMS follows the same procedure when escalating from page-level locking to table-level locking.)
Thus, when an SQL statement references a small number of rows scattered throughout a large table, the MS-SQL Server maximizes concurrent access to the data with row-level locks. However, if a statement references most or all of the rows in a table, the system maximizes concurrent access (and reduces lock overhead) by switching to table-level locking. Because MS-SQL Server dynamically adjusts its lock granularity by table, a single statement may use row-level locking on one table, page-level locking on another, and table-level locking on a third table.
Understanding Deadlocks and How the DBMS Resolves Them
Deadlock is a situation in which two users (or sessions) have a lock on separate objects, and each user's transaction is waiting for a lock on an object held by the other user. Figure 356.1 illustrates a deadlock condition in which Transaction A has a lock on the ORDERS table and needs a lock on the CUSTOMERS table to proceed. Transaction B, meanwhile, has a lock on the CUSTOMERS table and is waiting on Transaction A to complete and release its lock on the ORDERS table.
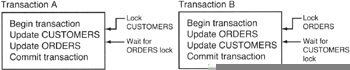
Figure 356.1: Transaction A and Transaction B, deadlocked with each transaction waiting for the other to release a table before proceeding
Without intervention by the DBMS, each session will wait forever for the other to COMMIT (or ROLLBACK) its transaction and unlock the portion of the data file the transaction in the session needs to continue. While Figure 356 depicts a simple situation in which two transactions are deadlocked, in real life, the situation is often more complex, with three or more sessions stuck in a cycle of locks, each waiting for data locked by one or more of the other sessions.
To deal with deadlocks, the DBMS will choose one of the sessions as the "deadlock victim," terminate it, ROLLBACK (undo) any changes made by the transaction running in the session, and release its lock(s) so that the transaction(s) in the other session(s) can continue.
Each DBMS product has its own methodology for detecting deadlocks and selecting which of the sessions will be the deadlock victim. MS-SQL Server, for example, periodically scans for and flags sessions waiting on a lock request. If a flagged session is still waiting for a lock during the next periodic scan for locks, the DBMS begins a recursive deadlock search. (After all, the session may just be blocked, waiting for a large query or other long-running SQL statement to complete its work.) If the recursive search detects a circular chain of lock requests, MS-SQL Server selects the transaction with the least amount of work to undo and terminates it.
Not only does MS-SQL Server roll back the deadlock victim's transaction, but the DBMS also notifies the user's application of the transaction's failure by sending an error message 1205. The server then cancels the terminated transaction's locks and lock requests, and allows the nonterminated transaction(s) to continue.
Due to the way in which the DBMS handles deadlocks, any SQL statement is a potential deadlock victim. As such, an application program executing an SQL statement batch must check for and be able to handle the deadlock victim error code in any transaction that works with multiple tables. If a deadlock victim error code is returned in an interactive session, the user can simply retype and resubmit the SQL statements. In programmatic SQL, an application that receives the deadlock victim error code may either alert the user and terminate or automatically restart the transaction.
Understanding the SERIALIZABLE Isolation Level
Serializable is a DBMS concept that means that each database user can access the database as if there were no other users accessing the same data concurrently. In short, serializability requires that a user's application will see a completely consistent view of the data during a transaction, and neither uncommitted nor committed actions of other users will have any effect on data values seen by the transaction's statements. Or, said another way, SERIALIZABLE implies that if two transactions (Transaction A and Transaction B) are executing concurrently, the DBMS will ensure that the results will be the same whether Transaction A is executed first, followed by Transaction B, or whether Transaction B is executed first, followed by Transaction A.
As shown in Table 357.1, if you execute the SET statement
|
Isolation Level |
Lost Update |
Uncommitted Data/Dirty Read |
Inconsistent Data/Nonrepeatable Read |
Phantom Insert |
|---|---|---|---|---|
|
Serializable |
Prevented |
Prevented |
Prevented |
Prevented |
SET TRANSACTION ISOLATION LEVEL SERIALIZABLE
the DBMS will ensure that transactions executed during the session are not subject to any of the four concurrent transaction processing problems you learned about in Tip 350, "Understanding Concurrent Transaction Processing Problems and Isolation Levels."
In short, the SERIALIZABLE isolation level completely insulates a transaction from the actions of all SQL statements concurrently executed by the DBMS on behalf of other users.
When a session is at the SERIALIZABLE isolation level, the DBMS will maintain each transaction's exclusive lock on updates to the portion of the database tables it uses throughout the transaction's lifespan. After starting the execution of a transaction at the SERIALIZABLE isolation level, the DBMS will not allow any other user(s) to make any changes to data read or modified by the statements in the transaction. Moreover, the DBMS will also prevent users from inserting new rows of data that would be included in the results set of any of the executed WHERE clauses in the transaction's statements, nor will they be able to execute DELETE statements that would remove any such rows.
Understanding the REPEATABLE READ Isolation Level
The REPEATABLE READ isolation level is the second-highest isolation level (just below SERIALIZABLE). At the REPEATABLE READ isolation level, the DBMS prevents a second transaction from modifying data read by the first transaction until the first transaction ends (and releases its shared locks on the data read). However, another user can INSERT additional rows into the table(s) queried by the first transaction. As a result, a query such as
SELECT * FROM orders WHERE cust_ID = 2002
may generate a different results table when executed at the beginning of Transaction A than it does when executed again later in the same transaction—even if the transaction itself makes no changes to the ORDERS table. The inconsistent query results, due to the phantom insert problem, occur if another user executes an INSERT statement that adds an additional row (or additional rows) with CUST_ID 2002 into the ORDERS table between the times at which Transaction A executes the two identical queries on the ORDERS table.
Most applications do not need the capability to repeat a multi-row query during a single transaction. As such, leave sessions at the (MS-SQL Server default) READ COMMITTED isolation level whenever possible because the explicit locking of data from other users at the REPEATABLE READ isolation level reduces the concurrency of the database. In most instances, an application will never "see" the newly inserted rows (because they do not execute the same query at multiple points in the same transaction), and the DBMS will remain self-consistent as long as data values read at some point during a transaction remain unchanged by other users throughout the transaction.
As shown in Table 358.1, the REPEATABLE READ isolation level prevents three of the four concurrent (multi-user) update problems.
|
Isolation Level |
Lost Update |
Uncommitted Data/Dirty Read |
Inconsistent Data/Nonrepeatable Read |
Phantom Insert |
|---|---|---|---|---|
|
Serializable |
Prevented |
Prevented |
Prevented |
Prevented |
|
Repeatable Read |
Prevented |
Prevented |
Prevented |
Possible |
The main advantage of executing at the REPEATABLE READ isolation level over the SERIALIZATION isolation level is the improvement in overall system performance. If Transaction A is executing at the REPEATABLE READ isolation level and other users submit INSERT statements to add rows to tables used in the transaction, the DBMS will add the rows while continuing to process the statements in Transaction A. If, on the other hand, Transaction A is running at the SERIALIZABLE isolation level, any INSERT statement that adds rows to a results table returned by a WHERE clause in any of the executed statements in Transaction A will have to wait until the DBMS finishes processing Transaction A.
Understanding the READ COMMITTED Isolation Level
While the READ COMMITTED isolation level prevents only two of the four concurrent transaction processing problems (as shown by Table 359.1), the third-highest level in the isolation-level hierarchy improves database concurrency by releasing shared locks as soon as data is read.
|
Isolation Level |
Lost Update |
Uncommitted Data/Dirty Read |
Inconsistent Data/Nonrepeatable Read |
Phantom Insert |
|---|---|---|---|---|
|
Serializable |
Prevented |
Prevented |
Prevented |
Prevented |
|
Repeatable Read |
Prevented |
Prevented |
Prevented |
Possible |
|
Read Committed |
Prevented |
Prevented |
Possible |
Possible |
The DBMS prevents the uncommitted data/dirty read problem by not allowing statements in a transaction executed at the READ COMMITTED isolation level to see uncommitted updates made by other concurrently executed transactions. However, the nonrepeatable read and phantom insert problems can occur because committed changes made by other transactions may become visible during the course of the transaction. As a result, a transaction that repeats a query such as
 SELECT cust_ID, total_orders FROM customers
 WHERE cust_ID = 3003
may return a different value for TOTAL_ORDERS each time, as transactions executed concurrently on behalf of other users change the values in the CUST_ID 3003 row of the CUSTOMERS table and execute COMMIT statements to write the changes permanently to the table. Similarly, a transaction that executes a SELECT statement such as
SELECT COUNT(*) FROM orders WHERE cust_ID = 4004
more than once may find that the aggregate COUNT(*) returns a different value each time the DBMS executes the query because other transactions such as COMMIT, INSERT, and/or DELETE statements add or remove ORDERS table rows for CUST_ID 4004.
In addition to avoiding dirty reads by hiding uncommitted changes, the READ COMMITTED isolation level prevents lost updates. If a statement in Transaction A, for example, attempts to update a row already changed by Transaction B, the DBMS will automatically ROLLBACK (undo) all changes made by Transaction A. As such, if you write an application that executes several UPDATE statements, be sure to execute a COMMIT statement after each one. Otherwise, the DBMS will undo all changes made since the application started, if the program happens to attempt an UPDATE on a row already updated by another concurrently executing transaction.
Understanding the READ UNCOMMITTED Isolation Level
READ UNCOMMITTED is the lowest isolation level defined by the SQL-92 standard and (as shown in Table 360.1) prevents only the lost update problem. In fact, on some DBMS products (such as MS-SQL Server, for example), the READ UNCOMMITTED isolation level does not even prevent the lost updates. Therefore, be sure to check your system documentation to see if READ UNCOMMITTED, as specified by the SQL-92 specification, implies "READ ONLY" and therefore disallows updates by transactions executed at the READ UNCOMMITTED isolation level.
|
Isolation Level |
Lost Update |
Uncommitted Data/Dirty Read |
Inconsistent Data/Nonrepeatable Read |
Phantom Insert |
|---|---|---|---|---|
|
Serializable |
Prevented |
Prevented |
Prevented |
Prevented |
|
Repeatable Read |
Prevented |
Prevented |
Prevented |
Possible |
|
Read Committed |
Prevented |
Prevented |
Possible |
Possible |
|
Read Uncommitted |
Prevented |
Possible |
Possible |
Possible |
If READ UNCOMMITTED implies "READ ONLY" mode on your DBMS product, then the DBMS will protect you from lost updates at the READ UNCOMMITTED isolation level, since a transaction cannot execute updates of any kind when executed in READ UNCOMMITTED mode. However, if your DBMS product, like MS-SQL Server, allows updates at the READ UNCOMMITTED isolation level, the lost update problem can (and will) occur if two concurrently running transactions execute UPDATE statements that change data values in the same rows and column(s) of a table. Since neither transaction requests or holds shared nor exclusive locks on the data it modifies to prevent concurrent changes by the other transaction, data values changed by one UPDATE statement can be immediately changed by a second UPDATE statement—even before the DBMS completes the execution of the first UPDATE statement.
The main advantage of executing SELECT statements at the READ UNCOMMITTED isolation level is that doing so allows the highest degree of database concurrency because queries executed in READ UNCOMMITTED mode not only do not lock the data they read, but also ignore any existing shared or exclusive locks held by other transaction. However, by circumventing the system's concurrent processing protections, a SELECT statement such as
SELECT item_number, qty_on_hand inventory
may report inaccurate results when the query performs "dirty reads" of updated but as yet uncommitted data values in the INVENTORY table. If, for example, the DBMS executes a ROLLBACK of uncommitted and subsequently aborted inventory update or online order entry transactions concurrent with the execution of the SELECT statement, the query's results table will contain values that never really existed in the database.
Therefore, use the READ UNCOMMITTED isolation level only for queries whose results do not have to be 100 percent accurate, such as a COUNT(*) of orders processed over an extended period or time, or for a report where the user is looking for general trends in the data and is not concerned about the actual values in specific rows or sets of rows. Moreover, to avoid the lost update problem, never execute an UPDATE statement at the READ UNCOMMITTED isolation level, even if your DBMS product allows you to do so.
Using the MS SQL Server Enterprise Manager to Display Blocking and Blocked Sessions
As you learned in Tip 356, "Understanding Deadlocks and How the DBMS Resolves Them," MS-SQL Server automatically resolves deadlocks by terminating one of the deadlocked transactions to release locks so that the other(s) can continue running. However, a session can block other applications from reading or updating one or more tables for an extended period of time without creating a deadlock the DBMS will clear. Suppose, for example, that FRANK starts an MS-SQL Server Query Analyzer session and executes the statement batch:
 BEGIN TRANSACTION
 SELECT * FROM auto_inventory
 UPDATE auto_inventory SET MODEL = 'Model 2'
 WHERE year = 1999 AND make = 'Camero'
MS-SQL Server will grant FRANK's transaction exclusive locks on the AUTO_INVENTORY table rows modified by his UPDATE statement. Moreover, FRANK's process will retain these locks until he terminates the transaction by ending his session or by executing a ROLLBACK or a COMMIT statement.
If another process attempts to query or update the AUTO_INVENTORY table, the transaction will "hang" waiting for FRANK's session to release its exclusive locks. Furthermore, the DBMS will not terminate either FRANK's transaction or the other query (or UPDATE) transaction because the two processes are not deadlocked. Rather, FRANK's process is simply blocking the other's request for a shared or exclusive lock on rows in the AUTO_INVENTORY table.
You can use the MS-SQL Server Enterprise Manager to display blocking and blocked sessions by performing the following steps:
- To start the MS-SQL Server Enterprise Manager, click your mouse pointer on the Start button. When Windows displays the Start menu, move your mouse pointer to Programs, select Microsoft SQL Server 7.0, and then click your mouse pointer on Enterprise Manager.
- To display the list of SQL servers, click your mouse pointer on the plus (+) to the left of SQL Server Group.
- Click your mouse pointer on the plus (+) to the left of the icon for the SQL server whose sessions you want to display. For example, if you want to display sessions running on a server named NVBIZNET2, click your mouse pointer on the plus (+) to the left of the icon for NVBIZNET2. The Enterprise Manager will display folders containing databases and services available on the MS-SQL Server you selected.
- Click your mouse pointer on the plus (+) to the left of the Management folder. The Enterprise Manager will display icons for various database management activities and status reports.
- Click your mouse pointer on the plus (+) to the left of the Current Activity icon. The Enterprise Manager will display icons you can use to display process information and locks (by process ID and by object ID).
- Double-click your mouse pointer on icon to the left of Locks/Process ID. The Enterprise manager, in turn, will display the currently running system process ID's (SPID's), similar to that shown in Figure 361.1.

Figure 361.1: The MS-SQL Server Enterprise Manager Locks/Process ID window
Notice that the right pane of the Enterprise Manager window shows which of the sessions is blocking the transaction processing in other sessions. In the current example, the Enterprise Manager shows that the SA's session (SPID 7) is blocked by FRANK'S session (SPID 9).
To display the display the last statement batch executed by a session, right-click your mouse pointer on the icon of the session whose last statement batch you want to see, and then select Properties from the Enterprise Manager pop-up menu. The Enterprise manger, in turn, will display a Process Details dialog box similar to that shown in Figure 361.2.

Figure 361.2: The MS-SQL Server Process Details dialog box
Review the last statement(s) executed by the blocking session to determine whether the user is just executing a process that will take a long time to complete, or (as is the case in the current example) if the user inadvertently failed to execute a COMMIT statement to close an open transaction and release its locks on database objects. After you find out why a session is blocking another, you can wait patiently for the blocking process to finish, contact the owner of the blocking session, and ask the user to complete or abort the open transaction, or you can terminate the blocking session (as you will learn to do in Tip 362, "Using the MS-SQL Server Enterprise Manager to Kill Processes Holding Locks on Database Objects").
To exit the Process Details dialog box, click your mouse pointer on the Close button.
Using the MS SQL Server Enterprise Manager to Kill Processes Holding Locks on Database Objects
In Tip 361, "Using the MS-SQL Server Enterprise Manager to Display Blocking and Blocked Sessions," you learned how to use the MS-SQL Server Enterprise Manager to determine the system process ID (SPID) of the session(s) that are blocking (or being blocked by) other sessions. If you decide that a transaction will not complete its work within a reasonable period of time, you can use the Enterprise Manager to terminate it. (Suppose, for example, that FRANK starts a transaction that makes updates to the AUTO_INVENTORY table and then goes to lunch before executing a COMMIT statement to close the transaction, make the changes permanent, and release locks held by the transaction.)
To use the MS-SQL Server Enterprise Manager to terminate the open transaction running in a session, perform the following steps:
- Follow the six-step procedure in Tip 361 to display the list of sessions running on the MS-SQL Server and to determine which sessions are blocking other sessions.
- Click your mouse pointer on the icon to the left of Process Info to display the information on the processes running on the MS-SQL Server you selected in Step 1. (You will find the Process Info icon immediately above the Locks/Process ID icon in the MS-SQL Server Enterprise Manager's left pane, as shown in Figure 362.1.)

Figure 362.1: The MS-SQL Server Enterprise Manager Process Info window - Right-click your mouse pointer on the icon to the left of the SPID running the process you want to terminate (KILL). For the current example in which FRANK'S transaction (SPID 9) is blocking SA's query (SPID 7), you would right-click your mouse pointer on the globe icon to the left of 9 in the SPID column in the Enterprise Manager's right pane.
- Select the Kill Process option from the pop-up menu. Enterprise Manager will display a Kill Process message box prompting you to confirm your intent to kill (terminate) the process running in the SPID you selected in Step 3.
- To kill the process, click your mouse pointer on the Yes button.
After you complete Step 5, MS-SQL Server will abort the transaction running in the session with the SPID you selected in Step 3 and ROLLBACK (undo) any uncommitted work the session has done.
Note In addition to the Enterprise Manager's graphical user interface (GUI), MS-SQL Server provides stored procedures and an SQL statement you can execute from the command line to find a blocking SPID and terminate it. If you execute the stored procedure sp_lock, MS-SQL Server will display the list of SPID's with locks and those requesting locks (i.e. the blocked SPID's). After you determine the SPID of the session
running the transaction you want to terminate, you can abort the transaction the SPID is running by executing the statement
KILL
(where ) is the number of the SPID with the process you want to kill.)
Understanding Locking and Transaction Isolation on MS SQL Server versus Oracle
From a review of the intricate locking mechanisms and isolation levels described in Tips 350-360, you can see that DBMS products make every reasonable effort to process queries and updates for multiple users concurrently while isolating each user from the actions of others. In fact, one of the primary functions of the DBMS is to make sure that multiple users can query and update the database without receiving inconsistent information from in-progress transactions and without inadvertently overwriting each others' updates. However, while the goal of all DBMS products is the same, the method each uses to protect users from each other may differ greatly.
For example, Oracle and MS-SQL Server take a very different approach to database locks and isolation strategies. On Oracle, statements that read data neither acquire locks nor wait for locks to be released before reading rows of data. As such, the eternally blocked process in Tip 361, "Using the MS-SQL Server Enterprise Manager to Display Blocking and Blocked Sessions," could not occur as described in that tip. On an Oracle DBMS, the UPDATE statement in FRANK'S transaction would still acquire an exclusive lock on a row (or perhaps a page) in the AUTO_INVENTORY table. However, the query in the system administrator's (SA's) session would not "hang." Instead, in an Oracle environment, the SA's query would read a copy of the data that contains data values prior to FRANK'S uncommitted changes vs. waiting for READ COMMITTED access to the most current data values once FRANK'S session commits its work.
Therefore, on an Oracle DBMS, when a SELECT statement requests data that has been changed but not yet committed by another transaction, the system supplies the query with the last set of values already committed (permanently written) to the database at the start of the query. The session executing INSERT, DELETE, or UPDATE statements acquires exclusive locks on all modifications and holds these locks until the end of the transaction to prevent others from overwriting uncommitted changes.
MS-SQL Server, on the other hand, uses shared locks to ensure that queries see only committed data (unless, of course, you set the transaction isolation level to READ UNCOMMITTED). As such, a SELECT statement executed on MS-SQL Server acquires and releases shared locks as it retrieves data for its results table. Although these shared locks have no effect on other SELECT statements, the DBMS does require that a query wait for a transaction to COMMIT any pending changes prior to reading updated but as yet uncommitted data. As such, releasing locks quickly and reducing the length of transactions that modify data is more important on MS-SQL Server than on an Oracle server.
The important thing to understand is that you must check the lock and isolation philosophy of your DBMS product to ensure that you are writing applications that will support what will be an ever-increasing number of concurrent users. A code review is especially important when moving SQL code from one DBMS product do another. As you learned from the comparison of MS-SQL Server and Oracle locking strategies in the current tip, an SQL statement batch that runs perfectly fine on an Oracle DBMS can cause multiple lockups (and unhappy users) when run without modification on MS-SQL Server.
Using the SET TRANSACTION Statement to Set a Transaction s Isolation Level
A transaction's isolation level tells the DBMS the extent to which you want the system to insulate your work from interaction with work the DBMS performs concurrently on behalf of other users. Each DBMS product has a default isolation level at which it executes the statements in a transaction. MS-SQL Server, for example, uses a default isolation level of READ COMMITTED. The SET TRANSACTION statement lets you change a session's isolation level.
In Tip 350, "Understanding Concurrent Transaction Processing Problems and Isolation Levels," you learned that concurrently processing multiple transactions subjects database data to four main problems. The way in which the DBMS implements its locking mechanism at each of the four isolation levels prevents one or more of these problems, as shown in Table 364.1.
|
Isolation Level |
Lost Update |
Uncommitted Data/Dirty Read |
Inconsistent Data/Nonrepeatable Read |
Phantom Insert |
|---|---|---|---|---|
|
Serializable |
Prevented |
Prevented |
Prevented |
Prevented |
|
Repeatable Read |
Prevented |
Prevented |
Prevented |
Possible |
|
Read Committed |
Prevented |
Prevented |
Possible |
Possible |
|
Read Uncommitted |
Prevented |
Possible |
Possible |
Possible |
The syntax of the SET TRANSACTION statement is:
 SET TRANSACTION [{READ ONLY|READ WRITE}]
 ISOLATION LEVEL {READ UNCOMMITED|READ COMMITTED|
 REPEATABLE READ|SERIALIZABLE}
 [DIAGNOSTICS SIZE ]
Therefore, to tell the DBMS that you want the statements in a transaction that makes no changes to the database protected only from lost update problems, you would execute a SET TRANSACTION statement such as:
SET TRANSACTION READ ONLY ISOLATION LEVEL READ UNCOMMITTED
Similarly, to protect a transaction that updates the database from all four of the update concurrency problems and return at most three error messages (if necessary), you would execute a SET TRANSACTION statement similar to:
 SET TRANSACTION READ WRITE ISOLATION LEVEL SERIALIZABLE
 DIAGNOSTICS SIZE 3
| Note |
Like many other statements defined in the SQL-92 standard, some DBMS products support the SET TRANSACTION in ways that do not adhere strictly to the letter of the specification. MS-SQL Server, for example, gives the syntax of the SET TRANSACTION statement as
 SET TRANSACTION ISOLATION LEVEL {READ UNCOMMITTED|
 READ COMMITTED|REPEATABLE READ|SERIALIZABLE}
which eliminates both the statement's ability to set the transaction's access mode as READ ONLY or READ WRITE and to control the number of error messages the server can return if it encounters errors while executing the statements in a transaction. |
Be sure to check your system documentation to determine your DBMS product's rules for the use of the SET TRANSACTION statement. Some DBMS products, like the SQL-92 specification, require that you execute the SET TRANSACTION statement as the first statement in a transaction. In addition, these DBMS products use the statement's clause(s) to change the default transaction settings for only the one transaction in which the statement appears. MS-SQL Server, on the other hand, lets you execute the SET TRANSACTION anywhere in a transaction and uses the value that follows the TRANSACTION ISOLATION LEVEL clause to set the isolation level for statements executed during the remainder of the session-not just those executed in a single transaction.
| Note |
MS-SQL Server, unlike most other DBMS products, does not revert the transaction isolation level back to the system's default (READ COMMITTED) after a user (or application) changes it by executing a SET TRANSACTION statement during the session. Therefore, if you lower the isolation level to READ UNCOMMITTED, for example, MS-SQL Server will process transactions at the READ UNCOMMITTED isolation level for the remainder of the session-unless you execute another SET TRANSACTION statement that raises the isolation to the session's initial default (READ ONLY) or above. |
Using the COMMIT Statement to Make Database Updates Permanent
The SQL-92 specification defines two statements you can use to terminate a transaction: COMMIT and ROLLBACK. While executing a ROLLBACK statement undoes any work performed in a transaction, submitting a COMMIT statement makes all data modifications (the actions of all UPDATE, INSERT, and DELETE statements) performed since the start the transaction a permanent part of the database. Moreover, after committing a transaction, the DBMS frees resources (such as table, page, and row locks) held by the session.
Up to the point at which you execute a COMMIT statement, you can undo the actions taken by the statements submitted to the DBMS in a transaction by executing a ROLLBACK statement. Suppose, for example, that you start an MS-SQL Server Query Analyzer session and execute the statement sequence:
 BEGIN TRAN
 UPDATE employees SET salary = salary * 1.5
 DELETE employees WHERE office = 1
 UPDATE employees SET manager = NULL WHERE manager = 102
If you then execute the statement
ROLLBACK
the DBMS will make the EMPLOYEES table look like it did before you executed the first UPDATE statement that follows BEGIN TRAN-including "bringing back" all of the rows removed from the table by the DELETE statement. However, if you follow the initial sequence of statements with
 COMMIT
 ROLLBACK
the COMMIT statement closes the transaction and makes your updates and the row removal permanent, and the subsequent ROLLBACK will not be able to undo the work performed by the committed (and now closed) transaction.
If your DBMS product lets you nest transactions, COMMIT statements executed to close inner (nested) transactions do not release resources or make permanent changes to the database. Only the COMMIT statement executed to terminate the outermost transaction makes actual changes to the DBMS that cannot be rolled back. Suppose, for example, that you execute the statement batch:
 BEGIN TRAN outermost_tran
 UPDATE employees SET salary = salary * 1.5

 BEGIN TRAN nested_tran1
 DELETE employees WHERE office = 1
 BEGIN TRAN nested_tran2
 UPDATE employees SET manager = NULL
 WHERE manager = 102
 COMMIT TRAN nested_tran2 - the DBMS commits no work

 COMMIT TRAN nested_tran1 - the DBMS commits no work

 COMMIT outermost_tran - the DBMS commits ALL work
Only the final COMMIT statement (on the outer transaction) actually makes work performed by the outer and inner (nested) transactions a permanent part of the database. As such, nested transactions provide a convenient way to create groups of statements whose work you can undo (on a statement-group-by-statement-group basis), while reserving a decision as to whether or not to COMMIT the entire body of work performed until you either COMMIT or ROLLBACK the outermost transaction.
| Note |
Interactive DBMS tools, such as the MS-SQL Server Query Analyzer, normally treat statements you enter and execute (by pressing F5 or by selecting the Query menu Execute option, for example) as implicit transactions. As such, if you type DELETE employees and then tell the Query Analyzer to execute the statement, you cannot then type ROLLBACK and press F5 to undo the work performed by the DELETE statement. The Query Analyzer executes an implicit COMMIT statement after each sequence of statements (or each individual statement) you tell it to execute. To prevent interactive DBMS tools (such as the MS-SQL Server Query Analyzer) from committing your work each time you tell them to execute one or more statements, you must explicitly mark the start of each transaction by executing a BEGIN TRAN (or BEGIN TRANSACTION) statement. After you do, the Query Analyzer will treat all individual statements and groups of statements you tell it to execute as part of a single, open transaction. You can then either undo all work performed since the most recent BEGIN TRAN statement executing a ROLLBACK statement, or make the work a permanent part of the database by executing a COMMIT statement. (If you close the Query Analyzer session normally prior to executing a COMMIT for each open transaction, the Query Analyzer will execute implicit COMMIT statements to close all open transactions and make any work they performed permanent.) |
Understanding When Constraints Are DEFERRABLE and When They Are Not
In Tip 15, "Understanding Constraints," you learned that a constraint is a limitation you can place on a table column or group of columns to prevent users from inserting data values that violate business rules or database integrity. For example a PRIMARY KEY constraint in the table definition
 CREATE TABLE offices
 (office_ID INTEGER PRIMARY KEY,
 manager_ID INTEGER,
 manager_count INTEGER,
 employee_count INTEGER
 sales_quota MONEY)
prevents any UPDATE or INSERT statement from placing a nonunique or NULL value into the OFFICE_ID column of the OFFICES table. While many DBMS products force the system to check all relevant constraints every time a user executes an INSERT, UPDATE, or DELETE statement, the SQL-92 standard includes the capability to defer constraint checking.
If a user tells the DBMS to defer constraint checking, the system will not validate modified or newly inserted data values after executing each of the statements in a transaction. Instead, the DBMS will hold its constraint checks in abeyance until the user submits a COMMIT statement to mark the completion of the transaction. At that point, the DBMS will check all deferred constraints. If none of the modified or newly inserted data violates any of the deferred constraints, the DBMS will execute the COMMIT statement and make the transaction's work a permanent part of the database. On the other hand, if proposed changes violate one or more constraints, the DBMS will execute a ROLLBACK and undo any work performed by the transaction.
The ability to defer constraint checking is important when you need to make two or more updates to the database simultaneously in order to maintain its integrity. Suppose, for example, that the database is constrained by the assertion
 CREATE ASSERTION office_employee_count
 CHECK ((offices.employee_count = COUNT(employees.emp_ID))
 AND (employees.office_ID = offices.office_ID)
 AND (employees.status = 'A'))
which holds that the value in the EMPLOYEE_COUNT column of each row in the OFFICES table is equal to the number of active employees assigned to the office. Without deferred constraint checking, the OFFICE_EMPLOYEE_COUNT constraint would prevent you from adding a new employee or from changing a terminated employee's STATUS to T. In order to satisfy the constraint at all times, you must add the employee (or change the employee's status) in the EMPLOYEES table at the same time you change the EMPLOYEE_COUNT in the OFFICES table.
Unfortunately, the DBMS can execute only one statement at a time. As a result, if you INSERT a new EMPLOYEES row or UPDATE an employee's STATUS first, the EMPLOYEE_COUNT in the OFFICES table will be wrong. Similarly, if you UPDATE the OFFICES table first, the EMPLOYEE_COUNT for the OFFICE will no longer match the actual count of active employees assigned to the office in the EMPLOYEES table. The obvious way to resolve the problem is to defer constraint checking until the DBMS has executed both statements. At that point, the DBMS can check to make sure that the work of both statements (when taken as a whole) maintains database integrity.
When defining a constraint (in a table or in an ASSERTION), SQL-92 lets you identify the constraint as either DEFERRABLE or NON DEFERRABLE. If a constraint is defined as DEFERRABLE, a user can execute a SET CONSTRAINTS statement (which you will learn about in Tip 367, "Using the SET CONSTRAINTS Statement to Defer DEFERRABLE Constraints Prior to Committing a Transaction") and have the DBMS check the constraint at the completion of a transaction (that is, after executing a set of SQL statements) instead of checking the constraint after each SQL statement the system executes that updates data governed by the constraint. Conversely, checking a constraint defined as NON DEFERRABLE cannot be put off and must be done right after each SQL statement that modifies data in or adds data to any of columns referenced in the constraint.
By default, the DBMS treats each constraint as NON DEFERRABLE unless you explicitly set specify that the constraint is DEFERRABLE when you create or alter it. Moreover, the system sets each constraint as INITIALLY IMMEDIATE, meaning that the system must check the constraint immediately after an SQL statement modifies columns referenced in the constraint. Obviously, a NON DEFERRABLE constraint must also be INITIALLY IMMEDIATE. However, if you define a constraint as DEFERRABLE, you can also set it to INITIALLY DEFERRED, meaning that the constraint will be checked only when a transaction that modifies data it governs executes a COMMIT statement.
In the current example, the OFFICE_EMPLOYEE_COUNT assertion is NON DEFERRABLE and INITIALLY IMMEDIATE by default. In Tip 369, "Adding the Data Control Component to a Visual Basic (VB) Form to Retrieve SQL Table Data," you will learn how to use the SET CONSTRAINTS statement to defer constraint checking for DEFERRABLE constraints.
Using the SET CONSTRAINTS Statement to Defer DEFERRABLE Constraints Prior to Committing a Transaction
You can use the SET CONSTRAINTS statement to tell the DBMS to check DEFERRABLE constraints after the system executes all of the statements in a transaction vs. each time it executes one of the statements in the transaction. Suppose, for example, that you have an INVENTORY table created with the CREATE TABLE statement
 CREATE TABLE inventory
 (item_number INTEGER UNIQUE DEFERRABLE,
 item_cost MONEY,
 description VARCHAR(30),
 CONSTRAINT non_zero_cost
 CHECK (item_cost > 0) DEFERRABLE)
which specifies the UNIQUE constraint on the ITEM_NUMBER column as DEFERRABLE. If you want to make sure that there is a numeric gap of at least 500 between each item number, you might execute and UPDATE statement similar to:
UPDATE inventory SET item_number = item_number + 500
However, the DBMS will abort the execution of the statement if adding 500 to any of the current values in the ITEM_NUMBER column would cause the insertion of a duplicate value into the column (as would be the case if there is an existing ITEM_NUMBER 101 and an ITEM_NUMBER 601). However, if the DBMS were to check the UNIQUE constraint after updating all item numbers, there would be no duplicate values.
If you execute the SET CONSTRAINTS statement
SET CONSTRAINTS ALL DEFERRED
the DBMS will set all DEFERRABLE constraints to DEFERRED for the remainder of your session. As a result, the UPDATE statement:
UPDATE inventory SET item_number = item_number + 500
will execute without error because the DBMS will not check the UNIQUE constraint on the ITEM_NUMBER column until it executes the implicit COMMIT statement after updating all rows in the INVENTORY table.
The important thing to understand is that you can defer constraints only until such time as you COMMIT a transaction. At that point, the DBMS always checks all deferred constraints to make sure none of the transaction's work violates database integrity. If the work you want to do requires that the system defer constraint checks for more than a single SQL statement, either submit the statements together as a single batch, or explicitly execute a BEGIN TRANSACTION (or BEGIN TRAN) statement, which you then have to end either by ending your session normally or by executing a COMMIT statement.
In addition to letting you defer the timing of the system's constraint checks for all DEFERRABLE constraints at once, the syntax of the SET CONSTRAINTS statement
 SET CONSTRAINTS
 {|ALL} {DEFERRED | IMMEDIATE}
also lets you specify individual, named constraints whose constraint checks you want to be IMMEDIATE vs. those whose checks you want to defer. For example, if you want to defer only the NON_ZERO_COST constraint and not UNIQUE constraint on the ITEM_NUMBER column, you would execute the SET CONSTRAINTS statement
SET CONSTRAINTS non_zero_cost DEFERRED
which names the NON_ZERO_COST constraint as the one you want checked when the transaction is committed.
| Note |
Since the SET CONSTRAINTS statement changes the timing of constraints checking for the remainder of your session, be sure to execute the statement SET CONSTRAINTS ALL IMMEDIATE after you COMMIT the transaction whose work required that you defer constraint checking. |
SQL Tips and Techniques
- Understanding SQL Basics and Creating Database Files
- Using SQL Data Definition Language (DDL) to Create Data Tables and Other Database Objects
- Using SQL Data Manipulation Language (DML) to Insert and Manipulate Data Within SQL Tables
- Working with Queries, Expressions, and Aggregate Functions
- Understanding SQL Transactions and Transaction Logs
- Using Data Control Language (DCL) to Setup Database Security
- Creating Indexes for Fast Data Retrieval
- Using Keys and Constraints to Maintain Database Integrity
- Performing Multiple-table Queries and Creating SQL Data Views
- Working with Functions, Parameters, and Data Types
- Working with Comparison Predicates and Grouped Queries
- Working with SQL JOIN Statements and Other Multiple-table Queries
- Understanding SQL Subqueries
- Understanding Transaction Isolation Levels and Concurrent Processing
- Writing External Applications to Query and Manipulate Database Data
- Retrieving and Manipulating Data Through Cursors
- Understanding Triggers
- Working with Data BLOBs and Text
- Working with Ms-sql Server Information Schema View
- Monitoring and Enhancing MS-SQL Server Performance
- Working with Stored Procedures
- Repairing and Maintaining MS-SQL Server Database Files
- Writing Advanced Queries and Subqueries
- Exploiting MS-SQL Server Built-in Stored Procedures
- Working with SQL Database Data Across the Internet
EAN: 2147483647
Pages: 632
