Working with SQL Database Data Across the Internet
Using sp_makewebtask to Create a Task That Generates a Web Page
The MS-SQL Server built-in stored procedure sp_makewebtask makes it simple to place the results of an SQL query or set of queries within HTML tables on a Web page. To use sp_makewebtask, you must write the queries whose results sets you want displayed beforehand. As such, sp_makewebtask does not let your Web site visitors submit ad hoc queries to the MS-SQL Server. (You will learn how to let site visitors write their own queries on-the-fly within Tip 592 "Submitting an SQL Query through an HTML Form.") However, sp_makewebtask does let you create Web pages with self-updating reports on such things as sales statistics, inventory levels, personnel data, customer lists, vendor lists, and so on.
In short, if you find that you are executing the same SQL query repeatedly, you can use sp_makewebtask to create a Web task the MS-SQL Server will execute for you on demand or periodically. Rather than display query results onscreen, the tasks sp_makewebtask creates generate Web pages and insert query results within HTML tables on those pages. Moreover, the SQL data displayed on the Web pages need not be static.
Using sp_makewebtask, you can create dynamic Web content by specifying that the MS-SQL Server Agent execute the Web task's queries periodically or whenever users change data within the database that effects the information displayed on the page. Each time the MS-SQL Server Agent runs the Web task, the stored procedure the Web task executes re-generates the Web page with the most up-to-date information from the database.
To create the Web (page generation) task you want the MS-SQL Server to execute on demand, according to a preset schedule, or whenever users make changes to the report's underlying data, call the sp_makewebtask stored procedure, which has the following syntax
sp_makewebtask [@outputfile=]'', [@query=] [,[@fixedfont=] {0|1}] [,[@bold=]{0|1}] [,[@italic=]{0|1}] [,[@colheaders=]{0|1}] [,[@lastupdated=]{0|1}] [,[@HTMLheader=]{1|2|3|4|5|6}] [,[@username=]] [,[@dbname=]] [,[@templatefile=]''] [,[@webpagetitle=]''] [,[@resultstitle=]'] [,{[@URL=]'',[@reftext = ] '']}| {[@table_urls=]{0|1}, [@url_query=]'<2-column table of URL queries>']}] [,[whentype@=]{1|2|3|4|5|6|7|8|9|10}] [,[@targetdate=]] [,[@targettime=]] [,[@dayflags=]] [,[@numunits=]] [,[@unittype=]{1|2|3|4}] [,[@procname=]] [,[@maketask=]{0|1|2}] [,[@rowcnt=]] [,[@tabborder=]{0|1}] [,[@singlerow=]{0|1}] [,[@blobfmt=]] [,[@nrowsperpage=]] [,[@datachg=]{TABLE=[COLUMN=] [,...TABLE= [COLUMN=]}]
where:
- @outputfile specifies the full pathname of the HTML document that the stored procedure is to create. For example, to create the Web page INVENTORY_LIST.HTM within the folder WEBSSQLTIPS on the D: drive, you would use @outputfile='D:WEBSSQLTIPS INVENTORY_LIST.HTM'.
- @query specifies the query or set of queries that the MS-SQL Server is to execute. The stored procedure sp_makewebtask displays the query results set from each query within an HTML table on the Web page specified by @OUTPUTFILE.
- @fixedfont is 1 if the query results are to be displayed in a fixed font or 0 if they are to be displayed in a proportional font. Default: 1.
- @bold is 1 if the query results are to be displayed in boldface or 0 if they are to be displayed with a regular (non-boldface) character weight. Default: 0.
- @italic is 1 if the query results are to be displayed in italic or 0 if they are to be displayed as non-italic. Default: 0.
- @colheaders is 1 if the column names from the query results set are to be used as headings within the HTML table or 0 to display the query results without the column names. Default: 1.
- @lastupdated is 1 if the stored procedure is to insert a "Last updated: " one line before the first HTML table with query results, or 0 to suppress the date last generated information. Default: 1.
- @HTMLheader specifies which of the six HTML heading levels to use when formatting the text in @RESULTSTITLE. For example, setting @HTMLHEADER to 1, and the stored procedure will format the title above the query results tables as "
Title
," 2 to format it as "Title
," and so on (up to 6). - @username is the username under which to execute the query (or queries) assigned to @QUERY. The default is to use the current username (that is, the username of the person creating the Web task). Only the system administrator (sa) or database owner (dbo) are allowed specify a username other than the current username.
- @dbname specifies the name of the database in which the stored procedure's query (or queries) is to be executed. The default is to use the current database.
- @templatefile is the pathname of the file to be used as the template for the Web page the stored procedure generates. The HTML template contains HTML tags and text that are to appear on the Web page in addition to the HTML table with the query results. The stored procedure will replace each <%insert_data_here%> marker within the Web page template file with data returned by an SQL query.
- @webpagetitle is the text that the stored procedure is to place between start and end title tags ( ) within the Web page header section. The default title is SQL Server Web Assistant.
- @resultstitle is the text that the stored procedure is to display as a title before the first (and perhaps only) HTML table of query results inserted on the Web page.
- @URL is the Web address (that is, the uniform resource locator or URL) to another HTML document. The stored procedure sets the hyperlink's href attribute to the URL passed as @URL.
- @reftext is the hyperlink anchor text to be displayed on the line following the last HTML table of query results on the Web page. The stored procedure creates the hyperlink to another Web page by substituting the text passed as @URL and @REFTEXT for @URL and @REFTEXT in a the following hyperlink syntax: <a href="@URL">@REFTEXT</a>
- @table_urls is 1 if the hyperlinks the stored procedure is to insert on the Web page are to be generated by the query within the @URL_QUERY parameter. The default, 0 indicates there is no query to generate hyperlinks. If @TABLE_URLS is 1, @URL_QUERY must have a SELECT statement that returns a two-column results table.
- @url_query is a SELECT statement that returns a two-column results table of hyperlink Web addresses (URLs) and anchor text. The stored procedure displays the hyperlinks returned by executing the query (within @URL_QUERY) after the last HTML table of SQL query results that the stored procedures inserts on the Web page. The first column of each row within the URL results table contains the URL of a Web page and the second column contains the hyperlink's anchor text.
- @whentype specifies when the MS-SQL Server Agent is to run the Web task that creates the Web page with query results. The default of 1 instructs the MS-SQL Server is to run the task immediately and delete the task (and stored procedure that creates the Web page) immediately after execution. The possible values for the @WHENTYPE parameter are:
- Create the Web page now. The stored procedure creates a Web task that the MS-SQL Server executes and then deletes immediately after execution.
- Create the Web page later. The stored procedure creates a Web task that the MS-SQL Server Agent runs at the date and time specified by @TARGETDATE and @TARGETTIME parameters. After executing the Web task (once), the MS-SQL Server deletes the Web task. (If @TARGETTIME is omitted the Web task executes at 12:00 a.m.)
- Create the Web page every n day(s) of the week. The stored procedure creates a Web task that the MS-SQL Server Agent runs on the day(s) of the week specified by the @DAYFLAGS parameter. MS-SQL Server Agent starts the Web task beginning on the date specified by @TARGETDATE at @TARGETTIME and then executes the task again every n day(s) of the week. (If @TARGETTIME is omitted, the Web task starts at 12:00 a.m. each n day.)
- Create the Web page every n minutes, hours, days, or weeks. The stored procedure creates a Web task that the MS-SQL Server Agent executes every n period. The period (minutes, hours, days, or weeks) is specified by the @UNITTYPE parameter. MS-SQL Server Agent starts the Web task beginning on the date specified by @TARGETDATE at @TARGETTIME and executes the task again every n period. (If @TARGETTIME is omitted the Web task executes at 12:00 a.m.)
- Create the Web page upon request. The stored procedure creates a Web task that the MS-SQL Server will execute only when the user calls the stored procedure using sp_runwebtask.
- Create the Web page now and later. The stored procedure creates a Web task that the MS-SQL Server executes now and which the MS-SQL Server Agent will run one additional time when @WHENTYPE is 2.
- Create the Web page now and every n day(s) of the week. The stored procedure creates a Web task that the MS-SQL Server executes now. Then, the MS-SQL Server Agent will run the Web task again periodically thereafter as when @WHENTYPE is 3, except @TARGETDATE is not required.
- Create the Web page now and then periodically thereafter. The stored procedure creates a Web task that the MS-SQL Server will execute now and that the MS-SQL Server Agent will then run periodically as when @WHENTYPE is "4," except @TARGET-DATE is not required.
- Create the Web page now and upon request. The stored procedure creates a Web task that the MS-SQL Server executes now and again only by user request as when @WHENTYPE is 5.
- Create the Web page now and when data changes. The stored procedure creates a Web task that the MS-SQL Server executes now and again whenever a user changes a value within one of the columns listed within the @DATACHG parameter.
- @targetdate specifies the date that the MS-SQL Server Agent is to run the Web task. @TARGETDATE is required when @WHENTYPE is 2 (later), 3 (days of week), 4 (periodic), or 6 (now and later). The format for @TARGETDATE is YYYYMMDD.
- @targettime specifies the time at which the MS-SQL Server Agent is to run the Web task on the date in @TARGETDATE. The format for @TARGETTIME is HHMMSS.
- @dayflags specifies which days of the week the MS-SQL Server Agent is to execute the Web task. If the Web task is to be executed multiple days each week, add the date flags for the execution days together. For example, to have the MS-SQL Server Agent run a Web tasks on Monday, Wednesday, and Friday, set @DAYFLAGS to 42-2 (Monday) + 8 (Wednesday) + 32 (Friday).
- 1 = Sunday
- 2 = Monday
- 4 = Tuesday
- 8 = Wednesday
- 16 = Thursday
- 32 = Friday
- 64 = Saturday
If the Web task is to be executed multiple days each week, add the date flags for the execution days together. For example, to have the MS-SQL Server Agent run a Web tasks on Monday, Wednesday, and Friday, set @DAYFLAGS to 42-2 (Monday) + 8 (Wednesday) + 32 (Friday).
- @numunits specifies the number of minutes, hours, days, or weeks between successive executions of a periodic Web task-that is, for Web tasks with @WHENTYPE 4 (periodic) or 8 (now and periodically thereafter). The @UNITTYPE parameter specifies the period between successive executions.
- @unittype specifies the time unit between executions of the Web task when @WHENTYPE is 4 (periodic) or 8 (now and periodically thereafter)-1 = hours, 2 = days, 3 = weeks, and 4 = minutes.
- @procname is the name of the Web task. If omitted, the system will generate the name as WEB_.
- @maketask specifies whether to schedule a Web task along with creating the stored procedure that generates the Web page.
- 0 = generate an unencrypted stored procedure but do not create the Web task.
- 1 = generate an encrypted stored procedure and the Web task.
- 2 (default) = generate an unencrypted stored procedure and the Web task that executes it.
- @rowcnt specifies the maximum number of rows from the results set to display within the HTML table on the Web page. The default is "0," which means to display all the rows in the results set.
- @tabborder is 1 (the default) if the there is to be a border around the HTML query results table, or 0 for an HTML table without borders.
- @singlerow specifies whether the query results are to be displayed all on one page or on multiple pages, with one row per page. The default, 0 specifies all rows from the results set will appear within a single HTML table. 1 specifies that the Web task is to create a new Web page for each row of query results. Successive HTML pages are generated with a number appended onto the filename specified by the @OUTPUTFILE parameter. For example, if @OUTPUTFILE is WEB_PAGE.HTML and there are three rows within the results set, the Web task will create the Web pages: WEB_PAGE1.HTML, WEB_PAGE2.HTML, and WEB_PAGE3.HTML.
- @blobfmt specifies whether a data "blob" (that is, data within a column of data type IMAGE, NTEXT, or TEXT) is to be displayed within the HTML table on the Web page or if these columns should be written to an external file and linked to the current Web page by a URL. See Tip 580 "Using the MS-SQL Server Stored Procedure sp_makewebtask to Display IMAGE and TEXT Data on Linked Web Pages," for details on handling IMAGE, NTEXT, and TEXT data.
- @nrowsperpage specifies the number of query results set rows to display on each Web page. Successive pages are linked with NEXT and PREVIOUS hyperlinks.
- @datachg is the list of table (and optionally) column names that trigger execution of the Web task after changes are made. @DATACHG is required when @WHENTYPE is 10. Specifying the @DATACHG parameter creates three triggers (UPDATE, INSERT, and DELETE) on each table specified by the @DATACHG parameter. The MS-SQL Server will execute the stored procedure (which generates the Web page) when triggered by an UPDATE, INSERT, or DELETE executed on the table named by @DATACHG. If a trigger already exists on a table, sp_createwebtask adds its sp_runwebtask call to the end of the existing trigger-provided the existing trigger was not created WITH ENCRYPTION. (If the existing trigger is encrypted, sp_makewebtask will fail.)
Suppose, for example, that you want the MS-SQL Server to create a Web page (such as that shown in Figure 577.1) daily at 12:00 a.m.
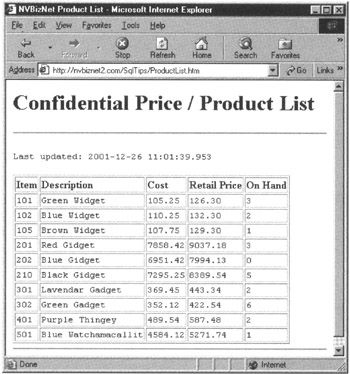 Figure 577.1: A generic Web page generated by a stored procedure created by sp_makewebtask
If the tables required for the report are within the SQLTips database, execute the following statement batch:
USE SQLTips

EXEC sp_makewebtask
 @outputfile='D:InetPubWWWRootSqlTipsProductList.htm',
 @query='SELECT p.Item_Number AS "Item'', Description,
 Cost, Sales_Price AS "Retail Price'',
 (SELECT COUNT(*) FROM inventory AS i
 WHERE i.item_number = p.item_number) AS
 ''On Hand''
 FROM products AS p
 ORDER BY p.item_number',
 @HTMLHeader=1,
 @webpagetitle='NVBizNet Product List',
 @resultstitle= 'Confidential Price / Product List',
 @whentype=8,
 @numunits=l,
 @unittype=2,
 @procname=web_CreateProductsPage
Note that calling the sp_makewebtask stored procedure creates not only a stored procedure (web_CreateProductsPage, in this example) that generates the Web page (shown previously in Figure 577), but also the Web task that executes the stored procedure according to the schedule prescribed through the @WHENTYPE parameter.
Creating a Web Page Template for MS SQL Server Query Results
In the preceding tip ("Using sp_makewebtask to Create a Task That Generates a Web Page"), you learned how to create a stored procedure that displays the results set from an SQL query within an HTML table on a Web page. Figure 577 showed a Web page such a stored procedure might generate. Although the Web page displays query results within an HTML table "as advertised," you most likely want more control over the content on and layout of the Web page. Fortunately, you can create a Web page template and have the stored procedure insert the HTML table with the SQL query results among other elements as desired.
You can give the file in which you create the Web page template any name you like. You must however, store the template within a folder accessible to the MS-SQL Server when the DBMS executes the stored procedure to create the Web page based on the template. The Web page template is an ordinary HTML (or XHTML) document with an <%insert_data_here%> marker inserted wherever you want the HTML table(s) of query results to appear on the Web page.
Suppose, for example, that you want to create a Web page similar to that shown previously in Figure 577. However, instead of black text on a white background, you want a Web page with blue text on a light yellow background. In addition, you want the company logo centered above the list of products. To control elements that appear on the Web page that the MS-SQL Server generates, create a template file such as the following:
NVBizNet - Product List
Confidential Price / Product list

<%insert_data_here%>
After you save the template to a file named PRODLIST.TF within the D:INETPUBWWWROOTSQLTIPSTEMPLATES folder, for example, add a @TEMPLATEFILE parameter to the sp_makewebtask stored procedure call as follows:
 EXEC sp_makewebtask
 @outputfile='D:InetPubWWWRootSqlTipsProductList.htm',
 @query='SELECT p.Item_Number AS ''Item'', Description,
 Cost, Sales_Price AS ''Retail Price'',
 (SELECT COUNT(*) FROM inventory AS i
 WHERE i.item_number = p.item_number) AS
 ''On Hand''
 FROM products p
 ORDER BY p.item_number',
 @templatefile=
 'D:InetPubWWWRootSQLTipsTemplatesProdList.TF',
 @whentype=8,
 @numunits=l,
 @unittype=2,
 @procname=web_CreateProductsPage
The .TF extension on the template file (PRODLIST.TF) is arbitrary, and stands for "Template File." Note that when you specify a Web page template you can omit from the sp_makewebtask stored procedure, call all Web page element parameters (such as @LASTUPDATED, @HTMLHEADER, @WEBPAGETITLE, and @RESULTSTITLE). The MS-SQL Server ignores them when you use a template to specify the format of and/or other content on the Web page.
By the way, you are not limited to displaying only a single results set per page. If you want to display the results sets from multiple queries within the Web page template, simply place one <%insert_data_here%> marker for each results set. For example, if you want to display the data within the CUSTOMERS table and the data within the EMPLOYEES table as two HTML tables on the same Web page, you might use a template such as the following:
NVBizNet - Customers & Employees
Confidential Lists
Customer List
<%insert_data_here%>
Employee List
<%insert_data_here%>
The specific type of information and other miscellaneous Web page elements and formatting instructions shown within this Tip are not important-you can use any legal HTML or XHTML elements and text content within your templates. Note however, that you must insert an <%insert_data_here%> marker wherever you want the MS-SQL Server to display the results table from an SQL query on the Web page. Within the next tip, "Formatting the Query Results Table on a Web Page Created by an MS-SQL Server Stored Procedure," you will learn that between <%begindetail%> and <%enddetail%> markers, you can insert an <%insert_data_here%> marker for each column within the query results table.
After you create a template with multiple <%insert_data_here%> markers and save it to a disk file with a name such as CUSTS_N_EMPS.TF, for example, you can assign multiple SELECT statements to the sp_createwebtask's @QUERY parameter. In this example, there are two <%insert_data_here%> markers, so you would change the @QUERY parameter to pass two queries as shown here:
 EXEC sp_makewebtask
 @outputfile='D:InetPubWWWRootSqlTipsCusts_Emps.htm',
 @query='SELECT * FROM customers
 SELECT * FROM employeesp '
 @templatefile=
 'D:InetPubWWWRootSQLTipsTemplatesCusts_N_Emps.TF',
 @whentype=8,
 @numunits=l,
 @unittype=2,
 @procname=web_CreateEmpsAndCustsPage
Although shown on two lines here for formatting purposes, the second SELECT statement could have begun on the same line on which the first ended. All that is required is that you leave at least one space between the last character of one query and the keyword SELECT that starts the next.
Formatting the Query Results Table on a Web Page Created by an MS SQL Server Stored Procedure
In Tip 577, "Using sp_makewebtask to Create a Task That Generates a Web Page," you learned how to create a stored procedure that, in turn, generates a Web page with SQL Query results. Then, in Tip 578 "Creating a Web Page Template for MS-SQL Server Query Results," you learned how to insert one or several HTML tables with SQL query results onto a Web page along with other content.
In addition to inserting text and images on the page along with one or more query results tables, you learned that the Web page template lets you format text and layout the page exactly as you want. In fact, you can use any legal HTML or XHTML document as a Web page template. Simply insert <%insert_data_here%> markers wherever you want SQL query results to appear, and save the updated document to a new filename. Then, set the @TEMPLATEFILE parameter (within the sp_createwebtask stored procedure call) to the full pathname of the template file. The MS-SQL Server will then generate a new Web page with all the elements and appearance of the original page plus one or more HTML tables with the data returned from SQL queries.
Because sp_makewebtask provides very few typeface and text formatting options, you might find it necessary to write additional formatting instructions for the query results text. Fortunately, you can use <%begindetail%> and <%enddetail%> markers to tell the MS-SQL Server that it is simply to insert column data into an HTML table formatted per your instructions within the Web page template.
To format the query results on the Web page, you must write the tags that define the HTML table within the Web page template (versus letting the MS-SQL Server create the HTML tags for you). For example, to format the table with the Product/Price List you saw in Tip 578 "Creating a Web Page Template for MS-SQL Server Query Results," you might write the Web page template as follows:
NVBizNet - Product List
Confidential Price/Product List
<%begindetail%> <%enddetail%>
| Prices & Products | ||||
| © NVBizNet.com (702)-361-0141 | ||||
| Item | Description | Cost | Retail Price | On Hand |
|---|---|---|---|---|
| <%insert_data_here%> | <%insert_data_here%> | <%insert_data_here%> | <%insert_data_here%> | <%insert_data_here%> |
The th and td rules within the style sheet (at the beginning of this example) style the table heading () and table data () cells within the table. In addition thead, tbody, and tfoot rules set the appearance of the three sections of an HTML table—the header (), body (), and footer (). The important things to notice are:
- The Web page template includes the table definition between start and end table tags (
). - You define text of the table heading cells between the start and end table heading tags () within the Web page template versus relying on the MS-SQL Server to add them to the results table.
- You place <%begindetail%> and <%enddetail%> tags around one row of table data tags within the table definition and insert one <%insert_date_here%> marker within each set of start and end table data tags (). In this case, the each <%insert_data_here%> marker tells the MS-SQL Server to insert the data from one column within a row in the query results set.
The sp_createwebtask stored procedure call remains largely unchanged as
 EXEC sp_makewebtask
 @outputfile='D: InetPubWWWRootSqlTipsProductList.htm',
 @query='SELECT p.Item_Number, Description, Cost,
 Sales_Price, (SELECT COUNT(*)
 FROM inventory AS i
 WHERE i.item_number =
 p.item_number)
 FROM products p
 ORDER BY p.item_number',
 @templatefile=
 'D:InetPubWWWRootSQLTipsTemplatesFmtProdList.TF',
 @whentype=8,
 @numunits=l,
 @unittype=2,
 @procname=web_CreateProductsPage
Since the headings for the HTML table are written into the Web page template, the SELECT clause within the stored procedure that creates the Web page no longer needs to provide user-friendly headings.
The most important thing to understand is that you must define one row within the HTML table the Web page, similar to that shown here:
 <%begindetail%>

 <%insert_data_here%>
 <%insert_data_here%>
 <%insert_data_here%>
 <%insert_data_here%>
 <%insert_data_here%>

 <%enddetail%>
The MS-SQL Server replaces the <%insert_data_here%> markers with the column data from the current row within the results set, and then uses the table definition again for next row, and the next, and so one. In this example, the SQL query's SELECT clause has five columns, and as a result, the table definition too must have five sets of start and end table data tags () to create a row with five data cells. If the SELECT clause had ten columns, the table data row defined within the HTML table in the Web page template would need ten cells (that is, ten sets of start and end table data tags []).
Using sp_makewebtask to Display IMAGE and TEXT Data on Linked Web Pages
The MS-SQL Server lets you store character strings longer than 8,000 characters within columns of data type TEXT and graphics image files within columns of data type IMAGE. (A single TEXT and IMAGE column can hold up to 2 gigabytes of data.) Although you could use what you learned in Tips 577–579 to execute a query and have the MS-SQL Server display the contents of a TEXT column within the cells of an HTML table, you typically don't want to do that. The amount of data within the column used to display the TEXT data will dwarf the remaining data items within the HTML table and thereby make the table unusable as a tabular display of related information.
When you store a graphics image within an SQL table, the DBMS stores the image as a binary string (that is, as a string of 1's and 0's). MS-SQL Server leaves it up to the program retrieving the data from an IMAGE column to interpret the string of 1's and 0's and reconstitute it into the graphics image the binary string represents. As such, you don't want to display the contents of an IMAGE column within a cell in an HTML table either. The DBMS would place the IMAGE data into the table cell as a binary string and not the graphics image you want to see.
The built-in stored procedure sp_makewebtask lets you use the @BLOBFMT parameter to specify what the DBMS is to do with the data within TEXT and IMAGE columns returned as part of a query's results set. You can either have the DBMS display TEXT and IMAGE data within the HTML table's cells (which, as discussed, is undesirable), or you can have the DBMS write the data to external files and place a hyperlink to those files within the HTML table. Placing a hyperlink into the HTML table of query results is a good solution, because it lets you review the query results in tabular form, and if you want to read a large (that is, a long) text item or see a graphics image, you need only click its hyperlink within the HTML table.
To write a TEXT or IMAGE column to an external file, use the sp_makewebtask stored procedure's @BLOBFMT parameter with the following syntax
@BLOBFMT='%% file= [tplt=] URL= [...%% file= [tplt=] URL=]'
Note that you can work with multiple TEXT and/or IMAGE data columns. Just repeat the "%%[]" pattern within the @BLOBFMT parameter once for each TEXT and IMAGE column you want to write to an external file. (Each external file is accessible by a hyperlink within the HTML table of SQL query results.)
Suppose, for example, that the sp_makewebtask @QUERY parameter has the following SELECT statement, which returns TEXT data in column #1 and IMAGE data in column 6:
 SELECT pr_info AS 'Publisher Name', pub_name, city, state,
 country, logo, 'Company Logo'
 FROM pub_info AS pub_info, publishers
 where pub_info.pub_id = publishers.pub_id
Given the preceding query, the @BLOBFMT parameter for this example would be set as follows:
 @blobfmt=
 '%1% file=D:InetPubWWWRootSqlTipsTempPR_Text.htm
 URL=http://NVBizNet2.com/SQLTips/Temp/PR_Text.htm
 %6% file=D:InetPubWWWRootSqlTipsimagespublogo.gif
 URL=http://NVBizNet2,com/SQLTips/images/publogo.GIF'
Thus, the full text of the sp_createwebtask stored procedure call would be something like the following to produce the Web page shown in Figure 580.1:
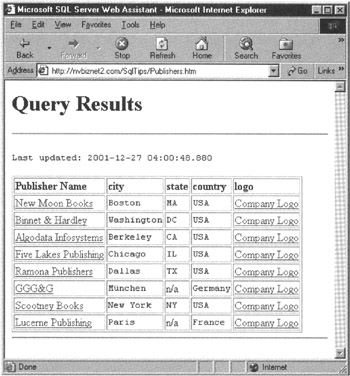
Figure 580.1: A generic Web page with hyperlinks to TEXT and IMAGE data generated by the stored procedure web_CreatePublisherPage
 USE pubs
 EXEC sp_makewebtask
 @outputfile='D:InetPubWWWRootSqlTipsPublishers.htm',
 @query='SELECT pr_info AS ''publisher Name'', pub_name,
 city, state, country, logo,
 ''Company Logo''
 FROM pub_info AS pub_info, publishers
 where pub_info.pub_id = publishers.pub_id',
 @blobfmt='%1%
 file=D:InetPubWWWRootSglTipsTempPR_Text.htm
 URL=http:// NVBizNet2.com/SQLTips/Temp/PR_Text.htm
 %6%
 file=D:InetPubWWWRootSqlTipsimagespublogo.gif
 URL=http://NVBizNet2.com/SQLTips/images/publogo.GIF',
The stored procedure uses the contents of the column that follows an IMAGE or TEXT column within the query results as the anchor text for the hyperlinks that point to the external files into which the stored procedures writes the TEXT and IMAGE data. In this example, the values returned in column 2 (PUB_NAME) serve as the anchor text strings for the hyperlinks that point to external files that hold the TEXT data returned in column 1 (PR_INFO). Similarly, the values returned in column 7 (the string literal "Company Logo") serve as the anchor text strings for the hyperlinks that point to external files that hold the IMAGE data returned in column 6 (LOGO).
Thus, as shown previously in Figure 580.1, the stored procedure does not display TEXT and IMAGE content within the columns of the HTML table. Instead, the stored procedure writes the BLOB content to disk files and stores a hyperlink to the content within the HTML table. Notice then in this example where the query returns seven columns, only five are displayed within the HTML table, because two (the first and the sixth) columns are written to disk files.
Although this example uses no template files, you can specify an HTML template file for the main Web page (that is, the Web page with the HTML table of query results) and another for the Web pages in which the stored procedure writes the TEXT column's data. (You don't use template files for IMAGE columns because you want the stored procedure to write the binary string within the table's IMAGE column exactly as-is to the graphics file on disk.)
| Note |
For TEXT data, use a filename with an extension that a Web browser will recognize as a Web page (that is, .htm, .html, .asp, .php, and so on). In order for the .php and .asp extension to work, the Web server must have the Active Server Pages for .Asp or PHP script engine for .php installed. For IMAGE data use a filename with the extension that corresponds to the format used to encode the image (typically .GIF, .JPG, .TIF, and so on). By using a Web page extension for TEXT data and a graphics file extension for IMAGE data, you instruct the Web browser to display the file of TEXT data as a Web page (with a long string of many characters) and to interpreted the binary string within the IMAGE file as a graphics image. |
Using Built In Stored Procedures to Launch or Delete Web Tasks
The MS-SQL Server has three built-in stored procedures you can use to manage Web tasks: sp_createwebtask, sp_runwebtask, and sp_dropwebtask. While sp_createwebtask lets you create new Web tasks, sp_runwebtask lets you execute existing tasks—whether scheduled for execution or not. Finally, when you no longer want to execute a particular Web task, you can use the built-in stored procedure sp_dropwebtask to remove the web task from the DBMS.
You learned how to use sp_createwebtask in Tips 577–580. In short, sp_createwebtask lets you create a special type of stored procedure that executes one or more queries whose results set the DBMS writes to an HTML table on a Web page. One thing shown by example but not pointed out within the four previous tips is that you should always use the sp_createwebtask's @PROCNAME parameter to name each Web task you create. True, you can omit the parameter and let the system generate a name for you. However, the system-generated name of the form web_ will not be easy to remember. In addition, a system-generated name like web_20011227042606552682 doesn't tell you anything about what the stored procedure associated with the Web task does. As such, when it comes time to start a Web task manually or to edit or drop one, you will have to search your written documentation or edit Web task's stored procedure to figure out which one you want to run, change, or delete. By using a descriptive name (such as web_CreateProductList), you can often zero-in on the Web task with which you want to work by simply reviewing the list of Web tasks defined within the database.
When you create a Web task, you specify when and how often you want the MS-SQL Server Agent to execute the task. However, you may sometimes want to start the task manually between scheduled executions. Suppose, for example, that you have a scheduled task that recreates a Web page with the company's inventory each Sunday at 12:00 a.m. If receive a large shipment of products arrive on Wednesday, you will want to update the inventory on the Web page immediately versus waiting until the end of the week.
The built-in stored procedure sp_runwebtask that lets you start a Web task immediately (even one scheduled for execution in the future) has the following syntax:
sp_runwebtask [[@procname=]'']
 [,[@outputfile=]'']
where:
- @procname is the name of the Web task you want to execute.
- @outputfile is the name of the Web page (output file) that the Web task creates.
When starting a Web task, you must be in the same database in which the particular Web task you want to run was created. To start the task, call sp_runwebtask and supply either the tasks's name or the full pathname of the Web page the task creates. Suppose, for example, that you have a Web task named web_CreatePublishersPage that creates the Web page PUBLISHERS.HTM within the D:INETPUBWWWROOTSQLTIPS folder. You can call sp_runwebtask to run the Web task immediately by executing either of the following statements:
 EXEC sp_runwebtask @procname='web_CreatePublishersPage'

 EXEC sp_runwebtask @outputfile=
 'D:InetPubWWWRootSglTipsPublishers.htm'
If you want to delete a Web task, call sp_dropwebtask to delete both the Web task and its related stored procedure from the DBMS. To call sp_dropwebtask, you use the same syntax you use to call sp_runwebtask:
 sp_dropwebtask [[@procname=]'']
 [,[@outputfile=]'']
As with sp_runwebtask, you can supply either the Web task's name or the full pathname of its output file when calling the built-in stored procedure sp_dropwebtask. As such, to delete a Web task named "web_CreatePublishersPage" that creates the Web page PUBLISHERS.HTM within the D:INETPUBWWWROOTSQLTIPS folder, you first execute a USE statement to move to the DBMS in which you created the Web task and then execute either one of the following statements to delete the Web task and its stored procedure:
 EXEC sp_dropwebtask @procname='web_CreatePublishersPage'

 EXEC sp_dropwebtask @outputfile=
 'D:InetPubWWWRootSqlTipsPublishers.htm'
Using the MS SQL Server Web Assistant Wizard to Create a Web Task That Executes a Stored Procedure
In Tip 577 "Using sp_makewebtask to Create a Task That Generates a Web Page," you learned how to use the built-in stored procedure sp_makewebtask to create a Web task that displays SQL database data on a Web page. While sp_makewebtask is easy to use, the number of parameters available for formatting output data and scheduling the task is rather daunting at first. Until you get used to all the options available, you might consider using MS-SQL Server's Web Assistant Wizard to create Web tasks.
As you will learn in this tip, the Web Assistant Wizard guides you through the process of creating a Web task. By grouping related options within various dialog boxes, the Wizard makes the list of options easier to deal with. In addition, the Web Assistant Wizard helps you to formulate queries you want the Web task to execute by letting you select the table columns (from a graphical display) whose values you want to see on the Web page. From the entries and selections you make within a dialog box (displayed after you select the SQL Table columns you want displayed), the Wizard generates the query that selects the rows of data to include in the HTML table that the Web task inserts in the Web page it creates.
The Web Assistant Wizard is located within the MS-SQL Server Enterprise Manager. To start the Wizard and create a Web task that executes a stored procedure, perform the following steps:
- Click your mouse on the Start button. Windows will display the Start menu.
- Move your mouse pointer to Programs on the Start menu, select the Microsoft SQL Server group, and then click your mouse on Enterprise Manager. Windows will start the SQL Server Enterprise Manager.
- Click your mouse on the plus (+) to the left of the Microsoft SQL Servers icon to display the SQL Server Group. Then, click your mouse on the plus (+) to the left of the SQL Server Group icon to display the list of MS-SQL Servers available on your network.
- To display the list of resources on the MS-SQL Server with the database in which you want to create a Web task, click on the plus (+) to the left of the MS-SQL Server's name. For example, if you want to work with the MS-SQL Server NVBizNet2, click on the plus (+) to the left of NVBizNet2. Enterprise Manager will display a list of folders that represent the resources available on the MS-SQL Server NVBizNet2 (for the current project).
- Click your mouse on the Databases folder. Then, select the Tools menu, Wizards option. The Enterprise Manager will display the Select Wizard dialog box.
- Click your mouse on the plus (+) to the left of Management to display the list of Management Wizards. Next, click your mouse on the Web Assistant Wizard within the list of Management Wizards and then on the OK button at the bottom of the dialog box. The Web Assistant Wizard will display its Welcome screen.
- Click the Next button at the bottom of the Welcome screen. The Web Assistant Wizard will display the Select Database dialog box.
- Click the drop-down list button to the right of the Database name field and select the database in which you want to create the Web task. For the current project, select SQLTips from the selection list, and then click the Next button. The Web Assistant Wizard will display a Start a New Web Assistant Job dialog box similar to that shown in Figure 582.1.
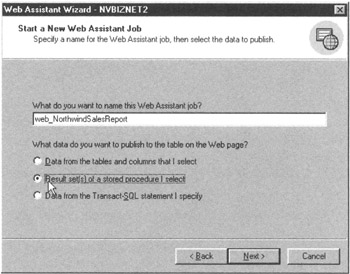
Figure 582.1: The Web Assistant Wizard Start a New Web Assistant Job dialog box - Into the "What do you want to name this Web Assistant job?" field, enter a name for the Web task. For the current project, enter web_NorthwindSalesReport.
- Click your mouse on the radio button to the left of "Result set(s) of a stored procedure I select" within the column of radio buttons below the Web task name field. Note that you can also use the Web Assistant Wizard to create Web tasks that publish results sets from queries on tables by clicking the first radio button in the list and the results set produced generated from executing a Transact-SQL statement by clicking the third radio button. Click the Next button. The Web Assistant Wizard will display the Select Stored Procedure dialog box.
- Within the list box with stored procedures at the center of the Select Stored Procedure Dialog box, click your mouse on the stored procedure you want the Web task to execute. For the current project, click "usp_ShowNorthwindSales" and then on the Next button at the bottom of the dialog box. The Web Assistant Wizard will Display the Schedule the Web Assistant Job dialog box shown in Figure 582.2.
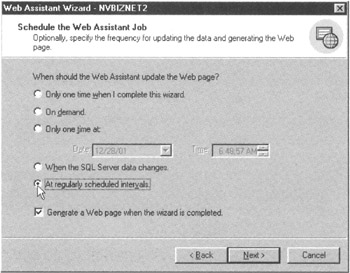
Figure 582.2: The Web Assistant Wizard Schedule the Web Assistant Job dialog box - Decide when you want the Web task you are creating to run and how often it is to repeat. Then, click the radio button next to your choice. For the current project, click the radio button to the left of "At regularly scheduled intervals" and then on the Next button. The Web Assistant Wizard will display the Schedule the Update Interval dialog box shown in Figure 582.3.
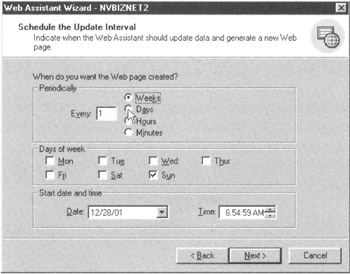
Figure 582.3: The Web Assistant Wizard Schedule the Update Interval dialog box - Use the check boxes and radio buttons within the dialog box to select the dates, times, and/or days of the week on which you want the Web task to run. For the current project, have the Web task update the Northwind sales report on the Web page monthly by clicking the Days radio button and entering 30 into the Every field within the Periodically section near the top of the dialog box. Then, click the Next button. The Web Assistant Wizard will display the Publish the Web Page dialog box.
- Into the File name field within the Publish the Web Page dialog box, enter the pathname to which you want the MS-SQL Server to publish the Web page. If the folder is accessible to the MS-SQL Server, enter the pathname of a Web page within a folder on the Web site where you want the Web page with the SQL data displayed. Note that if you enter a pathname that points to location other than a folder within the Web site, you must copy the Web page that the Web task creates into one of the site's folders before Web site visitors can see the Web page generated. For the current project, assume the MS-SQL Server has write access to the Web site's folders. As such, enter D:InetPubWWWRoot SQLTipsNorthwindSalesReport.htm into the File name field. Then, click the Next button at the bottom of the dialog box. The Web Assistant Wizard will display the Format the Web Page dialog box shown in Figure 582.4.
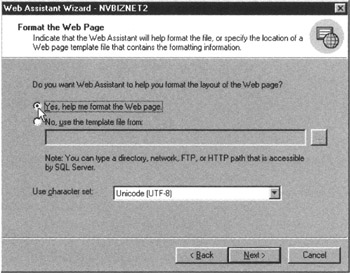
Figure 582.4: The Web Assistant Wizard Format the Web Page dialog box - If you want the Web task to use a Web page template, click the radio button to the left of "No, use the template file from" and enter the pathname of the Web page template you want to the Web task to use. (You learned how to create Web page templates within Tip 578, "Creating a Web Page Template for MS-SQL Server Query Results" and Tip 579, "Formatting the Query Results Table on a Web Page Created by an MS-SQL Server Stored Procedure.") For the current project, assume you have no Web page template and want the Web task to format the Web page. Therefore, click the "Yes, help me format the Web page" radio button. Then, click the Next button at the bottom of the dialog box. The Web Assistant Wizard will display the Specify Titles dialog box shown in Figure 582.5.
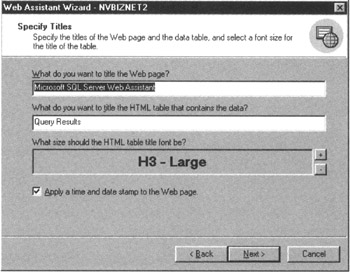
Figure 582.5: The Web Assistant Wizard Specify Titles dialog box - Into the "What do you want to title the Web page?" field, enter the Web page title text you want the Web task to insert between start and end title tags ( ) within the Web page header section. (The Web browser displays the Web page title within the title bar across the top of the browser's application window and not on the Web page itself.) For the current project, enter Northwind Cumulative Sales Report.
Into the "What do you want to title the HTML table that contains the data?" field, enter the text you want to appear on the Web page as a title above the HTML table with the query results set. For the current project, enter Northwind Cumulative Annual Sales Figures.
Use the plus (+) and minus (-) buttons to the right of the "What size should the HTML table title font be?" field to set the size of the title text. For the current project, assume you want the title formatted using HTML level-1 heading tags, so click the minus (+) button until you see "H1-Largest."
Decide if you want the Web task to insert a line that writes the date and time of the last update on the Web page. If not, clear the "Apply a time and date stamp to the Web page." check box by clicking your mouse on the check box it until the checkmark disappears. For the current project, assume that you want the Web task to display the date and time of the most recent update, and leave the check box checked. Then, click on the Next button at the bottom of the dialog box. The Web Assistant Wizard will display the Format a Table dialog box shown in Figure 582.6.
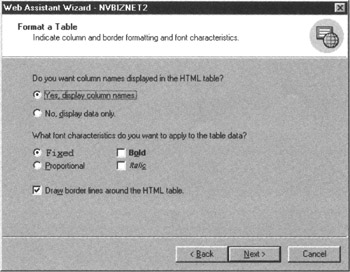
Figure 582.6: The Web Assistant Wizard Format a Table dialog box
Decide whether you want the Web task to use the column names from the query's SELECT clause as headings across the first row within the HTML table and how you want the non-heading data within the table to look. Then, make the appropriate radio button and check box selections. For the current project, accept the defaults to have the Web task use the SELECT clause column names as HTML table headings, write table data with fixed width spacing, in a non-bold, non-italic font, and draw a border around the HTML table and each of its cells. Then, click the Next button. The Web Assistant Wizard will display the Add Hyperlinks to Web Page dialog box shown in Figure 582.7.
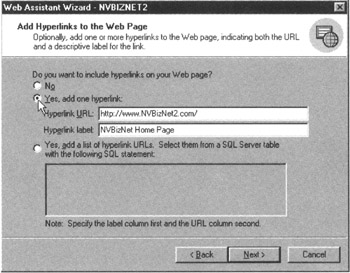
Figure 582.7: The Web Assistant Wizard Add Hyperlinks to the Web Page dialog box
You should always provide at least one hyperlink the visitor can use to navigate to the site's home page, to the "next" page on a hierarchical site, or to a Web page with the site map or menu. For the current project, have the Web task insert a hyperlink to the site's homepage (www.NVBizNet2.com) on the line following the HTML table with the SQL data. As such, click the "Yes, add one hyperlink" radio button, enter HTTP://www.NVBizNet2.com/ into the "Hyperlink URL" field, and "NVBizNet Home Page" into the "Hyperlink label" field. Click your mouse on the Next button. The Web Assistant Wizard will display the Limit Rows dialog box shown in Figure 582.8.
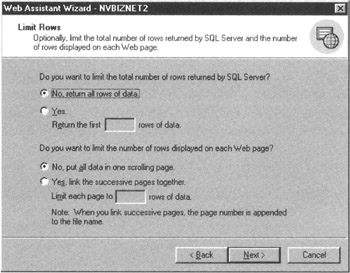
Figure 582.8: The Web Assistant Wizard Limit Rows dialog box
| Note |
You can have the Web task display at the bottom of the Web page a list of hyperlinks (versus a single hyperlink). To do so, you must have an SQL table with hyperlinks in one column and the associated anchor text in another. Then, in to the textbox at the bottom of the Add Hyperlinks to the Web Page dialog box, you would enter an SELECT statement that returns two columns ( and then ) for each hyperlink within the table. |
If you want to limit the number of results set rows the Web task displays and/or to display only a certain number or rows within an HTML table, click the appropriate radio buttons and enter the row counts. For the current project, accept the Web defaults to display all rows of query results within a single HTML table on a Web page. Then, click the Next button.
After you complete Step 22, the Web Assistant Wizard will display its final screen, which has a textbox that lists the options you've chosen. Review your selections and use the Back button if necessary to move back through the Wizard's dialog boxes to make any corrections. When all is OK, click the Finish button on the Wizard's last screen. The Web Assistant Wizard will generate the Web task within the database you selected and display the "Web Assistant successfully completed the task." message box.
Understanding Active Server Pages (ASP) and ActiveX Data Objects (ADO)
In Tips 577–582, you learned how to create and run MS-SQL Server Web tasks. As you now know, a Web task calls a stored procedure the DBMS creates for the Web task when it adds the task to the list of MS-SQL Server Agent's "to do" list. Web task-associated stored procedures execute queries or (as you learned in Tip 582 "Using the MS-SQL Server Web Assistant Wizard to Create a Web task that Executes a Stored Procedure") call other stored procedures, which in turn, execute queries. What makes a Web task different from "normal" MS-SQL Server Agent scheduled jobs (tasks), is that a Web task creates a Web page on which the task inserts (within an HTML table) the results set from the query its stored procedure executes.
The "problem" with a Web task is that it is static. That is, a Web task always executes the same query—the one you wrote when you created the task. Moreover, Web site visitors cannot use the task to submit their own queries to the DBMS. Web tasks that generate a set of pre-defined reports with up-to-date information from the database are a powerful feature. However, there will be many times when users require more or different information than that provided within the HTML tables your Web tasks create.
In addition, a Web task only provides communication in one direction—from the database to the site visitor. Therefore, while a Web task lets site visitors view data stored within database tables, it does not let visitors add, change, or delete anything. Thus, for a truly robust Web interface with the DBMS, you need more capabilities than Web tasks have to offer. That's where ActiveX Data Objects (ADO) and Web server-side script processors such as the Active Server Page (ASP) script host and the PHP script engine (discussed within the next tip) come in.
ADO consists of a set of objects that programming languages (like Visual Basic and Visual C++) and scripting languages (like VBScript, JavaScript, and JScript) can use to access data within an SQL database. The three most commonly used ADO objects are:
- connection objects, which let scripts establish connections with the DBMS;
- command objects, which scripts use to submit commands (such as SELECT, INSERT, UPDATE, and DELETE statements) to the DBMS for execution;
- recordset objects, which include field and row objects that scripts can use to view and manipulate query results sets.
Thus, as you will see in Tips 589–596, ADO lets you use Web server-side scripts to query an SQL DBMS for information and then integrate that data returned into Web pages as requested by Web site visitors. In addition, by combining scripts with HTML forms, you can use ADO to update the data within the database. The great thing is that the dynamic linked library (DLL) files you must have to access database data with ADO come standard with most DBMS products. As such, when you install the DBMS, you also install ADO support.
Think of the ADO Connection object as establishing a two-way pipeline between the script on the Web page and the SQL DBMS. The script, embedded within the Web page, uses the ADO Command object to send SQL statements to the DBMS through the "pipeline" established by the ADO Connection object. Note that any valid SQL statement is fair game. As long as the username under which the script connects to the DBMS has the required security privileges, the DBMS will execute the statement sent.
After executing the SQL statements it receives, the DBMS uses the ADO Recordset object to send query results and error messages (through the ADO Connection object) back to the script that submitted the SQL statements to the DBMS. The script, in turn, uses the Recordset object to display (on the Web page) and manipulate the data within the database. This two-way, ADO enabled communication between script and DBMS continues until the script connection times out or the script closes it.
To run server-side scripts embedded within a Web page and thereby exploit ADO to display and/or manipulate data within an SQL database, you need a script engine to execute the script's commands. The two most popular script engines are ASP (discussed within this tip) and PHP (discussed within the next tip).
The ASP script host lets you create dynamic Web pages by combining HTML tags and text content with instructions written in a scripting language such as VBScript, JScript, PerlScript, Python, Rexx, and more. HTML tags and text within an Active Server Page provide the static (unchanging) portion of the Web page content. Meanwhile, the embedded script generates the dynamic (that is, changing) content you want the Web server to insert. For example, rather than have a Web task generate a Web page that lists all orders placed by all customers, you can use an HTML form and VBScript embedded within an Active Server Page to let site visitors display a Web page with order details for a particular customer or set of customers. Moreover, although visitors retrieve the same Active Server Page, each of them can view data on the same or different customers—without you having to make any changes to the ASP Web page.
When a Web browser requests an Active Server Page (typically a file with an .asp extension), the Web server finds the page and passes the Web document to the ASP script host on the Web server. The ASP script host parses the Web page and sends the script statements it finds enclosed within start and end script tags (<% ... %>) to a script engine for processing.
The script engine, in turn, interprets the script's statements and returns the output (if any) as a string of HTML (tags and text) to the asp.dll script host. As you will see in Tips 590–596, a script can connect with an SQL DBMS, retrieve data, and return that data to the script host. Then, the script host inserts the script's output (which might be data from an SQL DBMS) in place of the script statements within the ASP document and passes the updated Active Server Page to the Web server. The Web server, in turn, sends the ASP Web page to the site visitor that requested it.
Thus, with the proper scripts, you can customize Web page content based on who is visiting the Active Server Page. Suppose for example, that your bank stores your account information within an SQL database. Using Active Server Pages on your bank's Web site you can manage your checking, savings, or credit card accounts. Scripts embedded within the ASP Web pages, let you connect with the DBMS and submit queries that generate the HTML tags and retrieve the data necessary to display your account information. When another customer logs in to your bank's Web site, that customer retrieves and works with his or her account data (and not yours) at the same Web address.
In addition to displaying dynamic and custom content, you can write ASP scripts that change data within a database. Suppose, for example, that you login to your bank's Web site and fill out an HTML form to transfer money from one account to another. After you click the form's Submit button, your Web browser sends the information you entered into the HTML form to the URL given by the action attribute within the form's
tag. If the URL names an Active Server Page, the Web server passes the Web document (specified by the URL) along with form results to the ASP script host. The script host passes the amount you specified and the account selections you made (or entered) on the HTML form to a script engine, which in turn, executes script statements that login to the DBMS and update your account balances stored within the database tables.
To create an Active Server Page, you need only a text editor, such as Notepad (which comes standard with all versions of Windows), because an Active Server Page is nothing more than an ASCII text file. To be treated as an Active Server Page, a Web document's filename must have an extension that associates the file with the asp.dll scripting engine. Typically, ASP files have an .asp extension, because site administrators associate (designate) files with an .asp extension for processing by the asp.dll application.
To make Active Server Pages available on the Internet or your company's intranet, you need a Web server that supports ASP. Both Microsoft's Internet Information Server (IIS) and its Personal Web Server (PWS) have built-in ASP support. If the ISP hosting your Web site is running Windows NT 4, he or she may have installed IIS 2 (which has ASP 1.0 support). IIS 3 is part of Windows NT 4 Service Pack 3, and IIS 4 is available free as part of the Windows NT 4 Option Pack. (You can download Option Pack 4 from the Microsoft site at http://www.microsoft.com/NTServer/downloads/recommended/NT4OptPk/default.asp.) Both IIS 3 and IIS 4 come with the asp.dll that provides ASP 2.0 support. Windows 2000 includes IIS 5, which supports ASP 3.0.
As mentioned previously within this tip, in addition to IIS, Microsoft's PWS (available within the Windows NT 4 Option Pack) also provides ASP support. (By the way, you can run the PWS on Windows NT Workstation or Windows 95 and above.) If you publish your Web site on a non-IIS (or PWS) Web server, you may still be able to use ASP. Find out if your ISP installed ASP extensions from a company like Chili!Soft or Halcyon Software. Once installed, Chili!Soft ASP, for example, lets you run Active Server Pages on Web servers from Apache, Lotus, Netscape, and Microsoft running on Microsoft, Sun, and IBM platforms.
To view Active Server Pages, you need both a Web server and a Web browser. Because the Web server (and not the Web browser) executes scripts embedded in Active Server Pages, any Web browser will do. One of the strengths in having the Web server rather than the Web browser execute scripts is that only the Web server must support the scripting languages used to write scripts embedded within Web pages. The script host running on the Web server is responsible for sending the script to the proper scripting engine and for inserting script output (including results sets returned from SQL queries) within the Web page as standard HTML tags and text the Web browser can understand and display.
Downloading and Installing PHP
PHP (which originally stood for Personal Home Page tools), like ASP, lets you run server-side scripts embedded within Web pages. These embedded scripts can access database data and other resources available to the Web server to build Web pages on-the-fly. Also like ASP, you can use PHP free of charge. However, unlike ASP, PHP does not come standard with a Web server. To use PHP, you must download it across the Internet, as you will learn how to do within this tip.
When a site visitor requests a PHP Web page—that is, an HTML document that has an extension, usually .php, associated to the PHP processor—the Web server sends the request to the PHP processor. The PHP processor retrieves the document and goes through it line by line, executing all PHP statements the processor finds enclosed within start PHP () script tags. The processor writes the output generated by the statements as well as all the text and HTML outside the start and end PHP script tags to a virtual Web page within the Web server's memory. When the PHP processor instructs it to do so, the Web server sends this (in-memory) Web page to the site visitor that requested the PHP document.
In short, the PHP processor creates a Web page each time a site visitor requests a document with a .php extension from the Web site. As such, you can use PHP to convert your Web site from a collection of static Web pages into a Web server-based database application that has a Web page user interface.
Whereas client-side scripting languages (such as JavaScript) run within the Web browser, PHP is a server-side scripting language, which means a program on the Web server (and not code within the Web browser) executes PHP statements embedded within the PHP Web page. In technical terms, PHP is a cross-platform, markup language embedded, server-side scripting language, which means:
- You can use the same PHP scripts on Web servers running a variety of operating systems such as Linux, Mac OS, RISC OS, Unix, and Windows.
- You embed PHP statements within your Web page file either alone or alongside the HTML, XHTML, or XML tags that describe the Web page to the Web browser.
- When the site visitor requests a Web page with a .php extension, the Web server sends the request to the PHP processor. The PHP processor locates the requested file and executes the script embedded within the Web document. The processor replaces PHP statements with their output (which might include data return within results sets from SQL queries) as it builds the virtual Web page within the Web server's memory. The Web server then sends to the site visitor the Web page built by the PHP processor running at the Web server.
The beauty in using PHP lies in the fact that the Web browser never sees the PHP code embedded within the Web page. When you write PHP scripts, you need not worry whether the visitor's Web browser supports PHP. To create a PHP-enabled Web page, you simply embed the PHP scripts you want executed within the Web page and save the document to a file with an extension (such as .php) associated with execution by the PHP processor. When the site visitor requests a Web page with a .php extension, the Web server knows to send the request to the PHP processor and then to send the Web page that the PHP processor generates to the Web site visitor that requested it.
Before you can execute PHP scripts, you must download and install a PHP processor. If you are working with a Linux or Unix machine, you must not only retrieve the PHP processor's source code but must also compile it using an ANSI C compiler such as gcc or g++. You can retrieve the latest version of PHP for Unix/Linux from http://www.php.net. Be sure to download both the PHP source code to compile and the PHP documentation, which will guide you through the installation and help you select the necessary configuration options.
Configuring PHP on Windows NT running IIS is much simpler than compiling and configuring PHP for the Apache Web server on a Linux or Unix machine. Proceed to the PHP Web site at http://www.php.net and click the Downloads hyperlink. In the Win32 Binaries section of the downloads Web page, click the hyperlink to download the PHP archive file and then on the hyperlink to download the PHP installation program (as of this writing, you download PHP 4.0.6 Zip Package and PHP 4.0.6 Installer, respectively). When prompted, store both files within the same folder (such as C:PHP) on the Web server. Remember, PHP is a server-side scripting language. As such, you install and run the language processor on the Web server.
Next, unzip the PHP compressed file (currently, php-4.0.6-Win32.zip) and then execute the PHP InstallShield installation program (currently, php406-installer.exe). The installation program will prompt you to enter the pathname of the folder in which you unzipped the PHP processor's files and the folder and version of IIS (or Personal Web Server) to which you want to add PHP support. After completing its work, the installation program will ask you to let it reboot your Windows (NT, 2000, or XP) server to finish the installation process. If you have any problems during the installation, or want to perform a manual installation, print and review the contents of the install.txt file within the PHP folder.
Understanding Open Database Connectivity (ODBC) and Data Source Names (DSNs)
Before it can submit queries and other SQL statements for processing, an ASP or PHP script must establish a connection with the DBMS. To connect with a DBMS, a server-side script must use an open database connectivity (ODBC) driver to act as a go-between. The script passes a string (with connection/login instructions or an SQL statement) to the ODBC driver. The ODBC driver puts the string into a format that the DBMS (such as MS-SQL Server) understands and then sends the connection/command string to the DBMS for processing. When the DBMS responds by sending data back to the user, the ODBC driver formats the output (such as a query results sets and data filled cursors) from the DBMS and passes the data from the DBMS to the script.
If you are working with Windows on an Intel platform and have installed Microsoft Office products, chances are excellent that you already have the ODBC drivers you need to connect with the MS-SQL Server. ODBC drivers are installed when you install MS-SQL Server client utilities and such products as Microsoft Office and Microsoft Access, which make SQL data available within Word documents, spreadsheets, and Access databases. If you are using a DBMS product other than MS-SQL Server, check your server's documentation. Most SQL products provide an ODBC driver you can use to communicate with the database from external applications written in C, C++, Visual Basic, VBScript, JavaScript, and so on.
When installing an ODBC driver, bear in mind that you must sometimes install the driver on the server and other times on the client, that is on your network workstation. The location at which the application that must communicate with the DBMS runs determines where you must install the ODBC driver. For example, to allow a Visual Basic program running at your workstation to communicate with an SQL DBMS, you must install the ODBC driver for the DBMS on your workstation. Conversely, when a script running at the Web server must communicate with a DBMS running either on the same computer or on another computer across the network (or the Internet), you must install the ODBC driver the script needs on the computer with the Web server.
After you install the requisite ODBC driver on your system, you can create data source names (DSNs) that let your applications connect with the SQL DBMS of your choice and work with its data. As is the case with ODBC drivers, you can create a DSN either at the server or on the client workstation. Again, the determining factor in deciding where to create the DSN is where the application that needs it is running. If the application is running at the workstation, perform the steps in the following procedure at the workstation. Conversely, if you are creating a DSN to support server-side scripts embedded within (PHP or ASP) Web pages, execute the following procedure at the computer with the script processor-typically the same computer running the Web server.
To create a DSN (on either a client workstation or server), you use the ODBC administrator on the Windows Control Panel by performing the following steps:
- Click your mouse on the Start button. Windows will display the Start menu.
- Move your mouse pointer to Settings on the Start menu and select Control Panel. Windows will open the Control Panel in a new window.
- Double-click the Data Sources (ODBC) icon. (If you are using Windows 2000, versus Windows NT, you must open the Administrative Tools folder before you will see the Data Sources icon.) Windows will start the ODBC Data Source Administrator similar to that shown in Figure 585.1.
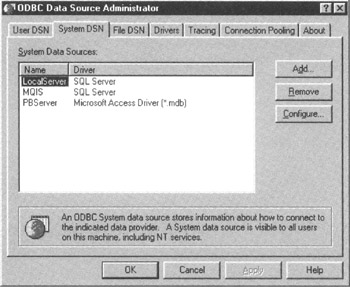
Figure 585.1: The System DSN tab within the ODBC Data Source Administrator Dialog boxNote When installing a DSN on a Windows (NT, 2000, or XP) server, make sure you are working with the System DSN (versus the User DSN) tab in Step 4. If you install the DSN on the User DSN tab, the script processor, running as a system process (and not logged in as a user) will not be able to "see" the DSN you create. When you create a DSN on the System DSN tab it is available to all users and system services (like the script processor).
- Click the Add button on the System DSN tab. The ODBC Data Source Administrator will display the Create New Data Source dialog box similar to that shown in Figure 585.2.
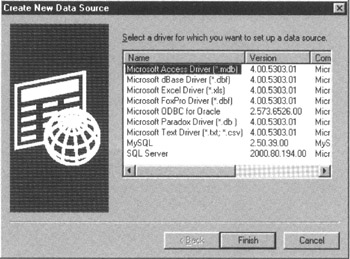
Figure 585.2: The ODBC Data Source Administrator Create New Data Source dialog box - Select the ODBC driver for your DBMS product. Click the Finish button. The ODBC Data Source Administrator will display the screen 1 of the Create a New Data Source to SQL Server dialog box similar to that shown in Figure 585.3.
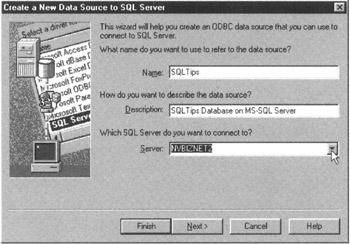
Figure 585.3: Screen 1 of the ODBC Data Source Administrator Create a New Data Source to SQL Server dialog boxNote If the ODBC driver for your DBMS product is not among those listed in the text box within the New Data Source Dialog box, check your DBMS documentation or installation instructions. One of these documents will tell you where you can obtain the ODBC driver you need and how to install it on your system. Before continuing with the next step of this procedure, you must have the ODBC driver for the DBMS product with which you want an application or script to communicate installed on your computer.
- Into the Name field enter the name you want to use when referring to the DSN within your script or application. Because a DSN points to a particular data source, such as one of several databases managed by an SQL DBMS, enter the name of the database or a one-word description of the data source. For current project, enter SQLTips into the Name field. Into the Description field, enter an (optional) brief description of the DSN. For the current project, enter SQLTips Database on an MS-SQL Server into the Description field. Use the drop-down list button to the right of the Server field to display a list of SQL servers accessible from the computer on which you are installing the DSN, pick the one to which you want the DSN to connect. For the current project select NVBizNet2. Click the Next button. The ODBC Data Source Administrator will display screen 2 of the Create a New Data Source to SQL Server dialog box similar to that shown in Figure 585.4.
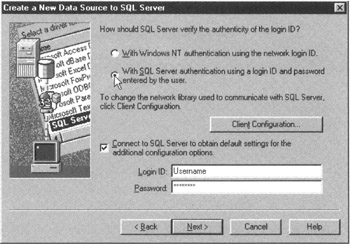
Figure 585.4: Screen 2 of the ODBC Data Source Administrator Create a New Data Source to SQL Server dialog box - Select the method by which you want to authenticate the login to the DBMS through the DSN. For the current project, click your mouse on the radio button to the left of "With SQL Server authentication using a login ID and password entered by the user." Click a checkmark into the "Connect to SQL Server to obtain default settings for the additional configuration options" check box. (Let the MS-SQL Server driver obtain initial settings from the MS-SQL Server you selected or entered into the Server field in Step 6.) Into the "Login ID" and "Password" fields, enter a username and password (respectively) that you want the ODBC driver to use when connecting to the MS-SQL Server while determining and testing default settings. The username/password you enter here are only used during the setup process. When connecting with the DSN from within a script or application later, the script or application will be required to supply a valid username/password pair. Click the Next button. The ODBC Data Source Administrator will attempt to use the username/password pair to connect with the MS-SQL Server (you specified in step 6). If successful, the ODBC Data Source Administrator will display screen 3 of the Create a New Data Source to SQL Server dialog box similar to that shown in Figure 585.5.
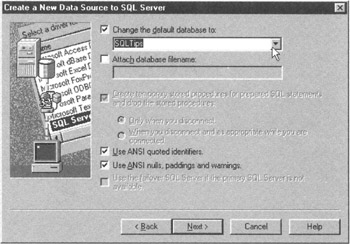
Figure 585.5: Screen 3 of the ODBC Data Source Administrator Create a New Data Source to SQL Server dialog box - Click the drop-down list button to the right of the "Change the default database to" field, and select the database you want to use as the default connection for any process using this DSN. For the current project, select SQLTips from the drop-down list. (Bear in mind that this is only the default database. A script or application connecting to the DBMS through the DSN can always submit an SQL USE statement and switch to a different database.) Click the Next button. The ODBC Data Source Administrator will display screen 4 of the Create a New Data Source to SQL Server dialog box similar to that shown in Figure 585.6.
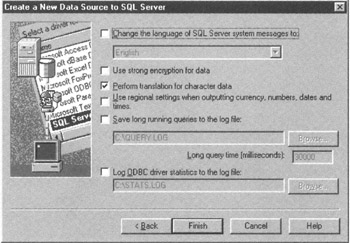
Figure 585.6: Screen 4 of the ODBC Data Source Administrator Create a New Data Source to SQL Server dialog box - Click the Finish button. The ODBC Data Source Administrator will display an ODBC Microsoft SQL Server Setup dialog box similar to that shown in Figure 585.7.
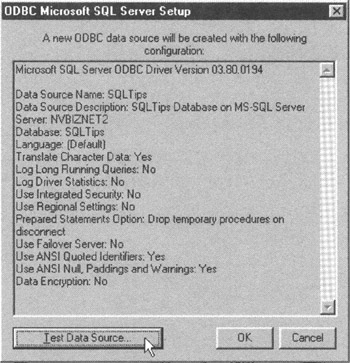
Figure 585.7: The ODBC Data Source Administrator ODBC Microsoft SQL Server Setup dialog box - Reviewing the settings listed within the dialog box. If any are incorrect, click the Cancel button, and move back to the appropriate screen of the Create a New Data Source dialog box to make the corrections you must make. If the new DSN's configuration options are correct, click the Test Data Source button to test whether the DSN can truly connect with the default database on the MS-SQL Server selected in Step 6. The ODBC Data Source Administrator will display its connection and options test results within the SQL Server ODBC Data Source Test dialog box shown in Figure 585.8.
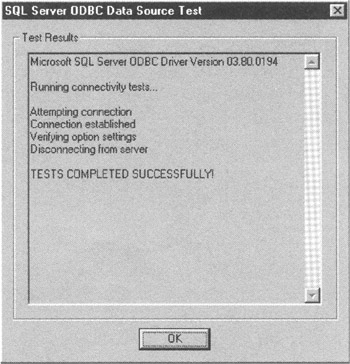
Figure 585.8: The ODBC Data Source Administrator SQL Server ODBC Data Source Test dialog box - Note any errors and then click the OK button to return to the ODBC Microsoft SQL Server Setup dialog box. If there were errors report within the SQL Server ODBC Data Source Test dialog box, click the Cancel button and proceed back to the appropriate dialog box to make any necessary changes to correct the problems reported. Otherwise, click the OK button to save your new DSN and return to the System DSN tab of the ODBC Data Source Administrator dialog box.
After you complete Step 11, click the OK button near the bottom center of the dialog box to exit the ODBC Data Source Administrator application.
Within the next tip you will learn how to use the DSN you created in this tip to let a script login and open a connection with a DBMS.
Establishing a Data Source Name (DSN) Connection with an SQL DBMS
To work with data in a database managed by an SQL DBMS, an application (such as an embedded script on an ASP or PHP Web page) must first login. After you create a DSN (as you learned to do in Tip 585 "Understanding Open Database Connectivity [ODBC] and Data Source Names [DSNs]"), the login process is simple. Because the DSN supplies the ODBC driver with all the session information, your script need only specify the DSN through which it will use to connect with the DBMS and supply a valid username/password pair. In short, logging in though a DSN is no more difficult than logging in to the MS-SQL Server DBMS through the SQL Query Analyzer's login screen.
For example, the following JavaScript when embedded within a PHP Web page (that is a Web page, with a .php extension) will use the SQLTips DSN created within the preceding tip to connect with the SQLTips database on the MS-SQL Server name NVBizNet2:
function open_DSN_connection() { $conn = odbc_connect("SQLTips","Maggy","Evans"); return $conn; }
In this example, the PHP script uses the odbc_connect() function to establish a connection with the DBMS. The three parameters passed to the function are "SQLTips" (the name of the DSN), "Maggy" (the username), and "Evans" (the password). If the connection attempt succeeds, the odbc_connect() function returns the connection handle to the $CONN variable. While this example only checks the value within the connection handle and then displays the connection status, your scripts will use the connection handle ($CONN) to send queries and other commands to the DBMS and to retrieve query results-as you will learn to do in Tips 590-592.
Whereas you use the odbc_connect() function to establish a connection between the script on a PHP Web page and an SQL DBMS, you use the ADO Connection object to do the same thing within a VBScript embedded within an ASP Web page. For example, the following script will use the same SQLTips DSN used for the preceding example to connect with an SQL DBMS. However, as shown in Figure 586.1, this script provides a little more detail about its connection than did the previous JavaScript example:
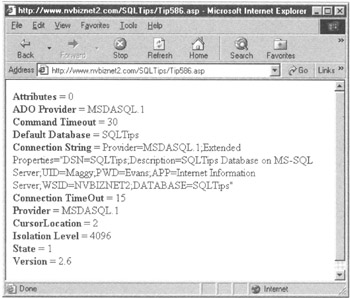
Figure 586.1: Information about an open DSN connection stored within an ADO Connection object's properties
<% 'Function which establishes a connection with a DBMS 'through the DSN "SQLTips" when called. Sub open_DSN_connection (byref connObjDSN) CONST dsnConnection = "DSN=SQLTips;UID=Maggy;pwd=Evans;" 'Create the ADO Connection object Set connObjDSN = server.createobject("adodb.connection") 'Place the connection string into the ConnectionString 'property with the ADO Connection object and then try to 'establish a connection with the DBMS. With connObjDSN .ConnectionString = dsnConnection .open End With End Sub DIM connObjDSN call open_DSN_Connection (connObjDSN) 'After calling the function that opens the connection, 'display on the PHP Web page the connection details 'available from ADO Connection object properties. With connObjDSN Response.write _ "Attributes = " & .Attributes & "
" & _ "ADO Provider = " & .Provider & "
" & _ "Command Timeout = " _ & CommandTImeOut & "
" & _ "Default Database = " _ & .DefaultDatabase & "
" & _ "Connection String = " _ & .ConnectionString & "
" & _ "Connection TimeOut = " _ & .ConnectionTimeout & "
" & _ "Provider = " & .Provider & "
" & _ "CursorLocation = " _ & .CursorLocation & "
" & _ "Isolation Level = " _ & .IsolationLevel & "
" & _ "State = " & .State & "
" & _ "Version = " & .Version & "
" & _ End With %> "
Note that an ADO object (such as the ADO Connect object [connObjDSN] used in this example) has "methods" and "properties." The methods are the actions or things the object can do. The ADO Connection object, for example has the following methods:
- Cancel-Instructs the DBMS to cancel execution of the last command asynchronous "Open" or SQL statement sent through the Connection object to the DBMS.
- Open-Opens a connection with the DBMS.
- Close-Closes the object's open connection with the DBMS.
- BeginTrans-Starts a new transaction on the DBMS.
- CommitTrans-COMMIT, that is, make permanent the work performed since the last BeginTrans method call.
- RollBackTrans-Rolls back, that is, undoes any work performed since the last BeginTrans method call.
- Execute-Submits a statement that is not expected to return any rows of query results to the DBMS for execution.
An object's properties, on the other hand, tell you something about the object or hold some value placed within the object either by one of the object's methods, or by the script to pass some parameter value to a method. The ADO Connection object, for example, has the following properties:
- Attributes- Specifies whether a new transaction is to start after a COMMIT or ROLLBACK is executed.
- CommandTimeout- Indicates, in seconds, how long to wait for a command to execute. The default is 30 seconds.
- DefaultDatabase- Lets you specify the connection's initial database when the Open method opens a connection to the DBMS.
- ConnectionString- Series of arguments separated by semicolons (;), which specify all the information the connection must have to connect with a datasource. When connecting through a DSN, the Open method copies the DSN's data into the ConnectionString property along with the username and password provided by the script.
- ConnectionTimeout- Indicates in seconds, how long to wait for the connection to open.
- Provider- Indicates the connection's data provider.
- CursorLocation- Specifies where ADO is to build the cursors to temporarily hold query results.
- IsolationLevel- Indicates whether on transaction can see uncommitted data within another transaction.
- Mode- Indicates the available permissions for accessing data through the connection. The mode might be unknown (which is the default until set) or the connection might have read-only, read/write, or write-only access.
- State- Indicates whether a connection is open, closed, or busy trying to connect.
- Version- Returns the version number of the ADO implementation.
You will learn how to use the ADO Command object's Execute method to send queries and the Connection object's Execute method to send other (non-query) statements to the DBMS within Tips 590-596. In addition, these tips will also show you how the ADO Recordset object lets you work with the multiple row results sets that SQL queries return to the ASP script within an SQL cursor.
The important thing to understand now is the odbc_connect() function and the ADO Connect object let server-side scripts use a DSN to establish a connection between the script and the DBMS. The script then sends commands to the server through the open connection and uses it to retrieve query results from the DBMS as well.
Downloading, Installing, and Connecting with a MySQL Database Using the MyODBC Driver
As you work with ASP and PHP, you will find that one of the most powerful (and often used) features of these server-side script processors is their ability to work with data within an SQL database. You can use scripts embedded within ASP or PHP Web pages to not only retrieve and display information retrieved from an SQL database, but also to insert, delete, and update the information stored within database tables. In fact, with the appropriate ODBC driver installed, you can send any command to the DBMS that you could execute after logging in at the server or at a workstation connected to the server's local area network (LAN).
When you go online to visit Web sites at which you access your bank, brokerage, or other account information, make purchases, or check the status of orders, chances are excellent that you are working with an SQL database. Although you typically don't type SQL SELECT, INSERT, UPDATE, or DELETE statements while online, behind the scenes, server-side scripts retrieve data from database tables to generate the Web page content you see. In addition, scripts update the data within the database when directed to do so by instructions you enter and send to the Web server through HTML forms.
Large, established companies have funds available to purchase the latest SQL DBMS product from such vendors as Microsoft, Oracle, and IBM. If you are just getting started (on your road to riches) or if you are launching a non-commercial Web site that must store information about or data submitted by a visitor within an SQL database, consider using the MySQL DBMS. MySQL is a full-featured, multi-user DBMS that can run on many of today's popular operating systems such as AIX, BSDI, DEC Unix, HP Unix, SCO UnixWare, Tru64 Unix, FreeBSD, NetBSD, OpenBSD, Linux, MacOS X Server, OS/2 Warp, Solaris, Windows (95, 98, ME, NT, 2000, XP), and more.
You can download MySQL from the Internet at www.MySQL.com and use it free of charge.
MySQL supports all the standard SQL-92 data types, statements, and transaction processing. Although MySQL does not support stored procedures, scripts embedded within PHP or ASP Web pages. You can use MySQL's ODBC interface to submit one or a batch of SQL statements to the DBMS and retrieve data from it. Therefore, you can code the statement batch usually found within a stored procedure as the statements submitted to the DBMS (through the ODBC interface) by a script function or subroutine.
Before it can submit queries and other SQL statements for processing, a Web page script must establish a connection with the DBMS. As you learned in Tip 585 "Understanding Open Database Connectivity [ODBC] and Data Source Names [DSNs]," to connect with a DBMS, a script must have an ODBC driver to act as a go-between. To login, and thereby open a connection with the DBMS, the script passes a string with connection and login details to the ODBC driver. The ODBC driver, in turn, puts the string into a format that the DBMS understands and then sends the connection string to the DBMS for processing. Next, the ODBC driver formats the output produced by the DBMS and passes the results of the login attempt back to the script.
As of this writing, the MyODBC driver that a script needs in order to communicate with the MySQL DBMS does not come bundled with the DBMS. However, like the MySQL DBMS itself, you can download the MyODBC (ODBC) driver from the Internet at the MySQL Web site at www.MySQL.com/Downloads/. Simply click on the MyODBC hyperlink within the APIs (Application Program Interface) section of the "downloads" Web page. Then follow the download instructions for your operating system.
If you installed MySQL on a Windows system, for example, retrieve the MyODBC.zip (archive) file and store it within a folder (such as C:My Download Files) on the same computer in which you installed the MySQL DBMS. Next, extract the files within the archive (.zip) file to a folder such as C:My Download FilesMyODBC, and then perform the steps in the following procedure to complete the installation process:
- Find Setup.exe within the folder in which you extracted the files within the MyODBC archive file.
- Double-click Setup.exe to start the installation program. Setup.exewill display the Microsoft ODBC Setup message box.
- Click Continue. The installation program will display the Install Drivers dialog box.
- Click MySQL in the Available ODBC Drivers list box and then click on the OK button. The installation program will display the Data Sources dialog box.
- Click on the Close button. The installation program will display the "Setup Succeeded!" message box.
- Click on the OK button at the bottom of the message box to exit the installation program.
After you install the ODBC driver for the MySQL DBMS (MyODBC), you can create a DSN through which your scripts can communicate with the MySQL DBMS. (You learned how to create DSNs in Tip 585 "Understanding Open Database Connectivity [ODBC] and Data Source Names [DSNs].")
The ODBC Data Source Administrator will display the TDX MYSQL Driver Default Configuration dialog box shown in Figure 587.1 after you select MySQL within the ODBC Data Source Administrator's Create New Data Source dialog box.
Figure 587.1: TDX MYSQL Driver Default Configuration dialog box
You need only fill in the first three fields within the TDX MYSQL dialog box whose fields include:
- Windows DSN name- The name you want to use when referring to the DSN within your script or application. Because a DSN points to a particular data source, such as one of several databases managed by the MySQL DBMS, enter the name of the database or a one-word description of the data source. For the current project, enter MySQLTips into the "Windows DSN Name" field.
- MySQL host (name or IP)- Enter the name or IP address of the computer on which you installed the MySQL DBMS. For example, if you installed MySQL on a Windows NT server named NVBizNet2, you would enter NVBizNet2 into the "MySQL host (name or IP)" field.
- MySQL database name- The name of the initial database you want the script or application to use when it connects to the MySQL DBMS through the DSN being defined. For the current project, enter SQLTips into the "MySQL database name" field.
- User- The username under which the DSN is to login to the database. Typically, you will leave both the User and Password fields blank and let the script log in using the username (and password) desired when establishing a connection with the DBMS.
- Password- The password portion of the username/password pair for the DSN to use when logging in to the DBMS. Leave both the Password and User fields blank and let the script log in under the username desired when it establishes a connection with the DBMS.
- Port (if not 3306)- Normally you must only change the port setting if you installed MySQL on a computer behind a firewall that doesn't allow access across port 3306. In this case, you must contact your network administrator to have him or her either open port 3306 for access, or provide another open port and then change the value within the "Port" field accordingly.
- SQL command on connect- Lets you specify an SQL statement to be executed each time an application logs into the DBMS using the DSN being defined. Typically left blank, you might use this field to execute an INSERT statement to log access through the DSN into an audit table.
You can also use the check boxes within the bottom half of the dialog box to set up to 19 different options that affect the behavior of the MyODBC driver. Typically, the default settings-with no check boxes checked-are the ones you want. If you experience problems while using MySQL, you can return to the ODBC driver setup screen for the SQLTips DSN later and click a checkmark into the "Trace MyODBC" check box and the "Safety" check box to gather additional information that will help you resolve any issues.
After you click on the OK button at the bottom of the TDX MySQL Driver Default Configuration dialog box (shown previously in Figure 587), your scripts can use the DSN you created to open a connection with the MySQL DBMS. For example, on a PHP Web page, you can use the same odbc_connect() function you learned about in Tip 586 "Establishing a Data Source Name (DSN) Connection with an SQL DBMS" to use the MySQLTips DSN (you created within this tip) to connect with the MySQL DBMS:
function open_DSN_connection() { $conn = odbc_connect("SQLTips","Konrad","King"); return $conn; }
Similarly, if you are using an ASP Web page, you can use the ADO Connection object within a script written with VBScript as follows:
<%
 Sub open_DSN_connection (byref connObjDSN)
 CONST dsnConnection = "DSN=SQLTips;UID=Konrad;pwd=King;"

'Create the ADO Connection object
 Set connObjDSN = server.createobject("adodb.connection")

'Place the connection string into the ConnectionString
'property within the ADO Connection object and then try
'to establish a connection with the DBMS.

 With connObjDSN
 .ConnectionString = dsnConnection
 .open
 End With
 End Sub
%>
Establishing a DSN Less Connection with the MS SQL Server or MySQL DBMS
Opening a connection between a script embedded within a Web page and a SQL DBMS through a data source name (DSN) is convenient because the DSN handles the connection details. Therefore, as you saw in Tip 586 "Establishing a Data Source Name (DSN) Connection with an SQL DBMS," the script need only provide the DSN and a valid user-name/password pair to login to the DBMS. In fact, as you saw from the code samples at the end of Tip 587 "Downloading, Installing, and Connecting with a MySQL Database Using the MyODBC Driver," the script need not even know the specific DBMS product with which it is connecting. Although the parameters the ODBC driver must pass when connecting a script with an MS-SQL Server, for example, differ from those required to connect with a MySQL database, when using a DSN, the script still only specifies the name of the DSN and a valid username/password pair to connect with either DBMS product.
Therefore, connecting a script with an SQL database through a DSN reduces the amount of code you have to write. All connection details, such as the name and location of the DBMS, the ODBC driver selection, and session settings, are coded within the DSN and not your script. In addition, using a DSN lets you reuse the same code to connect with different DBMS products.
While convenient, using a DSN to connect with a DBMS has a couple of disadvantages. First, although a script can submit a USE statement to select any database managed by the DBMS once connected, the system administrator must create at least one DSN for each DBMS to which scripts might connect. Second, a script takes a performance hit when using a DSN versus communicating directly with the DBMS through a vendor supplied OLE DB provider. (An OLE DB provider is a software interface, which lets external applications send commands into and retrieve data from a data source such as an MS-SQL Server DBMS, an Oracle DBMS, a MySQL database, and so on.) Because a DSN sends statements to the ODBC driver which then passes the commands to the OLE DB provider for the data source. Using a DSN means you add an extra level of SQL statement and data handling (the ODBC layer) when sending commands to the DBMS and retrieving data from it.
Fortunately, the ADO Connect object lets your scripts connect and communicate directly with the OLE DB provider for a DBMS-thereby avoiding the performance impact of using the ODBC layer by eliminating it. For example, to connect with a MySQL database through a DSN-less connection, you would use code similar to the following:
 <%
 Sub open_OLEDB_connection (byref connObj)
 connectString = _
 "PROVIDER=SQLOLEDB;DATA SOURCE=NVBizNet2;" & _
 "UID=Konrad;PWD=King;DATABASE=SQLTips"

 'Create the ADO Connection object
 Set connObj = server.createobject("adodb.connection")

 'Place the connection string into the ConnectionString
 'property within the ADO Connection object and then call
 'the .open method to establish a connection with the DBMS.

 With connObjDSN
 .ConnectionString = dsnConnection
 .open
 End With
 End Sub
 %>
Notice that opening a DSN-less connection is similar to opening a connection through a DSN-you need only change the string you place within the connection object. For a DSN connection, you specify only the DSN, username, and password within the connection string. Conversely, when opening a DSN-less connection you use the following syntax for the connection string:
 "PROVIDER=;
 DATA SOURCE=;
 UID=;
 PWD=;
 DATABASE="
Whereas MS-SQL Server uses the OLE DB provider SQLOLEDB, Oracle uses MSDAORA, and MS-Access uses Microsoft.Jet.OLEDB.4.0. Therefore, check your DBMS documentation for the name of the OLE DB driver for your DBMS.
Unfortunately, as of this writing, the MySQL DBMS does not provide a native OLE DB driver through which you can connect to the DBMS using ADO. However, you can still open an DSN-less connection with a MySQL database using the MyODBC (ODBC) driver as shown in the following connection string:
 connectString = "DRIVER={MYSQL};SERVER=NVBizNet2;" & _
 "UID=Konrad;PWD=King;DATABASE=SQLTips"
You would, of course, replace "NVBizNet2" with the name of the server on which you installed your MySQL DBMS, supply a valid username/password pair for UID and PWD, and replace "SQLTips" with the name of a database managed by your MySQL server.
Whether you establish a DSN or a DSN-less connection with the DBMS, you will use the same ADO Command and Recordset object methods to work with the data within the DBMS.
Using an ADO Connection to Execute a SELECT Statement to Set Up Username Password Access to a Web Site
When you must send SQL statements (such as a SELECT statement) to the DBMS, use the ADO Command object. Suppose, for example, that you want to setup username/password access to a Web site. You would use an HTML form to let the site visitor enter the username and password. Then, by specifying the address of an ASP or PHP Web page for the
tag's action attribute, you can have an embedded script connect to an SQL DBMS, send a query for the username and password entered, and then use the query results to determine whether the visitor may access the members-only area within a Web site.
A Web page with a login form might be defined as follows:
Login and Start a Session
SQL Tips and Techniques
Username:
Password:
Within the ASP Web page (LOGIN.ASP) then, you would embed a script similar to the following:
 <%
 '********************************
 '*** OPEN DSN-Less Connection ***
 Sub open_OLEDB_connection (byref connObj)
 connectString = _
 "PROVIDER=SQLOLEDB;DATA SOURCE=NVBizNet2;" & _
 "UID=sa;PWD=michele;DATABASE=SQLTips"

 With connObj
 .ConnectionString = connectString
 .open
 End With
 End Sub

 '********************
 '*** MAIN ROUTINE ***
 Dim connObj, objResultsSet, queryString

 'open the connection to the DBMS
 Set connObj = server.createobject ("adodb.connection")
 open_OLEDB_connection (connObj)

 'setup the SELECT statement to submit to the DBMS
 queryString = _
 "SELECT COUNT(*) Count FROM siteAccessList " & _
 "WHERE username = '" & Request.Form("username") & _
 "' AND password = '" & Request.Form("password") & "'"

 With connObj

 'submit the SELECT statement to the DBMS

 Set objResultsSet = .Execute (queryString)
 'save the session variables and then
 'move the visitor member to the member area

 If objResultsSet.Fields("count") = 1 Then
 Session("username") = Request.Form("username")
 Session("password") = Request.Form("password")
 Response.Redirect "/SQLTips/StartSession.asp"
 End If
 End With
 %>
The ASP REQUEST object's FORM collection lets you retrieve data entered into the fields (called elements) within an HTML form. In this example, the script retrieves the entries made into the "username" and "password" elements and uses them to form a SELECT statement as:
 SELECT COUNT(*) FROM siteAccessList
 WHERE username=''
 AND password=''
After assigning the query string (that is, the preceding select statement with data from the HTML form) to the QUERYSTRING variable, the script uses the ADO Command object's Execute method to send the SELECT statement (within the QUERYSTRING variable) to the DBMS for execution. The DBMS, in turn, executes the SELECT statement and returns the query results to the script within the ADO Recordset object (OBJRESULTSSET, in this example). Note that the VBScript Set statement within the preceding script both calls the Execute method and accepts the query results set into the ADO Recordset object (OBJRESULTSSET):
 With conObj
 Set objResultsSet = .Execute (queryString)
 End With
In this example, the Recordset object has a field named COUNT that contains the result returned by the SQL COUNT(*) aggregate function within the query's SELECT clause. The login validation script is supposed to determine if the username/password pair entered within the HTML form's input elements matches the username and password stored within a row in the SITEACCESSLIST table. If the DBMS returns a "matching" row (in which case COUNT(*) aggregate will return 1), the username/password pair entered is valid and script redirects the visitor to the STARTSESSION.ASP Web page. Conversely, if the "count" field has a value of 0 (versus 1), the username/password pair entered was not valid and the script does not move the site visitor into the members-only section of the Web site.
The following three tips will show you how to submit queries through HTML forms and how to display within an HTML table on a Web page the results sets that SQL SELECT statements return to a script.
Displaying Query Results Within an HTML Table on a Web Page
Typically, you will want to display the query results set returned by a SELECT statement within a HTML table on a Web page. Think of the last time you visited your bank's Web site. You most likely reviewed your account balances and item detail for deposits made and checks presented for payment within a particular period. Similarly, when you visit a credit card's Web site, you can get the listing of charges and payments made on the account during a particular billing cycle. By visiting an online store's Web site, you can get a list of the items on your last order, when the order was shipped, and if shipped via UPS or Federal Express, a tracking number. Using the tracking number, you can then get a detailed list of dates and times your shipment reached various points within the UPS or Federal Express delivery system. In all these cases, the results sets returned by your queries were most likely displayed within HTML tables on the Web pages you viewed.
Rather than write a different routine to display the results set from each query you submit, you can write a single, reusable function or subroutine to display a query results set within an HTML table. As you will see in a moment, you can write a script that displays query results without knowing the names of the columns or the number of columns returned within the query results set beforehand.
The ADO Recordset object's Fields collection has a Count property you can use to determine the number of fields (that is, columns) returned within a results set. To retrieve the number of fields (columns) returned within a results set, you would use a statement similar to:
columnCount = objResultsSet.Fields.Count
Each field, in turn, has a Value and Name property you can use to extract the field's name and value (respectively) from the Fields collection. Thus, to retrieve a field's name, you might use a statement such as:
columnName = objResultsSet.Fields(0).Name
When working with the items within the Fields collection, bear in mind that the first item has an index of 0 and not 1. Thus, the preceding example returns the name of the first column (which has an index of 0) within the Fields collection.
Meanwhile, to retrieve a field's value, you would use:
columnName = objResultsSet.Fields(0)
Note that you need not explicitly reference the Value property when you want to retrieve the value stored in an item within an ADO collection. If you omit the property name when referring to an item within a collection, the default property Value is assumed. In general, the fewer periods you use when referencing objects and collections items, the better the script's performance. Thus, of the following two statements, the second will execute more quickly than the first because it uses the collection item's default property versus referencing the property explicitly:
 columnValue = objResultsSet.Fields(0)
 columnValue = objResultsSet.Fields(0).Value
Putting it all together then, you could use the following VBScript subroutine to display the results set from any query as an HTML table on a Web page:
 Sub display_In_Table (objResultsset)
 With Response
 .Write "
" .Write "" For column = 0 To objResultsSet.Fields.Count - 1 .Write "" Next .Write "" Do While Not objResultsSet.EOF .Write "" For column = 0 To objResultsSet.Fields.Count - 1 If objResultsSet.Fields(column) <> "" Then .Write "" Else .Write "" End If Next .Write "" objResultsSet.MoveNext Loop .write "
| " & objResultsSet.Fields(column).Name _ & " | |
|---|---|
| " & objResultsSet.Fields(column) _ & " | |
" End With End Sub
In addition to the Fields collection properties discussed previously, the subroutine in this example uses the Recordset object's EOF property and its MoveNext method to move through the rows within the query results set. The MoveNext method moves the row pointer to the next row within the ADO Recordset object. When the row pointer is located beyond the last row within the Recordset object, the Recordset's EOF property (OBJRESULTSSET.EOF, in this example) is set to TRUE. (If there are no rows within the Recordset object, then the SELECT statement returned no rows that satisfied the search criteria in its WHERE clause, the row pointer is positioned beyond the "last" row within the Recordset object initially, and the Recordset object's EOF property is TRUE immediately.)
Writing a Reusable PHP Routine to Display Query Results on a Web Page
In Tip 590, "Displaying within an HTML Table on a Web Page Query Results Returned through an ADO Recordset Object," you learned how to work with the ADO Command object to send a query to the DBMS and display its results set within an HTML table. In place of ADO objects, some server-side script engines provide functions you can use to work with the data within various DBMS products. PHP, for example, provides functions you can use to access data stored within dBase, Informix, InterBase, MS-SQL Server, mSQL, MySQL, Oracle, PostgreSQL, Sybase, and more. (In addition to functions that work only with a specific vendor's DBMS product, PHP also provides a general set of ODBC functions that you can use to work with the data within any vendor's DBMS product.)
When using PHP (or other server-side script engines) to generate Web pages, create a set of modules that do the following:
- Writes the starting and ending blocks of text and tags for a Web page—such as STARTHTML.PHP and ENDHTML.PHP in the following example.
- Connects with a DBMS—such as MSSQLCONNECT.PHP in the following example.
- Sends queries to the DBMS—such as MSSQLQUERY.PHP in the following example.
- Displays query results within an HTML table—such as SHOWTABLE.PHP in the following example.
The following code shows how you might define a PHP Web page with a script that calls on reusable modules to displays SQL query results on a Web page:
Each of the PHP INCLUDE directives (used in each of the first six lines within this example), tell the PHP script engine to insert the contents from an external file. Placing script modules within external files is convenient when you want to reuse the same code on several Web pages. Moreover, by leaving the code in an external file versus cutting and pasting it into other Web pages, you can change content on several Web pages at once by changing a single file—the external file whose script (code) you INCLUDE within the other pages.
Suppose, for example, that you have the following code within the file STARTHTML.PHP:
'; echo "$title"; echo '
SQL Tips & Techniques
'; if <$heading <> **) echo "
$heading
"; return; } ?>
Within the file, you can include content that you want the script to place at the start of each of the site's Web pages. Although in this example, the STARTHTML() function only inserts title and heading text, it could easily be written to echo an HTML image tag () to insert a company logo at the top of each Web page as well.
Similarly, to write the text content and HTML tags for elements found at the end of each Web page on the Web site, you might use the following code for the ENDHTML() subroutine stored within the external file ENDHTML.PHP:
 Created by <a href="mailto:kki@NVBizNet.com">
 Konrad King</a>.

 © 2002 - all rights reserved!';
 echo "";
 return;
 }
 ?>
In this example, each Web page that calls ENDHTML() will end by displaying the Web master's name and a copyright notice. To make your Web site more user-friendly, you might also include a site map or menu with hyperlinks to all the site's pages at the bottom of each page. By echoing the text content and hyperlinks within a file such as ENDHTML.PHP, you need only type the text, hyperlinks, and HTML tags for the elements you want to appear at the bottom of all the site's pages only one time. Simply code them within the function within a file like ENDHTML.PHP, and then call the function that writes the element on the Web page within the file.
The CONNECTTODB function within the file MSSQLCONNECT.PHP file accepts the name of the MS-SQL Server ($DB_HOST) and uses it and the username ($DB_USER) and password ($DB_PASS) to log in to the DBMS. After successfully logging in, the script sets the initial database to that specified in $DB_NAME:
". "
** Error ** Unable to connect ". "to DMBS: $db_host!
". "
"; } else { //Select the database with the data you want to query if (!mssql_select_db($db_name, $link)) { $success = false; echo "
". "
** Error ** Unable to select ". "the database: $db_name!
". "
" ; } } return $success; } ?>
Note that the function CONNECTTODB places the connection handle (through which the script can send statements to and receive results sets from the DBMS) within the global variable $LINK. If unable to connect with the DBMS or to select the initial database specified, the function displays an error message on the Web page and returns FALSE. The following code within the script on the main Web page (which starts with the INCLUDE statements that insert the code from the external files as discussed within this tip), calls the routine to query the DBMS and display query results only if CONNECTTODB was able to connect with the DBMS:
 //** CALL THE ROUTINE TO CONNECT WITH THE DBMS **
 if (connectToDB($db_host, $db_user, $db_pass, $db_name))
 {
 //** FORMULATE THE QUERY THEN PASS IT TO THE ROUTINE **
 //** THAT WILL SEND IT TO THE DBMS AND DISPLAY THE **
 //** QUERY RESULTS WITHIN AN HTML TABLE

 $query = "SELECT * FROM Authors ".
 "ORDERED BY au_fname, au_lname";
 showTable($query);
 }

 //** WRITE THE TEXT AND TAGS THAT END A WEB PAGE **
 endHTML();
 ?>
If not able to connect, the script simply writes the content and HTML tags that must appear at the bottom of each Web page. This is done without calling the SHOWTABLE() function, which submits a query to the DBMS and then displays the query's results set on the page. As a result, the page will either display an HTML table of query results (if the script successfully connects with the DBMS and selects the database that contains the data desired), or an error message (if the DBMS connection or database selection fails).
The external file SHOWQUERY.PHP contains the script statements that call the EXECUTE-QUERY function (which submits the SELECT statement within $QUERY to the DBMS) and displays the query results set within an HTML table:
 ";

 //display column names as table headings

 echo "";
 for ($i=0; $i < $fields; $i++)
 {
 echo "";
 $fieldType[$i] = mssql_field_type($result, $i);
 }
 echo "";

 //display query results (that is, the column) values
 //within the table's rows below the headings (column names)
 //that run across the top of the HTML table

 while ($array = mssql_fetch_array($result))
 {
 echo "";
 for ($i=0; $i < $fields; $i++)
 {
 if (($fieldType[$i] <> "char") and
 ($fieldType[$i] <> "blob"))
 echo '";
 else
 echo " ";
 }
 echo "";
 }

 echo "
| " . mssql_field_name($result, $i) . " | |
|---|---|
| '; else echo ' | '; if ($array[$i] <> null) echo "$array[$i] |
"; return; } ?>
Note that the script checks the data type of each field and aligns non-character data flush with the right side of each table cell. The script aligns character data flush with a cell's left side.
Of course, there will only be results set data for the script to display within the HTML table only if the EXECUTEQUERY() function successfully submits its query to the DBMS for execution. As shown by the following code from the external file MSSQLQUERY.PHP, EXECUTEQUERY() will either return the rows within the query's results set or display an error message if the DBMS was unable to execute the query for some reason:
". "
** Error ** The DBMS reported ". "an error in executing query!
". "
"; } return; } ?>
Note that, as is the case throughout the script's statements (both within the main Web page and within external files), the EXECUTEQUERY function communicates with the DBMS through the $LINK connection handle. ($LINK was initially set by the MSSQL_CONNECT() function call within the external file MSSQLCONNECT.PHP.)
The EXECUTEQUERY() function returns the query results set to the script that called it by placing the query results within the global variable $RESULT. Even if the results set contains no rows because no data matched the search criteria within the query's WHERE clause, $RESULT will still contain the column names. Therefore, $RESULT is NULL (and !$RESULT is TRUE) only when the DBMS experiences an error of some kind when executing a query.
You can find the script files used within this tip on the book's companion Web site at www.premierpressbooks.com/downloads.asp. If you are using a DBMS other than MS-SQL Server, simply change the "MSSQL_" references within the files to the string that starts the function calls for your DBMS product. For example, if you are using the MySQL DBMS, your function calls will start "MySQL_" versus "MSSQL_". Similarly, Oracle functions start "Ora_," Sybase functions start "Sybase_," and so on. The PHP manual available online at http://www.PHP.net/manual/en/ lists and fully describes each of the function calls to access the various DBMS products PHP supports.
Submitting an SQL Query Through an HTML Form
Using HTML forms to submit SQL queries requires only that you apply what you learned about SELECT statements within the tips throughout this book and about using scripts to connect to and communicate with an SQL DBMS. As you learned in Tip 589 "Using an ADO Connection to Execute a SELECT Statement to Setup Username/Password Access to a Web Site," you use an HTML form to accept input from a site visitor. After the visitor clicks the HTML form's submit button, the Web browser sends the selections and entries the visitor made within the form's elements to the Web address (that is, to the URL) given by the action attribute within the HTML form's
tag.
When a form's action attribute specifies the URL (or Web address) of a PHP or ASP Web page, the scripts embedded within the page can retrieve the entries that the visitor made on the HTML form by name. Suppose, for example, that you create a "query" page such as the one shown in Figure 592.1, which has the following form definition:
Figure 592.1: A Web page with an HTML form through which a site visitor can submit an SQL Query
SELECT:
FROM:
WHERE:
ORDER BY:
In this example, the PHP processor copies data that the visitor entered into the form's elements into variables that scripts within the PHP Web page QUERY.PHP can access. The name of each variable with data from a form element consists of the element's name preceded by a dollar sign ($). As such, scripts within QUERY.PHP can retrieve text entered into the form's selectClause element from the variable $selectClause, text entered into the fromClause element from the variable $fromClause, text entered into the whereClause element from the variable $whereClause, and text entered into the orderBy element from the variable $orderBy.
To submit to the DBMS the SQL query the visitor defined with his or her entries into the four fields within the HTML form, you might define the PHP Web page QUERY.PHP as follows:
 " .
 "SELECT " . $selectClause . ""
 "FROM " . $fromClause . "";
 IF (trim($whereClause) <> "")
 $headingQuery .=
 "WHERE " . $whereClause . "" ;
 If (trim($orderBy) <> "")
 $headingQuery .=
 "ORDER BY " . $orderBy . "";

 $headingQuery = str_replace("\", $headingQuery);

 //********************************
 //** Display the Web Page Title **
 //********************************

 startHTML ("Display Query Results", $headingQuery);

 //******************************************************
 //** Connect to the DBMS, and call showTable, which **
 //** submits the query and displays the query results **
 //******************************************************

 if (connectToDB($db_host, $db_user, $db_pass, $db_name))
 {
 $query = "SELECT " . $selectClause . " " .
 "FROM " . $fromClause;
 IF (trim($whereClause) <> "")
 $query .= " WHERE " . $whereClause;
 If (trim($orderBy) <> "")
 $query .= " ORDER BY " . $orderBy;

 $query = str_replace("\", "", $query);
 showTable($query);
 }
 endHTML();
 ?>
Similarly, if the form's action attribute specifies the URL of an ASP Web page, such as http://www.NVBizNet2.com/SQLTips/Query.ASP for example, you might use the following VBScript to formulate and submit a query based on the visitor's entries into an HTML form:
 <%
 Dim connObj, objResultsSet, querystring

 'open the connection to the DBMS

 Set connObj = server.createobject ("adodb.connection")
 open_OLEDB_connection (connObj)
 queryString = "SELECT " & Request.Form("selectClause") & _
 "FROM " & Request.Form("fromClause")
 If Trim(Request.Form("whereClause")) <> "" Then
 queryString = _
 queryString & " WHERE " & Request.Form("whereClause")
 End If

 If Trim(Request.Form("orderBy")) <> "" Then
 queryString = _
 queryString & " ORDER BY " & Request.Form("orderBy")
 End If

 'submit the SELECT statement (the query) to the DBMS

 Set objResultsSet = connObj.Execute (queryString)

 'call the routine that displays the query results set
 'within an HTML table on the Web page
 display_In_Table (objResultsSet)
 %>
Code used but not repeated here is that within the subroutines open_OLEDB_connection() (shown previously within Tip 588 "Establishing a DSN-Less Connection with the MS-SQL Server or MySQL DBMS") and display_In_Table() (shown previously within Tip 590 "Displaying within an HTML Table on a Web Page Query Results Returned through an ADO Recordset Object").
Note that VBScript lets you retrieve entries made into HTML form elements by using the Request object's Form collection. The Form collection is an array (within the Request object) into which the ASP script host copies the selections and entries the visitor made on the HTML form and whose data the Web browser sent to the ASP Web page for processing. As shown in this example, your scripts can extract the value entered into each form element by referring to the item that has the same name within the Form collection.
The Web page shown previously in Figure 592.1 has the minimum content you want to display when letting the site visitor submit an SQL query to the DBMS. However, simply displaying a form into which a Web site visitor enters the clauses within a SELECT statement is not at all user-friendly. To make use of the query form, the visitor must know not only the names of the tables within the database, but also the names of the table columns as well. In addition, the visitor must know the correct syntax for each clause within an SQL SELECT statement.
The query forms you create for your users (typically managers accessing the DBMS through the company's intranet) to use should look more like that shown in Figure 592.2.
Figure 592.2: A Web page with an HTML form on which the visitor can make selections and some data entry to formulate and submit an SQL query
The Web page shown in Figure 592.2 is much more user-friendly. The visitor no longer has to know the names and structures of the tables within the database to submit a query. Instead, the visitor simply clicks a checkmark into the check boxes next to the names of the columns whose values the DBMS is to report. Based on the columns selected, the script that formulates the query—inserting into the SELECT statements FROM clause the names of the tables whose columns appear within the query's SELECT clause. Radio buttons at the bottom of the form help the visitor specify the search criteria the DBMS is to use when selecting rows it will add to the query's results set.
Creating Web pages with HTML forms that let users submit queries to the DBMS often involves making a tradeoff between creating a user-friendly Web interface for DBMS and letting the users write queries that involve as many tables, columns, and search criteria as they want. For example, the HTML form in Figure 592.1, though not user-friendly, lets the user submit a query that involves any number of tables, columns, and search conditions. Conversely, the form on the Web page in Figure 592.2 requires less knowledge about the database structure and about writing SQL SELECT statements; however, the form in this example limits the user's choices to columns within three tables and at most four search criteria to be used in the SELECT statements WHERE clause.
The HTML forms you create will, of course, depend on the knowledge and query requirements of the users on your system. Don't be surprised when you find yourself writing one set of Web page interface pages for power users that must view data within the database from various perspectives and another set of Web page based queries for use by managers who need specific, predefined reports on a daily, weekly, or monthly basis.
The important thing to understand is that you can use HTML forms to let DBMS users (or Web site visitors) specify data for which they want to search the DBMS. Using a server-side scripting language such as VBScript, PHP, JScript, and so on, you can write SELECT statements based on the user's input into HTML form, submit the queries to the DBMS, and then display the query results sets for the users within HTML tables on Web pages.
Using an HTML Form to Insert Data into an SQL Table
As you learned within the preceding tip, HTML forms let Web site (either Internet or intranet) visitors send data and commands to scripts embedded within ASP or PHP Web pages. In addition to letting visitors use forms to write SQL queries, you can use forms to let visitors insert, update, or remove data from a database. In fact, handling database updates through an HTML form involves the same communications process between visitor and script and between script and DBMS that you use to handle queries.
Within a PHP script, you process HTML form-based database updates by retrieving form data from variables with the same names as the form elements. Similarly, within VBScript you access form element values from the Request object's Form collection. Then, based on the information received from the HTML form, the script submits the desired INSERT, UPDATE, or DELETE statement to the DBMS for execution.
Suppose, for example, that you want salespeople to maintain information about their customers online. You might use a form similar to that shown within Figure 593.1 to add a new customer to the salesperson's list of customers.
Figure 593.1: HTML form used to insert and/or update customer data
To retrieve customer information entered into the HTML form and insert it into the CUSTOMERS table, set the action attribute within the HTML form's
tag to the URL of an ASP Web page as shown here:
Then, within the ASP Web page (ADDCUST.ASP, in this example), embed a VBScript such as the following:
 <%
 Dim connObj, objResultsSet, statementString

 'create a connection object and then call a subroutine
 'to open a connection to the DBMS

 Set connObj = server.createobject ("adodb.connection")
 open_OLEDB_connection (connObj)

 'Formulate the INSERT statement based on the visitor's
 'inputs within the HTML form

 statementString = _
 "INSERT INTO customers " & _
 "(first_name, last_name, street_addr, city, state, " & _
 " zip_code, phone_number, salesrep_ID) VALUES (" & _
 "'" & Request.Form("fName") & "'" & _
 ",'" & Request.Form("lName") & "'" & _
 ",'" & Request.Form("stAddress") & "'" & _.
 ",'" & Request.Form("city") & "'" & _
 ",'" & Request.Form("state") & "'" & _
 ",'" & Request.Form("zipCode") &"'"&_
 ",'" & Request.Form("phoneNumber") & "'" & _
 "," & Request.Form("salesrepID") & ")"

 'submit the INSERT statement to the DBMS for execution

 connObj.Execute statementString,,adExecuteNoRecords
 %>
The VBScript in this example calls the open_OLEDB_connection() subroutine that you learned about in Tip 588 "Establishing a DSN-Less Connection with the MS-SQL Server or MySQL DBMS" to open a DSN-less connection with the DBMS. To build the SQL INSERT statement, the script uses the Request object's Form collection to retrieve information entered into the form (shown previously in Figure 593.1). Finally, to submit the INSERT statement to the DBMS for execution, the VBScript uses the ADO Connection object's Execute method.
Note that when using the Execute method to submit an INSERT, DELETE, or UPDATE statement, you don't expect the DBMS to return a results set. As such, you can avoid the overhead of creating a Recordset object by changing the syntax of the Execute method call to the following
.EXECUTE ,ra,options where:
- is the SQL INSERT, DELETE or UPDATE statement the DBMS is to execute.
- ra is an optional parameter indicating the number of rows effected by the query.
- options specifies how the DBMS is to execute the SQL statement passed within the parameter.
The execute method call in this example tells the DBMS to execute the SQL statement (within STATEMENTSTRING) without returning any records within a results set.
connObj.Execute statementString,,adExecuteNoRecords
| Note |
For a list of enumerated values (such as adExecuteNoRecords) you can use to set options and properties within various ADO objects and methods (such as the Connect object's Execute method), visit http://www.w3schools.com/ado/ and click on one of the ADO objects listed along the left side of the Web page. After your Web browser displays the W3Schools information about the ADO object, click your mouse on the hyperlink for one of the object's properties or methods. If the method or property has enumerated values (that is, named constants) you can use to set its options or properties, you will find the enumerated values listed following the example code that shows how to use the property or method. |
For a complete list of all enumerated values for all ADO object properties and methods, visit the Microsoft Developer Network (MSDN) library at http://msdn.microsoft.com/library/. To reach the ADO enumerated type list, from the menu along the left side of the screen, make the following selections:
- Click the plus (+) to the left of Data Access.
- Within the Data Access menu, click the plus (+) to the left of Microsoft Data Access Components (MDAC).
- Within the MDAC menu, click the plus (+) to the left of SDK Documentation.
- Within the SDK Documentation menu, click the plus (+) to the left of Microsoft ActiveX Data Objects (ADO).
- Within the ADO menu, click the plus (+) to the left of ADO Programmer's Reference.
- Within the ADO Programmer's Reference menu, click the plus (+) to the left of ADO API Reference.
- Within the ADO API Reference menu, click on ADO Enumerated Constants. Note: Click on the words "ADO Enumerated Constants" and not on the plus (+) to the left of the menu choice.
After you select "ADO Enumerated Constants," the MSDN site will display a page with hyperlinks to the constants you can use with ADO objects and methods along the right-hand side of the page. Because, getting to this point involves a lot of selections, be sure to add the page to your browser's list of bookmarks or favorites, so you can return to the page with a single mouse-click in the future.
Updating and Deleting Database Data Through an HTML Form
Before updating or deleting data within a database, you must first search for the rows with the columns whose data you want to change or the rows you want to remove. Then you execute an UPDATE or DELETE statement to change or remove data, respectively. Of course, you perform the search and update or search and delete within the same statement. The WHERE clause within an UPDATE or DELETE statement contains the search criteria the DBMS uses to identify target rows to remove or those with data to change. In an UPDATE statement, the SET clause specifies the column values to change.
A form such as the following provides the greatest flexibility for updating records within a table:
UPDATE:
SET:
WHERE:
To process the update form, you would embed a VBScript such as the following within the ASP Web page (UPDATE.ASP, in this example):
 <%
 Dim connObj, objResultsSet, statementString

 'create a connection object and then call a subroutine
 'to open a connection to the DBMS

 Set connObj = server.createobject ("adodb.connection")
 open_OLEDB_connection (connObj)

 'Formulate the UPDATE statement based on the visitor's
 'inputs within the HTML form

 statementString = _
 "UPDATE " & Request.Form("tableName") & _
 " SET " & Request.Form("setClause") & _
 " WHERE " & Request.Form("whereClause")

 'submit the UPDATE statement to the DBMS for execution

 connObj.Execute statementString,,adExecuteNoRecords
 %>
Similarly, you can use the following form to delete rows from a table:
DELETE:
WHERE:
To process the delete form, you would embed a VBScript such as the following within the ASP Web page (DELETE.ASP, in this example):
 <%
 Dim connObj, objResultsSet, statementString

 'create a connection object and then call a subroutine
 'to open a connection to the DBMS

 Set connObj = server.createobject ("adodb.connection")
 open_OLEDB_connection (connObj)

 'Formulate the DELETE statement based on the visitor's
 'inputs within the HTML form

 statementString = _
 "DELETE FROM " & Request.Form("tableName") & _
 " WHERE " & Request.Form("whereClause")

 'submit the DELETE statement to the DBMS for execution

 connObj.Execute statementString,,adExecuteNoRecords
 %>
Although the forms within the preceding examples within this tip make it easy to update or delete rows in DBMS tables, the user must know how to write SQL DELETE and UPDATE statements to use them. In addition, if the user enters the wrong criteria into the whereClause element in either form, he or she may inadvertently UPDATE or DELETE the wrong, too many, or all rows within a table. As such, you should setup delete and update access such that it occurs after the user executes a query that displays the target rows. Then, let the user select onscreen which rows to UPDATE or DELETE.
For example, to setup DELETE access on the CUSTOMERS table through an HTML form, you could use a query form such as the following to let the user display a list of customers that he or she might delete:
SELECT: cust_ID,
FROM:
WHERE:
ORDER BY:
Note that the form in this example forces the user to include the CUST_ID column within the list of columns he or she decides to display within the query's SELECT clause. For the CUSTOMERS table in this example, the CUST_ID column is the PRIMARY KEY. To delete customers marked for deletion on the form described next, the query results must include a column that the VBScript that deletes rows from the CUSTOMERS table can use to identify those rows within the CUSTOMERS table that the user marked for deletion.
When the user clicks the Submit button (labeled "Submit Query") in this example, the following subroutine embedded within the ASP Web page DELCUSTSEL.ASP, will present the list of customers matching the user's search criteria as shown in Figure 594.1:
Figure 594.1: An HTML form that has a check box which displays the CUSTOMERS query results set and has a check box the user can use to mark customers for deletion
 Sub display_In_Table (objResultsSet)
 With Response
 .Write "
" .Write "" .Write "" .Write "" For column = 0 To objResultsSet.Fields.Count - 1 .Write "" Next .Write "" DIM row_number row_number = 0 Do While Not objResultsSet.EOF .Write "" row_number = row_number + 1 'place a check box within the first column of each row .Write "" 'Display column values from the SQL table For column = 0 To objResultsSet.Fields.Count - 1 If objResultsSet.Fields(column) <> "" Then .Write "" Else .Write "" End If Next .Write "" objResultsSet.MoveNext Loop .write "
| DEL | " & objResultsSet.Fields(column).Name _ & " | |
|---|---|---|
| " & objResultsSet.Fields(column) _ & " | ||
" .write " " & _ "" .Write "" End With End Sub
Note that the display_In_Table() subroutine shown in this example, displays the query results within an HTML table that is itself within an HTML form. The first cell of each row within the table contains a check box in which the user can click to mark a row in the CUSTOMERS table for deletion.
When the user clicks the Submit button (labeled "Delete Rows") within this form, the Web browser sends the check box selections the user made to the script on the ASP Web page DELCUSTROWS.ASP. DELCUSTROWS.ASP, then uses the following script that removes from the CUSTOMERS table the rows selected by the check boxes in the form shown previously in Figure 594.1:
 <%
 Dim connObj, statementstring, i

 'open the connection to the DBMS

 Set connObj = server.createobject ("adodb.connection")
 open_OLEDB_connection (connObj)

 'setup each DELETE statement to submit to the DBMS

 For i = 1 To Request.Form.Count
 statementString = "DELETE FROM CUSTOMERS593 " & _
 " WHERE cust_DeleteCust.HTML"
 %>
Calling Stored Procedures from Within a Script
Whenever possible, you should use stored procedures to execute SQL statements on behalf of the scripts embedded within your Web pages. Using stored procedures leads to enhanced DBMS performance and faster statement execution.
When executing an SQL statement submitted through an ADO Connect or Command object's Execute method, the DBMS must first generate an execution plan. Conversely, when a script calls a stored procedure, the DBMS can begin executing the stored procedure's statements immediately. Because the DBMS creates the stored procedure's execution plan when it executes the CREATE PROCEDURE statement, the DBMS avoids having to generate the same execution plan multiple times for the batch of statements within the stored procedure. Not having to generate execution plans reduces the processing load on the DBMS. Moreover, the DBMS is able to finish executing the statements faster, because it does not have to take time to create execution plans for the stored procedures statements in real-time, in addition to executing them.
In addition, using stored procedures lets you ensure all steps within an insert, update, or delete process are completed. Suppose, for example, that you have a VBScript that customers can call (through a hyperlink on a Web page) to cancel an order. In addition to deleting the order from the ORDERS table, the script must also remove the ORDERDETAILS rows for the order (so as not to leave orphans within the ORDERDTAILS table), update the COMMISSIONS table, so the salesperson does not get paid commission on the cancelled order, and must add items back into the INVENTORY table. Rather than code these statements separately into a script, it is much easier (and more reliable) to have the script call a stored procedure that executes all the required statements without inadvertently forgetting one or more or the steps. (True, a script will always execute all the statements coded within it. However, a programmer updating the Web page later may omit a line of code by accident, or there may be a communications failure of some kind between the script process and the DBMS while sending multiple statements across the network or the Internet.)
To call a stored procedure from within a script, simply pass to the ADO Connect object's Execute method the name of the stored procedure you want to call in place of an SQL statement. Suppose, for example, that a customer uses an HTML form on a Web page to cancel an order. Without a stored procedure, a script must call the Connection (or Command) object's Execute method four times to update the ORDERS, ORDERDETAILS, COMMISSIONS, and INVENTORY tables to reflect the order cancellation. By relying on a stored procedure that updates the four tables, the script need only call the Execute method once, as shown here:
 <%
 Dim connObj, statementString

 'Formulate the statement that calls the stored procedure

 statementString = "usp_cancel_order " & _
 "@order_number='" & Request.Form("order_number") & "'"

 'open the connection to the DBMS and execute the stored
 'procedure call

 Set connObj = server.createobject ("adodb.connection")
 open_OLEDB_connection (connObj)

 connObj.Execute statementString„ adExecuteNoRecords
 %>
Note that a script can pass parameters values to the stored procedure as necessary. In this example, the script uses the Form collection within the Request object to retrieve the order number that the customer entered (or selected) within the HTML form on the Web page. The script then creates a statement string that passes the order number to the stored procedure through the @ORDER_NUMBER parameter.
Although the stored procedure within the preceding example returned no query results, your scripts can call stored procedures that execute queries and return results sets as well. Rather than execute the stored procedure call with the adExecuteNoRecords options setting, simply create a Recordset object in which the DBMS can place the query results the stored procedure returns, as shown here:
 <%
 Dim connObj, objResultsSet, statementString

 'Formulate the statement that calls the stored procedure

 statementString = "sales_by_year " & _
 " @beginning_date='" & Request.form("start_date") & _
 "', @ending_date='" & Request.form("end_date") & "'"

 'open the connection to the DBMS

 Set connObj = server.createobject ("adodb.connection")
 open_OLEDB_connection (connObj)

 'call the stored procedure that executes the query

 Set objResultsSet = connObj.Execute (statementString)

 'display the query results returned by the stored procedure
 'within an HTML table

 display_In_Table (objResultsSet)
 %>
Using VBScript to Process a Recordset
In Tip 594 "Updating and Deleting Database Data Through an HTML Form," you learned how to create HTML forms that let users generate and execute SQL UPDATE and DELETE statements. You also learned that the best way to let most users remove table rows or change data within a database is to require that they first execute a query that displays potential target rows onscreen. Then, with data displayed within an HTML form, the user can select the rows to change or delete visually, which is much easier and less prone to error than writing selection criteria for the WHERE clause within an SQL UPDATE or DELETE statement.
Whereas users may, at times, want to delete several table rows at once, modifying column values within a table is typically a one-row-at-a-time operation. As such, you might replace the check box you placed at the start of each row of query results in Tip 594 with a hyperlink that retrieves the column values from a particular row in an database table. By placing the row's column values within the elements of an HTML form, you can let the user modify each value within the row as desired. When finished modifying the row's values, the user clicks the HTML form's Submit button to send the form results (that is, the update row values) to a server-side script that submits an UPDATE statement to the DBMS for execution.
Suppose, for example, that you wanted to create a Web-based application that lets users update the data within a CUSTOMERS table. First, create a Web page with a form such as the following that lets the user select the row (or rows) within the CUSTOMERS table that he or she might want to change:
SELECT: cust_ID,
FROM:
WHERE:
ORDER BY:
After the user clicks the form's Submit button (labeled "Submit Query," in this example), the Web browser sends the form results (that is, the information entered into the form) to an ASP (or PHP) Web page (CUSTLIST.ASP, in this example). Embedded within CUSTLIST.ASP is a script, such as the following, which creates an SQL SELECT statement based on the form results and submits the query to the DBMS:
 <%
 Sub SubmitQuery(objConn, byref objRecordset)
 DIM queryString

 If (Trim(Request.Form("selectClause")) = "*") Then
 queryString = "SELECT * "
 else
 queryString = "SELECT cust_ID "

 If (Trim(Request.form("selectClause")) <> "") Then
 queryString = queryString & ", " &
 Trim(Request.form("selectClause"))
 End If
 End If

 queryString = _
 queryString & " FROM " & Request.Form("fromClause")

 If Trim(Request.Form("whereClause")) <> "" Then
 queryString = queryString & " WHERE " & _
 Request.Form("whereClause")

 End If

 If Trim(Request.Form("orderBy")) <> "" Then
 queryString =
 queryString & " ORDER BY " & Request.Form("orderBy")
 End If

 'submit the query, the SELECT statement to the DBMS

 Set objRecordset = objConn.Execute (queryString)
 End Sub
 %>
Note that the script must include within the query's SELECT clause the PRIMARY KEY column from the target table (CUST_ID, in this example). During the update process, other scripts will use the PRIMARY KEY value to retrieve and then modify the values in a specific row within the target table (CUSTOMERS, in this example). After submitting the query, another script within the CUSTLIST.ASP Web page must process the query results returned from the DBMS. DisplayInTable() is a VBScript subroutine that processes the rows of query results returned within an ADO Recordset object to display the customer list, as shown in Figure 596.1:
Figure 596.1: An HTML form that lets users click on the "Edit" hyperlink within the first column to select a row within the CUSTOMERS table to update
 <%
 Sub DisplayInTable(objRecordset)
 With Response
 .Write ""
 .Write ""
 'use Recordset field names as HTML table column headings

 .Write ""
 For column = 0 To objRecordset.Fields.Count - 1
 .Write ""
 Next
 .Write ""

 'display the value in the Recordset within the HTML table

 Do While Not objRecordset.EOF
 .Write ""

 'Put an "EDIT" hyperlink in the First column of each row

 .Write ""

 For column = 0 To objRecordset.Fields.Count - 1
 If objRecordset.Fields(column) <> "" Then
 .Write ""
 Else
 .Write ""
 End If
 Next
 .Write ""

 objRecordset.MoveNext
 Loop

 .write "
| EDIT | " & objRecordset.Fields(column).Name _ & " | |
|---|---|---|
| <a href="EditCust.asp?cust_cust_ID") & "">EDTT</a> | " & objRecordset.Fields(column) _ & " | |
" End With End Sub %>
After the user clicks one of the "Edit" hyperlinks within the first column of the table shown in Figure 596.1, the Web browser retrieves the ASP Web page EDITCUST.ASP and passes to it a query string with the PRIMARY KEY value for the customer's row within the CUSTOMERS table. A VBScript embedded within EDITCUST.ASP uses the PRIMARY KEY value to retrieve the customer's row and calls the following DisplayInForm() subroutine to display the row's current column values within an HTML form:
 <%
 Sub DisplayInForm(objRecordset)
 With Response
 .Write _
 "
" .Write "" .Write "" 'use Recordset field names as HTML table column headings For column = 0 To objRecordset.Fields.Count - 1 .Write "" Next .Write "" 'display the value in the Recordset within the HTML table Do While Not objRecordset.EOF .Write "" 'Put an "EDIT" hyperlink into the first column of each row For column = 0 To objRecordset.Fields.Count - 1 .Write "" objRecordset.MoveNext Loop .write "
| " & objRecordset.Fields(column).Name _ & " |
|---|
| " & _ "" Next .Write " |
" .Write "" .Write "
" .Write " " .Write "" End With End Sub %>
When the user clicks the form's Submit button (labeled "Save Changes"), the Web browser sends the form results to VBScripts embedded within the ASP Web page UPDATECUST.ASP. The SubmitUpdate() subroutine embedded within UPDATECUST creates and submits to the DBMS an UPDATE statement, which writes the new column values to the customer's row within the CUSTOMERS table:
 <%
 Sub SubmitUpdate(objConn)
 DIM queryString, i, setCount

 setCount = 0
 queryString = "UPDATE customers593 SET "

 For i = 1 To Request.Form.count - 1
 If Request.Form.Key(i) <> "cust_ID" Then
 setCount = setCount + 1

 If setCount > 1 Then
 queryString = queryString & ","
 End If

 queryString = _
 queryString & Request.Form.key(i) & "='" & _
 Request.Form(i) & "'"
 End If
 Next

 queryString = queryString & "WHERE cust_ID =" &
 Request.Form("cust_ID")

 'submit the UPDATE statement to the DBMS

 Set objRecordset = objConn.Execute (queryString
 End Sub
 %>
Working with SQL Transaction Processing Across the Internet
SQL transaction processing lets you treat multiple SQL statements as a single unit of work. According to relational database processing rules, either the DBMS executes all statements within a transaction successfully or any work performed by any of the statements is undone. In other words, if a statement within a transaction fails, the DBMS will make the database data appear as if none of the statements in the transaction was executed.
If you have an open transaction and a script embedded within a Web page aborts or if the user closes his or her connection with the DBMS without executing a COMMIT statement, the DBMS is responsible for undoing any work performed and restoring database tables back to their original, unmodified condition. A user can close his or her connection with the DBMS either explicitly (by calling the ADO Connection object's Close method, for example) or implicitly (by moving on to another Web page or by disconnecting from the Internet altogether). In addition, a long period of inactivity will cause the DBMS to close an open connection-even if the user remains on the same Web page as the script used to open the connection to the DBMS.
The ADO Connection object has three methods you can use to manage SQL transactions:
- BeginTrans begins a new transaction. If your DBMS product allows nested transactions, you can make multiple BeginTrans method calls without first closing an open transaction by calling the CommitTrans or the RollbackTrans method. Conversely, if your DBMS does not support nested transaction, calling BeginTrans while a connection has an open transaction already will result in an error.
- CommitTrans makes permanent any work performed by statements since the last BeginTrans method call and ends (or closes) the current transaction. If your DBMS product supports nested transaction, each CommitTrans method call closes the innermost transaction. Thus, if the script has made three BeginTrans method calls (without any intervening RollbackTrans or CommitTrans calls), the first CommitTrans method call closes and makes permanent the work performed since the third BeginTrans method call. A second CommitTrans method call makes permanent any uncommitted work perform since the start of the second transaction (and prior to the start of the now closed third transaction). Finally, a third CommitTrans method call makes permanent any work performed since the start of the first transaction and prior to the start of the (now closed) second transaction.
- RollbackTrans cancels (or undoes) all changes made since the last BeginTrans method call and ends the current transaction. If your DBMS product supports nested transaction, each RollbackTrans method call closes the innermost transaction while leaving any outer transactions open and the work performed by statements within them in place.
Unless you make a BeginTrans method call to open a transaction, the DBMS automatically commits (that is, makes permanent) work performed by each statement you submit by calling a Connect or Command object's Execute method. Thus, if you have the following statement flow, no work is undone (or rolled back) by the RollbackTrans method call, because the statements were executed (and their work committed) outside an open transaction:
 <%
 objConn.Execute ""
 objConn.Execute ""
 objConn.Execute ""

 objConn.RollbackTrans 'undoes nothing
 %>
After calling the RollbackTrans method, three modifications remain in effect since their work was automatically committed by the DBMS.
Conversely, if you have the following statement flow, the DBMS does not automatically commit (make permanent) any work performed while a transaction remains open:
 <%
 objConn.Execute ""

 objConn.BeginTrans
 objConn.Execute ""
 objConn.Execute ""

 objConn.RollbackTrans 'undoes MOD 2 & MOD 3
 %>
The RollBackTrans method call undoes any work performed by MOD 2 and MOD 3 and closes the open transaction. Work performed by MOD 1 remains in place however, because the DBMS automatically committed the MOD 1 work, since it occurred outside an open transaction.
Similarly, if you have the following statement flow, the CommitTrans method call makes permanent the work performed by MOD 1, and the RollbackTrans method call will therefore only undo work performed by MOD 2 and MOD 3:
 <%
 objConn.BeginTrans
 objConn.Execute ""

 objConn.CommitTrans 'makes permanent MOD 1

 objConn.BeginTrans
 objConn,Execute ""
 objConn.Execute ""

 objConn.RollbackTrans 'undoes MOD 2 & MOD 3
 %>
Finally, when working with nested transactions, such as the following, a CommitTrans or RollbackTrans method call only effects the work performed within the current, innermost transaction:
 <%
 objConn.BeginTrans
 objConn.Execute ""
 objConn.Execute ""

 objConn.BeginTrans
 objConn.Execute ""

 objConn.BeginTrans
 objConn.Execute ""

 objConn.RollbackTrans 'undoes MOD 4
 objConn.CommitTrans 'makes permanent MOD 3
 objConn.RollbackTrans 'undoes MOD 1 & MOD 2
 %>
In this example, the first RollbackTrans method call undoes the work performed by MOD 4, and closes the inner-most (third-level) transaction. MOD 1, MOD 2, and MOD 3 remain in place until the first CommitTrans method call makes permanent the work performed by MOD 3 and closes the inner-most (second-level) transaction. Finally, the second RollbackTrans method call undoes the work performed by MOD 1 and MOD 2 and the closes the remaining open transaction.
Creating a Virtual Connection with the MS SQL Server
If you use the MS-SQL Server DBMS, you are no doubt familiar with the SQL Query Analyzer, because the SQL Query Analyzer is the MS-SQL Server-supplied client application that lets you login to the DBMS and work with database objects. You can use the Query Analyzer to submit standard SQL statements and MS-SQL Server-specific, Transact-SQL commands and built-in system stored procedures.
Though a powerful and somewhat user-friendly interface for the MS-SQL Server DBMS, SQL Query Analyzer is still just an application program that happens to be able to communicate with an MS-SQL Server. By reading Tips within this book, you learned to write Visual Basic applications (Tips 390-425) and Visual C++ applications (Tips 372-389) that could submit SQL statements and Transact-SQL commands to the DBMS and retrieve data from it. In Tips 583-597 you learned now to use ODBC drivers, OLE DB providers, and ADO objects to let scripts embedded within ASP and PHP Web pages communicate with the MS-SQL Server DBMS as well.
Within this tip, you will learn how to create MS-SQL Server Virtual connections through the Internet Information Server (IIS). These virtual connections act as pipelines that let you communicate directly with the DBMS using hypertext transport protocol (HTTP). In other words, after you setup a Virtual Connection on the MS-SQL Server, you can type SQL statements and Transact-SQL commands into your Web browser's Address field and send those statements and commands directly to the MS-SQL Server-without going through a PHP engine or ASP script host. In addition to sending commands and statements to the DBMS, you can have the MS-SQL Server return query results sets as XML documents that your Web browser can display. In short, MS-SQL Server virtual connections let you manage and work with MS-SQL Server database objects using a Web browser (running on your PC or other Web-enabled device) or any other application able to send and receive HTTP messages.
To create virtual connections through the IIS Web server to an MS-SQL Server DBMS, perform the following steps:
- Create a folder on the Web server computer's hard drive for each database to which you want HTTP access. Because the Web server must have read and write access to these folders, you may want to create them within the IIS server's root directory. For example, on an IIS Web server whose root folder is D:InetPubWWWRoot, you might create the folder for the virtual connection to the NORTHWIND database as D:InetPubWWWRootNwind.
- Within the folder you created in Step 1, create two subfolders: SCHEMA and TEMPLATE. For example, if you created the NWind folder as indicated in Step 1, you would create the SCHEMA and TEMPLATE folders as D:InetPubWWWRootNWindSchema and D:InetPubWWWRootNWindTemplate, respectively.
- Start the IIS Virtual Directory Management for SQL Server program by clicking your mouse on the Windows Start button. When Windows displays the Start menu, select Programs, move your mouse pointer to the Microsoft SQL Server program group, and then click your mouse on Configure SQL XML Support in IIS. Windows will start the IIS Virtual Directory Management for SQL Server program in a window similar to that shown in Figure 598.1.
Figure 598.1: The IIS Virtual Directory Manage for SQL Server window - Click the plus (+) to the left of the IIS Web server with the Web site through which you want to access the MS-SQL Server. The configuration program will display the Web sites managed by the Web server.
- Click your mouse on the Web site in which you want to create the database virtual directory. For the current project, click your mouse on "Default Web Site."
- Select the Action menu, New option and click your mouse on "Virtual Directory." The configuration program will open the New Virtual Directory Properties dialog box shown in Figure 598.2.
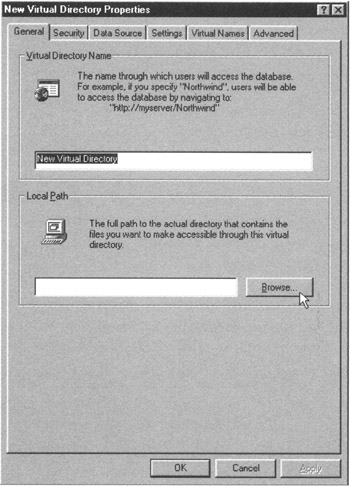
Figure 598.2: The General tab of the New Virtual Directory Properties dialog box - Into the "Virtual Directory Name" field within the General tab, enter the name for the virtual directory. You use the virtual directory name when specifying the database to which you are sending the SQL (or Transact-SQL) statement in the Web browser's Address field, so use something that reflects the database name. For the current project, enter Northwind into the "Virtual Directory Name" field.
- Into the "Local Path" field enter the pathname to the virtual connection's "root" folder, which you created in Step 1. For the current project, enter D:InetPubWWWRoot NWind into the "Local Path" field.
- On the Security tab (shown in Figure 598.3), specify the authentication method you want the MS-SQL Server to use in allowing HTTP access to the database. If you enter a user-name and password into the Credentials area of the Security tab, make sure the username you specify has only SELECT access on tables unless you want to make it available to everyone on the the Internet! Bear in mind that anyone accessing the database across the Web will have the access rights of the username you specify here. To prompt the user for a username/password, select either "Use Windows Integrated Authentication" (to allow access to users with both a valid Windows NT, 2000, or XP account and a valid MS-SQL Server account) or "Use Basic Authentication (Clear Text) to SQL Server Account" (to allow access to users with a valid MS-SQL Server account). For the current project click the "Use Basic Authentication (Clear Text) to SQL Server Account" to prompt the user for a valid MS-SQL Server username/password pair.
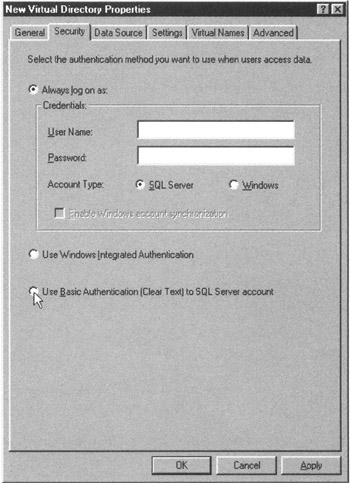
Figure 598.3: The Security tab of the New Virtual Directory Properties dialog box - On the Data Source tab (shown in Figure 598.4), enter the name of the MS-SQL Server with the database for which you are setting up HTTP access into the SQL Server field. Or, click your mouse on the search button to the right of the field to have the configuration program search your network and display the list of available MS-SQL Servers within a Select Server dialog box, and click your mouse on the MS-SQL Server's name and then on the OK button within the Select Server dialog box.
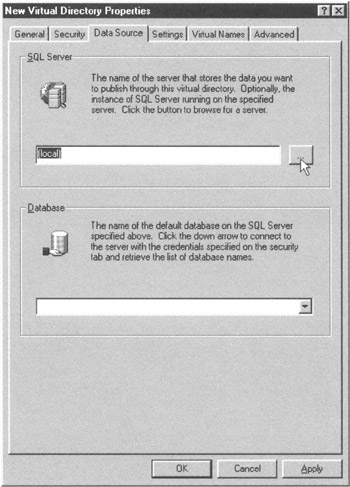
Figure 598.4: The Data Source tab of the New Virtual Directory Properties dialog box - Into the Database field, enter the name of the database to which you are setting up HTTP access. For the current project, enter Northwind into the Database field.
- On the Settings tab (shown in Figure 598.5), click a checkmark into the "Allow URL queries," "Allow template queries," "Allow XPath," and "Allow POST" check boxes.
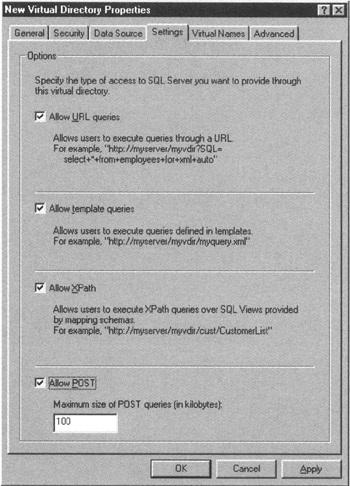
Figure 598.5: The Settings tab of the New Virtual Directory Properties dialog box - On the Virtual Names tab (shown in Figure 598.6), create the virtual names that users will use to work with templates (within the TEMPLATE subfolder), schemas (within the SCHEMA subfolder), and database objects within the database. Click your mouse on the New button. The configuration program will display the Virtual Name Configuration dialog box shown in Figure 598.7.
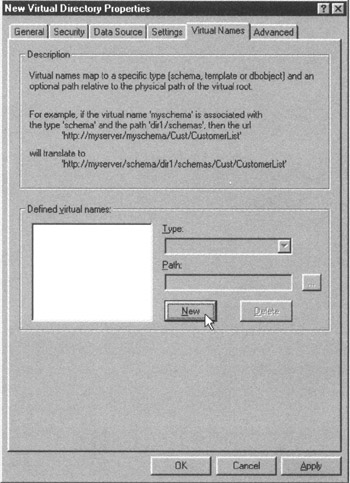
Figure 598.6: The Virtual Names tab of the New Virtual Directory Properties dialog box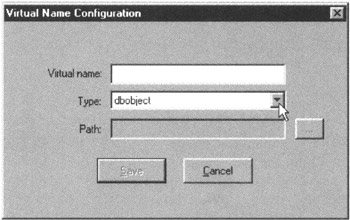
Figure 598.7: The Virtual Name Configuration dialog box - Into the "Virtual name" field, enter schema.
- Click the drop-down list button to the right of the Type field and select "schema" from the selection list.
- Into the Path field enter the path name to the SCHEMA subfolder you created in Step 2. For the current project, enter D:InetPubWWWRootNWindSchema into the Path field. Then click on the Save button. The configuration program will return to the Virtual Names tab and add the virtual name you entered in Step 14 to the "Defined virtual names" list box within the Virtual Names tab.
- On the Virtual Names tab click your mouse on the New button. The configuration program will again display the Virtual Name Configuration dialog box (shown previously in Figure 598.7).
- Into the "Virtual name" field enter template.
- Click the drop-down list button to the right of the Type field and select "template" from the selection list.
- Into the Path field enter the path name to the TEMPLATE subfolder you created in step 2. For the current project, enter D:InetPubWWWRootNWindTemplate into the Path field. Then click on the Save button. The configuration program will return to the Virtual Names tab and add the virtual name you entered in Step 18 to the "Defined virtual names" list box within the Virtual Names tab.
- On the Virtual Names tab click your mouse on the New button. The configuration program will again display the Virtual Name Configuration dialog box (shown previously in Figure 598.7).
- Into the "Virtual name" field enter dbobject.
- Click the drop-down list button to the right of the Type field and select "dbobject" from the selection list. Then click on the Save button. The configuration program will return to the Virtual Names tab and add the virtual name you entered in Step 21 to the "Defined virtual names" list box within the Virtual Names tab.
- Click the OK button at the bottom of the New Virtual Directory Properties dialog box.
After you complete Step 24, the configuration program will create the Northwind virtual connection on the IIS Web server Web site you selected in Step 5 and return to the IIS Virtual Directory Management for SQL Server window.
To test the virtual connection you created, start your Web browser (and dial-up Internet connection, if necessary). Then, within the browser's Address field enter a simple query using the following syntax:
 http:///?sql=
 +FOR+XML+AUTO&root=root
Although shown on two lines here, you would enter your query within the Address field as a single, albeit long, URL.
For example, if you created the Northwind virtual connection on the Web site www.NVBizNet2.com you might enter a query like
 http://www,nvbiznet2.com/Northwind?sql=
 SELECT+*+FROM+shippers+FOR+XML+AUTO&root=root
into the browser's Address field and then press the ENTER key. The Web browser will execute the following query against the SHIPPERS table within the NORTHWIND database:
SELECT * FROM shippers
Note that you substitute a plus (+) for each space within the command that you enter into the Web browser's Address field.
The DBMS will have Windows prompt you for a valid MS-SQL Server username/password pair and then send the query results to your Web browser as an XML document as shown in Figure 598.8.
Figure 598.8: An XML document with the results set from an SQL query submitted to an MS-SQL Server using HTTP
Executing SQL Statements Using HTTP
After you create a virtual connection to an MS-SQL Server (by performing the steps within the procedure in Tip 598 "Creating a Virtual Connection with the MS-SQL Server"), you can use the virtual connection to send any SQL statement or other command you want to the DBMS. The virtual connection acts as a conduit that lets HTTP traffic flow into and out of the DBMS. If the message contains an SQL query, the DBMS will execute the SELECT statement and return the results set to your Web browser (or other application) as an XML document. Figure 598.8 (shown previously) shows how the Internet Explorer (IE) displays query results returned within an XML document. Within this tip you will learn how to execute SQL and Transact-SQL statements using HTTP. Then, within the next tip, you will learn how to get the DBMS to include an XSL style sheet with the XML document it returns. (The XSL style sheet instructs the Web browser what to do with the XML defined entities it finds within the XML document, so the Web browser will display query results within an HTML table instead of raw XML code.)
Being able to use virtual connections to send HTTP-based queries to an MS-SQL Server is an excellent feature, because it makes data within a database available for display within your Web browser across the Internet to anywhere in the world. However, the true power of the virtual connections lies in the fact that you can use them to send any command you want the DBMS to execute—including Transact-SQL statements that modify data within the database, create or change the structure of database objects, add or drop users, execute stored procedures, and more.
Because users accessing the DBMS through a virtual connection can take any action for which the account used to login to the DBMS (through the connection) has the necessary privileges, be very careful when setting up the security scheme for your virtual connection. Do not supply a username/password that logs the virtual connection in to the DBMS (within step 9 of the procedure in the preceding tip)—unless the username you are using has only SELECT access to particular database objects containing data you want to make available to anyone on the Internet. The virtual connection will pass any HTTP messages it receives to the DBMS. The DBMS, in turn, will execute any statement for which the virtual connection's username has the required access privileges.
To send a statement to the DBMS through your Web browser, you enter the statement into the browser's Address field using the following syntax:
 http:///
 ?sql=+FOR+XML+AUTO&root=root
Thus, to send the following select statement through the Northwind virtual connection on the NVBizNet2.com Web site:
SELECT CompanyName, ContactName, City, Country
FROM suppliers
WHERE Country <> 'USA'
ORDER BY City, Country
you would enter the following URL into your Web browser's Address field:
http://www.NVBizNet2.com/Northwind/?sql=SELECT+CompanyName,
+ContactName,+City,+Country+FROM+suppliers+WHERE+Country+<>
+'USA'+ORDER+BY+City,+Country+FOR+XML+AUTO&root=root
Note that you replace each space between words within the SQL statement or transact-SQL command with a plus (+).
To have the DBMS execute a stored procedure you would use a similar syntax, which includes the stored procedure's parameter values (if any) within the statement string the DBMS is to execute:
 http:///
 ?sql={EXEC|EXECUTE}
 [+@=''
 [...,+@=''])&root=root
Note the absence of the "+FOR+XML+AUTO" (which inserts column names as XML tags within the XML document) from the URL. If the stored procedure returns a results set, you must append the "FOR XML AUTO" at the end of the query within the stored procedure, (as you will see in a moment). If the stored procedures performs some operation(s) on the database and does not return a set of row and column values, you can omit "FOR XML AUTO" altogether.
For example, to have the DBMS execute the stored procedure "TenMostExpensiveProducts," which has the following definition
 CREATE PROCEDURE TenMostExpensiveProducts AS
 SET ROWCOUNT 10
 SELECT ProductName, UnitPrice
 FROM products
 ORDER BY UnitPrice DESC
 FOR XML AUTO
you would enter the following URL into your browser's Address field:
 http: //www.NVBizNet2.com/Northwind/?sql=
 EXECUTE+TenMostExpensiveProducts&root=root
(You would of course, use the Web site address and name of your virtual connection instead of www.NVBizNet2.com and Northwind used in this example.)
If you must pass parameter values to a stored procedure, specify each parameter's value by name as "@=" within the URL that you type into the Web browser's address field. For example, you would enter the following URL in to the browser's Address field
 http://www.nvbiznet2.com/Northwind/?sql=EXECUTE+SalesByYear
 +@Beginning_Date='06/01/1996',+@Ending_Date='05/31/1997'
 &root=root
to have the DBMS execute a stored procedure defined as follows:
CREATE PROCEDURE SalesByYear
 @Beginning_Date DateTime, @Ending_Date DateTime AS

SELECT Orders.ShippedDate, Orders.OrderID,
 "Order Subtotals".Subtotal,
 DATENAME(yy,ShippedDate) AS Year
FROM Orders INNER JOIN "Order Subtotals"
 ON Orders.OrderID = "Order Subtotals".OrderID
WHERE Orders.ShippedDate
 BETWEEN @Beginning_Date AND @Ending_Date
ORDER BY Year
FOR XML AUTO
Using XML Schemas to Submit Queries Using HTTP and XSL Style Sheets to Format Query Results
Within the preceding tip, you learned how to submit SQL statements and Transact-SQL commands to an MS-SQL Server using HTTP. In general, after you create a virtual connection between an Internet Information Server (IIS) Web server and a database on an MS-SQL Server (which you learned to do within Tip 598 "Creating a Virtual Connection with the MS-SQL Server"), you can use HTTP to submit any statement string you want the DBMS to execute. Simply enter into your Web browser's Address field the Web address (that is, the URL) of the virtual connection along with the statement you want executed. What makes a DBMS virtual connection so powerful is that through a virtual connection you can query, update, and manage database objects from anywhere in the world across the Internet.
Unfortunately, without an XSL style sheet, most Web browsers don't know what to do with XML entities described within the XML documents in which the DBMS returns query results sets. As a result, Web browsers simply display everything within the XML file onscreen as plain text. For example, Internet Explorer (IE) displays the XML document of query results for the following HTTP based query as shown within Figure 600.1:
Figure 600.1: XML document displayed without an XSL style sheet as displayed by IE
 http://www.NVBizNet2.com/Northwind/?sql=SELECT+employeeID,+
 FirstName,+LastName,+Title,+Photo+FROM+employees+
 FOR+XML+AUTO&root=root
To display the query results within an HTML table as shown within Figure 600.2, create an XSL style sheet such as the following:
Figure 600.2: XML document formatted with an XSL style sheet and then displayed by IE
| Employee Information | ||||||||
|---|---|---|---|---|---|---|---|---|
| ID | First Name | Last Name | Job Title | Photo | ||||
Whereas XML simply describes what makes up an entity such as a row of query results, HTML tags tell the Web browser how Web page objects like text, graphics images, video clips, animations, and sound data should appear onscreen. In other words, XML describes the individual items within the query results while HTML describes how the Web browser should display each item. An XSL style sheet tells the Web browser how to convert entities within an XML document into the HTML that defines a Web page, which displays those entities (in a more optimal format than plain text).
For example, in the XSL style sheet that precedes Figure 600.2 (shown previously), each row of query results is described by the following code within the XML document
is translated into the following HTML:
 1Nancy
 DavolioSales Representative
To do so, the Web browser applies the following rule from the XSL style sheet used in this example:
As mentioned previously within this tip, XSL templates tell the Web browser what HTML tags and text to substitute for XML entity references within the XML document. In this example, the employees template within the XSL style sheet tells the Web browser the HTML with which to replace each employees entity found within the XML document. The replacement HTML supplied by the XSL style sheet has the Web browser display the value of each of the employees entity's parts (employeeID, FirstName, LastName, Title, Photo) within a cell (between tags) of a row (between tags) within an HTML table. After it applies the XSL templates to make all the necessary conversions (from XML entity descriptions to sets of HTML tags, attributes, and text), the Web browser displays the query results returned within the XML document as Web page content such as that shown previously in Figure 600.2.
To create XSL style sheets that tell the Web browser to display results sets from HTTP-based queries you submit to the DBMS, simply change the templates shown within the XSL file in this example to match the column names in your query's SELECT clause. Be sure to change the quoted entity name ("employees") referenced within the XSL start template description line ("," in this example) to match the name of the XML entity to which the template applies.
For example, to handle the XML "suppliers" description returned for the query
SELECT CompanyName, ContactName, Phone
FROM suppliers
you would change the template description within the preceding example XSL style sheet to:
" reference in front of the "&root=root" within the URL as shown here:
 http://www.NVBizNet2.com/Northwind/7sqlsSELECTH-employeeID,+
 FirstName, +LastName, +Title, +Photo+FROM+employees+
 FOR+XML+AUTO&xsl=EmpNamePhoto.xsl&root=root
Now that you know how to solve the display issues you encounter when submitting HTTP-based queries, the only thing left to fix is the amount of typing you have to do each time you want to submit even a simple query to the DBMS. The solution for the typing problem is to store the query as an XML template file within the TEMPLATE subfolder you created for the virtual connection. For example, you would store the query, including XSL style sheet file specification within an XML template file as follows:
 SELECT employeeID FirstName, LastName, Title, Photo
 FROM employees FOR XML AUTO
Assuming you save the XML template within the file EmpQuery.xml within the TEMPLATE subfolder, you would then type the URL for the preceding HTTP-based query as:
 http://www.NVBizNet2.com/Northwind/template/EmpQuery.xml
 ?contenttype=text/html
Of course, the longer the statement string, the greater the typing effort you avoid by referring to the XML template file rather than typing the query itself.
| Note |
Throughout this tip, the examples used a virtual connection named "Northwind" on the www.NVBizNet2.com Web site. When writing HTTP-based SQL statements of your own, substitute for www.NVBizNet2.com the.com address on which you defined the virtual connection to the database you want to use, and the name of your virtual connection for "Northwind." Note also that the Web site and virtual connection name appear between |
tags within the XSL style sheet file. In order for your database object (dboject) references to work properly, you must substitute your .com address and virtual connection name for that in the example XSL style sheet shown after Figure 600.1 within this tip. |
Displaying Image Data Stored Within an SQL Table
To display image data (that is, graphics images, animations, video clips, or other binary data) stored within a table, a Web server-side script must first write the image data to a disk file. After storing the image data within a disk file, the script embedded within the PHP or ASP Web page on which the image is to appear must set the src attribute within the tag used to display the image to the pathname of the file in which the script saved the binary data. Before we review a VBScript that an ASP Web page might use to retrieve and display image data, let's see how easy the process is if you happen to be using all Microsoft products.
There are three applications involved in displaying an SQL table-stored image on a Web page—the SQL DBMS, the Web server, and the Web browser. If you are using the Microsoft MS-SQL Server DBMS, Internet Information Server (IIS) Web server, and the Internet Explorer (IE) Web browser, you can display image data stored within an SQL table by inserting an tag such as the following within the Web page HTML:
The tag's src attribute instructs the IE Web browser to send an HTTP-based query to the MS-SQL Server. In this example, the Web browser requests that the DBMS send the contents of the PHOTO column from the row within EMPLOYEES table where the EMPLOYEEID is equal to 1. Of course, IE can only retrieve and display the image data if NVBizNet2.com has a virtual connection to the DBMS named NORTHWIND, and the virtual database object DBOBJECT is defined. (You learned how to setup virtual connections that provide HTTP access to MS-SQL Server database objects within Tip 598 "Creating a Virtual Connection with the MS-SQL Server.")
In Tip 599 "Executing SQL Statements Using HTTP," you learned how to submit SQL queries within a URL you enter into the Web browser's Address field. Using what you learned then, you can display image data stored within a database table by entering a URL such as the following into the Web browser's Address field:
 http://www.NVBizNet2.com/Northwind/dbobject/Employees
 [@EmployeeTD='1']/@photo
Again, in order for IE to display image data stored within the EMPLOYEES table's PHOTO column, the IIS Web server for the NVBizNet2.com Web site must have a virtual connection named NORTHWIND to the MS-SQL Server database that contains the EMPLOYEES table.
Finally, in Tip 600 "Using XML Schemas to Submit Queries Using HTTP and XSL Style Sheets to Format Query Results," you learned how to write the following tag definition within an XSL style sheet to display multiple images on a Web page as shown previously in Figure 600.2:
Unfortunately, each of the three preceding techniques for displaying image data on a Web page require an all-Microsoft setup as well as a virtual connection between the IIS Web server and a database on an MS-SQL Server. To make image data available within a variety of Web browsers and DBMS platforms, you can use ADO and a VBScript such as the following embedded within an ASP Web page:
<%@ Language=VBScript %>
<% option explicit %>
<%
'********************************
'*** OPEN DSN-Less Connection ***
'********************************
Sub open_OLEDB_connection (byVal ServerName, DbName,
Username, Password,
byRef objconn)
Dim connectString
connectString = "PROVIDER=SQLOLEDB;DATA SOURCE=" & _
ServerName & ";U;PWD=" & _
Password & ";DATABASE=" & DbName
With objConn
.ConnectionString = connectString
.open
End With
End Sub
'*****************************
'*** Variable Declarations ***
'*****************************
Dim objDiskAccess
Dim objConn
Dim objRecordset
Dim ADO_field_header
Dim block_size
'connection properties & query string
Dim Username
Dim Password
Dim ServerName
Dim DBName
Dim query_string
'image file processing variables
Dim block_count
Dim image_chunk
Dim image_file_extension
Dim image_file_size
Dim offset
Dim remainder
Dim temp_image_filename
Dim temp_image_pathname
Dim temp_image_physical_folder
Dim temp_image_virtual_folder
Dim html_image_tag
'***********************
'*** Setup Constants ***
'***********************
ADO_field_header = 78
block_size = 256
'Determine where you want the image stored on disk
'***Change these to match where you want the image stored.
temp_image_filename = "Image"
temp_image_physical_folder = _
"D:InetpubwwwrootNWindTemp"
temp_image_virtual_folder = "/NWind/Temp/"
image_file_extension = ".bmp"
'ADO connection string properties
'*** Change these to match your DB access needs.
UserName = "username"
Password = "password"
ServerName = "NVBizNet2"
DBName = "Northwind"
'***Change the query string to retrieve the image you want
'***To retrieve from the DBMS
query_string = _
"select Photo from Employees where EmployeeID='1'"
'********************
'*** Main Routine ***
'********************
on error resume next
'***You can-download a copy of "FileAccessor.dll" from
' the book's companion Web page at
' www.PremierPressBooks.com/
Set objDiskAccess = _
CreateObject("FileAccessor.FileWriter")
'Formulate the pathname for the image file the script will
' create on disk.
'Delete the previously written file of the same name (if it
' exists).
'Then open the disk file into which the script will write
' the contents of the image column from the table.
'***You need to change this "delete action" to match your
' image file retention requirements.
temp_image_pathname = _
temp_image_physical_folder & temp_image_filename & _
image_file_extension
objDiskAccess.RemoveFile temp_image_pathname
objDiskAccess.OpenFile temp_image_pathname
'Open a connection to the DBMS and call the method that
' executes the query.
Set objConn = Server.CreateObject("ADODB.Connection")
Open_OLEDB_Connection _
ServerName, DbName, Username, Password, objConn
Set objRecordset = objConn.Execute (query_string)
'Compute the image file's size (in bytes) by subtracting
' the bytes within the ADO field header
'Then, after discarding the header bytes stored at the
' start of the image field's column within the ADO
' Recordset object, Compute the number of "block size"
' blocks there are within the image field.
image_file_size = _
objRecordset.fields("Photo'').ActualSize - _
ADO_field_header
image_chunk = _
objRecordset.fields(''Photo'').GetChunk(ADO_field_header)
block_count = image_file_size block_size
'To make the last write ouptput a full "block size"
' buffer, divide the block size into the image's total
' size and then retrieve and write to the disk file any
' "left over" bytes so that when looping the read you
' always have exactly some number of "block size" (and no
' extra) bytes to read and write
remainder = image_file_size Mod block_size
If Remainder > 0 Then
image_chunk = _
objRecordset.fields("photo").GetChunk(remainder)
objDiskAccess.WriteToFile image_chunk
End If
'Work through the image field "block size" bytes at a time
' and append each block of bytes onto the disk file.
offset = remainder
Do While Offset < image_file_size
image_chunk = _
objRecordset.fields(''photo'').GetChunk(block_size)
objDiskAccess.WriteToFile image_chunk
offset = offset + block_size
Loop
html_image_tag = _
" "
'Close the disk file, recordset and the DBMS connection.
objDiskAccess.CloseFile
objRecordset.Close
objConn.Close
%>
"
'Close the disk file, recordset and the DBMS connection.
objDiskAccess.CloseFile
objRecordset.Close
objConn.Close
%>
Display Image Data from Table Column
"Photo" Image Column Contents
| <%=html_image_tag%> |
Note that the script in this example retrieves the contents of the PHOTO column from one row of the EMPLOYEES table within the NORTHWIND database. However, you can customize the routine to retrieve and display the contents of any image column you like. Simply download Displaylmage.ASP from the book's companion Web page at www.premierpress-books.com/downloads.asp. Then, change the image file, connection string, and query string information define within the Constants section at the beginning of the script to suit your needs.
In addition to VBScript, which any ASP script engine will process, the script in this example uses disk access methods from an ActiveX control named FileAccesor.DLL. If you do not have an application you can use to read and write disk files, download a copy of FileAccessor.DLL from the book's companion Web page and save it within a folder on the Web server (that is on the system on which the ASP Web page DisplayImage.ASP will run). For example, you might store FileAccessor.DLL within the Web site's root folder D:InetPubwwwroot. Wherever you store the ActiveX control, make sure to note the location, because you must register the control using REGSVR32.EXE before ASP scripts can use the control's methods. For example, if you stored the control within the folder D:InetPubwwwroot, you would use following command to register the ActiveX control on the Web server:
REGSVR32 D:InetPubWWWRootFileAccessor.DLL
If you already have a VB application that lets you create and write to disk files, feel free to use it in place of FileAccessor.DLL. The important thing to understand is that you can use ADO to retrieve image data from a database table into your VBScript. Then, you must use an external application program (such as FileAccessor.DLL) that lets you write data within an ADO Recordset object to a file on the hard drive. As mentioned at the start of this tip, you must write the image data to a physical disk file before you can display the graphics image on a Web page.
SQL Tips and Techniques
- Understanding SQL Basics and Creating Database Files
- Using SQL Data Definition Language (DDL) to Create Data Tables and Other Database Objects
- Using SQL Data Manipulation Language (DML) to Insert and Manipulate Data Within SQL Tables
- Working with Queries, Expressions, and Aggregate Functions
- Understanding SQL Transactions and Transaction Logs
- Using Data Control Language (DCL) to Setup Database Security
- Creating Indexes for Fast Data Retrieval
- Using Keys and Constraints to Maintain Database Integrity
- Performing Multiple-table Queries and Creating SQL Data Views
- Working with Functions, Parameters, and Data Types
- Working with Comparison Predicates and Grouped Queries
- Working with SQL JOIN Statements and Other Multiple-table Queries
- Understanding SQL Subqueries
- Understanding Transaction Isolation Levels and Concurrent Processing
- Writing External Applications to Query and Manipulate Database Data
- Retrieving and Manipulating Data Through Cursors
- Understanding Triggers
- Working with Data BLOBs and Text
- Working with Ms-sql Server Information Schema View
- Monitoring and Enhancing MS-SQL Server Performance
- Working with Stored Procedures
- Repairing and Maintaining MS-SQL Server Database Files
- Writing Advanced Queries and Subqueries
- Exploiting MS-SQL Server Built-in Stored Procedures
- Working with SQL Database Data Across the Internet
EAN: 2147483647
Pages: 632
