Using Data Control Language (DCL) to Setup Database Security
Understanding How and Why to Limit Access to Various Database Objects
Over the course of time, the data in a company's database will grow to contain a complete description of the organization. It will hold information on past successes and failures, the current organization scheme, key customers and employees, proprietary processes, and what it costs to do businesses. In short, the database will have information on which the company relies to do businesses and which could definitely be damaging should it fall into the hands of a competitor. As such, a company has a fundamental need to keep its data secure from prying eyes of other companies vying for the same customers. In addition to forces outside the company, the database administrator (DBA) must also protect the database from employees within the company itself.
Not every table should be available to every user. Marketing employees, for example, should not have access to tables dealing with new products under development, lest they be tempted to promise customers products and capabilities the company is not yet ready to release. Moreover, in the interest of maintaining good morale among workers, you would not want to give all employees access to the payroll tables. In addition to causing contention among coworkers earning different salaries, the knowledge of what the company managers, supervisors, and officers make may unduly influence the employees' (or union's) demands during wage negations.
Finally, some users should be able to update particular tables or only certain columns in tables, while others should have only view access to the same data. Continuing with the payroll table example, employees in the human resources (HR) department or bookkeeping department need to be able to modify an employee's personal data and salary information. Meanwhile, the employee and perhaps his or her manager should be able to only view the information on file.
The SQL security scheme lets you not only protects your data from unauthorized, prying eyes, but it also lets you limit which tables (or portions of tables) authorized users can see and what actions they can take on database objects.
Implementing the security scheme set up by the DBA and enforcing its restrictions are the responsibilities of the DBMS. The SQL-92 standard defines an overall framework for database security, and all commercially available DBMS products support SQL statements the DBA can use to set up database security and GRANT and REVOKE user ID access and SQL statement execution privileges.
SQL security is based on three concepts:
- Users. Are the people who query and update the data in a database. All activities undertaken by the DBMS are initiated by a user request, either interactively or through an application program. The DBMS creates or drops objects and retrieves, inserts, removes, or updates data only in response to a user-submitted SQL statement. It is up to the DBMS to check the user's security profile and either permit or prohibit the action requested based on the ID of the user making the request.
- Database objects. Are the "things" in the database protected by the DBMS security scheme. Users will have permission to use certain objects such as tables, views, stored procedures, and application programs, and be prohibited from using others.
- Privileges. Are the types of statements a user is permitted to ask the DBMS to execute on database objects. A user might, for example, be allowed only to SELECT (or query) certain tables or views but not be able to DELETE or UPDATE existing table data. By using the GRANT and REVOKE statements, the DBA can permit or prevent a user from executing any SQL statement on any database object.
You will learn more about the GRANT and REVOKE statements in Tips 144–156. For now, the important thing to know is that setting up database security is a central part of a DBA's job. The DBA not only must protect the database from outside forces, but must also limit the actions users within the organization can perform on individual database objects. Every commercial SQL database supports the implementation of a security scheme and provides (at a minimum) the ability to set up user IDs and GRANT and REVOKE their access privileges.
Understanding Individual User IDs and Authentication
A single-user database, residing on a personal computer, will normally have only one user-ID—a short name that identifies the person that created and owns the database and (by extension) all of its objects. In a single-user environment, the one user ID normally has all privileges to access all database objects. After all, it doesn't make much sense to create database objects you then prevent yourself from using.
In a production environment, the database typically runs on a fileserver or networked personal computer and is used by many users. The database administrator (DBA) normally assigns user IDs, which are the heart of SQL security. As is the case for the single-user environment, each user ID is a short name that identifies the user to the DBMS software. The DBMS checks the user ID against the privileges given to that ID prior to carrying out an SQL statement. If the DBA assigned the necessary privileges to the user ID, the DBMS performs work specified by the SQL statement submitted by the user ID. Conversely, if the user ID does not have enough privilege, the DBMS prohibits the ID from executing the statement the user submitted.
Restrictions on the names the DBA can choose for user IDs vary from implementation to implementation. The SQL-89 standard specified that user IDs could be up to 18 characters and had to adhere to the database object-naming conventions you learned about in Tip 9, "Understanding Table Names," and Tip 10, "Understanding Column Names." MS-SQL Server and Sybase allow user IDs of up to 30 characters, while some mainframe databases limit user IDs to 8 characters or less. Check your system documentation for the specific limits on user IDs on your DBMS. (If you are concerned about portability, limit your user IDs to eight characters or less to ensure that they can be used across DBMS implementations.)
Although the name used to log on to a DBMS is most often called a user ID, the term authorization ID is more correct, since the DBA will sometimes assign the same ID to multiple users. Whether assigned to a single user or a group of users, the DBMS checks its system security tables to determine what the ID used to log on to the DBMS is authorized to do. However, a single ID assigned to all of the workers in a department such as the accounting, human resources, or payroll departments does not really identify an individual user as implied by the term user ID. (In fact, the ANSI/ISO specification uses the term authorization ID instead of user ID.)
While the SQL-92 standard specifies that the DBMS will provide authorization (user) IDs for database security, it is not specific as to the mechanism the DBMS will use for associating a specific user ID with the SQL statements the user submits to the database. It is left up to the DBMS to decide how to link a user ID to statements submitted in situations ranging from a user logon to the DBMS itself, to the use of forms-based data entry and query applications, and the running of report-generation programs that run against DBMS data at preprogrammed intervals, with no physical user present.
Most DBMS systems use sessions to associate user IDs with SQL statements submitted for execution. An interactive session begins when a user logs on to the DBMS and starts an interactive SQL program (such as the MS-SQL Server Query Analyzer). In the case of programmatic SQL (such as the report program running at a preset time), the session begins when the program connects to the DBMS and sends a user ID and password embedded within the application to gain access to the DBMS.
Whether started interactively or through an application program, the session ends when the user or application program terminates its connection to the DBMS by logging off. All SQL statements submitted to the DBMS during the session are associated with the user ID specified when the user or application program started the session by logging in.
To start an SQL session, the user or application program must supply both a user ID and a password. The user ID tells the DBMS what privileges the user (or application) has in accessing the database, and the DBMS uses the password to verify that the user (or application) is authorized to use the user ID specified.
Although the concept of using user ID/password pairs is common across database products, the specific way of supplying them to the DBMS varies from one DBMS to another. For example, to access the Oracle database using SQL Plus, you can start a session with
SQLPLUS KONRAD/KING
while MS-SQL Server lets you start an interactive session using the ISQL program and specifying the user name and password as:
ISQL /USER=KONRAD / PASSWORD=KING
Check your system manual to determine your system's requirements for specifying your user ID and password to connect to the DBMS and start an SQL session.
| Note |
Some DBMS products use the user IDs defined on the host computer system's operating system as the user ID for connecting to the DBMS. MS-SQL Server, running on Windows NT, for example, lets you choose which authentication method you want to use on a per-session basis. If you are not already logged on to an MS-SQL Server when you start the MS-SQL Server Query Analyzer, the program will display a Connect to SQL Server dialog box similar to that shown in Figure 135.1.
|
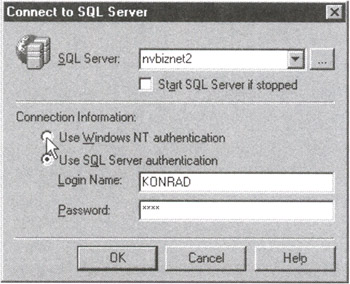
If you click on the radio button to the left of Use SQL Server Authentication, you can supply the login name (user ID) and password that the Query Analyzer will send to the DBMS for authentication and logon to the DBMS. When using SQL Server Authentication, the user ID and password you supply need not match any defined for users on the NT Server itself. On the other hand, if you click on the radio button to the left of Use Windows NT Authentication, the Query Analyzer will use the user ID you used to log on to the NT server to start your DBMS session.
Whether your DBMS has its own user authentication method or uses that provided by the host operating system, the DBA must still define each individual user ID's access privileges in the DBMS. Thus, your network user ID may let you connect to the database, but the DBMS will permit you to execute only SQL statements to which the DBA has GRANTed your user ID execution privilege on database objects you are allowed to see.
Understanding MS SQL Server Standard and Windows NT Integrated Security
As you learned in Tip 135, "Understanding Individual User IDs and Authentication," there are two ways for an SQL DBMS to manage user IDs. Some DBMS products use the user names defined in the host computer's operating system as database authorization IDs. Others, especially those that have versions available for several different operating systems, maintain their own internal list of user IDs and passwords. MS-SQL Server lets you manage user accounts using either of the two security methods.
The security method you choose controls how MS-SQL Server manages user accounts on the server and how the DBMS interacts with the Windows NT security system. In standard security mode, MS-SQL Server will accept Windows NT user names as authorization IDs and will also allow you to define additional user ID/password pairs within the DBMS itself. Meanwhile, in integrated security mode, MS-SQL Server depends on Windows NT to manage user connections through the operating system's access control list (ACL).
| Note |
MS-SQL Server integrated security (which lets the operating system manage user accounts) is available only if you are running MS-SQL Server on a Windows NT platform. If you are using any other operating system, MS-SQL Server must use standard security and manage its own user IDs and passwords. |
The most common way of configuring MS-SQL Server is to make the DBMS responsible for managing and maintaining database user accounts by starting MS-SQL Server in standard security mode. In standard security mode, the MS-SQL server authenticates the user login by checking the user ID/password pair against those stored in its internal system tables. As a result, if MS-SQL Server is running in standard security mode on a network server, starting a DBMS session requires two logins—one to log in to the server in order to gain network access and a second to log in to the database.
Integrated security mode, on the other hand, requires a single login to gain both network and database access. MS-SQL Server lets the NT operating system authenticate the user ID and password. It then creates a trusted connection to the DBMS—using the login name entered to gain access to the network as the user ID for the database session.
To use the MS-SQL Server Enterprise Manager to set the MS-SQL Server security mode, perform the following steps:
- Start the Enterprise Manager by clicking your mouse on the Start button. When Windows displays the Start menu, move your mouse pointer to Programs, select Microsoft SQL Server 7.0, and then click your mouse on Enterprise Manager.
- To display the list of SQL servers, click your mouse on the plus (+) to the left of SQL Server Group.
- Click your mouse on the icon for the SQL server whose security system you wish to manage. For example, to work with the security system for the SQL server named NVBIZNET2, click your mouse on the icon for NVBIZNET2.
- Select the Action menu Properties option.
- Click your mouse on the Security tab. The Enterprise Manager will display the security tab for the SQL Server Properties dialog box similar to that shown in Figure 136.1.

Figure 136.1: The Security tab of the MS-SQL Server SQL Server Properties dialog box - To use standard security, which allows SQL server access by both user IDs maintained by MS-SQL Server and user names managed by Windows NT, click your mouse on the radio button to the left of SQL Server and Windows NT. To use integrated security, which allows only SQL server access to user names defined by Windows NT, click your mouse on the radio button to the left of Windows NT Only. For the current project, have MS-SQL Server use standard security by clicking your mouse on the SQL Server and Windows NT radio button.
- Click your mouse on the OK button to apply the security mode selection and close the SQL Server Properties dialog box.
Whether you use standard security to have MS-SQL Server handle user ID login and password authentication or you let the Windows NT operating system handle it by selecting integrated security mode, you must set up a user ID on the MS-SQL Server for every authorization ID (user name) allowed to start a database session. In Tip 137, "Using the MS-SQL Server Enterprise Manager to Add Logins and Users," you will learn how to use MS-SQL Server's Enterprise Manager to create and drop database login and user accounts.
Using the MS SQL Server Enterprise Manager to Add Logins and Users
User IDs on an MS-SQL Server consists of two components: a login, which lets the user ID attach to the MS-SQL Server, and a user, which the MS-SQL Server uses to control the privileges a user ID has in a given database managed by the SQL Server. MS-SQL Server stores the login component of the user ID in the SYSLOGINS table of the MASTER database and stores the user component in the SYSUSERS table of each database in which the user ID has access privileges.
Each user ID allowed to attach to an MS-SQL Server will have a single login entry in the SQL server's SYSLOGINS table. Because a single MS-SQL Server normally manages several databases, a single user ID may have a user component in one or many databases. Splitting the user ID into login and user components lets a single user ID have different privileges in different databases while retaining a single password.
Thus, MS-SQL Server implements the SQL security scheme by authenticating the login component of the user ID with its password to let the user connect to the SQL Server and establish a session. The server then uses the user component of the user ID to determine whether to permit or prohibit SQL statement execution on objects in the databases managed by the server.
To use MS-SQL Server Enterprise Manager to add user ID login and user components, perform the following steps:
- Start the Enterprise Manager by clicking your mouse on the Start button. When Windows displays the Start menu, move your mouse pointer to Programs, select Microsoft SQL Server 7.0, and then click your mouse on Enterprise Manager.
- To display the list of SQL Servers, click your mouse on the plus (+) to the left of SQL Server Group.
- Click your mouse on the plus (+) to the left of the icon for the SQL server on which you want to create the user ID. For example, if you want to manage user IDs on a server named NVBizNet2, click your mouse on the plus (+) to the left of the icon for NVBizNet2. The Enterprise Manager will display folders containing databases and services available on the MS-SQL Server you selected.
- Click your mouse on the plus (+) to the left of the Security folder. The Enterprise Manager will display a list of security objects on the SQL Server you selected in Step 3, similar to that shown in Figure 137.1.
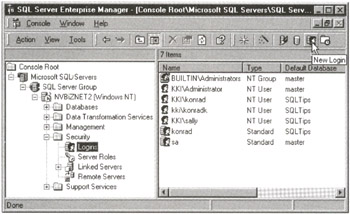
Figure 137.1: The MS-SQL Server's Enterprise Manager security object and login name list - Click your mouse on the Logins icon.
- Select the Action menu New Login option, or click on the New Login button (second button from right) on the Enterprise Manager Standard toolbar. Enterprise Manager will display an SQL Server Login Properties-New Login dialog box similar to that shown in Figure 137.2.

Figure 137.2: The General Tab of the MS-SQL Server's SQL Server Login Properties-New Login dialog box - Enter the new user ID into the Name field. For the current example, enter SQLTips.
- If you want to use integrated Windows NT authentication to log in to the MS-SQL Server using the user ID you entered in Step 7, click your mouse on the radio button to the left of Windows NT Authentication. Then enter the name of the domain of the server on which the user name is defined in the Domain field. For the current example, use standard SQL Server authentication by clicking your mouse on the radio button to the left of SQL Server Authentication, and enter the password into the Password field. For the current example, enter 1001 for the password.
Note If you plan to use Windows NT authentication for a user ID, be sure to select Windows NT Authentication and enter the correct domain name into the Domain field. You cannot change the user name or authentication method for a user ID later without deleting the user ID and then re-entering it. If you select SQL Server Authentication, the user will have to enter the user ID and password prior to MS-SQL Server giving the user ID access to the database tables-even if Windows NT has the same user ID/password pair.
- To select the default database the user ID will use when a session is established, click on the drop-down button to the right of the Database field and select the default database from the list of databases managed by the SQL Server. For the current example, select SQLTips.
- Click on the Database Access tab. Enterprise Manager will display the list of databases managed by the SQL Server, similar to that shown in Figure 137.3.
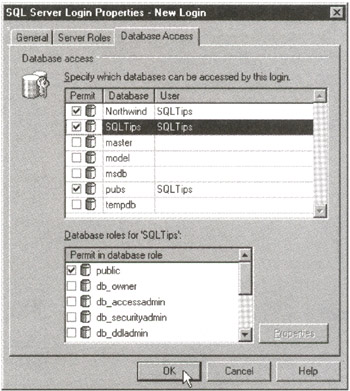
Figure 137.3: The Database Access tab of the MS-SQL Server SQL Server Login Properties-New Login dialog box - To give the user ID access to databases on the SQL Server, click on the check box to the left of each database to which the user ID is to have access. For the current example, click your mouse on the check boxes to the left of NORTHWIND, SQLTips, and PUBS until a check mark appears in each of the three check boxes.
- Click your mouse on the OK button. The Enterprise Manager will display a Confirm Password dialog box if you selected SQL Server Authentication in Step 8. Re-enter the password you entered in Step 8. For the current example, enter 1001 and click on the OK button.
- If you have additional user IDs to define, continue at Step 6. Otherwise, click your mouse on the Close button (the X) in the upper-right corner of the Enterprise Manager window to exit Enterprise Manager.
Steps 6-9 of the add new user-ID procedure setup the login component of the user-ID by specifying the login name the user or application program will use to connect to the SQL Server and the password the server can use to authenticate the login. (If you selected Windows NT Authentication in Step 8, MS-SQL Server will assume the operating system authenticated the login's password and will not ask the user to enter either the login name or the password again before establishing the connection the to the SQL Server.)
While Steps 6-9 establishes the login component of the user-ID, Steps 10 and 11 tell the server to add a user component for the "SQLTips" user-ID in the SYSUSERS tables of the NORTHWIND, SQLTips, and PUBS databases.
Using the MS SQL Server Enterprise Manager to Drop Logins and Users
As you learned in Tip 137, "Using the MS-SQL Server Enterprise Manager to Add Logins and Users," MS-SQL Server creates a login and a user entry in its system tables for each user ID you add to the system. As such, you can prevent a user ID from working with objects in a particular database by removing the user ID's user record from the SYSUSERS table in that database. Or, if you want to prevent a user ID from accessing objects in all databases and stop the ID from connecting to the database server, remove the user ID's login record from the SYSLOGINS table in the MASTER database.
MS-SQL Server lets you remove logins and users either by executing the stored procedures sp_droplogin and sp_dropuser or with the Enterprise Manager by performing the following steps:
- Start the Enterprise Manager and display the system login names by performing Steps 1-5 of the procedure in Tip 137.
- If you want to remove login records, skip to Step 7. Otherwise, to remove user records, find the user ID whose user component you want to modify in the Enterprise Server window's right pane. Then right-click your mouse on the name (user ID). For the current project, right-click on SQLTips, the user ID you created in Tip 137.
- When Enterprise Server displays the right-click pop-up menu, select the Properties option. Enterprise Server will display the SQL Server Login Properties dialog box you saw in Figure 137.2.
- Click your mouse on the Database Access tab to display the list of databases managed by the MS-SQL Server. (You saw the Database Access tab in Figure 137.3.)
- To prevent a user ID from accessing a database, clear the check box to the left of the database icon. For the current example, click your mouse on the check box to the left the NORTHWIND database icon until the check mark disappears.
Note You will not be able to remove the user component of the user ID from the SYSUSERS table of any database in which a user ID owns objects (such as tables, views, or stored procedures). To prevent the user ID from accessing the database, transfer ownership of the user ID's object to another user ID and then clear the check box in the Permit column.
- Click your mouse on the OK button to have Enterprise Server remove the user record from the SYSUSERS table (of the NORTHWIND database, in the current example).
- To remove a login, find the user ID whose login component you want to drop in the Enterprise Server window's right pane. Then click your mouse on the name (user ID) to select it. Next, press the Delete key. (Or, you can right-click your mouse on the name and then select the Delete option from the right-click pop-up menu.) Enterprise Server will display an Are You Sure You Want to Remove This Login? message box.
Note You cannot remove the login record for any user ID that owns objects on the database server. Therefore, if you have a user ID that owns database objects (such as views, tables, or stored procedures), you can deny login access by:
- Transferring object ownership to another user ID and then repeating the delete login procedure
- Right-clicking your mouse on the login name, selecting the Properties option on the pop-up menu, and then changing the user ID's password on the General tab of the SQL Server Login Properties dialog box
- Right-clicking your mouse on the login name, selecting the Properties option on the pop-up menu, and then clicking on the radio button to the right of Deny Access on the General table of the SQL Server Login Properties dialog box
- Click your mouse on the Yes button to confirm your login delete request. Or, click on the No button if you do not want to remove the user name.
If you have additional user records you want to remove, continue at Step 2, or continue at Step 7 if you want to remove another login record. Otherwise, click your mouse on the Close button (the X) in the upper-right corner of the Enterprise Manager window to exit Enterprise Manager.
Understanding MS SQL Server Security Roles Group User Security
User groups simplify the administration of privileges by letting the database administrator (DBA) GRANT or REVOKE access to multiple database objects for several users at once. In a large organization, employees in the same department typically have the same database access needs. All of the employees in the human resources (HR) department, for example, will probably have the same privileges on a group of tables dealing with payroll and employee personal information. Likewise, all of the employees in the accounting department will most likely need a common set of access rights to tables dealing with the company's invoice and accounts payable data.
The ANSI/ISO security model lets you deal with setting up groups of users with similar access rights in one of two ways:
- Assign a single user ID to all of the people in the group. Granting the one user ID the privileges to database objects all of the users need lets you set up access for many users at once because the one user ID that you set up will be used by multiple users. However, when you let people share the same user ID, you cannot distinguish the work performed by one employee login from another. (So, you won't know which employee in HR accidentally deleted the EMPLOYEE table, for example.)
- Assign a different user ID for each person in the group. Using multiple user IDs lets you hold each user accountable for work performed. However, setting up the same privileges over and over again for each member of a group is tedious and (therefore) error-prone-especially if you nave a large number of users needing the same privileges to many database objects.
MS-SQL Server provides a third alternative-database roles, which let you set up a set of access privileges on one or many database objects. By assign a user ID to a role, you can GRANT access privileges to many database objects at once, thereby reducing the time spent (and tedious nature of) administering access rights on a server with many database objects and large groups of users needing the same access privileges on those objects.
There are two types of database roles, standard and application. A standard role is what most people would call a group because you assign user IDs to a standard role (group) and then grant the standard role privileges to access database objects.
An application role, on the other hand, is a password-protected set of privileges. Unlike a standard role, an application role has no user IDs assigned to it. Instead, an application program connects to the DBMS using the name of the application role as its user ID and the role's password for authentication. Once it has established the connection, the DBMS grants the privileges defined in the application role to the application program.
To use Enterprise Manager to assign a user ID to an MS-SQL Server database role, perform the following steps:
- Start the Enterprise Manager by clicking your mouse on the Start button. When Windows displays the Start menu, move your mouse pointer to Programs, select Microsoft SQL Server 7.0, and then click your mouse on Enterprise Manager.
- To display the list of SQL Servers, click your mouse on the plus (+) to the left of SQL Server Group.
- Click your mouse on the plus (+) to the left of the icon for the SQL server on which you want to assign database roles. For example, if you want to assign roles on a server named NVBIZNET2, click your mouse on the plus (+) to the left of the icon for NVBIZNET2. The Enterprise Manager will display folders containing databases and services available on the MS-SQL Server you selected.
- Click your mouse on the plus (+) to the left of the Databases folder. The Enterprise Manager will display a list of the databases managed by the server you selected in Step 3.
- Select the database in which you want to assign roles. For the current project, select SQLTips by clicking your mouse on the plus (+) to the left of the SQLTips icon in the expanded Databases list. Enterprise Manager will display a list of database objects available in the database you selected.
- To have Enterprise Manager display the list of database roles in its right pane, click your mouse on the Roles icon in the database objects list you expanded in Step 5.
- Right-click on the role to which you wish to add a member, and select the Properties option from the pop-up menu. For the current example, right-click on the icon for the DB_OWNER role in the Enterprise Manager's right pane, and then select Properties on the pop-up menu. Enterprise Manager will display a Database Role Properties dialog box similar to that shown in Figure 139.1.
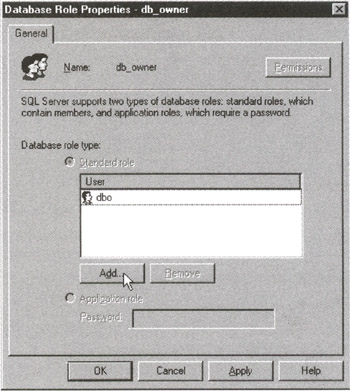
Figure 139.1: The MS-SQL Server Enterprise Manager Database Role Properties dialog box - To add a user ID to the role, click your mouse on the Add button. Enterprise Manager will display the list of user IDs not yet assigned to the role.
- Select the user IDs you want to add to the role, and then click your mouse on the OK button. For the current example, click your mouse on SQLTips and then the OK button. Enterprise Manager will add the user IDs you selected to the role and return to the Database Role Properties dialog box.
- Click your mouse on the OK button to save your changes and return to the Enterprise Manager application window.
- Click your mouse on the Close button (the X) in the upper-right corner of the Enterprise Manager window to exit Enterprise Manager.
You will learn how to create MS-SQL Server standard and application roles in Tip 142, "Using MS-SQL Server Enterprise Manager to Create Database Roles."
Understanding MS SQL Server Permission
Permissions, or privileges, are the rights a user ID has to access a database object such as a table, view, domain, or stored procedure. The database administrator (DBA) controls user and application program interaction with the database by granting and revoking privileges (permissions) to user IDs and roles.
In addition to permissions explicitly granted by the DBA, the DBMS also implicitly (automatically) gives the full set of object privileges to the owner or creator of an object. As such, the database object owner (DBOO) automatically has SELECT, INSERT, UPDATE, DELETE, EXEC, DIR (foreign key references), and data definition language (DDL) privileges on the database objects the user or application program creates. Moreover, the DBOO can also GRANT and REVOKE privileges to other user IDs.
| Note |
When a user ID creates a database (vs. a table, a view, or other objects within a database), the user ID becomes the database owner (DBO). MS-SQL Server automatically gives the DBO full permissions (all privileges) on all objects in the database. Moreover, the system administrator (SA) account, which is automatically created when you install MS-SQL Server, has full permissions (all privileges) to all objects in all databases on the SQL Server. |
The privileges, or permissions, available for database objects on MS-SQL Server are:
- SELECT. Lets a user-ID query or read data from a table or view. The SELECT privilege can be limited to individual columns within a table or view, or granted on the entire object as a whole.
- INSERT. Lets a user ID add rows to a table or view.
- UPDATE. Lets a user ID change data in a table or view. Similar to the SELECT privilege, the UPDATE privilege can be limited to individual columns within a table or view or granted on the entire objected as a whole.
- DELETE. Lets a user ID remove rows from a table or view.
- EXEC. (Execute.) Lets a user ID execute a stored procedure.
- DRI. (Declarative referential integrity.) Lets a user ID add FOREIGN KEY constraints on a table.
- CREATE TABLE. Lets the user ID add a new table to the database. As you already know, the user ID will become the DBOO of the table it creates and thus will have all privileges on that table.
- ALTER TABLE. Lets the user ID change the structure of a table.
- DROP TABLE. Lets the user ID DROP or delete a table.
- CREATE. Lets the user ID create the database object (such as a DEFAULT, PROCEDURE, RULE, or VIEW) to which it is granted the ALTER privilege. As was mentioned previously, the user ID will become the DBOO of the database object it creates, with all permissions (privileges) on the new database object.
- ALTER. Lets the user ID modify the structure of or the statements in (in the case of stored procedures) the database object (such as a DEFAULT, PROCEDURE, RULE, or VIEW) to which it is granted the ALTER privilege.
- DROP. Lets the user ID delete or remove the database object (such as a DEFAULT, PROCEDURE, RULE, or VIEW) to which it is granted the DROP privilege.
- BACKUP DATABASE. Lets the user ID back up an entire database to a backup device.
- BACKUP LOG. Lets the user ID back up a database transaction log to a backup device.
- CREATE DATABASE. Lets the user ID create a new database on the SQL Server. After creating the database, the user ID will become the DBO for the database and thus will have all permissions on all objects created in the new database by any user ID.
You will learn how to use the GRANT and REVOKE statements to give and remove permissions (privileges) from user IDs and roles in Tips 144–156.
Understanding SQL Security Objects and Privileges
An SQL database consists of objects such as tables, views, stored procedures, constraints, defaults, user-defined data types, indexes, and user IDs. The objects to which the DBMS applies security protections are further differentiated as security objects. Since tables and views are the two primary database objects, it was only logical that the first SQL standard (SQL-89) named both of them as security objects.
SQL-92 expanded the list of security objects beyond tables and views to include domains, data types, and character sets, and added external references protections for tables and views. In short, the SQL standards (both SQL-89 and SQL-92) specify that the DBMS be able to individually protect important objects found in all standard SQL database products. Protecting database security objects means letting a user ID have certain access privileges to some objects while prohibiting access to others.
| Note |
Each DBMS product expands the list of standard security objects by affording security protections to data objects its developers feel are worth safeguarding. MS-SQL Server, for example, adds security protections for stored procedures. Meanwhile, DB2 includes protections for indexes, schemas, and packages. (Check the GRANT and REVOKE statements in your system manual for a complete list of security objects in your DBMS implementation.) The important thing to know now is that the underlying SQL security scheme is to use the GRANT and REVOKE statements to give or withhold specific SQL statement execution privileges for database objects on a user-ID-by-user-ID basis. |
The set of SQL statements the user ID can execute on a database object (that is, the things the user ID can do to a "thing" in the database) are the user ID's privileges on the security object. All commercial DBMS products support the four security privileges defined in the SQL-89 and in SQL-92 standards:
- SELECT. Lets the user ID retrieve data from a table or view by using the table or view name in the FROM clause of the SELECT statement. Although the SQL standard allows the SELECT privilege to be granted or withheld for an entire table, several DBMS products (including SYBASE and MS-SQL Server) let you GRANT SELECT on specific columns in a table or view (vs. the entire object).
- INSERT. Lets the user ID add new rows to a view or table by using the table or view name in the INTO clause of the INSERT statement. SQL-92 expanded the original SQL-89 INSERT security privilege by letting the DBMS limit it to only specific columns in each row. Thus, a user ID may be able to add new rows to a table, but it may be forced to leave some of the row's column values NULL.
- DELETE. Lets the user ID remove rows from a table or view by using the table or view name in the FROM clause of the DELETE statement.
- UPDATE. Lets the user ID change values in a table or view by using the table or view name as the target of an UPDATE statement. SQL-92 expanded the original SQL-89 UPDATE security privilege by letting the DBMS limit it to only specific columns in each row. As such, a user ID may be able to change values in some columns but not others.
Most DBMS products also support the two new privileges added in SQL-92:
- REFERENCES. Lets a user ID refer to a column in a table or view in a foreign key or check constraint (Tip 153 will show you how a user-ID can use a foreign key or check constraint to determine the values in a column-even if the user-ID is denied SELECT privilege on the column or the entire table.)
- USAGE. Lets the user ID use domains (named sets of legal column values), user-defined character sets, collating sequences, and translations. For example, without USAGE privilege on a domain, a user ID cannot CREATE a table with a column that uses the domain name as its data type.
Your DBMS product will likely support security privileges beyond the six specified by the SQL-92 standard. (In Tip 140, "Understanding MS-SQL Server Permissions," you learned about several additional privileges supported by MS-SQL Server.) The important thing to know is that the DBMS protects its objects by allowing a user ID to execute only those statements to which it has been granted the privilege. Check the your system's documentation on the GRANT and REVOKE statements for the list of security objects and privileges your DBMS supports.
Using MS SQL Server Enterprise Manager to Create Database Roles
As you learned in Tip 139, "Understanding MS-SQL Server Security Roles and Group User Security," you can GRANT a user ID multiple privileges to one or several security objects by assigning the ID to a role. In effect, roles provide MS-SQL Server a group user security scheme. When you add a security permission to a role, that permission is granted to all of the members at once. Conversely, removing a privilege from a role causes every user ID in the group to lose the privilege. Thus, assigning a role to a user ID is the same as putting the ID into a group with the name of the role.
To use the MS-SQL Server Enterprise Manager to add a role to the database, perform the following steps:
- Start the Enterprise Manager by clicking your mouse pointer on the Start button. When Windows displays the Start menu, move your mouse pointer to Programs, select Microsoft SQL Server 7.0, and then click your mouse pointer on Enterprise Manager.
- To display the list of SQL servers, click your mouse pointer on the plus (+) to the left of SQL Server Group.
- Click your mouse pointer on the plus (+) to the left of the icon for the SQL Server on which you want to create a database role. For example, if you want to create a role on a server named NVBIZNET2, click your mouse pointer on the plus (+) to the left of the icon for NVBIZNET2. The Enterprise Manager will display folders containing databases and services available on the MS-SQL Server you selected.
- Click your mouse pointer on the plus (+) to the left of the Databases folder. The Enterprise Manager will display a list of the databases managed by the server you selected in Step 3.
- Select the database in which you want to create the role. For the current project, click your mouse pointer on the SQLTips icon in the expanded Databases list.
- Select the Action menu New option, and click your mouse pointer on Database role. Enterprise Manager will display a Database Role Properties-New Role dialog box similar to that shown in Figure 142.1.
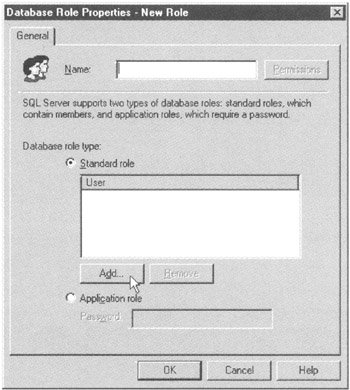
Figure 142.1: The MS-SQL Server's Enterprise Manager Database Role Properties-New Role dialog box - Enter the name of the new role in the Name field. For the current project, enter SQLTips_Users.
- Select the type of role you want to create by clicking your mouse pointer on the radio button to the left of Standard Role to create a user ID group, or on the radio button to the left of Application Role to create a privilege set for an application program. For the current project, click on the radio button to the left of Application Role.
- If you are creating an application role, continue at Step 10. Otherwise, to assign a standard role to one or more user IDs, click your mouse pointer on the Add button. Enterprise Manager will display the Add Role Members dialog box showing the list of user IDs to which the role has not yet been assigned. Click your mouse pointer on the user IDs you want to include as role members, and then click your mouse pointer on the OK button. For the current project, click your mouse pointer on the user ID SQLTips (which you created in Tip 137, "Using the MS-SQL Server Enterprise Manager to Add Logins and Users"), and then click your mouse pointer on the OK button.
- If you are creating a standard role, continue at Step 11. Otherwise, to finish creating an application role, enter the application role's password in the Password field.
Note Unless you want any user or application program that knows the name of the application role to have access to the database, be sure to put a nonblank password into the Password field.
- To add the new role to the database, click on the OK button.
Note MS-SQL Server roles are local to the database in which they are created. Therefore, if you create a role in one database (such as SQLTips, for example), the role is not available for assignment to user IDs in the PUBS database. As such, you must create the role in each database in which you need to use it—unless you create the role in the MODEL database. Roles, like other objects in the MODEL database, are added to each new database you tell MS-SQL Server to create.
After you create a standard or application role, you must GRANT the role privileges, which you will learn to do in Tip 143, "Using MS-SQL Server Enterprise Manager to Assign Database Role Privileges." Remember, a role can bestow the set of privileges it is assigned only to the user IDs that are members of the standard role or the application programs or users that log on using the application role name as a user ID.
Using MS SQL Server Enterprise Manager to Assign Database Role Privileges
You learned how to create standard and application roles in Tip 142, "Using MS-SQL Server Enterprise Manager to Create Database Roles," and how to assign a standard role to user IDs in Tip 139, "Understanding MS-SQL Server Security Roles and Group User Security." However, as was mentioned at the end of Tip 142, a role will give user IDs assigned to it only those privileges that make up the role's permissions set. There are two ways to give a role the set of privileges it can give to its members-either by using the GRANT statement (which you will learn about in Tip 144, "Understanding Ownership Privileges and the GRANT Statement") or by using the Enterprise Manager to edit role properties.
To give a role (and, by extension, the user IDs to which it is assigned) access privileges to database security objects, perform the following steps:
- Start the Enterprise Manager and display the Database Role Properties dialog box by performing Steps 1 through 6 of the procedure in Tip 139.
- Right-click your mouse pointer on the role whose privileges you want to assign. For the current project, right-click your mouse pointer on the icon for the SQLTips_USERS Role you created in Tip 142. Enterprise Manager will display the Database Role Properties dialog box.
- To display the Permissions tab similar to that shown in Figure 143.1, click your mouse pointer on the Permissions button.
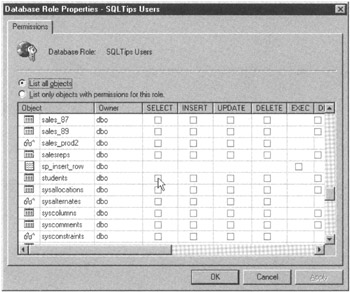
Figure 143.1: The Permissions tab of the MS-SQL Server Enterprise Manager Database Role Properties-New Role dialog boxNote If you are changing only some of the privileges on objects to which you gave the role permissions in the past, click your mouse pointer on the radio button to the left of List Only Objects with Permissions for This Role to reduce the number of database objects displayed in the object list area of the Permissions tab. When you want to give a role privileges (permissions) on additional database objects (as is the case in the current example), you want to see all database objects in the list area, which is the default.
- Use the scroll bar to the right of the database object list area to find the database object(s) on which you want the role to have SQL statement execution privileges. For the current example, find any one of the tables you created in previous tips. If you have not created any tables, use one of the views (denoted by the eyeglass icon in the Object column.)
- To GRANT permissions (privileges), click your mouse pointer on the check box in the column of each permission you want user IDs or application programs assigned to the role to have on the database object. For example, to GRANT SELECT, INSERT, UPDATE, DELETE and DRI privileges on the STUDENTS table, you click your mouse pointer on the check boxes in column of the STUDENTS row of the list box until each one has a check mark in it.
Note Not all privileges are available for all database objects, and the permissions check box is missing from the columns where the privilege is not applicable to the database object. For example, Figure 143 shows that you can GRANT EXEC (execute) privilege only on the SP_INSERT_ROW-which makes sense since SP_INSERT_ROW is a stored procedure and the other permissions are not applicable to it. Conversely, you cannot GRANT the role EXEC permission on the tables and rows listed in the object area. Finally, DIR (external FOREIGN KEY and CHECK reference privilege) is applicable only to database tables.
- Repeat Steps 4 and 5 until you have selected all of the privileges on each of the database objects you want the role (and its members or application program) to have.
- Click your mouse pointer on the OK button to save your permission selections and return to the General tab of the Database Role Properties dialog box.
- To update the role's definition in the database's system tables, click your mouse pointer on the OK button on the Database Role Properties dialog box.
- To exit Enterprise Manager, click your mouse pointer on the Close button (the X) in the upper-right corner of the Enterprise Manager.
One minor problem in using Enterprise Manager to GRANT statement execution privilege to a role is that it allows you to GRANT or REVOKE each privilege only on the entire database object. As such, if you use Enterprise Manager to GRANT UPDATE privilege on the EMPLOYEES table to the SQLTips_USERS role, all of the role's members will be able to modify all of the columns in the EMPLOYEES table.
In Tips 145-156, you will learn how to use the GRANT statement to limit a role's privileges to specific columns in a table or view.
Understanding Ownership Privileges and the GRANT Statement
The user ID that successfully executes a CREATE TABLE or CREATE VIEW statement becomes the database object owner (DBOO) of the object created. Since the DBMS automatically assigns the full set of privileges on the object to its owner, the DBOO has SELECT, INSERT, DELETE, UPDATE, REFERENCES, and any other privilege supported by the DBMS to security objects he or she creates.
Other than the database administrator (DBA) (who has full privileges on all objects in all databases managed by the DBMS) and the database owner (DBO) (who has full privileges to all objects in the database he or she created), no one other than the DBOO has any rights to a newly created object. As such, in order for anyone (other than DBA and the DBO) to have access to a table, the table's DBOO must GRANT the user ID privileges to execute SQL statements with the table as their target.
Although a database view functions like a table in most SQL statements, creating a view to display a table's data does not give a user ID ownership privileges on the table. The user ID executing the CREATE VIEW command becomes the owner (DBOO) of the view and may exercise all privileges supported by the database on that view. However, the DBMS will disallow INSERT, UPDATE, or DELETE statements on the newly created view unless the user ID has the corresponding privilege on both the view and the view's base table. For example, if you have a view named NEW_EMPLOYEE_LIST based on the data in the EMPLOYEES table, you cannot UPDATE the view's HOURLY_RATE column unless you have UPDATE privilege on the EMPLOYEES table-even if you created the NEW_EMPLOYEE_LIST view yourself.
| Note |
In order to execute a CREATE VIEW statement successfully, the user ID must have SELECT privilege on each of the source table columns the view is to display. |
A DBA (DBMS administrator), DBO (database operator), and DBOO (object operator) can use the GRANT statement to give a user ID or role privileges on a database object such as a table or view. The basic syntax of a GRANT statement is:
 GRANT  [()]
 ON
 TO  [WITH GRANT OPTION]
Thus, to GRANT user ID KONRAD the privilege to retrieve employee data from and add new rows to the EMPLOYEES table, you would execute the GRANT statement:
GRANT SELECT, INSERT ON employees TO konrad
To give all members of the SQLTips_USERS role the ability to add rows to and remove rows from the TIPS table, you would execute the GRANT statement:
GRANT INSERT, DELETE ON tips TO sqltips_users
Finally, to give user ID SALLY the ability to modify only the FIRST_NAME, LAST_NAME, and ADDRESS columns of the rows in the EMPLOYEES table, you would use the GRANT statement:
 GRANT UPDATE (first_name, last_name, address)
 ON employees TO sally
You will learn more about using the GRANT statement to in Tips 149-156. For now, the important thing to know is that the owner of a database object (the DBOO) can use the GRANT statement to give other user IDs and roles permission to execute certain SQL statements on the object.
Using the GRANT Statement WITH GRANT OPTION to Allow Users to Give Database Object Access to Other Users
As the database object owner (DBOO), you have control over which user IDs can access objects you create and what those users can do to those objects. After you create an object such as a table or view, only your user ID can execute SQL statements on it until you use the GRANT statement to give another user access privileges.
| Note |
The database administrator (DBA) and database owner (DBO) accounts have full privileges, including GRANT, on all objects in the database. |
For example, if you execute the GRANT statement
GRANT ALL PRIVILEGES ON employees TO sally
right after you create the EMPLOYEES table, only your user ID and user ID SALLY will be able to work with the EMPLOYEES table. Moreover, while the GRANT statement gives Sally all privileges on the EMPLOYEES table, she cannot give another user ID access privileges on the table because your GRANT statement did not include the WITH GRANT OPTION clause.
Suppose, for example, that you created a Las Vegas employees view named VW_VEGAS_EMPLOYEES. To give your Las Vegas office manager, Mary (user ID MARY), query access to the view, you can execute the GRANT statement:
GRANT SELECT ON vw_vegas_employees TO mary
After GRANTing her SELECT privilege, Mary is able to query the data in the underlying table(s) that "feed" the VW_VEGAS_EMPLOYEES view. However, she cannot give anyone else privilege to work with the view. Moreover, Mary cannot create another view based on the VW_VEGAS_EMPLOYEES view.
| Note |
The DBOO has all privileges (including GRANT) on the objects he or she creates. However, letting Mary, in the current example, create an object that would let another user see VW_VEGAS_EMPLOYEES view data when Mary does not have WITH GRANT OPTION access to the view would violate DBMS access security. As such, the DBMS prevents a user ID from creating a view on any object (table or view) on which it does not have SELECT privilege and a WITH GRANT OPTION. |
If you want Mary to be able to GRANT other user IDs SELECT privilege on the VW_VEGAS_EMPLOYEES view, include the WITH GRANT OPTION. For example, the WITH GRANT OPTION in a GRANT statement such as
 GRANT SELECT ON vw_vegas_employees
 TO mary WITH GRANT OPTION
lets the user ID to which the privilege list is granted pass on any privilege(s) in the list to another user ID. Thus, the WITH GRANT OPTION in the current example will let Mary GRANT another user-ID SELECT access to the VW_VEGAS_EMPLOYEES view. Mary cannot, however, GRANT any privileges (such as INSERT, DELETE, UPDATE, or REFERENCES, in the current example) that she has not been granted WITH GRANT OPTION.
Be careful when including the WITH GRANT OPTION in a GRANT statement. By allowing another user to give access to your database objects, you are trusting that he or she will be as careful as you are in protecting the database object from other users. If you give WITH GRANT OPTION privilege to another user, that user not only can GRANT the privileges he or she has on the object, but also can pass along the privileges and the WITH GRANT OPTION privilege to another user ID.
Understanding the REVOKE Statement
In Tip 144, "Understanding Ownership Privileges and the GRANT Statement," you learned that the database object owner (DBOO) can use the GRANT statement to give other users access privileges to objects he or she owns. The REVOKE statement does the reverse. By executing a REVOKE statement, the DBOO takes away privileges he or she previously granted on a database object to other user IDs and/or roles.
The syntax of the REVOKE statement is:
REVOKE [GRANT OPTION FOR][()]
ON
FROM  [CASCADE | RESTRICT]
If you previously granted SELECT, INSERT, and REFERENCES privileges on the EMPLOYEES table to user ID FRANK with a GRANT statement similar to
GRANT SELECT, INSERT, REFERENCES ON employees TO frank
and then executed the REVOKE statement
REVOKE INSERT, REFERENCES ON employees FROM frank
User ID FRANK will retain only the SELECT privilege on the EMPLOYEES table.
When you execute a REVOKE statement, bear in mind that you can rescind only privileges you previously granted. As such, if both you and another user GRANT the same privilege on an object to a user ID, the user ID will still have the privilege if you later REVOKE the privilege and the other user does not.
For example, suppose user ID CAROL executed the GRANT statement
GRANT SELECT, INSERT, UPDATE ON employees TO frank
and you executed the GRANT statement:
GRANT SELECT, INSERT, REFERENCES ON employees TO frank
If you later execute the REVOKE statement
REVOKE ALL PRIVILEGES ON employees FROM frank
User ID FRANK will still have SELECT, INSERT, and UPDATE privileges on the EMPLOYEES table because these privileges were granted by CAROL. Your REVOKE ALL PRIVILEGES command removed only all of the privileges on the EMPLOYEES table that you previously granted to FRANK.
Using the REVOKE Statement with the CASCADE Option to Remove Privileges
As you learned in Tip 145, "Using the GRANT Statement WITH GRANT OPTION to Allow Users to Give Database Object Access to Other Users," when the database object owner (DBOO) (or other grantor) adds WITH GRANT OPTION to a GRANT statement, the user ID receiving privileges on an object can GRANT those privileges to other users. Adding the CASCADE option to a REVOKE statement lets the original GRANTor take away the privilege(s) being revoked from the initial recipient and from any other user ID to which he or she passed the privilege.
For example, the GRANT statement
 GRANT SELECT, INSERT ON employees TO frank
 WITH GRANT OPTION
gives user ID FRANK SELECT and INSERT privilege on the EMPLOYEES table. The WITH GRANT OPTION gives FRANK the ability to GRANT his privileges (including the WITH GRANT OPTION) to another user ID with a GRANT statement such as:
GRANT SELECT, INSERT ON employees to SUE WITH GRANT OPTION.
Since user ID SUE received privileges and the WITH GRANT OPTION from FRANK, she, too, can execute a GRANT statement such as:
GRANT SELECT ON employees TO Scott
If the a user wants to REVOKE one or more privileges previously granted to another user ID, the CASCADE option on the REVOKE statement tells the DBMS to remove all privilege(s) resulting from the original GRANT statement. Therefore, in the current example, the REVOKE statement
REVOKE INSERT ON employees FROM frank CASCADE
will take away the SELECT privilege on the EMPLOYEES table from user ID FRANK and then cascades through the security system removing the SELECT privilege on the EMPLOYEES table from SUE and SCOTT as well (because their SELECT privileges flowed from the original SELECT granted to FRANK).
SQL-92 requires that you tell the DBMS what to do when revoking privileges that have been granted to other users. MS-SQL Server implements the standard by requiring you to add the CASCADE option to any REVOKE statement that removes a privilege previously granted through the WITH GRANT OPTION. As such, if you are running MS-SQL Server, you cannot remove only the original user ID's privilege(s). Since the REVOKE statement must include the CASCADE option, MS-SQL Server requires that you take away the previously granted privilege(s) not only from the user ID to whom you granted the privilege(s) but also from all user IDs to which that user ID granted the privilege(s).
Because different implementations handle revoking privileges passed from one user to the next in different ways, you will need to check your system documentation on the REVOKE statement to see how your DBMS requires you to handle the removal of privileges granted with the WITH GRANT OPTION.
Some DBMS products let you issue the REVOKE statement without the CASCADE option if the user ID that granted the privilege has not yet passed it on to another user. Other products provide the RESTRICT option such that the REVOKE statement
REVOKE INSERT ON employees FROM frank RESTRICT
will execute successfully if FRANK has not granted INSERT privilege on the EMPLOYEES table to another user, and will fail (with an error message) if he has.
Protecting database objects (especially tables and views) from unauthorized access is very important to the DBMS. As such, you will want to maintain tight control over who can do what to the objects you own. Therefore, always add the CASCADE option when revoking a privilege previously granted with the WITH GRANT OPTION. If your DBMS lets you revoke only the original user's privilege(s), you lose control of who has what access privileges to the database objects you own. After all, you really do not know to whom the user (whose access rights you revoked) granted privileges by exercising the GRANT statement's WITH GRANT OPTION.
| Note |
Almost all DBMS products automatically revoke all privileges derived from the original GRANT statement. As such, the CASCADE option in the REVOKE statement serves as a reminder that the effect of executing the REVOKE may have the effect of preventing database object access by more than just the user ID named in the statement. |
Using the REVOKE Statement GRANT OPTION FOR Clause to Remove GRANT Privilege
Executing a GRANT statement that includes the WITH GRANT OPTION, such as
 GRANT SELECT, INSERT, UPDATE, DELETE ON invoices
 TO konrad, mary WITH GRANT OPTION
gives the user IDs named in the statement the ability to pass any or all of the privileges they receive on to other users. Thus, in the current example, user IDs KONRAD and MARY can GRANT SELECT, INSERT, UPDATE, and DELETE on the INVOICES table to other user IDs or roles (groups of users).
In Tip 147, "Using the REVOKE Statement with the CASCADE Option to Remove Privileges," you learned how to use the REVOKE statement with the CASCADE option to remove a user IDs privilege(s) and those he or she granted to others by exercising the WITH GRANT OPTION. Sometimes, however, you want to remove only the user ID's GRANT privilege while leaving the actual access privileges to the object intact—that is where the GRANT OPTION FOR clause in the REVOKE statement comes in.
The GRANT OPTION FOR clause in the REVOKE statement lets you remove a user ID's ability to GRANT privileges on a database object to other users without taking away the user's access privileges on the database object.
For example, executing the REVOKE statement
 REVOKE GRANT OPTION FOR INSERT ON invoices
 FROM konrad CASCADE
on MS-SQL Server will allow user-ID KONRAD to keep SELECT, INSERT, UPDATE, and DELETE privileges on the INVOICES table but will REVOKE any INSERT privileges KONRAD granted to other users and prevent KONRAD from granting INSERT privilege in the future. As such, if KONRAD previously executed the GRANT statements
 GRANT INSERT, UPDATE ON invoices TO sue
 GRANT SELECT, INSERT, UPDATE ON invoices TO frank
SUE will retain UPDATE privilege on the INVOICES table, and FRANK will keep SELECT and UPDATE privileges after the database object owner (DBOO) executes the REVOKE (GRANT OPTION FOR) statement:
 REVOKE GRANT OPTION FOR INSERT ON invoices
 FROM konrad CASCADE
Although MS-SQL Server revokes the privilege(s) passed to other users when you REVOKE a user ID's GRANT privilege(s), not all DBMS products exhibit the same behavior.
Unlike revoking a privilege, which tells the DBMS to revoke the privilege from the user ID and from any users to whom he or she passed the privilege, revoking the WITH GRANT OPTION tells the DBMS only to disallow the user ID and any user to whom he passed the WITH GRANT OPTION from granting the privilege again. MS-SQL Server implements the revocation of the GRANT privilege by taking away the GRANT privilege from user ID named in the statement and REVOKING the privilege from all users to whom the user ID previously passed the privilege by exercising the GRANT option.
Check your system documentation on the REVOKE statement to see how your DBMS handles revoking a user ID's ability to GRANT access privileges to another user. All DBMS products let you use the REVOKE GRANT OPTION to take away a user ID's ability to GRANT privileges listed in the statement to others. (The user ID whose GRANT option is revoked still retains his own access privilege on the object.) Some products (unlike MS-SQL Server) will also let users previously granted the privilege (whose GRANT privilege is being revoked) to continue to exercise the privilege previously derived from the original GRANT WITH GRANT OPTION.
Using the GRANT SELECT (and REVOKE SELECT) Statement to Control Access to a Database Object
Granting SELECT privilege on a table or view to a user ID or role lets the user ID or role members "see" the data in a table. As you learned in Tip 144, "Understanding Ownership Privileges and the GRANT Statement," the database object owner (DBOO) has full privileges to objects he or she creates, while all other database users have no access rights at all. As such, the DBOO must execute a GRANT statement with SELECT as one of the privileges in the privilege list to let other user IDs and programs view data in a table.
The syntax of the GRANT statement used to give SELECT privilege is:
GRANT SELECT [() ]
ON  |
TO  [WITH GRANT OPTION]
Thus, to allow user ID KONRAD to execute SELECT or CREATE VIEW statements on the EMPLOYEES table, for example, the table's DBOO (or other user that has GRANT SELECT privilege) must execute a GRANT statement such as:
GRANT SELECT ON employees TO konrad
Or, to GRANT SELECT access on the VW_LV_EMPLOYEES view to MARY, SUE, and the PAYROLL_USERS role, the view's DBOO could execute the GRANT statement:
GRANT SELECT ON vw_lv_employees TO mary, sue, payroll_users
As a final example, to give SELECT access on the INVOICES table to FRANK and to allow FRANK to GRANT SELECT access to other users, a user ID with GRANT SELECT privileges on the INVOICE table would include the WITH GRANT OPTION in the GRANT statement, as follows:
GRANT SELECT ON invoices TO frank WITH GRANT OPTION
SELECT privilege (with or without the option to GRANT SELECT) to another user ID or role lets a user ID or program only query and view a table's data. It does not convey the ability to change column values, remove rows from, or add rows to a table.
When the person who granted SELECT access on an object to a user ID or role no longer wants the user ID or role members to view the data in a table, the grantor can execute a REVOKE statement to remove SELECT access. The syntax of a REVOKE statement that takes away SELECT access privilege is:
 REVOKE [GRANT OPTION FOR] SELECT | ()
 ON
| FROM [CASCADE]
Thus, if the DBOO granted SELECT access on the VW_LV_EMPLOYEES view to MARY, SUE, and the members of the PAYROLL_USERS role and later wanted only SUE to have query access to the view, the DBOO could execute the REVOKE statement:
REVOKE SELECT ON vw_lv_employees FROM mary, payroll_users
One important thing to remember is that a user ID can REVOKE only access privilege that it granted. As such, if the DBOO granted SELECT access on the INVOICES table to user ID FRANK with the GRANT statement
GRANT SELECT ON invoices TO frank WITH GRANT OPTION
and FRANK subsequently exercised his GRANT option to GRANT SELECT access on the INVOICES table to SUE, the DBOO could not REVOKE SUE's SELECT access privileges with the REVOKE statement
REVOKE SELECT ON invoices FROM sue
since SUE's access was granted by FRANK.
To REVOKE SUE's SELECT access to the INVOICES table, either FRANK would have to execute the REVOKE statement or the user ID that granted FRANK SELECT access with the WITH GRANT OPTION (the DBOO, in the current example) would have to either REVOKE FRANK'S GRANT SELECT option using
 REVOKE GRANT OPTION FOR SELECT ON invoices
 FROM frank CASCADE
or REVOKE FRANK's SELECT privilege on the INVOICES table entirely using:
REVOKE SELECT ON invoices FROM frank CASCADE
As you learned in Tip 147, "Using the REVOKE Statement with the CASCADE Option to Remove Privileges," revoking a privilege or the GRANT OPTION for a privilege (on MS-SQL Server) removes the access privilege from all user IDs that derived the privilege on the object from the original GRANT statement. In the current example, SUE's SELECT privilege on the INVOICES table was derived from FRANK's GRANT statement. As such, revoking FRANK'S SELECT privilege on the INVOICES table takes away SUE's derived SELECT privilege on the INVOICES table as well.
| Note |
After the DBOO or another grantor uses the REVOKE statement to remove a user IDs SELECT privilege, the user ID will still have SELECT access on the database object if someone else also granted it the same privilege on the object. For example, if both WALTER and SCOTT granted SELECT on the INVOICES table to SUE, and SCOTT later executed the statement REVOKE SELECT ON invoices FROM sue SUE would still have SELECT access on the INVOICES table because SCOTT's revocation of the SELECT privilege has no effect on the SELECT access that WALTER granted to SUE. |
Understanding MS SQL Server Column List Extension to the SELECT Privilege
The ANSI/ISO standard does not permit the inclusion of a column list when granting the SELECT privilege. As such, if a DBMS product strictly adheres to the standard, granting SELECT is an all-or-nothing proposition—either a user ID has SELECT access to all of the columns in a table or view, or the user ID has no SELECT access to any of them. By extending the standard, MS-SQL Server (as well as several other DBMS products) lets you specify a list of columns when you want to GRANT SELECT on some columns in a table or view and not others.
Suppose, for example, that you want to give the benefits coordinator, PAUL, access to the ID, name, insurance, and retirement plan information in the employee record. However, you do not want him to see any of the salary, ratings, and quota data. MS-SQL Server lets you specify the columns a user ID can query with a SELECT statement by including the column list in a GRANT statement similar to:
GRANT SELECT (id, name, health_plan_selection,
 health_plan_cost, dental_plan_selection,
 dental_plan_cost,
 retirement_plan_participation_pcnt,
 retirement_plan_vesting_date)
ON employees TO paul
In the current example, if PAUL executes the SELECT statement on a column in the EMPLOYEES table to which he does not have query access, such as
SELECT id, name, salary FROM employees
MS-SQL Server will respond with the error message similar to:
Server: Msg 230, Level 14, State 1, Line 1
SELECT permission denied on column 'salary' of object
'employees', database 'SQLTips', owner 'dbo'.
The important thing to remember is that granting SELECT privilege without a column list lets the user ID see data in all of the columns in the table or view on which the privilege is granted. Adding a column list to the GRANT SELECT statement limits the user ID's SELECT privilege to only displaying data in the listed columns.
| Note |
If your DBMS product does not let you specify a column list in the GRANT SELECT statement, you can still limit the users to having only SELECT access on specific table columns by granting SELECT access on a view instead of on the base table itself. You will learn more about using a view to limit a user ID's SELECT access to specific table columns in Tip 157, "Using a View to Limit SELECT Privilege to Specific Columns in a Table." |
Using the GRANT INSERT (and REVOKE INSERT) Statement to Control Access to a Database Object
The INSERT privilege on a table or view lets a user ID or the members of a role add rows of data to a table. As you learned in Tip 150, "Understanding MS-SQL Server Column List Extension to the SELECT Privilege," a user with SELECT privilege can only "see" a table's data and is not able to modify its contents at all. Conversely, a user ID with only INSERT privilege is able to change a table's contents (by adding rows) but is not able to review any work performed—unless the ID also has SELECT privilege on the object. Moreover, without DELETE privilege (which you will learn about in Tip 154, "Using the GRANT DELETE [and REVOKE DELETE] Statement to Control Access to Database Objects"), the user cannot remove a row just added or even change data values in the row without UPDATE access (which you will learn about in Tip 152, "Using the GRANT UPDATE [and REVOKE UPDATE] Statement to Control Access to Database Objects"). Thus, INSERT privilege is just that—the ability to add rows to a table (either directly or through a view). After insertion, the row becomes a part of the table, and the user ID that added it has no additional privileges on the row beyond those that the user has on the table or view.
The syntax of the GRANT statement used to give INSERT privilege is:
 GRANT INSERT ON  |
 TO  [WITH GRANT OPTION]
As such, to allow user ID SALLY to execute INSERT statements on the INVOICES table, for example, the table's owner (or other user with GRANT INSERT privilege) must execute a GRANT statement such as:
GRANT INSERT ON invoices TO sally
Or, to give INSERT access on the PRODUCTS table to GARY and to allow GARY to GRANT INSERT access to other users, someone with GRANT INSERT privilege on the PRODUCTS table must include the WITH GRANT OPTION in the GRANT statement, as follows:
GRANT INSERT ON products TO gary WITH GRANT OPTION
Finally, to GRANT INSERT access on the VW_KEY_CUST_ORDERS view to LEONARD, MARK, and the SALES_MANAGERS role, a user with GRANT INSERT access on the view must execute the GRANT statement:
 GRANT INSERT ON vw_key_cust_orders
 TO leonard, mark, sales_managers
| Note |
In order to successfully GRANT INSERT access on a view, the owner (DBOO) of the view must also have GRANT INSERT on the underlying table on which the view is based. As you learned in Tip 11, "Understanding Views," a view is a virtual table in that it does not have any data (rows) of its own. Instead, a view simply displays data values found in an underlying "real" table. As such, when inserting a row into a view, the user is actually adding a row to the underlying table whose data the view displays. |
Since one needs only SELECT access on a table to create a view based on it, a user without INSERT access on the underlying table can create a view. Moreover, as the owner of the newly created view, the user can grant INSERT access on the view to another user. (Remember, the user ID creating a table or view has full privileges on the object as its owner—which includes the right to GRANT INSERT on the object to another user.) However, if the user that created the view does not have INSERT access on its underlying table, the DBMS will not allow the insertion of data into the underlying table through the view.
Conversely, when a user with GRANT INSERT access on the underlying table creates a view and then grants INSERT access on the view to another user, the user receiving INSERT access will be able to add rows to the underlying table through the view. For example, given a VW_KEY_CUST_ORDERS view based on an ORDERS table, a user with GRANT INSERT access on the view and on the ORDERS table can execute the GRANT statement
GRANT INSERT ON VW_KEY_CUST_ORDERS TO frank
to give user ID FRANK the access privilege to INSERT a row into the underlying (ORDERS) table by using the view in the INTO clause of an INSERT statement such as:
 INSERT INTO vw_key_cust_orders
 VALUES ('1/1/2001', 1, 8, 6, 258.25, 20)
The DBMS will not, however, allow FRANK to add a row directly to the ORDERS table using the INSERT statement
INSERT INTO order VALUES ('1/1/2001', 1, 8, 6, 258.25, 20)
because FRANK has INSERT access only on the VW_KEY_CUST_ORDERS view and does not have INSERT access on the ORDERS table itself.
When you want to take away a user's ability to add rows to a table, execute a REVOKE INSERT statement to take away the INSERT privilege you previously granted. For example, if you granted INSERT access on the INVOICES table to SALLY, you can take away her ability to add rows to INVOICES by submitting the REVOKE statement:
REVOKE INSERT ON invoices FROM sally
After executing the REVOKE INSERT statement, any other privileges SALLY had on the INVOICES table remain in place. Moreover, as was the case with the SELECT privilege, SALLY will still have INSERT access on the INVOICES table if she received the privilege from another user in addition to the one executing the REVOKE INSERT statement. When you REVOKE a privilege, the DBMS takes away only the privilege you granted, and the REVOKE statement has no effect on the same privilege granted on the object by another user.
Using the GRANT UPDATE (and REVOKE UPDATE) Statement to Control Access to Database Object
UPDATE privilege on a table or view lets a user or application program execute UPDATE statements to selectively change data values stored in existing rows. While users with UPDATE access can change a table's data, they cannot add new rows, remove rows, or even "see" existing data values stored in the table.
| Note |
In some DBMS products (including MS-SQL Server), the user must have both UPDATE and SELECT access on an object to successfully execute an UPDATE statement on the table or view. When executing an UPDATE statement on MS-SQL Server, for example, the DBMS first selects the rows whose data values are to be updated and then executes the actual UPDATE on the selected rows. As such, if a user on an MS-SQL Server has UPDATE but not SELECT access on a table or view, the user will not be able to change the table's data because the DBMS will not allow the user to "select" the rows to be updated by the UPDATE statement. Therefore, to GRANT UPDATE access on MS-SQL Server, for example, you must GRANT both UPDATE and SELECT access on the object. Check your system documentation to see if your DBMS requires that a user ID have both UPDATE and SELECT access on an object to be able to change data values in it. |
The syntax of the GRANT statement used to give UPDATE privilege is:
 GRANT UPDATE [()]
 ON  |
 TO  [WITH GRANT OPTION]
Thus, to allow user ID KRIS to execute UPDATE statements on the INVOICES table, for example, the table's owner (or other user with GRANT UPDATE privilege) must execute a GRANT statement such as:
GRANT UPDATE ON invoices TO kris
Or, to give UPDATE access on the PRODUCTS table to FRANK and allow FRANK to GRANT UPDATE access to other users, someone with GRANT UPDATE privilege on the PRODUCTS table must include the WITH GRANT OPTION in the GRANT statement, as follows:
GRANT UPDATE ON products TO frank WITH GRANT OPTION
Finally, to GRANT UPDATE access on the VW_LV_INVENTORY view to SCOTT, HARMON, and the LV_STORE_MANAGERS role, a user with GRANT UPDATE permission on the view must execute the GRANT statement:
 GRANT UPDATE ON vw_lv_inventory
 TO scott, harmon, lv_store_managers
| Note |
In order to successfully GRANT UPDATE access on an object through a view, the user granting UPDATE access on the view must also have GRANT UPDATE access on the underlying table on which the view is based. As you learned in Tip 11, a view is a virtual table without any physical data of its own. Rather, a view displays data values found in underlying "real" table(s). As such, when updating data values in a view, the user is actually changing the data in the columns of the view's underlying table. |
Since one needs only SELECT access on a table to create a view based on it, a user without UPDATE access on the underlying table can create a view. Moreover, the owner of the newly created view can GRANT UPDATE access on the view to another user. (Remember, the user ID that creates a table or view has full privileges on the object—including the right to GRANT UPDATE on the object to another user.) However, if the user that created the view does not have UPDATE access on its underlying table, the DBMS will not allow the modification of data in the underlying table through the view.
Conversely, when a user with GRANT UPDATE access on the underlying table creates a view and then grants UPDATE access on the view to another user, the user receiving UPDATE access will be able to change data values in the underlying table through the view. For example, given a VW_KEY_CUST_ORDERS view based on an ORDERS table, a user with GRANT UPDATE access on the view and on the ORDERS table can execute the GRANT statement
GRANT UPDATE ON VW_KEY_CUST_ORDERS TO david
to give user ID DAVID permission to UPDATE values in the underlying (ORDERS) table by using the view as the target table in an UPDATE statement such as:
 UPDATE vw_key_cust_orders SET ship_date = '07/11/2001'
 WHERE invoice_date = '07/10/200' AND ship_date IS NULL
The DBMS will not, however, allow DAVID to change data values directly in the ORDERS table with the similar UPDATE statement
 UPDATE ORDERS SET ship_date = '07/11/2001'
 WHERE invoice_date = '07/10/200' AND ship_date IS NULL
that uses the ORDERS table instead of the view as the target of the UPDATE statement. David has UPDATE access only on the VW_KEY_CUST_ORDERS view but does not have UPDATE access on the ORDERS table itself.
Granting UPDATE access on a table or view is not an all-or-nothing proposition. If you want user ID KAREN, for example, to be able to modify data in only some of the columns in the INVENTORY table and not others, list the columns KAREN can modify in the GRANT UPDATE statement. For example, the GRANT statement
GRANT UPDATE ON inventory TO karen
gives user ID KAREN the ability to change data in any of the columns in the INVENTORY table, while the GRANT statement
 GRANT UPDATE (item_description, item_cost) ON inventory
 TO karen
lets KAREN modify only the values in the ITEM_DESCRIPTION and ITEM_COST columns of the INVENTORY table.
When you want to take away a user's ability to change data values in a table, execute a REVOKE UPDATE statement to remove the UPDATE privilege you previously granted to the user. For example, if you granted UPDATE access on the INVOICES table to SUE, you can take away her ability to change data values in the INVOICES table using the REVOKE statement:
REVOKE UPDATE ON invoices FROM sue
After the DBMS executes the REVOKE UPDATE statement, any other privileges the user ID has on the object remain in place. Moreover, as was the case with the SELECT and INSERT privileges, the user will still have UPDATE access on an object after you do a REVOKE UPDATE if the user also received UPDATE access on the object from another user. When you REVOKE a privilege, the DBMS takes away only the privilege you granted, and the REVOKE statement has no effect on the same privilege granted on the object by another user.
Just as granting UPDATE access on an object is not an all-or-nothing proposition, neither is revoking the privilege. To REVOKE UPDATE access on only specific columns in a table or view (vs. the entire object), list the columns the user is no longer allowed to UPDATE as part of the REVOKE statement. For example, while the REVOKE statement
REVOKE UPDATE ON invoices FROM sue
prevents user ID SUE from updating any of the columns in the INVOICES table, the REVOKE statement
REVOKE UPDATE (invoice_date, cust_id, item_cost)
ON invoices FROM sue
prevents user ID SUE only from updating the INVOICE_DATE, CUST_ID, and ITEM_COST columns of the INVOICES table.
Using the GRANT REFERENCES (and REVOKE REFERENCES) Statement to Control Access to Database Objects
The REFERENCES privilege allows a user to refer to the table's PRIMARY KEY and any other columns constrained by the UNIQUE constraint as the FOREIGN KEY in another table. (You will learn about the PRIMARY KEY constraint in Tip 171, "Understanding Primary Keys," and about the UNIQUE constraint in Tip 192, "Using the UNIQUE Column Constraint to Prevent Duplicate Values in a Column.") Although REFERENCES privilege does not give a user the ability to display a table's data directly, the access privilege was added to SQL-92 to deal with a subtle security issue posed by a user's ability to use a FOREIGN KEY to indirectly determine data values in a table's columns-without SELECT access on those columns. Suppose, for example, that a user does not have SELECT access to a table called TAKEOVER_STOCKS_LIST but knows that the STOCK_SYMBOL column is the PRIMARY KEY for the table. By creating a table with the definition
CREATE TABLE my_takeover_stocks
 (symbol VARCHAR(10)
 CONSTRAINT fk_takeover_targets FOREIGN KEY(symbol)
 REFERENCES takeover_stocks_list(stock_symbol))
My_TAKEOVER_STOCKS, the user will end up with a complete list of stocks in the TAKEOVER_STOCKS_LIST table.
As you learned in Tip 62, "Using the CREATE TABLE Statement to Assign Foreign Key Constraints," the value in each row of a FOREIGN KEY column must exist in one of the rows of the column in the table referenced by the FOREIGN KEY constraint. In the current example, the DBMS allows the user to INSERT a stock symbol into the MY_TAKEOVER_STOCKS table only if the stock symbol already exists in the TAKEOVER_STOCKS_LIST table. As such, attempts to insert symbols not in the TAKEOVER_STOCKS_LIST table into the MY_TAKEOVER_STOCKS will fail with an error message similar to:
Server: Msg 547, Level 16, State1, Line 1
INSERT statement conflicted with COLUMN FOREIGN KEY
 constraint 'fk_takeover_stocks'. The conflict occurred in
 database 'SQLTips', table 'takeover_stocks_list', column
 'stock_symbol'.

The statement has been terminated.
Since the DBMS will only allow the insertion of stock symbols already present in the TAKEOVER_STOCKS_LIST table, the MY_TAKEOVER_STOCKS table will have a list of all stocks in TAKEOVER_STOCKS_LIST after the user attempts to INSERT all possible stock symbols into MY_TAKEOVER_STOCKS.
The syntax of the GRANT statement used to give REFERENCES privilege is:
 GRANT REFERENCES [()] ON
 TO  [WITH GRANT OPTION]
Thus, to allow user ID ROB to CREATE a table with one or more FOREIGN KEY constraints that reference columns in the EMPLOYEES table, the table's owner (or other user with GRANT REFERENCES privilege) must execute a GRANT statement such as:
GRANT REFERENCES ON employees TO rob
Or, to give REFERENCES access on columns in the CUSTOMERS table to JAMES and to allow JAMES to GRANT REFERENCES access to other users, someone with GRANT REFERENCES privilege on the CUSTOMERS table must include the WITH GRANT OPTION in a GRANT statement such as:
GRANT REFERENCES ON customers TO james WITH GRANT OPTION
Granting REFERENCES access on a table is not an all-or-nothing proposition. If you want a user to be able to make FOREIGN KEY references only to some of the columns in a table, simply list the columns allowed as part of the GRANT statement. For example, the GRANT statement
 GRANT REFERENCES (stock_symbol, security_cussip) ON
 takeover_list_table TO karen
allows user ID KAREN to use only the columns STOCK_SYMBOL and SECURITY_CUSSIP as FOREIGN KEY references in tables she creates.
| Note |
Although a FOREIGN KEY in one table is normally the PRIMARY KEY in another table, most DBMS products (including MS-SQL Server) let you use any column to which the UNIQUE constraint has been applied as the reference column for a FOREIGN KEY constraint. Therefore, if you have a table in which the only unique column is the PRIMARY KEY, you need not specify a column name when granting the REFERENCES privilege. However, if you have a table with multiple columns to which you have applied the UNIQUE constraint, use a column list in the GRANT REFERENCES statement, and be sure to exclude any columns whose values you want to remain hidden from the user to whom you are granting REFERENCES access. |
When you want to take away a user ID's ability to create FOREIGN KEY references to columns in a table, execute a REVOKE REFERENCES statement to remove the privilege you previously granted. For example, if you granted REFERENCES access on the EMPLOYEES table to JERRY, you can take away his ability to reference columns in the EMPLOYEES table by using the REVOKE statement:
REVOKE REFERENCES ON employees FROM jerry
After the DBMS executes the REVOKE REFERENCES statement, any other privileges a user has on the object remain in place. Moreover, as was the case with the SELECT, INSERT, and UPDATE privileges, the user will still have REFERENCES access on an object after you REVOKE REFERENCES if the user also received REFERENCES access on the same object from someone else. When you REVOKE a privilege, the DBMS takes away only the privilege you granted. The REVOKE statement has no effect on the same privilege granted on the object by another user.
As was the case with granting the privilege, revoking REFERENCES on an object need not be an all-or-nothing proposition. To REVOKE REFERENCES access on only specific columns in a table, list the columns the user is no longer allowed to reference as a FOREIGN KEY in the REVOKE statement. For example, while the REVOKE statement
REVOKE REFERENCES ON customers FROM sally
prevents user ID SALLY from referencing any of the columns in the CUSTOMERS table, the REVOKE statement
 REVOKE REFERENCES (cust_ID, phone_number) ON customers
 FROM sally
prevents her only from referencing the CUST_ID and PHONE_NUMBER fields in a FOREIGN KEY.
| Note |
If you granted REFERENCES access on an object to a user and the user created a table with FOREIGN KEY constraints referencing columns in the object, revoking REFERENCES access prevents the user ID only from defining subsequent FOREIGN KEY reference to the object. The FOREIGN KEY references in any tables created prior to the revocation of the REFERENCES privilege will continue to check for data values in the referenced column(s) even after REFERENCES is revoked. |
Using the GRANT DELETE (and REVOKE DELETE) Statement to Control Access to Database Objects
DELETE privilege on a table or view lets a user or application program remove one or more rows from a table. As you learned in Tip 151, "Using the GRANT INSERT (and REVOKE INSERT) Statement to Control Access to a Database Object," INSERT access lets a user add rows to a table. However, after adding a row, the user has no special access rights over it. In fact, as you learned in Tip 149, "Using the GRANT SELECT (and REVOKE SELECT) Statement to Control Access to a Database Object," the user that added a row cannot even ask the DBMS to display the data values in the row without SELECT access. DELETE access, like each of the other access privileges, gives the user ID a singular capability-to remove rows from a table (whether the user added the rows or not).
| Note |
In some DBMS products (including MS-SQL Server), the user must have both DELETE and SELECT access on an object to successfully execute a searched DELETE statement such as: DELETE FROM invoices WHERE invoice_date < 01/01/1900 On MS-SQL Server, for example, the DELETE statement in the current example will fail with an error message similar to Server: Msg 229, Level 14, State 5, Line 1 SELECT permission denied on object 'invoices', database 'SQLTips', owner 'dbo'. if the user ID executing it has DELETE access without SELECT privilege on the INVOICES table. Now, a user with only DELETE access can still execute a DELETE statement, just not a searched DELETE. For example, a user needs only DELETE access to execute the DELETE statement DELETE FROM employees which will remove all rows from the employee table. Since removing all rows from a table is seldom (if ever) the desired outcome from executing a DELETE statement, be sure to GRANT SELECT access on the objects on which you are granting a user ID DELETE access. |
The syntax of the GRANT statement used to give DELETE privilege is:
 GRANT DELETE ON  |
 TO  [WITH GRANT OPTION]
Thus, to allow user ID JERRY to execute DELETE statements on the INVOICES table, for example, the table's owner (or other user with GRANT DELETE privilege) must execute a GRANT statement such as:
GRANT DELETE ON invoices TO jerry
Or, to give DELETE access on the EMPLOYEES table to SCOTT and to allow SCOTT to GRANT DELETE access to other users, someone with GRANT DELETE privilege on the EMPLOYEES table must include the WITH GRANT OPTION in the GRANT statement, as follows:
GRANT DELETE ON employees TO scott WITH GRANT OPTION
Finally, to GRANT DELETE access on the VW_SHIPPED_ORDERS view to SALLY, SUSAN, and the SHIPPING_RECEIVING_CLERKS role, a user with GRANT DELETE permission on the view must execute the GRANT statement:
 GRANT DELETE ON vw_shipped_orders
 TO sally, susan, shipping_receiving_clerks
| Note |
In order to successfully GRANT DELETE access on an object through a view, the user granting DELETE access on the view must also have GRANT DELETE access on the underlying table on which the view is based. As you learned in Tip 11, "Understanding Views," a view is a virtual table without any physical rows of its own. Rather, a view displays data values found in underlying "real" table(s). As such, when removing rows from a view, the user is actually deleting rows from the view's underlying table. |
Since one needs only SELECT access on a table to create a view based on it, a user without DELETE access on the underlying table can create a view. Moreover, the owner of the newly created view can GRANT DELETE access on the view to another user. (Remember, the user ID that creates a table or view has full privileges on the object-including the right to GRANT DELETE on the object to another user.) However, if the user that created the view does not have DELETE access on its underlying table, the DBMS will not allow the removal of rows from the underlying table through the view.
Conversely, when a user with GRANT DELETE access on the underlying table creates a view and then grants DELETE access on the view to another user, the user receiving DELETE access will be able to remove rows from the underlying table through the view.
For example, given a VW_SHIPPED_ORDERS view based on an ORDERS table, a user with GRANT UPDATE access on the view and on the ORDERS table can execute the GRANT statement
GRANT DELETE ON vw_shipped_orders TO david
to give user ID DAVID permission to DELETE values from the underlying (ORDERS) table by using the view as the target table in a DELETE statement such as:
 DELETE FROM vw_shipped_orders
 WHERE shipped_date < '01/01/1999'
The DBMS will not, however, permit DAVID to remove rows directly from the ORDERS table with the similar DELETE statement
DELETE FROM ORDERS WHERE shipped_date < '01/01/1999'
that uses the ORDERS table instead of the view as the target of the DELETE statement. David has DELETE access only on the VW_SHIPPED_ORDERS view but does not have DELETE access on the ORDERS table itself.
When you want to take away a user ID's ability to DELETE rows from a table or view, execute a REVOKE DELETE statement to remove the privilege you previously granted. For example, if you granted DELETE access on the CUSTOMERS table to WALTER, you can take away his ability to remove columns from the EMPLOYEES table by using the REVOKE statement:
REVOKE DELETE ON customers FROM walter
After the DBMS executes a REVOKE DELETE, any other privileges a user has on the object remain in place. Moreover, as was the case with the SELECT, INSERT, REFERENCES, and UPDATE privileges, the user will still have DELETE access on an object after you REVOKE the privilege if the user also received DELETE access on the object from someone else. When you REVOKE a privilege, you take away only the privilege you granted. The REVOKE statement has no effect on the same privilege granted on the object by another user.
Using the GRANT ALL (and REVOKE ALL) Statement to GRANT (or REVOKE) Privilege to Database Objects
SQL provides a convenient shortcut to use when you want to grant SELECT, INSERT, UPDATE, DELETE, and REFERENCES access on an object. Instead of enumerating the five privileges, you can simply execute a GRANT ALL statement.
The syntax of the GRANT statement to GRANT full access to an object is:
 GRANT ALL [PRIVILEGES][()] ON
 TO  (WITH GRANT OPTION]
Therefore, the GRANT statement
GRANT ALL ON employees TO sue
is equivalent to:
 GRANT SELECT, INSERT, UPDATE, DELETE, REFERENCES
 ON employees TO sue
In order to successfully execute the GRANT ALL statement, you must have the GRANT option for all security privileges available for the object. In the case of a table, you must have the access to GRANT: SELECT, INSERT, UPDATE, DELETE, and REFERENCES. If, on the other hand, you are granting all access privilege on a view, you must GRANT: SELECT, INSERT, UPDATE, and DELETE access on the view and the view's underlying table-there is no REFERENCE access on a view.
As the database object owner (DBOO), you have all rights to the objects you create and thus can successfully execute the GRANT ALL statement on any of the objects you own. If you are not the DBOO, the DBOO (or another user with full access and GRANT option) will have to GRANT the five access rights (four, in the case of a view) along with the WITH GRANT OPTION to you so that you can GRANT ALL of the rights on the object to another user.
If you submit a GRANT ALL statement and are missing one or more of the available access rights or just the privilege to GRANT one or more of those privileges to another user, the DBMS will fail to execute the GRANT ALL statement and will return an error message similar to:
 Server: Msg 4613, Level 16, State 1, Line 1
 Grantor does not have GRANT permission.
Unfortunately, your DBMS (like MS-SQL Server, in the example), may not be specific as to which of the access privileges or GRANT option(s) you are missing.
Be careful when specifying a column list in a GRANT ALL statement. Because not all of the security privileges accept a column list, you will have to check your system documentation to see what your DBMS will do when presented with a column list in a GRANT ALL statement. MS-SQL Server, for example, will GRANT ALL privileges on the columns listed for those privileges that accept a column list (SELECT, UPDATE, and REFERENCES) and will ignore the column list for those privileges that do not accept a column list (DELETE and INSERT).
Thus, for MS-SQL Server, the GRANT ALL statement
 GRANT ALL (employee_id, first_name, last_name)
 ON employees TO rodger, sue, mary
is equivalent to the GRANT statements:
 GRANT SELECT, UPDATE, REFERENCES
 (employee_id, first_name, last_name)
 ON employees TO rodger, sue, mary
 GRANT INSERT, DELETE ON employees TO rodger, sue, mary
The REVOKE ALL statement takes away all privileges granted on the object listed by the user executing the statement on the object listed in the ON clause from the user IDs or role(s) listed in the FROM clause. For example, to remove all privileges you granted to SUE on the EMPLOYEES table, execute the REVOKE statement:
REVOKE ALL ON employees FROM sue
Unlike the GRANT ALL statement, you do not have to have full access to WITH GRANT OPTION on an object to execute a REVOKE ALL statement. For example, if you have only GRANT SELECT, INSERT, UPDATE, and DELETE access on the INVOICES table and you execute the GRANT statements
 GRANT SELECT, INSERT, UPDATE, DELETE ON invoices TO sue
 GRANT SELECT, INSERT, DELETE ON invoices TO frank
 GRANT SELECT ON invoices TO konrad
you could REVOKE ALL of the privileges you granted to SUE, FRANK, and KONRAD with a single REVOKE ALL statement, such as:
REVOKE ALL ON invoices FROM sue, frank, konrad
In the current example, in which you granted each user ID having a different set of access privileges, the REVOKE ALL statement is equivalent to the REVOKE statements:
 REVOKE SELECT, INSERT, UPDATE, DELETE ON invoices FROM sue
 REVOKE SELECT, INSERT, DELETE ON invoices FROM frank
 REVOKE SELECT ON invoices FROM konrad
| Note |
As was the case with the REVOKE statement, when you execute the REVOKE ALL statement, the DBMS takes away only the privileges you granted to the object from the user IDs listed in the statement's FROM clause. As such, if both you and another user granted user ID SUE all privileges on the CUSTOMERS table, SUE would still have all privileges on the CUSTOMERS table after you executed the REVOKE ALL statement: REVOKE ALL ON customers FROM sue |
A REVOKE ALL statement, like a REVOKE statement, takes away only privileges you granted, and the user retains all privileges on the object received from someone else.
Using a View to Limit INSERT Privilege to Specific Columns in a Table
As you learned in Tip 151, "Using the GRANT INSERT (and REVOKE INSERT) Statement to Control Access to a Database Object," INSERT privilege lets you control who has the ability to add rows to a table or view. Those with INSERT privilege are allowed to add rows; those without it are not. SQL-92 extends the basic INSERT privilege by adding the ability to limit the INSERT privilege to one or more columns vs. having to grant INSERT access to all of the columns in a row (or none of them).
Suppose, for example, that you have an EMPLOYEES table created with
CREATE TABLE employees
 (id INTEGER PRIMARY KEY,
 first_name VARCHAR(25) NOT NULL,
 last_name VARCHAR(30) NOT NULL,
 ssan CHAR(11) NOT NULL,
 address VARCHAR(50),
 manager SMALLINT,
 quota SMALLINT,
 hourly_rate MONEY,
 commission_rate MONEY)
and you want let the marketing room manager, MIKE to add new employees, but you do not want MIKE to be able to specify an employee's MANAGER, QUOTA, HOURLY_RATE, and COMMISSION_RATE. If your DBMS supports a GRANT INSERT statement with a column list, you could accomplish your goal with:
 GRANT INSERT (id, first_name, last_name, ssan, address)
 ON employees TO mike
Unfortunately, not all DBMS products allow a column list in a GRANT INSERT statement. If your DBMS, like MS-SQL Server, does not, you can still limit the GRANT INSERT to specific columns by granting INSERT on a view with only some of the table's columns listed instead of granting INSERT on the table itself.
In the current example, you would CREATE a view with
 CREATE VIEW vw_new_marketing_rep_template AS
 (SELECT id, first_name, last_name, ssan, address
 FROM employees)
and then GRANT INSERT on the VW_NEW_MARKETING_REP_TEMPLATE view with:
GRANT INSERT ON vw_new_marketing_rep_template TO mike
| Note |
When using a view to limit the INSERT privilege to specific columns, bear in mind that the DBMS will supply a NULL for those table columns not included in the view when the user uses the view to INSERT a row into the underlying table. As such, if the view does not include all of the columns to which you have applied a NOT NULL constraint, the user will not be able to INSERT any rows into the table through the view even after you GRANT INSERT on the view. |
In the current example, when MIKE adds a new employee with an INSERT statement similar to
 INSERT INTO vw_new_marketing_rep_template VALUES
 (1, 'Konrad', 'King', 'SSAN', '765 E. Eldorado Lane')
the DBMS will add a row to the EMPLOYEES table using the specified column values for the ID, FIRST_NAME, LAST_NAME, SSAN, and ADDRESS columns, and place a NULL in the MANAGER, QUOTA, HOURLY_RATE, and COMMISSION_RATE columns. If the view's definition were changed to
 CREATE VIEW vw_new_marketing_rep_template AS
 (SELECT id, first_name, last_name, address FROM employees)
user ID MIKE could not use the view to add employees because each attempted INSERT statement into the VW_NEW_MARKETING_REP_TEMPLATE view would violate the NOT NULL constraint on the SSAN column.
Using a View to Limit SELECT Privilege to Specific Columns in a Table
Tip 149, "Using the GRANT SELECT (and REVOKE SELECT) Statement to Control Access to a Database Object," showed you how to use the GRANT SELECT statement to let a user display column values in a table or view. Unlike the INSERT, UPDATE, and REFERENCES privileges, the SQL-92 standard does not allow a column list in a SELECT statement. As such, if your DBMS implements the SELECT statement exactly as defined by the standard, you have to let a user ID see the data in either all of the columns of a table or none of its columns. Fortunately, as is the case with the GRANT INSERT statement, you can get around the SELECT statement's "no column list" limitation by granting SELECT on a view instead of on the underlying table itself.
| Note |
Some DBMS products, including MS-SQL Server, extend the standard SELECT statement to allow a column list (as you learned in Tip 149). Check the GRANT statement syntax in your system manual for the list of privileges for which your DBMS supports a column list. |
To let a user see only some of the columns in a table, CREATE a view with only the columns you want the user to see defined, and GRANT SELECT on the view instead of on the underlying table. For example, given the EMPLOYEES table defined in Tip 156, "Using a View to Limit INSERT Privilege to Specific Columns in a Table," you could use the CREATE statement
 CREATE VIEW vw_marketing_reps AS
 (SELECT id, first_name, last_name, ssan, address, manager,
 quota FROM employees)
and then GRANT SELECT on the VW_MARKETING_REPS view to the MARKETING_EMPLOYEES role with:
GRANT SELECT ON vw_marketing_reps TO marketing_employees
The members of the MARKETING_EMPLOYEES role could then execute SELECT statements to display data in any (or all) of the columns in the VW_MARKETING_REPS view, which gets its data from the EMPLOYEES table. Since the two pay columns (HOURLY_RATE and COMMISSION_RATE) were omitted from the view's column list, the users would not be able to display data in these columns. In fact, they would not even know the columns existed.
Using Views to Extend SQL Security Privileges
As you learned in Tip 156, "Using a View to Limit INSERT Privilege to Specific Columns in a Table," and Tip 157, " Using a View to Limit SELECT Privilege to Specific Columns in a Table," you can use views to limit which columns in a table a user can display with a SELECT statement and the columns into which a user can place data when adding a row with an INSERT statement. Both of these tips show you ways in which you can use a view to limit the columns that a user can see and modify. You can also use a view to limit a user's access to specific rows within a table (in addition to specific columns within those rows).
Suppose, for example, that you have several sales offices, and each office is allowed to manage its employee records in a centralized EMPLOYEES table. By using a column list in a GRANT UPDATE statement, you can limit a manager's ability to make changes to specific columns such as:
GRANT UPDATE (first_name, last_name, address)
ON employees TO sales_office_managers
However, by granting UPDATE access on the EMPLOYEES table that contains employee information from all offices, a manager from one office could change the employee data on employees working at a different office. By granting the same UPDATE privilege on a view (instead of the underlying table) you can restrict the UPDATE privilege so that managers can change employee data only for employees working in their own offices.
For example, if you create a views such as
CREATE VIEW vw_office1_employees AS
 (SELECT * FROM employees WHERE office = 1)
CREATE VIEW wv_office1_employees AS
 (SELECT * FROM employees WHERE office = 2)
for each office, you can use GRANT statements such as
GRANT UPDATE (first_name, last_name, address)
ON vw_office1_employees TO office1_managers
GRANT UPDATE (first_name, last_name, address)
ON vw_office2_employees TO office2_managers
to limit each set of office managers to updating personal information only for its own employees.
The views created in the current example can also illustrate a way in which to limit SELECT access to only certain rows within a table. By granting SELECT privilege with the GRANT statements
GRANT SELECT ON vw_office1_employees TO office1_managers
GRANT SELECT ON vw_office2_employees TO office2_managers
you limit the members of the OFFICE1_MANAGERS role to displaying all EMPLOYEES table columns for employees working at office 1, and the members of the OFFICE2_MANAGERS role to seeing only the information on office 2 employees.
| Note |
To further restrict SELECT access to specific columns within specific rows, modify the CREATE VIEW statements to SELECT only the columns and rows you want the user to see. For example, the CREATE VIEW statement CREATE VIEW vw_office1_employees AS (SELECT first_name, last_name, address FROM employees WHERE office = 1) will allow only the members of the OFFICE 1_MANAGERS role to display and modify the FIRST_NAME, LAST_NAME, and ADDRESS columns for office 1 employees after you execute the preceding GRANT UPDATE and GRANT SELECT statements in this tip. |
Similar to limiting SELECT and UPDATE privileges, you can also use a view to limit DELETE access to specific rows in a table. Suppose, for example, that you wanted to let your shipping department manager, user ID FRANK, remove any back orders older than six months. You could create a view of old back orders using
 CREATE VIEW vw_backorders_180 AS
 (SELECT * FROM orders WHERE date_shipped IS NULL AND
 (GETDATE() - order_date) > 180)
and grant FRANK DELETE access to just those rows with:
GRANT DELETE ON vw_backorders_180 TO frank
User ID FRANK could then remove old back orders from the system using:
DELETE FROM vw_backorders_180
| Note |
GETDATE() used in the current example is an MS-SQL Server built-in function that returns the current system date and time in DATETIME format. |
SQL Tips and Techniques
- Understanding SQL Basics and Creating Database Files
- Using SQL Data Definition Language (DDL) to Create Data Tables and Other Database Objects
- Using SQL Data Manipulation Language (DML) to Insert and Manipulate Data Within SQL Tables
- Working with Queries, Expressions, and Aggregate Functions
- Understanding SQL Transactions and Transaction Logs
- Using Data Control Language (DCL) to Setup Database Security
- Creating Indexes for Fast Data Retrieval
- Using Keys and Constraints to Maintain Database Integrity
- Performing Multiple-table Queries and Creating SQL Data Views
- Working with Functions, Parameters, and Data Types
- Working with Comparison Predicates and Grouped Queries
- Working with SQL JOIN Statements and Other Multiple-table Queries
- Understanding SQL Subqueries
- Understanding Transaction Isolation Levels and Concurrent Processing
- Writing External Applications to Query and Manipulate Database Data
- Retrieving and Manipulating Data Through Cursors
- Understanding Triggers
- Working with Data BLOBs and Text
- Working with Ms-sql Server Information Schema View
- Monitoring and Enhancing MS-SQL Server Performance
- Working with Stored Procedures
- Repairing and Maintaining MS-SQL Server Database Files
- Writing Advanced Queries and Subqueries
- Exploiting MS-SQL Server Built-in Stored Procedures
- Working with SQL Database Data Across the Internet
EAN: 2147483647
Pages: 632
