|
Most DBMS products will allow you to omit the list of columns from the INSERT statement. If you don't provide the column list, the DBMS assumes a column list that includes all of the columns in the table in the order in which they appear in the table definition. As such, in the current example
INSERT INTO orders
VALUES (1, 10, 1001, 5, '05/18/00', 'keep frozen')
is equivalent to:
INSERT INTO orders
(order_number, customer_number, item_number, quantity,
order_date, special_instructions)
VALUES (1, 10, 1001, 5, '05/18/00', 'keep frozen')
To get a list of a table's columns and the order in which they appear in each row of the table, without listing any of the table's data, execute the SELECT statement:
SELECT * WHERE NULL = NULL
(Substitute the name of the table whose columns you want to display for
, of course.)
(In Tip 317, "Understanding Why the Expression NULL = NULL Evaluates to False," you will learn why the WHERE clause NULL = NULL is FALSE and will therefore cause the SELECT statement to display only the column names and none of the table's data.)
Using the INSERT Statement to Insert Rows Through a View
In addition to using a view to display table data, you can use a view in an INSERT statement to add data to the view's underlying table. The syntax for inserting data into a table through a view is the same as that used to INSERT data directly into a table-except that you use the name of the view instead of the name of the table as the target of the INSERT statement's INSERT clause. Thus, the syntax of the INSERT statement to add rows to a table through a view is:
 INSERT INTO
 [(...[,])]
 VALUES (...[,])
For example, given a table created with the SQL statement
 CREATE orders
 (order_id INTEGER IDENTITY,
 cust_id INTEGER NOT NULL,
 item INTEGER NOT NULL,
 qty SMALLINT DEFAULT 1,
 order_date CHAR(10),
 ship_date CHAR(10),
 handling VARCHAR(30) DEFAULT 'none')
and a view defined by
 CREATE VIEW vw_shipped_orders AS
 SELECT order_id, cust_id, item, qty, order_date,
 ship_date
 FROM orders
 WHERE ship_date IS NOT NULL
you can use the INSERT statement
 INSERT INTO vw_shipped_orders
 (cust_id, item, qty, order_date, ship_date)
 VALUES (1002, 55, 10, '2000-05-17', '2000-18-00']
to add a row the underlying table, ORDERS.
Executing the SELECT statement
SELECT * FROM vw_shipped_orders
on the view yields the result:
 order_id cust_id item qty order_date ship_date
 -------- ------- ---- --- ---------- ---------
 1 1002 55 10 2000-05-17 200-15-18
 (1 row(s) affected)
Executing the SELECT statement
SELECT * FROM orders
on the underlying ORDERS table, yields the result:
 order_id cust_id item qty order_date ship_date handling
 -------- ------- ---- --- ---------- --------- --------
 1 1002 55 10 2000-05-17 200-15-18 none
 (1 row(s) affected)
Notice that when you INSERT data through a view, you need not include values for all of the columns in the view. In the current example, the ORDER_ID column included in the view definition was omitted from the INSERT statement.
As is the case with an INSERT directly into the underlying table, the DBMS will use the table columns default value for any column for which the INSERT statement does not specify a value. In the current example, the DBMS will supply the "next" unique INTEGER value for the ORDER_ID column because the table definition specifies the IDENTITY characteristic for the ORDER_ID column, and the INSERT statement does not include a value for the column. (You learned about the MS-SQL Server IDENTITY property in Tip 32, "Understanding the MS-SQL Server IDENTITY Property.") Similarly, the DBMS will use the defined default value of "none" for the HANDLING column, since the values list in the INSERT statement does not include a HANDLING value.
| |
Note |
If a column does not have a default value and the INSERT statement does not include an explicit value for it, the DBMS will set the column to NULL when it executes the INSERT statement.
|
| |
Note |
When inserting a row into an underlying table through a view, you can supply values for the columns only in the view definition. In the current example, the HANDLING column is not a part of the view definition. As such, you cannot supply a value for the HANDLING column when adding rows to the ORDERS table through the VW_SHIPPED_ORDERS view.
|
An interesting anomaly can occur when you INSERT data into a table through a view-a row from a successfully executed INSERT statement may seem to "disappear" when you use the view to display table data. For example, execute the INSERT statement
 INSERT INTO vw_shipped_orders
 (cust_id, item, qty, order_date)
 VALUES (2004, 110, 20, '2000-05-01')
to add a row to the ORDERS table through the VW_SHIPPED_ORDERS view. Next, execute the SELECT statement:
SELECT * FROM vw_shipped_orders
The DBMS will return the results:
 order_id cust_id item qty order_date ship_date
 -------- ------- ---- --- ---------- ---------
 1 1002 55 10 2000-05-17 200-15-18
 (1 row(s) affected)
What happened to the second order?
If you execute the SELECT statement
SELECT * FROM orders
on the underlying ORDERS table, the DBMS will return:
order_id cust_id item qty order_date ship_date handling
-------- ------- ---- --- ---------- --------- --------
1 1002 55 10 2000-05-17 200-15-18 none
2 2004 110 20 2000-05-01 NULL none
(2 row(s) affected)
So, the second order is indeed in the table!
The reason the SELECT on the view did not display the second order while the SELECT on the underlying ORDERS table did is that the value in the SHIP_DATE column is NULL in the second order. Since the WHERE clause in the view definition specifies that the view is to display only rows where the SHIP_DATE is not NULL, the view will not display the second order. (The DBMS set the SHIP_DATE column to NULL because the INSERT statement did not include a value for the column, and the table definition did not define a default value.)
Using the MS SQL Server Enterprise Manager to Define or Change a Primary Key Constraint
As you learned in Tip 61, "Using the CREATE TABLE Statement to Assign the Primary Key," a PRIMARY KEY uniquely identifies each row in the table in which it is defined. MS-SQL Server gives you three ways to add key constraints to your tables: as part of a CREATE TABLE statement (as you learned in Tip 61 and Tip 62, "Using the CREATE TABLE Statement to Assign Foreign Key Constraints"), as part of an ALTER TABLE statement (as you learned in Tip 60, "Using the ALTER TABLE Statement to Change Primary and Foreign Keys"), and by using the MS-SQL Server Enterprise Manager.
To use MS-SQL Server Enterprise Manager to add or change a table's PRIMARY KEY constraint, perform the following steps:
- Start the Enterprise Manager by clicking your mouse on the Start button. When Windows displays the Start menu, move your mouse pointer to Programs, select Microsoft SQL Server 7.0, and then click your mouse on Enterprise Manager.
- To display the list of SQL Servers, click your mouse on the plus (+) to the left of SQL Server Group.
- Click your mouse on the plus (+) to the left of the icon for the SQL Server with the database containing the tables to which you wish to add key constraints. For example, if you want to work with tables in a database on a server named NVBizNet2, click your mouse on the plus (+) to the left of the icon for NVBizNet2. The Enterprise Manager will display folders containing databases and services available on the MS-SQL Server you selected.
- Click your mouse on the plus (+) to the left of the Databases folder. The Enterprise Manager will display a list of databases on the SQL Server you selected in Step 3.
- Click your mouse on the plus (+) to the left of the database with the table to which you wish to add key constraints. For the current example, click your mouse on the plus (+) to the left of the SQLTips database icon. Enterprise Manager will display a list of icons representing database objects.
- Click your mouse on the Tables icon. Enterprise Manager will display the list of tables in the database (whose object list you expanded in Step 5) in the application window's right pane.
- Click your mouse on the name of the table to which you wish to add a key constraint. For the current example, click your mouse on EX_ORDERS.
- Select the Action menu Design Table option. The Enterprise Manager will display a Design Table window similar to that shown in Figure 69.1.
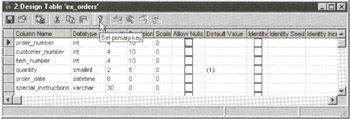
Figure 69.1: The MS-SQL Server Enterprise Manager's Design Table window
- To select a single column for the table's PRIMARY KEY, click your mouse on the selection button to the left of the name of the column that will make up the key. If you want to create a composite or multi-column PRIMARY KEY, hold down the Ctrl key as you click your mouse on the selection buttons to the left of the names of the columns to include in the key, and then release the Ctrl key. For the current example, click your mouse on the selection button to the left of ORDER_NUMBER.
| |
Note |
Be sure to clear the Allow Nulls check box for every column in your PRIMARY KEY. NULL values are not allowed in the columns that make up the PRIMARY KEY.
|
- To tell the Enterprise Manager to create the PRIMARY KEY, either click your mouse on the Set Primary Key button on the Design Table Standard toolbar, or right-click your mouse on one of the columns in the PRIMARY KEY and then select the Set Primary Key option on the pop-up menu.
- To save your changes, click your mouse on the Save button (the floppy disk icon), the first button from the left on the Design Table Standard toolbar.
- Click your mouse on the Close button (the X) in the upper-right corner of the Design Table window.
When you complete Step 12, Windows will close the Design Table window and return to the Enterprise Manager application window.
Using the INSERT Statement to Add Data to Specific Columns in a Row
The most common form of the INSERT statement is as a row value expression. Although you can use the INSERT statement to add a single value to a table, you will normally use it to add a row of data a time. For example, the INSERT statement
 INSERT INTO employee VALUES (1,'Konrad','King',
 '555-55-5555','7810 Greenwood Ave',NULL,NULL)
will add a row to a table created with the statement
 CREATE TABLE employee
 (employee_id INTEGER,
 first_name VARCHAR(20),
 last_name VARCHAR(30) NOT NULL,
 social_security_number CHAR(11),
 street_address CHAR(30),
 health_card_number CHAR(15),
 sheriff_card_number CHAR(15),
 PRIMARY KEY (employee_id))
by transferring the data values in the VALUES clause into the columns of the table row based on position. "Based on position" means the DBMS will put the first value, 1 into the first column, employee_id; the second value, Konrad into the second column, first_name; the third value, King into the third column, last_name, and so on.
The syntax of the INSERT statement is:
INSERT INTO
 [([...,])]
VALUES ([...,])
If you omit the optional column list following the
, the DBMS sets the column list to include all of the columns in the table in the order in which they appear in the table definition. In the current example, the DBMS treats the statement
 INSERT INTO employee VALUES (1,'Konrad','King',
 '555-55-5555','7810 Greenwood Ave',NULL,NULL)
as if it were written as:
INSERT INTO employee
 (employee_id, first_name, last_name,
 social_security_number, street_address,
 health_card_number, sheriff_card_number)
VALUES (1, 'Konrad', 'King', '555-55-5555',
 '7810 Greenwood Ave',NULL,NULL)
While the data values in the VALUES clause must match the number of columns specified in the column list (which follows the table name), you need not list all of the table row's columns in the column list. For example, if you want to provide only EMPLOYEE_ID, FIRST_NAME, and LAST NAME, you could use the INSERT statement:
 INSERT INTO employee
 (employee_id, first_name, last_name)
 VALUES (2, 'Sally', 'Fields')
The DBMS will then set the EMPLOYEE_ID column to 2, FIRST_NAME to Sally, LAST_NAME to Fields, and the remaining columns in the row to their default values (which is NULL unless set to another value by a DEFAULT clause in the CREATE statement or previously bound to a default value using the sp_bindefault stored procedure).
Thus, from the current example, you can see that while every column name in the INSERT statement's column name list must match a column name in the table into which you are inserting data, the INSERT statement's column list need not contain the names of all of the table's columns. Moreover, the column names in the column list need not be listed in the order in which they appear in a table row. For example, the INSERT statement
 INSERT INTO employee
 (first_name, employee_id, last_name)
 VALUES ('Sally', 2, 'Fields')
is equivalent to:
 INSERT INTO employee
 (employee_id, first_name, last_name)
 VALUES (2, 'Sally', 'Fields')
The advantage in listing column names in an INSERT statement is that the statement with a column list will still execute properly after a user adds a column to the table. For example, if the user executes the statement
ALTER TABLE employee ADD COLUMN hourly_pay_rate NUMERIC
the INSERT statement
INSERT INTO employee VALUES (1,'Konrad','King',
 '555-55-5555','7810 Greenwood Ave',NULL,NULL)
will fail to execute because the VALUES clause does not have a value for the HOURLY_PAY_RATE column. (Remember, if you do not supply a column list, the DBMS sets the column list to include all of the column names from the table definition. Thus, the INSERT statement in the current example fails to execute, because the column name list includes one more column name than the number of values in the VALUES clause.)
Conversely, after using the same ALTER TABLE statement (cited in the previous paragraph) to add a new column to the table, the statement
 INSERT INTO employee
 (first_name, employee_id, last_name)
 VALUES ('Sally', 2, 'Fields')
will still execute properly. It tells the DBMS to put values into the FIRST_NAME, EMPLOYEE_ID, and LAST_NAME columns, and to set the remaining columns (including the new HOURLY_PAY_RATE column) to the column's default value (NULL, unless otherwise defined).
| |
Note |
When listing columns in an INSERT statement, you must include values for any columns with a NOT NULL constraint unless the column has a non-NULL default value. In the current example, an INSERT statement must include values for both the EMPLOYEE_ID and LAST_NAME columns, since both columns are governed by a NOT NULL constraint and neither of them has a non-NULL default value. (The PRIMARY KEY constraint on the EMPLOYEE_ID column adds the NOT NULL constraint to the column by default.) As such, the INSERT statement
INSERT INTO employee
 (first_name, last_name) VALUES ('Sally', 'Fields')
will fail when the DBMS attempts to set the EMPLOYEE_ID column to NULL.
|
| |
Note |
If you want the DBMS to supply a unique non-NULL value for a single-column PRIMARY KEY, add the IDENTITY property to column. (You learned about the IDENTITY property in Tip 32, "Understanding the MS-SQL Server IDENTITY Property.") If the EMPLOYEE_ID column in the EMPLOYEE table in the current example had the IDENTITY property, the DBMS would successfully execute the INSERT statement in the previous note by supplying a unique, non-NULL EMPLOYEE_ID.
|
Using the SELECT Statement to INSERT Rows from One Table into Another
Although used primarily to add one row of data to a table, you can use a single INSERT statement to add multiple rows to table at once. In fact, you can use an INSERT statement to copy all or part of one table into another.
As you learned in Tip 70, "Using the INSERT Statement to Add Data to Specific Columns in a Row," the syntax of the basic INSERT statement is:
 INSERT INTO
 [( [...,])]
 VALUES ([...,])
Well, the VALUES clause of the INSERT statement should actually be written as:
INSERT INTO
[( [...,])] VALUES ( [...,])
Here, each is a list of column values that matches the number (and type) of columns in the statement's column name list (which follows the table name).
Thus, while you used the INSERT statement to add a single row to the table in Tip 70, you can add additional row values to the same statement when you want to add multiple rows to the table at once. For example, the statement
 INSERT INTO employee VALUES (1,'Konrad','King',
 '555-55-5555','7810 Greenwood Ave',NULL,NULL)
with one row value constructor (introduced by the keyword VALUES) will add one row to the employee table, while the statement
 INSERT INTO employee
 (employee_id, first_name, last_name,
 social_security_number, street_address,
 health_card_number, sheriff_card_number)
 VALUES (1, 'Konrad', 'King', '555-55-5555',
 '7810 Greenwood Ave',NULL,NULL),
 (2, 'Sally', 'Fields', '556-55-5555',
 '77 Sunset Strip',NULL,NULL),
 (3, 'Wally', 'Wallberg', '557-55-5555',
 '765 E. Eldorado Lane',NULL,NULL)
with three row value constructors (following the keyword VALUES) will add three rows to the same table.
| |
Note |
As you learned previously, the column list (following the table name) in the two example INSERT statements in the previous paragraph are equivalent. When you do not specify column names (as is the case in the first INSERT statement), the DBMS supplies the INSERT statement with a column name list that consists of all columns in the table (as is explicitly enumerated in the second INSERT statement).
|
Thus far, the example INSERT statements in this tip list values for all columns in a table row. However, as is the case with a single-row INSERT statement, multi-row INSERT statements can supply values for all or part of a row's columns. For example, the statement
 INSERT INTO employee (employee_id, first_name, last_name)
 VALUES (4, 'Joe', 'Kernan'), (5, 'David', 'Faber'),
 (3, 'Brad', 'Woodyard')
will add three rows to the EMPLOYEE table. (The DBMS will assign the column default value [NULL, in the current example] to each of the columns not list in the column name list.)
Because SQL lets you use a single INSERT statement to add multiple rows to a table at once, you can replace the VALUES clause with a SELECT statement—as long as the rows constructed by the SELECT statement have the same number and type of columns as those found in the column name list (which follows the table name in the INSERT statement).
Thus, to INSERT rows from one table into another, use the INSERT statement syntax:
INSERT INTO
 [( [...,])]
SELECT  [...,]
FROM
[WHERE ]
As such, to insert all employees in the EMPLOYEE table into a second employees table, EMPLOYEE2, you could use the INSERT statement:
INSERT INTO employee2 SELECT * from employee
| |
Note |
In order for the SELECT * clause in the example INSERT statement to work, both EMPLOYEE and EMPLOYEE2 must have the same number of columns in the same order. In the following paragraphs, you will learn how you can get around this restriction by listing column names explicitly vs. using the column name list implicit in the SELECT * clause. The important thing to know now is that you can copy data from one table into another either by listing the specific columns whose data you want copied or by omitting the column list, in which case the DBMS assumes that you want to copy all of the column values from one table into another.
|
If you have several queries to run against data from multiple tables, you will find that your queries are simpler and execute more quickly if you first consolidate the data from multiple tables into one temporary table and then execute your SQL statements as single table queries against the new aggregate table. Accumulating data into a single data avoids having the DBMS search multiple tables multiple times, repeatedly reading and eliminating the same data that does not meet your search criteria.
For example, given CUSTOMERS, EMPLOYEES, and ORDERS tables defined as follows
 CREATE TABLE customers
 (customer_id INTEGER, first_name VARCHAR(30),
 last _name VARCHAR(30), address VARCHAR(35),
 city VARCHAR (20), state CHAR(2),
 zip_code INTEGER, phone_number CHAR(12),
 salesperson INTEGER net_due_days SMALLINT,
 credit_limit NUMERIC)
 CREATE TABLE employees
 (employee_id INTEGER, first_name VARCHAR(30),
 last_name VARCHAR(30), address VARCHAR(35),
 ssan CHAR(11), salary NUMERIC,
 low_quota SMALLINT, medium_quota SMALLINT,
 high_quota SMALLINT, sales_commission NUMERIC)
 CREATE TABLE orders
 (order_id INTEGER, order_date DATETIME,
 item_number INTEGER, quantity SMALLINT,
 customer_id INTEGER, salesman_id INTEGER)
 CREATE TABLE products
 (product_id SMALLINT, description VARCHAR(40),
 quantity_on_hand SMALLINT, item_cost NUMERIC)
you can combine data into a single table defined by
 CREATE TABLE temp_report_table
 (customer_ID INTEGER,
 cust_first_name VARCHAR(30),
 cust_last_name VARCHAR(30),
 salesman_ID INTEGER,
 salesman_first_name VARCHAR(30),
 salesman_last_name VARCHAR(30),
 order_date DATETIME,
 order_item_number SMALLINT,
 order_item_quantity SMALLINT,
 order_total NUMERIC,
 order_item_desc VARCHAR(40))
by using the INSERT statement:
INSERT INTO temp_report_table
 (customer_id, cust_first_name, cust_last_name,
 salesman_id, salesman_first_name, salesman_last_name,
 order_date, order_item_number, order_item_quantity,
 order_total, order_item_desc)
SELECT
 customers.customer_id, customer.first_name,
 customers.last_name, employee_id, employees.first_name,
 employees.last_name, order_date, item_number, quantity,
 (quantity * item_cost), description
FROM orders, customers, products, employees
WHERE orders.customer_id = customers.customer_id
AND product_id = item_number
AND employee_id = salesman_id
Once you've combined the data from the four tables into one, you can use a single-table SELECT statement to display data from one or more of the tables. For example, the SELECT statement
 SELECT
 cust_first_name, cust_last_name, salesman_first_name,
 salesman_last_name, order_item_quantity, order_total,
 order_item_desc
 FROM temp_report_table WHERE order_item_number = 5
will display the names of the salesmen that sold item 5; the names of the customers that purchased it; and the date, quantity, total, and item description for orders for item 5.
You can also use the simple single-table query
 SELECT salesman_id, salesman_first_name,
 salesman_last_name, order_total
 FROM temp_report_table
 WHERE order_total =
 (SELECT MAX(order_total) FROM temp_report_table)
to display the amount of the largest order and the name of the salesman who sold it.
In both single-table query examples, you would have had to perform a SELECT and a multiple-table JOIN (as you will learn to do in Tip 283, "Understanding Joins and Multi-table Queries") to display the same information, had you not first combined all of the data you needed into a single table.
Setting the MS SQL Server SELECT INTO BULKCOPY Database Option to TRUE to Speed Up Table to Table Data Transfers
One of the strengths of the SQL relational DBMS model is its ability to perform transaction processing. By grouping sets of SQL statements together as a single transaction, the DBMS can maintain data—even when an action requires the successful execution of multiple SQL statements. If a portion of a transaction fails, the DBMS uses the database transaction log to "back out" the partially executed transaction and restores pretransaction data values to the affected tables. Once uncommitted statements are rolled back, the tables appear as if none of the SQL statements in the transaction was executed.
The ability to rollback partially executed and even successfully complete but erroneous transactions normally more than justifies the overhead involved in maintaining the transaction log—just ask any database administrator who was able to "undelete" rows of critical (and perhaps irreplaceable) data mistakenly removed by a user executing a DELETE statement with a faulty search condition.
Although it is a critical safeguard for normal processing, maintaining the transaction log imposes unnecessary overhead when you are consolidating large amounts of data from multiple tables into a single, redundant temporary table (as you did in Tip 71). After all, if the SELECT statement fails partway through execution, you still have the original data values in the original tables. As such, you can TRUNCATE (remove the data from) the temporary table and restart the data consolidation.
If many users are copying large numbers of rows into redundant (and many times, temporary) tables, you can improve the overall performance of the DBMS (and speed up the data transfers) by setting the database SELECT INTO/BULKCOPY option to TRUE. Setting the SELECT INTO/BULKCOPY option to TRUE tells the DBMS to treat table-to-table data transfers as bulk inserts. The DBMS stores less information in its transaction log during a bulk insert, which reduces the overhead necessary to maintain the transaction log and consequently lets the DBMS use additional resources to complete the table-to-table transfer in a shorter period of time.
| |
Note |
Setting the SELECT INTO/BULKCOPY option to TRUE has database-wide ramifications. While SELECT INTO/BULKCOPY is set TRUE, the DBMS will store less than full transaction log information about all INSERT statements that have a SELECT INTO clause. The abbreviated transaction log data will prevent you from performing an undo or rollback for these INSERT statements. However, the lack of an "undo" option is not a problem since you still have the data in the original tables, just in case.
|
To reduce the amount of information written to the transaction log during table-to-table data transfers, execute the sp_dboption stored procedure using the syntax:
sp_dboption , 'SELECT INTO/BULKCOPY', TRUE
As such, to speed up the transfer of data between tables in the SQLTips database, you would execute the statement:
EXEC SP_DBOPTION SQLTips, 'SELECT INTO/BULKCOPY', TRUE
If you later want to maintain a full transaction log for all updates (including table-to-table data transfers), execute the statement:
EXEC , 'SELECT INTO/BULKCOPY', FALSE
Here, is the name of the database in which you wish to turn off the bulk copy treatment of INSERT statements that include a SELECT INTO clause.
| |
Note |
If you are loading table data from another computer system, from another DBMS, or from large sequential files, use the MS-SQL Server BULK INSERT statement or BCP utility—they allow you to set transaction log and other options on an individual table basis (vs. database-wide, as the SELECT INTO/BULKCOPY database option does). The BCP utility, for example, lets you define the format of the source data and will load data into tables much more quickly than repeated single-row INSERT statements. (See the MS-SQL Server "Books Online" documentation for more help on the BCP utility.)
|
Using the UPDATE Statement to Change Column Values
To change one or more data values in a database, execute an UPDATE statement. You can use a single UPDATE to change the value of one or more columns of a single row or to change multiple column values in selected rows in a single table. Of course, in order to modify the data in the table named in the UPDATE statement, you must have UPDATE access to the table. (You will learn about SQL Object Privileges in Tip 142.)
The syntax of the UPDATE statement is:
 UPDATE
 SET  =
 [...,  = ]
 [WHERE ]
As such, when salesperson #3, Joe Smith, gets promoted to area supervisor, you can reassign all of Joe Smith's customers to their new salesperson #9, Sally Fields, using the UPDATE statement:
UPDATE customers SET salesperson = 9 WHERE salesperson = 3
Or, you can set the credit limit to $10,000 and the payment terms to net 120 for customer Konrad King using the UPDATE statement:
UPDATE customers
SET credit_limit = 10000, net_due_days = 120
WHERE first_name = 'Konrad' AND last_name = 'King'
The WHERE clause in the UPDATE statement identifies the row or rows in the table (given by
) whose column values are to be modified. The SET provides the list of column values to be assigned to the rows that satisfy the search criteria in the WHERE clause. In short, the UPDATE statement goes through a table (of customers, in the current examples) one row at a time and updates column values in rows for which the search conditions yields TRUE. Conversely, the UPDATE statement leaves column data unchanged in rows where the search condition (in the WHERE clause) evaluates to FALSE or NULL.
As you can see from the syntax of the UPDATE statement, the SET clause contains a list of column assignment expressions. A table column name can appear as the target of an assignment only once in the assignment list. Moreover, the expression must yield a value compatible with the data type of the column to which it is to be assigned. (You cannot, for example, assign a character string to a column with a NUMERIC data type.) Moreover, the expression must be computable based on the values in the columns of the row currently being updated, and it may not contain any subqueries or column functions (such as SUM, AVG, COUNT).
| |
Note |
Column values not referenced in the expressions or in the WHERE clause of an UPDATE statement, maintain the value they had prior to any updates throughout the entire statement. Thus, the UPDATE statement
UPDATE employees
SET low_quota = (low_quota * 2), medium_quota =
 (low_quota * 4), high_quota = (medium_quota * 8)
WHERE low_quota = 1 AND medium_quota = 2
will set the LOW_QUOTA to 2, the MEDIUM_QUOTA to 4 (4 * 1, not 4 *2), and the HIGH_QUOTA to 16 (8 * 2, not 8 * 4).
|
Make sure you do not omit the WHERE clause unless you want to UPDATE all of the rows in a table. For example,
UPDATE employees SET low_quota = low_quota * 1.5
will increase the LOW_QUOTA value by 150 percent for all employees (rows) in the EMPLOYEES table.
| |
Note |
Before executing a new UPDATE statement (especially one with complex selection criteria), execute a SELECT COUNT(*) statement using the UPDATE statement's WHERE clause. For example, the statement
SELECT COUNT(*) FROM customers WHERE salesperson = 3
will tell you the number of rows the DBMS will modify when you execute the UPDATE statement:
UPDATE customers SET salesperson = 9 WHERE salesperson = 3
By seeing the number of rows the UPDATE statement will change, you're likely to catch mistakes in the selection criteria—if you have some idea as to the number of rows that you expect to modify.
|
Using the UPDATE Statement with a Conditional Clause to Change Values in Multiple Rows at Once
You can use the UPDATE statement to modify column values in one, some, or all of the rows in a table. The syntax of the UPDATE statement is:
 UPDATE
 SET  = ...
 [,  = ]
 [WHERE ]
If you want to update columns in all of the rows in a table, use an UPDATE statement without a WHERE clause, such as
UPDATE employee SET YTD_fed_tax_withheld = 0.00,
 YTD_FICA_Employer = 0.00, YTD_FICA_Employee = 0.00,
 YTD_gross_pay = 0.00
which sets the value of the YTD_FED_TAX_WITHHELD, YTD_FICA_EMPLOYER, YTD_FICA_EMPLOYEE, and YTD_GROSS_PAY columns to 0.0 in all of the rows in the EMPLOYEE table.
To modify the columns in only some of the rows in a table, add a WHERE clause to the UPDATE statement. When the DBMS executes an UPDATE statement that has a WHERE clause, it selects the rows that meet the search criteria and then goes through those rows one at a time, updating the column values as specified by the UPDATE statement's SET clause.
For example, the UPDATE statement
UPDATE employees SET low_quota = 1, medium_quota = 2,
 high_quota = 4
WHERE low_quota IS NULL
will set the three columns LOW_QUOTA, MEDIUM_QUOTA, and HIGH_QUOTA to 1, 2, and 4, respectively, in those rows where the LOW_QUOTA is NULL prior to the execution of the UPDATE statement.
The column names in the UPDATE statement's SET clause must be columns in the target table (the table named after the keyword UPDATE). Moreover, expressions in the UPDATE statement's SET clause cannot include any subqueries or column functions and must evaluate to a data type compatible with the data type of the columns to which they are to be assigned.
Do not worry about the order of the expressions in the SET clause. Since the value of each column used in an expression (and in the WHERE clause) is set to the column's value before any updates are applied, changes to a column's value made by one expression have no effect on any other expressions in the same UPDATE statement.
For example, suppose you were to execute the UPDATE statement
 UPDATE employees
 SET department = ' Main Room', sales = 0,
 low_quota = sales, medium_quota = low_quota + 5,
 high_quota = medium_quota + 5
 WHERE sales > low_quota AND department ='Training'
on a table row where the SALES column has a value of 10 and LOW_QUOTA, MEDIUM_QUOTA, and HIGH_QUOTA columns have values of 1, 2, and 4, respectively.
The UPDATE statement will set DEPARTMENT to Main Room, SALES to 0, LOW_QUOTA to 10, MEDIUM_QUOTA to 6, and HIGH_QUOTA to 7. Even though it changed the value of LOW_QUOTA from 1 to 10, before it set the value of MEDIUM_QUOTA to LOW_QUOTA + 5, the UPDATE statement uses the preupdate value of all columns (including LOW_QUOTA) throughout the expressions in the SET clause. As such, the UPDATE statement sets the value of MEDIUM_QUOTA to 1 + 5, or 6, and HIGH_QUOTA to 2 + 5, or 7—even though both LOW_QUOTA and MEDIUM quota have new higher values by the time the DBMS evaluates the expressions.
(If you wanted to set the values of the quotas based on the value of the SALES column in the current example, you would use SALES in each expression. The UPDATE statement
UPDATE employees
SET department = ' Main Room', sales = 0,
 low_quota = sales, medium_quota = sales + 5,
 high_quota = sales + 10
WHERE sales > low_quota AND department ='Training'
would yield the desired quota values of 10, 15, and 20.
Using a Subquery in an UPDATE Statement to Change Values in Multiple Rows at Once
Tip 73, "Using the UPDATE Statement to Change Column Values," and Tip 74, "Using the UPDATE Statement with a Conditional Clause to Change Values in Multiple Rows at Once," show example UPDATE statements using WHERE clauses that determine a row's eligibility by using one of the comparison operators (=, >, <, <>, IS). The UPDATE statement will also let you use the results of a SELECT statement to specify which rows you want to UPDATE in the target table.
For example, suppose you want to reassign employees with a less than average number of sales to the training department. You could use the UPDATE statement:
UPDATE employees SET department = 'Training'
WHERE department <> 'Training'
AND sales < (SELECT AVG(sales)
 FROM employees
 WHERE department <> 'Training')
As another example, suppose you want to change the job title of all supervisors in charge of more than five employees to manager. You could use the UPDATE statement:
 UPDATE employees SET job_title = 'Manager'
 WHERE job_title = 'Supervisor'
 AND 5 < (SELECT COUNT (*)
 FROM employees WHERE reports_to = employee_id)
(In the current example, you could not omit the job_title = 'Supervisor' search condition because a vice president responsible for more than five employees would have his job title changed to manager.)
You can nest subqueries in the WHERE clause to any level, meaning that the SELECT statement in the UPDATE statement's WHERE clause can have a SELECT statement in its WHERE clause, which can have a SELECT statement in its WHERE clause, and so on.
SQL-89 prevented the SELECT statement in the WHERE clause of an UPDATE statement from referencing the table being updated at any level. SQL-92 eliminates this restriction by evaluating the references to columns in the target table as if none of the rows of the target table were updated. As such, the SELECT statement in the first example will use the same average of SALES for every row of the EMPLOYEES table, even though the average of SALES made by employees not in training changes as low-producing employees are moved to the training department as the DBMS works it way through the table.
Using the UPDATE Statement to Change Column Values in Rows Selected Based on a Computed Value
In Tip 75, "Using a Subquery in an UPDATE Statement to Change Values in Multiple Rows at Once," you learned how to UPDATE specific rows in a table based on the single value returned by the SELECT statement's aggregate function (AVG). (You will learn more about using an aggregate function in a subquery to return a single value in Tip 331, "Using an Aggregate Function in a Subquery to Return a Single Value.") You can also use a computed value to select rows you want the UPDATE statement to modify.
Suppose, for example, that you had an employee table defined by
CREATE TABLE employees
(employee_id INTEGER,
 first_name VARCHAR(25),
 last_name VARCHAR(30),
 SSAN CHAR(11),
 sales INTEGER,
 status VARCHAR(30),
 low_quota INTEGER,
 medium_quota INTEGER,
 high_quota INTEGER,
 bonus INTEGER,
 bonus_multiplier INTEGER DEFAULT 1)
and you want to reward employees whose SALES are greater than 150 percent of their high quota by doubling their bonuses. You could use the UPDATE statement:
 UPDATE employees SET bonus_multiplier = 2
 WHERE sales > high_quota * 1.5
In addition to using a computation on a column value, you can use the result of a computation using the value returned by an aggregate function as your selection criteria. Suppose, for example, that you want to double the bonus of all employees whose SALES exceed 150 percent of the average HIGH_QUOTA. You could use the UPDATE statement:
 UPDATE employees SET bonus_multiplier = 2,
 WHERE sales > (SELECT AVG(high_quota) FROM employees) * 1.5
When using computed values as selection criteria, the important thing to know is that the DBMS evaluates any expressions in the WHERE clause to a constant value and then uses that value to select the rows to be changed during the course of executing the UPDATE statement.
Using the UPDATE Statement to Change Values in One Table Based on Values in Another Table
Although the UPDATE statement lets you change only the column values in a single table (whose name appears immediately following the keyword UPDATE), you can use any table (or combination of tables) available to you in the UPDATE statement's WHERE clause. As such, you can decide which rows in the target table to update based on the values in columns of other tables.
For example, suppose you sell auto parts from various vendors, and one of them, XYZ Corp, has gone out of business. You can change the REORDER_STATUS column of all parts from XYZ Corp in your INVENTORY table using the UPDATE statement:
 UPDATE INVENTORY SET reorder_status = 'Discontinued'
 WHERE vendor_id IN (SELECT vendor_id FROM vendors
 WHERE company_name = 'XYZ Corp')
Of course, this example may be a bit of a stretch since you would normally know the VENDOR_ID and use it in the WHERE clause in place of the subquery, writing the UPDATE statement as
 UPDATE INVENTORY SET reorder_status = 'Discontinued'
 WHERE vendor_id = 5
if XYZ Corp's VENDOR_ID were 5.
As another example suppose you wish to identify each salesperson with customers who have placed more than $1,000,000 worth of orders as a "Key Account Manager." Given tables created with the statements
CREATE TABLE employees
 (employee_id INTEGER,
 first_name VARCHAR(25),
 last_name VARCHAR(30),
 SSAN CHAR(11),
 total_sales MONEY,
 status VARCHAR(30))

CREATE table customers
 (customer_number INTEGER,
 company_name VARCHAR(50),
 salesperson_id INTEGER)

CREATE table orders
 (customer_id INTEGER,
 order_number INTEGER,
 order_date DATETIME,
 order_total MONEY)
you can identify salespeople with individual customers whose orders total more than $1,000,000 using the UPDATE statement:
 UPDATE employees SET status = 'Key Account Manager'
 WHERE employee_id IN
 (SELECT salesperson_id FROM customers
 WHERE customer_number IN
 (SELECT customer_id FROM orders
 GROUP BY customer_ID
 HAVING SUM(order_total) > 1000000))
| |
Note |
You did not use the value in the TOTAL_SALES column as the selection criteria because a salesperson can have more than $1,000,000 in TOTAL_SALES and still not have any customers that have made purchases totaling more than $1,000,0000. For example, if the salesperson had 100 accounts, each of which purchased $20,000 in goods, the TOTAL_SALES would be $2,000,000, but none of the customers would be "key accounts" since none made purchases totaling over $1,000,000.
|
The important thing to understand is that you are not restricted to using only the target table in the UPDATE statement's WHERE clause. To the contrary, you can also use any other tables (to which you have SELECT access) whose columns you need to formulate the statement's selection criteria.
Using the UPDATE Statement to Change Table Data Through a View
As you learned in Tip 73, "Using the UPDATE Statement to Change Column Values," the UPDATE statement lets you change column values in a single target table. Using the syntax
UPDATE
SET  = ...
 [,  = ]
[WHERE ]
you can modify one or more values in one or more rows, and you can base row selection on values in any tables to which you have SELECT access. However, the UPDATE statement can have only one target table, meaning that the UPDATE statement can change values in only one table at a time.
In Tip 65, "Using the MS-SQL Server Enterprise Manager Create View Wizard to Create a View," you learned that a view is a virtual table-it does not contain any data, but it references data columns in one or more underlying tables. Since a view is a single, albeit virtual, table, it would seem that you could use a view based on multiple underlying tables to get the UPDATE statement to modify columns in multiple tables at once.
Unfortunately, the DBMS checks the view to make sure the view's SELECT statement includes only a single table. As such, if you attempt to execute the statement
UPDATE cust_rep
SET employee_status ='Terminated', cust_sales_rep = 2
WHERE employee_id = 6
where CUST_REP is a view based on columns from multiple underlying tables, the DBMS will fail to execute the UPDATE statement and respond with an error message similar to:
 Server: Msg 4405, Level 16, State 2, Linel
 View 'CUST_REP' is not updateable because the FROM clause
 names multiple tables.
The two advantages for using a view in place of the underlying table in an UPDATE statement are that you can make column names more descriptive, and that you can limit the columns the user can update in the underlying table.
Suppose, for example, that you had a table created with the statement
 CREATE TABLE employees
 (emp_id INTEGER PRIMARY KEY IDENTITY,
 fname VARCHAR(25),
 lname VARCHAR(30),
 addr VARCHAR(30),
 SSAN CHAR(11),
 dept VARCHAR(20),
 badgno INTEGER,
 sales INTEGER,
 tot_sales MONEY,
 status VARCHAR(30),
 low_quota INTEGER,
 med_quota INTEGER,
 high_quota INTEGER,
 bonus INTEGER,
 bonus_mult INTEGER DEFAULT 1)
and you only wanted a user to be able to update the name, address, Social Security number, and badge number for employees in the marketing department. You could use the CREATE VIEW statement:
CREATE VIEW vw_marketing_sup_emp_update
 (employee_number, first_name, last_name, address,
 social_security_number, badge_number)
AS SELECT emp_id, fname, lname, addr, ssan, badgno
FROM employees
WHERE dept = 'Marketing'
Given UPDATE access to the VW_MARKETING_SUP_EMP_UPDATE view, the user could then UPDATE a marketing employee's personal information and badge number without being able to change (or even display) the employee department, status, count, volume, quotas, and bonus information.
For example, to assign (or change) employee 123's badge number, the marketing supervisor could use the UPDATE statement:
 UPDATE vw_marketing_sup_emp_update
 SET badge_number = 1123
 WHERE employee_number = 123
When the DBMS receives an UPDATE statement that uses a view as the target table, the DBMS builds the virtual table using the SELECT statement in the view definition. Thus, in the current example, the DBMS builds a temporary (virtual) table by selecting employees in the marketing department from the EMPLOYEES table. The virtual (view) table has only the columns listed in the view's SELECT statement, and the additional data in each row of the EMPLOYEE column is excluded.
After it builds the view table (VW_MARKETING_SUP_EMP_UPDATE in the current example), the DBMS uses the selection criteria in the UPDATE statement's WHERE clause to determine which row (or rows) in the virtual (view) table it is to UPDATE. (Thus, if employee 123 is in the EMPLOYEES table but not in the marketing department, the UPDATE command will fail because employee 123 does not exist in the target table, VW_MARKETING_SUP_EMP_UPDATE.)
Finally, the DBMS applies the updates specified in the UPDATE statement's SET clause to the columns in the underlying table, not the virtual (view) table. In the current example, the DBMS will set the BADGNO column of the row where EMP_ID is 123 in the EMPLOYEES table to 1123.
You will learn all about creating views and how the DBMS handles them in Tips 206-215.
Using the DELETE Statement to Remove a Row from a Table
While the INSERT statement adds one or more rows to a table, the DELETE statement removes them. In order for the database to remain an accurate model of the real world, you must remove rows of data that represent physical entities that no longer exist. For example, if a customer cancels an order, you need to remove one or more rows from an ORDERS table. After you terminate an employee, you need to remove a row from the EMPLOYEES table. When you discontinue a product, you need to delete a row from the PRODUCTS table—and so on.
A single row is the smallest unit of data that the DELETE statement can remove from a table. (To remove a column from all of the rows in a table, use the ALTER TABLE statement with a DROP COLUMN clause, as you learned in Tip 58, "Using the MS-SQL Server ALTER TABLE, DROP COLUMN Clause to Remove a Table Column.")
Suppose, for example, that you have an e-mail database that has users and messages tables created by
 CREATE TABLE hotmail_users
 (user_id VARCHAR(25) PRIMARY KEY,
 name VARCHAR(50),
 address VARCHAR(50),
 phone_number VARCHAR(30),
 password VARCHAR(20))

 CREATE TABLE hotmail_messages
 (user_id VARCHAR(25),
 date_time_received DATETIME,
 subject VARCHAR (250),
 sent_by VARCHAR(25),
 date_time_sent DATETIME,
 priority CHAR(1),
 message TEXT
 CONSTRAINT recipient_account_id
 FOREIGN KEY (user_id) REFERENCES hotmail_users)
The syntax of the DELETE statement is:
DELETE from [WHERE ]
Therefore, if user KKI decides to discontinue use of his e-mail account, you could use the DELETE statements
DELETE FROM hotmail_messages WHERE user_id = 'KKI'
DELETE hotmail_users WHERE user_id = 'KKI'
to remove KKI from the HOTMAIL_USERS table and all of his e-mail messages from the HOTMAIL_MESSAGES table.
The WHERE clause in the DELETE statement identifies the row or set of rows that the DELETE statement is to remove from the table whose name appears immediately following the keyword DELETE.
As such, the first DELETE statement in the example will remove multiple rows from the HOTMAIL_MESSAGES table if user KKI has more than one e-mail message on file. Conversely, the second DELETE statement will DELETE a single row from the HOTMAIL_USERS table since USER_ID's are unique. (The PRIMARY KEY constraint on the USER_ID column of the HOTMAIL_USERS table specifies that all rows in the table must have a unique, non-NULL value in the USER_ID column.)
| |
Note |
When removing rows from multiple tables, the order in which you execute the DELETE statements will be of consequence if the PRIMARY KEY in one of the tables is referenced by the FOREIGN KEY constraint in another table. In the current example, the PRIMARY KEY (USER_ID) in the HOTMAIL_USERS table is referenced by the FOREIGN KEY constraint (RECIPIENT_ACCOUNT_ID) in the HOTMAIL_ MESSAGES table. As such, if you attempt to DELETE the HOTMAIL_USERS row with USER_ID KKI before you remove all of the e-mail messages stored for USER_ID KKI from the HOTMAIL_MESSAGES table, the DELETE statement will fail to execute and the DBMS will display messages similar to:
Server: Msg 547, Level 16, State 1, Line 1
DELETE statement conflict with COLUMN REFERENCE constraint
 'recipient_account_id'.
The conflict occurred in database 'SQLTips', table
 hotmail_messages', column 'user_id'.
The statement has been terminated.
|
As you will learn in Tip 174, "Understanding Referential Integrity Checks and Foreign Keys," the FOREIGN KEY constraint specifies that the value in the column(s) defined as the FOREIGN KEY (USER_ID, in the current example) must exist as one of the PRIMARY KEY values in the table name in the FOREIGN KEY's REFERENCES clause (HOTMAIL_USERS, in the current example). Therefore, to successfully DELETE the user KKI and all of his messages, you must first DELETE the messages with USER_ID KKI from the HOTMAIL_MESSAGES table. Then you can DELETE the row with USER_ID KKI from the HOTMAIL_USERS table.
Using the DELETE Statement with a Conditional Clause to Remove Multiple Rows from a Table
In Tip 79, "Using the DELETE Statement to Remove a Row from a Table," you learned how to remove one or more rows from a table based on a column's contents being equal to a certain value. You can also use the DELETE statement to remove rows from a table based on column values being in a set of data values or satisfying the search condition based on conditional operators (such as <, >, <=).
Suppose, for example, that a group of the financial counselors left your brokerage firm and took all of their clients with them. You could use the DELETE statement
DELETE FROM clients WHERE fc_id IN (1001, 1005, 1010, 1015)
to remove all client records (table rows) taken to another firm by financial counselors with IDs 1001, 1005, 1010, and 1015.
To base row removal on a conditional operator, simply use the operator in the DELETE statement's WHERE clause. For example, to delete all back orders placed prior to January 2000, you could use the DELETE statement:
 DELETE FROM orders
 WHERE order_date < '01/01/2000' AND ship_date IS NULL
Although the syntax or the DELETE statement
DELETE from [WHERE ]
shows the WHERE clause as optional, you must omit the WHERE clause only if you want the DBMS to remove all of the rows from a table. Stated another way, if you omit the WHERE clause, the DBMS will, without warning, delete all of the rows from the table. As such, the DELETE statement
DELETE FROM clients
will delete all of the rows from the CLIENTS table. Therefore, be positive that you really want to remove all of the data in a table before you execute a DELETE statement without a WHERE clause.
| |
Note |
If you are planning to remove all of the rows from a table, check to see if your DBMS has a special command for clearing a table while leaving its structure intact. MS-SQL Server, for example, provides the Transact-SQL TRUNCATE TABLE statement, which you will learn about in Tip 82, "Using the TRUNCATE Statement to Remove All Rows from an MS-SQL Server Table." Typically, specialized table-clearing facilities will complete their tasks more quickly (and efficiently) than using the DELETE statement to remove all of the data from a table one row at a time.
|
As with the UPDATE statement, always reread your DELETE statement twice before you click your mouse on the Execute or Submit button. If you have some idea as to the number or rows you expect to remove, use the DELETE statement's WHERE clause in a SELECT COUNT (*) statement, such as:
 SELECT COUNT (*) FROM orders
 WHERE order_date > '01/01/2000' AND ship_date IS NULL
If you know there are very few old back orders on the system, but the count comes up as a large number, look at the WHERE clause again, and perhaps change the SELECT statement to display some of the columns in the rows it counted. Doing so may help you to avoid a possibly costly error in executing a DELETE statement based on an erroneous search condition.
(In the current example, the large row count returned by the SELECT COUNT (*) statement may have alerted you to the fact that you were about to delete all rows for unshipped orders placed after 01/01/2000 vs. prior to the beginning of the year.)
Using the DELETE Statement with a Subquery to Remove Multiple Rows from a Table
Tip 79, "Using the DELETE Statement to Remove a Row from a Table," and Tip 80, "Using the DELETE Statement with a Conditional Clause to Remove Multiple Rows from a Table," showed you how to select rows to DELETE based on column values in the target table's row. Sometimes, however, that you don't know the value in any of the columns in the row(s) you want to delete and must base the selection on values in columns of other tables. By adding a subquery to a DELETE statement, you can delete selected rows in one table based on values in another table.
Suppose, for example, that you wanted to remove all customer records for those customers who have not placed on order in over two years. You could use the DELETE statement
DELETE FROM customers
WHERE (SELECT COUNT (*) FROM orders
 WHERE customer_ID = ordered_by
 AND order_date > '05/30/1999') = 0
or, you could write the same DELETE statement as:
DELETE FROM customers
WHERE NOT EXISTS (SELECT * FROM ORDERS
 WHERE customer_ID = ordered_by
 AND order_date > '05/30/1999')
You can name only a single table in the DELETE statement's FROM clause. As such, the statement
DELETE FROM hotmail_messages, hotmail_users
WHERE hotmail_messages.user_id hotmail_users.user_id
AND name = 'Konrad King'
is illegal since a multi-table join is not allowed in the FROM clause of a DELETE statement. If you want to remove all e-mail messages the username Konrad King has on file, use this DELETE statement instead:
DELETE FROM hotmail_messages
WHERE user_id = (SELECT user_id FROM hotmail_users
 WHERE name = 'Konrad King').
When you include a subquery in a DELETE statement, the DBMS first executes the subquery to create a result set (of rows or columns values). The DBMS then uses the result set from the subquery in the search condition specified by the DELETE statement's WHERE clause. Thus, when executing the DELETE statement
DELETE FROM salesreps
WHERE 1000 >
 (SELECT SUM(order_total) FROM orders
 WHERE sold_by = salesrep_id))
the DBMS will evaluate the SELECT statement first. As such, it will use the SOLD_BY and ORDER_TOTAL columns of the ORDERS table to create a result set that contains a list of SALESREP_ID and total sales pairs. The DBMS will then work its way through the SALESREPS table one row at a time, deleting those rows where the total sales for the sales rep is less than $1,000.
Using the TRUNCATE Statement to Remove All Rows from an MS SQL Server Table
Although you could use a DELETE statement without a WHERE clause to remove all rows from a table, the Transact-SQL TRUNCATE TABLE statement will execute the task more quickly and efficiently. The syntax of the TRUNCATE TABLE statement is:
TRUNCATE TABLE
If you use the DELETE statement
DELETE FROM employee
the DBMS will go through the EMPLOYEE table one row at a time, noting the row deletion and writing the values of the columns in the row to be deleted into the transaction log prior to removing the row from the table.
When you execute the TRUNCATE TABLE statement
TRUNCATE TABLE employee
the DBMS removes pages of information at once. Each page of data contains multiple rows. Thus, the TRUNCATE TABLE statement will remove multiple rows of data from the table at once (vs. one row at a time, the way the DELETE statement does). Moreover, the TRUNCATE TABLE statement does not update the transaction log. As such, if you remove rows from a table using the TRUNCATE TABLE statement, you will not be able to ROLLBACK (undo) the row deletions, even if you execute the TRUNCATE TABLE statement as part of a transaction.
| |
Note |
The TRUNCATE TABLE statement is especially handy if your transaction log is full and the DBMS cannot expand it because there is no more room on the hard drive on which it is stored. If you try to use the DELETE statement to remove rows from a table to free up disk space, the statement will fail because the DBMS cannot write any more information to the transaction log. You can, however, use the TRUNCATE TABLE statement to remove all rows from a table to free up disk space, since it does not write any information to the transaction log as it permanently deletes table rows.
|
Using the DELETE Statement to Remove Table Rows Based on a Computed Value
Tips 79–81 showed you how to use the DELETE statement to remove a row from a table based on a value stored in one or more of the row's columns. As you now know, you can select the rows to delete either by checking the value of the column(s) directly or by checking to see if the column value(s) in question are part of a result set returned by a subquery in the DELETE statement's WHERE clause.
In addition to using the value stored in a column, you can select rows to delete based on a computed value. Suppose, for example, that you had CUSTOMER TABLE defined as
 CREATE TABLE customers
 (cust_id INTEGER PRIMARY KEY,
 first_name VARCHAR(25),
 last_name VARCHAR(35),
 address VARCHAR(40),
 phone_number VARCHAR(20),
 total_purchases MONEY,
 last_order_date DATETIME,
 order_count INTEGER)
and you want to remove all customers who have not made a purchase within the year prior to 05/30/99, unless the customer's previous average purchase amount exceeds the overall average purchase amount by 75 percent. You could use a DELETE statement similar to the following:
 DELETE FROM customers
 WHERE last_order_date < CONVERT(DATETIME,'05/30/99'). - 365
 AND total_purchases / order_count <
 (SELECT (SUM(total_purchases) / sum(order_count)) *
 1.75 FROM customers)
Notice that you can use computed values both inside and outside a subquery (if any) in the DELETE statement's WHERE clause.
Moreover, SQL-92 lets you use the target table in the subquery's FROM clause by evaluating the subquery as if none of the table's rows has been deleted. As such, although the DELETE in the current example changes the value of the overall average order as it removes customers from the table, the DBMS will use the same value for the average order for every row it checks—because it uses the overall average computed before any rows (TOTAL PURCHASES and ORDER_COUNTs) were removed from the table.
Using the DELETE Statement to Remove Table Rows Through a View
In addition to using a view to insert a row (as you learned to do in Tip 68, "Using the INSERT Statement to Insert Rows Through a View") or change the value of one or more columns in a row (as you learned to do in Tip 78, "Using the UPDATE Statement to Change Table Data Through a View"), you can also use a view to DELETE rows from a table. As you know, a view is a virtual table whose actual, physical data is stored in one or more underlying tables. As such, insertions, modifications, and deletions performed on a view are actually done to the underlying tables. As such, when you use a DELETE statement to remove a row from a view, you are actually removing a row from the table on which the view is based.
As was the case with the UPDATE statement, if you want to use a view as the target table in a DELETE statement, the view must be based on a single underlying table. The view need not display all of the columns in the underlying table, and it can display computed columns. The only restriction is that the view's SELECT statement must reference only a single table—the DELETE statement's target table.
Suppose, for example, that your company closed the Tulsa shipping department, and you want to remove all Tulsa shipping department personnel. Given a view named VW_TULSA_EMPLOYEES and created by
 CREATE VIEW vw_tulsa_employees AS
 SELECT employee_id, first_name, last_name, SSAN, department
 FROM employees
 WHERE location = 'Tulsa'
you can use the DELETE statement
DELETE FROM vw_tulsa_employees WHERE department = 'shipping'
to remove rows from the EMPLOYEES table where the value of the LOCATION column is Tulsa and the value of the DEPARTMENT column is shipping.
When you use a view as the target table for a DELETE statement, you can remove only rows that satisfy the search criteria in the view's SELECT clause. Thus, in the current example, the DELETE statement will remove rows where the location column has the value Tulsa, even though the location is not specified in the DELETE statement's WHERE clause. Thus, employees that work in the shipping department at other locations will remain in the table.
In short, you can DELETE only existing rows from the target table. (To restate the obvious, you cannot remove a row from a table if the row is not in the table.) As such, you can use a view to DELETE only rows that meet the view's selection criteria, since those are the only rows in the view.
Because a table row is the smallest unit of data that a DELETE statement can remove, a DELETE statement with a view as the target table will remove an entire row from the underlying table—even if the view displays only some of the table's columns. For example, suppose the EMPLOYEES table in the current example was created with:
 CREATE TABLE employees
 (employee_id INTEGER,
 first_name VARCHAR(25),
 last_name VARCHAR(30),
 SSAN CHAR(11),
 location VARCHAR(20),
 department VARCHAR(20),
 total_sales MONEY)
Then, the DELETE statement
DELETE FROM vw_tulsa_employees
will remove all rows where the LOCATION column has a value of Tulsa, even though the VW_TULSA_EMPLOYEES view has only the columns EMPLOYEE_ID, FIRST_NAME, LAST_NAME, SSAN, and DEPARTMENT.
Although the DELETE statement will remove an entire table row (including columns not defined in the view), you can reference underlying only table columns that are part of the view's definition in the DELETE statement's WHERE clause. Thus, the DELETE statement
DELETE FROM vw_tulsa_employees WHERE total_sales < 1000
will fail because TOTAL_SALES is not a column in the VW_TULSA_EMPLOYEES view (virtual table). If you try to refer to an underlying table column that is not defined as a column in the DELETE statement's target table (the VW_TULSA_EMPLOYEES view, in the current example), the DBMS will respond with an error message similar to:
Server: Msg 207, Level 16, State 3, Line 1
Invalid column name 'total sales'.
Working with Queries, Expressions, and Aggregate Functions
|
